It’s Halloween at Cute Card Thurday!

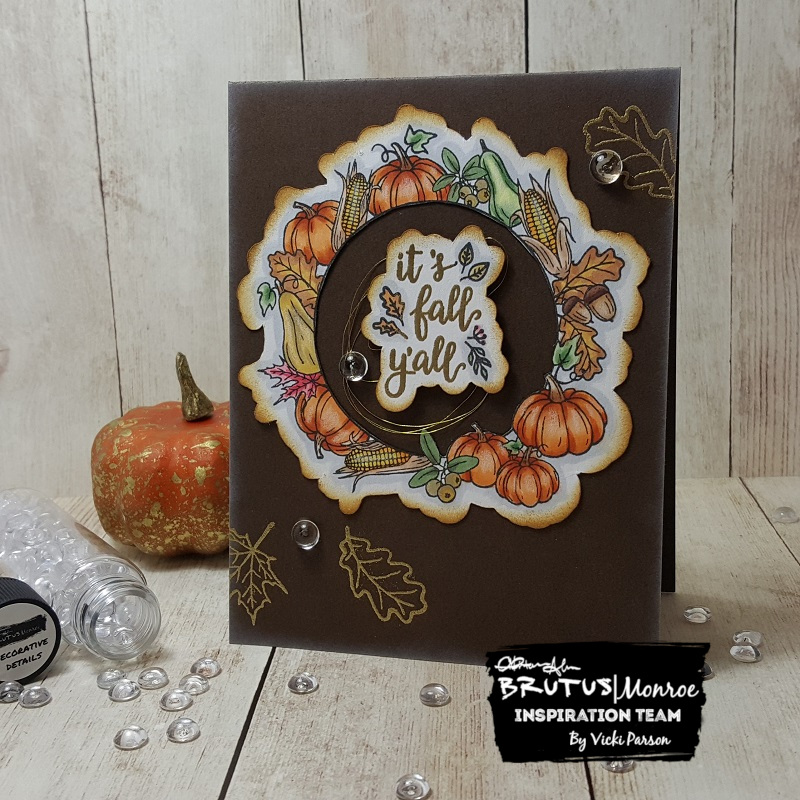
Hello friends!  Has the weather been cooling down for you yet?  We are supposed to get much cooler than normal over my way this weekend!  Night time low around 36 degrees is a bit too chilly this time of year!  I need Fall to last! 🙂

Today starts up a new challenge this week for Cute Card Thursday!  The theme for this one is “Halloween“!!  So if you still have some more Halloween cards or treat projects, etc that you need to make, please share it with us!  We look forward to seeing what you make!

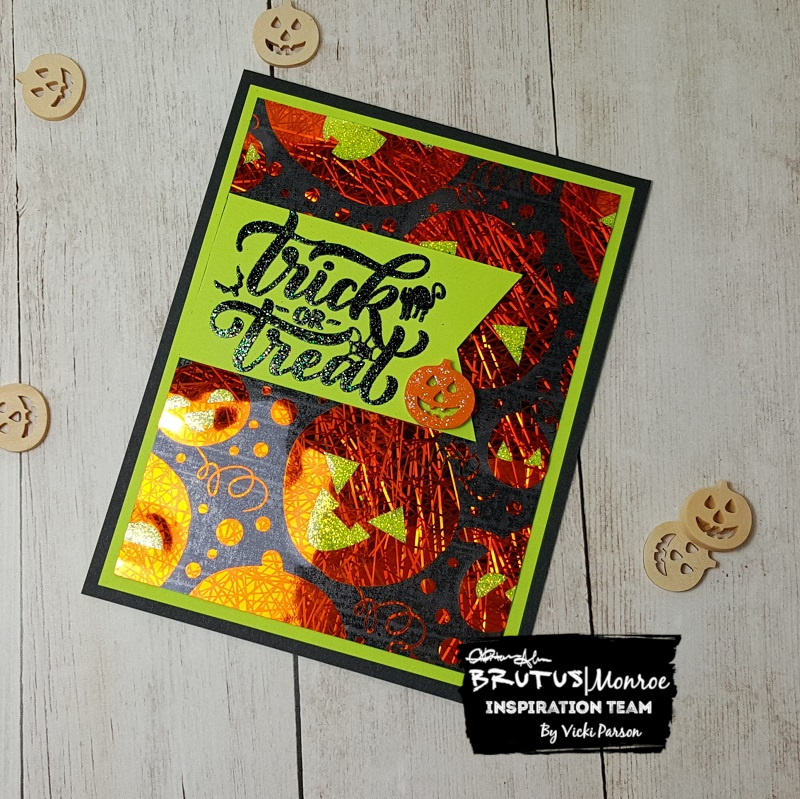
For my card, I thought it would be fun to use another Whimsy Stamps October digital stamp with a Halloween theme:

Vicki-CCT603-Witch Cinnamon-Oct10

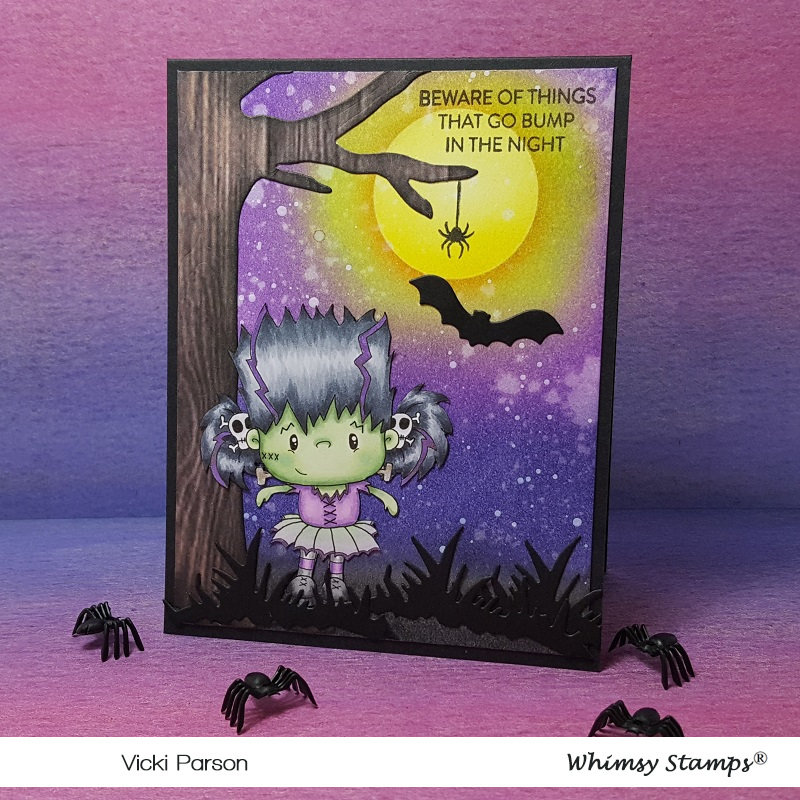
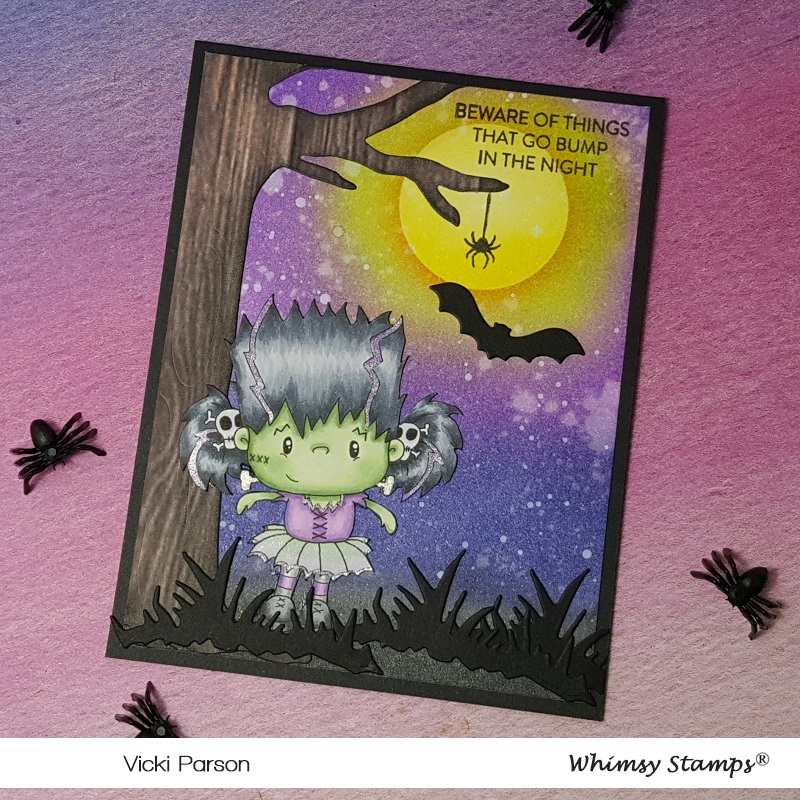
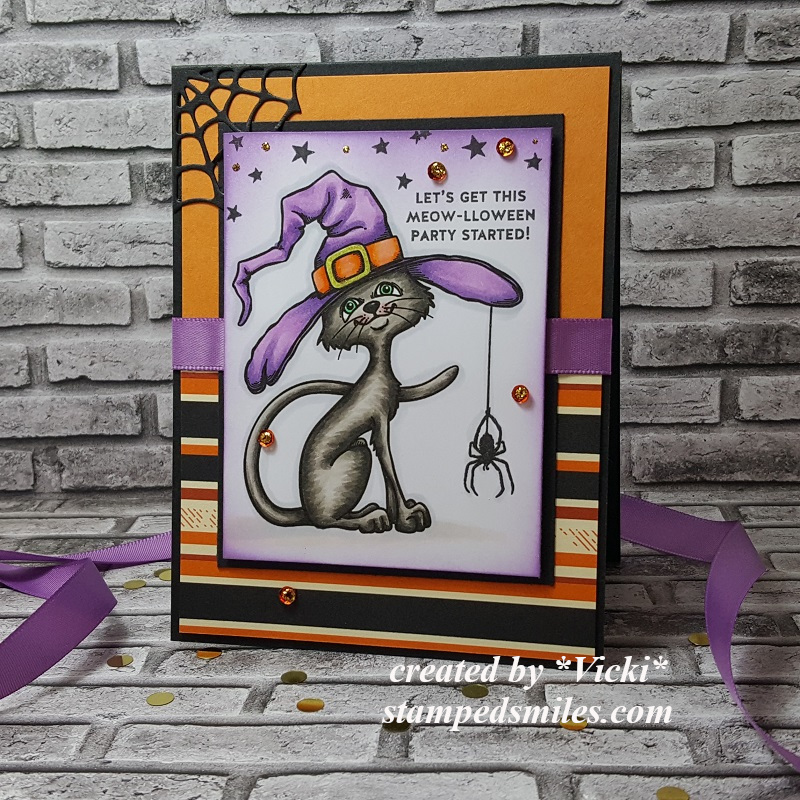
This cute little witch is called Witch Cinnamon and I’ve used her in a little different way from the original version for my card.

First thing I did was take some black cardstock and used an embossing folder for the trees in the background.  I took a white ink pad over it so the embossing stands out a bit better over it.  I layered this onto a piece of purple cardstock and then added it over an A2 sized top folding black card base.

I took a circle die and cut it out with some yellow glitter cardstock which I then popped up with some black craft foam that I also cut out with a circle die.  I took the bat die and also die cut some bats from black glitter card stock and attached them over the design along with the witch image that is “flying” in front of the moon.  I black heat embossed (sparkly black EP) the sentiment from a Simon Says Stamp Frightful Fun set over purple card stock that I cut into a banner over the design.  I then added a thin strip of green glitter card stock at the bottom of the card.

Vicki-CCT603-Witch Cinnamon-Oct10-dark

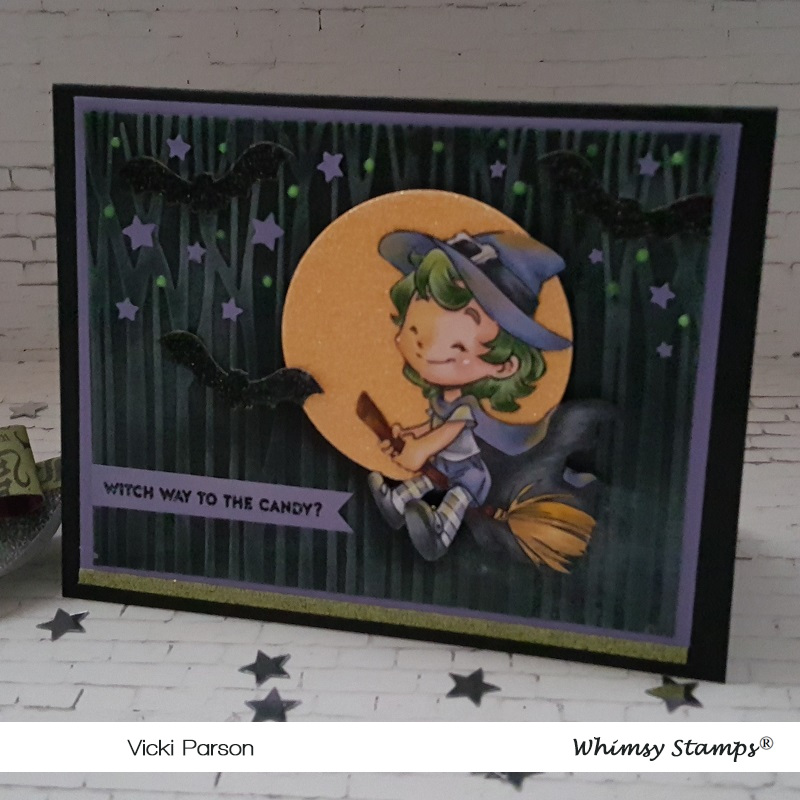
For this photo, I tried shutting the lights off so that you can see the “green dots” in the sky that glow in the dark!  These are Nuvo Glow Drops Neon – Apple Sour that I added for the dots in the sky area.  I’ve also taken a Stampin’ Up! punch from my stash and added some purple colored stars around the area too.  If you compare this photo to the one above, you can see that with the light on, the drops are a bit more translucent.  When the lights are dimmed, you can see the glow-in-the-dark effect!

Vicki-CCT603-Witch Cinnamon-Oct10-close

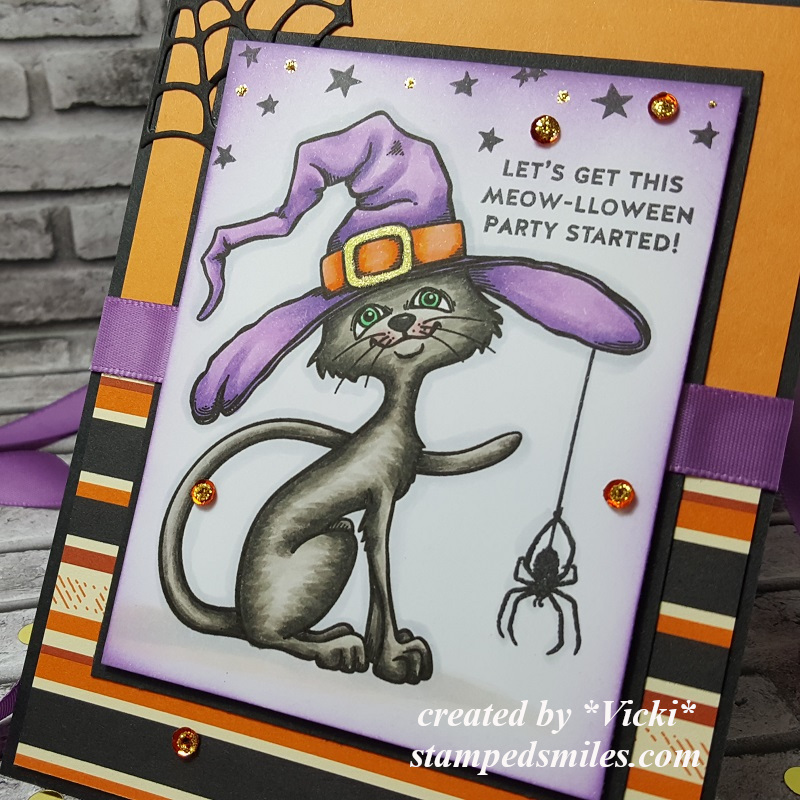
I’ve zoomed in on how I’ve colored up this cutie for my card.  She’s colored with Copic markers and colored pencils.  If you take a look at the original image, you can see that I have decided to fussy cut out just the witch as I wanted her flying in front of a full bright glittery moon!  She still looks pretty cool if you were to cut her out entirely with a circle die too! 🙂

I’ve used a colored pencil to create a nice little “moon glow” on one side of her and in some areas along the top of her where I thought the moon would be glowing some light on her.

I’ve also used a white gel pen for her checks and for highlighting on her stockings.  I also used a silver gel pen to color in the buckle on her hat.  Hard to see in the photo, but behind her broom, I took a glitter pen to add a bit of shimmer where she was flying.

Vicki-CCT603-Witch Cinnamon-Oct10-flat

I hope you’ve enjoyed my card today and been inspired to create some Halloween projects soon!

Challenges this card was entered for:

  1.  Aud Sentiments – Halloween/Fall + sentiment
  2. Brown Sugar – October Anything Goes
  3. QKR Stampede – #366 Anything Goes
  4. Daisy Chain – Pink or Halloween
  5. Simply create Too – Anything Goes with optional:  Spooky/Scary
  6. Fab ‘n’ Funky – Halloween
  7. Little Red Wagon – Cut it Out!

Cheerful Sketches Guest Designer

Hello friends!  Hope you’ve had a wonderful weekend!  I just got back from a lovely weekend trip with hubby and we had such a great time visiting over in Hannibal, MO.  This was something we both really needed to just get away for a bit and it was wonderful to be able to go and do something fun!

Today I’m sharing my creation I made as a guest designer for the Cheerful Sketches challenge blog.  (I had won a spot with one of my creations I had entered.)  I was also shared the sketch and an image to work with:

Vicki-GDTCheerfulSketches-MyBesties

The was a company that I have heard of before, but this is the first time that I have actually colored one up.  This is from the My Bestie Shop in their Harvest Collection called Harvest Besties Doll 25.

I took the image and colored it up and cut it out the size I needed for my card and layered it with some dark brown cardstock.  I took some sunflower style papers from my stash and placed a piece over a 5.5″ square dark brown top folding card base.

I cut out a couple of squares for each corner of the card and layered a scallop die cut square to each one with some orange colored cardstock.  I also took a strip of this same orange cardstock and attached it diagonally across it.

Lastly, I took the image panel and wrapped some seam binding ribbon around it with a bow, twine and button.  For the seam binding ribbon, I spritzed it with water and crinkled it up a bit and let it dry before adding to my card.  I then added some Fall Prima flowers around the design.

Vicki-GDTCheerfulSketches-MyBesties-close

Here’s a closer view of the image and how I’ve colored her up with Copic markers.  For the gold glittery details in the Fall sentiment and around her (including the buttons on her shoes), I’ve taken a Quickie Glue Pen to color it in with and then added some pretty Fall gold glitter over it.

The edges of this image panel were sponged with some Tea Dye Distress Ink and then sprayed with water for the water droplet marks.

Vicki-GDTCheerfulSketches-MyBesties-flat

She has put me in the mood to go to the pumpkin patch and bring one home!

Thanks so much for stopping in today!  Hope you’ve been inspired in some way and I’ll be seeing you soon!

Challenges:

  1.  Love to Craft – LTCCB39 Oct Anything Goes
  2. Little Red Wagon – Pumpkin Party
  3. Fab ‘N’ Funky – Autumn Colors
  4. Watercooler Wednesday – WWC241 Anything Goes Feminine
  5. Crafting with an Attitude – Anything Goes
  6. Crafty Catz – Anything Goes with option of Ribbon, Bow or Flower
  7. Creative Knockouts – Lots of Layers

Anything Goes for Cute Card Thursday!

Hello friends!  And here we are almost the first week in October coming to a close!  Wow, time goes so quickly I can’t keep up with it! LOL!

It’s Thursday and time for a brand new challenge over at the Cute Card Thursday Challenge blog!  The challenge for this week is our monthly “Anything Goes” theme with our sponsor Whimsy Stamps!

Vicki-CCT602-Oct3

Now how cute is this little Frankenstein girl?!  She could be a trick-or-treater coming around the tree with her arms out trying to walk like a Frankenstein to scare you, but I’m giggling! 🙂    This digital cutie is called, of course, Frankie by CC Designs for Whimsy Stamps.

I wanted to create a spooky scene for her (you know, to help with her trying to be scary and all!)  So I took a piece of Bristol Smooth cardstock and made a circle mask for the glowing moon and placed it where I wanted it go and began ink blending around it with some Carved Pumpkin distress ink.  I then went over that a bit with some Twisted Citron and then worked my way with Wilted Violet, Dusty Concord and Black Soot for the bottom portion.  I removed the mask and went over circle with some Squeezed Lemonade.  I wanted lots of stars in the sky, so I first sprayed the background with water and picked up the colors, then I added some “dots” with a white gel pen.  I know it won’t show up in the photos, but I sprayed the background with some shimmer spray which really makes the background so sparkly.

To finish the scene I took the Whimsy Stamps No-See All Seasons Tree die set and cut the tree out from the Whimsy stamps Rustic Wood and Brick digital papers and then sponged around the edges of it with some Black Soot distress ink.  I also took the grass die from that set and cut out 3 pieces of it with black cardstock for the ground.  I took the sentiment and spider image from the Simon Says Stamp Spook Up Some Fun stamp set and added it to the scene.  I had an older Whimsy Stamps Halloween die cut set that I cut the bat from black cardstock and added to the scene too.

Vicki-CCT602-Oct3-close

Here’s a closer look at the image and how I’ve colored it in.  I tried to capture the sparkle in the background, but it just doesn’t show up like it does in person.  You can see for the “streaks” in her hair that I’ve used a purple gel pen so it’s glittery.  I’ve also used that same gel pen for the trim on her outfit.  I used a silver gel pen for the “bolts” from her neck/face area.  She was fussy cut out and attached to the scene.  I took a glitter pen and went over her skirt too.

I’ve used Copic markers to color her in with and they’re listed below:

  • Frankie’s Hair and Shoes – C8, C7, C5, C3, C1
  • Frankie’s Skin – YG67, YG63, YG61
  • Frankie’s Outfit – V20, V17, V15, V12, YG11, C3, C1

Vicki-CCT602-Oct3-flat

Of course, I needed to make it even more spooky by adding some plastic spiders to the scene!  And yeah…. if I see a real spider…you’d be hearing a very high-pitched scream coming from me!! LOL!!  Not a fan…but pretend is just fine!  Let’s just hope I don’t drop one on the floor and see it later and scream! LOL!

I hope you’ve enjoyed my spooky Halloween card today!

Challenges I’d like to enter for this card:

  1.  Creatilicious – Anything Goes with optional: use a punch
  2. Pearly Sparkles – Spooky and/or Cute
  3. A Bit More Time to Craft – Anything Goes
  4. Addicted to Stamps and More! – Anything Goes #361
  5. Crafting by Designs – Anything Goes

Fall is Here with Digi Doodle Studios!

Hello friends!  Now that we have started October, the temperatures will start to drop and the leaves will begin to change color and drop from the trees.  That’s when we know that Fall is truly here and I look forward to being out in it! 🙂

I wanted to capture that feeling on my card for you today using an image from Digi Doodle Studios:

Vicki-DDSJoieAutumn-Oct2

This cutie is called Joie Autumn and I just love her sweet little pup companion there playing around in the fall leaves with her!  She looks so happy and this is probably something I would do instead of actually raking them up!! LOL!!

Have you ever “googled” a card sketch?  I never really thought to do this, but I have some really cool Autumn type papers and I wanted to create some layers with them on my card, but I didn’t want it to look like a hot mess, so I picked out a card sketch and used that to create this card using some more papers from my stash!  I also got to use my Autumn embossing folder for the strip in the center along with my favorite glitter ribbon across it.

I’ve layered some gold foil cardstock with a few of the layers in there and added some Prima leaves and a button over the gold ribbon bow to finish it off.  I white heat embossed the sentiment from Lawn Fawn and cut it out with a My Favorite Things banner die.

Vicki-DDSJoieAutumn-Oct2-close

Here’s this sweet image upon a closer look at the coloring I’ve done!  I’ve also added a highlight with a white gel pen to her cheeks, the pup’s cheeks and the rim on her hat.  I took a gold gel pen and colored the pup’s collar with it as well as using it for additional “dots” around the sunflowers in her hair.

The light blue shading around her was used with Copic markers as well as the blending of the colorful pile of leaves on the ground.  I took colors from the leaves as well as other colors to blend and mute them together to make it appear like a leafy colored ground.

I cut this image out with a stitched rectangle die and layered it onto some green cardstock which is the same I’ve used for the 5.5″ square card base and the embossed strip in the middle.

Vicki-DDSJoieAuumn-Oct2-flat

I hope you’ve enjoyed my Fall creation today and you’ve been inspired in some way!  I appreciate each and every one of your kind thoughts more that you’ll ever know!

Thanks for dropping by and I’ll see you soon!

Challenges I’d like to enter this card for:

  1.  As You Like It – CAS or FAF Why? – I actually like both and I think my style runs a bit into both sometimes.  I feel like I have SO much crafty stash that I just want to keep adding more onto my cards…so lately it’s been this way! 🙂
  2. Cardz 4 Galz – Pretty Bows (not really sure if it’s pretty, but it’s glittery!)
  3. Stamps & Fun = Creativity – The Magic of Fall
  4. Make My Monday – Autumn
  5. Through the Craft Room Door – Anything Goes
  6. Sheepski Designs – Autumn

Meow-lloween Party for 2 Crafty Critter Crazies

Meow friends! 🙂   It’s October and I’m always excited about this month because there are so many fun Fall activities that happen and I also really enjoy the Halloween atmosphere around this time.  I hope you’ll enjoy the fun right along with me!

Today, I’m excited to bring you my creation for a brand new challenge for this month over at 2 Crafty Critter Crazies!  Remember that it’s always an “anything goes” challenge PLUS you need to use a critter on your creation!

This month we’re being sponsored by Beccy’s Place and was generous to supply the team with an image to play with:

Vicki-2CCC31-Beccy's Place

I just fell in love with this adorable kitty from the Scaredy Cats digital set.  I think he’s all dressed up and seriously ready to “get this meow-lloween party started“!!

So fun to pull out some Halloween papers and colors for this card.  I usually like to add in some purple somewhere if I can, so I found some ribbon and thought it matched up with kitty’s hat.

I couldn’t help but to add a few more elements to this kitty by taking a spider image from a Tim Holtz stamp set and adding it to kitty’s hat.  I also stamped the stars at the top along with the sentiment from a Simon Says Stamp Halloween stamp set from last year…I think.  The web up in the corner is an older die from my stash that I usually pull out for Halloween creations.

Vicki-2CCC31-Beccy's Place-close

Here you can see how I’ve colored up this fun kitty with Copic markers.  I’ve also colored the belt buckle on the hat with a gold gel pen.

I used some Wilted Violet to sponge around the edges of the kitty panel after I stamped the stars at the top.

While I was filling the sequins with gold Stickles, I added a few dots to the starry sky for just a bit more sparkle.

Vicki-2CCC31-Beccy's Place-flat

Hope you’ve enjoyed my fun “meow-lloween” card today!

Thanks so much for stopping in today my friends and be sure to check right back again here today as I have another post coming soon!

Challenges:

  1. Tuesday Throwdown – Anything Goes
  2. Creative Moments – Anything Goes + optional twist: masculine
  3. CRAFT -Animals
  4. The Paper Players – PP461 Tic Tac Toe

Clearly Foiling

Hello friends!  I had so much “foiling fun” that I kept going with making more!  This time, I’m using those “clear sheets” from the Designer Toner Sheets:

For my Christmas card here, I’ve used my laminator to foil over the “clear sheet” from the Peppermint Twist Designer Toner Sheets with the Red Static Foil Sheets.  This creates a “see-through” area for the shaker contents.

For the shaker part, I’ve taken a Self-Adhesive Shaker Pouch, attached it to a piece of white cardstock, very carefully trimmed off the edges, filled it with lots of sequins and confetti stars and then sealed it up to keep the contents inside moving freely.  I then placed the clear foiled piece over top of it by using some Stick-It sheets which helps to keep the adhesive from showing through.

I then took an A2 sized top folding white card base and used some score tape along the two edges and then rubbed some of the Gold Static Foil over it.  I then took the shaker panel and mounted it over top.

Vicki-FoiledShaker-Christmas-close

The greeting and the Santa hat were attached over top from the Yuletide Greetings stamp set that I’ve cut out using the Yuletide Greetings Cut File.  I’ve colored up the hat with Copic markers and then added some glitter over the fur trimming.  I’ve just used my Xyron machine to run adhesive on the back of these pieces to adhere them.

Vicki-FoiledShaker-Christmas-Flat

I’ve added a ribbon in the upper corner with a couple of gold bells tied to the center of the bow.


So I continued on with my “foiling fun” by also making Halloween too….

My second card uses one of the clear sheets as well from the Carved Designer Toner Sheets and I’ve used the Orange Sketch Foil sheet over that.  Since this is a clear sheet, I thought it would be fun to make the pumpkin faces stand out a little bit.  So I turned the sheet over and added some glitter behind each pumpkin face and let it dry.  (This might take some time to dry depending upon how thick you make it.)  Once dry, I took a Stick-It sheet again to attach it to a piece of black cardstock.

I mounted this over a piece of Green Neon Cardstock that I’ve also used for my sentiment banner.  I then added these layers over an A2 sized top folding card base.

Vicki-FoiledPumpkins-close

Here you can see the glitter showing through pumpkin faces and how they appear to somewhat “glow” with the darker panel behind them.

For the sentiment banner, I took the sentiment from the Trick or Treat stamp set and heat embossed it with the Raven Sparkle EP and cut it into a banner.  I added a small wooden pumpkin for the accent that I painted with orange paint and clear glitter paint over that.

Vicki-FoiledPumpkins-flat

Thanks so much for stopping in today!  I hope that you’ve enjoyed my creations and were inspired in some way!

Wishing you all a wonderful rest of your weekend and I’ll be seeing you again soon! 🙂

Dies & Punches for Cute Card Thursday

Hello friends!  It’s time for a new Cute Card Thursday challenge!  This week we’d like to see those “Dies &/or Punches” on your creations this week!  These are some of my favorite tools to use in my craft room and we’re looking forward to seeing your take on this challenge!

Here’s what I’ve made for it:

Vicki-CCT600

Nothing says “Fall” to me like those ripe apples ready to be picked and specially to make a yummy caramel apple with as well!  I had so much fun pulling out several of my Lawn Fawn stamps and dies to make this interactive card design!  I haven’t played with my Lawn Fawn stuff for quite a while, so it was time! 🙂

For the interactive pull tab mechanism, I’ve used the Lawn Fawn Magic Color Slider dies along with the Caramel Apple, Thanks a Bushel and Jump for Joy stamp sets to put together this card.  I’ve also used the Jump for Joy and Thanks a Bushel dies to cut out some of the images on my card.  For the pull tab at the top, I took a sentiment from the Push Here stamp set to stamp the “pull here”.

For part of the layers in the card, I took an older Scallop rectangle die no longer available from Lawn Fawn for the white layer.  I’ve also used some Woodgrain cardstock that I’ve sponged with Vintage Photo Distress ink along the edges of it and the plaid paper which is no longer available from LF.  For the layer behind the apple panel and the base of the card I’ve used the LF Sunflower cardstock.

Vicki-CCT600-close

Here’s a closer look at the image that I’ve got colored up with Copic markers.  I just stamped them over some Copic blending card.  For the inside slider where the caramel apple is, I didn’t want to add any layers to it so that it would slide freely.

Vicki-CCT600-upright

Here’s what the card looks like with the slider hidden inside.  I just added some twine to the end of the pull tab at the top.

Hope you’ve enjoyed my interactive card design today using lots of fun dies!

Thanks so much for dropping in today and I’ll be seeing you soon!!

Challenges:

  1.  Lawn Fawnatics – Awesome Autumn
  2. Simon Says Stamp Wednesday – Interactive
  3. Simon Says Stamp STAMPtember Lawn Fawn Collaboration – LF products
  4. Double Trouble – Thing 1:  Mad for Plaid, Thing 2:  Use Your Stuff Challenge entry (see below), Thing 3:  Tag &/or Frame
  5. Use Your Stuff – Tag &/or Frame
  6. Sheepski Designs – Die Cuts &/or Punches
  7. Little Red Wagon – Fruit

It’s Fall Y’All!

Hello friends!

For my card today I’ve used acrylic bubbles and that is one of my faves to use on pretty much ANY style of creation I’m making and here you can see why:

Vicki-BMbloghop-DD

Fall is certainly my most favorite time of the year and I really enjoy creating with all of the fun Autumn style products.  The wreath and sentiment that I’ve used are from the Fall Y’All stamp set and I’ve cut it out using the Fall Y’All Cut File that you can get for your cutting machine.  I have a Cricut, so I’ve used that to cut it out with.

Now that cut file does NOT cut out the center of the wreath, so I just poked my scissors in the center of it that made a large enough hole so that I could fussy cut around the inside of it.    The cut file will also cut around for your sentiment.

The base of the card is an A2 top folding card.  I took a couple of the leaf images from the Autumn Essentials stamp set and heat embossed a couple of them on the card base with the Gilded EP.

I then glued on the cut-out wreath image, popped up the sentiment in the center with foam tape and also added some gold thread behind it before attaching.  I took some white ink and sponged around the edges of the card base and then finally attached the acrylic bubbles over the card.

Vicki-BMbloghop-DD-close

Here’s a closer look at the image and how I’ve got it colored in.  I’ve used Copic markers to color it along with the leaves on the sentiment.  I also took some distress ink and sponged around the edges of the cut images.

For the sentiment, I first stamped it with the black ink and then cleaned off the stamp and then stamped it again with the embossing ink.  I sprinkled the Gilded EP over the sentiment and then brushed off the EP on the leaf areas as I didn’t want those embossed.  I heat set only the wording.

Vicki-BMbloghop-DD-flat

I hope you’ve enjoyed my creation today and were inspired in some way!

Challenges:

  1.  Crafty Gals Corner – Fall Colors
  2. Cardz 4 Galz – Welcome Autum/Fall
  3. A Bit More Time to Craft – Anything Goes
  4. The Creative Crafters – Anything Goes
  5. Pammies Inky Pinkies – PIP1937 Anything Goes
  6. Crafty Cardmakers – Autumn Colors

It’s Time for Foiling Fun!

Hello friends!  Happy Saturday!!  I hope you have a fun weekend planned!

I’d like to share with you a couple of creations that I’ve made using some new Deco foil products:

For this card, I used both the Red and Gold Static transfer sheets and foiled it with the Ornamental Toner Sheet.  I first foiled it in red (but that sheet wasn’t used for this.)  I took the negative of that red piece and placed it over a full Deco Foil Toner Sheet and then the black areas where the ornaments are, I took the gold transfer sheet and foiled the ornaments in that.  So it’s sort of a double foiling!

I added this foiled panel over a piece of white cardstock that I wrapped some gold ribbon around and then I heat set the sentiment from the Yuletide Greetings stamp set with Gilded embossing powder.  The sentiment was stamped with Embossing Ink from a Yuletide Greetings Cut File.  I also had fun making a Halloween card:

For this card, I pretty much did the same as the card above in where I took the “negative” from the foiled Webbed Toner Sheet using the Gold Transfer Sheet which made the webbing black.  I left it like that for the background of my card.

For the “ground” I took a piece of black cardstock and ripped some strips for the “dirt” and sponged the edges of it with a gold ink.  I took the images from the Trick or Treat stamp set and colored them up, fussy cut them out and arranged a scene at the bottom.  I took a Copic liner to write in my own grave markers. 🙂

I took the silhouette bat from the stamp set and heat embossed it over the foiled background with Raven Sparkle embossing powder.  I also used this for the sentiment banner that I made from some Speckled Egg card stock.  I also took some of the same cardstock and layered it behind the card front and then mounted this over an A2 sized top folding card base.

Hope you’ve enjoyed my fun foiled cards today!   Thanks for stopping in today and I’ll see you again soon!!

Challenges:

  1.  Always Fun – Create a Scene #127 (bottom Halloween card)
  2. Pammies Inky Pinkies – PIP1936 Anything Goes
  3. Simon Says Stamp Monday – Stamp It
  4. Sweet Stampers – Use a Sentiment
  5. Through the Craft Room Door – Anything Goes
  6. Crafty Creations – Anything Goes

It’s Autumn at Cute Card Thursday

Hello friends!  Thank you for joining me!  I hope you’re all having a wonderful week so far!  It’s a tad bit warmer than what I’d like to see it be in September for sure, so I’m hoping it cools down soon!

Today starts a new challenge this week for Cute Card Thursday.  This week we’d like to see your “Autumn” creations.  We look forward to seeing what you create for it!

Here’s what I’ve made using one of our sponsor’s images:

Vicki-CCT599-ADU

This little squirrel is so sweet and I love how the tail on him was designed!  This is called “Bushy Tail” from All Dressed Up.  They’re sponsoring the challenge this week, so please be sure to play along for a chance to win!

I’ve dug out some papers from my Autumn stash of papers and picked some out that I thought would go with this image.  I layered a strip over a 5″ square piece of dark gray cardstock that I embossed with a leaf embossing folder that I was finally able to use!  I sponged a bit of white ink over the raised areas.

I also took some score tape and ran it down the center of the card and added some glitter over it and burnished it in.  The image panel was popped up over the card with foam tape.  I added some twine around each corner of the image panel along with a bow that I’ve placed a pearl in the center.

Vicki-CCT599-ADU-close

Here’s a closer look at the squirrel image that I’ve colored in with Copic markers.  I wanted to keep the squirrel looking a bit softer, so I’ve used some lighter colors.

During the fall is a good time to view all of the squirrels running around our yard trying to burry their nuts.  We seem to find them in silly places sometimes as they save them for later! LOL!

I die cut the image with a scalloped square die and sponged around the edges with some Pumice Stone Distress Ink and layered it over a piece of the dark gray and then layered it again over a piece of kraft cardstock.

Vicki-CCT599-ADU-flat

Thanks so much for stopping by and I’ll see you again soon!

Challenges:

  1.  All Dressed Up Challenge – Anything Goes + ADU image
  2.   Creative Fingers – Anything Goes
  3. Allsorts – Autumn
  4. Crafty Friends – Autumn Colors
  5. Creative Moments – Anything Goes with optional Fall Colors
  6. Sunday Stamps – SSC213 “Autumn Whisper” colors