Hello friends! Really hope that you’re having a great week as we start to dip down into cooler temps and that means that Autumn is coming to a close (sadly) and winter is upon us along with Christmas! Are you ready? I’m working on things…that’s all I can say! I need to get more motivated for sure! Many things are already done, but it’s the double checking to make sure…and sometimes it’s not! LOL
Recently, I needed to make a birthday card for hubby, so I pulled out a card kit I had from last year and came up with this one for him:
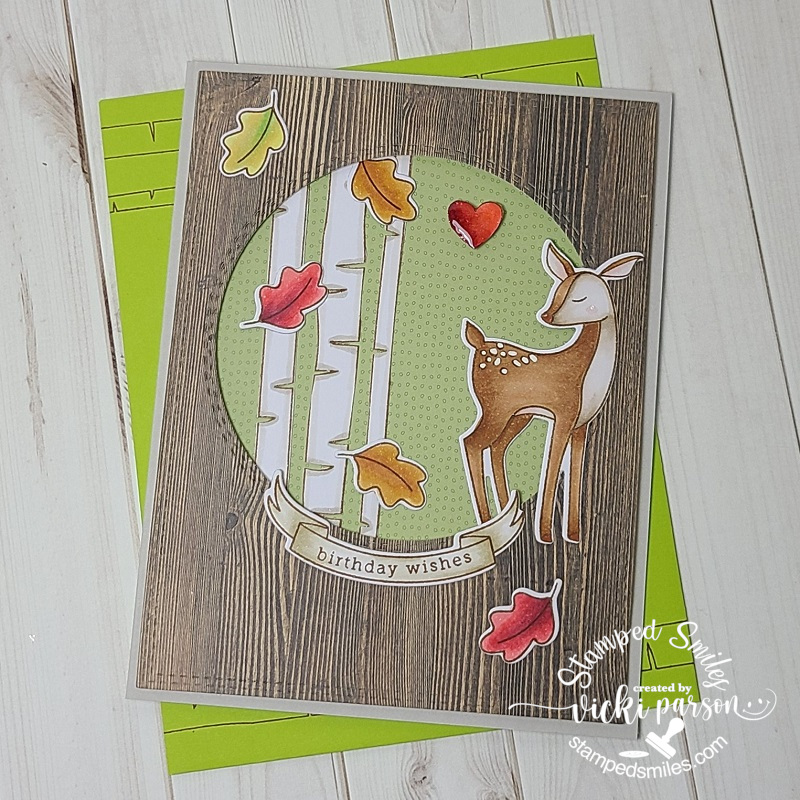
This was a really fun one to do from the Simon Says Stamp Woodland Whimsy card kit from last year. (I linked the stamp set and dies still available.) My husband is a huge fan of outdoor wilderness and especially deer in the Autumn season as they can be easier to spot with the falling leaves. So it just seemed like the type of card to make suited for him.
I’ve colored in all of the images with Copic markers and die cut them out with the exception of the birch trees as there were no dies included with the set. I placed them behind my die cut circle from the woodgrain paper included with the kit. I backed it with another piece of the paper from the kit as well. I even tucked in the back part of the deer’s feet along with a leaf to make it part of the scene. I like the banner from the set which is left blank so that you can add whatever greeting you want with it.
The little heart above the deer was also fussy cut out and then I covered it with a glitter brush pen as well as some crystal effects over top for the shine. I thought about adding some sequins, but decided it wasn’t needed. The scene was layered over a piece of cardstock included with the kit and then I stamped some of the birch trees onto a coordinating envelope as well.
Also thought I’d share some other projects that I’ve been working on since my last post. It seems that I’ve become a little addicted to taking those classes and events…honestly don’t need to be taking them, but sometimes it’s just fun to participate in the fun with fellow crafters! I do enjoy sharing with those like-minded crafters like me! 😁
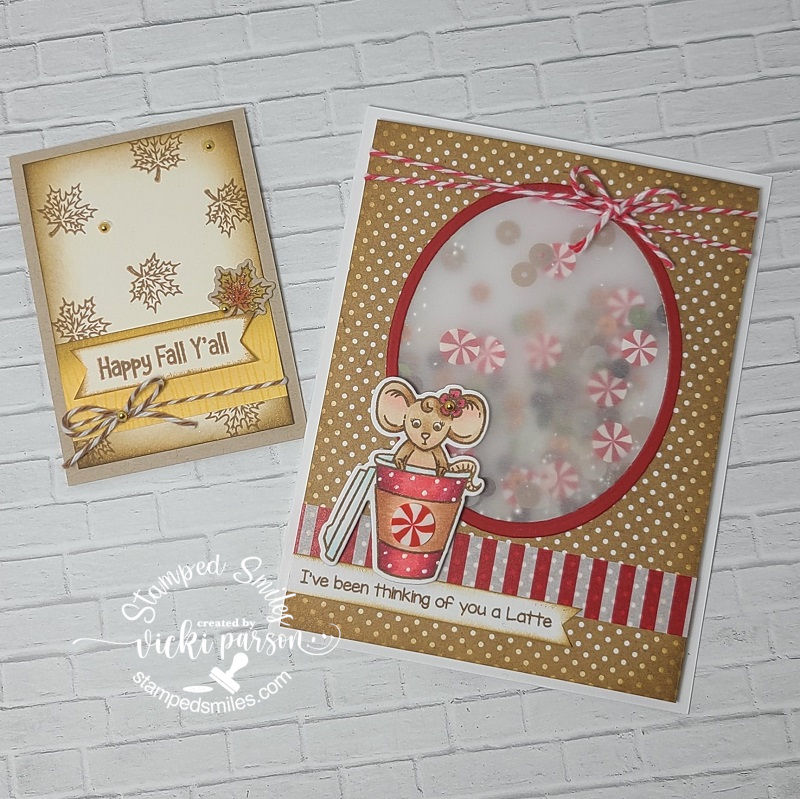
These are all projects I’ve made using products from Inky Stamper. ***If you are on my website, just click on the photos to enlarge them to see better and the wording will also be more visible.
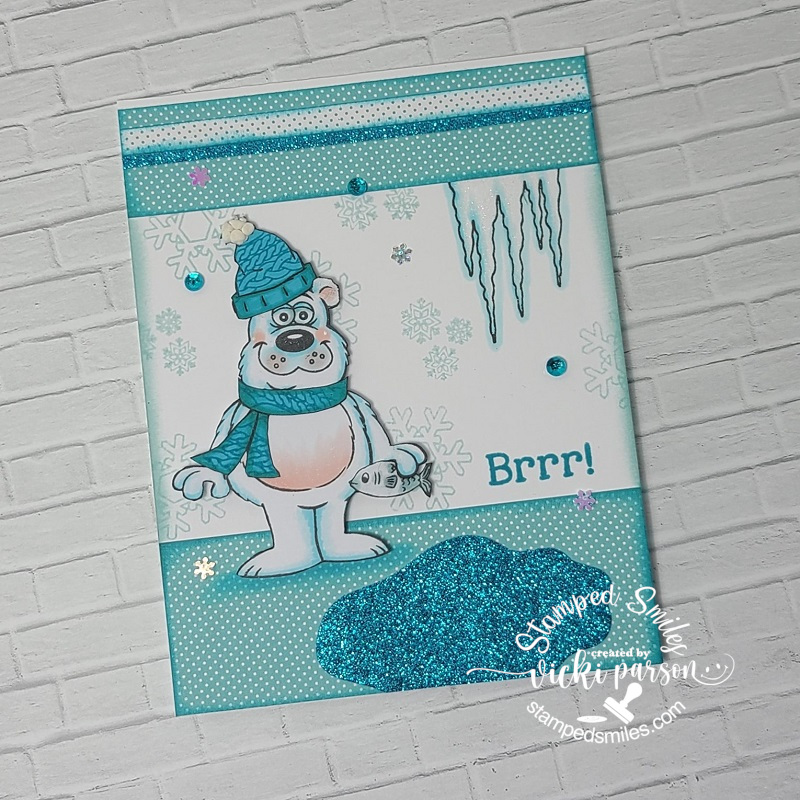
These are projects we made during a “Game Night” event! Cute fun fold card, a mini card and the little round container is decorated with a deck of circle playing cards inside! It has a magnetic closure! Super fun event!This is a set of projects made during an OOAK event class with Chelsea from Inky Stamper. We made the fun vellum shaker card and the mini Fall card with this class. The kit is still available in the store here – Peppermint Mocha Latte KitThis card was made up by me for the Inky Stamper Inkspiration FB Group using the colors Blue and White for this month’s challenge. I used “Bear” for my main image.
I’ve also been working on some Christmas things that I will share soon as well as some other requested commissioned cards that I’ve recently finished. I would like to get those Christmas cards finished up early for a change! How about you?! Are you all done creating for the Holidays yet?
Until next time, thanks for stopping in today friends!
Hello friends! I hope you’re having a great week! I’m stopping in today as a guest design spot winner to share a fun new challenge today over at the Let’s Squash It! Challenge Blog!
I’ve just recently discovered this challenge blog a few months ago and thought it was fantastic because I have so many embossing folders and I know I only use them a fraction of the time creating cards. I thought that this would give me some inspiration to use them and learn fun new techniques with them to stretch out the use as well! I had won on a previous challenge so was asked to be a guest designer for them in this month’s challenge! How exciting!
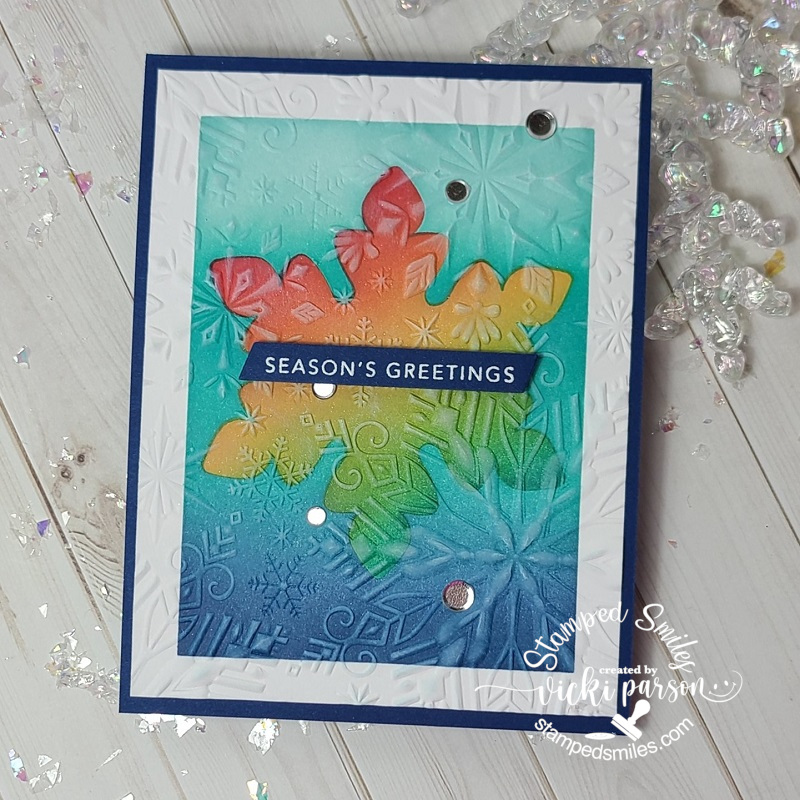
So, for the challenge this month, they ask that you “use some stenciling over your cards and then use an embossing folder over it“. So, this had me thinking and I don’t really recall doing this before! So of course, you start pulling out tons of stencils and then grabbing the embossing folders to see what looks you might achieve with the idea and here’s what I thought of…
I love how it turned out! I’m so thrilled that the card is pretty much flat first of all. It has only the card front layer attached to the card base and then the sentiment strip. Great for mailing a Christmas card!
I took the Taylored Expressions Rectangle Masking Stencils and then also added a Snowflake Masking Stencil (unknown from my stash) so that I could line it up properly over the rectangle area. I started by ink blending with TE inks in a rainbow color pattern in a diagonal direction. BEFORE removing the stencil, I sprayed it with some Shimmer Spray. I lifted off the snowflake mask being careful to leave the remaining rectangle stencil in place and then I took the “negative” snowflake from the stencil to cover it up. I then used some blue tones of TE ink over the rectangle stencil in a straight across direction with the rainbow snowflake being covered up. Once I was happy with the ink blending, I removed all stencils.
Lastly, I took the entire stenciled panel and ran my Sizzix Winter Snowflakes Textured embossing folder over top of it. That added bit of an embossing folder really stepped it up! I also rubbed over top of the impressions with a white ink pad on the colored sections to make it pop a bit more.
I white heat embossed the sentiment from Taylored Expressions Mini Strips Holiday and die cut it out with the TE Mini Strips Asymmetrical Die over a TE Blue Corn cardstock piece which was what the card base is cut from too. Popped up the strip with foam tape and finished with some silver sequins.
So, I hope you’ve enjoyed my creation today and that you’ll pop on over at the “Let’s Squash It!” Challenge Blog to check out the challenge this month and play along with us too! Looking forward to seeing what everyone’s comes up with for this one! Thanks for stopping by today and I’ll see you soon!
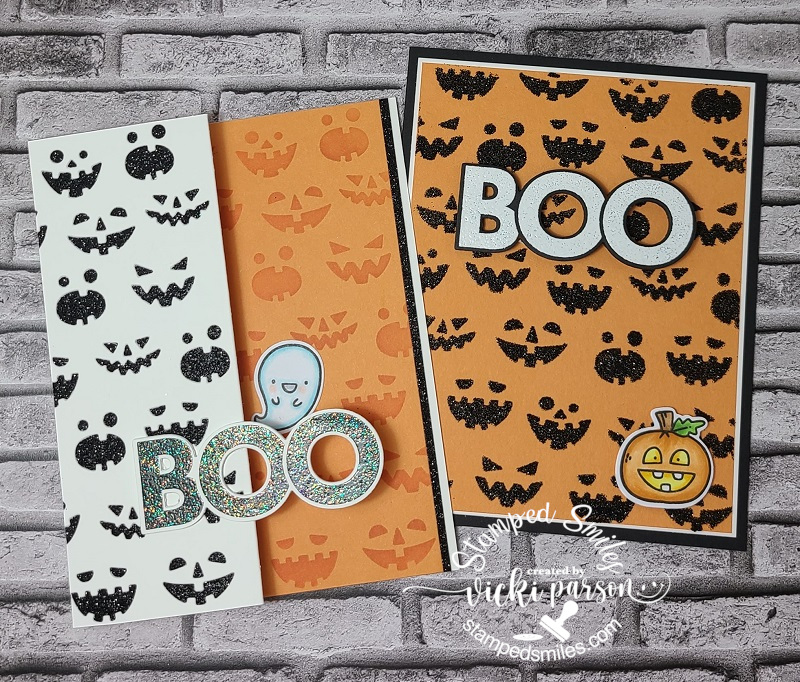
Happy Friday friends! We’re now upon Halloween weekend!🎃 Are you ready?! Lots of candy on hand to give out and some to enjoy for yourself…check. Scary movies at the ready…check. Ready for lots of fun before the weekend ends!
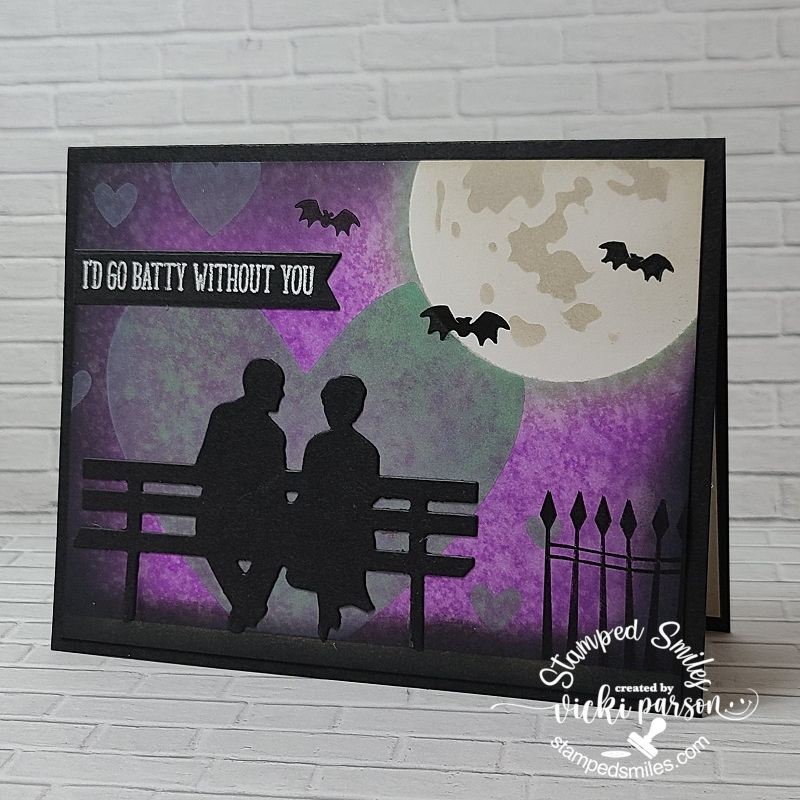
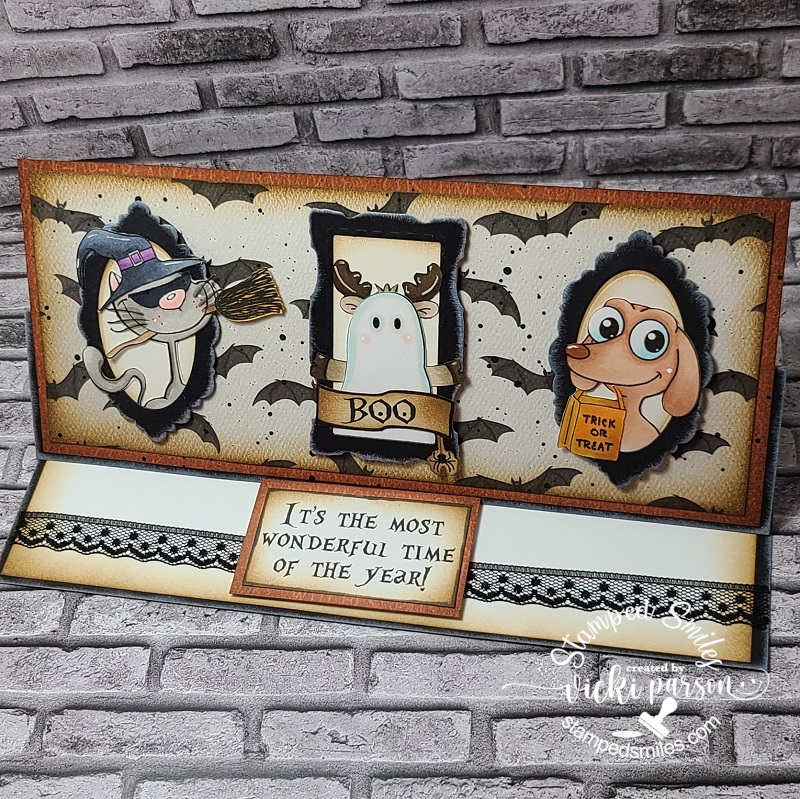
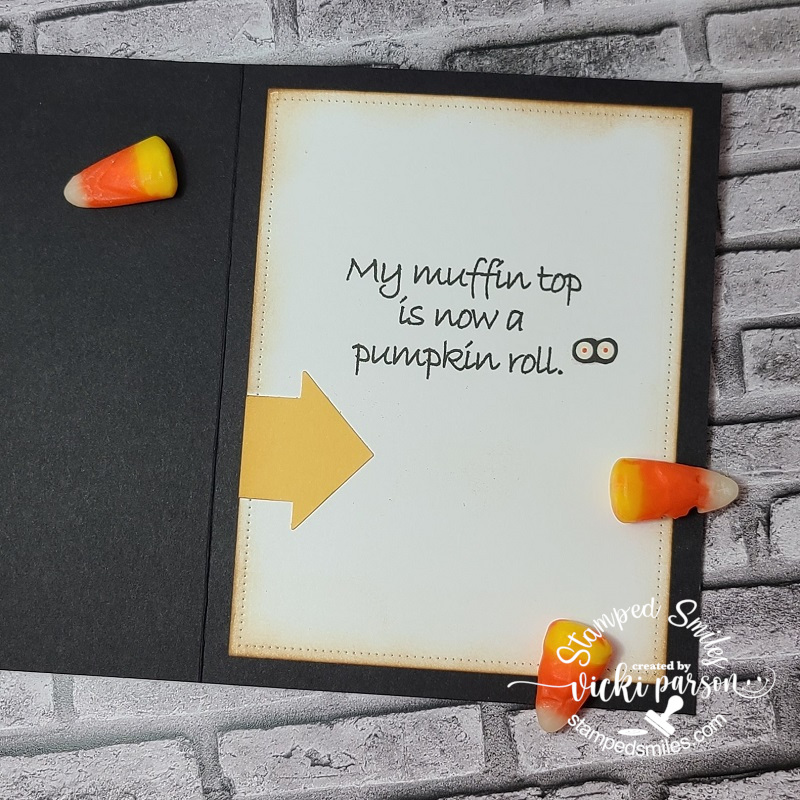
Not really sure exactly where my love for Halloween comes from, but I love it so much that even my wedding anniversary comes real close too! So today is our 22nd year anniversary and I couldn’t have made it in this crazy life without my “Boo”! I’ve made a card to let him know how I feel:
And yes, this is probably something we would certainly be doing under that moon as we’ve done before including watching bats fly around in the sky! We do weird and wonderful things which is just ONE of the gazillion reasons why I love him so! I’ve made a card with a bit of a “love/Halloween” theme. I’m not sure I’ve ever really made a Halloween style card for him before, but I know this will make total sense for him and he’ll get a kick out it.
Started with the background using some Oxide ink blending keeping careful with leaving the “moon” area clean. I sprayed water over top of the purplish/black background for that texture and then took a Taylored Expressions heart stencil over the background and introduced another color of oxide ink. I ink blended the edges and bottom with black. I have a Tim Holtz “Moon Mask” to create the moon with…which makes it super easy! I stamped the fence at the bottom right and the bats with black ink. The couple on the bench (TE “Love Story” die) was die cut from black cardstock and glued in the center of the large heart. Lastly, I white heat embossed the sentiment over another piece of black cardstock and cut it out with a sentiment banner attached to the top left edge.
It’s really a simple card, but I loved creating the background with a “spooky love” feel that I know he’ll like too!
And since we’re going “all batty” here, I thought I’d share my creation that I’ve made for this months’ Inky Stamper challenge using a recycled item! I thought this might be a good opportunity to create a fun treat! I took an empty paper towel holder to cut a 2″ tall container with a handle and covered it with some Doodlebug papers. I layered some trim and ribbon around it and added a punched-out circle for the bottom.
I’ve used the Inky Stamper Bat stamp set for the bat that I’ve stamped, colored and die cut for the front of my treat holder. I’ve cut out a stamped sentiment banner to tie onto the handle. Really easy and fun to create! You could get about 5 containers per empty roll which I thought was a lot!
I sure hope you’ve enjoyed my “BATTY” makes today and I wish you a very frightfully FUN weekend!
Happy Friday friends! Another weekend in October is upon us and so is Halloween! Yay! Well, I’m excited about it anyway! LOL If not for being a kid to trick or treat…for treats and spooky fun anyway!
Today I’m so thrilled to be guest designing for Digi Doodle Studios! If you’ve been around my blog, then you’ve probably seen some of my past creations with the company as a design team member.
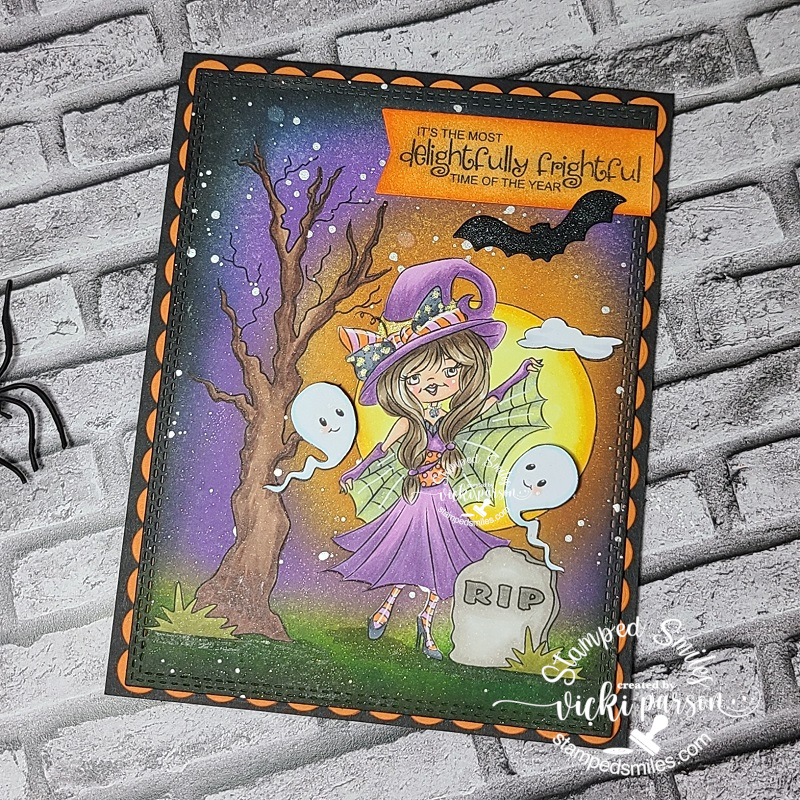
Isn’t this such a cute and fun scene?! I’ve used this adorable Kikimora Halloween Witch digital stamp from Digi Doodle Studios and created this fun scene with her using a past digital set called Ghostly Haunts Pairables which was discontinued. I’ve sized and placed the images on my computer before printing them out. I also printed out an additional one as well as another on some masking paper.
The reason for printing over masking paper was so that I could fussy cut out the image…yes even the tree, to ink blend the background. (Any “imperfections” can be covered up with the coloring, so I ink blended FIRST.) You could always ink blend a background and then cut out your image(s) to place over top, but I wanted this to be a one layer with the blended background to be incorporated with it for the glowing moon and night sky with a ground area. The only thing about the image that is NOT flat are the two ghosts that I fussy cut out from an additional printing of it along with the cloud over the moon. The ghosts were partially popped up with a foam square and I glued flat the cloud. This helped with the scene to give that dimensional look. The scene was cut with a MFT rectangle die and was finished with ink blending around the edges ending with Black Soot at the very edges.
So, BEFORE I removed the masks from the images to color, I also decided to take some silver paint to create some splatters in the night sky. I then took some shimmer spray to go over top of it for some sparkle. I then die cut a banner for the sentiment and ink blended some Carved Pumpkin over it to glue at the top and cut off the edge from the panel. I then layered this scene over an orange scallop edge rectangle die cut piece that was layered over an A2 top folding black card base.
I’ve also die cut a bat from my stash in black cardstock and glued it around the sentiment banner. I’ve covered the bat with a glitter brush pen for a bit of sparkle as well.
For the grounding of the images and some shadow effects from the moon, I took a Copic marker to color in some shadow under the witch, tombstone and tree. You can also see on the witch that I’ve added some highlights with a white gel pen as well as silver and gold gel pens for her outfit. I also covered the little diamond on her necklace with some Stickles Star Dust glitter. It looks awesome in person and matches her dress.
I tried, but it’s so hard to capture all of the sparkly glitter goodness over this card. The entire sky is covered with sparkle. I do hope you’ve enjoyed my card.
Thanks for dropping in and have an awesome weekend!
Hello friends! I’m so excited to share the “Handmade for the Holidays” release at Taylored Expressions today! You can go check out all the things right now in the store! I’m extra excited that I get to be a part of this special release with them as a guest designer too! (This was for my win during the TE 13th birthday celebration challenges I had entered from last month! 🎉 Yay!) There will also be a huge post about it on the Taylored Expressions Blog too! I really hope that you enjoy the projects I’ve made to share with you and if you stop by the store, please let Taylor know that I sent you!
For my first set of projects, I’ve made a fun Christmas décor item that you can gift for the Holidays, use as a center piece for your table setting, etc. I’ve taken the Taylored Expressions (new) Accordion Tree die and used it to make a trio of trees with the “poinsettia style” attached to the accompanying TE Tree Stumps (sold separately) to go with this die and another two trees without the stumps. For the trio of trees, I’ve used the Merry Blooms Stamps, Stencil & Clear Combo set to create a background over a Toffee cardstock base inking and blending with Sweet Basil, Cherry Pop and Mulled Wine inks. I’ve also used the same products to make the tag as well. I’ve gold heat embossed the centers for the poinsettias in the background. I’ve also taken the TE (new) Itty Bitty Sentiments Holiday stamp set and used the tiny images from the set to create backgrounds for the other two trees. I’ve splattered the tree backgrounds as well as the tag background with acrylic white and gold paints. These die cut trees were glued back-to-back with the score line in the center as a guide which makes them 3D looking. I’ll explain each item below:
This was such a fun 3D project to create! I wanted all the trees together in one piece, so I thought it would be fun to grab one of these wood slices I’ve been hoarding forever and glue the trees to this base. There is an accordion star that comes with the accordion tree die, but I thought it would be fun to take the TE Perfect Poinsettia die and cut out several of the smallest bloom to make that the “star topper” for the poinsettia tree. I’ve used the coordinating stamps to stamp the “veins” and gold heat embossed the centers for them. I folded them in half and glued it to the top of the tree. I also attached some TE Gold Drip Drops for the “ornaments” over the tree (TE Drip Drops make perfect “ornaments” for these trees!) and added some gold twine bows front and back. I’ve ink blended the edges of the poinsettia tree with Toffee ink and gold paint sponged on the poinsettia topper.
This is what the other side (back) of this piece looks like…so it’s visible from all angles. Here you can better see the other two trees and how the backgrounds were made. I’ve also added some thick white paint to the edges of them to make it look more like “snowed over” trees especially since they were splattered with white paint. For the wood slice that the trees are attached to, I’ve used some Ranger Mica Flakes for a bit of sparkle attaching it with Multi-Medium Matte glue.
For the tag, I’ve die cut the background explained above with the TE Stacklets 2 die and wrapped some gold twine around it with the TE (new) Itty Bitty Sentiments & Tags Holiday set for the little tree with the gold heat embossed sentiment over it. I’ve also gold heat embossed the large sentiment from the Joyful Season stamp set & dies that I’ve popped with my favorite product TE Sticky Strips. I’ve cut out another layering piece behind the tag with Sweet Basil cardstock, punched a hole and added more gold twine.
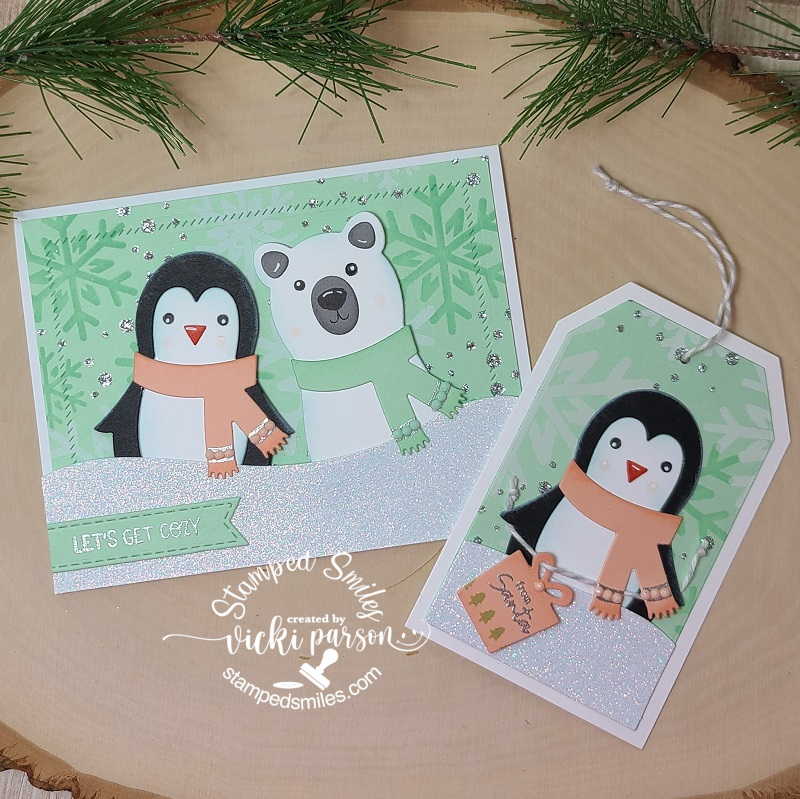
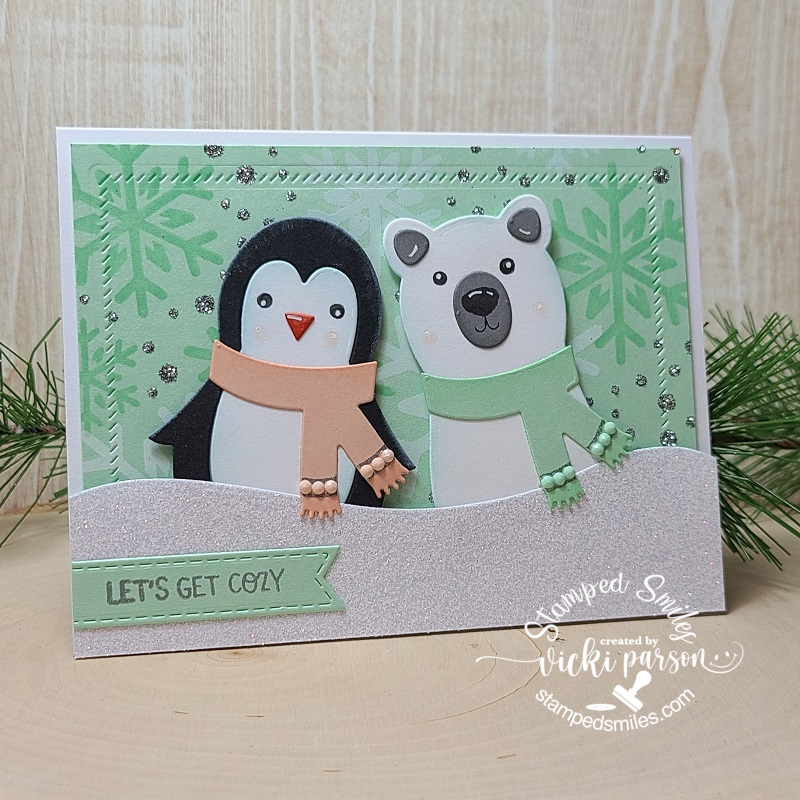
And how stinkin’ CUTE are these guys?! This is my second set of projects for this release using the NEW TE Snow Squad Dies & Clear Stamp Combo set. As you can see, the cute die cut critters are made to perfectly fit the Tag Stacklet dies! I’ve the Tag Stacklet 2 die set for my sweet penguin! The critters are so easy to cut out and decorate them as you like! I like that the clear stamp set comes with it to stamp in the eyes as those tiny dots can be so hard to deal with and loose! You get a penguin, a polar bear and a snowman with this die set!
Again, I thought it would be fun to create a background for my card and tag set, so this time, I’ve taken the TE Let It Snow Layering Stencil set for a snowy background. I’ve started with a Mint Julep cardstock base, blended the same color ink for the first layer, Sugar Cube ink for the second layer and for the third layer, I’ve used some TE Glitter Grab and immediately covered it with some TE Silver Glitter. Love how it turned out with the subtle color!
Starting with my card details, I’ve decided to give the snow squad critters soft colors with their scarves. The clear stamp set with the dies also come with a two-line image for adding details to the scarf, so I silver heat embossed those and then added some matching TE Tiny Diamonds Pastel in between those lines. They matched up perfectly! I inked around the edges of each die cut piece for the critters and stamped the face images including the cheeks which I off-stamped first to keep them light. I used a white gel pen for highlight details.
I thought it would be fun to have these Snow Squad critters pop out from a snow drift, so I took some TE Sugar Cube Glitter Cardstock and cut out a “snow drift” with a piece of the their scarves over it and popped them up over the snowy background I’ve created using a TE Diagonal Stitch Rectangle Stacklets for the stitching details behind them which was layered over an A2 sized Sugar Cube top folding card base. For the sentiment, I silver heat embossed it from the TE Winter Wishes clear stamp set over a Mint Julep cardstock that was cut out using the TE Stitched Banner Stacklets die.
And of course, I had to use the penguin again for my coordinating tag! I’ve used part of the same background I’ve made for the card and cut it out using the TE Tag Stacklets 2 die set with another Sugar Cube cut out for the layering base.
I did the same thing for this tag that I did for the card above with the snow drift, but I also added a tiny tag that he’s holding with some Doodlebug Gray Twine. The tag was created with the same TE (new) Itty Bitty Sentiments & Tag Holiday sets. I’ve stamped the row of tiny trees from the set with the Mint Julep ink and then silver heat embossed the sentiment above it. I’ve also used more of the TE Tiny Diamonds Pastel for the center of the bow on the present along with the penguin’s scarf. I’ve punched a hole at the top and added more of the same twine at the top.
So how about you?! Are you ready for the up-coming Holiday Season? I sure hope that I was able to bring you some inspiration with your handmade projects for the Holidays! Again, you can check out all of the brand new Taylored Expressions products in the store as it’s now been released! Be sure to check out all of the wonderful inspiration on her blog too!
Thanks so much for stopping in today! I appreciate all of your kind support friends! Have a great day!
Hey friends! I know it’s well into October and so you may be wondering where in the world have my Halloween posts been? Today was gloomy and foggy out…and it’s getting evening, so it was a good time to post! If you know me, then you know I love all things Halloween, but I’ve actually been in the background lurking with my Halloween projects! Bwhaa!! I just haven’t had time to sit and make a post for them yet. The reason for that is, of course, I’m taking too many classes and doing events that I’m like a “mad scientist” in the background with all of the crafting things, but haven’t been sharing them! So, I’ve decided to set aside some time to create a post with all things Halloween! (Don’t worry, there will be more special ones coming too!)
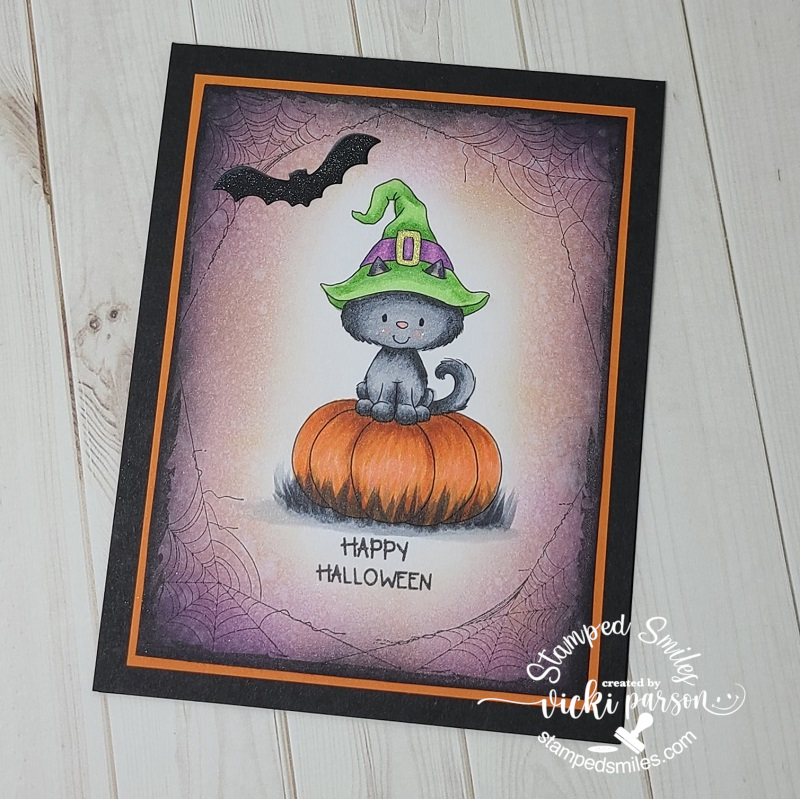
Now isn’t this one a cutie?! I’ve received this free digital image especially from the Whimsy Stamps World Card Making Day Event on Facebook that they usually hold every year and have some fun games and challenges. This image was created by Crissy Armstrong of course and she even did a cute little tutorial with it, so I had to color it up!
I’ve used Copics for the coloring and even made a shadowy creepy black/gray grass along the bottom of the pumpkin. The hat buckle was colored with a gold gel pen. The sentiment came from an older Whimsy Stamps candy corn set I had in my stash. For the background, I’ve used my favorite Whimsy Stamps Spider Web Frame background stamp to go around kitty. I then used a couple of different Distress inks to sponge around the edges and then spritzed water over it & blotted it up with a paper towel to make it even “creepier” looking. I layered it over an orange layer from my stash and then placed this over an A2 sized top folding card base. I also die cut a bat from an old freebie from Whimsy Stamps years back to glue at the top of the scene and covered it with a glitter brush pen. Super fun!
Now I want to enter this into the annual Whimsy Stamps 31 Nights of Halloween that they do every year! Check out the event with lots of Halloween inspiration & fun if you’re interested! I always love to play along, and I think Whimsy Stamps has some of THE best products for crafting Halloween!
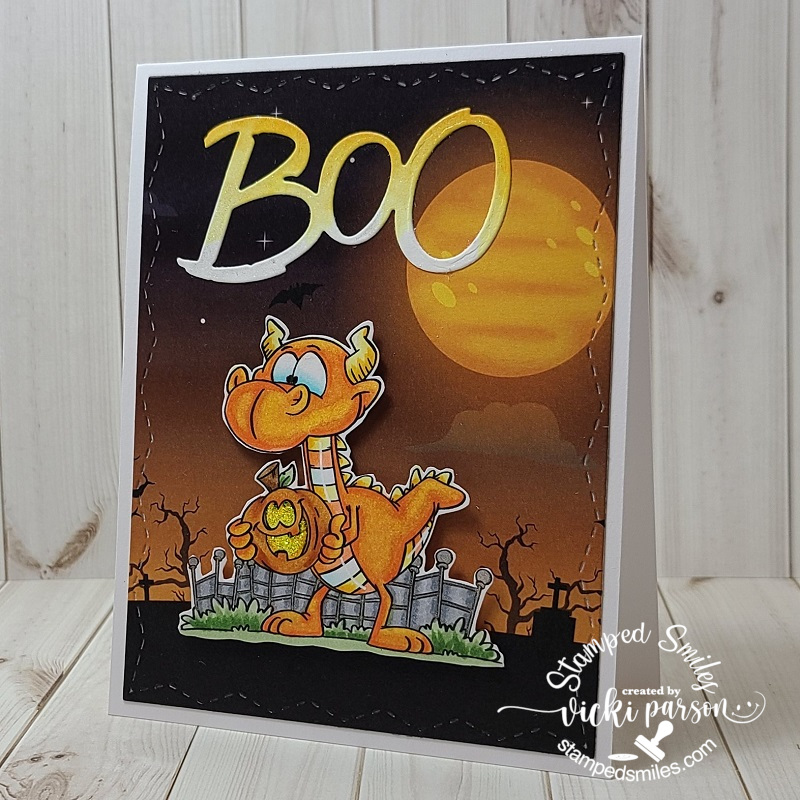
And this is another card I made for the Whimsy Stamps WCMD Event challenge using a fun Autumn/Halloween mood board. (The event is over, but it was super fun!) The first thing about the mood board I noticed was all of the orange and fun jack-o-lanterns that popped out at me. Plus, this was another cute freebie digital image given to us during the event.
So I colored up this dragon using mainly orange tone Copics with a “candy corn” effect. I also used it for the die cut sentiment at the top that was cut out from the Whimsy Stamps Boo die set. Hard to tell in the photo, but I covered it with the glitter brush pen too. I popped up the “dragon guy” over a piece of the Whimsy Stamps 6×6 Haunted Paper Pack cut with the Whimsy Stamps Zig Zag Stitched Rectangle Dies. It was all layered over a white A2 top folding card base. I also added some yellow Stickles to the pumpkin’s face.
And since I’ve been doing so many classes, I thought I’d just create another gallery full of Halloween projects that I’ve done. I have actually been working on some books and journals as well as mixed media projects and not sure if I’ll get them finished up before Halloween as I’ve been busy, but it’s always fun to get creative and messy especially for all things creepy and spooky! 💀 Hope you enjoy! – (If you’re viewing this on my website, just click on the photos to enlarge them to see)
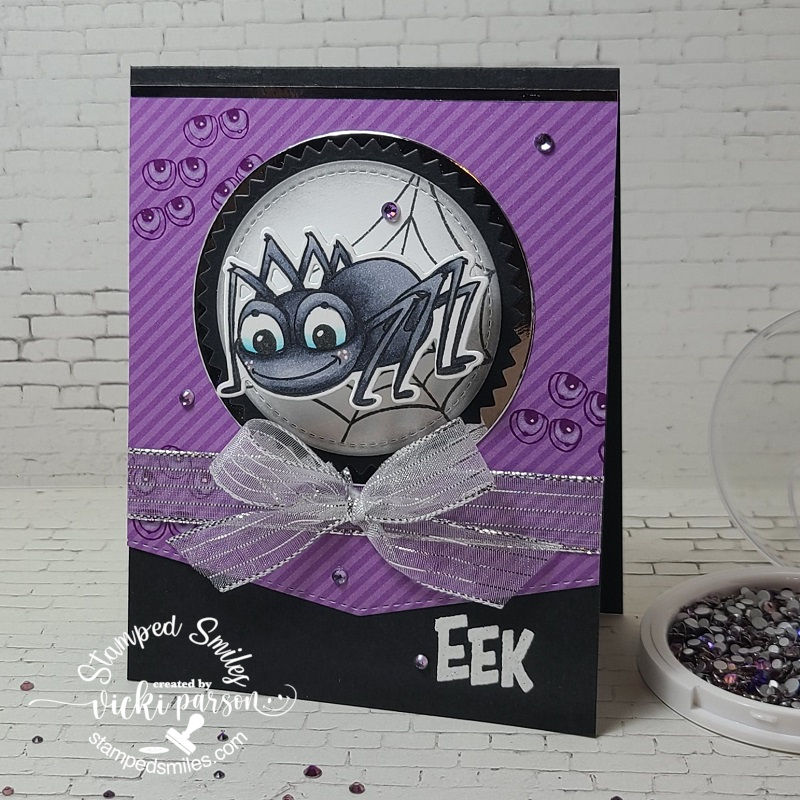
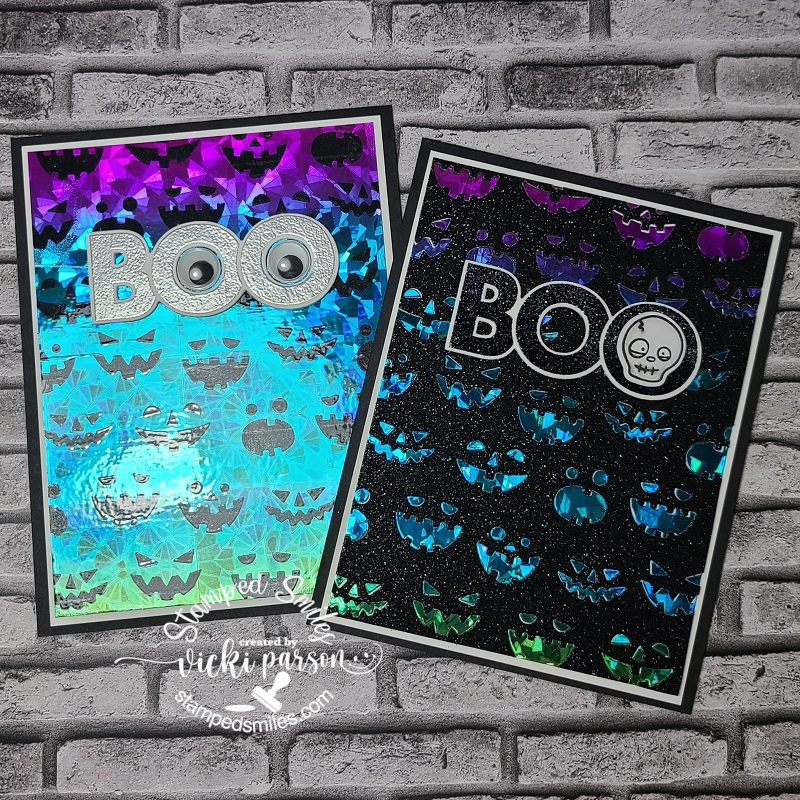
This was a fun one I made using a sketch for the Inky Stamper’s World Card Making Day Event! I had to pull out the Spider set and stamp up the eyeballs for the background! The spider was die cut out over the circle with an added wobbler on him! So fun!A class that Taylor taught using a special Halloween bundle showing how to foil. This is the second portion of Taylor’s class using the same Jack-o-Lantern Cutting Plate.Here’s another set of Halloween cards taught by Taylor for a virtual event I attended in Aug. (I think I over did it on the splatter! LOL)This was a Lawn Fawn class with this set of projects during the Aug virtual event. The back project is a gable box.This was a DecoFoil class class from the Aug virtual event…LOTS of foil! The green background is felt.This was a watercolor mini slimline class taught during the Aug virtual event. I’ve used glow-in-the-dark glitter for the inside faces except the center one was just yellow glitter.From a Riley & Co Halloween class. This is an easel slimline card.Another Riley & Co easel type card. LOLTEE HEE! A Riley & Co Dracula topped with glossy accent hair. Also added it to the bat too. See next photo for the inside……inside of Dracula card. LOLRiley & Co is so funny! The cat is on a wobbler!This card reminded me of Jimmy Fallon’s Friday Thank you notes! (If you’ve ever caught one of those shows!) See what I mean in the next photo for the inside of this card……ha ha! inside of Thank you Halloween Candy…
Whew! Was that a lot of Halloween or what?! Many of these things just give me a big chuckle and I just think they’re so fun especially now that I’ve looked back on them. Although many of these projects were created earlier this Summer, I thought it would be a good time to share them with you. #MakeHalloween365 I still have more Halloween up my sleeve soon, so stayed tuned!
Thanks so much for stopping by this evening and I hope you’ve enjoyed my Halloween projects here! HAPPY CRAFTING
Hello friends! Happy October! I hope that you’re having a great week so far and looking forward to doing something crafty this weekend for World Card Making Day!!🌍😀 I have decided to post something a bit early as I know there will be tons and tons of special posts planned by many, so I thought it best to post today instead!
IN THE MEANTIME, I DO HAVE A FUN GIVEWAY LOCATED ON MY POST BELOW OR CLICK HERE TO SEE IT!! YOU HAVE UNTIL OCTOBER 10th TO ENTER…JUST LEAVE ME A COMMENT THAT YOU’RE INTERESTED!!
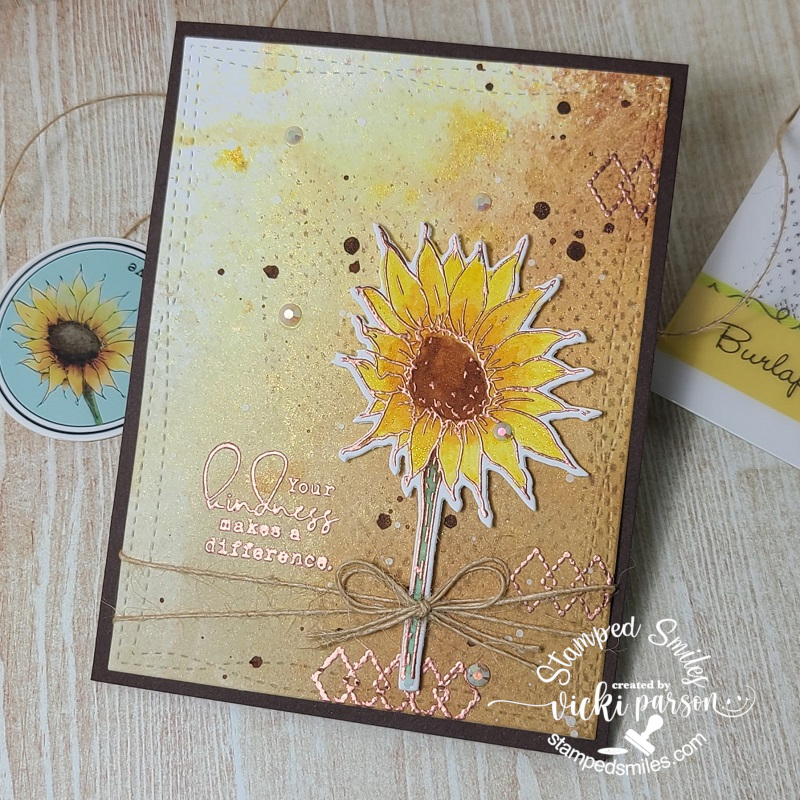
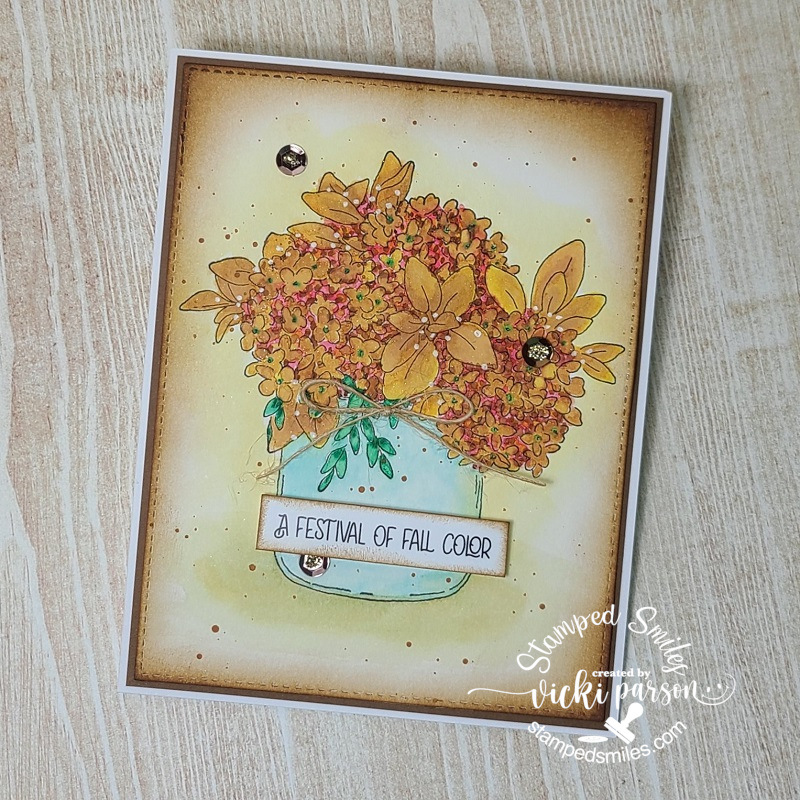
There are SO MANY things going on this time of the year and maybe that’s why I love Autumn so much. (WCD, Halloween, birthday, Cooler temps, warm clothes, Harvest, yummy foods, pretty colors, changing leaves, Halloween…oops already said that…but you know!) I am thankful for all of it! I have a couple of cards from a TE kit I recently got (yes, I know…another one to pile on!), but I fell in love with it so much & I am using it right away! 😁
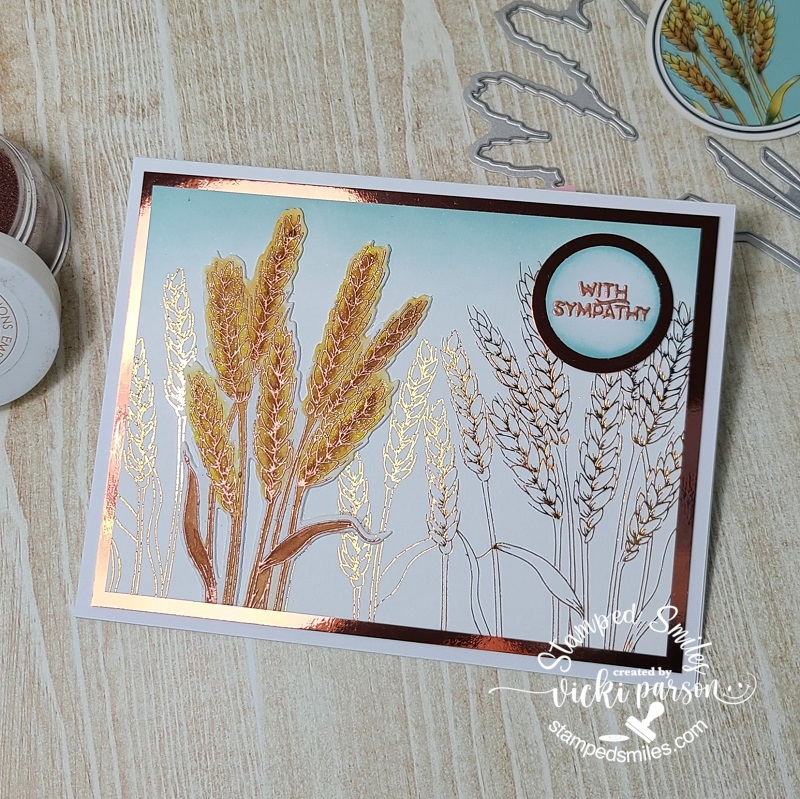
There is some copper EP that comes in the kit, so I heat embossed both the sunflower and wheat images together so that I could color them both at the same time with some watercolor. I then cut them both out with the coordinating dies and set aside to work on my background.
The background was so fun! I’ve used a Bristol Smooth watercolor panel and pulled out some Mica Stains and other sprays from my stash with a spray bottle filled with water and just played. Some of it I splattered to make “dots”. I used the “Burlap” background stamp in the kit and randomly stamped the background as well as heat embossed an element and sentiment from the stamp set. I cut this panel with a die and wrapped some twine around it before attaching to a chocolate truffle card base. I used some foam strips to pop up the flower and added a twine bow to it. Finished it off with some Iridescent Rhinestones.
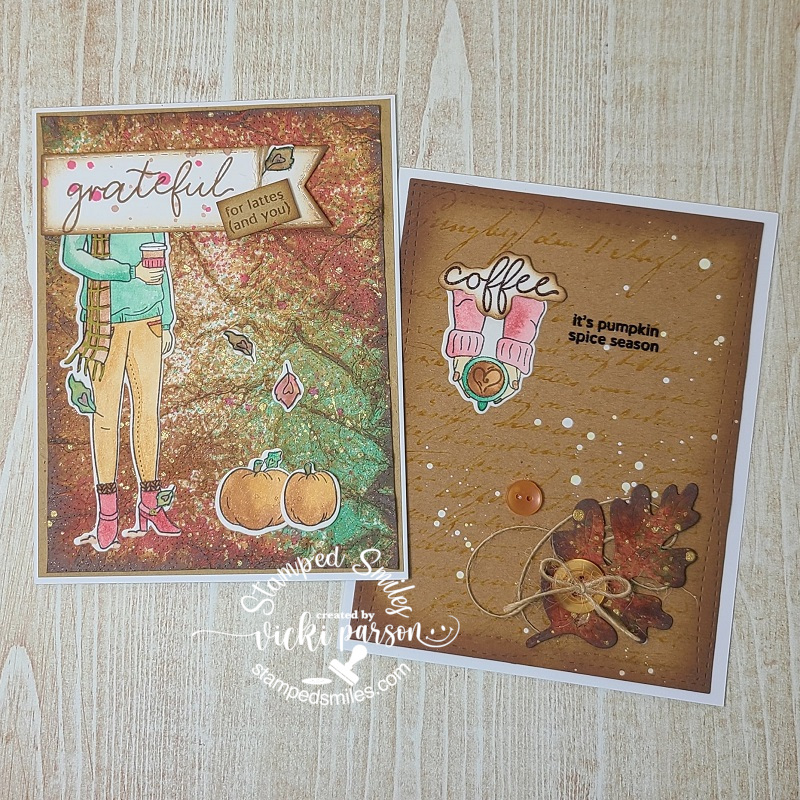
And this is the second card I’ve made using the wheat image that I previously colored with the sunflower image above. What’s nice about this card is that the background was done using one of the foilable panels from the kit. I found some copper foil and ran it through my laminator. I lined up the cut out wheat image with the background and glued it over top cutting off the bottom portion that stuck out. I also heat embossed a sentiment from the TE clear set in my stash and then punched it out with a circle punch. I used my blender brush to very lightly add some Sea Salt ink at the top of the foiled panel as well as around the sentiment circle.
Lastly, I attached both the image and sentiment panels onto a piece of copper foil cardstock and then mounted it onto a side folding A2 white card base. It was simple, but I like the shine it gives.
I had been discussing with someone recently how I really need to make more sympathy cards to have on hand…so here’s a start to getting a pile going hopefully.
Speaking of needing cards, all of the birthday cards from my last post have been spoken for! Everyone seems to really need birthday cards and like having them on hand. I can totally relate to that! I think I need to get some “sorry I forgot” ones thrown in there too! 😂
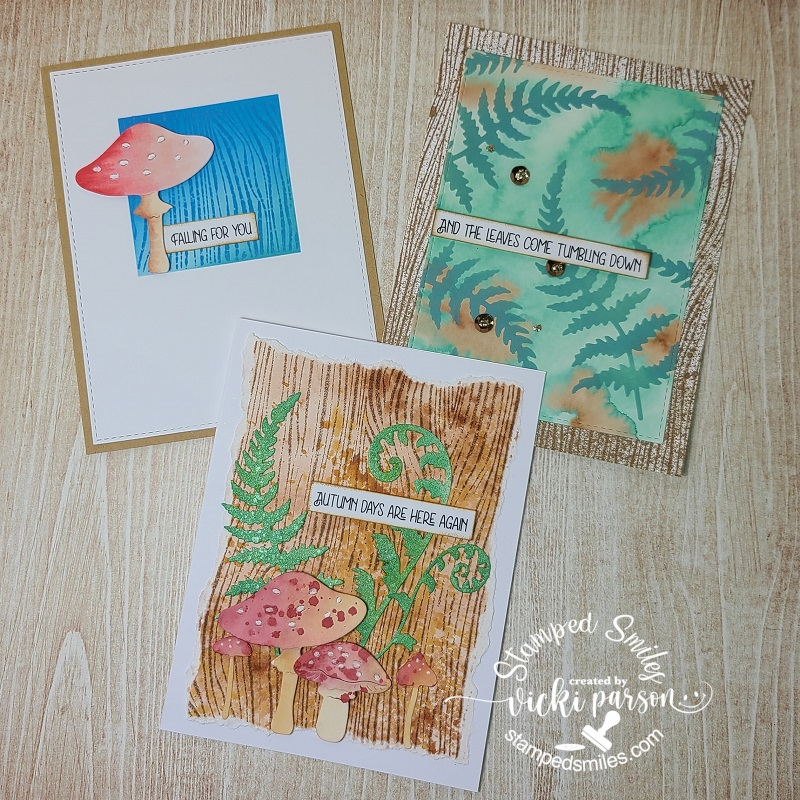
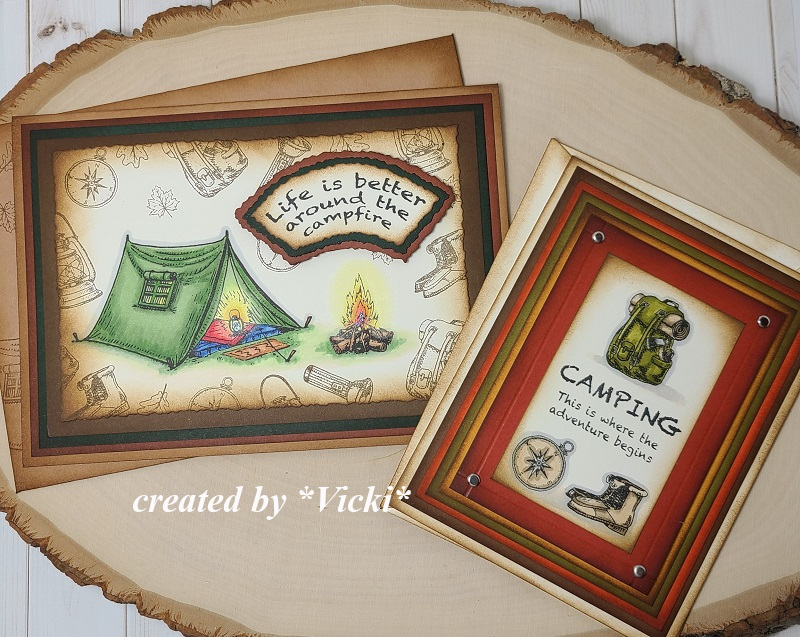
I still have some projects that I’ve been working on in the background from some classes I took over the Summer but still haven’t shared yet, so I thought I’d start a little bit at a time and I think these “Autumn themed” cards work with my post today: (If you’re seeing this post on my website, just click on the photos below in the gallery to see them up close.)
These projects were from a class taught by Daniel West for Hero Arts and we received a large woodgrain background stamp for the class. It was fun to make the backgrounds!This is an image from Impression Obsession that was more of a “Spring like” image, but changing up the colors for Fall gave it a different look. I sponged around the image and panel and added some splatters.This was a Simon Says Stamp class using an older stamp set. We used some sprays and also colored with them for the images.
I have taken SO MANY classes, so I still have many more projects to share as I go here! Hope that you enjoy seeing what I’ve been up to! It’s just fun to play around and in the process…no matter how little a piece I use…I am using my stash somehow and I’m very happy about that! At least I’m still crafting anyway! LOL
Thanks for dropping in and have a great crafty weekend!
Hey friends! Hope you’ve had a wonderful weekend and will be enjoying the first ‘official’ day of Autumn tomorrow!🍂 Yay! I know that this is my most favorite time of the year and today it seems like it has finally cooled off a bit which is very welcoming to give the air condition a break! Decorating for Fall/Halloween is also a favorite thing I like to do along with being outside…so I’ll be doing that this week and weekend for sure!
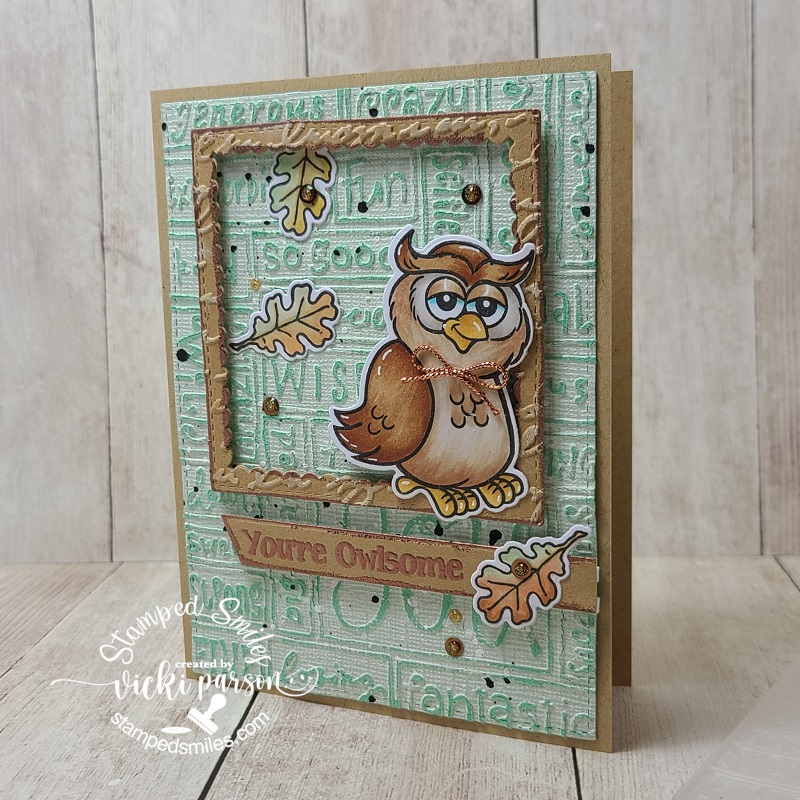
Today I have some creations that I’ve been working on. The first one comes from a challenge that I wanted to enter along with breaking out a new stamp set, but excited about using an older embossing folder and some paper that has been in my stash for far too long:
He even looks like a wise old owl…and I thought he would be cute with a little bow around his neck too! This is not a ‘new’ stamp set from Inky Stamper, but it’s the first time I’ve broken out to use this Owl stamp set! Their challenge issued this month was “embossing” and so I pulled out a VERY old embossing folder (remember the Cuttlebug days?! LOL) I think it was one of my very first ones! Plus, I pulled out some Coordination’s textured and colored cardstock. It is weathered looking, but when you sand over it, the color comes out underneath…really cool stuff that I haven’t used very much! You can get the coordinating dies for this ‘Owl’ set which also cuts out the owl and the leaf in the set. I’ve colored them up with Copic markers and used the die to cut them out with.
For the embossing folder card front, I took a piece of the Coordination’s paper, die cut it out and then ran that piece through the selected embossing folder and then sanded over it with a sanding block. I also die cut a frame the same color as the card base and took a separate embossing folder from Stampin’ Up! to go over that with and sanded it a bit as well before popping it up on the card front.
Before placing all of the elements on the card front, I decided to add some white and black paint splatters over the background. I also copper heat embossed the sentiment underneath the owl, die cut the strip and popped it up with one of the leaves over top. (You can also see along the edges that I’ve heat embossed too!) I popped up the owl but left him grounded to the frame and then finished it with copper sequins filled with glitter drops. The copper twine bow was a last element decision. LOL🦉
Speaking of sanding, it reminded me of this class I took with Inky Stamper making these cards. (couple weeks ago)
Anyway, the sanding reminded me of this class because at the bottom of the card, the kit included sandpaper for the beach. Really love the look it gave to the design with the texture and tiny bit of sparkle in it!
And the same day I had the class above, I had this class from Craft Fancy during their OOAK event. These were made from their “Alcohol Pearls Butterfly card kit” (I think they have some left in store if interested). The kit came with one alcohol ink color in Celestial Pearls, which is beautiful, but I decided to also add some copper metallic from my stash for another bit of color. I also went on my own a bit with the white heat embossed sentiments at the bottom. I really had fun playing with the alcohol backgrounds and being able to cut them out in one pass for different looks.
I thought this set of four cards would be perfect to add to my donation box to The Butterfly Project in support of domestic violence. So, I was able to send off a batch of cards for that this past week too.
Hope you’ve enjoyed my mixed collection of projects here and I’m sure I’ll have more fun things coming soon! Thank you for stopping in!
Hello friends! Really hope your week is going well. My thoughts go out to all of those that are experiencing difficulties in their life and hope things turn better for you very soon. I hope to bring a smile for you today.
I’ve really had such a fun time playing around as a guest designer this month for Inky Stamper and this will be my final project for them this month. Chelsea has some really cute stamps and I hope you’ll check them out! (I have the badge on the sidebar of this blog if you need to come back later to find it. Just click on the badge to get to the store.)
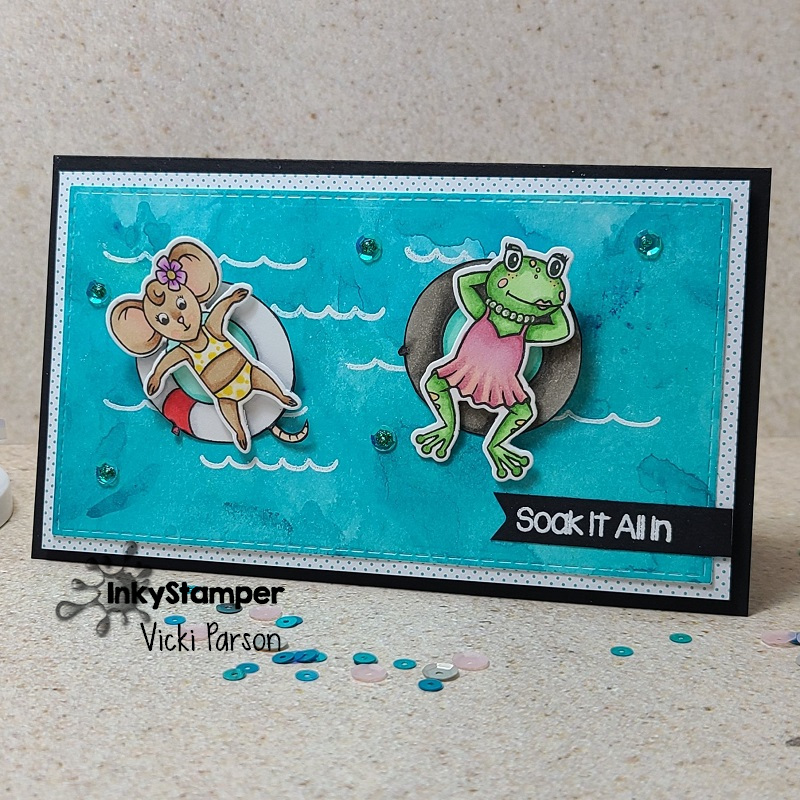
For my final project, I’ve decided to create a mini slimline card with an interactive component! If you’re not familiar with a “mini slimline” size, you take a piece of cardstock measuring 6″ x 7″ and then fold it in half on the 7″ side so that your card base is 6″ x 3.5″. I really don’t mind any size of card really as I have been known to make my own envelopes too. But I first learned about this “mini slimline” size from Taylored Expressions as she has many products in this size including the envelopes. (I have used one of the “slimline stitched dies” from TE to cut one of my panels on this card.)
I’ve used BOTH of the Chaise Lounge stamp set with “Freida the Frog” (as she is named) as well as the Splash stamp set with “Rosie” (as she is named) from Inky Stamper on my card here today! I think they’re so CUTE! Ever have those moments with a friend floating around in the swimming pool and just soaking in the sun and some secrets?!! LOL! That sounds like a fantastic summer event to me!
For the “water” background, I took some Bristol Smooth cardstock and white heat embossed the “water wave” image (both stamp sets have one of these images in it). I took out some of the Nuvo Shimmer powders from my stash and made a fun watercolor panel with them. I haven’t used these in quite some time, so it was fun to play with and I forgot how shimmery they are! Obviously, the white embossed waves resisted the watercolor.
I cut out the panel with the TE slimline stitched die and mounted it over a piece of dotted paper from the Doodlebug Swiss Dot Paper Pad. I stamped and colored the images, die cut them out and popped them up over the floaty tubes. (Remember the tip about using a white gel pen to go around the edges to get rid of those lines you see when you cut them out.) I then punched a hole on this watercolor panel where I wanted the images to be, so they weren’t too close to each other to freely spin around! Inky Stamper has these awesome interactive elements called “Clear Move-Its” and I LOVE them! They snap together and voila!
You can see bits of the shimmer from the watercolor background here too!
I popped up this panel with foam tape and then layered it over my black mini slimline card base so the spinners could move freely. I’ve also added a black sentiment banner that was white heat embossed with the Chaise Lounge stamp set.
I couldn’t resist adding a bit more “bling” so I also pulled out the Picket Fence Mermaid Water sequins being careful not to interfere with the spinners and then filled the centers with some Stickles from my stash. I could just keep spinning these all day long! LOL!
Really hope that you’ve enjoyed my projects this month as a guest designer for Inky Stamper and you’ll pop by to check them out! Super fun stuff! (Be sure to join the InkyStamper Inkspiration FB Group for more fun!) I’m sure I’ll play with their stuff again in the future!
Thanks for popping in today and finding my posts! Glad you’re here!
Hello friends! Hope you’re having a great week so far! Today, I have some cards I made for my GDT month at Inky Stamper using washi tape! I have loads of washi tape because I have a “squirrel moment” when I see it and think how pretty…and it’s not that expensive and easy to craft with and whatever excuse I can come up with!😁 Then it sits around unused!
This is why I’m glad that the “Washi Tape Challenge” came up for this month in the InkyStamper Inkspiration FB Group! You just need to use at least 1 Inky Stamper product and your washi tape…any you have! I decided to go for 2 cards:
For both I cards, I took a scrap piece about 4.25″ x 5.5″ of black cardstock and covered it diagonally with 3 different types of washi tape. One was from the Inky Stamper Doodlebug Lily White Swiss Dot washi tape, another from some metallic shiny silver washi tape and another from some clear sparkly washi tape in my stash. The white turned up almost grayish over the black and the clear sparkle turned up differently as compared to it on the crab card in the background over white cardstock. I thought it was cool the different looks I got with it.
I then decided to use some dies to cut it out with and then cut the remainder in different sized strips for my cards as well so I wouldn’t have to waste the rest of it…
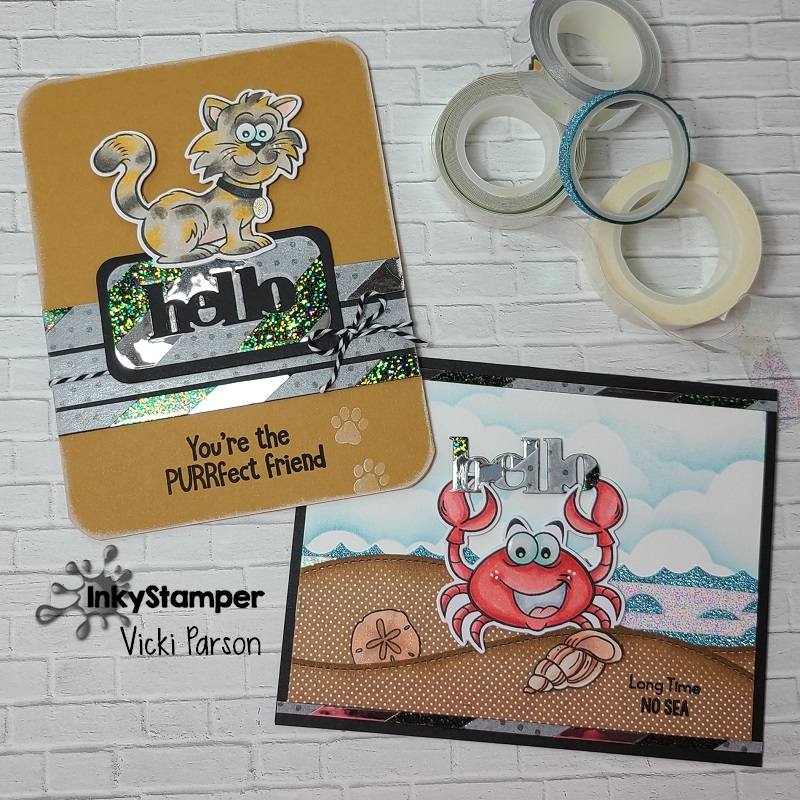
For this card, I took a “hello” die from my stash and cut it out of the washi tape piece I created on the black cardstock piece. I then cut out the “negative” sentiment with a rounded corners rectangle die and layered another piece of black cardstock behind it that was cut out slightly larger and popped up over an A2 card base that I’ve also layered with more of the washi tape strips I cut out from the left over. I added this cute kitty from the Inky Stamper Cat stamp set along with the sentiment at the bottom. I thought it would be fun to add a couple of paw prints at the bottom in white ink from the Inky Stamper Dog stamp set. Lastly, I thought it needed some Doodlebug Twine too!
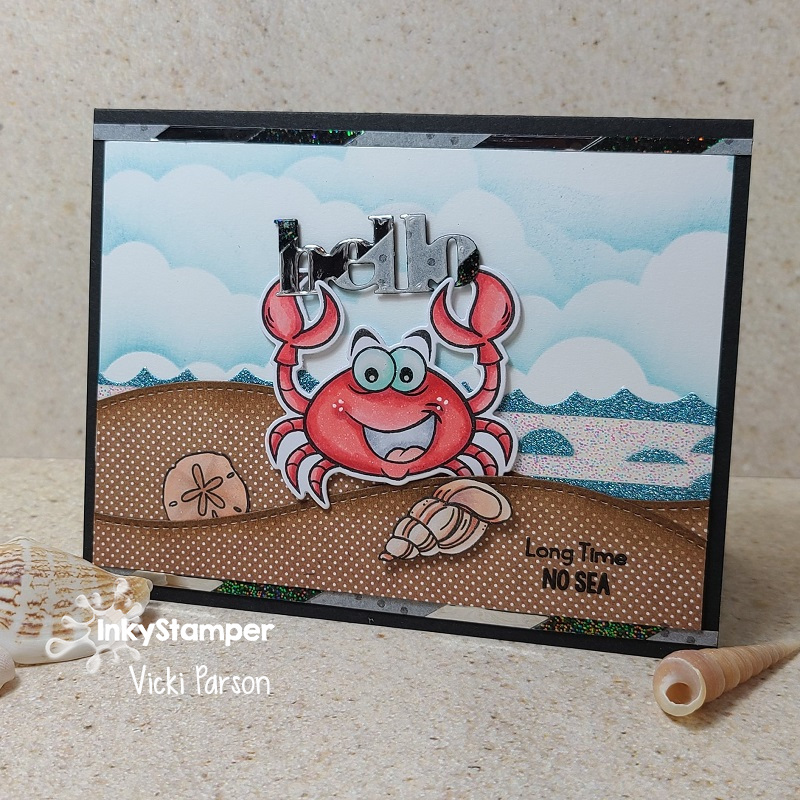
And for this card, you see that I’ve taken the die cut “hello” sentiment from above and added it to the crab’s claws to hold up in the air…so fun! I still had a couple more left-over strips from above and added that to the top and bottom of the scene I’ve created on this card.
So, for the scene, I’ve used the cute Inky Stamper Crab stamp set along with the sentiment at the bottom. The sparkly looking “sea” in the background comes from a couple of different glitter washi tapes I had in my stash. I then used a border die cut to cut it out to go across the card front. Die cut some waves for the sand and tucked in all of the stamped and colored elements over a stenciled cloud background. I added this card front scene to an A2 sized black card base.
How about you?! Do you hoard your washi tapes? I sure had fun playing around with it making these cards and I think it’ll be fun to sit and play some more with it as I have so much of it! I think it was fun to die cut too!
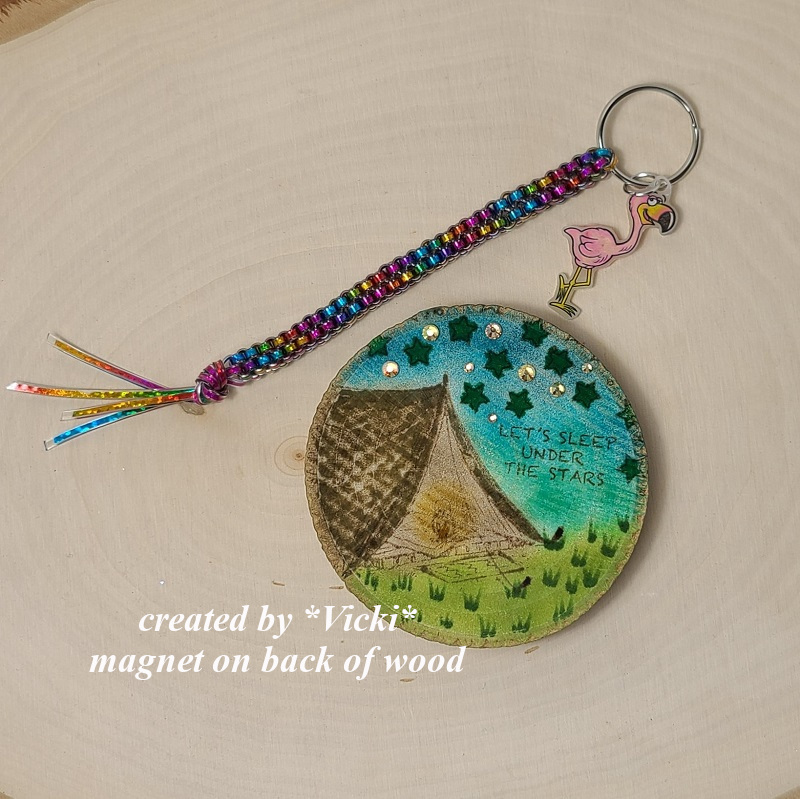
Just wanted to share some projects with you I’ve made this past weekend from a Craft Camp that I went to with Inky Stamper. We made lots of fun projects: (click on photos to enlarge!)
First photo shows a fun keychain made with a special knot technique that was new to me! The flamingo accent is from a shrinky Dink! The wood slice is stamped and sponged with ink. I put a magnet on the back of mine. The second set of cards was made from a stamp set received in the camp kit from Anthony’s Paper Craft (new to me store) and the last set of cards is a brand new Inky Stamper Flamingo stamp set with an interactive card and mini card! Had lots of fun!
Thanks so much for stopping by today! Really hope you’ve enjoyed my washi tape cards and you can come join in the challenge with us this month! Have an amazing crafty day!