Autumn Leaves & Pumpkins for Sparkles Monthly

Hello friends!  I hope that your October month is going well so far.  We’re starting to get some noticeably cooler temps in the forecast as we creep towards Halloween at the end of the month.  Love this time of year when those leaves start showing their pretty colors as they fall from the trees!  We should be getting that soon as well to clean up the yard! LOL

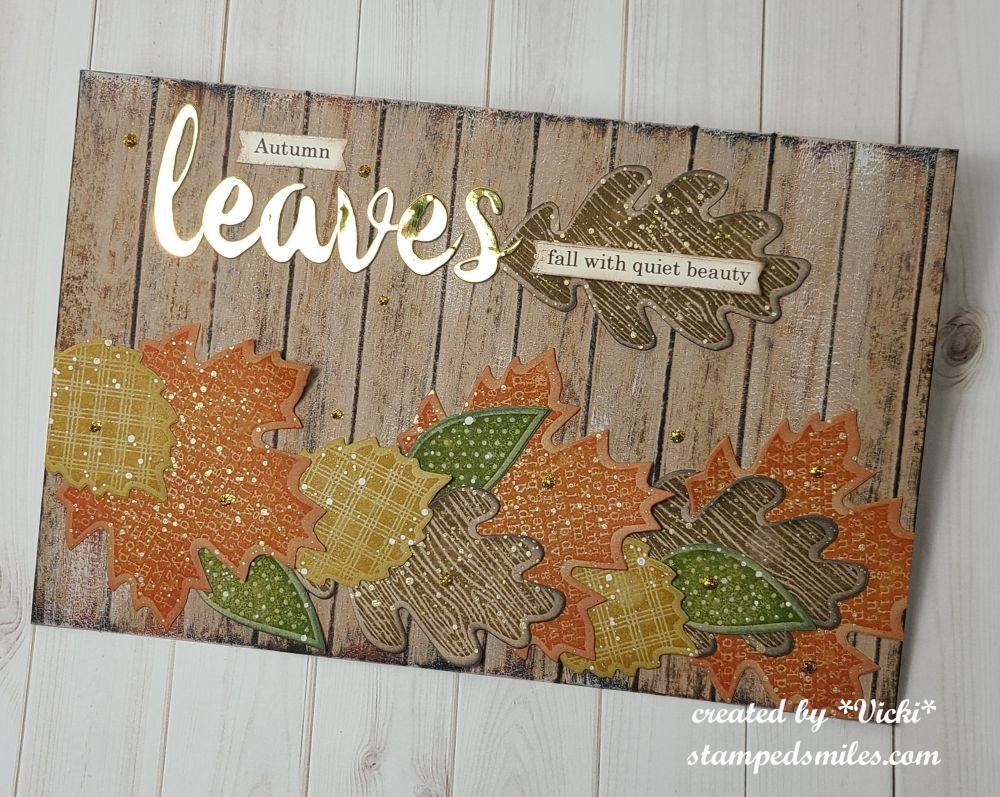
This brings us to a new monthly challenge over at Sparkles Monthly and we have the theme of “AUTUMN LEAVES & PUMPKINS  this month.  I look forward to seeing all of the projects in the gallery for this one.  Here’s what I came up with: 

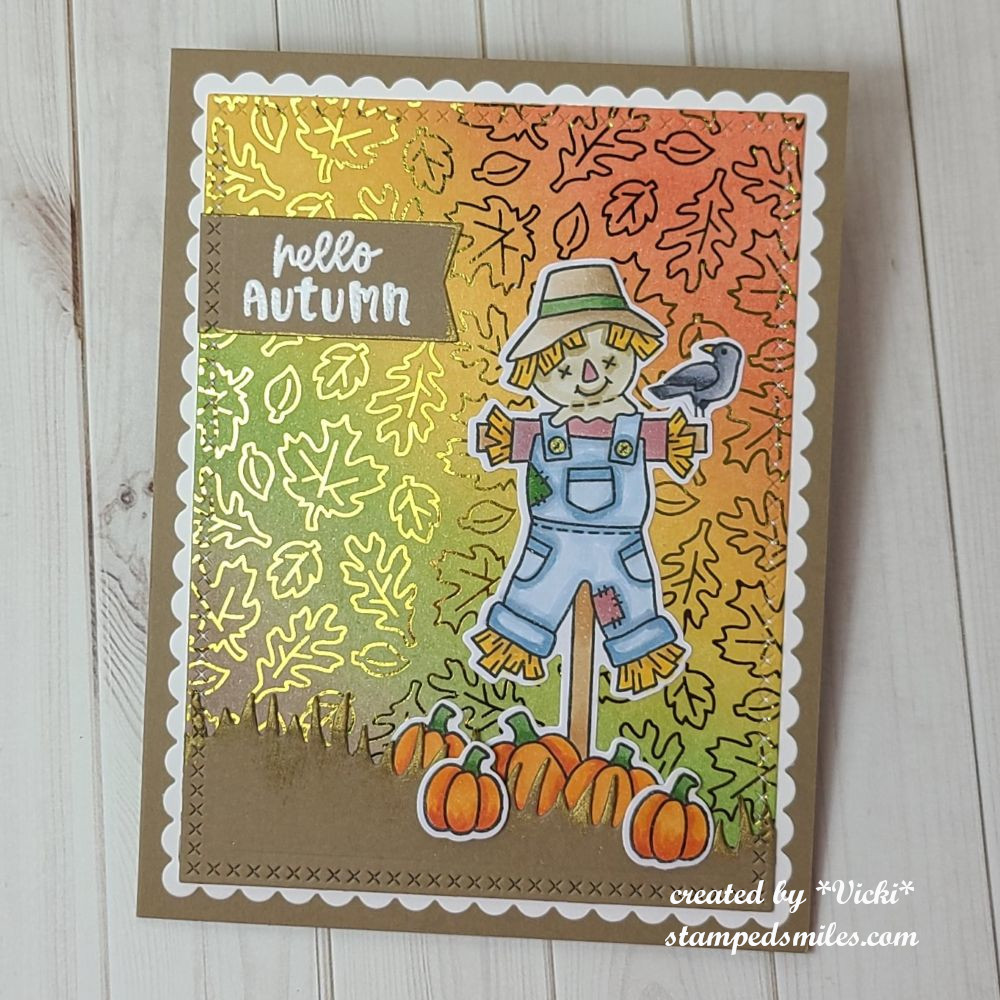
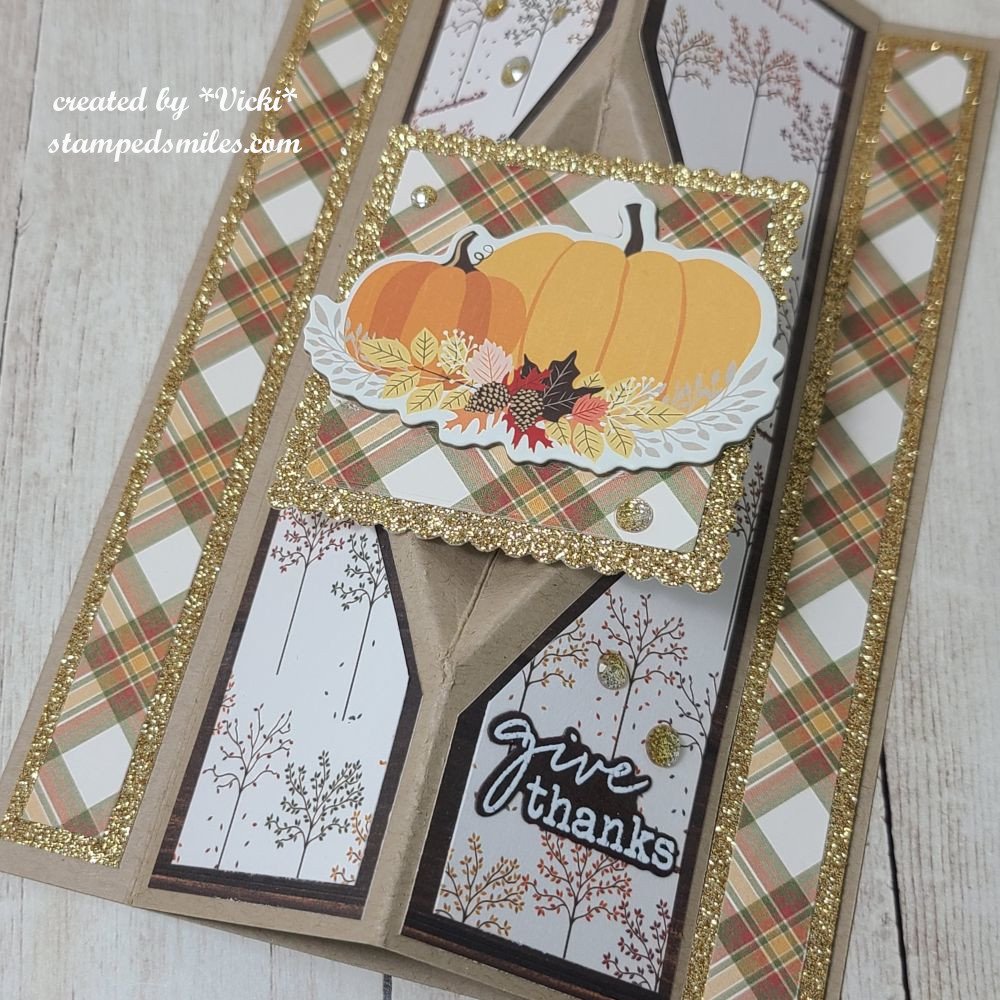
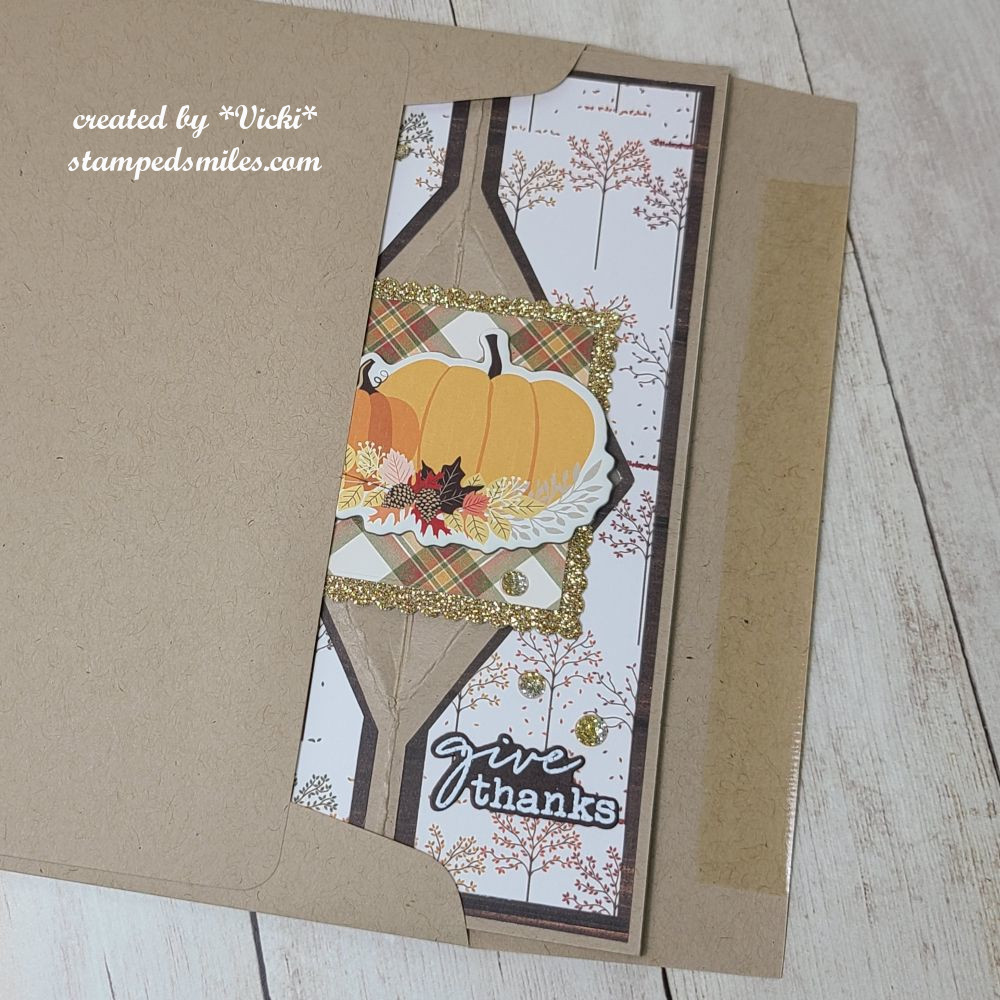
I fell in love with this cute scarecrow from Newton’s Nook called Autumn Fields and I knew that I wanted to use it for this challenge.  I colored up the image along with a few pumpkins and cut them out in the coordinating dies.  I was going to add a couple of leaves for the background, but I thought it would be cool to pull out the NN Fabulous Fall Toner Card Fronts and ink blend over it for the background.  So I gold foiled the background and blended some various inks to create the background scene for the scarecrow.

I die cut a grassy hill border from Lawn Fawn and inked the blades with a gold ink pad and layered that onto my foiled leaves background.  I tucked in the scarecrow and pumpkins for grounding and then white heat embossed a sentiment (from the scarecrow set) that was cut out with a banner die (from MFT- closed).  I also used the gold ink pad around that as well.

I cut out the entire layered panel with a cross-stitched rectangle die from Lawn Fawn and then used a scalloped rectangle die from Taylored Expressions cut from white cardstock to layer behind it.  I attached everything to an A2 side folding card base in the Latte color from Taylored Expressions.

  • Hope you’ve enjoyed my card and will hop on over to the challenge blog to check out what the rest of the design team has made for inspiration.

THANKS SO MUCH FOR STOPPING BY TODAY!!

Challenges:

  1. Try it On Tuesday – Autumn Colors
  2. Pammie’s Inky Pinkies – PIP2541 Anything Goes
  3. Four Seasons – Anything Goes Fall
  4. Pearly Sparkles Pumpkins and/or Fall Leaves
  5. Creative Fingers Anything Goes
  6. Stamping Sensations – Autumn/Anything Goes
  7. We Love Stamping – Anything Autumn/Anything Goes
  8. Cupcake Inspirations Fall Harvest
  9. Aud Sentiments Ink Blending and/or Fall/Thanksgiving + sentiment

September AJ Page-Quiet Beauty

Hello friends!  I do not even know where this month went!  Wow!  I guess life has a way of keeping us busy and sometimes we just need to make time to take time.  I do hope that you’re having a great September month and looking to the Autumn season.  It’s my favorite season to be out in…I still need the cooler weather though!  I’m hoping for it soon!

Can’t believe it, but it’s time for another monthly AJ page with my crafty friend Carol (from Crafty-Stamper) who is collaborating with me to “SMASH OUR STASH”! We get creative trying to use up our never-ending stash piles along with a prompt for each month.  I know she always has great inspiration to share, so please check out her blog too! Here’s my AJ page with the “SMASH OUR STASHSEPTEMBER prompt of “WOOD”: 

Although the temps are still unseasonably warm right now, I’m dreaming of those pretty Autumn colors and cooler temps!  I decided to get lots of inks out and make a background for this one to display my leaves across it.

For the background:  I started with a kraft piece of cardstock measuring my usual 8.5″x 5.5″ size and then at every 3/4″ I scored a line across the longer side edge.  So, using the score marks with the texture line facing up at me, I swiped  a few colors of distress inks in Vintage Photo, Walnut Stain, Rusty Hinge and Black Soot.  I then took a flat DRY paint brush and brushed down over the ink marks I swiped to brighten the colors.  It’s such a simple technique to make a background!

I definitely “shopped my stash” this time and pulled out a VERY old Stampin’ Up! stamp set called “Wonderfall” and the Bigz die to cut them out.  Those were the days where we didn’t have a MISTI tool to help us line stamps up! LOL  It’s much easier now with the MISTI!  So I splattered all of the leaves after the die cutting and stamping with metallic gold watercolor, brown and white Copic Opaque white.  I arranged them all over the background and attached them.

Here’s a closer view of the background so you can see how I’ve done it along with the details on the leaves.

For the sentiment, I die cut some letters from gold metallic foil cardstock and attached to background.  I used my computer to print out the other words and die cut them out with a banner die and sponged the edges.  I used foam tape to pop up the one over the leaf.

Lastly, I used some gold glitter drops to add a bit of sparkle to it.

  • Thanks so much for dropping in today!  I hope you’ve enjoyed my art journal page today!  I hope you’re able to get outside and enjoy your weekend!

Challenges:

  1. Art Journal Journey – Make Your Own Background (wood panel/plank background with inks)

A Single Flower at Sparkles Monthly

Hello friends!  Welcome to the start of a new week for mid-September!  I think Summer actually DID come back to us as we’ve set record high heats for this time of the year!  I think I’m ready for those cooler temps to come back! Ugh!  I know it won’t be long now and we can start enjoying trips outdoors as we look forward to picking apples and all Autumn festivities that we do!

Today is time to share a new challenge over at Sparkles Monthly and we have the theme of “USE A SNGLE FLOWER (floral image)  this month.  Flowers seem to be everyone’s favorite.  Here’s what I came up with: 

Mine is a single sunflower image.  My husband planting them in our backyard this year and they were so pretty!  Of course, I forgot to take a photo of one before they died off.

The items I’ve used came from an older card kit from Simon Says Stamp including the stamp set called Sunflower Fields.  There is a single sunflower image that I thought would be perfect for this challenge, plus I can use more items from my stash!

For the size of the flower image, I wanted it to stand out, so I used a tag and twine from the kit and decided to make this a mini slim card size.

For the background:  I used a piece of watercolor cardstock and gold heat embossed the “Romantic Script” background stamp (retired) from My Favorite Things and then used some oxide inks swiped on glass with spritzed water to make a “smooshed” background.  I also used these same colors to watercolor my flower with. (except the green, I only used that for the flower)  I also used some gold watercolor to splatter over the tag.  I only splattered the tag because I didn’t think it would show very much over the card background.

I cut the smooshed watercolor panel to fit over a kraft side folding mini slimline card base.  I die cut the flower and the sentiment to attach over the tag, added some twine and then used foam tape to pop it up over the ink smooshed background.  Lastly, I’ve added some yellow sequins to finish it off.

I hope you will take some time to pull out a single flower and join us in the challenge this month!  Looking forward to seeing your creations!  Thanks so much for dropping by!

Challenges:

  1. Creative Inspirations Anything Goes
  2. Ellibelle’s Garden Party Anything In or From a Garden
  3. Creative Fingers Anything Goes
  4. Lil’ Patch of Crafty Friends Anything Goes
  5. Penny’s Anything Goes Using Paper
  6. Love to Craft Anything Goes
  7. Crafts Galore Encore Anything Goes

K is for Keep It Simple (CAS)

Hello friends and happy Friday!  The weather has decided to cool down quite a bit over the last couple of days and it’s been very nice to have the windows open for a change!  I think we’re supposed to have another spell of warm weather, but I’ll take the cool down for now!

Today is a new challenge over at the Alphabet Challenge Blog!  Our next letter is “K”, and the hostess has chosen “K is for KEEP IT SIMPLE (CAS style)   *Please remember that this is a bi-weekly challenge, so you have two weeks to enter.*  I hope you’ll join in the fun with us.  Here’s the project I’ve made for this challenge:

That cat is not a fan of winter! LOL  I do love me some snark for the Holidays, so I thought this stamp set called “Holiday Grumplings” (retired stamp set) from Taylored Expressions would be great for a simple Holiday card.

I also think that CAS style cards are great for pulling out those left over scraps from your papers for little strips to create a simple layout, so that’s what I did here.  I stamped, colored with Copics the kitty and popped him/her up with foam tape over the snowflake strip.

Lastly, I just added a light brush with pink ink to the left of the kitty and then gold heat embossed the sentiment over it.  Placed the white panel over a pink A2 sized top folding card base and done.

  • I’m happy to report that I’ve spent some time going through my stash of cards and realized that I have several already finished and ready for sending out Christmas cards!  So I’m basically DONE for Christmas cards!  Yay!  The first time ever that I’m ready ahead of time!  NOW…hopefully I’ll send them out on time too! LOL

Hope you’ve enjoyed my card today and helped to inspire you to “KEEP YOUR CRAFTING SIMPLE” and join us for the challenge!  Look forward to seeing what you make!  Thanks so much for stopping in today! 

Challenges:

  1. Critter Crazy Anything Goes with Featured Critter
  2. Crafty Animals Anything Goes including Animal
  3. Pammie’s Inky Pinkies – PIP2535 Anything Goes
  4. Merry Little Christmas Anything Christmas Goes
  5. Creative Inspirations Christmas in September

Mix It Up with a Fancy Fold

Happy September friends!  Can you believe we’re getting ready to get into the Autumn season already?!  It seems like the summer flew by, but I have to say that I’m so very ready for the falling leaves and all things Autumn to start up now…especially cooler temps!

Today also brings us to a new challenge over at the Mix It Up Challenge Blog.    The challenges always run for 6 weeks so there is plenty of time to enter.  The theme given for us this time is: Fancy Folds or you can always do the ‘Anything Goes” too.  Here’s the card that I came up with for the challenge using the theme:

This is a something I came across a while back and saved the tutorial for later to give it a go.  This is called a “Faceted Vertical Easel Card” and this is a 5″x7″ size.  I would give you a link to the tutorial, but when I started creating half-way through to come upon the layers, I noticed the measurements were not quite right, so I had to figure out an adjustment to make it work correctly.  I do love the look of it with its unique faceted design.  It’s basically just an easel style card with a bit of a design in the center fold area and going vertical instead of horizontal.  (If I make another again, I’ve decided another easier way to work it.

Since I was in the mood for the Autumn season, I decided to make my design with that in mind.  I started with a kraft cardstock base measuring 10″x7″ with all of the different scores/cuts for this design as well.  For decorating it, I’ve pulled out some Autumn papers by Photoplay in my stash and added a layer of glitter gold cardstock.  To make square aperture with the pumpkins, I pull a cardboard cutout from the paper pack to use with it, and then white heat embossed a sentiment and die cut to place on the bottom right of card.  Lastly, I’ve added some gold gems to both panels as well as the square panel in the center of the card.

I think what I like most about this is that it folds completely flat for mailing in an envelope.  Once the recipient receives it, you can slide it open to catch the strip on the right side of the card and it will stand up like the first photo in this post.

  • I hope you’ve enjoyed my fancy fold card today and you’ll hop on over to the challenge blog to see what the rest of the team has come up with.  I look forward to seeing the gallery and what fancy folds will be in there!

Thanks so much for stopping in today!  Have a great day!

Challenges:

  1. Creative Creases Anything with a fun fold
  2. Penny’s challenge Anything Goes using paper
  3. Simon Says Stamp Wednesday – Anything Goes
  4. The Four Seasons Challenge – Fall
  5. The Crafter’s Cafe Anything Goes optional:  Use Pattern Papers
  6. The Creative Crafters Anything Goes

August AJ Page-Good-bye Summer

Hello friends!  Here we are at the end of August already!  I’ve already been feeling the Autumn vibes, so I thought I’d create with Summer one more time.  There is still a few more weeks left of Summer, so let’s enjoy it!

Wanted to share a photo that hubby took a really good close-up shot of a bumble bee enjoying the last bit of summer blooms on one of our flowers in the back yard the other day.  He is covered in pollen!  I love the bright colors in the flower.

Speaking of bright colors, today starts another monthly AJ page with my crafty friend Carol (from Crafty-Stamper) who is collaborating with me to “SMASH OUR STASH”! We get creative trying to use up our never-ending stash piles along with a prompt for each month.  I know she always has great inspiration to share, so please check out her blog too! Here’s my AJ page with the “SMASH OUR STASHAUGUST prompt of “BRIGHT/HAPPY COLORS”: 

Bright and happy colors to me are those sunny yellows, citrus and basically a rainbow of bright colors.  I tried to reflect this with my page using mainly blended ink colors, but I also used some watercolor and paint too.

FOR THE BACKGROUND:  I used a 5.5″ x 8.5″ piece of Bristol Smooth Watercolor cardstock.  I covered the background with a light wash of blue watercolor and let it dry.  I took a stencil from My Favorite Things (closed) called “Sun Ray” and went over the background with yellow paint applying with a watered-down sponge.  Once that was dry, I splattered the entire background with some metallic gold watercolor.  I covered the bottom portion of the page with some wood plank background paper. (I like to make my own book to add my finished pages in.)

The “Summer” lettering was die cut with white cardstock and then ink blended with several different bright colors.  I stamped out the lettering above it.  Both the stamp and dies came from Lawn Fawn.

Here’s a closer view of the drink glass I created using some die sets from Taylored Expressions called Summertime Sips.  There was the glass that I lightly ink blended around the edges and then for the separate die for inside the glass, I ink blended a few different colors for that tropical drink look.  There are also ice cube dies that I cut from glitter cardstock to put in there.  I cut another glass from vellum and then cut the stem of it so that I could attach it to the front of the glass which is where I added all of the items inside to make it look see-though. 

The straw and the umbrella were cut in white and then ink blended and put together for the glass.  I also took the TE Fresh Squeezed die set to cut more pieces from white cardstock and then I ink blended some green and orange colors over them to arrange around my cup.  The green slice on the top of the cup was cut with scissors so that I could add it to the inside of the glass rim.  I covered the inside of these citruses with a glitter brush pen.

Lastly, I took a black detail pen to make lines around the edges of the page and also the stitch marks within the lettering and around the sentiment strip at the bottom.  This was printed from computer and ink blended with yellow ink.

  • Thanks so much for stopping in today!  Hope you’ve enjoyed my page!  Have a wonderful weekend!

Challenges:

  1.  Art Journal Journey – Hot Summer (Nights and Days)
  2. Creative Artiste Anything Goes Mixed Media
  3. Anything Goes in a Card Free Zone – August -No Cards

And speaking of bright and happy, I know a few people have mentioned my new grandson and wondering if I get to see him.  My answer to that is every single chance I can get! LOL  He’s growing so very fast!  He came for a visit for lunch…well grandma fed him his bottle.

I will be getting to see him again VERY soon and I’m so excited!  How can you resist that face!?

Thought I’d share a little update to make you smile! 😉

J is for JUMP

Happy Friday friends! 🎉 I see that we are nearing the end of August and that it’s time for kids to get back to school, which means, Autumn is heading our way!  I think I’m ready for cooler weather right now!  I just love all things Fall as it’s my favorite time of the year!  What is your favorite season?

Today starts up a new challenge over at the Alphabet Challenge Blog!  Our next letter is “J”, and the hostess has chosen “J is for JUMP (this can be anything that jumps!)   *Please remember that this is a bi-weekly challenge, so you have two weeks to enter.*  I hope you’ll join in the fun with us.  Here’s the project I’ve made for this challenge:

I knew when I saw the theme for this challenge that I had to use a pile of leaves for “jump“!  I also think the best critters for that would come from Lawn Fawn of course!  Can you see the little “wee” mouse jumping out from the pile?!

I started with a white card front by blending some blue inks in the background for the sky.  I also used the Lawn Fawn Leafy Tree Backdrop: Portrait die to go over my ink blended sky background.  The frame and tree were cut out from dark brown woodgrain texture cardstock.  I used some green cardstock to cut the circle from the die set to place behind the tree as well as the LF Grassy Hillside Border die behind the tree and frame as well.

For the Autumn leaves pile and sentiment, I used the LF Jump for Joy stamp set/dies.  All images were colored with Copics and I white heat embossed the sentiment over the ink blended sky.  For the mice critters, I used the LF You Autumn Know stamp set/dies.  For the little bunny, I used the LF Butterfly Kisses stamp set/dies.  Some of the die cut images were just attached and others were popped up with foam tape for dimension.  I actually wanted my pile of leaves to be larger, so I stamped, colored and die cut two of them.  (I needed that little mouse on the right to be jumping out from the pile too!)

This was a fun one to make because I kept pulling out different sets to figure out which critters I wanted to use, but these cute mice get me every time.  It makes me look forward to seeing the colors, sights, smells and sounds of Autumn coming.  I hope you’ve enjoyed it too and I look forward to seeing all of the “jumping” that will appear in the gallery!

Thanks so much for stopping in today!  Have a great weekend!

Challenges:

  1. Ally’s Angels Anything Goes
  2. The Creative Crafters Anything Goes
  3. Sweet Stampin’ – Animals
  4. Lil’ Patch of Crafty Friends Anything Goes
  5. Pammie’s Inky Pinkies – PIP2533 Anything Goes
  6. Creative Inspirations – Anything Goes
  7. Craft Rocket Animals

I is for Ink Blending

Hello friends and happy August!  Hope you’ve been having a good start to your month so far.  I thought it was supposed to be the “lazy days of Summer”, but it sure isn’t feeling that way lately! LOL Now it seems like we’re getting ready for “back to school” time!  Where is this year going?!

Just wanted to share a new challenge up today over at the Alphabet Challenge Blog!  Our next letter is “I” and the hostess has chosen “I is for Ink Blending”   *Please remember that this is a bi-weekly challenge, so you have two weeks to enter.*  I hope you’ll join in the fun with us.  Here’s the project I’ve made for this challenge:

I sure love to do some ink blending!  I love doing the dark to light with a watermark effect especially for ocean scenes.  So I started with a regular blend of blue ink colors starting light at the top and then working my way down to darker blues.  I think the colors used were Tumbled Glass, Salty Ocean, Blueprint Sketch and Blue Saphire Distress Oxide inks.  I then added the “Ray of Light” stencil (MFT store closed) over and ink blended with the same colors.  It was then spritzed with water and dabbed with paper towel for the bubbly look.

BEFORE I started any ink blending at all, I had an “Under the Sea” border die cut (MFT store closed) that I used to create a mask with labeling tape so that I could leave the border at the bottom for sand.  After the ink blending was finished, I ink blended some Antique Linen and Frayed Burlap Oxide inks to create the sand.  I didn’t worry about it getting into the blue area because the colors are much lighter in tone.  After ink blending was done, I cut the panel out with a “Wavy Pierced Rectangle dies” From Whimsy Stamps.

For the rest of the scene, I pulled out these cute ocean critters from Doodlebug called “Sea Life” (purchased from Scrapbook.com) that I stamped, colored with Copics and then fussy cut.  Even though I had the coordinating dies (no longer available), I didn’t want the white border to distract from the ocean scene.  It did come with an extra “seaweed” die in the set that I just cut out in white cardstock and then ink blended some green colors over it to add to the scene.  I also used a white gel pen for highlights and dots in the sand along with a brown marker and glitter gel pen for more details to the sand.

Here’s a closer view of some of the details. I tried tilting it slightly, but it’s hard to capture the sparkle from the sand with the glitter gel pen.

I know this looks really similar to my last post with the mermaid AJ page, but I think I was having some fun with these underwater projects, and I just sat and had a playing session with it.  I do hope you’ve enjoyed my card today and will join us in the challenge for some ink blending fun too!

Thanks so much for dropping by today! Have a great weekend!

Challenges:

  1. Four Season – Anything Goes Summer
  2. Critter Crazy Anything Goes with Featured Critter
  3. Pearly Sparkles Under the Sea
  4. Sweet Stampin’ – Use a Stencil + stamping
  5. Try it On Tuesday – Summer
  6. Cardz for Galz Create a Scene
  7. Crafty Animals Anything Goes with Animal(s)
  8. Allsorts Animals/Anything Goes (various products mentioned and linked throughout the post)

Summer Days

Hello friends!  I hope that you’re staying cool during these Summer days!  For the most part, it’s too warm, humid or both outside, so I spend most days in the air condition.  Trying to organize things is what I’m attempting, but I end up crafting instead! LOL

I’m stopping by today to share that we have a new challenge over at Sparkles Monthly and we have the theme of “SUMMER DAYS  this month.  This seems rather appropriate right now, so I hope you’ll join us.  Here’s what I came up with: 

I have used these penguins many times and I just love them!  This is an older set called “Penguins in Paradise” from My Favorite Things (store closed).  I thought they’d be perfect to use for this theme and I wanted to make a scene for them to do all of those fun Summer things that we do!

I started with another My Favorite Things die set called “Beach Scene Starter” that cuts out the sand/water/palm tree/shells/sun/clouds/land and then I used inks to ink blend them in various colors.  For the sand, I splattered several different watercolor colors and Copic Opaque White.

After placing my scene together, I stamped, colored (with Copics) and die cut the three penguins and beach ball that I added to my beach scene and popped up with thin foam tape.

I used a white gel pen to add highlights to the images as well as details to the water shore area, coconuts, beach ball and the shells.  I also took a glitter brush pen and went over the sun as well as the penguin’s shades for some shimmer.  The sentiment is from the  Taylored Expressions Mini Strips-Hello Summer that was white heat embossed over dark blue cardstock and cut out with the mini sentiment strips die.

I hope you’ve enjoyed my card today and will join us for the challenge this month!  Please be sure to stop by the blog to check out the inspiration from the rest of the team!

Thanks for stopping in and I’ll see you soon!

Challenges:

  1. Four Seasons – Summer
  2. Love to Craft Anything Goes
  3. Love to Scrap Anything Goes
  4. Crafty Animals Anything Goes + Critter
  5. Creative Moments Use Die Cut (I used several)
  6. We Love Stamping – Sun/Sea/Sand or Anything Goes (within post details)
  7. A Cut Above – Anything Goes with a Die Cut
  8. Cupcake Inspirations For the Birds (penguins)

Lots of Stamp Joy and Summer School Sessions!

Hello friends!  I hope you’ve had a wonderful week and looking forward to a great weekend coming up!  We are having a heat advisory for the next several days over my way, so I thought it would be a great idea to stay indoors and craft!  I also thought this would be a great time to catch up with some posts sharing some things that I’ve worked on the first part of this year that I hadn’t gotten a chance to share with you.

  • LONG POST – pull up your chair with your favorite beverage and enjoy!

I thought I’d share the Taylored Expressions Virtual Stamp Joy that I did back in March.  I actually spent the weekend attending the classes and creating as I followed along.  I managed to get all of the projects done the day after the event was over, but failed to post all of what I had made due to the fact that I was busy helping two different people move…and then life just got really busy after that as well! LOL

*I also have added an additional event from Taylored Expressions this last weekend called “Summer School” which concentrated on foiling techniques.  Although I’ve done foiling before, I sure enjoyed seeing new products and learning a few new techniques too!  (These four cards are at the end of the gallery photos below)*

  • If you’re on my website, just click on the images below to enlarge the photos and view any details underneath each one.  ENJOY!


I always love to learn new things with stamping/crafting along with all of the fun new products that come out too!  I know I REALLY don’t need to purchase more things, but when cool stuff comes out, it’s really hard to pass it by!  I think doing these classes and joining in on different challenges help me to use these fun things up!

So I hope you’ve enjoyed my post sharing all of the things that I’ve been doing!  I will have another post sharing more things that I haven’t shared yet too!  In the meantime, I’ve also been working on a scrapbook which has been fun and something that I haven’t done in a really long time!  A baby can do that to you! LOL

Thanks so much for stopping in today my friends!  I’ll be seeing you soon!  Have a great weekend!😊