Find Peace with a Winter Deer

Hello friends!  As I had mentioned in yesterday’s post, we are currently being hit with snow AND ice over my way…so I might as well embrace it, right?!   Although I’ve been trying to sneak in some Spring creations, I also enjoy creating Christmas/Winter cards throughout the year so that I can take my time and not be hurried during the rush of the Season at the end of the year which makes it more enjoyable…and peaceful! 🙂

I’m using a stamp set called Winter Deer which I’ve used on my card for today:

Vicki-SnSWinterDeer-Feb

I started out with a piece of watercolor paper and used the Blue Blitz and Atlantis Burst Nuvo Shimmer Powders to create the background by spritzing it with water until I achieved the look I wanted and set aside to dry.

I cut this panel out with an oval die and using my cut-out deer for reference to see where I wanted to position the sentiment, I embossed the sentiment from the stamp set with White EP.  I used some Magic Speckle EP for a really cool background effect over the watercolor panel! (You can see it better in the photos below.)  I’ve used both Dimensional Glue as well as foam dots to attach the deer image and oval layers together.  I’ve used both white cardstock as well as some gold mirror cardstock for the layered panels.

Vicki-SnSWinterDeer-Feb-Close

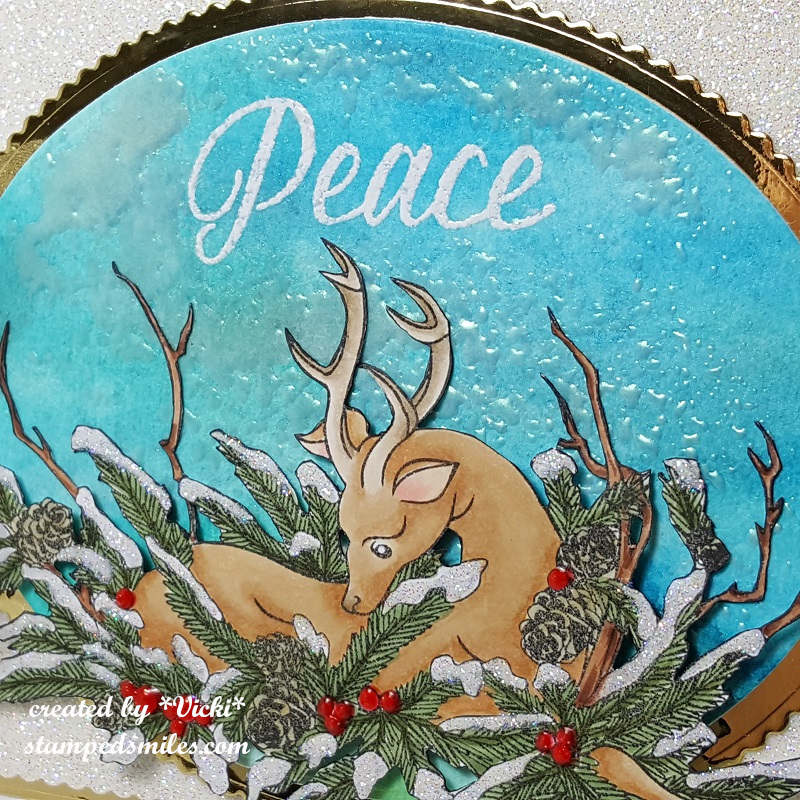
Here’s a closer look at the Copic coloring I’ve done on the deer as well as the Magic Speckle EP effect on the background!  Since it’s a thicker type of powder, I didn’t attach it with anything.  I just added “piles” of it where I wanted and melted it from underneath, so it didn’t blow all over.  Loving how it has that “icy look” to it!

For the deer, I’ve used my Tim Holtz 5″ Mini Scissors to VERY carefully cut this image out and then used a black marker to go along the edges to hide my imperfections. For the snow over the branches, I’ve used a Nuvo Precision Glue Pen to go over it and then sprinkle some Sparkling Snow Glitter over it.  I also took the Nuvo Red Berry Crystal Drops and covered the “berries” with it.  I set this aside until dry to work on the rest of my card.

Vicki-SnSWinterDeer-Feb-Flat

So for the glittery background panel behind the oval layers, I took a piece of white cardstock and attached it with a piece of the Adhesive Sheets and die cut it out with a scallop rectangle die.  I removed the release paper from it and burnished some of the same Sparkling Snow Glitter into this panel.  I attached it over another piece of gold mirror cardstock and then wrapped some organdy ribbon around it and attached a bow along the side.

In the center of the bow, I added a snowflake sequin and then put a dot of the Dimensional Glue in the center of it and then added some more of the Sparkling Snow Glitter.

These layers were attached to an A2 sized top folding white card base and then the oval layers were attached over the glitter panel next to the bow.

I hope you’ve enjoyed my card today and got inspired to keep ahead of making your Christmas cards this year!  Thank you so much for dropping in!  I really appreciate your kindness and support so much!!  (Reading your comments always brightens my day more than you know! HUGS)

Challenges I’d like to enter this card for:

  1.  Winter Wonderland – Anything Christmas Goes
  2. Merry Little Christmas – (MLCCB7) Anything Christmas Goes
  3. The Holly and Ivy Christmas Challenge – Anything Christmas
  4. 4 Crafty Chicks – Lots of Layers
  5. Happy Little Stampers – Anything Goes with Dies
  6. Allsorts – Winter Sparkle

Fistful of Flowers From Whimsy Stamps

Hello friends!  Hope that you are having a great week so far!  There is plenty of ice and snow over my way for the next several days, so I thought I would bring a little ‘happy’ today with a “Fistful of Flowers” from Whimsy Stamps!

Vicki-WSFistfulofFlowers-Feb12

Isn’t she the cutest?!  This was originally released as a rubber stamp from Crissy Armstrong, but this month it has been released in digital format now as well!

I have to be honest and say that after I had colored in the image, I was struggling with the colors of cardstock I wanted to use, and it seemed that anything I picked out wasn’t quite working.  (You ever have this problem?)  My hubby came in to visit me and I told him I was struggling, so he took me over to my paper and picked out these colors and I liked it, so I went with it!  Did he do good? 🙂

I have cut a piece of yellow cardstock out and then took the WS Mom’s Layered Flowers clear stamp set and white heat embossed the background with one of the daisy images.  I wrapped a piece of white ribbon around the yellow embossed piece that was also mounted onto a white 4.25 x 5.5 card front piece.  After wrapping the ribbon around both pieces, I added a bow and this panel was then mounted onto a white top folding A2 sized card base.

The colored image panel was layered with a blue cardstock which I’ve also cut a piece for a fishtail banner and added some daisy accent flowers to it.

Vicki-WSFistfulofFlowers-Feb12-close

                    This cutie has been colored up with the following Copics:

  • Jeans & Bow tie on shirt – B97, B95, B93, B34
  • Shirt & Hair Bows – R85, R83, R81
  • Flower Petals & White Band on Shirt – BG000 (also around image)
  • Flowers – center:  Y17 – Leaves/Stems: YG67, YG63, YG61
  • Grass – G24, G21, G20
  • Hair – YR30, E41, E43, E44, V95
  • Skin – E21, E11, E00, E000, R20

I took a glue pen and added some clear glitter over the edge of the flower petals for a bit of sparkle.  You can see that the daisy accents also have some light touches of glitter on the edges as well.

Vicki-WSFistfulofFlowers-Feb12-flat

So I hope you’ve enjoyed my card today and thanks for dropping by!

Challenges I’d like to enter this card for:

  1.  Crafting With an Attitude – Anything Goes
  2. Creative Fingers – Anything Goes
  3. QKR Stampede – #334 Anything Goes
  4. Crafty Friends – Anything Goes
  5. Pammie’s Inky Pinkies – PIP1906 Anything Goes
  6. Shopping Our Stash – Make Your Mark (colored with markers)

Anything Goes at Cute Card Thursday!

Happy Thursday friends! 🙂  It’s Thursday and that means it’s time for a NEW Cute Card Thursday challenge this week!  So this week it’s our beginning of the month “ANYTHING GOES” challenge!  We can’t wait to see your creations!

Our sponsor for this challenge is Whimsy Stamps.

Vicki-WS-ThinkSpringBunnies-Feb7

Are YOU thinking Spring too?!  I am, but I don’t think it’s working very well with the snow, cold and ice we’ve been getting! LOL!  So I will stay warm inside and bring my thoughts of Spring to my craft room!

I am using this really sweet digital image from Whimsy Stamps called Think Spring Bunnies by Crissy Armstrong.  It was previously released as a rubber stamp, but now it’s available in digital format!  I have printed out this image and used the following Copic Markers for coloring:

  1.  Bunnies – W5, W3, W1, W0, E33, E31, E30, C3, C1, C0 (tails)-, E44, E42, E40, Blender 0 (spotted bunny)
  2. spotted bunny inside ears, nose face – R20, R00
  3. Wooden sign – E25, E23, E21 (E23 used for center of yellow flowers)
  4. flowers – Y17, Y15, Y11, V17, V12 – YG67, YG61 (leaves/stems)
  5. grass – G24, G21, G20
  6. butterfly – Y11, R00
  7. sky around image – B01, B00, B000, B0000

Vicki-WS-ThinkSpringBunnies-Feb7-close

Here’s a closer view of the colored image.  I have also used a white gel pen in the bunny’s tails as well as the spotted bunny’s cheeks.  I also took a Wink of Stella clear glitter brush pen to go over the butterfly and the flying bug’s wings.

It was so fun to color these furry bunny butts!! 🙂

Vicki-WS-ThinkSpringBunnies-Feb7-flat

I’ve used some of the digital papers released last month called Oh Boy…really loving the ginghams in this set!  So, I’ve cut out both these papers along with some solid yellow papers (from same set) and the colored bunny strip with the Whimsy Stamps Hand Stitched Nested Rectangles dies.  I also took a strip of gray colored cardstock and used an older border die from Whimsy Stamps to create the scalloped edge.

These were all layered onto a white A2 sized top folding card base.  I wrapped some twine along the edge and tied it in a bow and then lastly, I’ve added some yellow crystals from Pretty Pink Posh randomly over the card.

Challenges:

  1.  Crafty Animals – Anything Goes + animal
  2. A Bit More Time to Craft – Anything Goes
  3. Crazy 4 Challenges (C4C469) – Ground Hog or Critter
  4. Send a Smile 4 Kids – Anything Goes/Easter/Spring
  5. 613 Avenue Create – Anything Goes with optional: use a critter
  6. Crafting From the Heart – Anything Goes

May Day Floral Wreath

Hello friends!  With the cold weather and ice around my area, I thought it would be nice to turn my attention towards the month of May with my creation today:

Vicki-SNSFloralNosegayWreath-Feb

I have used this digital stamp set called May Day Floral Nosegay.  I have printed out the pre-colored floral images and fussy cut them out for this card.  The sentiment in the center of the wreath is also from this same set which I’ve printed out as well and then cut it out with the Tonic Scalloped Squares Basic die set and sponged around the edges with some blue ink.

For the wreath, I’ve used the Tonic Rococo Fern Garland die and cut it out once in green cardstock and another in white cardstock.  For the white one I cut the ribbon area only and covered this piece with VersaMark ink which was heat embossed with some Sweetheart EP.  (This is such a pretty EP with lots of sparkle!  See below!)

Vicki-SNSFloralNosegayWreath-Feb-close

I also heat embossed this same Sweetheart EP along the edges of a white cardstock that I cut out to layer behind the wreath panel.  The heat embossed bow was glued over the green wreath and then the entire wreath was centered over the sentiment panel.  I also then layered these panels onto a piece of black cardstock.  I also put some craft foam behind this panel for some dimension on my card.

Vicki-SNSFloralNosegayWreath-Feb-closer

For the tiny flowers behind a couple of the white flowers, I took my Clear Mark Embossing Pen and heat embossed the very tips with the same EP as above.  All of these cut flowers were attached with the Dimensional Glue onto the wreath with a couple popped up for dimension.  I also took some Nuvo Honey Gold Glitter Drops for the centers of the flowers as you can see in the photo above.

Vicki-SNSFloralNosegayWreath-Feb-flat

Lastly, for the base of my card, I cut a piece of A2 sized top folding card base with a light blue cardstock.  I also used this same cardstock color to cut out a couple of pieces using the Tonic Elegant Columns die set…so pretty!  I sponged some white ink around the edges of them and attached them to the card base.  I cut off the edges that were sticking out with my scissors.

Hope you’ve been inspired by my creation today and I thank you so much for stopping by!!  See you soon!

Challenges:

  1.  4 Crafty Chicks – Anything Goes
  2. CRAFT – Anything Goes
  3. Moving Along With the Times – Add a Sentiment
  4. A Perfect Time to Craft – Anything Goes
  5. Crafty Catz – Anything Goes + optional:  Lots of Layers
  6. Papercraft – Something New (new stamp set, dies, EP, flowers)

Whimsy Stamps New Digital Release – Willow

Hello friends!  So are you having a Super Bowl party today?  It’s always been sort of a little “thing” at our house each year since my kids were little….they were in it for the snacks of course!  LOL!

Today I want to share with you a card I made with one of the brand new February digital releases from Whimsy Stamps!

Vicki-WS-Willow-Feb3

I have used this darling little Willow girl on my card today!  Oh, those eyes are so catching on her!  (Had to make them a pretty blue!)  I have colored her up with the following Copic markers:

  1.  Dress, hair bows, shoe bows – R85, R83, R81, R00
  2. Flowers – Y17, Y15, Y11, V17, V12, YG63, YG61
  3. Shoes, Socks – E84, E81, BG000
  4. Hair – E27, E25, E23, E21
  5. Skin, Eyes – E21, E11, E00, E000, R20, R00, BG49, BG45
  6. Around image – C1 (white gel dots on cheeks and eyes)

First, I took the Whimsy Stamps Notched Rectangles die set and cut out the colored image.  Then I thought those yellow flowers she’s holding needed to be brought out a bit so I took the smaller flower image from the Whimsy Stamps Mom’s Layered Flowers clear stamp set and stamped it with yellow ink around the edges and die cut a scalloped rectangle layer with a suede brown cardstock to layer behind it.  I sponged around the edges with some Brushed Corduroy distress ink and ink foam blending tool.  I did the same to the left edge of the white A2 sized top folding card base.

For the right side of the card base, I took some of the Oh Boy digital papers from last month’s release and attached it.  Then I took the sentiment from the same floral clear stamp set as mentioned above and stamped it with some brown ink at the bottom right corner of the card.

Vicki-WS-Willow-Feb3-close

Here’s a closer view of the coloring on my image.  You can see the yellow glittered hearts and those piercing blue eyes!

I then took the layered image panel and attached it to some craft foam and added it to the center of the card design.  Lastly, I stamped a couple of hearts from the same stamp set mentioned above and filled them with some yellow glitter and added pearls to the corners.

Vicki-WS-Willow-Feb3-flat

Please be sure to stop by the Whimsy Stamps store to check out all of the brand-new February release.

Challenges:

  1.  City Crafter – Floral Background
  2. Addicted to Stamps & More – Anything Goes
  3. Watercooler Wednesday – WWC206 Anything Goes
  4. CCEE Stampers – CCEE1905 National ‘Thank You’ month
  5. Creative Knockouts – Flower Power

Mixed Media Wall Hanging

Hello friends!  I’m back again to share a mixed media wall plaque that I’ve made:

vicki-vaseofflowers-wallhanging-project3

It’s been a while since I’ve made any mixed media projects, so it was nice to be able to “get messy” and use some media products that I don’t pull out often enough!

So I started out the image panel thinking I was going to make a card with it, but then it felt like it was too large, so I decided I was going to make a Vintage style wall plaque with it instead!  I had this plaque hanging around my room for about a year knowing that at some point I wanted to do something with it, so this felt like the opportunity I needed to get a project going.

vicki-vaseofflowers6

I’ve used a January release stamp set from Bugaboo called Vase of Flowers stamp set.  I colored it with Copic markers except for the pink flowers and butterflies.  I covered the flowers with the Pink Fizz glitter and the butterflies with the Canary flocking.  I cut out the image panel with the Tonic Loopy Lace Oval Die and added it to a piece of cardstock that was covered with the Super Adhesive Sheets.  I then covered the entire panel with the same Pink Fizz glitter and burnished into the background.

vicki-vaseofflowers7

Shown at a different angle, you can see all of the dimension and detail of the design.

I have also covered the flowers using some Brushable Glue and brushed it over top in certain areas over the flowers and then I sprinkled some Diamond Dust glitter over top of them.

I hope that you were inspired by my mixed media project today and I thank you so much for stopping in as I’m always happy to hear what you think!

Here’s the challenges I’d like to enter:

  1.  Not Just Cards – Anything Goes
  2. Crafty Gals Corner – Make it Sparkle
  3. Stamping Sensations – Fabulously Feminine (Stamped Vase of Flowers rubber stamp and colored it in.)
  4. Creative Moments – Anything Goes
  5. Crafty Calendar – Make it Flowery

Hello Cute Chicks!

Hello friends!  Err…should I say “Cute Chicks”!  🙂

I have some more Whimsy Stamps inspiration to share with you today using this sweet image by Crissy Armstrong called Penguin’s Cute Chicks.  Now it may look familiar to you and that’s because it was originally made as a rubber stamp, but starting with this month’s release it has been released in digital format!  So it’s great to now have both options available to you!

vicki-ws-penguincutechicks-jan22

I am a huge penguin fan and Crissy’s penguins are so fun to color!  I have colored this image with the following Copics:

  1.  Penguin Body, Beak, Feet, Cheeks:  C8, C5, C3, C1, C0 – YR18, YR15, YR12 – R00, R000
  2.  Penguin hat & scarf:  E89, E87, E84, E81
  3.  Chicks:  Y38, Y17, Y15, Y11 – Cheeks:  R00
  4. Chick blue & purple ribbons:  B39, B37, B34 – purple:  V17, V15, V12
  5. Egg shell and around image:  BG000
  6. Grass:  YG67, YG63, YG61

(More up-close details below!)

I have also used some fun digital papers from the January digital release called “Oh Boy” digital papers collection.  (You may remember the “Crateful of Kittens” card that I had previously done which was using these same papers.  I’ve used both the striped and solid papers for my card here.  At the top of the striped papers, I used the Whimsy Stamps Pierced Border Trio dies to cut a curvy border.  I cut another piece like that in black cardstock to layer behind it.

I took the WS Painted Sayings clear stamp set and stamped the greeting in the upper left corner of the image panel and I also used the splatter images from the set and stamped some black splatters over the solid colored digital papers.  Before attaching the striped panel to the solid background, I added some white ribbon with a bow and a black button with a bow twine through it.  I attached this to the solid panel and then attached all layers to a white 5″ square top folding card base.

vicki-ws-penguincutechicks-close

Here’s a closer view of the image with my coloring.  For around the edges of the image panel, I took a glue pen and sprinkled on some clear glitter for a bit of a sparkly touch around the design.  I layered this onto a black piece of cardstock and then added some craft foam behind it for a slight dimension and attached it to the card front.

Hope you’ve enjoyed my card today!  Thanks for stopping by!!  I’ll see you back again tomorrow for another really fun project I made!

Challenges I’d like to enter this card for:

  1.  As You Like It – Pearls or Buttons? (I love to add buttons in the center of bows and with different colors it can work on any style you’re designing.)
  2. Crafting From the Heart – #235 Anything Goes

Enjoy the Changes Life Brings

Hello friends!  Back with you today to share a card I’ve made using the January release stamp set called Early Spring Nest!

vicki-earlyspringnest-cardep-project2

I had so much fun playing with this pretty Spring image and playing with some new embossing powders on this one!

To get the background, I’ve taken a piece of watercolor paper and sprinkled it with some Nuvo Blue Blitz Shimmer Powder and spritzed it with water to also move it around the paper until I got the look I was wanting for it.  I set it aside to work on the rest of my card until it was COMPLETELY dry.  After it dried, I took my Static Free Bag to rub over the area and prep for heat embossing.  I stamped the Crackle Background stamp (Really love the versatility of this image!) with VersaMark and heat set the image with the Robin’s Egg embossing powder.  (Sounded like the perfect product to use for my card!)  I also used my corner chomper to round the corners on this panel.

For the scallop layer behind this panel as well as the layer behind the sentiment, I took my VersaMark ink pad and smeared on a layer around the edges and heat embossed them with the Coffee embossing powder.  I also used this for the sentiment as well as the nest image, so this also works for a nice, detailed embossing powder!   I made the fishtail banner layer before I did the embossing with my Tim Holtz 5″ scissors.  I took some craft foam and attached the front base panel to the embossed scalloped layer which was mounted onto a white A2 sized top folding card base.

Here’s a closer look at the stamped Crackle background with the Robin’s Egg heat embossing over the watercolor background.  I just love the shimmer it has in it!  You can also see the Coffee heat embossed layers.  I love the pretty Copper sheen it has as well as the dark brown flecks in it!  You can also see how well it embossed the fine detailed stamped images too.

There are so many different things going on with the embossing powder on this design that you really need to capture all the different angles throughout the design to see it!

vicki-earlyspringnest1

For the coloring of the image, I just used some Clean Color Real Brush markers for it.  I like to heat emboss the images when I do this sort of coloring as it helps to keep the water coloring inside the lines and acts as sort of a “well” so that the colors stay where you want them.

For the eggs inside the nest, I took a VersaMarker pen and colored them in with it.  Then I took the same Robin’s Egg embossing powder and heat set the eggs with it.  It really creates a fun and unique look with the blue tint and speckle flakes in it, plus it gives it a nice embossed shine for an “egg like” appearance!

After coloring in the image, I used my scissors to fussy cut it out and then added a couple of feathers from my stash and attached this image over the card front panel with some foam tape.  I finished off my design by adding a few random drops with some Nuvo Dazzling Blue Glitter Drops.

I hope that you’ve enjoyed my card today and thank you so much for stopping in!

Challenges I’d like to enter:

  1.  Fab ‘N’ Funky – New Beginnings  MISS IT!!!
  2. Not Just Cards – Jan Anything Goes
  3. Crafty Friends – New Beginnings
  4. Stamps & Fun = Creativity – #338 Anything Goes
  5. Pammies Inky Pinkies – PIP1902 Anything Goes

Cuddle Bunny at Whimsy Stamps

Hello friends!  Hope you’ve had a great weekend!  The last time I posted I mentioned it was so nice that we could cook out on the grill, well this week it’s snow conditions and very cold!  With life in the Midwest, you never know what you’re going to get.

I thought it would be nice to turn that warm weather feeling to the inside of my craft room and create with this January released digital image from Whimsy Stamps:

vicki-wscuddlebunny-jan15

Fell in love with this darling image by Crissy Armstrong called Cuddle Bunny.  This had been a previous rubber stamp that is now available in digital format!  I think there are many advantages to getting a digital version:  1) It NEVER runs out of stock in the store because it’s a digital file, PLUS, you don’t have to wait for it to come in the mail!  2) You can size the image(s) whatever size you want it to be!  3) You can easily combine other images with it and arrange them as you’d like before printing it out.  4) You can color with Copic markers without worrying about anything getting smeared and lastly:  5) You can still feel like you’re “getting your hands crafty” by coloring and finishing out your creation with other products!  So, if you haven’t jumped on the “digital wagon”, an image like this would be a great one to try out!

vicki-wscuddlebunny-flat

For my card, I have colored my image with Copic markers, see the detail list below and then sponged some Tumbled Glass distress ink with an ink blending foam tool and a cloud stencil.  I then cut it out with the Whimsy Stamps Notched Rectangle dies and added a yellow layer behind it that I’ve notched out by hand.

For the background I’ve taken a piece of blue watercolor paper panel and lined the top and bottom of it with a strip of flower borders from my old stash.  I used a glue pen for the centers of the flowers and attached some glitter over top.  I added a strip of sheer white ribbon across it and attached it to a piece of shimmer luster paper which was mounted onto a 5″ square yellow card base.

Lastly, I used some craft foam behind the image panel and attached it over my card and then added the ribbon bow with a chipboard flower in the center.

vicki-wscuddlebunny-close

Here’s a closer look at the image where you can see how I’ve colored it.  Hard to capture in the photo, but I’ve also taken some Nuvo White Blizzard Glitter Drops and added a tiny dot in the centers of the white flowers.  I have also used the Wink of Stella Clear Glitter Brush and went over the butterfly.

I hope you’ve enjoyed my creation today and I thank you so much for stopping in!  I look forward to sharing another project with you tomorrow!  See you soon!

Here’s the list of Copic markers I’ve used:

  1.  Dress, Hair Bow & White Flowers:  Y17, Y15, Y13, Y11, B00, B000
  2. Shoes:  E87, E84, E81
  3. Hair & Skin:  E49, E47, E44, E42, E21, E11, E00, E000, R20
  4. Bunny:  C3, C1, R00
  5. Butterfly & Flowers:  V15, V12
  6. Grass & White Flower Stems/Leaves:  G24, G21, G20, YG67, YG63, YG61

Challenges I’d like to enter this card for:

  1.  Crafty Creations – Anything Goes
  2. Crafty Animals – Anything Goes #22
  3. Creative Knockouts – Anything Goes
  4. QKR Stampede – Anything Goes #330
  5. Use Your Stuff – Furry Friends

Anything Goes for Cute Card Thursday!

Hello friends!  Hope you had an amazing Christmas and Santa brought you everything you’ve wished for!  It’s always a fun time of year to celebrate with family and friends!

Today is Thursday which means a brand new challenge over at Cute Card Thursday!  Another easy theme of “Anything Goes” for this week!  Looking forward to seeing what you’ve been crafting through the Holiday Season!

Sometimes I like to try out working with different media that I don’t normally always use on my creations, so for this one I’ve pulled out my watercolor:

Vicki-CCT562-watercolor winter hats

I have used one of the prints from Simon Says Stamp Suzy’s Winter Warmth Watercolor Prints.  I’ve decided to use my Kuretake Gansia Tambi Watercolor set with a #4 and #8 Silver Brushes to color the complete panel.

For a little bit of “snow splatter”, I took some white Folk Art Mixed Media acrylic paint spray around the edges of the dried watercolor piece. (Something new and fun for me to try out with this too!)

To finish up the design, I added some doodling in a couple of areas with my white gel pen and then attached the entire panel onto a white A2 sized top folding card base and rounded the corners of it with a corner chomper.

It was simple, but a fun card to make.  Because SOMETIMES, you just need to take time to chill and have fun coloring or playing around with different media, right?! 🙂

Challenges I’d like to enter:

  1.  SSS Work It Wednesday – Try Something NEW (Mixed Media acrylic spray is new!)
  2. QKR Stampede – Anything Goes #327
  3. Crafty Creations – Anything Goes
  4. The House that Stamps Built (D6218) – Anything Goes
  5. Simon Says Stamp Wednesday – Anything Goes