“W” is for WINGS

Hello friends and happy Friday!  It has been very cold over our way and I’m staying indoors as much as I can which means some crafting time is happening!  I do like looking from my window and seeing the chickadee birds along with the squirrels in the feeders!  I enjoy seeing those bright red cardinals, but I don’t get to see those as often.

Today is a new challenge over at the Alphabet Challenge and we are on the letter “W”.  The hostess has went with the theme “W is for “WINGS“.  You will have 2 weeks to join us, so I hope to see your creations in the gallery!  Here’s my card using this theme:

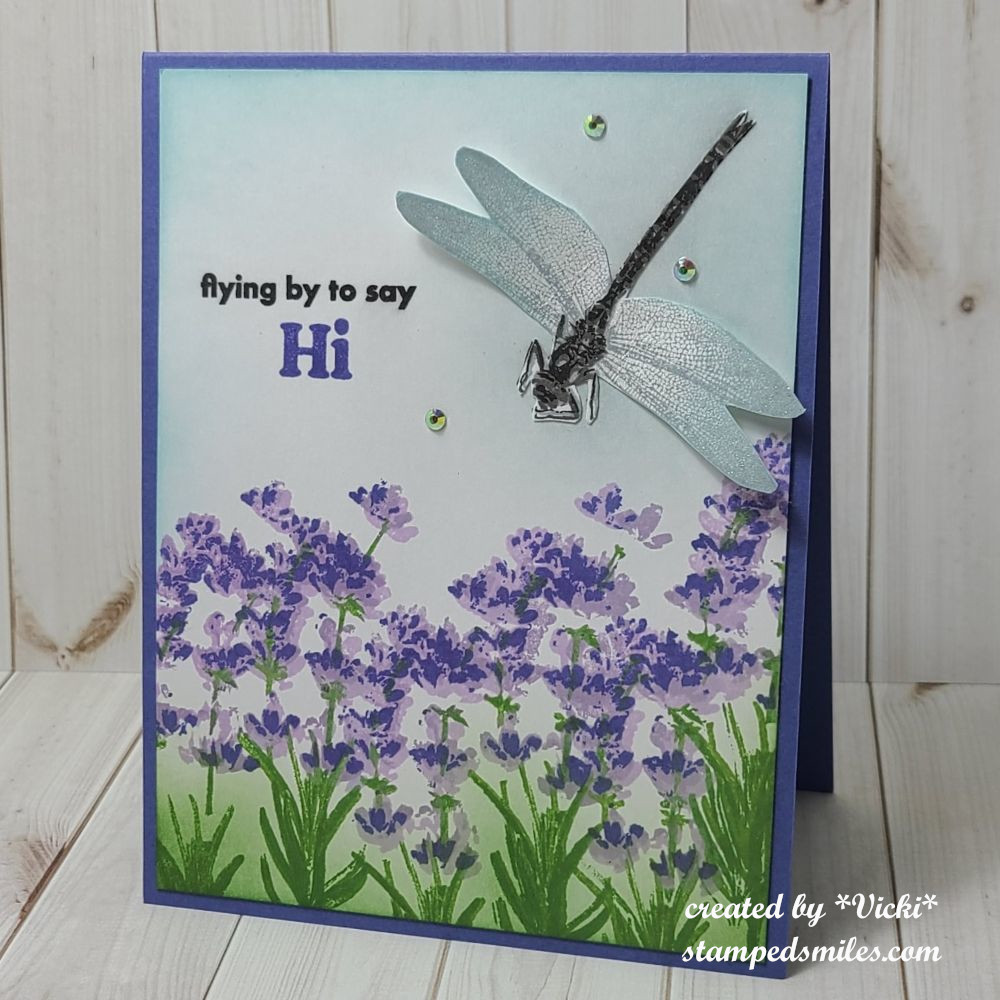
Since it’s so cold out, I decided to skip on over through winter and go straight to warm spring/summer with a dragonfly!  We usually don’t see dragonflies over my way until it gets pretty warmed up.  (It has to be above 60 degrees Fahrenheit, on average, for them to come out.)  I also was happy to finally pull out a stamp set that I got from STAMPtember of last year created by Kitchen Sink Stamps.  Unfortunately, this company is no longer operating.  There are a couple of stamp sets available for purchase on the Simon Says Stamp website I see.  But this particular stamp set called “All Aflutter” was only available during the STAMPtember event.  I’m happy to get it even though I didn’t make it in time to grab the die set before it sold out, but it’s a beautiful set.  It’s actually the only Kitchen Sink Stamps I own.

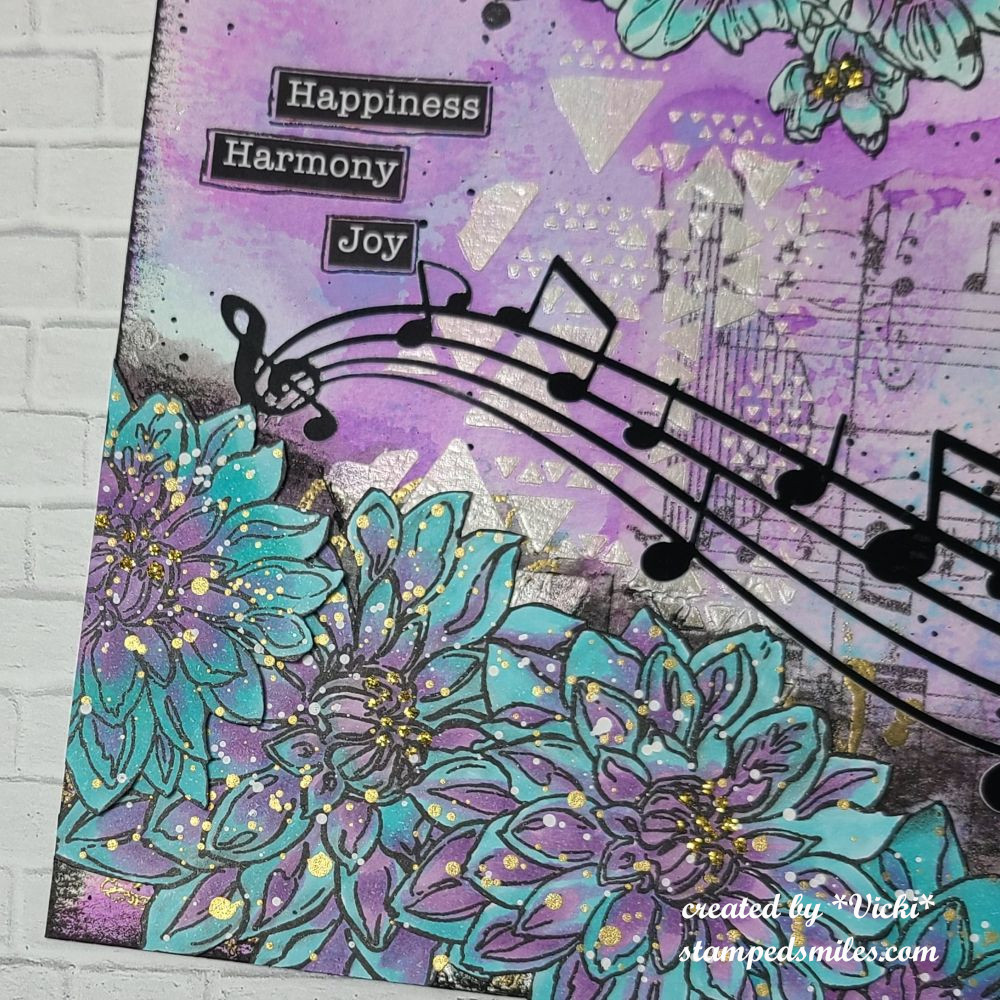
I started out with the green flower stems at the bottom.  This is a layering stamp set, so they very cleverly put the numbers in order to stamp.  I then added three purple colors for the flowers to go on top of the green stems.  I stamped the sentiment from the set with the “Hi” done in purple ink.  I ink blended like colors around the card panel.

I stamped the dragonfly body onto the card panel BEFORE stamping the sentiment for the placement of the design.  I attached the card front to a purple A2 top folding card base.

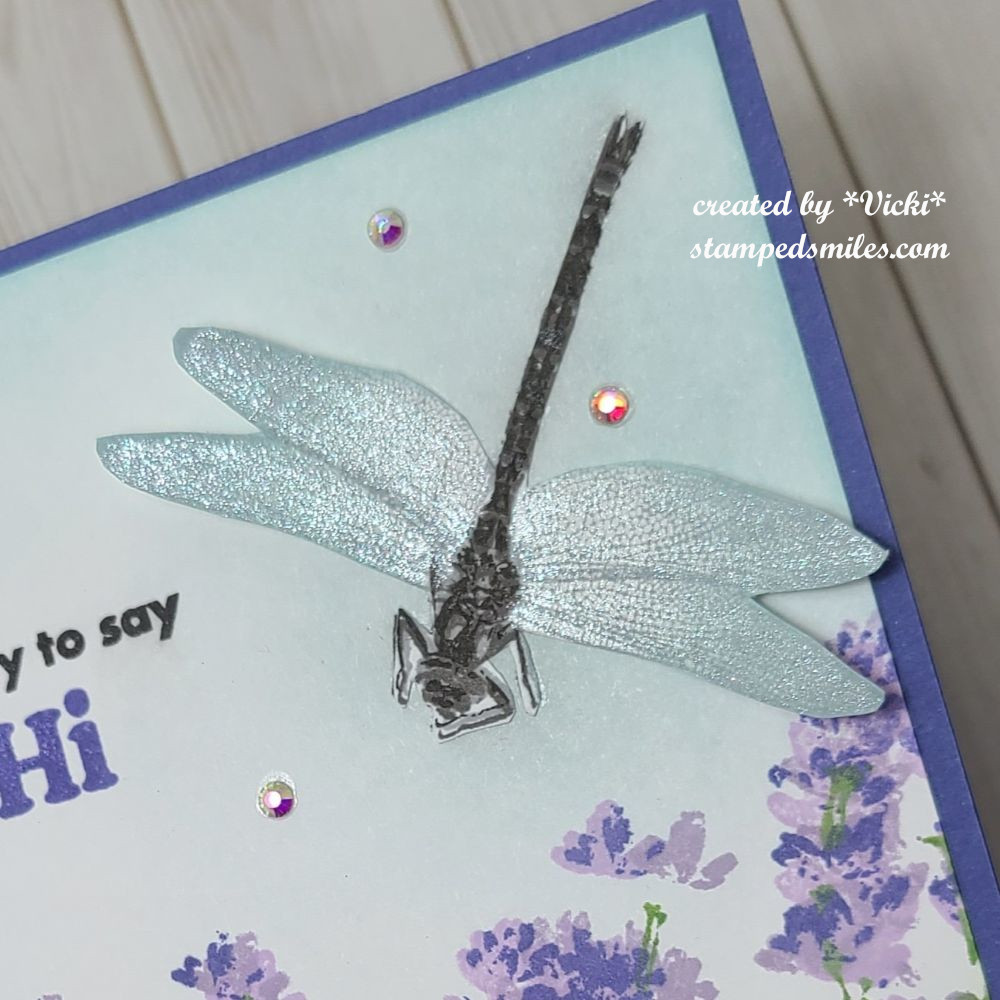
Dragonflies have to have that shimmer on their wings!  It’s so hard to take a photo of the shimmer from the glitter pen and I wanted that to come through for my dragonfly wings!

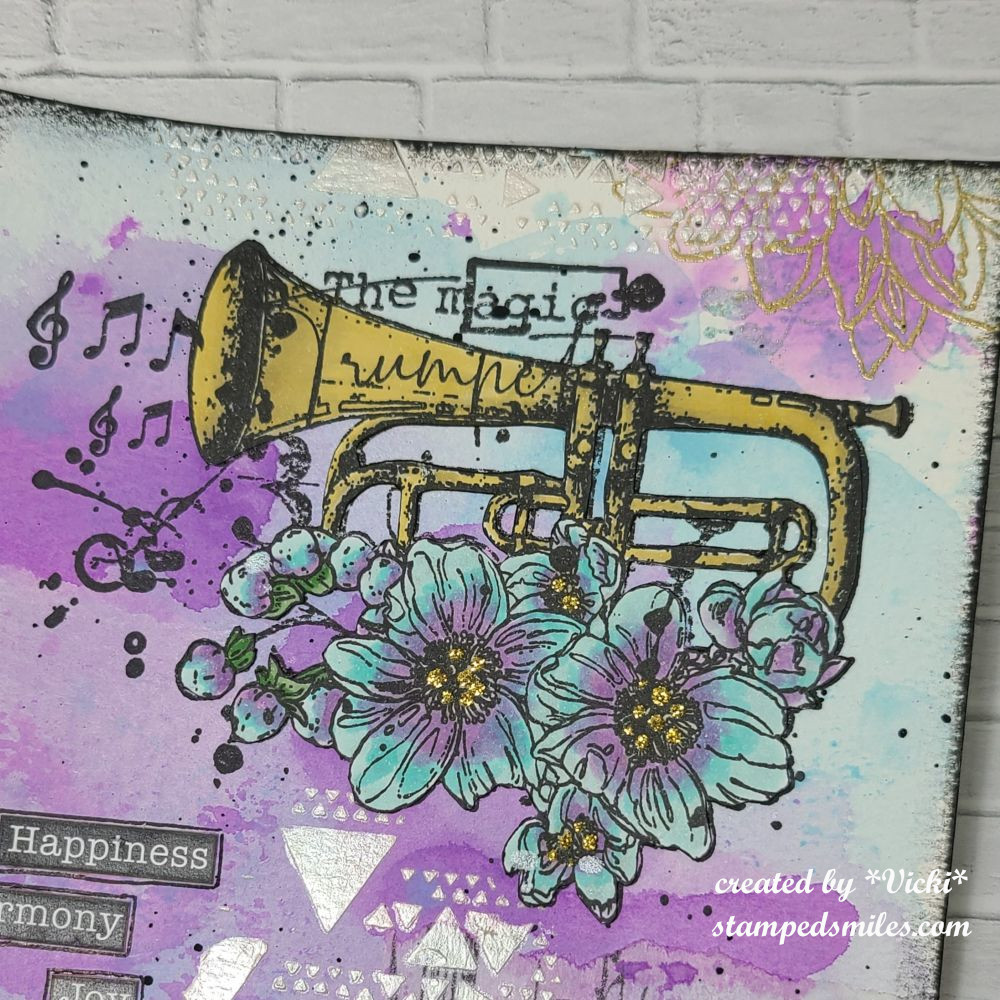
The dragonfly was stamped in the corresponding layers for his body and wings on a separate piece of cardstock.  The lightest grey was the wings.  I used my scissors to fussy cut him out and blended some light blue ink around his wings.  I glued the middle section of him only so that I could pop up the wings a bit.  

Lastly, I added some shimmer to his wings with the glitter pen and attached some gems.

  • I hope you’ve enjoyed my card today and you’ve been inspired to join in the challenge with us!    Be sure to check out the rest of the inspiration from the team!
  • Thanks for stopping in and I’ll be back tomorrow with my AJ collaboration with Carol!

Challenges:

  1. Ally’s Angels – Anything Goes
  2. Creatalicious Anything Goes + optional:  use green
  3. Lil Patch of Crafty Friends – #248 Anything Goes
  4. Pammie’s Inky Pinkies – PIP2507 Anything Goes
  5. Moving Along With the Times Things With Wings
  6. A Place to Start – #020325 Anything Goes + optional:  Things in the Sky

Art Journal Inspiration-Happiness, Harmony & Joy

Hello friends!  Brr!  It’s a very cold start to the week over my way, so that means I’m staying inside the warmth and crafting up some fun to share!  I’m really enjoying putting together these pages this month as I get to pull some things from my stash that I’ve really been wanting to play with.  This gives me a chance to use things for myself in whatever way I want because I don’t give these pages away and I think I find it to be a bit more “freeing” to do or try things that I may not normally do on a card.  

Maybe I can encourage you to try something for yourself!  I have more inspiration to share for the “MUSIC” prompt I’m hosting this month at Art Journal Journey:

For this page, I pulled out an AALL & Create stamp set that I’ve been wanting to use “Call the Tune” and I wanted to use the trumpet from the set.  I always think of trumpets as a bold and happy musical tune, so I thought flowers and my favorite colors would make me feel happy too!

For the background:  I started with an 8.5″x5.5″ watercolor panel and watered down some purple and turquoise acrylic paints so that I could use them like watercolor.  Once dry,  I attached some musical note tissue paper off the side and I also stamped the trumpet image in black on the top of the page.  I then used the flower image and gold heat embossed it on the bottom and top of the page.  I then took some black paint to splatter over it.   Lastly, I took the AALL & Create Reverse Triangles Stencil and some metallic white embossing paste over it in random areas.  Once that was dry, I went around the edges with the black Distress Crayon.

Moving towards the bottom of the page, I stamped the flower image twice, colored them with Copic markers and fussy cut them out to line the bottom of the page.  Before attaching them, I splattered them with gold watercolor and white Copic Opaque.  I also used the black Distress Crayon to go underneath the flowers before I attached them.

The musical notes were cut from my Cricut Machine with black glossy cardstock.  I also attached a few select words from the AALL & Create Motivation Station Ephemera pack and used a black marker to line around each one.

I stamped another trumpet image and colored it with Copic markers and then fussy cut around the colored images to attach over the black image I stamped on the page.  I even used a knife to go in between the sections of the trumpet.  It was a bit tedious, but worth it.

I finished the page off with some gold Stickles in the center of the flowers for a touch of sparkle because sparkle makes me happy too!

  • So what do you think?  Does this page bring happiness to you?  It gets me looking forward to Spring and seeing some flowers grow!  I’m going to go check out the fun musical inspiration in the Art Journal Journey gallery and I hope you check it out too!  Thanks for dropping by today and I’ll see  you soon!

Challenges:

  1. Art Journal Journey – Music
  2. Anything Goes in a Card Free Zone – no cards
  3. Creative Artiste Anything Goes Mixed Media
  4. We Love 2 Create – Anything Goes Mixed Media/Paper Crafts

For Someone You Love at Sparkles Monthly

Hello friends!  I hope that you had a great Valentine’s Day yesterday however you chose to celebrate it!  We chose to stay indoors where it’s warm and watch a movie!  

And speaking of love, this brings us to the February challenge over at Sparkles Monthly and for this month, our hostess is asking for a “Love Card (for anyone you love)” .  Be sure to stop by the blog to see what the rest of the design team has created for you.  Here’s my project for this challenge:

Aren’t these heart sweaters adorable?!  I had fun making a couple of cards to send to my kids (whom I love) for Valentine’s Day.  I was actually able to create two similar cards using a stencil set that allows you to make 4 sweaters at one time.

I love the Taylored Expressions Sweater Weather Stencil Set that you can ink blend up to four different sweaters at once.  This had previous come out for Christmas, but in December, they came out with a cute Valentine line to go with this stencil.  So I gold foiled a panel from the TE Foil It-Valentine Sweater Weather pack and then to decorate the sweaters, I used the TE Dinky Decorations Valentine die set.   I wanted more hearts, so I die cut a few extra to place around the background.

Speaking of the background, I used the TE Lots of Love 3D embossing folder and then sponged a bit of white over the hearts so they stood out a bit more.  I also die cut the A2 Thin Frame die for a gold mirror frame.  The sentiment came from the TE Love & Hugs stamp set

And here’s a closer look at the other card I made.  I know I could’ve used just one sweater for each card, but I thought these sweaters were too cute, so I decided to use all of them!  I’m thinking one of my sons would probably wear a sweater like one of these and the other would think it’s ridiculous! LOL  Regardless, at least they each know that they are loved by me!

I also had these fun TE Snarky Valentine Insiders panels that I gold foiled.  I have to share some snark with those I love too! LOL  (Click on the photos above to enlarge them if you’re on my website.)


I thought I’d share another card I had made for someone I love that was given to my husband for Valentine’s Day yesterday.  (Sometimes, I have to wait until he gets it before I share!):

This pup and his boing heart hat cracks me up!  Look at that face!  I actually made this last month during a Craft Roulette challenge.  I decided that I liked it so much that I put a Valentine greeting on it for my husband to give him on Valentine’s Day.

I used the Taylored Expressions Puppy Love (retired) stamp set and colored in this cute pup with Copic markers and die cut him out.  I stamped the TE Gingham Check BG Stamp in black ink over red cardstock.  I splattered some white Copic Opaque over top.

For the lace, I white heat embossed the border stamp from the TE Flip the Lace stamp/die (retired) over the Toffee cardstock and placed beneath the check background piece.  I added a black strip between the two and then popped the dog on it.  I stamped the “Seriously” from the pup stamp set and the Valentine greeting from the lace stamp set together and fussy cut them out to pop up with foam tape on the card.  I added a few white hearts around the pup.  The entire card is a mini slim from a pre-cut and scored Toffee card base.

  • Thanks so much for stopping by today and I hope that you enjoyed these “love” cards or have been inspired to make and send a card to someone you love too!  I look forward to seeing what you share in the gallery this month!  

HAVE A GREAT WEEKEND!

Challenges:

  1. Critter Crazy Anything Goes With a Featured Creature (Bottom card only)
  2. Crafty Animals Anything Goes + Animal (Bottom card only)
  3. Pearly Sparkles Love is in the Air
  4. Crafts Galore Encore Anything Goes
  5. Crafty Calendar – Hearts
  6. 613 Avenue Create – Anything Goes with optional: Lots of Love
  7. Crazy is Our Fame-Stencils Are Our Game – Pinks &/or Reds + stencil (sweater cards)
  8. Make My Monday – #245 Love (bottom pup card)
  9. Crafty Gals Corner – #264 Fill in the Blank:  “Pink________” (sweaters)

December Art Journal Page-SNOW

**DON’T FORGET TO ENTER THE GIVEAWAY I’M OFFERING IN THIS POST – OR SCROLL BELOW THIS POST TO SEE!**

Hello crafty friends!  I hope that you all had a happy Christmas time with your loved ones and friends!  2025 is quickly approaching us and I know there will be lots of changes coming to look forward to!  Although I’m not feeling 100%, so I think I’m going to rest for the remainder of what’s left of the year🤒.

Today is the monthly Art Journal Page collaboration with my crafty friend, Carol (from Crafty-Stamper)! We get creative trying to use up our never-ending stash piles along with a prompt for each month.  I know she always has great inspiration to share, so please check out her blog too! Here’s my AJ page with the “SMASH OUR STASH” December prompt of “FOUND OBJECT(S)” (something you found or discovered):  (I’ve also combined 2 other past prompts with this one that I’ve missed out on earlier in the year!)

SNOW SNOW SNOW!  I know people that hate it and people that love it!  Whatever YOUR favorite place to be with it…or not…mine is being inside the warmth and watching it from the window!  I don’t mind shoveling if I need to help my husband, but I enjoy watching it peacefully from the window.

The prompt for THIS month (December) is “Found object(s)” and I found some VERY pretty blue ribbon on a present this year and decided to keep it…and I have plenty left for another project!  I used it above the die cut window.  (This page is my normal 5.5″ x 8.5″ with pre-punched holes at the top…I would have a book finished, but I wasn’t feeling well enough to get one done, so I’ll have to do it later.)

And for the other prompts I’ve missed this year:  August I was away and didn’t get to complete that one and the prompt for that month was “Vintage/Old“.  The background wallpaper area looks vintage to me and it came from a VERY old pack of paper that I’ve had along with the letters on the side of the window.  I also missed November and the prompt for that month was “Food“.  I love me a good cup of cocoa in the winter and I thought I would make myself some Linzer cookies to add with it in the shape of snowflakes with frosting on them!  I even took a bite out of the one in front of the cup!

Since I’m not feeling well, I’m going to stop typing and get some sleep now.  Please let me know if you have any questions about the page as I’d be happy to answer!

Thanks so much for taking the time to stop in!  I really appreciate it and will try to reciprocate when I feel better.  Happy New Year friends and I’ll see you in 2025!

Challenges:

  1. Art Journal Journey – SNOW

Merry Christmas Makes PLUS GIVE AWAY!!!!

Hello friends!  Just wanted to pop in to wish you all a Merry Christmas and to share some final Christmas creations that I’ve made basically within the last few weeks!  Some of these are cards that I’ve sent friends and family and some are recent makes for Craft Roulette challenges.

  • Scroll below this post to see the give away!

First up are the last few weeks of the Craft Roulette challenges:

(I got out my stretchy pants to play along!)😉

(These are money holders for Christmas with recycled wrapping paper)
(This is a diagonal joy fold card design)
(Tri-Panel Card for me was 3 layer panels on the front! LOL)
(Always stepping on those tiny gems on my floor!)

Hopefully the next several cards have been received by everyone they were sent to, but if not, maybe the surprise will be which one you will get!  I don’t like making several at one time, so I’ve split up the design in sessions using the Taylored Expressions Make It Merry Stamp Set along with the Happy Half Sheets: (I’ve made my own “map” with the images)

Lastly, I’ve made several of these photo frame cards using the Lisa Horton Framed Poinsettia Stencils/Die/Embossing Folder: (Using a photo recently taken for our 25th wedding anniversary)

Hope you’ve enjoyed all of my Christmas projects this year and a very special thank you for being apart of the crafting journey with me!  I’m so thankful for the friends I’ve met along the way! 


ALERT!!  GIVEAWAY!!

Since this is the season of giving, I would like to  gift someone that would like to receive this set that I have collected myself (over the entire year as an extra) to give away to someone:

Vicki-December2024-giveawayVicki-December2024-giveawayback

If you’re NOT familiar with Taylored Expressions, this is a collection of the “freebie” rubber stamps that a person receives when placing an order. Each month the stamp image changes to something else.  I have not only collected a set for myself, but I’ve also collected another entire set (12 rubber stamps) to give to someone else that would like one!   I have included the sturdy laminated Collection card, in addition,  a sturdy plastic sleeve in which to store it all in.  Plus, I’ve also included a set of 2025 tear-off calendars in a package of ten to go with it!

You can purchase these in the store here under the Pretty Postage Collection, but I’m giving them all away in one set for the entire year as I’ve collected them.  I did NOT include the Pretty Postage die set that cuts out the images, but you can purchase your own by clicking on the link.

  • If you are interested in this give away from me (no affiliation with any company), please just leave me a comment below to tell me that you’re interested in the give away.  THAT’S ALL YOU NEED TO DO, BUT YOU HAVE TO TELL ME IF YOU’RE INTERESTED IN GIVE AWAY!   
  • You will need to leave your comment below by January 3rd, 2025 to enter.   I will announce here on my blog who won by January 5th, 2025. (The winner will need to be in contact for mailing out prize.)
  • P.S.  If you have been collecting and looking for one you’re missing, let me know which month and I’ll see if I have it as I have several months that are extras! (I know that I do NOT have any August left, though.)

Just wanted to send out a little Christmas cheer to a crafty friend!  It doesn’t matter where you live, I will be happy to mail it out…so please don’t let that stop you!  It’s just a special gift from one crafter to another to enjoy!

Thank you for making my crafting journey a special one and for joining me here to share inspiration with one another!  Looking forward to more in the coming year!

Wishing you and yours a VERY Merry Christmas with lots of joy and love! 

(I will be back after Christmas (Saturday) to share an art journal page with you!)

Christmas Transport at Sparkles Monthly-It’s almost Christmas!

Hey friends!  Wow, how in the world did Christmas get here so darn fast?!  I feel like we just got through Thanksgiving and then things were a blur after that!😳  So, I’m also now realizing that it’s been a whole month since I’ve posted!  YIKES!

Since it IS December…and the middle of it…that means today starts the December challenge over at Sparkles Monthly and for this month, our hostess is asking to see Christmas Transport on your project.  Be sure to stop by the blog to see what the rest of the team has created for you.  Here’s my project for this challenge:

For me, Christmas transport is not planes, trains or anything busy or noisy, but something a little more outdoors around the countryside.  There’s nothing better than a good road trip with snow falling and the smell of fresh pine in the air!  I live in an area where there are lots of tree farms to pick out your perfect tree.  (Do I pick out a real tree?  Nope…but I do love them and the smell.  Just not the mess. LOL) I prefer to visit the trees and not chop one down.

I’ve used the adorable Inky Stamper set called Vintage Truck and I’ve decided to add the tree image to the back of his truck as he’s taking it home to decorate for Christmas!  I’ve fussy cut the image out after coloring and even added a snowflake stamp to the truck door from the Inky Stamper Toboggan stamp set.  I’ve also stamped a few more along with the larger snowflake and cut out to add to the background of the card.

For the background, I’ve used some paper from the Lisa Horton A Festive Tapestry pack as it was perfect for a landscape of trees.  At the bottom, I’ve used the road die from Lawn Fawn and then placed it over my tree landscape and added the truck over it by popping up with foam tape so it looks like he’s on the road.  

So while making this card, I had the song stuck in my head and so I found a perfect sentiment to go with it from the Inky Stamper Tree stamp set.  I white heat embossed over a green piece and cut out a banner to add to the top left of the card.  Everything was placed over a white A2 top folding card base and I lastly added some Iridescent Clear Drops in the center of the snowflakes.

  • Hope you’ve enjoyed my card for you today and I hope that you’ll hop on over to the challenge blog and play along!  I’d love to see what you come up with!

Challenges:

  1. 613 Avenue Create – Anything Goes optional: Any Winter Holiday (Christmas)
  2. We Love Stamping – Winter/Anything Goes
  3. Stamping Sensations – Anything Goes Winter
  4. Sparkles Christmas – #167 Christmas Song-Carol (“Oh Tannenbaum”/Oh Christmas Tree”)
  5. Cardz for Guyz – #362 Holiday/Christmas Card/Tag
  6. Krafty Chicks – #746 Christmas
  7. As You Like It – Anything Goes Christmas
  8. C.R.A.F.T. – #744 Christmas/The Last Stretch 

Christmas Florals for Sparkles Monthly Challenge!

Hello friends!  I hope you’re having a great month so far and looking forward to a great weekend ahead!  I know it’s starting to get “crunch time” with the Holidays quickly approaching us in a few weeks, so it’s time to get those Holiday cards finished up and sent out!  

Today starts the November challenge over at Sparkles Monthly and for this month, our hostess is asking to see Christmas Florals on your project.  Be sure to stop by the blog to see what the rest of the team has created for you.  Here’s my project for this challenge:

When I saw this challenge, I knew what I wanted to pull out to play with right away!  I’ve pulled out the beautiful Taylored Expressions Scattered Holiday Blooms Bundle. I also wanted to use the Scattered Holiday Blooms Foil Panels which I foiled in gold.

After I foiled the panel, I used the coordinating layered stencils to go over it.  I was almost thinking that I might not want to cut the panel out after blending it because I liked it so much, but I wanted to try out the die that cuts each of the blooms out.  I love that the center of the large poinsettias has an extra cut in the center to lift up the edges too.  I ended up layering two of the poinsettias together for each one for even more dimension.  I layered some of the leaves around them and they were popped up over the card with foam tape again.

For the background of the card, I used the TE Sketched Plaid embossing folder over a toffee cardstock.  I took some gold ribbon and wrapped it around the two corners with the top one in a bow.  I then attached this over a white top folding A2 card base.  I used my corner chomper to round the corners of the base and toffee card panel.

Lastly, I die cut the “JOY” letters in white and gold mirror cardstock and attached them by slightly off-setting them before placing on the card front.  I added the holly to the “O” and a few more of the tiny blooms that were cut out from the blended panel to finish off the card.

  • I hope you’ve enjoyed my card today or have been inspired to get those holiday makes going by joining in the challenge with us this month!  I look forward to seeing what you create!  Thanks so much for stopping by and I’ll see you soon!

Challenges:

  1. Creative Friday – #372 Christmas
  2. Crafty Catz – #682 Anything Goes with optional: ribbon/twine
  3. Pammies’ Inky Pinkies – PIP2445 Anything Goes
  4. Krafty Chicks – #742 Christmas
  5. Just Us Girls – #753 Word Week:  JOY
  6. Crafts Galore Encore – #129 Anything Goes
  7. Love to Craft – #83 Anything Goes
  8. Merry Little Christmas – #59 Anything Goes Christmas
  9. Let’s Craft & Create – Anything Goes with optional: use a bow

Thankful for Fall, Pumpkins and Coffee!

Hey friends!  Just poppin’ in with another card I made and wanted to get it in before the deadline ends…which I normally don’t always do!😁

I have been playing along (with the exception of the last few years) with the Coffee Loving Papercrafters “Coffee Lovers Blog Hop” which has been going on since 2014!  It’s hard to believe it’s been around that long, but looking back at the posts that were shared recently for “a look back”, I had a different blog platform and there I was playing along 10 years ago!  Really appreciate all of the fun that Amy has provided to us through the years as well as the many sponsors that have been apart of it.

I’ve pulled out some stamp sets from one of the sponsors (Newton’s Nook) new and older from my stash in honor of this occasion:

That is the cutest cup of Pumpkin Spice Latte that I’ve ever seen!  I’ve used the NN Newton’s Mug stamp set with coordinating die to stamp, color and cut him out.  He was popped up with foam tape over the background.  For the pumpkin image on top of the mug, I’ve used an older NN stamp set called “Love a La Carte” (No longer available).  I just stamped, colored and fussy cut the image to place over the mug.  I also added some gold glitter on the heart above it.

For the background:  I cut a piece of paper with the NN Frameworks die set and pulled out some watercolors for the background and then splattered some gold after the background was dry.  I layered this over the brown cardstock.  I also used a piece of that brown cardstock to white heat emboss the sentiment which came from an older STAMPtember collaboration set with NN called “Talk Turkey“.  I cut it out with a banner die and attached it to the side of the scallop panel.  The leaves under the mug and over the watercolor panel were from the NN Autumn Mice stamp set and coordinating dies.  

I was trying to also follow along with a fun sketch from the Inky Paws Challenge (see below) and so I’ve pulled out some more papers from the NN Coffee House Stories paper pad that I thought went with the coloring on my cup and attached it to an A2 top folding brown card base.  I also added a strip of gold glitter paper to bring out the touch of glitter on the tiny heart above the pumpkin.

  • That’s it for today!  I hope you’ve enjoyed my coffee card or have been inspired to create something fun too!  I’m off to check out all the other entries for more inspiration!  Have a wonderful weekend ahead!

Challenges:

  1. Coffee Loving Papercrafters – #fallwinter2024clh 2024 Fall/Winter Coffee Lovers Hop using coffee, tea, cocoa, and/or apple cider
  2. Inky Paws Challenge – #234 sketch
  3. Double Trouble – #179 Lotsa Layers
  4. Inspiration Station – #67 inspirational photo (the coffee, leaves and pumpkin inspired me)
  5. Crafty Animals Anything Goes + animal
  6. Critter Crazy Anything Goes with a Featured Critter
  7. Inkspirational – #328 Layer It (layered leaves and panels)
  8. Shopping Our Stash – #534 Time for a Hot Drink

Reveal of Inky Escape! (Craft Retreat)

Hello friends!  November has come with the pretty leaves on the trees and the coolness in the winds.  I always turn to comforting “things” this time of the year and it always gives me a sense of peace before the year comes to an end.  A warm fuzzy blanket, socks/slippers, sweaters, etc.  is what I usually turn to.   What is your comfort “thing”?

I promised to share with you the fun things we did over at the “Inky Escape” event that I recently attended and it was wonderful to see all of my crafty friends again for laughs and fun together.  I think I miss them already!

I lifted this fun photo from the Inky Stamper FB page as I don’t have any photos other than seeing what others took.  There were a total of 18 of us this time:

Everyone received a “swag bag”…but the case this time was a Christmas stocking full of fun goodies and one of them was that everyone received cute fluffy socks. I’m not exactly sure which one is me in that photo, but I did have a polar bear sock! LOL We each placed one foot in the circle and Chelsea took the photo.

And speaking of the “swag bag”/Christmas stocking…here’s what we each received:

When I got to the event, there was this black stocking on my table with the cute tag attached to it with my name.  Each person received a personalized tag on the swag bag, plus the “skull” dies that were used to create the tag which was inside the stocking!  There are my polar bear fuzzy socks (I’ve already washed them up by hand so the colors wouldn’t bleed in the wash…and they’re so warm and fuzzy!)  I also received the cute “Christmas bulb” drink holder with a candy cane straw and a little ghost stopper for the top!  We used these containers to hold the “Jingle Juice” that we drank at some point!  And then I received a light up Christmas bulb necklace that has different settings when you push the button the back.  The theme for this event was called “Merry Spookmas” which you can see the greeting for that on my personalized tag.  So fun!

And speaking of fun…here are all of the Make-n-Takes that we created during the event.  We sat and made 4 projects and then two of those projects were “bonus” makes using some other special items.  (There is a “story” about one of them, but you can check out each project up close in the gallery below.)

*If you are on my website, just click on each photo to enlarge and scroll downward to see more information about each photo while it’s enlarged.*

The first four make-n-takes were made using the brand new Inky Stamper release that came out during this event!  You should go check them out now on the website! (They’re all shown on the home page under “Featured Products”.)  My favorite is that darling “Gifter” stamp set!  I’m sure you’ll be seeing something from that set soon from me! *wink*


And since I was there to “crop” (as they say), I brought some things to work on that I really wanted to get done.  So I decided to pull out some more Inky Stamper images to color and make a “Sheetload of Cards” using the September Sheetload of Cards Template by Crafty Al.  If you’re not familiar with her, check out her You Tube Channel and look for all of her “Sheetload of Cards” videos to see how you can find instructions for each month. #SUYSSep2024 #ShowUsYourSheetLoad

I utilized her template to create the full 12 cards as demonstrated.  The dimensions of the finished card design is 3.5″ x 6.25″ which I really liked as it helped to use up the full 6″x6″ size of those paper pads!  Also, you don’t have to create envelopes for these as they fit perfectly inside those envelopes (3-5/8″ x 6.5″) that you can find at any office supply area of a store.

As you can see, I used a variety of images that I stamped, colored and cut out for each design.  I matched up my design papers to coordinate with the images.  All of the images I used are from Inky Stamper.  All papers come from a variety of Doodlebug Design papers.

Here’s a closer look at two of the cards I made from the set so that you can see how the card opens up and the greetings on the inside of each card. (Sentiments come from Taylored Expressions.)  You can also see the coordinating envelopes next to them with the matching critter stamped in grey ink.

These cards are on the way for a special charity for ill children patients to help lift spirts and I hope each one will!

I know there were so many things going on during the event that I was even surprised that I got all of these finished.  They were mostly finished with the exception of the greeting which I added when I got home.  I had plenty to do while I was there and also enjoyed all the activities too!

I hope you’ve enjoyed my post today as well!  I thank you so much for stopping in!

Mix it Up With Paper Piecing!

**THIS IS POST TWO OF TWO FOR TODAY!  SCROLL BELOW TO SEE MY POST FOR THE GDT CREATIVE ARTISTE.  THANK YOU!**

Hello friends and a happy November!  I think that the last two months completely flew by and here we are getting closer to the end of the year…what?!  I hope that you look forward to happy times ahead and lots of crafting fun too!  I’m thankful you’re here with me, so let’s get this month started.

Today begins a new challenge over at the Mix It Up Challenge Blog and it’s always “Anything Goes with an optional theme“.  The optional theme this time is “Paper Piecing“! (This challenge is open for 6 weeks, so you have plenty of time to enter!)  Here’s what I came up with using this theme:

I absolutely love the look of quilts, but I like to keep my making of quilts done with paper!  So I thought this theme would be great for making a quilt pattern design for Christmas.  I normally paper piece stamped images, but I wanted to do something different this time and pull out more stash items and use them!

Several months ago, I purchased a card kit from Taylored Expressions called “Pieced Patterns” and I loved the concept of cut out squares attached over a “map” to follow along on how/where to place the squares.  It’s really easy to piece different colors/patterns together to make a design.  Some squares were also cut diagonal and I stamped a tone on tone pattern over some of the squares before they were cut out.  Then they were placed over the “map” design and cut out with a square die.  I also cut the stitched scallop frame to go around the square pattern.  I die cut a white snowflake twice to layer in the center of the pattern and added a red gem in the middle of it.

I attached the paper pieced pattern over a white card front that was cut with the Taylored Expressions Pierced Lattice Cutting Plate that was then attached to a top folding A2 white card base.  For the sentiment, I white heat embossed it from the Taylored Expressions Jingle All the Way stamp set and cut it out with the coordinating die.  It was popped up at the bottom with thin foam tape.

I can see this might be fun with several different squares cut out ahead of time to place over the different “map” designs to create multiple design patterns ready for cards!  It’s just a matter of taking the time to cut out all of the squares.


I have decided to create a “bonus” card using the same “paper piecing” technique, but with a stamped image this time…as we all need more Christmas cards, right?!  

For this card, I pulled out an older card kit from my stash (2016) and used the Doodlebug pattern papers that was included with the kit.  The papers are too cute not to use and hoarding them is not a good idea! 

I stamped the tree onto a stitched white rectangle, then stamped the tree, star and banner over some of the pattern paper, carefully cut it out and attached it to the stamped tree and white panel.  Before I attached the stamped pattern pieces, I used my Copics to color in the tree stump and outline around the tree.  I also added some details to the pattern pieces for shading as well.

 The banner was popped up with foam tape and I attached all the layers together over a top folding red A2 card base. All the cardstock/papers were included in the kit. I’ve added some red rhinestones on the tree where the ornaments were to finish it off.

Anyway, hope you’ve enjoyed all of my projects today and I hope you will take some time to check out the challenge blog to see what the other talented designers have made.  I look forward to seeing what you make!  Have a great day!

Challenges:

  1. Inkspirational – #327 Seasonal (Winter/Christmas) 
  2. Pammie’s Inky Pinkies – PIP2443 Anything Goes
  3. Cardz 4 Galz – #237 Showcase Your Patterned Paper (second card)
  4. Crafty Catz – #681 Anything Goes with optional twist: use dies/punches (top card, but dies used on both of them!)
  5. Lil Patch of Crafty Friends – #240 Anything Goes
  6. Penny’s Paper Crafty – #583 Anything Goes Using Paper