Mother’s Day Flowers

Hello friends!  Sending a happy Mother’s Day to all of the celebrating moms this weekend!  It’s a beautiful day out today and tomorrow will be too, so I’m going out to plant some flowers that I’ve been wanting to do!   I hope that you’re having a nice weekend in whatever you’re doing.

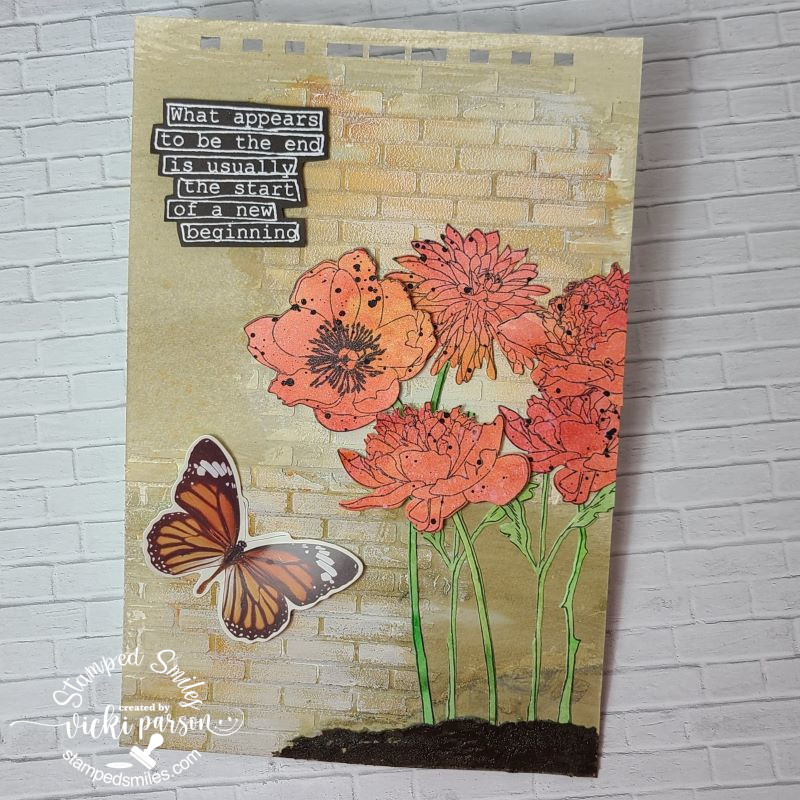
I just wanted to share a card that I had made just for Mother’s Day:

Vicki-TE-MothersDay

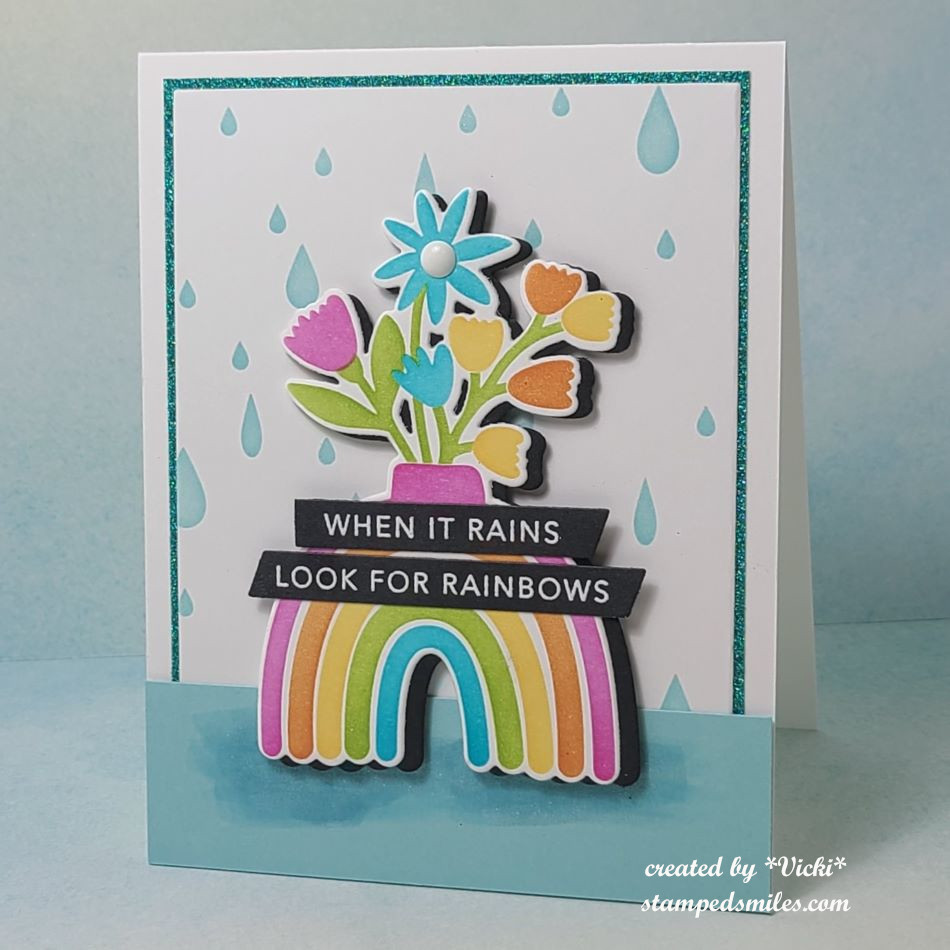
I love how this turned out with all of those blooms bursting out from the antique pail!  I’m in the middle of going back over some classes that I’m doing, and this was one of them that I’ve switched up to fit this occasion.   The original card had carrots as a base and I didn’t have the flower dies they used, so I made my own version with what I had.

The antique pail, flowers, leaves, bow and foiled sentiment dies all came from Taylored Expressions.  The scallop rectangle frame came from My Favorite Things and some of the design papers I’ve used came from Scrapbook.com.

The background papers and large flower came from the same pattern papers as a couple of other flowers and dark green leaves.  I used some light pink ink to sponge some of the other flowers and center of bow.  The center of the scallop frame has some light green blending, so that it wasn’t so stark white behind the flowers.  I also sponged around the antique pail.

I arranged the flowers inside the pail and turned it over to attach with glue over the center of the scallop panel.  I popped up the front flower and added some colored gem dots to the center of the flowers and bow.  I attached some mirror cardstock to the back of the scallop frame panel to match the foiled sentiment.  The sentiment was attached over the pail at the bottom.

It took a little bit of time to cut and arrange all of it, but it was fun to fiddle with.  

Thanks for taking some time to stop by and I hope you’ve enjoyed this pail of flowers for Mother’s Day!  Have a fabulous weekend whatever you do! 🌼🏵️

Challenges:

  1. Creative Inspirations – Feminine
  2. The Paper Funday – Anything Goes optional: Flower Shoppe
  3. Craft Rocket – Flowers
  4. Cardz 4 Galz – Celebration (Mother’s Day or other)
  5. My time to Craft – Mother’s Day or Friendship
  6. A Place to Start – Anything Goes optional: For a Lady
  7. Aud Sentiments – Foiling and/or Flowers + sentiment
  8. Unicorn – For the Girls
  9. Get Creative – Ladies Only

April Showers Bring May Flowers at Sparkles Monthly

Hello friends!  I’m so very happy to see April come as well as the warmer weather it has brought our way!  I’ve actually been taking sometime outside to see some blooms with daffodils, tulips and other buds popping out everywhere!  We are expected to get some rain tomorrow, but that is exactly what April is all about…and then the May flowers to follow!

This is exactly what it’s all about for this month’s challenge over at Sparkles Monthly too!  We hope you can share your “April Showers-May Flowers” projects with us this month!  Here’s what I’ve chosen to make:

I always love a good Spring rain with a little bit of sunshine peeking through that causes rainbows!  I never get a good photo of one, so I just enjoy it while it lasts! 

I’ve used a fairly new product from Taylored Expressions with my card today called “Create-in-quads ROYGBV” which creates 4 different card panels at one layered stencil session.  (I now have 3 other panels to make cards with too.)  I used the “Create-in-quads ROYGBV vase die” to cut it out and then another one in black cardstock for a slightly off shadow effect behind it.

For the background card panel, I had a DCWV rain drops stencil (that I’ve had for a long time) and blended some blue ink over it.  I’ve also cut a piece of blue/teal colored glitter paper for a thin border behind it to attach over an A2 white top folding card base.  I then took another piece of blue cardstock strip to make a “landing/grounding” for the vase to sit on.  Before popping up the ROYGBV vase, I took a marker to create a blue shadow underneath where the vase would be positioned.  I was going for a “rain puddle” look.  Popped it up with foam tape and added a white enamel dot in the center of one of the flowers.  I also took a glitter pen to cover over the raindrops and “rain puddle” under the ROYGBV vase.

The sentiment came from the Taylored Expressions Mini Strips-Rainbow stamp that I’ve white heat embossed over black cardstock and cut it out with the Mini Strips-Asymmetrical die and chose the ones that I wanted to use for this card to attach over top of the vase.  (I also have extra sentiments to use on other projects.)

Hope you’ve enjoyed my card today!  I also hope that you will take some time to stop in and join in the challenge with us this month!  I have several projects finished that I’d like to share, but I find it so hard to come and sit at a computer when the sunshine and happy weather is calling my name!  Maybe when it rains tomorrow, I will post more things! 

Have a great day and thanks for stopping by!

Challenges:

  1. Just Us Girls – Word Week: RAIN
  2. A Place to Start – One or More Flowers
  3. Crafts Galore Encore – #122 Anything Goes
  4. Try it On Tuesday – Rainbow Colors
  5. Addicted to Stamps & More – #465 Die Cut and/or Stencil
  6. Crafting Happiness – #170 Rainy Weather

Tricorn Fold Cuteness

Hello friends!  I hope that you’re having a wonderful week so far!  We have officially started Spring over my way and now I’m just waiting for the weather to warm up to match it.  I’m looking forward to being outside with the flowers!

Speaking of flowers, I saw this really cute image over at Beccy’s Place and wanted to play along, so I printed it out and colored it, but didn’t quite know what I wanted to do with it until I saw Beccy’s tutorial – Tricorn Fold Card: (click name for her tutorial)

Isn’t this so fun!?  I thought it was such a unique design that stands up, but also folds flat for a 4×6 card size.  I usually make an A2 (5.5″x4.25″) card size, but I can also easily create my own envelope for any size too.  It was a bit tricky at first and I messed it up because I put the scores going in the opposite direction, so I had to start over.  I wasn’t confident enough to figure out the mat layers of all the angles, so I just added some pattern papers to the largest two panels and then placed blank white on the back of the card for a message.

I also found a stitched hexagon layering die in my stash that worked out for the design which is what I used to cut out my colored mouse and layer behind him.  I found a sentiment that worked well for the space I had on my card and then finished it with a couple of teal rhinestones I had laying on my table.  It was fun to create, and it will also be great to send out too!

Here’s a closer view of the colored image that I’ve done using Copic markers.  I did add a few white dots to his cheeks with a white gel pen as well as the center of his eyes.

I have my card lying flat so you can see that it will fit inside an envelope for mailing.  It does spring back up, but I think that’s what will be great for a recipient to pull out of the envelope to see that the card stands up by itself.

Thanks for dropping in today and I hope you’ve enjoyed my card!

Challenges:

  1. Beccy’s Place – March Monthly Challenge optional Bingo (Not sure if the flowers in the image qualify, but if it does then I used the center across row)
  2. Crafty Catz – Anything Goes #667
  3. Crafty Animals – Anything Goes + animal #81
  4. Critter Crazy – Anything Goes featuring animal #84
  5. Creative Creases – Anything Goes with Fun Fold #78
  6. Creative Inspirations – Anything Goes
  7. The Crafty Addicts – Anything Goes #11
  8. Lil’ Patch of Crafty Friends – Anything Goes #226
  9. Crafty Calendar – More Than One Fold

Playing With Paper Blocks and Bunnies

Hello friends! Easter is coming for us for very soon and I’ve been enjoying all of the Spring that’s starting to come up outside with flowers and buds on the trees!  It’s still a little cool, but hopefully the weather will even out and stay warmer!

Since I’ve been trying to get motivated for Easter, I’ve pulled out some papers from my stash and have been inspired to CASE (copy & share everything) a friend that really inspires me to use things I have!  First, I’d like to share a fun Easter card that I’ve made for a sketch challenge that I was inspired by as well:

That sitting bunny is so cute!  (Thank you Carol…more on that later in post!)  If you check out the sketch from the Sketch Saturday challenge blog (see in challenge list below), you will see all of the fun angle strips in the sketch.  I thought it would be fun to pull out some Easter papers from my stash.  I wasn’t sure how to do the background until I saw that this sitting bunny worked perfect for a part of the paper pad that had this wheelbarrow image in it!  I cut it out from the paper and placed the bunny on it.

For the background of the card, I thought it would be fun to use my stencils to create a scene with grass and clouds.  The wheelbarrow bunny fit in the open area and then I used the angles from the sketch to cut pieces with the same Easter paper pad.  I just eyeballed everything by marking notches and lining those notches in my paper trimmer to get a straight cut.  Even the solid paper on the base layer came from the paper pad.  I just cut it A2 size to fit over an A2 top folding white card base.

The sentiment was stamped and cut out with the coordinating die.  I added some shadow under wheelbarrow with a green marker (not really the color I wanted, but it worked), and colored a bit of pink on the bunny too.  I added teal rhinestones next to the sentiment and done.


Next, I wanted to share something else that I was inspired by from my friend Carol at https://ourlittleinspirations.blogspot.com who sent me a very cool card and kind gift:

She always inspires me with her “snippet” creations and coming up with cards like this one to utilize those pattern papers we hoard so much!  The pattern is very pleasing to the eye and so I wanted to create one myself!  With all of the papers I have, I’m sure I could make a zillion cards! 😆  I also love how she used a monochromatic green theme with it…which I will need to try another one with this idea!  You should go check her blog out and be inspired too!

Also, she was very kind in sending me these die cut sitting bunnies & stools!  I do not know exactly where this bunny is from, but I’ve seen it around the craft world.  So cute!  Thank you so much for your kindness and inspiration my friend! 

So here’s the card that I created inspired by Carol.  I really love plaids and I thought it would be fun to re-create her design which I measured out her pieces and cut based on what I thought they were.  It was really fun and not as hard as it looks like it might be.  I wrote the measurements and cut from the same Easter paper pad as I used on the card above.  I started with a white base…that way if I messed up, it wouldn’t matter too much.  The sentiment piece was also from the same paper pad.  I just white heat embossed the sentiment and added some stitch details with a white gel pen.

I used one of the sitting bunnies that Carol provided me with, and tried to match up what I had from my stash the best I could to die cut some hearts along with the A2 side folding card base.

I brushed the hearts with a glitter brush pen and called it done.


I had so much fun playing with these paper blocks and bunnies!  I hope you’ve enjoyed my creations and inspiration today as well!  Thanks so much for stopping by!  C U SOON!

Challenges:

  1. Sketch Saturday – #746 optional twist: feature an animal (top card)
  2. Simply Create Too – Bunnies & Blooms #198 (top card)
  3. Make My Monday – Spring, Flowers, Weather, etc. #221 (top card)
  4. Fab ‘N Funky – Spring #591 (top card)
  5. Daring Cardmakers – Spring is in the Air (top card)
  6. The Paper Funday – Anything Goes optional: dies #63 (top card)

Art Journal Journey Inspiration-Letting Go…

Hello friends!  Hope that your week has been off to a good start.  We are closing up February, but there are still a couple of days left if you’d like to enter the Art Journal Journey Challenge that I’m hosting this month with the theme of “LIGHT“.  It has certainly been a journey as I’ve never created that many pages within a month’s time!  I did have fun on this journey as it also helped to push me to try a few different things that I can take me with as I continue to art journal.  Thank you to everyone over there for having me as host for this month and to those that have played along, as I have really enjoyed all of the fabulous inspiration!

For my last page, I challenged myself to try something I don’t feel comfortable with:

Sometimes as hard as it can be, you just have to let it go.   I let go the fear of hand lettering and drawing for this page.

For the Background:  I’ve got a piece of canvas paper 5.5″x8.5″ that was pre-punched on the right side with my Zutter machine.  (I like this canvas paper because it takes paint really well and the texture does not interfere with making the writing wonky.)  I took my favorite colors turquoise and lavender paints that were extremely watered down to cover the page with.  I was going for very light colors with a flow that blended together.  Once dried, I took some light blue ink and stenciled in certain places.

For that cute little girl that I found on my computer from Tiddlywinks, I printed her out rather large to fit on my page and colored her with Copic markers.  I printed an additional image over a piece of vellum and cut out the dandelion seeds and hearts and attached that portion to the girl image I colored.  I did this so that you could still see the background.  Once I’ve attached her to the page, I cut a piece of cotton ball and glued it to the dandelion weed and the one in her hair.  (Cotton is pretty light!)

Lastly, I took a deep breath and used a pen to write the title above her head as well as all of the dandelion seeds floating around with the words.  I used a white paint pen to make an underline around the words as if they’re flying through the air.  I filled in the lettering with a blue gel pen.

  • I hope you’ve enjoyed my page today and found some inspiration with it.  I also hope you’ve enjoyed my journey this month with art journaling too!  Thanks for stopping in!

Challenges:

  1.  Art Journal Journey – LIGHT/KEEPING IT LIGHT
  2. My Time to Craft – Create Your Own Background (paints, stenciling, drawing)
  3. We Love to Create – Anything Goes Mixed Media

Art Journal Inspiration-Fireflies and Gallery full of card classes!

Hello friends!  I hope that your week has been going great!  I had planned on posting earlier in the week, but I got so focused on completing my classes that I ran out of time!  (Check out the gallery below…LOTS of cards!)  I thought while I’m working on laundry today, I’d make a post sharing some things I’ve been doing…so grab yourself a beverage and take some time to enjoy!  First up is my art journal page:

  • Remember that I’m a guest host over at Art Journal Journey this month and the theme that I’ve chosen is “LIGHT“.  I hope you’ll stop over to see all of the wonderful inspiration that everyone has been creating with this theme and join in the fun!  

This so reminds me of Summer!  Remember as a child going outside in the dark and seeing tons of those flashing lights going off?!  I was always amazed that when I ran over to chase that flashing light, it disappeared on me and I was forever trying to capture those lights!

For the background:  I’ve chosen some Bristol Smooth cardstock in 5.5″x8.5″ pre-punched holes at the top cut with my Zutter machine.  I have started with stamping the jar and placing it where I thought it needed to be and then stamped those fireflies around it.  Starting with the fireflies, I dabbed on some yellow where they emit light and then used some soft blue around them working out with darker shades of blues as I reached the edges.  Bristol cardstock works great for ink blending with Distress Oxides.  To make sure that the yellow light was showing over the dark ink (without smudging it), I took some yellow paint and the end of my paint brush to make various sized yellow dots for the look of those fireflies in the distance.

I decided to take a leaf branch to generation stamp it along the edge for the illusion of a tree being there.  Although it looks black, I die cut a grass border in very dark green cardstock for the bottom portion of the page.  I also added another firefly at the bottom that was die cut and popped up with foam tape.  I used yellow ink for underneath his light glow.  The firefly wings have been covered with a glitter brush pen.

For the bottom lettering:  I printed it off my computer and then cut out each word, added some color with inks over them and then doodled around each word with a pen.  These words and this AJ page was totally inspired from a song called “Fireflies” by Owl City.  If you’re interested in listening to the song, check out the video below:

I learned that this song artist has insomnia and came up with this song during one of those times he had trouble sleeping.  I can relate and so it inspired my light page.


Next, I would like to share with you a card class event that I took part in called “Celebrations Delivered” provided by Scrapbook & Cards Today magazine.   It was a one day event with virtual live learning class videos and each instructor provided at least 3 different projects.  I have listed below each photo who the class instructor was.  

  • If you are on my website, just click on each photo to enlarge it and see the details about each one underneath the photo.  I have made 15 total cards from this:

Really had fun making these and using the products provided to us.  This also reminds me that I have more classes coming soon that I’ll be doing and that I’ve also forgotten to share some things that I had done last year, but hadn’t posted!  If anything else, you can hopefully enjoy or be inspired in some way as I post!  But more will come soon if my arms don’t fall off!😉

Thank you so much for stopping in today and I’m happy you’re here!  I will be dropping around to see what everyone is up to and I will be back on Saturday for our “Smash Your Stash” AJ inspiration!  Have a wonderful day!

Challenges:

  1. Art Journal Journey – LIGHT/KEEPING IT LIGHT 
  2. Simon Says Stamp Monday – NOT a card (art journal page at top)
  3. Try It On Tuesday – Spotlight It!  (Fireflies are spotlighted with yellow dots)  Hopefully this works for the challenge!

January AJ Page-BRR!

Hello friends!  Hope you’re enjoying your day so far and staying warm!  We’ve just recently survived a very cold below freezing temps in my area, so going outdoors is not that pleasant even bundled up!  So with that, I stay inside and find crafting to be my happy space!  

I’m very excited to be joining with my crafty friend, Carol (from Crafty-Stamper) for another year of SMASHING OUR STASH!🎉  I love the inspiration that we bring each other as well as accountability for getting those piles of stash used up!  Thank you for joining me again and please be sure to check out the wonderful inspiration on her blog too! Here’s my AJ page with this month’s prompt of “COLD” (anything related to this word):

Of course when I think of cold, I think of my favorite animal…the penguin!!  I pulled out some Lawn Fawn stamps to use on my page today.  Lots of blues and silver and sparkle help with the feeling of cold too!  I have so many sparkly items, so it was great to use some up!

For the background:  I started with a piece of Canson Watercolor 140# coldpress 5.5″x8.5″ pre-punched holes at the top and covered it with blue colored acrylic paints using a baby wipe.  I also went around the edges with a darker blue and then used a number stencil with white paint which you can barely see as I’ve covered most of it up.  I then splattered with white paint using a fan brush for the snow.

  • I also found a cool icicle border and cut it out with my Cricut machine in silver glitter cardstock for the top of the page.  I then used my Zutter machine to punch the holes again and used a corner chomper to round the top edges.

For the bottom:  I used all Lawn Fawn border dies for the mountains and snow hills.  The blue ice water the penguin is standing on is just a straight piece of blue cardstock covered with a glitter brush pen.  I also used Stickles glitter to cover the snow cone that the penguin snowman is holding.

The lettering was done with a Lawn Fawn alphabet die that I ink blended in blues and covered with crystal effects.  I foiled over the “January” word with blue foil and cut it out with a die and placed a couple of silver rhinestones next to it.  This was popped up with foam underneath the “BRR” letters.

I hope you’ve enjoyed my AJ page today and have been inspired in some way!  Thanks so much for stopping in!

Challenges:

  1. Art Journal Journey – It’s On the Calendar (January is COLD!)
  2. Kreativ-Tanten – Snow
  3. Once Upon a TimeMr. Popper’s Penguin book cover
  4. Penny’s Paper-crafty– Anything Goes with Paper
  5. The Sisterhood of Crafters – Winter Blues

Happy New Year! Mixing Up with Mixed Media!

Hello friends and welcome to 2024!🎉  I’m looking forward to a year filled with many happy memories and fun!  I’m wishing these things for you as well!  So to get the year started, I’m inviting you to a fun challenge to play along with at the Mix It Up Challenge!

The theme is always ANYTHING GOES with an optional theme of MIXED MEDIA!  With these challenges, you have plenty of time to enter as they run for 6 weeks!  I look forward to seeing what you come up with!  

I know that mixed media can seem a bit intimidating, but it’s only using more than 1 extra medium of any kind on your creation.  I usually do that anyway!  Here’s the card that I came up with for this challenge using the Mixed Media option:

I’m really loving how this turned out!  I’ve used another fun card kit from Taylored Expressions with the Snow Crystals card kit. (no longer available)

Background:  I started by white heat embossing the Swirling Snow Background Stamp over watercolor cardstock.  I used different shades of blue watercolor with a bit of turquoise in there as well.  I spritzed it with water to get the “watermark” look and let it dry.  I then used some Copic opaque white mixed with water and splattered some over top for another layer of snow.  After it was dry, I also filled in the circles with a glitter brush pen.

I die cut the snowflake die in navy and again in white cardstock 3 times.  I layered the navy at the bottom over the background.  The three snowflakes cut out with white were glued together and then I took 2 layers of sparkle silver embossing powder to heat set.  I layered the embossed snowflake slightly tilted from the navy snowflake and attached over top.  I also silver embossed the sentiment over a navy strip and added some “dash marks” with a white gel pen before attaching to the background.

Finished off the card by running the edges of the background panel with liquid glue and then attaching some chunky glitter to the edges.  I also attached a silver rhinestone in the center of the snowflake.  It’s so glittery and shiny in person!

Thanks so much for stopping in today and I hope that you will take the time to play along with us!  Be sure to check out the Mix It Up Challenge Blog for the design team inspiration!  

Challenges:

  1. Creative Fingers – Anything Goes
  2. Crafting From the Heart – Anything Goes
  3. Allsorts – Cold & Ice
  4. Crafting Happiness – Anything Goes
  5. Gem of a Craft – Anything Goes
  6. Four Seasons – Winter Season

December AJ Page-Keep Dancing + book and review

Hello friends!  Hope you had a great Christmas and were able to make some wonderful memories!  I can’t believe that we are ready to close out another year!  The time just goes way too fast and there’s so much more to look forward to!  I think the theme for my upcoming year is in this title post – KEEP DANCING!!!🕺

The last Saturday of the month (AND THE YEAR!) brings us to the monthly Art Journal Page collaboration with my crafty friend, Carol (from Crafty-Stamper)! We get creative trying to use up our never-ending stash piles along with a prompt for each month.  I know she always has great inspiration to share, so please check out her blog too! Here’s my AJ page with the “SMASH OUR STASH” December prompt of “Previous Prompt”:

Since this is the time of the year that we have a “look back”, I thought it would be fun to take one of this year’s previous prompts and come up with a new AJ page.  I chose April’s prompt of “SHINNY/SPARKLY”, and you can catch that page in the photos below or see my previous blog post HERE.

There’s nothing quite shinny or sparkly than New Year’s Eve!  I always think of the ball dropping on Times Square in New York, but it also had me thinking of a disco ball that is very sparkly.  Found this image online and printed it out.  Cut it out with a circle die and then added a bit of colored shading with my markers in grey.  I took a sponge to add glue to the entire ball and then covered it with chunky glitter.   I added some sparkle images and filled them with silver glitter and then die cut the numbers and glued them over top of the ball.

For the background:  It’s just a 6″x9″ black cardstock pre-punched at the top and then splattered with silver watercolor.  I added some music notes and die cut stars.  For the bottom, I used some woodgrain texture paper and cut strips to make a wood floor for the Riley the Moose disco dancer.  A silver metallic paint pen was used for the ball string at the top and the wording around the top of the ball.

I stamped, colored and hand cut the moose and popped him up over a die cut shadow for under his feet.  I typed a quote on the computer and printed it out over silver cardstock.  While it was still wet, I sprinkled clear EP over top and cut rounded corners for the page.  Lastly, I just popped up the glittered ball with foam tape and added some silver rhinestones at the bottom.

  • I thought it would be fun to do a review of all of the monthly pages that were created this year.  I put the months in order below.  (If you are on my website, just click on the photos to enlarge them.)

I pre-punch the holes at the short side of the pages each month and then at the end of the year, I use my machine to bind them together to make a book.  I add covers and decorate them.  There is a post with last year’s book HERE.

For this year, I went with the vertical look and added a stretch cord to keep them together better.  I also tried out the napkin with the cover:

The napkin is at the bottom with the foil marble look.  My husband got some napkins for New Year’s, and I thought I’d try it out.  I added some chipboard, stamped and cut out numbers and added some wooden pieces.  I used the rose papers for the covers on the inside as well as the back of the chipboard covers.  It was put together with my Bind-It-All machine and coils.

I hope you’ve enjoyed seeing my Art Journal Journey throughout the year as I sure have enjoyed doing them!  I get to pull from my stash to use, but there is also so much more to use!  So this means that I will for sure be continuing with this journey and I hope you’ll join me too!

Thank you so much for stopping by to have a look back.  Wishing you peace, love and health for the upcoming 2024 year!  See you in the next year friends!!!🎉

Challenges:

  1. Art Journal Journey – Above Us Only Sky (New Year’s Eve Ball Drop on Times Square with stars in the sky!!!)
  2. Crafting From the Heart – Anything Goes #8
  3. Creative Artiste – Anything Mixed Media Goes with option of Christmas
  4. Alphabet – ‘T’ is for Texture (texture on the top page with woodgrain floor, the chunky glitter disco ball.  Texture on the book with chipboard, wood pieces and paste.)

Lots of Joy Mailed Out!

Hello friends!  I hope that you’re having a great start to your week!  We’re almost there as Christmas approaches us quickly!  I’ve been enjoying the Season and having fun keeping busy.  Currently baking cookies and decided to take a break from that to sit and make a post about all of things that I’ve been doing besides posting!😆

This is just one of the several similar cards that I created for my Christmas cards this year.  It came from a Christmas in July card kit from Taylored Expressions.  It mainly used the Wreathed in Joy Stamp & Stencil Combo set.  There are dies you can cut them out with as well as foilable panels which is shown on this one.

I do not like to make several of the “same thing”, so I’ve changed them up to different colors, layouts, etc.  So you can see the different versions I’ve done below.  (If you are visiting my web page, just click on each photo to see it enlarged.)

 *Apologies for the messy stack for photo taking…it was a lot to do all at once!

I thought these would be enough for all of the Christmas cards to send out, but I realized going back through my list that I wasn’t going to quite have enough. 

So I’m glad that at the beginning of this month I took a Hero Arts Stamp-a-Long and made several different types of Christmas cards.  Here are the results of these below:  (Again, if you’re looking on my web page, just click on the photos to enlarge them.)

So some of these were also taken and used for sending out more Christmas cards.  I’m glad that I did the projects for this class or I probably would not have had enough cards.

BUT WAIT!  That’s not all!  I’ve also made a few other Christmas items that I’ve also sent out.  I’m also sharing some gifts and gift tags that I’ve made from a Taylored Expressions Advent Calendar that I got this year.  I made some more cards and tags.  (I tried out wax melting which is something I’ve never done…it was fun)  Others are from classes I took or participated in Craft Roulette for.

If you’re on my web page, just click on the photos below to enlarge each one.

Wow, so that was a lot!  I know that my blog has been pretty sparse with posts lately and I am finally getting around to posting the things that I’ve been working on, so I hope you’ll get that and you’re able to take some time for yourself this season and enjoy the peaceful quiet moments!

I will be sure to take a moment and catch up with everyone before Christmas arrives.  In the meantime, it’s back to cookie making!  Thanks so much for stopping in today!❤️