Working in a Winter Kit!

Hello friends!  If you live around my area, then you know that it’s in full swing Winter Weather time!  We do have snowflakes in the forecast for tomorrow, but hopefully it’s not too bad!

So while we’re thinking of snow, I thought this would be a great time to share with you all of the winter style cards I’ve made using a brand new subscription card kit that I’ve got going from Pink and Main.  So grab a cup of your favorite beverage and enjoy some crafty winter inspiration!

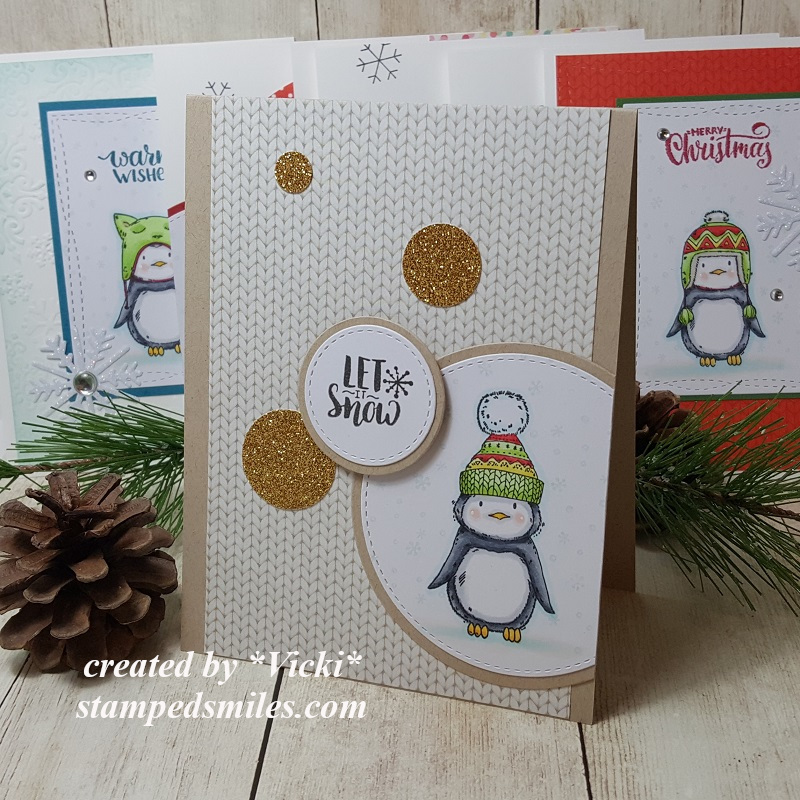
So my first card kit from Pink and Main was the December 2019 Winter Wonderland Crafty Courtyard Box which is no longer available, but they have this month’s box out which I will I get soon!  Here’s what I’ve made for the December box:

Vicki-PMCCboxDec2019-set

Yeah, I know!  That’s a lot of cards, right?!  I was surprised myself how many cards I was creating from this kit and I could’ve just kept going as I still have plenty of supplies left!  I needed to make a few more cards to send out after Christmas for the ones I missed and send out thank yous…so this came in handy actually!

P.S.  Every single one of these cards were completed with an envelope too!  (So far so good on my New Year’s Resolution! Yay!)

Vicki-PMCCboxDec2019-card6

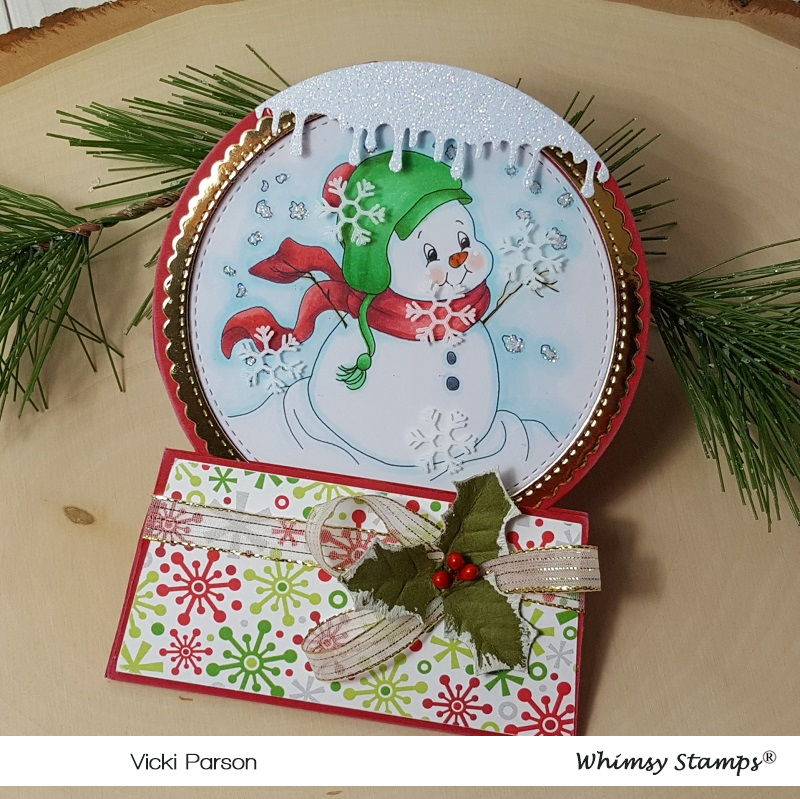
My first card here is a “see through” design using acetate for the center of the design.  I have used a Bold Snowflake die from Pink and Main NOT included in the kit, but overlayed it with another foam snowflake and button that WAS included in the kit.

I stamped snowflakes from the stamp set in the kit and added some “dots” with Stickles over the design too.

Vicki-PMCCboxDec2019-card2

This card was pretty simple, but I love it!  I’ve used the sentiment die that was included in the kit and die cut it with the sparkle cardstock from the kit as well as the pretty snowflake papers.  All I did was stamp 3 snowflakes and added another dot of Stickles to the centers.  I chomped the corners at the bottom and done!

Vicki-PMCCboxDec2019-card1

For this particular card, I’ve decided to make a ‘Z-fold’ card design and if you’d like to know the measurements and/or how to see one put together, then please check out my video tutorial on it here – “Coffee Style Z-fold Gift Card Holder“.

Vicki-PMCCboxDec2019-card1A

This is how the card folds closed.  It folds down to an A2 size.  I love how the colors look on this one!  Everything on this card except for the greeting on the inside was from the kit.

Vicki-PMCCboxDec2019-card4

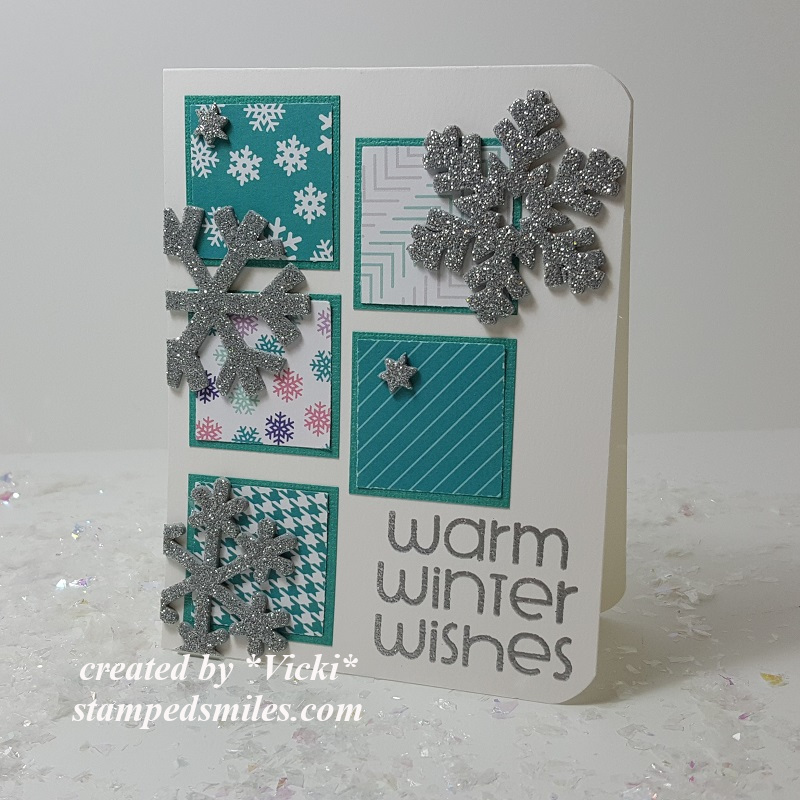
So I wanted to use lots of those papers from the paper pad included with the kit and they were double sided so I had even more choices to deal with! LOL!  I decided to make square panels for my layout and use those sparkly silver snowflakes from the kit to place over top.  I heat embossed the sentiment from the stamp set at the bottom.

Vicki-PMCCboxDec2019-card7

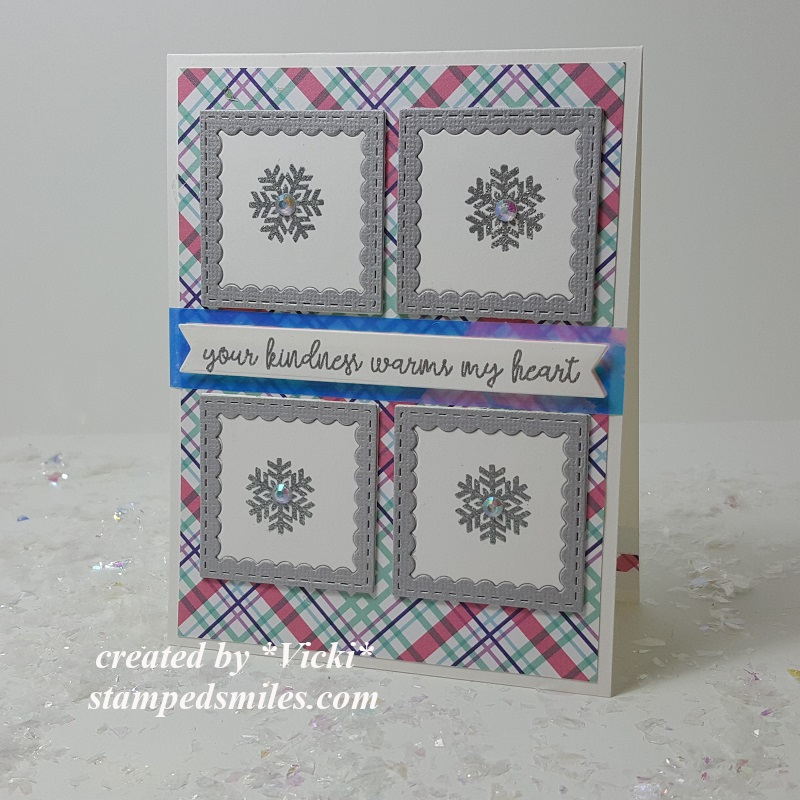
This card was just destined to be a square design.  I wanted to use my Reverse Scallop Square dies from Pink and Main for this one.  I’ve also used papers from the kit as well as the silver sparkle paper and snowflake.  I took a snowflake embossing folder fort he background.  I used sequins from the kit and filled the centers with more of that silver Stickles.  (I got a bit of the prop  over my sentiment there.  LOL!)

Vicki-PMCCboxDec2019-card3

I wasn’t finished using that “Reverse Scallop Square” die set, so I took it to die cut some embossed snowflakes and layer them over some of the papers from the kit.  The middle of the card has a strip of the awesome translucent tape included in the kit.  I covered the middle of the snowflakes with a rhinestone and pop up the embossed sentiment with foam tape over the tape.

Vicki-PMCCboxDec2019-card5

And this last one was hubby’s favorite. I took the largest image from the stamp set in the kit and heat embossed it over a watercolor panel.   Then I took some Distress Oxide ink spritzed with water over a glass mat and brushed them over it and splattered some with with a brush as well.  I die cut the sentiment from the die included in the kit with the sparkle paper in the kit and finished the design with more sequins filled with Silver Stickles.

I had “SNOW” much fun with this kit and creating these cards!  I hope you’ve enjoyed it as well and have been inspired in some way!!

Thanks so much for stopping in and I enjoy seeing what you have say!  I loved reading all of your New Year’s resolutions and NOT resolutions too! LOL!!

I’ll see you again soon my friends! 🙂

Challenges:

  1.  Cardz 4 Guyz – Blue is the Color
  2. Arty Divas – #12 Anything Goes
  3. Classic Design– Anything Goes
  4. Creative Inspiration – Something New or Something Old
  5. Challenge Up Your Life– Anything Goes
  6. A Bit More Time to Craft – Anything Goes
  7. Simon Says Stamp Work It Wednesday – Snowflakes!

Merry Christmas Friends!

Merry Christmas to all of my friends here and I’m honored to be a little part of your life with you in some way…I hope you know that!

**This is a pre-scheduled post to wish you all a special happy day.  I’m away spending time with my family right now, so sit back with your favorite beverage for a time out and I hope you enjoy today’s long post.**

Just wanted to share BATCHES of the cards and creations that I’ve made for the Holidays this year.  I know that I make lots of creations, but for the purposes of mailing cards, I try to keep these particular cards as “mail friendly” as possible, so these are more simple in style for me, but really enjoyed making them and just had fun:

Vicki-GlitterSnowSceneSet

I tend to do bulk cards in a set of 4-6 so that I don’t get “bored” with it or run out of a certain supply or something! LOL!  So this first set of 6 cards is using the gorgeous Stampin’ Up! stamp set “Winter Woods”.  I stamped up the scene background and then covered the entire panel with double stick adhesive and then covered it with dazzling diamonds glitter.  (The deer I added is from a favorite Newton’s Nook stamp set called Serene Silhouettes.)  The white heat embossed greeting is from the Stampin’ Up! stamp set “Itty Bitty Christmas”.  (I think this set was probably my favorite to do!)

Vicki-PenguinChristmasSet

I just *had* to get these penguins in there somewhere! LOL!  These set of cards are actually all just a bit different, but I colored up the penguins from the “Pablo the Penguin” free stamp set included with the Making Cards Magazine for December and cut them out in different ways and then mounted them onto cards.  Some of them use some of the free papers that were also included with the issue.  So this is another set of 6 cards that were mailed out.  Love those cute penguins with the different hats! LOL!

Vicki-ReindeerChristmasSet

Here’s another set of cards that I’ve made to send out, but because these were even more simple than the ones above with very little stamping involved, I made 8 of these.  (So if you’re counting, I’ve made 20 total so far…not including some other special cards I’ve mailed out to people along the way.)  – I absolutely fell in love with this die set from STAMPlorations called “Two Reindeer” and was so excited to see that I had won a gift certificate from their blog and this was something that I knew I would be getting right away!  This was cut from gold cardstock and mounted over a piece of various different Stampin’ Up! pattern paper from my stash…it’s always nice to be able to use up more of my hoarded paper stash!  The sentiment is again from the Stampin’ Up! “Itty Bitty Christmas” stamp set.

Vicki-GnomeXmasWobbler

Now I didn’t want to leave out a couple of cards that I made especially for my boys.  They know their mom likes to stamp, but they know I have to add in a bit of my goofy humor with them as well! 🙂  So of course I had to pull out this fun Simon Says Stamp “Gnome for the Holidays” card kit (sold out) to make them!  I think I ended up using ALL of the wobblers in the kit too!  I told my son that this is me wobbling with the presents about to drop everything and my hubby is trying to save everything! LOL!

Here’s a little wobbler action for you too…

And of course I had to make another card for my other son too…

Vicki-GnomeXmasWobbler2

I absolutely feel in love with all of those cute gnomes that came out everywhere this year for crafting…so I still have more that I didn’t get a chance to use, but thought this would be perfect for my son with this trendy style design…of course using a wobbler too!  And I do love him GNOME matter what! 🙂

For some reason, I thought the wobbler action on this one was more fun! LOL!  Not sure if it’s because of the weight/size or what…but cool to see the difference.

And whilst in the middle of making up all of these cards to mail out, I also had fun playing with the Christmas Advent Calendar that I had purchased a while back.  Because it’s an “Advent Calendar” you start with December 1st and open each day.  So each day to open was pretty cool because there was a new surprise stamp inside!  So I took each day’s stamp and made a tag for each one clear up until today’s last window to open: (obviously previously opened and made to finish! LOL!)

Vicki-BMAdvent-Week1

I will show by the week.  So this is week 1 with the first 5 days opened.  The stamp that I received for each day is noticeably featured in each tag.

Vicki-BMAdvent-Week2

And these are the tags made for week 2.  The angel tag was made with Deco Foil in the background.

Vicki-BMAdvent-Week3

These are week 3 tags made.  The purple colored tag on the left bottom is actually a shaker.  The window sheet was glaring in the camera.

Vicki-BMAdvent-Week4

This is week 4 of the tags.  Hubby picked out the candy canes as his favorite of all of them.  Mine was the stockings tag.

Vicki-BMAdventTags-Week5

And here is the final last week of the tags from the Advent Calendar.  Really cool to have all of these tags on hand for gifts!  I needed them! 🙂

And of course I wasn’t done with the Advent Calendar box itself because I thought I could “recycle” the little window flaps on the box because they had some cute images on them for each day…so I cut them off with my scissors after I opened that day and kept them:

Vicki-BMAdventTags-windowflaps

So I thought it would be fun to use them to create a card!  They had numbers on them, but I have covered them up in certain ways so that they’re not showing.  The cover die was cut out from the same colored cardstock for the background too.

Whew!  Now to get finished up with my wrapping and “merry making” before the big day!  I hope you are or have enjoyed yourself a wonderfully HAPPY Christmas day no matter how you’re celebrating it!  Thank you for spending some of your time here on my blog today!

I’ll be seeing you soon my friends!

Christmas Makes Countdown!

Hey friends!  I hope you’re having a great start to your week!  I have been in the Christmas making card mode the last few days and just finished sending out over twenty cards I believe.  I had previously made a few and already had those sent out over seas too.  I actually still have just a couple more to make for a few people close to me and I’ll be finished.

So I thought since I’ve been doing Christmas makings, I’d share some things that I’ve been working on with you!

Vicki-WS-snowglobe-KACCristmasswap

Here’s a fun “Snow Globe” shaped card that I had actually made for the Kit And Clowder Christmas card swap.  I made it in November and had actually sent it out the last week of November.  I just wanted to make sure she received it before I posted it anywhere and she did!

I have used this really sweet digital image from Whimsy Stamps called Snowman and Snowflakes by Crissy Armstrong.  I had to make it a certain size so that it would fit with my “Snow Globe” design.  So I’ve used a stitched die cut circle to cut it out with so that it could be placed on the inside of the card design.

If you would like to see how to put one of these shaped cards together for yourself, then you can check it out HERE on Splitcoast Stampers for the tutorial.

I’ve used some fun papers for the bottom and die cut a stitched scallop circle frame from some gold mirror cardstock and then used my MS “goo border punch” for the snow drip edge at the top.  I even took some white Staz On ink and stamped a few snowflakes over top of the acetate piece on the front of the card.  I added some gold ribbon and a holly sprig from Prima around the bottom.

Vicki-WS-snowglobe-KACChristmasswap-close

Here’s a closer view of the image and how I’ve got him all colored up with Copic markers.  I’ve also taken a glue pen and added some extra glitter to the snowflakes around the image as well.

Vicki-WS-snowglobe-KACChristmasswap-open

And when you open the inside of the “Snow Globe” card, this is what it looks like with the sentiment.  I have used a retired Whimsy Stamps clear stamp set called “Christmas Greetings” to stamp both the “happy” sentiment in red ink as well as the snowflakes on the piece of acetate with White Staz On ink.

I then took the Whimsy Stamps Christmas Large Word die and cut it out with a piece of gold mirror cardstock and glued that to the inside bottom of the card.  I also took some white ink and sponged around the edges of this entire inside.

I haven’t made one of these Snow Globe cards for quite a while, so that was fun to do!  I hope that you’ve enjoyed it too!  Thanks so much for stopping in today and I’ll see you again soon!

Challenges: 

  1.  Make My Monday – Anything Christmas
  2. Crafty Cardmakers – Christmas
  3. The Holly & Ivy Christmas – Anything Christmas
  4. Papercraft – Christmas
  5. Sweet Stampers – Anything Goes
  6. Try it On Tuesday – Christmas is Coming!
  7. Crafty Creations – #404 Anything Goes
  8. Cute Card Thursday – Anything Goes

Cards From My Heart

Hello friends!  With this not cooler, but COLDER weather we’ve been having, it looks like it may be a hard winter ahead and I’m already feeling it in my body unfortunately.  So with the heating pad and warm slippers,  I’m still crafting!

Today I’d like to share some cards that I have made for my hubby using some of the adorable stamps from Lawn Fawn …which I love:

Vicki-LF-Anniversary

At the end of October hubby and I celebrated our 20-year anniversary, and I made this card for him to let him know how I feel about him after all these years.  This would be something that we would certainly do where we live!  We always enjoy looking at the night sky together.

I started with some watercolor paper and blended some distress inks for the background and spritzed it with water.  I then made sure it was completely dry before white heat embossing the stars that I colored in the centers with a gel pen.  I then took a white gel pen and added more “dots” in the sky.

I’ve used Upon a Star and the Winter Skies stamp sets for both the images and sentiment. I took the Little Town border die to add over top of the starry sky and layered it onto a navy card base that has some more die cut stars (from Upon a star coordinating dies) at the top sponged with white ink.

For the sentiment, I had to piece together a couple of words from different sets to get it to say what I wanted it to.  I cut it out with a long banner die from My Favorite Things.

Vicki-LF-Anniversary-close

Here’s a closer view of the sky and the images.  For the fox couple, I black heat embossed it and then used my Zig Clean Color Real Brush markers to color them with and then popped them up over the corner of the scene with foam dots.

I actually used a color palette and sketch from a challenge blog, but missed the deadline to post it, but I think it turned out great and hubby enjoyed it.  He said, “Yes, this is something we would do!”  He also likes the color blue.

Here’s another card I made for hubby as his birthday was this last Friday:

Vicki-LF-LightUpCard

Although this one is a bit simple, it has a really fun interactive element to it!  If you’ve known me for a while, then you may know that my husband is an electrician, so this card was very fitting for him!

I have used the Lawn Fawn Turn Me On stamp set and coordinating dies along with the Life is Good stamp set for the sentiment and the Push Here stamp set to make this card.  I also have a large stash of Lawn Fawn papers that I’ve used for this which I don’t think are available any longer.

I used vellum for the light bulb that was heat embossed over it and then I colored it yellow on the backside of the vellum to place behind the die cut opening from the blue panel.  That was die cut with the coordinating dies.  I stamped and colored the light switch as well and also die cut it out over the blue panel.  I then white heat embossed the sentiment and cut it out with a sentiment banner die from MFT.  It was sponged with white ink and glued over the blue panel.

Vicki-LF-LightUpCard-alight

The best part of this design is that when you push on the light switch, the light bulb turns on!  I’ve used the Chibitronics to create this feature.

You can see here what it looks like when you push on the light switch!

You can also check out this quick few second video to see it in action below:  (CLICK HERE if you want to see it on You Tube.)

Although this looks like a pretty simple card, mechanically it had its difficulties with the light up interior portion of it and it was met with some challenges and patience as I had to keep testing it to make sure it worked right!  At one point I had to tear it apart because the battery accidentally flipped over!  I also had to use like 4 layers of foam tape so that the light wouldn’t continuously be on all the time! LOL!

Vicki-LF-LightUpCard-flat

It was all worth it though as it was for the love of my life, and he really did appreciate the efforts that went into making it as he even took it to work with him so that he could show it to his fellow co-workers!  LOL!  They seemed to be pretty impressed with it and even offered some advice on how much to charge for something like this!  LOL

The card was thick due to the amount of foam on it, so it didn’t fit into a regular envelope. Since it went to hubby, I just hand delivered it to him! 🙂

Hope you’ve enjoyed my share of creations today that I made for hubby!  I will be seeing you again soon!  Thanks for dropping in friends…I will be visiting soon!

Challenges:

  1.  Lawn Fawnatics – Cards for Guys
  2. Creatalicious – Anything Goes with optional:  For a Man
  3. Crafty Friends – Anything Goes
  4. Cardz 4 Guyz – All Wrapped Up (top card with scarves)
  5.  Get Creative – Anything Goes
  6. Through the Craft Room Door – Anything Goes
  7. Retro Rubber – Anything Goes + stamps older than 1 year (ALL listed are at least 1 year or older!)

Naughty or Nice for Digi Doodle Studios

Hello friends!  Hoping you all had a wonderful weekend!

Today I’m sharing a fun circle shaped design using a cute new Pairables set from Digi Doodle Studios:

Vicki-DDSChristmasElves-Nov4

This cute little elf is sitting atop of an ornament, getting out the list for Santa and marking down who’s naughty or nice! LOL!  This image and sentiment are apart of the Christmas Elves Pairables Digi stamp set.   On my computer I actually expanded the ornament image to make it larger and then added the cute little elf from the set right on top of the ornament.  I printed it out as one image and colored it up with Copics.  I’ve also stamped some snowflakes around the image and cut him out with a circle die.  I used some Broken China distress ink to sponge around the edges.

I layered him onto a brushed gold die cut circle and added some gold stickles around the edges.  I then layered these onto a red die cut circle that was embossed with an embossing folder, which is also the same one that I used for the green piece on the inside of the card.

I made a circle easel card and then cut out the sentiment from the digi set in a strip  (also sponged with Broken China ink) and mounted it over another piece of red cardstock and attached it on the inside right above the green embossed layer.  (This strip is what helps keep the front layer propped up.)

Vicki-DDSChristmasElves-Nov4-side

Here you can see the side view of the card design.  These are very simple to make with die cut shapes and I love how they nicely display for the recipient.

I’ve add some green saddle stitch ribbon to the center of the red circle before attaching it to the easel card backing and then added a bow that I’ve tied 2 gold bells on with a piece of twine.  I then used the twine to make a double bow to go behind the green one and glued them on my card.

I added some snowflake accents and placed a blue rhinestone in the center of each.

Vicki-DDSChristmasElves-Nov4-close

Here’s a closer view of the details on this cutie.  I actually have lots of thing going on with this image.  First, I covered the bottom of his ornament with glossy accents.  It’s a fairly thick layer and you can see the details of it in the photo below, but I had to let it dry over night!

I have taken a gold gel pen and colored the “bells” on the elf’s outfit.  I then took a white gel pen for his cheeks.  On top of the ornament, I used a glue pen and covered it with some clear loose glitter.

For the trim on his hat, I took some Brutus Monroe Snow Paste and a small brush to apply it.  It’s REALLY thick stuff, so for a small area like that, I had to be a bit careful.  Love the sparkle in it and you can see, in the photo above this one, the side view of how thick it actually is!  I heat set it with my heat gun because it “puffs” up a bit when you heat it.

Vicki-DDSChristmasElves-Nov4-flat

Here’s what the card looks like when it is closed up.  I think this would also make for a really cute ornament too!  You can really see the shine on the glossy accents from this photo and why it took all night to dry! LOL!

I hope you’ve enjoyed my easel card today and gotten some inspiration and/or a smile!  Thanks so much for stopping in today!  I’ll be seeing you again soon!

Challenges:

  1.  Merry Little Christmas – November Anything Christmas Goes
  2. Pearly Sparkles – Christmas
  3. My Time to Craft – No Rectangle or Square Cards Allowed
  4. Stamping Sensations – Traditional Christmas Colors (Red, Green, Gold)
  5. A Bit More Time to Craft – Anything Goes
  6. Crafts Galore Encore – Anything Goes

Z-Fold Gift Card Holder with Digi Doodle Studios for Coffee Lovers Blog Hop + Video Tutorial

Good morning friends!  Aaah!  It sounds like a great morning for coffee, doesn’t it?!  Well it sure does to me anyway!  Today, my post is all about coffee…so grab yourself a cup, sit back and enjoy!

I’m so excited today to share my post with you because Digi Doodle Studios is a first-time sponsor for the Coffee Lovers Blog Hop!  There are lots of fun coffee themed products in the store and I’m thrilled to be sharing some with you today:

Vicki-DDS-CoffeeHop-ZfoldGiftCard

Isn’t she just adorable with coffee in hand?!  This image is called “Ginger” from Digi Doodle Studios and I’ve got her all-colored up front and center of my Z-Fold Gift Card Holder.

If you have ever made a Z-Fold card, then this is something with a little bit of extra added fun with a gift card holder pocket on the inside, plus you can see how the card nicely displays on the front which is perfect for popping into an envelope to mail out to your coffee loving friend!

The papers that I’ve used for this work perfectly with the theme today which are also from Digi Doodle Studios called Coffee Break Digi Papers.  (I love that I never have to worry about running out of my favorite pattern!!)  There are also several sentiments from Digi Doodle Studios used on my project called Coffee Anyone Sentiments.

*If you want to see a video with detailed instructions on how to make one of these Z-Fold Gift Card Holders along with a sharing of the full collection of the digital papers that I’ve used on my project, check out the video below or CLICK HERE to view it on You Tube:

This is such an easy and fun project to put together especially for the up-coming Holidays, but as you can see this is very neutral so that I could easily use it for most any time of the year.

Vicki-DDS-CoffeeHop-ZfoldGiftCard-close

Here’s a closer view of “Ginger” and how I’ve colored her up with Copic markers.  Of course, if you know me, I had to add a bit of sparkle somewhere.  I took a glitter brush pen and added some sparkle to her pink bow, the heart on her coat and the lid and flower on her coffee cup.

I die cut her out with a stitched rectangle die and then layered a piece of brown cardstock die cut with a scallop rectangle die.  For the around the edges of the image panel as well as the other sentiments I printed out, I sponged some Tea Stain Distress Ink around the edges.  The sentiment were cut out with a stitched circle die and then layered with a piece of brown cardstock cut with a scallop circle die.

To keep the image panel in place, a foam dot was used at the bottom panel so that when you pull up on the flap it opens up:

Vicki-DDS-CoffeeHop-ZfoldGiftCard-open

And this is what is so fun, is that when you flip up the front panel, you see how it opens up with the fun coffee sentiments inside and the surprise gift card holder at the top!

I have an urge to go to Starbucks now! LOL!

I hope you’ve enjoyed my fun Coffee themed project today as well as the video tutorial on how to make one yourself!  I’d love to see yours if you make one!  If you have any questions about anything, please let me know!

Now to sip on some more coffee and join in on all of the coffee inspiration today!  Thanks so much for stopping in and I’ll see you again soon!

Challenges:

  1.  Coffee Lovers Blog Hop – Anything Coffee/tea/cocoa/cider related.
  2. Watercooler Wednesday – WWC245 Anything Goes
  3. Simon Says Stamp Wednesday – Anything Goes
  4. As You Like It – Favorite Papers and Why? – Digital papers because I never have to worry about running out of my favorite pattern and I don’t have to worry about storage!

Dies & Punches for Cute Card Thursday

Hello friends!  It’s time for a new Cute Card Thursday challenge!  This week we’d like to see those “Dies &/or Punches” on your creations this week!  These are some of my favorite tools to use in my craft room and we’re looking forward to seeing your take on this challenge!

Here’s what I’ve made for it:

Vicki-CCT600

Nothing says “Fall” to me like those ripe apples ready to be picked and specially to make a yummy caramel apple with as well!  I had so much fun pulling out several of my Lawn Fawn stamps and dies to make this interactive card design!  I haven’t played with my Lawn Fawn stuff for quite a while, so it was time! 🙂

For the interactive pull tab mechanism, I’ve used the Lawn Fawn Magic Color Slider dies along with the Caramel Apple, Thanks a Bushel and Jump for Joy stamp sets to put together this card.  I’ve also used the Jump for Joy and Thanks a Bushel dies to cut out some of the images on my card.  For the pull tab at the top, I took a sentiment from the Push Here stamp set to stamp the “pull here”.

For part of the layers in the card, I took an older Scallop rectangle die no longer available from Lawn Fawn for the white layer.  I’ve also used some Woodgrain cardstock that I’ve sponged with Vintage Photo Distress ink along the edges of it and the plaid paper which is no longer available from LF.  For the layer behind the apple panel and the base of the card I’ve used the LF Sunflower cardstock.

Vicki-CCT600-close

Here’s a closer look at the image that I’ve got colored up with Copic markers.  I just stamped them over some Copic blending card.  For the inside slider where the caramel apple is, I didn’t want to add any layers to it so that it would slide freely.

Vicki-CCT600-upright

Here’s what the card looks like with the slider hidden inside.  I just added some twine to the end of the pull tab at the top.

Hope you’ve enjoyed my interactive card design today using lots of fun dies!

Thanks so much for dropping in today and I’ll be seeing you soon!!

Challenges:

  1.  Lawn Fawnatics – Awesome Autumn
  2. Simon Says Stamp Wednesday – Interactive
  3. Simon Says Stamp STAMPtember Lawn Fawn Collaboration – LF products
  4. Double Trouble – Thing 1:  Mad for Plaid, Thing 2:  Use Your Stuff Challenge entry (see below), Thing 3:  Tag &/or Frame
  5. Use Your Stuff – Tag &/or Frame
  6. Sheepski Designs – Die Cuts &/or Punches
  7. Little Red Wagon – Fruit

Triangle Corner Pop Up Card + video tutorial!

Today I’m sharing the Triangle Corner Pop Up Card.  I have actually received several messages and comments that people wanted to see a video tutorial on how to make one.  So I thought I would come up with a version that I could share to show the many different variations that you can come up with and the fun you can have with it!

Vcki-BMBeHappy-TriCornerPop-opened

This style is a much more elegant approach which is much different than a past creation I put together.  I love that you can change the look and have fun playing with different stamps and elements to fit inside the design!

For this one, I have taken the Rose and Butterfly stamp sets to stamp and Copic color.  I fussy cut out the images on my design.  I’ve used Jurassic 100# and White 100# cardstock.  The decorative paper is from the Rustic Florals paper pad.  I stenciled the bottom of the Jurassic panel with a stencil using some Unicorn Horn Glitter Glaze.  Both of the rose images along with the small heart circle on the easel card were popped up with some foam tape.

For the circle easel design, I’ve cut out a scallop circle with the white cardstock in the size that I thought would fit within the design.  Then cut the body of the card with other circle dies in the Jurassic cardstock and then the front with some more of that Rustic Florals paper that I’ve used in the background.  The sentiment below the butterfly and the hearts on the small circle were stamped from same stamp set.  All of the white panels (with the exception of the scallop circle) was ink foam blending with some grey distress ink.  To keep the card “locked” in this position, I’ve used the Mini Disc Magnets.

If you are interested in learning how to create one of these cards for yourself, then please be sure to check out my video below.  CLICK HERE to view on You Tube.

These cards can look really intimidating, but once you see the measurements of how to put one together, they’re really easy and fun to make!

Vicki-BMBeHappy-TriCornerPop-unfolded

Here’s what the card looks like completely opened up.  You can see on the left bottom panel that I’ve taken that rose from the stamp set again and stamped it in the corner with some grey ink after ink foam blending around the edges of it.  This will be the area that I’m leaving for a personal message.

To fold it down to a 4″ square card that’s close you will start by folding down on the top and then fold it over from the right side to the left.  This will completely close it up.

Vicki-BMBeHappy-TriCornerPop-front

Here you can see that the card is completely closed to a 4″ square size minus the rose leaves sticking out which I don’t mind.

I took another panel of the Jurassic cardstock for the front of the card and sponged around the edges of it with the white Ink and then also stamped the rose again in the corner of it.  Because I had several dimensional and extra layers on this card, I had to use a ribbon to tie it together to help it stay closed up.  You might need an envelope that is slightly larger than an A2 envelope, but if you use less layers and dimension, it should fit in an A2 size envelope.

Hope you’ve enjoyed my interactive card and tutorial today!  Thanks so much for dropping in with me! 

Challenges I’d like to enter this card for:

  1.  Cardz 4 Galz – #103 Wings
  2. Crafty Cardmakers – It’s a Bug’s Life
  3. Through the Craftroom Door – Anything Goes
  4. Try it On Tuesday – In my Garden there is….

Sending Smiles Mermaid Style

Hello friends!  Well it feels nice to get back into the swing of things here again!  I want to thank you from the bottom of my heart for the awesome welcome back I recieved from you guys!  Wish I could reach out through the screen and give you all a big hug!  🙂

Today is August 1st AND it’s on a Thursday too, so I wanted to share the card I made for the Whimsy Stamps August Digital new release as well as a brand new Cute Card Thursday Challenge too!!  Whimsy Stamps is our sponsor this week and it’s an easy “Anything Goes“, so please be sure to stop by the blog to see the wonderful inspiration from the rest of the design team and play along with us!!  We look forward to seeing what you’re working on!

Vicki-WSGoldie-Aug1

Oh aren’t these Sylvia Zet images just as cute as can be?!  I so enjoyed coloring her up!  (See the close up photo and details below.)  This is the DIGITAL version of  “Goldie” just released from Whimsy Stamps this month.  You can still also purchase the rubber cling stamp, but now it’s nice to be able to have the option to choose either one!

Since her name is “Goldie“, I had to use the orangish color palette for her!  When looking at the image, I immediately saw “bubbles”, so I thought it would be fun to make a circle easel card design with her!  This actually turned out to be a “non-traditional” circle easel card with the circled image going askew from the main area…which makes it seem more like several bubbles underwater!

I have cut several different sizes of circles, one for the main circle card base and several others with some old SU! bokeh looking papers from my stash.  I used a stitched scallop circle die set to cut out the layers behind the circles.  I sponged all circles with some blue ink for more depth.  I’ve added a strip of blue glitter cardstock on the main card front layer as well as some ribbon to attach to the front.  I arranged the circles where I wanted them and added some foam tape here and there to pop up the layers.

To hold up the card front, the inside of the easel card has another strip of that blue glitter cardstock and I stamped an anchor image over one of the circle panels using an older Whimsy Stamps clear set.  I used some foam tape to pop that up so that the front card panel would prop up.

I’ve taken the Whimsy Stamps Everyday Mini Sentiments stamp set to stamp the sentiment under the image panel with black ink.  For the accents on the card, I’ve used some clear acrylic bubbles randomly and glued them in places.  For the fish, it was a wood veneer from my stash that I heat embossed with some cool orange metallic embossing powder.

Vicki-WSGoldie-Aug1-side

Here you can see the details from the side view of the easel design and how it’s propped up with that anchor circle holding the front card panel in place.  to mail this card, you just unfold it and lay it flat as shown in the last photo below.

Vicki-WSGoldie-Aug1-close

Here’s a closer look at this really sweet image.  Below are the list of Copics I’ve used to color her in with:

  • Fins, flowers, Bubbles – Y38, Y35, Y32, BG000
  • Hair – C8, C5, C3, C1
  • Skin – E21, E11, E02, E00, E000, R20
  • Snail – W5, W3, W1, E33, E31, R20

Wink of Stella used for mermaid body, clear glitter and 2-way glue pen used for the bubbles.  I used a black gel pen to dot the center of flowers.

Vicki-WSGoldie-Aug1-front

Here’s what the folded and closed circle card looks like.  She will not quite fit into a regular A2 sized envelope because I arranged the circles differently, but a nice 5×5 size would work great.  I do have an envelope creator which is handy for those odd shaped designs that I can custom make.

Hope you’ve enjoyed my card today!

Challenges I’d like to enter this card for:

  1.  Sweet Stampers – Summer (digi and stamp used)
  2. QKR Stampede – #358 Anything Goes
  3. Addicted to Stamps & More – #352 Make Your Mark
  4. Little Red Wagon – Digital Stamps
  5. Crafty Gals Corner – 3+ layers

In Stitches for Cute Card Thursday

Hello friends!  Wow, this week has really been flying by!  I seem to think this almost every week, but I know when the weather starts getting warm, I seem to get more busy outside and perhaps that’s why with the weather being so nice, warm and sunny.  I am enjoying it!

Today starts a brand new challenge over at Cute Card Thursday this week and the theme is “Stitching (faux or real)“.  There are all types of ways to incorporate stitching into your paper crafting and I enjoy adding it to my creations.  So here’s how I’ve added it to my card for today.  I thought this would be such a cute idea for a get well card.

Vicki-CCT582

To make the slider for my card design, I have used the Lawn Fawn Magic Picture Changer and the Magic Picture Changer Add-On dies.  It looks pretty intimidating, but it actually wasn’t that bad to put together as the measuring and cutting is done with the die.  I’ve used the adorable Get Well Before ‘n Afters stamp set to create this and I know I’ll be making another one with the whale to make another card as I’m in need of one.  The turtles were colored with Copic markers and I’ve used them to also create the grass and sky background behind the turtle as he needed something to “ground” him and not be up in the air.  I took a water-proof pen and added a scribble above his head as he’s not happy being up-side-down!

I’ve cut the “add-on” pieces and the background of the card with the Lawn Fawn Watercolor Wishes and Really Rainbow paper packs.  But before attaching the “add-on” papers to the turtle frame, I took a needle and some linen thread and added a few cross-stitch marks around the blue frame.  I’ve also cut a few clouds from a retired LF die set and added the die cut “bottle” that I colored from the same “Get Well” stamp set.

Before I attached the turtle mechanism onto the card, I also die cut a strip of grass with the Grassy Hillside Pop-Up Add-On die in some green cardstock.  I then took one of the sentiments from the same “Get Well” stamp set and white heat embossed it at the bottom of this piece.  The turtle mechanism was popped up over the card front base with some foam tape which was all mounted to an A2 sized top folding card base.

I thought it would be fun to decorate the envelope too, so I die cut a piece of the grass again and used it as a stencil to sponge in some grass along the bottom of the envelope and then I also stenciled some clouds over it.

Vicki-CCT582-A

And here’s what the turtle looks like when you pull the tab out.  He is much happier now that he’s back on his feet again!  I think I played with this card and pulled that tab to watch that turtle get on his feet over and over! LOL!  I hope it will have the same effect on the person who receives it too!

Vicki-CCT582-close

Here’s a closer view of the coloring that I’ve done.  It was a small image and so I’ve kept the coloring pretty simple.  For the “happy” turtle I’ve made a few clouds in the sky.  To make the slider part work, you don’t want to add anything other than the coloring so that it slides smoothly.

Vicki-CCT582-flat

Here you can sort of get a better look at the coordinating envelope that I’ve made to go with the card.  Although I have made some hand stitched marks on my card, the dies themselves already have lots of cool stitch details in them when you cut it out, so I think it just helped add to the design.  This card is going to a male, so I didn’t want to create anything that was too over done.  I think this might bring a smile, what do you think?

P.S.  If you remembered my post the other day, I shared a photo of the Robin’s nest with one egg in it.  Well, since I’ve last checked, there are a couple more in there now:

3 robin eggs

Every time we go out there, the mother watches for us to leave as she wants to sit on her eggs!  This is why we can’t get a photo of her actually sitting on it.  But we will see if anything happens in a few weeks! 🙂

Thanks so much for dropping by today!  I hope you are enjoying your week and I’ll see you soon!!

Challenges:

  1.  Sweet Stampers – Animals
  2. Pammies Inky Pinkies – PIP1919 Anything Goes
  3. Crafting From the Heart – Anything Goes
  4. A Bit More Time to Craft – Anything Goes
  5. Simon Says Stamp Wednesday – Stitches
  6. Watercooler Wednesday – masculine anything goes WWC221