Penny’s Guest-UnFROGettable

Hello friends!  Welcome to June!  The “lazy days” of Summer are here!  I’m hoping I can be lazy this Summer, but not sure about that! LOL

I’m very happy to share my project with you today as a guest design spot I won from challenge #594 at Penny’s Paper-Crafty Challenge Blog!  This is a fortnight (bi-weekly) challenge starting today and the theme is always Anything Goes Using Paper!  Hope you will stop by the blog to see the team’s inspiration and play along!  Here’s the project I made for the challenge:

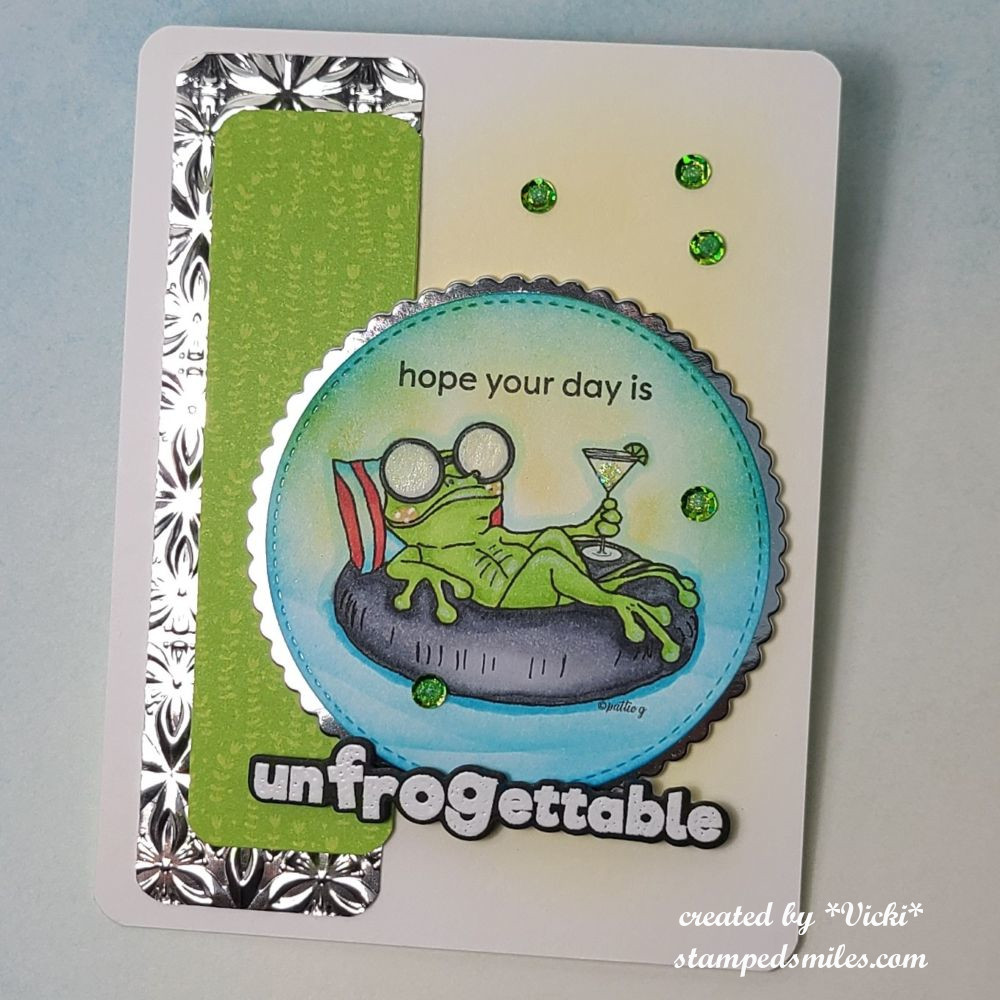
They gave me this super cute image called “Frogtini” by Pattie’s Creations to use, so I colored him up with Copics and added some stenciled waves at the bottom along with some blending of yellows and blues above him to create this relaxing scene.  I cut him out with a stitched circle die and layered him onto a silver mirror scalloped die cut circle.

I used a fun card sketch I found along with pulling some papers and a sentiment out from an older card kit I had in my stash to complete the card.  For the A2 sized top folding card base, I used a corner chomper to round the edges and then I used some more of the yellow ink over the background where the circle image was going to be for a bit of softness and color.

I embossed a strip of the silver mirror cardstock with a 3D embossing folder and rounded the edges of that strip along with the green paper strip to create my layout.  I popped up the circle image with foam tape over top.

Lastly, I white heat embossed the “unfrogettable” sentiment and cut it out with a coordinating die and placed it at the bottom of the circle with foam strips behind it.  I used the other part of the sentiment and stamped it directly above the frog’s head.

For some more finishing touches, I attached some green sequins, used a glitter brush pen for the frog’s sunglasses and covered the martini glass with Stardust Stickles along with some green Stickles for the centers of the green sequins.

  • Hope you’ve enjoyed my card today!  I had fun coloring him up!  Thanks so much for stopping in and I wish you a very hoppy and relaxing day!🐸

Challenges:

  1. Hand Stamped Sentiments – #464 Sketch
  2. As You Like It – Favorite Type of Embossing & why? (I really like both, but my all time favorite is the heat embossing because it’s so magical!)
  3. Crafty Catz – #694 Anything Goes with twist: “make us smile”
  4. Creative Fingers – #302 Anything Goes
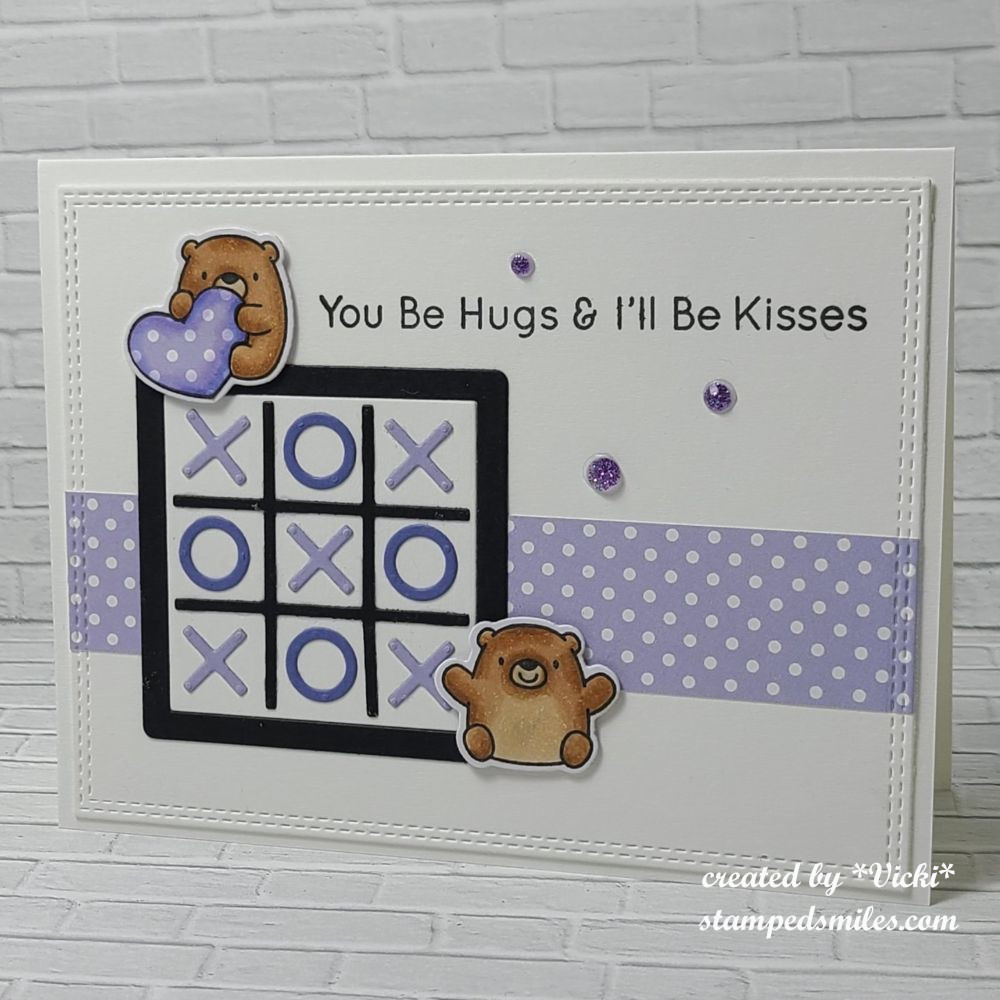
  5. Daring Card Makers – Tic Tac Toe (I used across middle row)
  6. Cut It Up – #331 Anything Goes with a die cut (used two circle and coordinating sentiment dies)
  7. Gem of a Craft – #6 Anything Goes Cardmaking/Papercrafts

May Art Journal Page-BEE YOU

Hello friends!  Here we are at the end of another month for the year!  It seems like we’ve only just barely started the year and now it’s almost at the halfway point?  Time seems to fly away!  Which reminds me that today is our monthly art journal page!

Yes, it’s our monthly AJ page with my crafty friend Carol (from Crafty-Stamper) who is collaborating with me to “SMASH OUR STASH”! We get creative trying to use up our never-ending stash piles along with a prompt for each month.  I know she always has great inspiration to share, so please check out her blog too! Here’s my AJ page with the “SMASH OUR STASH” MAY prompt of “WINGS”: 

There happens to be wings on many things, but my attention has been focused on bees lately.  I have been working on several projects and this was one of the things that I had used on something, so I thought I’d print me out an additional one to use on this month’s page!  (This image is a digital file that I printed out and hand cut with scissors.)

For the background:  I started with 8.5″x 5.5″Bristol Smooth Watercolor paper that I chomped the corners to get a rounded edge.  I used a Dina Wakley Media Stencil along with yellow tones Oxide Distress inks to blend over it.  While the stencil was still in place, I used a text stamp to go over it with brown ink. (water proof).  Lifted off the stencil and added some more bright yellow ink in various places and then spritzed it with water to blend a bit.  Since the text ink was water proof…it didn’t run.  I then went around the edges with brown ink and then splattered the entire page with gold watercolor.

I die cut the hexagon and drip corner with gold mirror cardstock and attached to page.  I used a black marker to make the “bee lines” and “bee antennas”.  I took the fussy cut bee and popped him up with foam tape over the marker lines.  I then used some glitter paint to paint over his wings.  (I’m glad it shows up nicely in the photo.)

Lastly, I cut out the letters for the sentiment in “BEE”.  for the “you”, I white heat embossed a sentiment that originally says “you are” and then die cut it out with a coordinating die.  I cut off the “are” portion so that I could use just the “you” to place under my “BEE” lettering.

Thanks so much for checking in today!  I hope you’ve enjoyed my page!  I will be back next week to share some items that I’ve been working on!  Have a great weekend!

Challenges:

  1. Art Journal Journey – Must Have Wings
  2. Simon Says Stamp Monday – Emboss It (embossed “you”)
  3. Try it On Tuesday – Things with Wings
  4. Anything Goes in a Card Free Zone – May Anything Goes- no cards
  5. Creative Artiste – #115 Anything Goes Mixed Media

Mix It Up with Paper Piecing!

This is my second post for today, please scroll down to see the Pearly Sparkles Guest Challenge details or click HERE.


Hello again my friends and Happy May Day to you!  I think I’m so ready for May so that I can start being outside with hopefully better weather than what April gave us!  

Today also brings us to a new challenge over at the Mix It Up Challenge Blog.    The challenges always run for 6 weeks so there is plenty of time to enter.  The theme given for us this time is: Paper Piecing or you can always do the ‘Anything Goes” too.  Here’s the card that I came up with for the challenge using the theme:

Look at this darling little gnome holding on tight to his balloons!  I got this adorable stamp from Ink ‘n’ Splatter a while back, but this is the first time I’m using it.  He’s called Party Gnome Celebration.  *Today is also the start of this company merging back up again with Digi Doodle Studios!  Dina has some cute artwork with her digital and clear stamps both!  You can see some past creations I made on my blog here under the category:  Digi Doodle Studios.* 

I’ve stamped the party gnome, colored him and then used some pattern paper from my stash to paper piece onto the balloons.  I just stamped the same image over different pattern papers, fussy cut each balloon out and glued each balloon in place.

For the background, I thought it would be fun to use some more of the pattern papers to create inchie squares and make a layout with them.  I attached the squares to the card front and then I embossed over top of it with a very old “Dotted Cuttlebug” embossing folder.  (If you’ve been a crafter for a while, then you know it’s old! LOL)  I black heat embossed the sentiment from the Party Gnome stamp set and cut it out with the same wonky stitched rectangle die set I’ve used for the front panel and popped that and the gnome up with foam tape.  I also stamped a few of the confetti image around the sentiment and then topped the card off with sequins.

I hope you’ve enjoyed my card today and I hope you find some time to create for our Mix It Up Challenge as well!  Hop on over to the see the inspiration!  Thanks for dropping in!

Challenges:

  1. Tic Tac Toe – #269 ( I used straight across middle row)
  2. Can You Handle the Pressure? – Anything Goes with embossing folder with optional: weather twist 
  3. Pammie’s Inky Pinkies – PIP2517 Anything Goes
  4. Penny’s Paper-Crafty – #595 Anything Goes Using Paper

Pearly Sparkles Guest

Hello friends again!  I have two posts going up for today, so please see my post for the Mix It Up Challenge details in the above post when it goes live or click HERE.


I’m so excited to have been asked to be a guest for this month’s Pearly Sparkles Challenge!  I always love playing along in challenges and supporting them when I can as I always find inspiration in using my supplies when I play!

So for May’s Challenge, they would like to see:  BLACK, WHITE PLUS ONE OTHER COLOR in your project(s).  Here’s the card I made for this theme to inspire you:

I wasn’t sure what I wanted to do for this, but I thought you couldn’t go wrong with some flowers.  I pulled out a long forgotten stamp set from Taylored Expressions called “Picked Posies” (no longer available) and black heat embossed the images over watercolor paper and used one pink watercolor brushed over the petals.  I die cut each flower with the coordinating die.

I made the rest of the card layout with all black and white elements.  I stamped the TE Checking In Background stamp in black ink over a white panel, placed this over an A2 sized top folding black card base.  I also used the TE More Easy Edgers die to cut an additional piece of white cardstock and placed it over the stamped checkered background.  I also used some more of the elements from the flower stamp set and stamped some more black images on that background before I attached the watercolor flowers on it.  I centered each flower with a black rhinestone.

For the sentiment, I white heat embossed over black cardstock using the TE Hello Friend Stamp & Die set.

  • Thanks so much for stopping in today and I hope you’ll check out this challenge to see what the rest of the team has to inspire you with so you can play along too!

See you again tomorrow!

Challenges:

  1. Creative Fingers – Anything Goes
  2. 613 Avenue Create – Anything Goes with optional: splash of color
  3. Lil’ Patch of Crafty Friends – Anything Goes
  4. Ally’s Angels – Anything Goes
  5. Crafter’s Cafe – Anything Goes optional: Female
  6. Double D – Springtime Flowers

April Art Journal Page-Recycled Spring

Hello friends!  I hope you all had a wonderful Easter and have been enjoying the wonderful Spring weather outside!  We have all sorts of blooms and buds everywhere which is really exciting to see!  I think I need to trim some lilacs from my bush to put in a jar and enjoy the lovely smell from them!

Today is our monthly AJ page with my crafty friend Carol (from Crafty-Stamper) who is collaborating with me to “SMASH OUR STASH”! We get creative trying to use up our never-ending stash piles along with a prompt for each month.  I know she always has great inspiration to share, so please check out her blog too! Here’s my AJ page with the “SMASH OUR STASH” April prompt of “RECYCLE/UPCYCLE”: 

Flowers are everywhere, so I thought I’d place them all over my page today too!

For my “recycled” elements, I have used a floral napkin in the background which gives it some wonderful texture and I’ve also painted some white paint over it for a “wash” so that it wasn’t so bright and vibrant and too busy for the background.  I splattered some black and gold watercolor over it as well.

I found a darling image with these gorgeous Spring birds perched on the fence, cut it out and popped it up at the bottom with foam tape.

I thought that a strip of gold cardstock (left over from a project) would make a nice bright accent to go with my gold embossed “HELLO SPRING” sentiment and gold splatter.

I’ve also “recycled” an old part of an ATC project and half of a doily to add on the side with the sentiment and I’ve tied some old twine around that ATC panel.

Lastly, I’ve added some flowers and a butterfly from my old collection of ephemera pieces left over from years ago!

  • I hope that you’ve enjoyed my art journal page today and it gives you all the feels of Spring in the air!  I had fun putting this one together!  Thanks so much for dropping in!

(Feeling a little bit under the weather this week and I’ll catch up as I can!  Thanks for understanding!)

Challenges:

  1. Art Journal Journey – Spring Birds
  2. Anything Goes in a Card Free Zone – April No Cards
  3. Creative Artiste – #114 Mixed Media projects
  4. Neglected Stuff – April (doily, Tim Holtz ephemera)
  5. Simon Says Stamp Monday – Blooming Blooms

March AJ Page-Favorites

Hello friends!  Here we are again at the end of another month!  Although I’ve been really busy this past week, I think I’m ready for March to be over with!  Mainly because of this crazy weather and another because I’ve been busy doing things other than crafting! LOL  (Must be time for that organizing…er as I like to say “agonizing”!)

Today is our monthly AJ page with my crafty friend Carol (from Crafty-Stamper) who is collaborating with me to “SMASH OUR STASH”! We get creative trying to use up our never-ending stash piles along with a prompt for each month.  I know she always has great inspiration to share, so please check out her blog too! Here’s my AJ page with the “SMASH OUR STASH” March prompt of “Favorite Things”: 

I’m sure you might’ve guessed that one of my favorite things to do is obvious on this page!  (This craft room actually looks a bit more organized than mine is currently!)  I did have so much fun with this one!  I’ve used SO many of my favorite things on here:  old stamps, mixed company favorite stamps, foiling, heat embossing, coloring (Copics and watercolor), ink blending, die cutting, fussy cutting, using old paper stash, mix of papers, favorite colors, the subject of stamping, my favorite room, wearing sweats, crafting while sun going down, etc, etc, etc.  Honestly, this was easy, but it could be because I enjoyed putting it together.

For the background:  I used a standard white cardstock base measuring 5.5″x8.5″ and then took some very old Stampin’ Up! paper (Porcelain Prints) to cover the entire size so that I could get the look of wallpaper.  I then used some textured woodgrain cardstock from my stash for the floor, the window and the shelves.  (The shelves were popped up with a foam strip)  I die cut a scallop border in white for the trim above the floor and also die cut a frame for the wall hanging.  The sentiment for the wall hanging was gold heat embossed and placed behind the frame. (I sponged some white clouds in there too.)  The border at the top was printed off my computer and I used another scallop border die to cut it out.  I sponged some brown ink around the edges of the page and added all of the elements.

The stamper girl image was from an old company called “Hambo Stamps” (went out of business several years ago), but I think it’s so cute and funny!  This is where the gold embossed sentiment came from as well.   Had fun coloring her up with my watercolor pens.

For the window, I used the Taylored Expressions Foil It-Dreamscapes along with the coordinating stencils that I received from Virtual Stamp Joy earlier this month.  (I will share my projects in another post later on.)  I also used the TE Arch Windowpanes die set to cut out a frame in the woodgrain cardstock over one of the ink blended panels.

And lastly, the little crafty items on the shelves and floor came from the Lawn Fawn Just Add Glitter stamps & dies.  I stamped and colored those up with Copics to place on the shelves.  I also thought it would be fun to add some glitter spilling from the gold glitter bottle and dumping onto the floor…always a fun thing to happen in the craft room while you ignore it because you’re so intently working on something!

All this page did for me was to remind me that I really need to do more organizing!  I hope you’ve enjoyed my page today and take a hop on over to see Carol’s inspiration too!   Thanks so much for stopping in today!

(P.S.  I’m currently away and it will be a few days before I can reciprocate your comments, but I truly appreciate your kind words of support.)

Challenges:

  1. Art Journal Journey – Home Sweet Home
  2. Anything Goes in a Card Free Zone – March (no cards)

It’s Easter at Sparkles Monthly!

Hello friends!  Hope your March is going along well and you’re starting to see some signs of Spring coming!  We even have a few flowers trying to pop up out of the ground which is so fun to see!  I hope they can hold out for a few cold days ahead.

Today I’m stopping in to share my card for the new challenge over at Sparkles Monthly and we have a very fitting theme of “Easter” this month.  I think I’m more than ready to start some Spring related projects, so I look forward to seeing the gallery.  Here’s the card I came up with:

How sweet is that bunny passing out his colorful eggs!  I pull out an older card kit (2019) and it had this adorable Simon Says Stamp set called “Bunny Wishes” (no longer available) mixed in with the kit which I don’t think came with it, but I wanted to use it with some of the other items that were in the kit like the papers.  It was like getting a brand new order and forgetting what I purchased! 😆 

I also used this beautiful oval die (not available) from SSS that cuts the oval, the flowers and the stitching marks around it.  I added a border of grass to place at the bottom and then I stamped the sentiment from the set and also stamped the “Easter” greeting on another piece of light blue cardstock cut with a banner die.  The gingham background was cut with a double stitched rectangle die and then I used the oval die to cut an opening for the bunny scene.  I added foam tape around the edges to pop up the panel on an A2 top folding pink card base.

Here’s a close-up view of the cute images that I’ve colored with Copic markers, cut out with the coordinating dies and then popped up over the floral oval scene with foam tape.  The extra Easter egg behind the basket was just glued to the scene.  It’s hard to see in a photo, but I’ve covered each egg with a glitter brush pen.  It’s sparkly IRL.

I did recently get this pretty Iridescent White Cord from SSS and took two strands of it to create a bow and then I attached it to the top of the oval.  It gives it a nice sheen and I might be using it again soon!

Thank you for stopping in today!  Hope you enjoyed my card and will join us for the challenge this month!  Have a great weekend!

Challenges:

  1. Pammie’s Inky Pinkies – PIP2510 Anything Goes
  2. Make My Monday – #247 Use a Die/Punch 
  3. Passion for Markers – #779 Dies &/or Punches + markers (used dies and Copics)
  4. Little Red Wagon – #798 Start Easter Projects
  5. Penny’s – #592 Anything Goes Using Paper
  6. Tic Tac Toe – #tttc266 I used 3rd down or middle across
  7. Four Seasons – Spring/Easter

X is for X’s and O’s

Hello friends and happy Friday!  The weekend starts and we’ve had some snow blowing around over our way with wind and colder weather, BUT next week it’s supposed to be warmer with Spring-like temps…but that’s the Midwestern climate!   It will level out later in the month.

Today is another new challenge over at the Alphabet Challenge Blog!  Our theme for the next two weeks is “X is for X’s and O’s (as in hugs & kisses)“.  We look forward to your entries!  I had some fun with this one:

I’ve had this Tic Tac Toe set for years and never even broke it out to use!  It was from the My Favorite Things “X’s and O’s card kit (obviously no longer available).  I also used those adorable My Favorite Things Bitty Bears (retired) to help with the hugs and kisses part.  I’m so happy to be using something from my stash and especially something that I haven’t used at all!

The card was pretty simple as the die cuts for the tic tac toe square were cut in different colors, found some polka dotted papers to match and also used those same papers to paper piece the heart on the top bear.  I stamped the sentiment from the kit, popped up the colored and die cut bears with foam tape and added a few purple gems.

Before attaching all of the elements, I applied the polka-dot striped paper to a white front card base that was cut with a double-stitched rectangle die also from MFT, and then attached to an A2 top folding white card base.

  • Thanks for stopping in today and I hope you’ll join in the X’s and O’s with us over on the challenge blog!  Have a great weekend and I’ll see you soon!

Challenges:

  1. Crafty Animals – #92 Anything Goes with animal(s)
  2. Critter Crazy – #96 Anything Goes with Featured Critter(s)
  3. The Divas That Cut…Paper! – Critters plus a die cut
  4. Pammie’s Inky Pinkies – PIP2509 Anything Goes
  5. The Neglected Stuff – Anything Goes with neglected item (my neglected item is that MFT X’s and O’s card kit that was never used circa 2017!) About time, huh?!
  6. Crafts Galore Encore – #133 Anything Goes

Art Journal Inspiration-Soul Singing

Hello friends!  I’m back today with one last inspiration for Art Journal Journey to remind you that there are still a few days left to enter your art journal project for this month!  So please be sure to hop on over to the Art Journal Journey Challenge Blog to see the details about how to enter.  I have really enjoyed all of the inspiration from the gallery!  So fun to see what everyone comes up with using my “MUSIC” theme this month!  I thank everyone for having me along as a host and sharing your kindness in welcoming me back this year.

I went with some animals this time:

I’m pretty sure that there has to be some sort of music going on at farm too, right?!  LOL  I found these cute “singing” critters online and thought that a farm scene would be a perfect platform stage for them!  This is also the first time that I’ve ever added an interactive element to an art journal page, so that was fun!

For the background:  Starting with an 8.5″x 5.5″ watercolor paper,  I printed the critters over it in the position that I wanted…this is so that the musical notes showed on the page.

I then used my Kuratake Gansi watercolors and brush to paint a scene starting with blues for the sky, letting that dry and then adding some green hills for the bottom of the scene.  I went over the areas a couple of times to get the look I wanted and let it dry.  I also die cut a green grassy border at the bottom of the page with green cardstock being careful to place it so that it covered the “legs/feet” of all the critters.

More layers over the background:  I used older Tim Holtz stamps to add some texture by stamping brown ink, then I used an old TH stencil and some yellow paint for the “sun rays” around the hill with a sponge to apply it.  I also used a sponge with white ink to stencil over another stencil in areas and lastly, I stamped some musical notes in silver ink in a few places.

Here’s a closer look at some of the details including the critters.  

Since I covered up the critters with the grassy border, I printed out the critters again on a separate piece of cardstock, colored them with Copic markers and fussy cut them out with my scissors.  I attached them over top of the printed out ones on the page so that they align with the music notes above them.  I used more markers to add some darker shadow grounding underneath each critter before permanently attaching to the page.

For the interactive element:  I used a die cut to cut out the pieces for the windmill in the brown, white and silver cardstock pieces.  I then used a circle die to cut a hole in the center of the windmill on the page and then added an element that makes the wheel portion spin in a circle when you spin it with your finger.

I went around the edges with some blue ink for the sky, attached some clouds and then printed out the quote on my computer and cut out each word attached to the page.  I used some blue ink to lightly add to the bottom of each one.

Lastly, I went around the edges of the page along with the edges of each word with a black micron pen and then I used a silver paint pen to go around the edges of the page again.

It’s a pretty flat page, but it made me happy!  What song do you think they’re singing?  

  • I hope you’ve enjoyed my page today as well as my art journal inspiration throughout the month!  Thank you so much for your kindness and support!  See you soon!

Challenges:

  1. Art Journal Journey – MUSIC
  2. Creative Artiste – #112 Anything Goes Mixed Media
  3. We Love 2 Create Mixed Media – #2 Anything Goes MM/Papercraft
  4. Creative Fingers – #295 Anything Goes
  5. Gem of a Craft – Anything Goes

February AJ Collab-You Are Enough

Hello friends!  I’m back again today to share some more inspiration with my Art Journaling!

Today starts another AJ page with my crafty friend Carol (from Crafty-Stamper) who is collaborating with me to “SMASH OUR STASH”! We get creative trying to use up our never-ending stash piles along with a prompt for each month.  I know she always has great inspiration to share, so please check out her blog too! Here’s my AJ page with the “SMASH OUR STASH” February prompt of “MUSIC” (of course!): 

Really had fun with this page as it’s got that bright and cheerful background which is a great reminder to yourself especially when the world looks black and white.

I was able to pull out several stash items like the DecoArt Fluid Acrylic Paints, the stamp sets and dies, some of which, I’ve had for a long time and some never used!

For the background:  I started with a canvas cardstock 140# measuring 8.5″x5.5″ and attached a music sheet of the same size over it. (I have tons of sheet music ephemera!)  I then used the DecoArt Fluid Acrylic Paints to go over it in a horizontal bright rainbow.  Once dry, I splattered white paint over it.  I also went around the edges with a black paint marker.

The flowers at the bottom came from the Taylored Expressions Botanical Beauty Background (retired), that I stamped in black and colored with cool grey markers.  I liked that it covered the entire width of my panel.  I used a coordinating die to cut it with and attached to the bottom.  I layered a black strip at the very bottom…because I thought it needed it.  

Moving to the top of the page, I used a Lawn Fawn Little Heart Strings border die cut out with some shimmer vellum.  (I also used the same vellum for the butterfly wings.)  I attached this to the top of the page with double sided adhesive strip.  I glued down the tiny hearts. This is the first time I’ve used this die because I had to cut it apart!  The butterfly dies came from a very old My Favorite Things die set that is no longer available…not sure of the name even.  The sentiment at the top over the heart string border came from the Taylored Expressions “You Are” that was white heat embossed over black cardstock and cut out with the coordinating die.  I attached it over the border.

Lastly, I used my Cricut Machine to cut out some single music notes in black glossy cardstock and I attached those to the center of the die cut butterflies.  I used some black Stickles glitter and put “dots” on the heart strings border, the butterflies and the center of the flowers.

Here’s a song that inspired me for this page:  

and if you need to hear this today,  just know that YOU ARE ENOUGH too

Thank you so much for stopping by today and sharing your kind comments and support!  I read them all and appreciate it!  Hope you enjoy the rest of your weekend!

Challenges:

  1.  Art Journal Journey – MUSIC
  2. Moving Along with the Times – #175 – Things with Wings
  3. A Cut Above – Anything Goes + die cuts
  4. The Neglected Stuff – #1 challenge (I’ve used musical sheet ephemera, paints, butterfly dies)
  5. Anything Goes in a Card Free Zone – No cards
  6. Creative Artiste – #112 Anything Goes Mixed Media
  7. We Love to Create – Anything Goes Mixed Media