October AJ Page-Magical Potion

Hello friends and happy weekend!  It’s the last Saturday for this month and next week will be November 1st!  Can you believe it?!  We’re nearing the end of the year, but I’d like to stop and enjoy the wonderful Autumn season right now while it’s here!

Last Saturday of October brings us to the monthly AJ page with my crafty friend Carol (from Crafty-Stamper) who is collaborating with me to “SMASH OUR STASH”! We get creative trying to use up our never-ending stash piles along with a prompt for each month.  I know she always has great inspiration to share, so please check out her blog too! Here’s my AJ page with the “SMASH OUR STASHOCTOBER prompt of “MAGICAL”: 

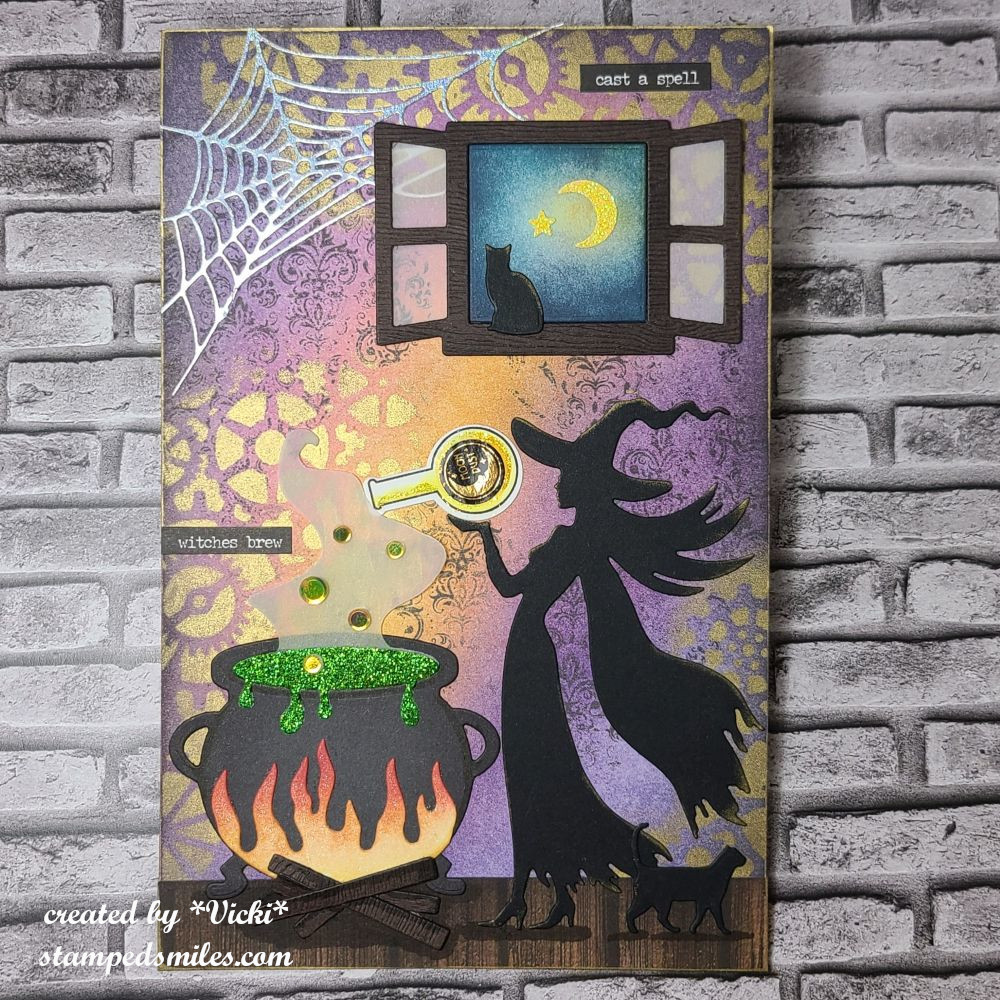
I couldn’t let this month go by without adding in a Halloween themed AJ page!  I love making them and getting out lots of dies from several different companies that made this one a fun project to pull together.

Background:  I used an 8.5″ x 5.5″ piece of Mixed Media cardstock and blended the background in various colors using a light yellow for the center where the window is open and the cauldron is brewing up something magical!

I then took a cogs and wheel stencil and sponged on some gold ink in various places.  I took a cool background stamp from Whimsy Stamps called Vintage Wallpaper and stamped it in random places.  I also cut a strip of wood plank background paper from my stash to add at the bottom of the page.  I then took my gold ink pad and swiped it around the edges of the page.

Die Cuts:  The large spider web cut from holographic paper, the witch, the fire, and cats all came from Whimsy Stamps.  The Cauldron and potion bottle came from Taylored Expressions, the window came from Simon Says Stamp and the wood under the cauldron came from Lawn Fawn.  For some of the pieces, I ink blended or added a gold highlight to the edges.  For the potion bottle, there is a tiny label on it that says “Moon Dust” with a moon on it.  (It’s hard to see in the photo.)  I added some glitter to the contents.  After ink blending the flames, I covered it with a glitter brush pen.

I took a marker to added some shadows under the witch, cat and cauldron.  I took some yellow sequins and added it under the potion bottle to make it look like she’s added it to the potion.  Lastly, I took a couple of Tim Holtz sentiment clippings to add to the scene.

  • I hope you’ve enjoyed my art journal page today!  I had fun with it!  Thanks so much for dropping in and I’ll be seeing you soon!

Challenges:

  1. Art Journal Journey – Steampunk/Halloween or both
  2. Creative Artiste Anything Goes Mixed Media
  3. Anything Goes in a Card Free Zone – No Cards
  4. Penny’s Anything Goes Using Paper
  5. Little Red Wagon Not a Card

A Single Flower at Sparkles Monthly

Hello friends!  Welcome to the start of a new week for mid-September!  I think Summer actually DID come back to us as we’ve set record high heats for this time of the year!  I think I’m ready for those cooler temps to come back! Ugh!  I know it won’t be long now and we can start enjoying trips outdoors as we look forward to picking apples and all Autumn festivities that we do!

Today is time to share a new challenge over at Sparkles Monthly and we have the theme of “USE A SNGLE FLOWER (floral image)  this month.  Flowers seem to be everyone’s favorite.  Here’s what I came up with: 

Mine is a single sunflower image.  My husband planting them in our backyard this year and they were so pretty!  Of course, I forgot to take a photo of one before they died off.

The items I’ve used came from an older card kit from Simon Says Stamp including the stamp set called Sunflower Fields.  There is a single sunflower image that I thought would be perfect for this challenge, plus I can use more items from my stash!

For the size of the flower image, I wanted it to stand out, so I used a tag and twine from the kit and decided to make this a mini slim card size.

For the background:  I used a piece of watercolor cardstock and gold heat embossed the “Romantic Script” background stamp (retired) from My Favorite Things and then used some oxide inks swiped on glass with spritzed water to make a “smooshed” background.  I also used these same colors to watercolor my flower with. (except the green, I only used that for the flower)  I also used some gold watercolor to splatter over the tag.  I only splattered the tag because I didn’t think it would show very much over the card background.

I cut the smooshed watercolor panel to fit over a kraft side folding mini slimline card base.  I die cut the flower and the sentiment to attach over the tag, added some twine and then used foam tape to pop it up over the ink smooshed background.  Lastly, I’ve added some yellow sequins to finish it off.

I hope you will take some time to pull out a single flower and join us in the challenge this month!  Looking forward to seeing your creations!  Thanks so much for dropping by!

Challenges:

  1. Creative Inspirations Anything Goes
  2. Ellibelle’s Garden Party Anything In or From a Garden
  3. Creative Fingers Anything Goes
  4. Lil’ Patch of Crafty Friends Anything Goes
  5. Penny’s Anything Goes Using Paper
  6. Love to Craft Anything Goes
  7. Crafts Galore Encore Anything Goes

H is for HOME

Hello friends!  This will be a pre-scheduled post as I’m away for a bit, so this is going to be a very short and sweet post from me.

There is a new challenge today over at the Alphabet Challenge Blog!   Our next letter is ‘H‘ and the hostess has chosen “H” is for HOME  *Remember that this is a bi-weekly challenge, so you have two weeks to enter*  I hope you will find some time to play along!  Here’s what I’ve created:

I have pulled out an older card kit from Simon Says Stamp called “Home Sweet Home” and used some of the cloud papers that came in the kit along with the stamp set to make my little square on the left.

This is a mini slimline sized easel calendar.  It folds flat for mailing and then sets up with a base at the bottom.  (I figured a message could go on the back.)  I got the Square Calendar Tear-Offs as well as the Landscape Calendar Table Tent Base from Taylored Expressions.  The “slash marks” on the home sweet home square also came from the TE Square Tear Off Calendar Stacklets Die Set which is how I was able to cut out the square to fit onto the design too.

Obviously, I have August 2025, but I also have 2026 calendars that I will have to replace for the new year.  I really love making these calendars every year to give as gifts and I thought it would be nice for someone moving into a new home as well.

  • Thanks so much for dropping in today!  I hope you will take a look at what the design team has for inspiration and join in the challenge with us!
  • I’ll have another scheduled post for tomorrow to share my monthly Art Journal Page.

E is for Embossing

Hello and happy Friday!  Thank you so much for the congrats from my last post about the baby!  I look forward to meeting our new family member soon!  It’s starting to get really warm over my way, so it’s a great time to be indoors with the cool air and craft.

Today starts a new challenge over at the Alphabet Challenge Blog!   Our next letter is E and the hostess has chosen “E” is for Embossing (heat or dry)  *Remember that this is a bi-weekly challenge, so you have two weeks to enter*  I hope you will find some time to play along!  Here’s what I’ve created:

I absolutely love to emboss!  I first fell in love with stamping because of the magic of heat embossing and then fell in love again when those embossing folders came out!  So I’ve decided to do both versions for my card.

I haven’t had a chance to use this Drifting Flowers embossing folder from Simon Says Stamp.  I thought it was so pretty!  I wanted to emboss in black and try out my Lisa Horton Interference Inks with it, so after I embossed it, I used my finger to rub white ink over the raised areas.  I then used the LH Interference Inks over that once it dried.  (I can’t remember exactly what colors I used, but it basically started as an experiment and I had several pads open!)  I also used a silver ink pad to rub the centers of each flower minus the large one.

I should also mention that some of the white ink was very slightly rubbed over the open areas as well because I got a white streak on it…so I just continued to rub all over those areas until blended in.  I didn’t mind the look.

While the inks were drying, I silver heat embossed the sentiment and cut out it with the coordinating die.  I additionally cut out two more for added thickness and attached to the panel.  I layered this embossed panel onto a mirror silver layer with both of these layers getting rounded on two ends with my corner chomper.  I added these onto a chomped top folding A2 black card base.  Lastly, I added some silver sequins.

Please be sure to stop by the challenge blog to see the inspiration from team as well!  I look forward to seeing your embossed projects in the gallery.  Thanks so much for stopping by today and I hope you like my card.  See you soon!

Challenges:

  1. Crafty Calendar – Add a Sentiment
  2. Pammie’s Inky Pinkies – PIP2523 Anything Goes
  3. Simon Says Stamp Wednesday – Fur, Feather and/or Flowers
  4. As You Like It – Favorite: to add a sentiment or not and why?  (I most always have sentiments on my cards because I feel it’s important when sending a greeting card to someone and it’s hard for me to leave it blank.)
  5. The Flower Challenge Embossing (heat/dry)

It’s Easter at Sparkles Monthly!

Hello friends!  Hope your March is going along well and you’re starting to see some signs of Spring coming!  We even have a few flowers trying to pop up out of the ground which is so fun to see!  I hope they can hold out for a few cold days ahead.

Today I’m stopping in to share my card for the new challenge over at Sparkles Monthly and we have a very fitting theme of “Easter” this month.  I think I’m more than ready to start some Spring related projects, so I look forward to seeing the gallery.  Here’s the card I came up with:

How sweet is that bunny passing out his colorful eggs!  I pull out an older card kit (2019) and it had this adorable Simon Says Stamp set called “Bunny Wishes” (no longer available) mixed in with the kit which I don’t think came with it, but I wanted to use it with some of the other items that were in the kit like the papers.  It was like getting a brand new order and forgetting what I purchased! 😆 

I also used this beautiful oval die (not available) from SSS that cuts the oval, the flowers and the stitching marks around it.  I added a border of grass to place at the bottom and then I stamped the sentiment from the set and also stamped the “Easter” greeting on another piece of light blue cardstock cut with a banner die.  The gingham background was cut with a double stitched rectangle die and then I used the oval die to cut an opening for the bunny scene.  I added foam tape around the edges to pop up the panel on an A2 top folding pink card base.

Here’s a close-up view of the cute images that I’ve colored with Copic markers, cut out with the coordinating dies and then popped up over the floral oval scene with foam tape.  The extra Easter egg behind the basket was just glued to the scene.  It’s hard to see in a photo, but I’ve covered each egg with a glitter brush pen.  It’s sparkly IRL.

I did recently get this pretty Iridescent White Cord from SSS and took two strands of it to create a bow and then I attached it to the top of the oval.  It gives it a nice sheen and I might be using it again soon!

Thank you for stopping in today!  Hope you enjoyed my card and will join us for the challenge this month!  Have a great weekend!

Challenges:

  1. Pammie’s Inky Pinkies – PIP2510 Anything Goes
  2. Make My Monday Use a Die/Punch 
  3. Passion for Markers Dies &/or Punches + markers (used dies and Copics)
  4. Little Red Wagon Start Easter Projects
  5. Penny’s Anything Goes Using Paper
  6. Tic Tac Toe I used 3rd down or middle across
  7. Four Seasons – Spring/Easter

“W” is for WINGS

Hello friends and happy Friday!  It has been very cold over our way and I’m staying indoors as much as I can which means some crafting time is happening!  I do like looking from my window and seeing the chickadee birds along with the squirrels in the feeders!  I enjoy seeing those bright red cardinals, but I don’t get to see those as often.

Today is a new challenge over at the Alphabet Challenge and we are on the letter “W”.  The hostess has went with the theme “W is for “WINGS“.  You will have 2 weeks to join us, so I hope to see your creations in the gallery!  Here’s my card using this theme:

Since it’s so cold out, I decided to skip on over through winter and go straight to warm spring/summer with a dragonfly!  We usually don’t see dragonflies over my way until it gets pretty warmed up.  (It has to be above 60 degrees Fahrenheit, on average, for them to come out.)  I also was happy to finally pull out a stamp set that I got from STAMPtember of last year created by Kitchen Sink Stamps.  Unfortunately, this company is no longer operating.  There are a couple of stamp sets available for purchase on the Simon Says Stamp website I see.  But this particular stamp set called “All Aflutter” was only available during the STAMPtember event.  I’m happy to get it even though I didn’t make it in time to grab the die set before it sold out, but it’s a beautiful set.  It’s actually the only Kitchen Sink Stamps I own.

I started out with the green flower stems at the bottom.  This is a layering stamp set, so they very cleverly put the numbers in order to stamp.  I then added three purple colors for the flowers to go on top of the green stems.  I stamped the sentiment from the set with the “Hi” done in purple ink.  I ink blended like colors around the card panel.

I stamped the dragonfly body onto the card panel BEFORE stamping the sentiment for the placement of the design.  I attached the card front to a purple A2 top folding card base.

Dragonflies have to have that shimmer on their wings!  It’s so hard to take a photo of the shimmer from the glitter pen and I wanted that to come through for my dragonfly wings!

The dragonfly was stamped in the corresponding layers for his body and wings on a separate piece of cardstock.  The lightest grey was the wings.  I used my scissors to fussy cut him out and blended some light blue ink around his wings.  I glued the middle section of him only so that I could pop up the wings a bit.  

Lastly, I added some shimmer to his wings with the glitter pen and attached some gems.

  • I hope you’ve enjoyed my card today and you’ve been inspired to join in the challenge with us!    Be sure to check out the rest of the inspiration from the team!
  • Thanks for stopping in and I’ll be back tomorrow with my AJ collaboration with Carol!

Challenges:

  1. Ally’s Angels – Anything Goes
  2. Creatalicious Anything Goes + optional:  use green
  3. Lil Patch of Crafty Friends – #248 Anything Goes
  4. Pammie’s Inky Pinkies – PIP2507 Anything Goes
  5. Moving Along With the Times Things With Wings
  6. A Place to Start – #020325 Anything Goes + optional:  Things in the Sky

Sheetload of Cards With Flashback Card Kit

Hello friends!  I hope you’ve had a good week and looking forward to a great weekend ahead!  The weather has been unseasonably cool for this time of the year and I’m able to get my windows open the last few days and enjoying it!  Unfortunately, it’s going to warm up again, so I know that the air will come back on.

Today I’m sharing something that is a bit different and new to me, but I think it will come in very handy for the future as my “goal for next year” is to use up those old card kits that have been stored in my stash for WAY too long!  I’m hoping to start this on my blog next year each month and focus on a card kit each month so I can clear things out from my stash!  Stay tuned!

I found a fellow crafter Call Me Crafty Al and I decided to give her Sheetload of Cards a try for this month and see how it goes!  It would probably have been much easier to do it the way she did, but I challenged myself to use my card kit items instead:

Here’s the set of all eight cards using the same sketch from Crafty Al’s Sheetload for this month.  You may not recognize the card kit that I’ve used as it’s an old one from Simon Says Stamp.  The box had November 2015 written on it, and the paper inside had “Here’s Looking at You” card kit on it.  I know that I have pulled it out and used a few things out of it, but there was still plenty to use!

I was looking to make some uplifting/inspirational cards so this all worked out great.

Click on the photos above if you’re on my website so you can get a closer view of them.

I’ve used all of the cardstock except one sheet of kraft, all of the 6×6 papers were used except two sheets and I’ve also used up some of the journaling cards that were included as well as the stamp set and thread.  The reason why some of the edges are rounded is because the journaling card inside the kit had rounded edges.  I just decided to incorporate that into the design and I think it worked out okay.

Honestly, I don’t know weather to be proud of myself for using up my extremely old card kit or feel embarrassed for having such an old card kit still in my stash!😂

Regardless, I hope you’ve enjoyed my play with the “Sheetload of Cards” for August 2024 utilizing a very old card kit!  How about you?  Do you still have some card kits or stashes of something from 2015…er older?  Would you like to use them up too?  Follow along with me next year each month as I attempt to use up those old old old stash items and have a session of “Crafting to the Oldies“!  This is me holding myself accountable!  Let’s do this!

  • Thanks so much for dropping in today and have a great weekend!❤️

It’s Funny and/or a Pun at Sparkles Monthly Challenge!

Hello friends!  Happy weekend!  Wow, it’s been very warm outside and I’ve been spending my time indoors.  I hope to be sharing some more posts with lots of things very soon, so stay tuned in!  Today starts another challenge over at the Sparkles Monthly Challenge blog!

This time was my turn to choose a theme and I thought with Father’s Day, masculine cards are a good way to use those “FUNNNY and/or a PUN” on our cards!  To make someone laugh or at least smile, is the main reason why I love to make cards!  If you feel like having a chuckle with your cards, make one and enter this month!  I can’t wait to see what you come up with!

Here’s my card for the challenge:

Nothing better than a hot French fry, but a French fry with a smile and bow tie is too fun!😆  (This is an American term for this food, but I know they’re called “chips” in Britain…either way, delicious and fun!)

For this challenge, I knew I wanted to pull out a large card kit I had gotten back in 2018 from Simon Says Stamp partnered with Doodlebug to create the I Chews You kit.  (Most of the items are not available any more other than the stamp set that I’ve linked.)  I fell in love with all of the cute images and puns from the Doodlebug So Pun Friends collection!  In this card kit, there was a die that cut out the box and fries.  The sentiments came from some “Chit-Chat Clippings“.

I first took a piece of white cardstock for the front panel and cut it with a wonky stitched rectangle die and placed it over a side folded A2 red card base.  I then took a wonky stitched circle die and cut a circle from the Doodlebug So Much Pun paper pad.  I placed it in the lower right and cut off part of the edge of the circle sticking out past the white panel.

I took the die cut fry box and cut it out in red and white.  I used the white strip to make the band at the top of the box.  I cut out the fries and sponged around the edges and arranged them behind the box and attached it to the circle panel.

The sentiment bubble was inked around the edges and placed in the top left above the fries.  I added a black layer behind the box sentiment strip and cut off the edge sticking out.  Lastly, I thought it would be fun to add a smile face to the fry and then I stamped, colored and die cut a bow tie from my stash to add on the one fry.  I finished it with some Doodlebug Heart Sprinkles.

I really had a great time putting this one together and I hope you’ve enjoyed it too!  Hoping to pull out this card kit again and make several cards with it as there is still so many things in this kit that I never got a chance to play with!  (I have so many things I need to do this with!)😉

Please be sure to check out the challenge blog to see the inspiration from the team and I hope you will take some time to have fun and play along with us!

Enjoy your weekend and thanks for stopping by!  I’ll catch you soon!

Challenges:

  1. Crafts Galore Encore Anything Goes
  2. Pammie’s Inky Pinkies – PIP2423 Anything Goes
  3. As You Like It – With or Without Words and Why? (I feel like this is the main reason to send a card to someone that includes a sentiment.  I especially like the fun and/or pun for sending smiles.)
  4. Tic Tac Toe – TTTC249 (I used first row down:  layers, die cut, pattern paper)
  5. Penny’s Paper-Crafty – #573 Anything Goes Using Paper
  6. Aloha Friday Masculine
  7. Creative Moments – #259 optional twist: Men and Boys

Sweet Treats for Sparkles Monthly

Hello friends!  I hope that you’re having a great week!  Do you have any up-coming plans this weekend?  I think I’m going to catch up on some craft things because it’s going to be a bit cooler and rainy over my way.  The flowers are starting to come out and some of the daffodils have bloomed…so I hope the weather holds!

Today begins a new challenge over at Sparkles Monthly and Helen would like to see some “Sweet Treats” this month!  I always think of birthday cards with this theme, so I thought I’d get ahead and make another birthday card to add to my stash especially since my son’s birthday was yesterday!  So here’s my card for this challenge:

YUM!  I’ve used the Simon Says Stamp Sundae Afternoons set and had lots of fun coloring up this image, and as I did, I was thinking of all of the different flavors of ice cream and toppings!

I realized that I needed a background and a surface for the sundae to be placed on, so I created a background with a cutting plate and sponged over the area where I was placing the sundae image.  I also took a strip the same size and sponged the top area where the sundae would set on and then cut both pieces out with a stitched rectangle die.  I also used some fun polka-dotted papers from my stash and added another stitched rectangle piece behind it before placing in on an A2 top folding white card base.  The die cut background front panel was popped up with foam tape.

For finishing it off, I stamped the sentiment at the bottom from the stamp set, added some shimmer with a glitter brush pen over the whip cream on top and the fruit slice.  I took some glossy accents over the cherries, toppings and jellybeans.  I also added a few clear bubble drops to the background.

This was a really fun card to create and now I have a birthday card ready for someone!  I hope you’ve enjoyed my card today and have been inspired to join the challenge with us this month as I’d love to see what everyone comes up with!

Thanks for dropping by and enjoy your weekend ahead!

Challenges:

  1. Pammie’s Inky Pinkies – Anything Goes PIP2410
  2. Penny’s Paper-Crafty – Anything Goes Using Paper #567
  3. Crafts Galore Encore – Anything Goes
  4. Love to Craft – Anything Goes #79
  5. Lil’ Patch of Crafty Friends – Anything Goes #225
  6. The Male Room – Food & Drink #184

Grateful & Encouraged

Hello friends!  It’s Thanksgiving tomorrow for us in the United States and I’d like to send a heartfelt Thanksgiving greeting to you all!  I would also like to say a huge thank you to everyone for your kindness and friendship.  I’m very grateful for you and encouraged by your support!

I’ve been working on several things and haven’t spent the time to photograph and share everything yet, but I will be sharing soon.  In the meantime, I’d like to share a few projects that I’ve made in lieu of the Thanksgiving holiday:

I don’t normally send Thanksgiving cards, but it’s a great way to say thank you to someone that hosted a dinner or brought something to share or just spend time with you!  That is the ONLY turkey stamp I own!  The stamp set is called “Sassy Thanksgiving” by CZ Designs at Simon Says Stamp.  I thought the sentiments in it were too cute and funny.  You certainly could make this any type of thank you as well.

This is also a fancy/fun fold card called a “Swing Easel Card”.  I found a tutorial using a vertical style on You Tube here – SWING EASEL TUTORIAL (I also used the same detail of embossing an additional panel with leaves and went over the texture with some gold paste.)

I made another panel for the center area and ink blended some blue that faded out and then splattered some gold paint over it.  I then layered it over a piece of gold that fits in the center panel of the easel.  I gold heat embossed the large sentiment and cut it out with the die.  It was popped up over the leaves.  I also cut an additional strip with the gold for the “catcher” of the front panel of the easel card.  I added the turkey and leaves along with the stamped sentiment on the inside bottom.


Autumn is my favorite time of the year and I enjoy using the colors and images in the cards I make, so here’s more that I’ve made:

I’ve made a couple of encouragement cards to send out to some people and I’ve used a favorite card kit from my stash by Taylored Expressions.  The images come from the stamp set Wheatfield Dreams.  I’ve used an oval die and oval mask to do some ink blending and just cut out the colored image to pop them over top.  Both sentiments were copper heat embossed.

I kept the backgrounds simple with the one on the left stamped with a background stamp from TE and the other was cut out with a wonky stitch die and layered over a green card base.

Hope you’ve enjoyed my creations, and I am so grateful you’ve chosen to stop by!❤️

Challenges:

  1. Creative Fingers – Anything Goes
  2. Lil Patch of Crafty Friends – Anything Goes
  3. Pammie’s Inky Pinkies – Anything Goes
  4. Crafting Happiness – Thanksgiving/Harvest #148
  5. Four Seasons – Fall Season
  6. The Crafty Addicts – Anything Goes
  7. Crafts Galore Encore – Anything Goes