October Art Journal-A Strange Feeling

Hello friends! **THIS IS A PRE-SCHEDULED POST AS I’M AWAY AT A STAMP RETREAT!!** 

The weather is finally starting to cool down now and we’ve finished cleaning the yard to prepare for winter months to follow soon.  Halloween will also be here in a few days, so I thought it would be fun to make my page today with that in mind!

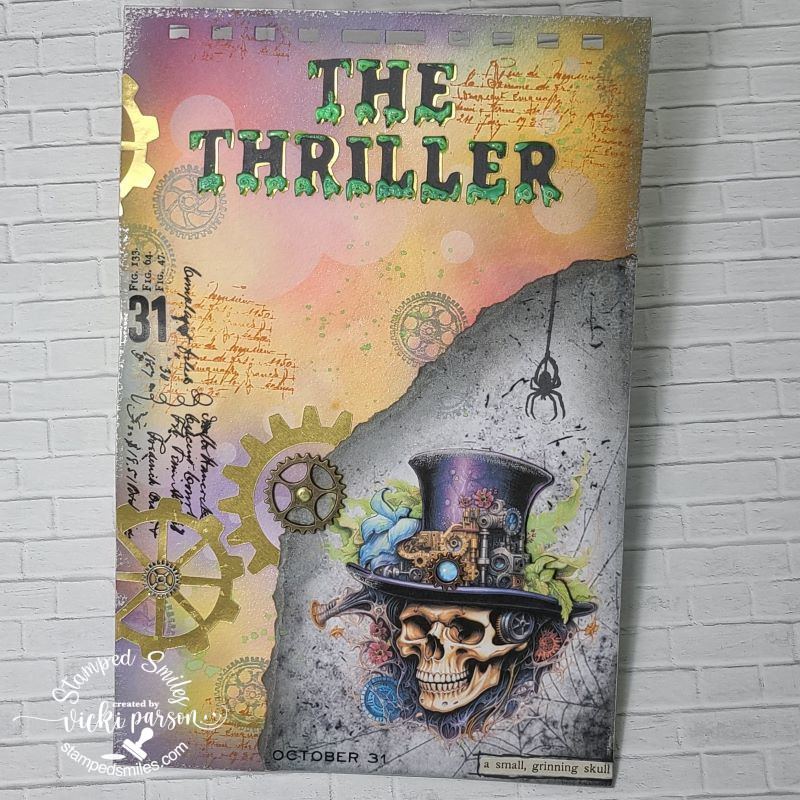
Today is the monthly Art Journal Page collaboration with my crafty friend, Carol (from Crafty-Stamper)! We get creative trying to use up our never-ending stash piles along with a prompt for each month.  I know she always has great inspiration to share, so please check out her blog too! Here’s my AJ page with the “SMASH OUR STASH” October prompt of ODD/Oddities” (anything unusual or strange): 

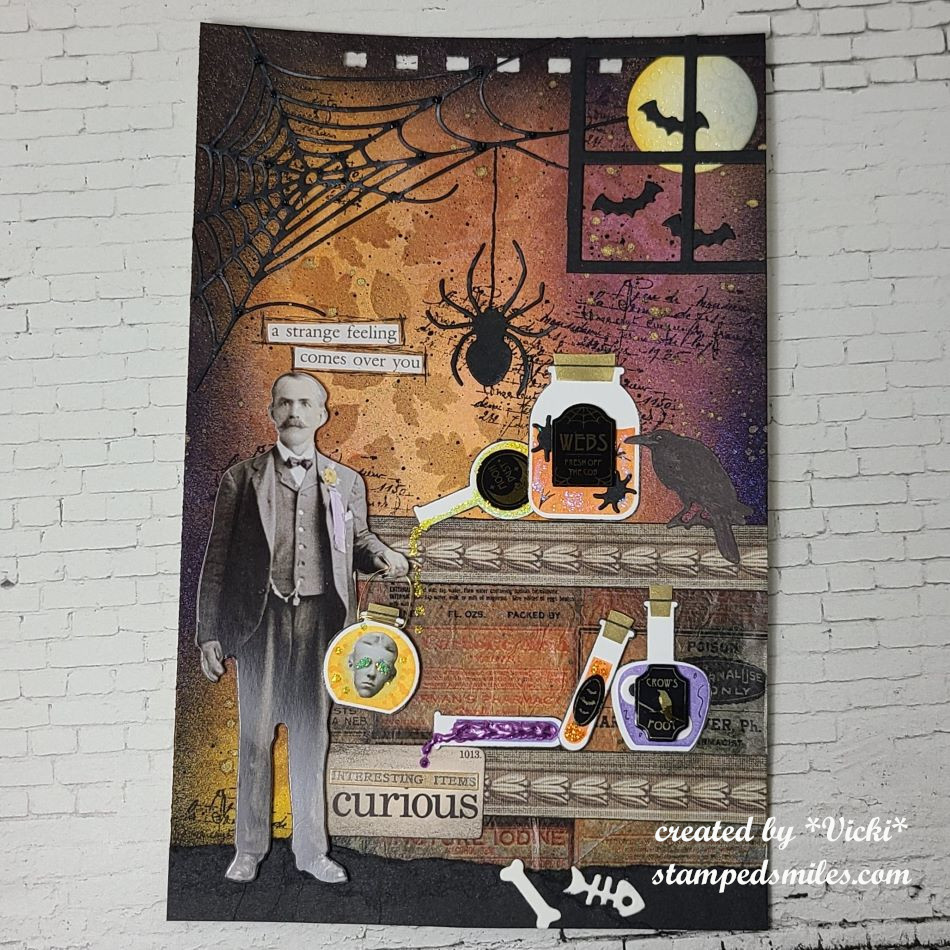
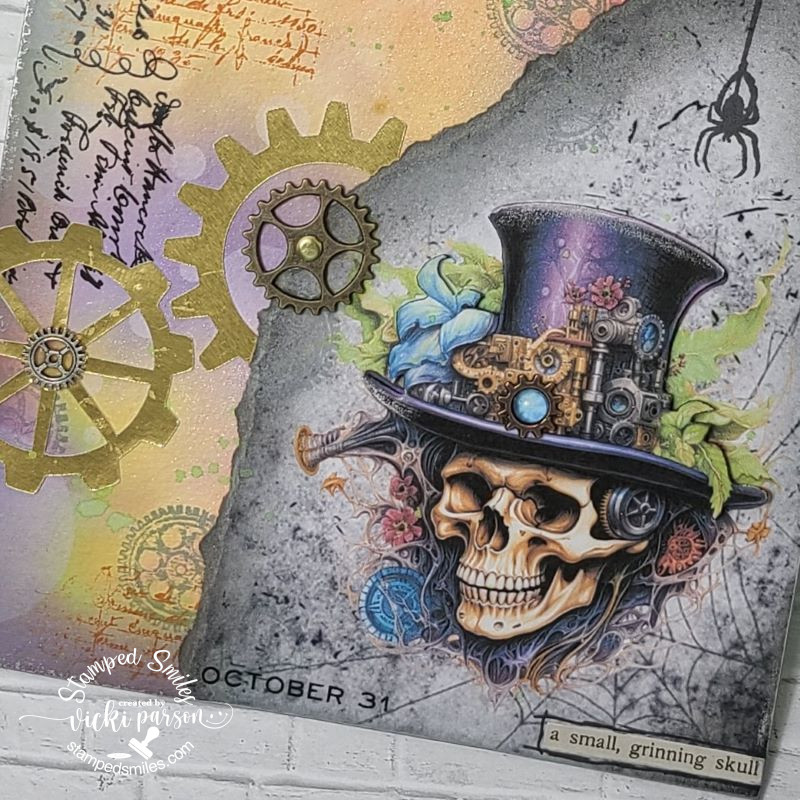
I don’t know if this is considered odd to anyone else, but I certainly do!  This weird scientist looking guy has a strange facial expression as he’s holding up a head in the bottle!  I’ve put so many details in this page that I thought you’d need to see close-up photos below.

For my background:  Starting with a 5.5″ x 8.5″ heavy watercolor paper with pre-punched holes at the top for binding later, I sprayed the background with mica sprays in Hocus Pocus, Jack-O-Lantern and Flickering Candle.  I sprayed some extra water over top to get them to blend together as they seem very concentrated and they didn’t move much over the watercolor paper after spraying a few times.  I took a leaves stencil inked over places with light brown ink.  I then ink blended the edges with black ink and stamped some lettering stamped randomly.  Lastly, I splattered with black and gold watercolor. 

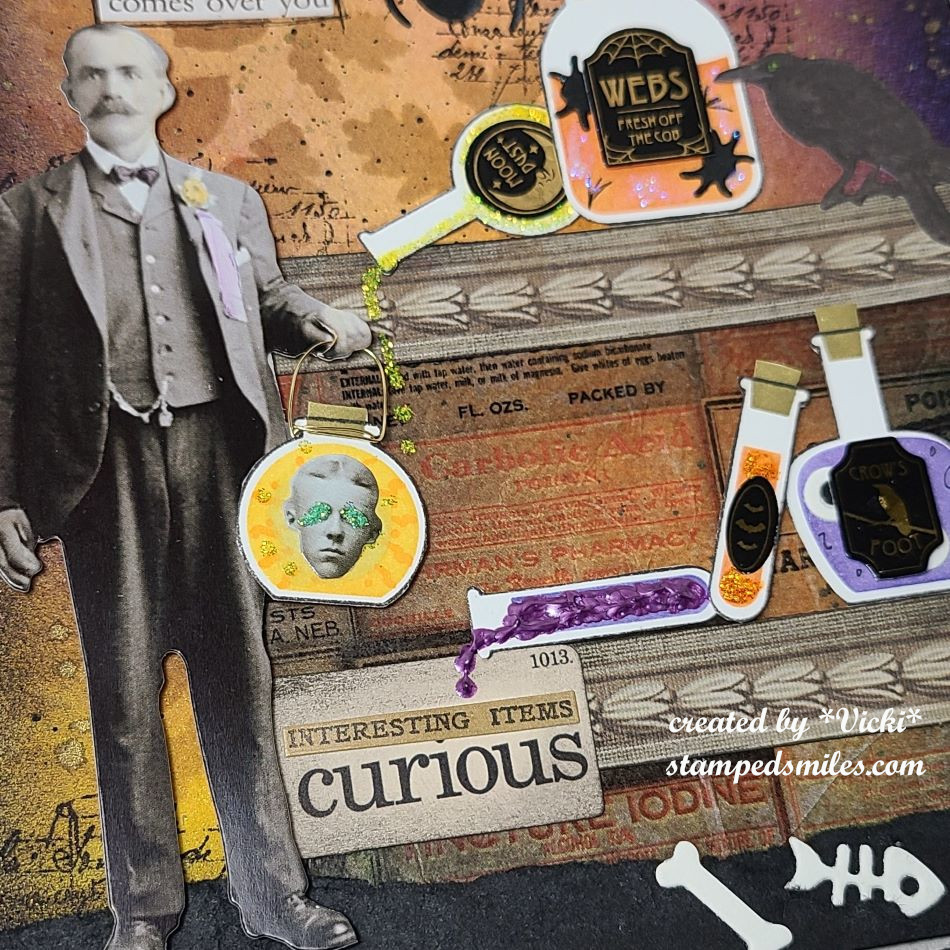
Upon a closer look at the bottom:  I needed an area for shelves to hold the potion bottles, so I took some Tim Holtz Halloween collage paper and attached it with matte medium.  It crinkled a bit, but I sort of liked that look.  I then found some decorative strips in my stash and added those for the “shelves”.  The crow and “curious” ephemera was also found with all of my Tim Holtz Halloween stash….along with the paper doll “guy”.  I cut off a head from one of them to place inside the jar.  I added some thin metal wire around the jar and cut a slit in the guy’s hand to make it look like he’s holding it.  I also added a bit of color to the guy’s flower and bow tie on his jacket outfit with markers.  BEFORE popping up the paper doll guy to the page, I ripped some black cardstock for the ground underneath him and tucked in the bones.

For the Bottles:  I used a Taylored Expressions “If You Dare” Stamp & Stencil set to make all of the bottles.  I also used the TE “If You Dare Halloween Labels” to foil and cut out to place over each jar.  To die cut some extra “strange things” to put inside a few of the jars and the bones at the bottom, I die cut pieces from the TE “Little Bits Cauldron Confetti” dies.  (The die cut bats from this were also used on the top of the page.)  For more finishing details, I doodled in some of the jars and then added some colored glitter/sparkle and pearl drops for the inside contents.  If you look closely at the crow’s eye, you can see I’ve added a tiny dot of yellow sparkle.  Some of the details were popped up and some were just glued down.

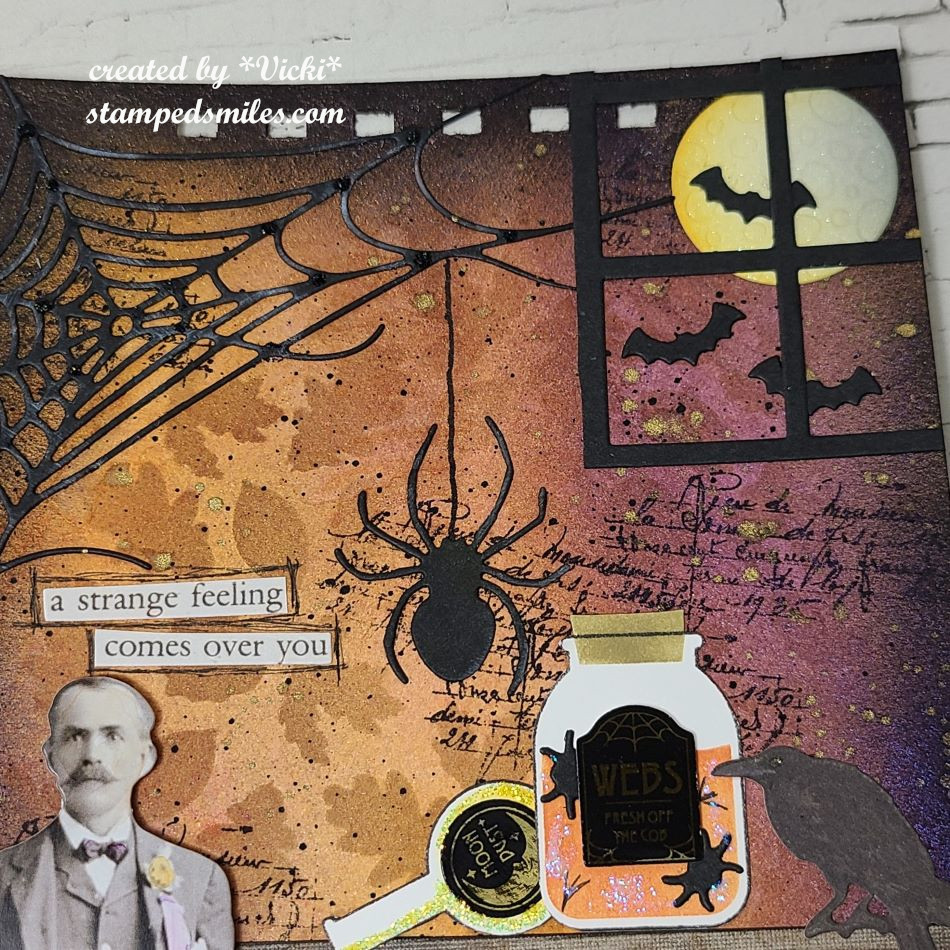
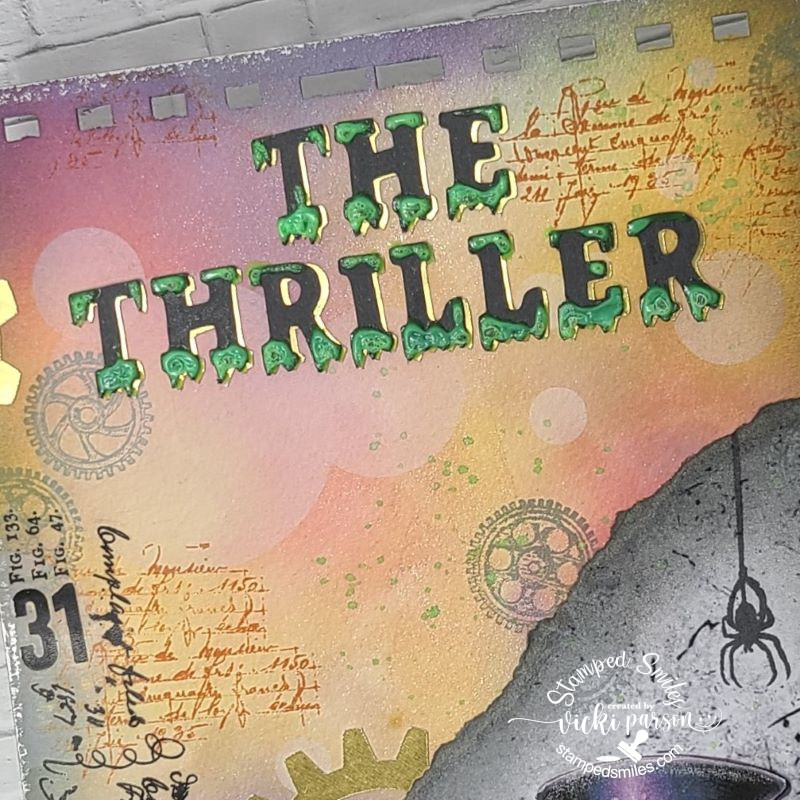
A closer look at the top:  Mostly die cut pieces were used at the top and the first I put down was the spider web and spider from Whimsy Stamps called Spiders and Webs…they’re huge!  (this store is so good at spooky things!)  I drew a line with a black marker from the spider to the web.  For the window, I die cut it out from a really old Mama Elephant die I’ve had in my stash…not sure if it’s still available.  BEFORE I placed the window down, I die cut the moon from the Lawn Fawn Shadow Box Halloween Add-On die set.  I blended in some yellow and gray  and covered it with a glitter sparkle pen.  I added the die cut bats and placed the window over top.

Lastly, I took some Tim Holtz Halloween clippings word strips and added to the page.  I took a black marker and went around the strips above the paper doll “guy”.

I know there are people that are not Halloween fans or care for the spooky things, but I really enjoy the weirdness of it all and have fun making things with it!  In the words of Lydia from Beetlejuice:  “I myself am strange and unusual“.

Winona Ryder in a hat as Lydia in Beetlejuice

I do hope you’ve enjoyed my page today and I really appreciate you stopping by!  I will be back later with things we’re doing at the retreat!  See you soon!

Challenges:

  1. Art Journal Journey – Autumn Colors & Inspiration (Purple, orange, yellow and black!)

June Art Journal Page-Finding Happiness

Hello friends!  Happy weekend!  I hope you’re enjoying yourself with whatever you have going on.  It’s hard to believe that it’s almost time for us to celebrate the 4th of July holiday! 

We’ve been having higher than normal temperatures this time of year and you never really know if that humidity is going to circle back up in the air to create a thunderstorm.  Nature can be a wonderful thing though, and this is what the focus is for my page.

  • It’s time for the monthly Art Journal Page collaboration with my crafty friend, Carol (from Crafty-Stamper)! We get creative trying to use up our never-ending stash piles along with a prompt for each month.  I know she always has great inspiration to share, so please check out her blog too! Here’s my AJ page with the “SMASH OUR STASH” June prompt of “DISTRESS”-(rough up/sand/rip, etc): 

So taking this approach with the prompt of “distress”, I thought it called for green colors and lots of nature collage type elements from my stash!  I have tons of those Tim Holtz ephemera packages, so I pulled those out along with distress oxide sprays.  I haven’t used those in quite a while.

For the background:  I started with a 5.5″ x 8.5″ (pre-punched holes with the Bind-It-All machine) very heavy weight canvas paper.  I started with a couple of pieces of ripped printed papers and distressed/inked the edges of it with Vintage Photo Distress Oxide ink.  I then took a Tim Holtz stencil and randomly applied paste over it.   After the paste dried, I placed the panel into a box and sprayed it with variations of water and distress oxide sprays in Peeled Paint, Rustic Wilderness, Fossilized Amber and Vintage Photo.  I added water and dried with my heat tool after each color until it was blended as I liked.  I took off the Vintage Photo cap and splattered a few drop with it.

Before applying the ephemera pieces, I had a solid fern stamp that I randomly stamped with Rustic Wilderness Distress Oxide ink.  I also stamped a few of those “rain drop” images randomly in the center of the page with black waterproof ink.  I removed the background color out of the images with a watercolor brush and then added back in a touch of blue color from an ink pad lid.  I used a white gel pen to add a highlight and covered the drops with a glitter brush pen.

Finishing the page, I’ve stamped the bug and magnifying glass, colored them in and added some acetate behind the magnifying glass, I ripped, sanded and distressed the edges of the page, the card behind the bird and randomly over the background.  Before attaching the pieces, I took some white pearl wax and rubbed over the stenciled paste areas.   I also sanded around the edges of the black sentiment strips.  I attached all of the ephemera pieces and popped the card and butterfly pieces with foam tape.  I added a safety pin to the card and glitter to the tops of the flowers in the corner.  (hard to see in photo)

  • The sentiment at the top reads:  if you want to find happiness, find gratitude.

Another prompt I worked on with this is the challenge over at Art Journal Journey which was “What Makes You Happy“.  So although nature helps with happiness for me, I find that happiness is multi-faceted with the purpose being exactly what the sentiment says.   I thought it went perfectly with this page.

Since my husband is retired and we now have time to take little road trips here and there and sometimes stop along the way to find an interesting trail or nature walk or park to explore.  We’ve had some great times doing this and I love being out in nature especially among the trees after a gentle rain.  The smell and coolness in Autumn are fabulous for this!

 Click on a photo to enlarge it if you’re on my website:

This was quite a wordy post, but I hope you’ve enjoyed my inspiration today and how it was inspired.  Thanks so much for joining me today and please check out Carol’s blog too!

Challenges:

  1. Art Journal Journey – What Makes You Happy
  2. Creative Artiste – #105 Anything Goes Mixed Media
  3. Anything Goes in a Card Free Zone – June challenge ATG
  4. A Place to Start – Anything Goes optional:  Anything but a card
  5. Paperminutes – #852 Stencils

April AJ Page-One Cup at a Time

Hello friends!  I hope you’ve been enjoying your month so far!  We’ve had a few really nice days this month, but it’s still a tad bit chilly and hopefully it will warm up more next month!  It’s hard to believe we are already headed into May for this year!

That means it’s time for the monthly Art Journal Page collaboration with my crafty friend, Carol (from Crafty-Stamper)! We get creative trying to use up our never-ending stash piles along with a prompt for each month.  I know she always has great inspiration to share, so please check out her blog too! Here’s my AJ page with the “SMASH OUR STASH” April prompt of “HALF” -(e.g. 2 halves to create whole item/half of something):

Yes, coffee please!  I’m a coffee lover and so is my husband!  I don’t think we’d be able to start a day without it!  I know there are lots of people who don’t like coffee and that’s OK…as long as there will be some somewhere for me, I’m good! 😉☕

It was my husband that inspired this page for me when I asked him what his favorite shape was, and he answered with a circle.  Looking down at my coffee cup was the circle I saw and decided to take more inspiration from a coffee cup we purchased at one of our favorite local coffee cafes you can see in the top corner of the photo.  To achieve the look, I took a cardstock color matching the cup and splattered white paint over it.  The “HALF” is obviously the coffee cup that was cut out with circle dies.  I cut another piece of the handle which makes it look like the view you would see from the top of the cup.  The other “HALF” of the cup was placed in the corner area at the bottom and this coffee is more of my husband who likes plain black coffee.  But this is certainly how we start our day together which is great since he’s retired now.  The other “HALF” cup has the latte art, and I did that one with light sponging around the edge and then took my colored pencils to free hand the design.  Not sure if that’s exactly what it looks like, but I gave it a try.

  • For the background:  I’ve used a strip of wood plank pattern paper from my stash, and I’ve also heat embossed a coffee bean background stamp with, of course, coffee embossing powder that I’ve had for a very long time, and it was a great time to use it!  I’ve also heat embossed the “coffee” sentiment and quotes with it. Below the embossed coffee is a sentiment that says:  “Take life one cup at a time” and the other two at the bottom say: “First we drink coffee, then we do the things”😂 
  • The coffee cup-stained background, I’ll share more about below.

I also took a big brush marker to go around the edges of the cups and the sentiment strips.  I wanted the heat embossing to stand out a bit more over the brown cardstock, so I took a white Tim Holtz crayon and rubbed over top of it to brighten it up.

Have you ever made backgrounds with coffee?  I had such a fun time playing with it and decided to make several different backgrounds that I could use for later!

I don’t drink instant coffee, but I have some in my cupboard because I like to make a chocolate cake that has instant coffee in it…so good!  I took some of this instant coffee and made the coffee cup-stained background for my page to create more circles that went with my circle coffee cups.

I also decided that since I had a cup of it, that I would go ahead and make more backgrounds with it and just play around with different things.  I splattered, I smooshed, I’ve added salt along with a few other things and let dry and make patterns with.  Once dry, I cleaned them off and here are the results of my play.  I wish I had done another cup circle background though.

I hope you’ve enjoyed my art journal page and been inspired in some way!  Thanks so much for dropping in!  Have a great weekend!  Mine will be busy!

Challenges:

  1. Art Journal Journey – Geometric Forms
  2. Creative Artiste – Anything Goes Mixed Media
  3. Creative Fingers – Anything Goes
  4. Try it On Tuesday – Inspired by a Song (Can’t think of coffee with the “Coffee Song” by Frank Sinatra!)
  5. Lil’ Patch of Crafty Friends – Anything Goes
  6. Penny’s Paper-Crafty – Anything Goes using paper

March Art Journal Page-You Just Have to Ride

Hello friends!  We are at the end of March, and it happens to also be Easter weekend as well this year!  So happy Easter and I hope you’re enjoying the beginning of the Spring season!  I will be out as this post goes up, but I wanted to get in this month’s AJ page!

It’s time for the monthly Art Journal Page collaboration with my crafty friend, Carol (from Crafty-Stamper)! We get creative trying to use up our never-ending stash piles along with a prompt for each month.  I know she always has great inspiration to share, so please check out her blog too! Here’s my AJ page with the “SMASH OUR STASH” March prompt of “POSTAL”:

For this month’s theme, I knew I had lots of real postage stamps in my stash and some ephemera pieces as well as some postal tissue wrap from Tim Holtz.  I have a huge roll of it and it was time to get it back out and use it up!  When looking for my postage stamps, I also found a post card that I previously created and a vintage looking photo that I printed out…which I also turned into a very large postage style stamp.  

The top of the page says:  “Some days you just have to ride, however difficult it might be!

For the Background:  I used an 8.5″ x 5.5″ piece of acrylic paper with pre-punched holes at the top and blended some media paints over the background which gave me the bright blended colors.  I ripped pieces of the Tim Holtz Postale Tissue Wrap and attached with matte medium over the blended paint background.  After it was dry, I ripped some more of the pieces and sanded the edges.  I also took some ” Rusty Brown” wax and went over the textured areas and around the edges with my finger.  Then I splattered some white paint over top.  

I popped up the pre-finished postcard and also added some ephemera around it and added that Shetland pony postage stamp.  I thought it went well with the vintage photo that I turned into a postage stamp with a die.  The quote at the top was printed on my computer, ripped edges and sponged with brown ink.

This is a bit busier in design than what I had planned it to be, but I had fun playing with it and I was glad to use up some more of that piled up ephemera!  I hope you got a “KICK” out of it too! 🫏 Thanks so much for stopping by and I’ll see you soon!

Challenges:

  1. Art Journal Journey – On All Fours
  2. Love to Scrap – Anything Goes
  3. Creative Artiste – Anything Goes Mixed Media
  4. Simon Says Stamp Wednesday – Anything Goes

Lots of Joy Mailed Out!

Hello friends!  I hope that you’re having a great start to your week!  We’re almost there as Christmas approaches us quickly!  I’ve been enjoying the Season and having fun keeping busy.  Currently baking cookies and decided to take a break from that to sit and make a post about all of things that I’ve been doing besides posting!😆

This is just one of the several similar cards that I created for my Christmas cards this year.  It came from a Christmas in July card kit from Taylored Expressions.  It mainly used the Wreathed in Joy Stamp & Stencil Combo set.  There are dies you can cut them out with as well as foilable panels which is shown on this one.

I do not like to make several of the “same thing”, so I’ve changed them up to different colors, layouts, etc.  So you can see the different versions I’ve done below.  (If you are visiting my web page, just click on each photo to see it enlarged.)

 *Apologies for the messy stack for photo taking…it was a lot to do all at once!

I thought these would be enough for all of the Christmas cards to send out, but I realized going back through my list that I wasn’t going to quite have enough. 

So I’m glad that at the beginning of this month I took a Hero Arts Stamp-a-Long and made several different types of Christmas cards.  Here are the results of these below:  (Again, if you’re looking on my web page, just click on the photos to enlarge them.)

So some of these were also taken and used for sending out more Christmas cards.  I’m glad that I did the projects for this class or I probably would not have had enough cards.

BUT WAIT!  That’s not all!  I’ve also made a few other Christmas items that I’ve also sent out.  I’m also sharing some gifts and gift tags that I’ve made from a Taylored Expressions Advent Calendar that I got this year.  I made some more cards and tags.  (I tried out wax melting which is something I’ve never done…it was fun)  Others are from classes I took or participated in Craft Roulette for.

If you’re on my web page, just click on the photos below to enlarge each one.

Wow, so that was a lot!  I know that my blog has been pretty sparse with posts lately and I am finally getting around to posting the things that I’ve been working on, so I hope you’ll get that and you’re able to take some time for yourself this season and enjoy the peaceful quiet moments!

I will be sure to take a moment and catch up with everyone before Christmas arrives.  In the meantime, it’s back to cookie making!  Thanks so much for stopping in today!❤️

November AJ Page-Winter Wonderland

Hello friends!  Hope everyone has had a wonderful Thanksgiving for those that celebrate.  And with that, there is also the Black Friday deals, and today is “small business Saturday”.  So have you’ve gotten some really good deals or do you shop during this time?  I don’t really shop too much during this time, but I enjoy hearing about the great deals everyone has gotten!

The last Saturday of the month also brings us to the monthly Art Journal Page collaboration with my crafty friend, Carol (from Crafty-Stamper)! We get creative trying to use up our never-ending stash piles along with a prompt for each month.  I know she always has great inspiration to share, so please check out her blog too! Here’s my AJ page with the “SMASH OUR STASH” November prompt of “STENCILS” (can also make your own):

I do love stencils, don’t you?!  I have lots of them in my stash and I don’t always use them as much as I’d like to, so how fun to pull out several of them for this month’s prompt!  All of the ones I’ve used on my page are from Tim Holtz.  The entire page is stencil expect for the deer, sentiment and bottom snow!  (I would’ve used the deer for a stencil too, but I don’t have one.)

For the background:  Started with my usual 6″x9″ 140# watercolor pre-punched holes on the side.  I took the large star looking stencil and sponged some VersaMark ink over it towards the top of the page and heat embossed it with clear EP.  (This made a “resist” for the ink I layered on top.)  I took a long strip of masking paper and ripped it to create some hills for the bottom.  I needed to mask so the colors didn’t go over it.   I took several different colors of Distress Oxide sprays along with spritzing with water to help the colors move around and made a few layers with this.  Once dry, I went over the background with the dotted stencil and sponged ink over it with a blue color.

For the tree stencil, I needed to be sure that it would cover the background I created, so I used some green paint to sponge over the stencil, but because the background is blue, it’s sort of harder to see the green.  This stencil also had a second part where you can cover each tree with another layer for either another green or snow.  So I used some Hero Arts white paste to cover it with.  I also used the same paste to add another layer of stencil to the sky for snowfall.

The silhouette deer is a stamp that I stamped with black pigment ink and then I heat embossed it with clear EP.  My final touch to the page was to take the Hero Arts white paste and cover the hills at the bottom using my spatula.  Really love the dried look of the paste as it has a wonderful shine to it which works great for snow!  It didn’t take as long as I thought it would to dry. (About 2 hours it was hardened.)

I found a couple of the Tim Holtz sticker quotes to go with my theme, added to black cardstock and went around the edges with a silver paint pen.  I cut them out with scissors and glued to the page.  I took some silver wax and went around the edge of the page with my finger and lastly added some glitter drops to a couple of the centers of the “stars” in the sky.

Hope you’ve enjoyed my art journal page today or have been inspired!  I appreciate you taking the time to stop in! 

Challenges:

  1. Art Journal Journey – Nature (I love nature in the wintertime!  So pretty covered in snow!)
  2. Try It on Tuesday – Baby, It’s Cold Outside!
  3. Crafting From the Heart – Anything Goes
  4. Creative Artiste – Anything Goes Mixed Media (stencils, pastes, paints, inks)
  5. Stencil Fun – Anything Goes using stencil(s) optional: leaves
  6. 613 Avenue Create – Anything Goes optional embossing (heat embossed)

October AJ Page-Thriller Mix

Hello friends!  Halloween is very near! 💀 I have been working on a few Halloween cards and will be posting those as soon as I know they’ve been received.  But today’s project is about Halloween in mixed media art journal form!  I do enjoy crafting Halloween!

Very excited to be doing the monthly Art Journal Page collaboration with my crafty friend, Carol (from Crafty-Stamper)! We get creative trying to use up our never-ending stash piles along with a prompt for each month.  I know she always has great inspiration to share, so please check out her blog too! Here’s my AJ page with the “SMASH OUR STASH” October prompt of “MIX” (mix colors together from any media):

For this month’s prompt, MIX, I have to say that I love to mix up colors to see what they look like.  I have SO many bottles of watercolor and of course watercolor is fun to mix up…so I went with that for my background.

For the background:  Hard to tell, but I’ve used eight different colors of watercolor that was applied to a pre-punched 6″ x 9″ Canson 140# cold press paper.  I also used a circle stencil to apply some white ink over it for a bokeh effect.  I also stamped some random words and gears.  (Stamperia and Tim Holtz)  I also took some of the green watercolor used in the background for a few splatters.

Showing my age here but does anyone remember the Micheal Jackson “Thriller”?!  It’s perfect for Halloween!  I thought I needed to add a title to my page to represent the Halloween theme and this song came to my mind! 😆

I found some cool lettering that I used my Cricut machine to cut them out with in both gold metallic (also cut gears with) and some dark grey cardstock.  I glued them together with a slight off-set so the gold shows through.  I also used some Nuvo Glow in the Dark liquid drops around the edges of the letters.  I wanted to make it really “goopy” so I heated it up with my heat gun so that it bubbled.

The bottom of the page has the really cool Steampunk skull image that came from an Etsy store.  I used another image of it to fussy cut the hat and then popped it up over the image on the paper.  If you look at the center bottom of his hat, I added a gear with a clear drop in the center of it.

I’ve also added a talk sticker and rub-on from Tim Holtz.  I added a couple more metal gears from my stash to go with the gold cut out ones.  Lastly, I’ve taken some silver metallic wax and went around the edges of the page and slightly over top of the skull’s hat.

Hope you’ve enjoyed my art journal page today!  I sure had fun putting it together!  Thanks so much for stopping by today!  

Challenges:

  1. Art Journal Journey – In Gear
  2. Creative Artiste – Anything Goes Mixed Media
  3. Try it On Tuesday – Halloween
  4. Two Old Bats Halloween – Anything Goes Halloween
  5. Simon Says Stamp Monday – Spooky!

September AJ Page-Thankful Imprint

Hello friends!  Can you believe we’re already through September?!  Today is a scheduled post from me as I’m away in an area with spotty to no connection right now, but wanted to be sure that I had my Art Journal Page posted for this month.

It’s also hard to believe that this is the 9th page done for this year!  I’m so glad I’ve done the monthly Art Journal Page collaboration with my crafty friend, Carol (from Crafty-Stamper)! We get creative trying to use up our never-ending stash piles along with a prompt for each month.  I know she always has great inspiration to share, so please check out her blog too! Here’s my AJ page with the “SMASH OUR STASH” September prompt of “IMPRINT” (using gel plate, print machine, leaves or something to create an impression):

Really had a fun time with this as I hadn’t gotten a chance to play around with my gel plate very much and I received about 15 different prints in one sitting!  It started out like I didn’t have a clue, but the more I kept experimenting, the more fun and unique prints came out.  Do you have a gel plate and/or do you use it often? (If you’re new to Gel Printing, here’s a link to a You Tube video showing you basics on how to get started The Basics of Gel Printing)  

For my print here, I decided to try something from nature and found a couple of maple leaves in my yard that were laying on the ground starting to turn.  I think there are about 3 layers of prints on this one…hard to remember when you just keep going!  I cut it out to fit the size of my AJ page.

FOR THE BACKGROUND – I started with my usual 6″ x 9″ Canson 140# cold pressed watercolor paper with pre-punched holes at the top and covered it with DecoArt media fluid acrylic Primary Cyan applied with a baby wipe.  Really love the blue background it gave here.  Then this is when I applied the gel print piece to my background.  I then used some orange, black and white colored acrylic paints to create some splatters over the background and gel print piece.

I die cut some maple looking leaves from the Taylored Expressions Garden Variety-Fall die set and ink blended them.  I also splattered some orange paint over them as well.  I had some gold glitter sheets that I cut down in a couple of thin strips to add to the top and bottom of my gel print piece.  I then attached the die cut maple leaves.  

I cut out the word “Thankful” from Impression Obsession three times in Pumpkin cardstock and layered them together for my page.  I also grabbed this sentiment from the Tim Holtz small talk stickers and layered it over the same Pumpkin cardstock and attached it next to the “Thankful” word on the page.

I thought about adding something more, but I then thought it would distract from the printing which already has a “busy” look to it and so I called this one done.

  • I’m very THANKFUL that you’ve taken the time to stop by and your kind support!  It’s always more fun to craft with like-minded friends!  I’m also THANKFUL to my crafty friend Carol for sharing this monthly AJ fun with me as well!  (I will stop by to see your page as soon as I can my friend!)

Have a great day and see you in October! 😊

TO LEAVE A COMMENT:

  1. Start typing in the comment box below each post you’d like to comment on and leave whatever message you’d like. 
  2. Once you start typing within the box, you will see 3 buttons show up with the options: “W” for WordPress icon, “F” Facebook icon and an “envelope” icon.  Choose one of these buttons in which to “login” or enter your name/email because this blog doesn’t allow anonymous comments.
  3. If you’re a Gravatar.com user, then you can click on the “W” button to sign in which will automatically show your profile photo and a “gear” button next to it.  If you already see your profile photo showing up, then all you need to do is leave your comment and hit the highlighted reply button.
  4. If you’d like to just enter your name and email (email address is not published), then click on the “envelope” icon.  Once you’ve done that, the “reply” button should be highlighted so that you can leave a reply.  Hopefully, once you’ve left your comment, it will “remember” who you are the next time you visit, and you won’t have to keep entering your information. **If you’re already logged into WordPress, this option WILL NOT work.  If you see your Gravatar profile with a gear next to it, you are ready to leave a comment.

*****If you are NOT seeing your comment appear immediately after you’ve left your comment and hit the reply button, I may have to “approve” your comment.  But once I’ve approved you, you shouldn’t have to be approved again unless you’re leaving several links within your comment.

I hope this helps!  Sorry if you’re having a problem leaving a comment and I really appreciate you taking the time to support your kindness with me!  BIGGEST HUGS

August AJ Page-A is for Adventure

Hello friends!  Wishing you a happy weekend!  We’ve had a heat advisory in our area all week, so I’ve been staying indoors organizing, cleaning and crafting!  Hope that you’re taking some time to enjoy your weekend even if it’s just for a moment of time.

I can’t believe we’re at the last weekend of August, because it’s time for the monthly Art Journal Page collaboration with my crafty friend, Carol (from Crafty-Stamper)! We get creative trying to use up our never-ending stash piles along with a prompt for each month.  I know she always has great inspiration to share, so please check out her blog too! Here’s my AJ page with the “SMASH OUR STASH” August prompt of “LETTERS”:

Thinking of YOUR stash, what do you come up with from the prompt?  I think as crafters, we probably all have some type of lettering in our stash!  I have stamps, stickers, chipboard, wood, stencils, ephemera, etc so I knew this would be a good opportunity to pull out something.  And if that doesn’t work for you, I suppose you could take the prompt literally, and attach an actual written letter or make one up yourself to add to your AJ page.  Lots of ways to interpret a prompt which makes it easy to come up with a plan to inspire you.  So this is what I came up with.

For the background:  I started with a 6″ x 9″ Strathmore Acrylic paper with pre-punched holes at the top and stenciled some crackle paste over my Tim Holtz alpha stencil and let dry.  I then took some Distress Oxide sprays in the colors kitsch flamingo, salvaged patina and speckled egg and mixed with sprayed water to let the the colors run over the stenciled areas.  After it dried, I used the Tim Holtz Grunged stamp set and stamped more letters over the background with black archival ink.  The edges were blended with dark gray ink and then I splattered the page with gold and white paints with a fan brush.  Lastly, I took some white gold metallic wax and went over the stenciled letters.

The film strip came from the Whimsy Stamps Slmiline Film Strip die cut out from black cardstock. For the three image sections, I found some packaging with maps images on them and cut it out with the same die.  Since the packaging had a slick surface, I painted it with clear gesso so I could stamp over it.  After it dried, I stamped the three panels with the TH Grunged stamp set in the same colors of Oxide inks as the background and then stamped the travel images with black archival ink from an old Stampin’ Up! set called “Traveler”.  To finish is off, I used an old chip board letter “A” from my stash, painted it black and added some more of that white gold wax along the edges, found a TH “small talk” sticker to go over it and then I drew some lines around it and sponged it to make it look grungy.  I finished it with more ephemera I found in my stash from Tim Holtz and Stamperia… and decided to call it done.

  • Thanks so much for stopping by today!  I hope you’ve found some inspiration with my project!  Enjoy your day!

Challenges I’d like to enter my page for:

  1. Art Journal Journey – Where in the World? (travel theme)
  2. Crafting Happiness – Any type of craft
  3. Creative Artiste Anything Mixed Media
  4. Paper a la Mode – No Cards – I was inspired by grungy things
  5. Crafting From the Heart – No Cards – Anything Goes
  6. Ally’s Angels – Anything Goes

May AJ Page-Start a New Beginning

Hello friends!  I feel like the time keeps moving whether or not I do!  At the last minute before getting something done, I finally started this page! Once I got going, it was fun to just play around to see what happens!

It’s time for the monthly Art Journal Page collaboration with my crafty friend, Carol (from Crafty-Stamper)! We get creative trying to use up our never-ending stash piles along with a prompt for each month.  I know she will have some wonderful inspiration to share, so please check out her blog too! Here’s my AJ page with the “SMASH OUR STASH” May prompt of “FLOWERS”.

I noticed looking back on my AJ pages that I rarely use flowers on them unless it’s already apart of some papers that I’m using.  So this was a good challenge for me and it was fun to pull out these Tim Holtz “Flower Garden” stamps and dies from my collection to use for this one.

For the background:  I started with my 9″x6″ pre-punched holes of Canson 140# cold press watercolor and used a brick stencil and model paste.  I covered the entire page with some linen and umber paints mixed together.  I dabbed a bit of orange and spritzed it with water for a rust look.  I then went over that with a dry brush effect with some light ivory paint to bring out the texture of the brick pattern.

The flowers and stems were stamped over a watercolor Bristol that I previously made and splattered with chocolate paint.  I also covered the die cut flowers with shimmer spray. (Not sure if you can catch that in the photo.)  All of the stems were glued, and the flowers were glued with some being popped with foam tape.  I covered the bottom area over the stems with grit paste and then went over it with brown paint to give the appearance of dirt.

I took a Dylusions stamp and white heat embossed it over chocolate cardstock for the sentiment, hand cut it and popped up with foam tape at the top of the page.  I added a butterfly from a Tim Holtz ephemera pack.


Hope you’ve enjoyed my AJ page today!  Thanks for dropping in and checking it out!

Challenges:

  1. Art Journal Journey – Flowers
  2. Creative Artiste – Anything Goes Mixed Media
  3. Simon Says Stamp Monday – Watercolor (I watercolored the flowers/stems)
  4. Arty Divas – Anything Goes