Feeling Tropical at Sparkles Monthly

Hello friends!  I hope that whatever state you’re finding yourself right now, that you’re able to find a bright spot in your day somewhere.  In watching the news, there are so many variable patterns in the weather and my heart goes to those in Hawaii dealing with the wildfire disaster.  My card today is not only for the DT challenge, but also a tribute to our tropical friends in Hawaii.

There’s a new challenge today over at the Sparkles Monthly Challenge with the theme of: TROPICAL and/or BEACH

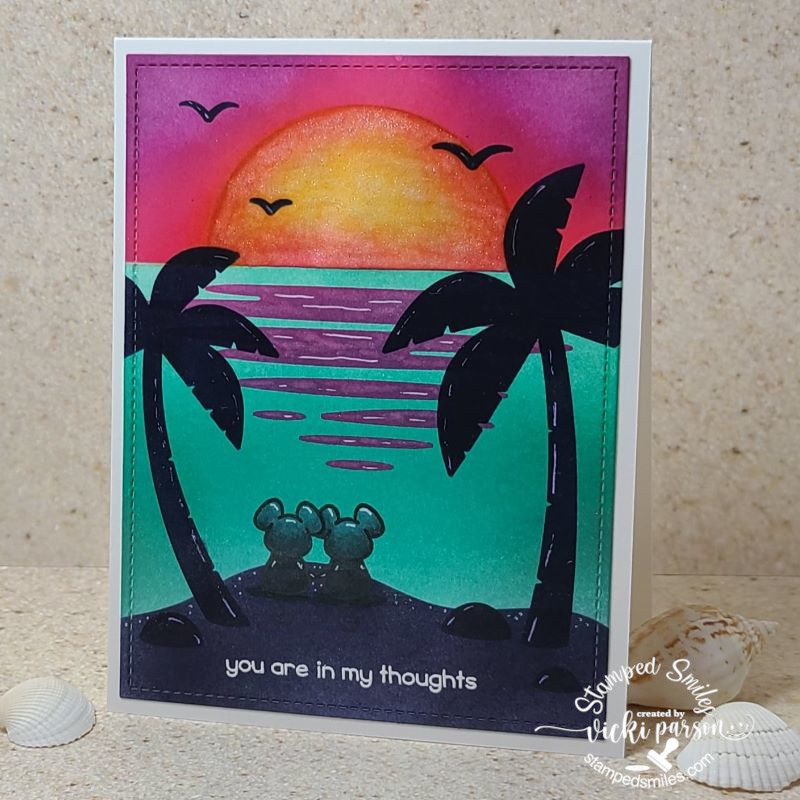
Since I live in the Midwest area, I don’t get a chance to see too many scenes like this, but maybe someday hubby and I will get a chance soon!  The inspiration for my card came from my computer background photo and I loved the look of the water with the setting sun.  Everything I’ve used on my card today came from Lawn Fawn.

The entire background was done with stenciling using the LF Beach Sunset Stencils and inks.  I added that mice couple from a freebie stamp set that came with one of my orders.  I colored them pretty dark with cool grey tones so that they blended into the beach and looked like a silhouette.  The sentiment at the bottom was white heat embossed from the LF Butterfly Kisses set.   I’ve used a glitter brush pen over the sun and purple reflective water.  I think I got a little carried away with the white gel pen, but I was trying to make it look like the dark areas were highlighted with some of that setting sun over it and there’s just no removing any lines! (If you’ve done this, then you know what I’m saying!)

I hope that you’ve enjoyed my Tropical themed card today or found some inspiration with it.  Thanks so much for dropping in and please check out the challenge details with inspiration from the DT and play along!

Challenges I’d like to enter this card for:

  1. Four Seasons – Anything Goes Summer
  2. Crafts Galore Encore – Anything Goes
  3. The Paper Funday – Anything Goes optional: Great Outdoors
  4. Penny’s Paper-Crafty – Anything Goes using paper
  5. Get Creative – Summer Nights
  6. My Time to Craft – Stenciling
  7. Creative Fingers – Anything Goes

July AJ Page-Always Look Up!

Hello friends and happy weekend! As we finish off another really hot day…probably for most of the U.S. right now, I do hope you’re staying cool and enjoying the rest of the month of July.  We’ve been in a heat advisory in our area for the last few days, but hopefully it will cool down soon.  In the meantime, I will be crafting inside!

It’s time for the monthly Art Journal Page collaboration with my crafty friend, Carol (from Crafty-Stamper)! We get creative trying to use up our never-ending stash piles along with a prompt for each month.  I know she will have some wonderful inspiration to share, so please check out her blog too! Here’s my AJ page with the “SMASH OUR STASH” July prompt of “STRIPS/STRIPES”:

I don’t know why this makes me giggle, but it does!  I thought the best way to create the “STRIPS/STRIPES” prompt would be to pull out some more of those never-ending stash of pattern papers!  So I pulled some out for the strips at the bottom that I cut out with a hillside border die and one of the pieces happened to have stripes on it which worked out for both!  I thought it would look great for the field that the cow WAS on.😆

For the background:  I started with my usual piece of 6″x 9″ pre-punched at the top from Canson Watercolor paper and made a galaxy background with watercolors.  I had fun making a mess with it!  I let it air dry underneath some heavy books to keep it flat as it dried.  Once dry, I splattered some Copic opaque white with a fan brush over it.

This is where I added the strips of cut papers at the bottom.  Before I cut the green layer at the bottom, I ran it through my printer to create the quote on my computer.  I sponged the edges of it with green ink.  I also sponged some black ink around the edges of the galaxy background too.  The striped paper was painted with a light green ink and then splattered with a darker green color as I was trying to mute it a bit.  The “fence” behind it was cut out with white cardstock and placed behind the striped strip piece.

For the flying saucer and alien, I used an UFO die set from Whimsy Stamps and cut it out with several different specialty papers like holographic, silver glitter, green metallic, black glitter, vellum and acetate (for the front window of the saucer).  I popped it up with foam tape over a die cut piece of vellum that I’ve colored with a yellow marker and sprayed with shimmer spray…hard to pick up in a photo, but you can barely see it.  I attached it over the background by using my Xyron sticker machine, so you can still see through it.

I glued the “confused cow” from the MFT The Whole Herd stamp set within the “beam” vellum.  The hillside borders that I cut the bottom strips with came from MFT as well. 

I hope you’ve enjoyed my AJ page today and been inspired in some way!  Thanks so much for dropping in and don’t forget to look up!!😆

Challenges:

  1. Art Journal Journey – Come Fly with Me!
  2. Crafting From the Heart – Anything Goes except cards
  3. Creative Artiste – Anything Mixed Media
  4. Ally’s Angels – Anything Goes
  5. Crafting Happiness – Any Type of Craft
  6. Penny’s Paper-Crafty – Anything Goes Using Paper
  7. Through the Purple Haze – Anything Goes

Margarita and a Rainbow

Hello friends!  I hope you’re having a great week so far and that you’re able to keep cool as I know it seems to be pretty warm for many of us in the U.S.  It’s a great time to do some crafting, so I thought I’d share a few cards that I made that I needed. (Scroll down in this post to see the ‘rainbow’ card.)

I think a margarita sounds pretty refreshing in this heat!  Newton here seems to be enjoying it anyway!  All of the stamps I’ve used are from Newton’s Nook and I’ve made this card for a special person’s birthday.  This person I’m making this card for had gotten me hooked on mango margaritas and I wanted to represent that in the card.  (Note the salt rim on the glass.)  The color is more a strawberry color, but I wanted to go with the colors for the Inky Paws Challenge. (See below in the challenge list.)

I stamped the “happy birthday” sentiment (retired set from Newton’s Nook) repeatedly in the background on the pink panel and then I splattered it with white Copic and water with a brush.  The panel was cut from the Newton’s Nook Framework die set and layered with colors that match with the challenge.  The blue card base was repeated stamped with the taco and I stamped, colored and cut one out to place behind Newton with the margarita.  I took a strip of Doodlebug green polka-dot paper and white heat embossed the sentiment.  I cut a tiny strip off and turned it over to glue at the top of the strip.  I used foam tape to add the margarita kitty, finished it off with white twine and sequins with a spot of Stickles in the centers.

Challenges for margarita card:

  1. Inky Paws – #203 color challengeIPC203
  2. Country View – 4 legged friend
  3. The Diva’s That Cut Paper – Birthday theme
  4. NBUS – #52 July (Never Before Used Schtuff!)  New Newton’s Nook products!
  5. Crazy for Cats – Anything ‘CAT’ goes optional: festive
  6. Daring Cardmakers – summer drinkscover
  7. Simon Says Stamp – Anything Goes

Here’s another card I wanted to make for Beccy’s Place challenge using the free image that was provided this month and I thought it would make a great card for encouragement to send for a special cause I’m donating for:

I’ve used the non-colored version of this image and before printing it out, I’ve added a sentiment at the bottom from the Seasonal Window digital set from Beccy’s Place.  (There are quite a few uplifting quotes in that one.)  I colored the image with Copics and added a bit of shimmer on the sun with a glitter pen.

I think I’ve made this popped up frame around the image more complicated than what it needed to be, but I cut out the scallop frame twice for thickness, and also printed out a piece of the rainbow looking papers that was also a part of this month’s Beccy’s Place Challenge free image.  I cut it out with the scalloped frame and attached it to my double thick frame layers.  The image was placed over a black cardstock and the popped-out rainbow frame was placed over the image keeping a portion of the black frame showing.  These layers were mounted over a 4 1/2″ square white card base.

Hope that you’ve enjoyed my cards today!  Thank you for stopping in and I’ll be seeing you Saturday for another Art Journal Page!

Challenges for ‘rainbow’ card:

  1. Beccy’s Place Challenge – July Anything Goes using Beccy’s Place image optional: animal(s)
  2. Crafts Galore Encore – Anything Goes
  3. The Corrosive – Anything Goes
  4. The Crafty Addicts – Anything Goes
  5. Pammie’s Inky Pinkies – Anything Goes
  6. Love to Scrap – Anything Goes
  7. Love to Craft – Anything Goes

More Christmas Smells

Hello friends!  Since it’s still so very warm outside, I thought it would be fun to do a bit of coloring which I haven’t really done much of lately and create another Christmas card in July!  Hope you are staying cool…or warm depending on where you live! LOL

Vicki-InkNSplatterdigi-gingerbread

A cup of cocoa with marshmallows, a candy cane and a chocolate cupcake with a gingerbread friend to share it with sounds wonderful to me!  You may recognize the image from Digi Doodle Studios, which is where this retired image is from called “Jacks Ginger Cocoa Mug“.   It was just nice to be able to spend time coloring up a cute image and enjoy more from my long-forgotten stash!  I’ve used Copics to color the image and cut it out with my square dies to layer for my card design.

I thought the brown gingham papers went well with the cardstock that I’ve used from Stampin’ Up! called Baked Brown Sugar. I wanted to also bring in some red to the design because of the candy canes/peppermints in the image.  I layered a piece of lace ribbon over it and then popped up the layered colored image on top.  I used a photo corner punch for redder in the right top corner of the image.

The sentiment was white heat embossed over the Baked Brown Sugar cardstock and cut out with a stitched banner die.  The sentiment is also from a retired Pink & Main stamp set I had in my stash.  Lastly, I added some round peppermint clay accents to finish it off.

Hope you’ve enjoyed my Christmas card today or have been inspired for Christmas..or food!  Thanks for stopping by!

Challenges I’d like to enter:

  1. Christmas Kickstart – Gingerbread Treats
  2. Rudolph Days Challenge – Anything Goes Christmas (June)
  3. Merry Little Christmas – Anything Goes Christmas
  4. Crafter’s Cafe – Christmas in July
  5. Double D – Christmas in July
  6. Creative Knockouts – Christmas in July
  7. Crafty Catz – Anything Goes with optional Christmas in July

Patriotic Pandemonium

Hello friends!  I had a day of some crafty fun and wanted to share things I’ve made for some challenges.  I absolutely love the red, white and blue colors.  Most of the time it’s associated with patriotic colors and July 4th Holiday, but I’ve decided to take not just the colors, but the theme using one stamp set and a sheet of paper to create different looks with it.

First up is this really cute mouse waving his flag with a fun patriotic theme…which is what this new stamp set from Inky Stamper (called Americana) was intended for.  I printed out some freebie papers and used them on all of my cards here today.  I colored Ralph up with Copics and popped him up on a scallop circle silver glitter cardstock and stamped the sentiments and stars with red and blue inks.  I also added some sequins from the Stars & Stripes sequins mix at Inky Stamper and added some silver Stickles in the centers of those as well as the stars.  I also added one of the flags from the sequins mix next to the sentiment at the top.  (I’ve used these on all of these cards too.)

I’ve made this card for SCS Teapotter Tuseday challenge as a Patriotic Congrats card for someone in the military whose been promoted to Colonel, so this worked out really well for sending this one out.

For this card, I wanted to share that a teeny tiny image from a stamp set can be fun to use in a different way as well.  I took the “bomb popsicle” image that was stamped and colored and popped them up with foam tape over die cut stars from white glitter cardstock.  I’ve used some more of the freebie papers and added a sentiment that was white heat embossed over red cardstock and cut out with a banner die.  The tiny red stars came from that sequins mix I mentioned above.

I made this card based on a sketch for a challenge that I wanted to enter before it ended too.  (Check it out in the challenges listed below.)

And lastly using this same stamp set, freebie papers, sequins mix and color theme, I made a Christmas card with it.  I took the little star image from this stamp set and stamped it several times, colored it in and fussy cut several of them out.  It’s not that bad when you’re cutting and watching videos while you do it!

I took a circle die and traced a circle with a pencil so that I would have a guide as to where to create my wreath.  I stamped a few stars directly on the circle area and then erased the line before I colored them.  the other stars that I fussy cut, I glued some on and popped some up with foam squares.  I also added an extra star in the center of the silver bow on the wreath.

I added some silver sequins from the same sequins mix mentioned above and then placed some silver Stickles in the centers of them as well as in the center of the stars.

These were so much fun to make with all of the same products and color theme to challenge myself with.  I hope you’ve enjoyed them too or been inspired in some way.  Thanks for dropping by!

Challenges:

  1. Try Stampin’ On Tuesday – sketch + cold treats (card 2)Mix Up July 615
  2. Crafting Happiness – Anything Goes (card 1)
  3. Four Seasons – Anything Goes Summer (card 2)
  4. Crafty Animals – Anything Goes with animal (card 1)
  5. Critter Crazy – Anything Goes featuring animal (card 1)
  6. Pearly Sparkles – Christmas in July (card 3)
  7. Crafty Calendar – Anything Goes (card 1)
  8. Challenge Up Your Life – Patterned Paper (all cards use papers)
  9. The Paper Fun Day – Anything Goes optional: red, white & blue (all cards)
  10. Try it On Tuesday – Use 3 colours (red, white and blue)

It’s Christmas in July at Sparkles Monthly!

Hello friends! Have you’ve been enjoying the month of July so far? We finally got some rains, but now it’s humid and warmer. That’s OK because it’s always warm this time of year anyway and a great time for crafting indoors with the air conditoning!

Today starts up a new challenge for the Sparkles Forum Monthly Challenge Blog with the theme: Christmas in July! It’s a favorite for many card makers this month so that they can get an early start on those Christmas cards without having to wait last minute to get them all done. I don’t have an outrageous amount to send out, but I do like to donate and I have done 5 Christmas so far! So if you’re up for it, make a Christmas card and join the gallery at the challenge! Here’s the card that I’ve made:

There’s nothing like the smell of peppermint for Christmas (for me anyway!)  I had gotten this Candy Cane Lane card kit from Taylored Expressions last year and never really used it, so I thought this would be a good time to pull it out.

In the set, there came this cover plate die and I cut it out in the following, gold mirror, white glitter and white cardstock in A2 sizes.  I paper pieced each one over an A2 sized white card base front.  I added some light blue ink blending around the edges and bottom of the center panel and stamped a few “snowflakes” in the same color.

I die cut the candy canes and leaves and ink blended/stenciled those stacked together.  I used a white gel pen for the highlight over the canes, added a gold cord bow and some gold drip drops for the “berries”.  There was a stamp set with sentiments that I stamped out in red and then went over top of it with VersaMark ink so that I could emboss some Peppermint smelling embossing powder over it…that’s where the smell of peppermint came in for me!  I die cut it out with the coordinating die and glued it at the bottom of the candy canes.

Hope you can join the challenge with your Christmas cards this month!  Thanks so much for dropping in today!

Challenges:

  1. Sparkles Christmas – Include Gold
  2. Merry Little Christmas – Anything Christmas Goes
  3. Get Creative – Christmas in July
  4. Craft Rocket – Christmas in July
  5. Most Magical Time of the Year – ATG Christmas/Halloween optional:  Christmas in July
  6. Christmas Craft Creations – Christmas in July007July
  7. Little Red Wagon – Christmas or New Year?  (I hardly ever send out New Year cards)
  8. Krafty Chicks – Christmas
  9. CRAFT – Christmas

June AJ Page-Metal Train

Hello again!  I hope that you are enjoying your start to Summer or at least enjoying the month of June as we come to a close with it.  We are hoping to get some much-needed rain the next few days, but I see there has been some very strange weather happening everywhere lately.  So whatever your area, hoping it’s good for you.

It’s time for the monthly Art Journal Page collaboration with my crafty friend, Carol (from Crafty-Stamper)! We get creative trying to use up our never-ending stash piles along with a prompt for each month.  I know she will have some wonderful inspiration to share, so please check out her blog too! Here’s my AJ page with the “SMASH OUR STASH” June prompt of “METAL”:

How about you?!  Do you have lots of metal things in your stash?  I have several different things, but this time I wanted to concentrate on my large bag of metal gears along with some older things from my stash.  With the gears in mind, I decided that a steampunk theme would be something I could do.  So I pulled out my Stamperia Aviator themed papers and saw this cool steampunk train to use.

For the Background:  I used my usual 6″ x 9″ 140# Canson paper with the pre-punched holes at the top and painted it with some Periwinkle and Turquoise colored paints.  I splattered some dots over it with silver metallic paint and then went around the edges with some soft black sponged over it.  The wording strip at the top was printed on my computer and it says:  “Not all those that wonder are lost” repeated.  I also printed out the “9 3/4” from my computer and cut it out with a circle die and layered some copper metallic cardstock behind it. (If I saw a train platform with 9 3/4 on it, I’m sure I would want to take it!  Maybe I need a trip to Universal Studios!)

The train along with the “Vintage Travel” badge and compass were fussy cut out from the Stamperia papers.  I used a metal clip from my stash to combine the badge and compass together and used foam tape to attach it to the page.  I also used some foam tape to attach the cut-out train after adding a metal brad to the front wheel.

I wanted to share a closer look at the bottom of the page to explain what I did.  Using some black cardstock, I used the Lisa Horton Mechanical Rivets embossing folder over it.  I used some Finnibair metallic wax pastes to go over the entire panel to get this look.  Before attaching it to the page, I used some large metal eyelets from my stash to attach them at each corner and then I glued some extra metal gears over top of them.

You can see how I’ve attached all of the metal gears to the train here as well.  For the “steam” coming from the train, I just used a sponge and white ink.

Had some fun playing around with the metals and making faux metal as well with this one.  Hope you’ve enjoyed it too!  Thanks for dropping in today and see you soon!

Challenges I’d like to enter this AJ page in:

  1. Art Journal Journey – All About Numbers
  2. Country View – Vintage
  3. Creative Artiste – Anything Mixed Media
  4. Crafting From the Heart – Anything Goes (no cards)
  5. Simon Says Stamp Monday – Pick a Number
  6. Penny’s Paper-Crafty – Anything Goes Using Paper

Rainbow Chicken

Hello friends!  Hope you’re enjoying your week so far.  We’ve been having some really hot and dry days lately, so I’m trying to get some motivation going and have some play time for crafting!

I have not played along before, but I decided to grab this fun digital freebie from the Beccy’s Place Challenge and have a go at it because it really made me laugh when I saw it!

Isn’t this such a fun image?!  There was an option of different pre-colored images, but I decided to print out the lined image to color in.  I colored the chicken in rainbow and then added a pair of die cut glasses in silver mirror cardstock that I had on hand.  (I already had the glasses cut out from another card I made that was laying out on my desk, so when coloring this image, I thought it would be fun to add!)

The layout came from a sketch challenge that she’s also sponsoring. (see challenge list below) I thought that I was going to leave it as just black and white to make the rainbow chicken stand out, but I found some fun rainbow papers and decided to add one panel to go with the chicken.  I came up with and typed out the sentiment underneath the image and printed them both together.

For another part of Beccy’s challenge, there is an optional theme she included which was “doodling”.  So I took a white gel pen and added some lines for highlights on the chicken.  I’ve also taken a black marker pen to make some squiggle lines around the image panel too.  I blended some grey ink around the edges and then used a distress tool for the distressed edges.

After adding the glasses, I covered the eyeballs with some crystal effects for shine. 

And this one has been sent off to hopefully make someone smile!  I hope you like it too! 

Thanks so much for dropping in and I’ll see you again on Saturday for another AJ page!

Challenges:

  1. Beccy’s Place Challenges – June Challenge using Beccy’s Place image with optional doodling
  2. Cheerful Sketches – June sketchSketch
  3. The Diva’s That Cut..Paper! – Use a Critter
  4. The Corrosive – Anything Goes
  5. Crafter’s Cafe – Humorous
  6. Crafty Catz – Anything Goes optional: FUN
  7. Lil’ Patch of Crafty Friends – Anything Goes
  8. Pammie’s Inky Pinkies – Anything Goes

NO STAMPING ALLOWED at Sparkles Monthly

Hello friends!  It’s been a bit since my last posting!  I’m still crafting, but I’m also enjoying the outdoors lately too!  I’m just not making the time I need to post on my blog here!  However, being on a design team helps to keep me focused on posting and hopefully it’s something that will bring motivation because I need it!  So I will try and get some more posts in!

Today starts a new challenge over at the Sparkles Monthly Challenge and the theme is “No Stamping Allowed!This may seem a bit challenging, but I look forward to seeing what people come up with for it!  Be sure to check out the blog to see what the design team has come up with for inspiration!  Here’s what I’ve made for the challenge this month:

I was trying to channel something that would work and realized that I had these fun strip dies from Taylored Expressions and I wanted to play with some new colors, so I ran with that on the middle of my card front by alternating the strip colors.

I also die cut a frond three times and glued them together for thickness and sturdiness.  I attached it over the colored strip panel and then added a sentiment that was already toner printed so that I could foil over it with silver Deco Foil.  I also had a die that cut it out which was popped up with foam strips and added to the bottom of the die cut frond.  Lastly, I’ve just added some silver glitter drops randomly over the card front.

Hope you’ve enjoyed my non-stamped card today and will think about joining in the challenge with us this month!  Thanks so much for stopping in! Have a great week!

Challenges:

  1. Craft Rocket – Use Dies
  2. NBUS – #51 June – new colors and dies
  3. Creative Fingers – Anything Goes
  4. A Place to Start – Anything Goes and/or twist: flower + one other thing
  5. Penny’s Paper-Crafty – Anything Goes using paper
  6. The Crafty Addicts – Anything Goes
  7. CAS on Friday – Leaves


May AJ Page-Start a New Beginning

Hello friends!  I feel like the time keeps moving whether or not I do!  At the last minute before getting something done, I finally started this page! Once I got going, it was fun to just play around to see what happens!

It’s time for the monthly Art Journal Page collaboration with my crafty friend, Carol (from Crafty-Stamper)! We get creative trying to use up our never-ending stash piles along with a prompt for each month.  I know she will have some wonderful inspiration to share, so please check out her blog too! Here’s my AJ page with the “SMASH OUR STASH” May prompt of “FLOWERS”.

I noticed looking back on my AJ pages that I rarely use flowers on them unless it’s already apart of some papers that I’m using.  So this was a good challenge for me and it was fun to pull out these Tim Holtz “Flower Garden” stamps and dies from my collection to use for this one.

For the background:  I started with my 9″x6″ pre-punched holes of Canson 140# cold press watercolor and used a brick stencil and model paste.  I covered the entire page with some linen and umber paints mixed together.  I dabbed a bit of orange and spritzed it with water for a rust look.  I then went over that with a dry brush effect with some light ivory paint to bring out the texture of the brick pattern.

The flowers and stems were stamped over a watercolor Bristol that I previously made and splattered with chocolate paint.  I also covered the die cut flowers with shimmer spray. (Not sure if you can catch that in the photo.)  All of the stems were glued, and the flowers were glued with some being popped with foam tape.  I covered the bottom area over the stems with grit paste and then went over it with brown paint to give the appearance of dirt.

I took a Dylusions stamp and white heat embossed it over chocolate cardstock for the sentiment, hand cut it and popped up with foam tape at the top of the page.  I added a butterfly from a Tim Holtz ephemera pack.


Hope you’ve enjoyed my AJ page today!  Thanks for dropping in and checking it out!

Challenges:

  1. Art Journal Journey – Flowers
  2. Creative Artiste – Anything Goes Mixed Media
  3. Simon Says Stamp Monday – Watercolor (I watercolored the flowers/stems)
  4. Arty Divas – Anything Goes