Sending a Smile to a Hunter and Winner on You Tube!

Hello friends! Welcome to the month of September! I cannot believe that Fall is at the door here! The weather has already started to cool us down a bit and Summer is starting to fade as you can see the flowers starting to die off. Now I will look forward to the changing color of leaves which is always amazing.

Today I have a project to share that I’ve made for the Splitcoaststampers Teapot “Make it Pop” challenge. This card is in need of a special SCS friend’s father who is having some difficulties with health and I wanted to help with a smile for him if I could:

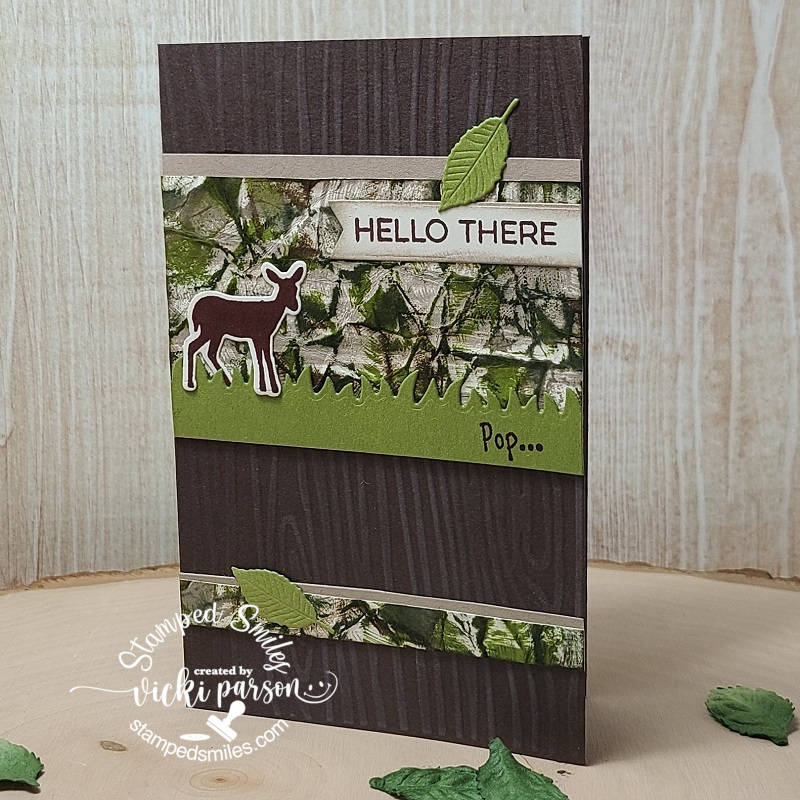
“Pop” as he is lovingly called, enjoys the outdoors and hunting which is something that several men in my own life enjoy, so I knew that this would be a direction I was going in with some stamps I have from Newton’s Nook.

For the background, I took a woodgrain embossing folder before fully assembling the card.

Since this is a hunting theme, I thought it would be fun to make a camouflage background and so I’ve used the fabulous tutorial on SCS HERE to create the look.  I also cut off a thin strip towards the bottom to add some interest to the design as well.  Over top of the background, I layered the sentiment from MFT and also cut it out with a banner die.  I used a grassy feilds border die from MFT for the strip at the bottom of the panel and stamped the “Pop…” over it in brown ink.  I stamped and cut out the deer from the Newton’s Nook Serene Silhouettes set with coordinating dies.  I also die cut a few green leaves with an older MFT die for a few accents inside and out.

When you open up the card…

vicki-mmtpt632-forpop-open-1

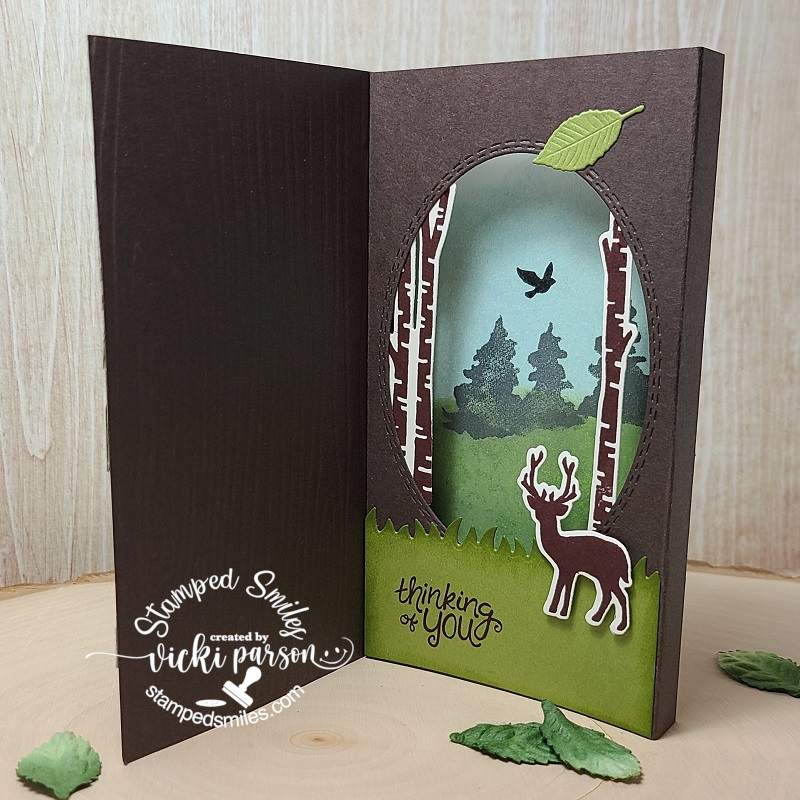
Because of the name “Pop”, the challenge was “Make it Pop”, we needed to show some sort of element like this on our design.  So I found this really fun “Pop-Up Diorama” card tutorial on SCS for my design.

I’ve used an oval die to cut the center of my card and then used a piece of cardstock for the background to attach behind it.  On this panel, I created a scene with blending inks and adding stamped and die cut elements from the Newton’s Nook Whispering Pines stamp set that I’ve also used the sentiment from on the inside.

For the rest of the card, I’ve used the same stamp set that I used on the outside of the card and arranged them to create this scene with different layers that are popped up.

Hope this helps bring a smile over to “Pop”.  Thanks so much for stopping in today and I hope you were inspired in some way too!

Have a great day friends and I’ll see you soon!

Challenges:

  1.  Splitcoaststampers Teapot Tuesday – Make it Pop
  2. International Art & Soul – Include an animal
  3. Crafting Happiness Anything Goes
  4. 2 Crafty Critter Crazies – Anything Goes + animal
  5. Moving Along with the Times – Create a Scene
  6. Crafty Animals – Anything Goes + animal

We’re On the Farm for {Cupcake Inspirations}!🐄

Hello friends!  Hope that you’ve had a wonderful weekend!  I sure enjoyed my time with hubby relaxing and enjoying the cooler temps for sure!  After all the “partying”, are you ready for a new challenge?

Today we’re starting with a brand new challenge over at {Cupcake Inspirations} with the theme “On the Farm“!  So whatever farm related project you’re working on, please be sure to link it up in our challenge!  We look forward to seeing what you all come up with!

Here’s what I’ve made for the challenge:

Vicki-CIC501-week1

I’ve been wanting to use this fun barn die from My Favorite Things for a while and this was super fun to create a farm scene with!  It even has the little embossed markings on the barn along with a bail of hay!🐓

I started out using the MFT cloud stencil and Tumbled Glass Distress Ink for the background panel, then layered over a grass border at the bottom and then cut this panel out with the stitched rectangle die.  I also stamped the sentiment as well as a few animals from the MFT The Whole Herd stamp set, colored and cut them out with the coordinating dies. (can’t find in the store!)  I then placed my fence border over top of the grass border, popped up the barn with foam tape where I wanted it and then placed all of the other images arranging them over the scene.  This front panel was attached to a top folding A2 red card base.

Vicki-CIC501-week1-close

So I love how the door on the barn can open up with that die cut!  Of course I had to add something inside the barn and with the nest of eggs sitting on top, it only felt right to place the chicken in there!  For the backing of the barn, I’ve taken a piece of paper from the MFT Woodgrain Whimsy Paper Pad and attached it from behind before popping it up with some foam tape.  I’ve also taken a pen and wrote the “milk” word over top of the colored can next to the cow.

Vicki-CIC501-week1-flat

Hope you’ve enjoyed my creation today!

Thanks so much for stopping by and I’ll be seeing you again soon!

Challenges:

  1.  Cardz 4 Guyz – #252 Explore Outdoors
  2. 613 Avenue Create – Anything Goes

{Cupcake Inspirations} Bithday Celebration Day 12 -Party Ending Soon!

Here we are friends!  This is my final day of inspiration to share with you on Day 12 of the special celebration over at {Cupcake Inspirations} for our 500th “birthday celebration” challenge!!  WHAT A PARTY IT HAS BEEN!! WOW!🧁🎉

Today, we are highlighting with our last but not least sponsor Inky Stamper – Please check out the challenge blog for more details about this sponsor.

The DT was generously given a stamp and die set to use for our creations:

Vicki-CIC500-Day12-InkyStamper

I have used this Oh so adorable Cupcake stamp and die set for my 4.5″ square card design.  So I thought it would be fun to create a fun little scene where you have the mouse coming out of his little “mouse hole” in the wall where he discovers this delicious looking cupcake with the sprinkles falling about! 😂

I started by masking off the middle of the square panel and created the “floor” by ink blending from the middle out.  I then moved my masking by covering that area up and used the negative from an oval die cut area to ink blend the “mouse hole” on the scene.  Lastly, I wanted it to look like a “wall”, so I just took a brick stencil and inked over it to go around the “mouse hole”

I stamped, colored and die cut the image and then popped him up with foam tape over the scene and stamped the sentiment underneath him.  I just glued on the sprinkles for the card.  I mounted the image panel over a die cut scallop square and then added a strip of sparkle washi tape over the card base.  (The scallop square panel was popped up with some craft foam.)  Hard to see in the photo, but I’ve brushed some glitter over the cupcake frosting!

Thank you so much for joining me here every day to check out the inspiration I’ve made from each of our sponsors.  I’m so glad that you took the time to celebrate right along with us!   I’ll be seeing you soon!

Challenges:

  1. The House That Stamps Built – A2620 Anything Goes
  2. Simon Says Stamp Wednesday – Anything Goes
  3. Cute Card Thursday – Inky! (used distress inks, masking and stencils for background)
  4. Creative Knockouts – #365 Anything Goes

Feeling Sentimental for Dare To Get Dirty

Hello again friends!  If you missed my previous post, be sure to check it out for details about a GIVEAWAY on my You Tube Channel!  You only have ONE week to enter it!

Today is my turn over at Splitcoaststampers “Dare to Get Dirty” Event to a host a challenge, so I wanted to share the creations that I’ve made for it.

Vicki-DTGD20basementstamper-words-shaker

First up I have this shaker style card I made with some of my fave Lawn Fawn products!

I’ve colored up that sweet little mouse standing over the banner from the Wild For You stamp set and cut him out with the coordinating die.  The black banner he’s sitting on was white heat embossed from the Happy, Happy Happy stamp set.  I also used the tiny smile face from this set to randomly stamp the background inside my shaker frame.  I then used the envelope at the bottom from the Love Letters stamp set that was colored and cut out with the coordinating die.

I’ve used some Stitched rectangle LF dies to create the shaker frame and the striped papers also come from some random LF papers in my stash.  I’ve used the  LF Scripty Smile die in black cardstock that I’ve attached over top of the acetate window area.

Vicki-DTGD20basementstamper-words-shaker-flat

Since the card was mainly black and white, I wanted to add a happy rainbow color which is where the shaker sequins came in.  I looked through my collection and found some Tie Dye Rainbow Sequins from Brutus Monroe.

Vicki-DTGD20basementstamper-wordsHUG

I guess I had rainbow colors in mind with my next card as well!  I absolutely LOVE this sentiment stamp from Trinity Stamps called Folded Hug.  I started by white heat embossing it over black cardstock and then I cut it out with my MFT Wonky Stitch Rectangle die and layered it over a white scallop rectangle layer and layered that again over a black piece of cardstock.  I also used the coordinating Sending Hugs die set to cut the “hug” letters out multiple times to raise them up over the image and then finished with the rainbow colors that I’ve used for the background of the card.

Vicki-DTGD20basementstamper-words-HUG-close

Upon a closer look at the image, you can see where I’ve colored in parts of the image with my Karin Brush Metallic pen set.  I think it showed up so pretty over the black cardstock.  I’ve also covered the rainbow letters with a glitter brush pen and then went over that with glossy accents.  I love how shinny the letters are IRL!

I hope you’ve enjoyed my share of creations during the Splitcoaststampers “Dare to Get Dirty” Event and has helped inspire you in some way!  I appreciate you stopping in!

Challenges:

  1. Lawn Fawnatics – Make the Sentiment the Star
  2. Aud Sentiments – Anything Goes + Sentiment
  3. Inkspirational – Rain or Rainbows (second card)
  4. The Sisterhood of Crafters – Sentiment as Focal Point

{Cupcake Inspirations} Birthday Celebration Day 11

Today is a new day!  We are on day 11 of celebrating over at {Cupcake Inspirations} with another feature of sponsors for our 500th “birthday celebration” challenge!!  YEEOWZA!

Today, we are highlighting Rachel Vass Designs – Please check out the challenge blog for more details about this sponsor.

The DT was provided with digital image sets to use for our creations:

Vicki-CIC500-Day11-RachelVassDesigns

I have the gorgeous Sunshine Daisies digital set for my design here by printing the image along with the sentiment that came with the set on a piece of Bristol watercolor paper.  I remember hubby brightening up my day a while back with some very pretty colorful rainbow of daisy flowers he brought home, so I based my colors that way.

I’ve used my watercolor markers and water brush to color the image with and then I took some yellow sparkle AquaPigment along with some Cream Grey Aquapigment from Brutus Monroe to splatter over top of the design before I cut it out with a Wonky Stitch rectangle die from MFT.

I layered this panel over an A2 top folding Soft Suede card base and finished it off with some clear sparkle sequins that I added some yellow Stickles to the centers.

Hope you’ve enjoyed my watercolor rainbow daisies today!  Thank you for stopping in to check my post today!  See you tomorrow!

Challenges:

  1. The Divas that Cut…Paper – Flowers + die cut
  2. My Time to Craft – Clean and Simple
  3. Simon Says Stamp Monday – Beautiful Botanicals
  4. Little Red Wagon – #564 Digi Do

{Cupcake Inspirations} Day 10

Hello friends!  I’m back again with more celebration fun as we continue with our celebrating over at {Cupcake Inspirations} for another feature of sponsors for our 500th “birthday celebration” challenge!!  YAY!

Today, we are highlighting Digital Delights by Louby Lou – Please check out the challenge blog for more details about this sponsor.

The DT was provided with images from this sponsor to use for our creations:

Vicki-CIC500-Day10-DigiDelightsLoubbyLou

Isn’t she a cutie?!  I have used Cupcake Josie for my image here that was colored with Copics and cut out with a stitched rectangle die.  I used some fun birthday papers I’ve found in my stash to layer my design with along with a sentiment that was white heat embossed and die cut with a banner die that I’ve attached over the design.

I’ve added some glossy accents over the cherry on her cupcake as well as some dotting with a metallic gel pen for the sprinkles as well as for her bows.

Please be sure to add your birthday/celebration creations in the gallery soon before the challenge ends in a few days!  We look forward to seeing them all!

Thank you for popping over here today friends!  See you tomorrow!

Challenges:

  1.  Creative Moments – #197Anything Goes optional pretty papers
  2. Pammie’s Inky Pinkies – PIP2034 Anything Goes

Spooky Ombre & Welcome Gnomes for Dare to Get Dirty

Hello friends!  I’m back again today to share a couple more cards that I’ve made for the Splitcoaststampers “Dare to Get Dirty” event!  They’ve released another batch of challenge over there today!  There is certainly lots of crafty fun going on lately, isn’t there?!😀

My first card was made for a challenge from the lovely Lee:

Vicki-DTGD20LuvLee-ombre

This card was so much fun to create!  I’ve used only purple shades to make this entire design!  I started out with a white piece of cardstock using the MFT Rolling Clouds stencil and ink blended them in with several Stampin’ Up! inks that I’ve had in my stash for quite a while now! LOL!  After I was done, I spritzed it with a water bottle.

I took the awesomely spooky Trick or Treat stamp set and used some SU! Elegant Eggplant ink to stamp the witch image, bat and the sentiment at the bottom.  I used my MISTI to stamp several times to darken the ink up on them.

I cut out the panel with a stitched rectangle and then cut out an additional piece of Potion Cardstock with a stitched scallop rectangle die from MFT. I layered it over an A2 sized top folding Elegant Eggplant card base.

Vicki-DTGD20LuvLee-ombre-close

I then took a glitter brush pen to “color in” the inside of the moon around the witch that gave a really cool shimmer look to it. I then started noticing that it was taking away some of the purple ink while doing this, which was really awesome as it made the moon glow even more!  (I just had to be careful around the witch because she was stamped with regular dye purple ink and I didn’t want to blur it.)

I finished the design with some Lilac Matte Sequins that I filled with some Violet Galaxy Crystal Nuvo Drops.  It’s much more sparkly in person!


My next card was made for a challenge from the lovely Kelly:

Vicki-DTGD20MiamiKel4-gnomes

This scene was really fun to put together!  I fell in the love with the little house and gnomes from the Simon Says Stamp Gnome School.  I thought it would make a nice “new home” type of card.  I colored them up and cut them out with the coordinating dies to arrange over my scene.

The scene started with a piece of kraft that was ran over with the SSS Petal Plate die for the texture in the background.  I cut out some clouds and a border of grass with dies and inked them up with some inks for shadows.  I then took this panel and cut it all out with a stitched rectangle die and mounted it over a top folding A2 sized black card base.  I also took a sentiment strip from the SSS Gnome School Sentiment Strips to place over the design while arranging the images over the scene.

Vicki-DTGD20MiamiKel4-gnomes-close

For the sign on top of the “home”, I used one of the sentiments made for that spot and white heat embossed it over my coloring.  Hard to tell in the photo, but I’ve also covered the heart on the gnome’s hat as well as the glasses on the gnome with a glitter brush pen.  I also did the same for the windows on the home.

I hope you’ve enjoyed my creations for today and I sure appreciate you stopping in to check out all of the happenings that are going on!  Hope you’re able to join in some of what’s going on too!  See you soon!

Challenges:

  1.  Simon Says Stamp Wednesday – Oh So cute (bottom card only)
  2. Stamps & Fun = Creativity – #372 Lavender or Purple (top card)
  3. Always Fun – #177 In the Sky Scene (top card)
  4. Crafting Happiness – #63 Anything Goes

{Cupcake Inspirations} Birthday Celebration Day 8 – Halfway Reminder! Cupcakes or Bust!

Hey there friends!  We’re now at the half-way mark of our wonderful “Birthday Celebration” challenge over at {Cupcake Inspirations}!


Have you been adding your birthday/celebration themed creations to the gallery yet for your chance to win a prize from one of the amazing sponsors we’ve enjoyed sharing the inspiration with?!  If you haven’t, we hope you will be able to join in the fun with us as we’re really loving the wonderful projects we’ve been seeing so far!


Today I thought it would be fun to create a unique card with my friends for {Cupcake Inspirations} as well as another of an old favorite from our sponsor Riley and Company that was also featured for yesterday!  I have loved this adorable moose for many years and so I couldn’t help but use another image to create something for a little chuckle….

Vicki-CIC500-Day8reminder-RileyandCo

I had so much fun with this easy to make card!  I’ve used my Cricut Explore to print out and cut the shape of the cupcake.  I actually did this twice so that I could make a folding card with the shaped design.  I made a score mark on the bottom cupcake along the left side and glued it together so that it would open up on the right side.

I’ve taken this really adorable Riley and Company “Or Bust” stamp that I’ve had for a few years and stamped and colored him up.  Since the space above the “or bust” words is empty, I filled it with a sentiment from a MFT set that was perfect! 😂  I then fussy cut him out and popped him up with foam tape over the card.

I used a gold metallic gel pen to color the frame of the sign he’s holding, wrapped some gold metallic ribbon around the cupcake with a bow and a cupcake button in the center and then finished it off with some glitter over the sprinkles on the top of the cupcake.

Hope that you’ve enjoyed my fun little shaped card today!  Thanks for dropping in and I’ll see you on Day 10 for more inspiration with another sponsor!

Challenges:

  1. Cut It Up – #207 Old School + die cut (Have had this Riley for years! Used Cricut)

A Unicorn with Sprinkles & Rainbows for Dare to Get Dirty

Hello again today my friends! Yes, still posting and with another “twofer post” again today! It will calm down eventually, but for now I have lots of things to share with you!😀

As you may have read in my second post from yesterday, we kicked off the “Dare to Get Dirty” Event over at Splitcoaststampers and I shared the card I made for one of the challenges. I have another creation to share with you that I made for one of the challenges released today and this one is for the lovely Lori:

This really brought out the little girl in me when creating this card with the rainbow colors and magical scene! This sweet little unicorn image along with the rainbow in the background and the sentiment all come from the Digi Doodle Studios Unicorn Wishes Pairables set. I’ve printed them out, colored them with Copic markers and fussy cut them out with the exception of the sentiment which I left and cut out as a cloud with my Lawn Fawn Cloud Border dies. I’ve also used that die to cut some clouds from a piece of vellum and an additional piece of white cardstock.

I’ve used an older My Favorite Things Stitched Rainbow die from white cardstock that I colored with Copic markers to place behind the first set of clouds behind the unicorn. Before layering my clouds, I took some distress ink and blending tool to add a bit of blue shadow behind them. After attaching all the cloud and rainbow layers, I cut it out with the MFT Blueprints 27 die set .

Lastly, I’ve attached this layer over an A2 sized white top folding card base and popped up the fussy cut unicorn with foam tape. I took some random sequins to attach over the design.

Here’s a closer view of some of the details in the card. I added some loose glitter over the unicorn’s wings with a 2-way glue pen and some loose glitter. Hard to tell, but I’ve also added some shimmer to the rainbows and the unicorn’s mane with a glitter brush pen. I also added a bit more blue cloud shadow under the unicorn’s feet before attaching him on the card.

This was really fun to create and I know it will make a fun card to share.

Thanks so much for dropping in!

{Cupcake Inspirations} Birthday Celebration Day 7🧁

We are rolling now!  We are on day 7 of celebrating over at {Cupcake Inspirations} with another feature of sponsors for our 500th “birthday celebration” challenge!! Super cool!!

Today, we are highlighting Riley and Company – Please check out the challenge blog for more details about this sponsor.

I have loved this little moose for many years and have collected some stamps from them over the years including some recent ones and I always get a chuckle from either the moose or the “Funny Bone” sentiments! So I had to help with featuring this sponsor:

I had to combine this funny sentiment with the cupcake theme and I thought it would be so fun to have little Riley peeking out from the edge holding a cupcake!😂

I took one of the images from the Basic Dress Up Riley, colored him with Copics and cut him out with coordinating dies. The sentiment was white heat embossed over a strip of black that I added Riley partially to the back of before attaching it to the background paper. I’ve also added a couple of banners and tied some black twine around the top of the card. I used a cupcake image from my stash, colored and cut it out and popped it up with a foam dot over Riley’s hand.

I finished the card with some sequins and some clear glitter Stickles.

Hope you’ve enjoyed my inspiration card for today’s sponsor and be sure to play along with us soon! Thanks so much for dropping by and I’ll see you again tomorrow!