MFT Summer School: Rule of 3 Sympathy

Hello there friends!  Hope you’re having a great week.

It seems, unfortunately, that every time I make another sympathy card, I run out and need to make another…it almost makes me hesitant to create another one to build my stash for the fear of it.  But as a card maker, I create with my heart and it’s important for me to share that with others and especially in times like this.  I know that those people that  know me, understand this.

(This post is dedicated to a family friend that has been around since I can ever remember him.  RIP Bill)

Vicki-MFTbutterflysympathy

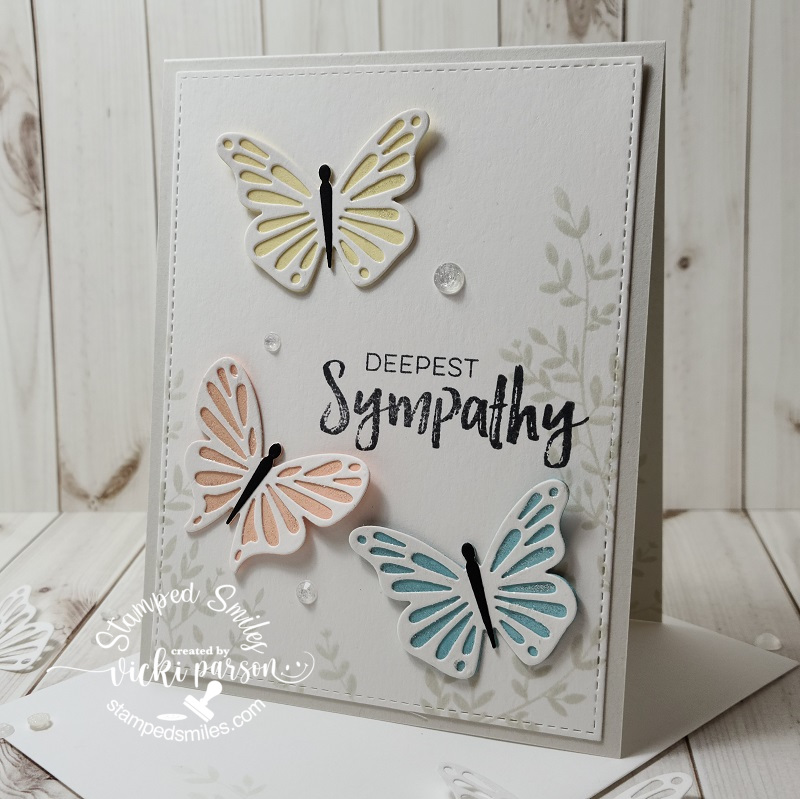
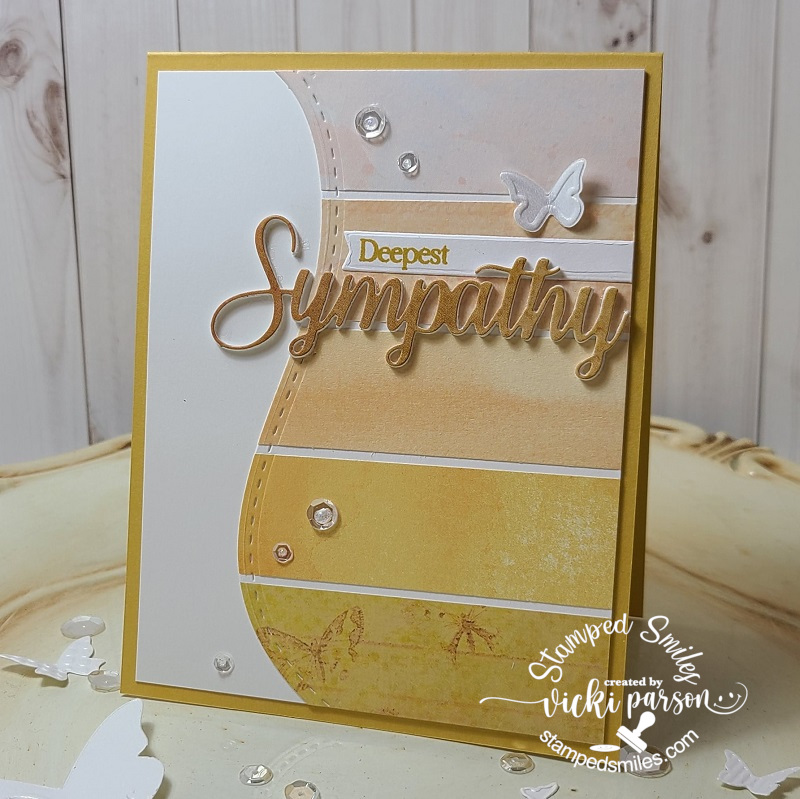
Upon knowing that I needed to create a sympathy card, I had seen that the My Favorite Things Summer School had started and their first lesson was about “The Rule of 3” and so with that in my mind, I went to my MFT stash to create this card.

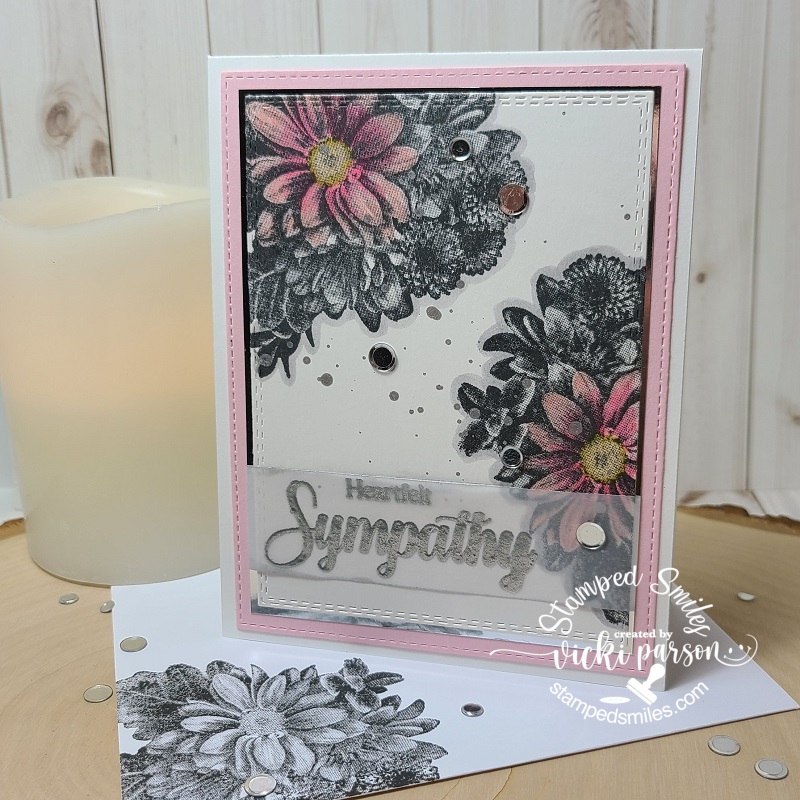
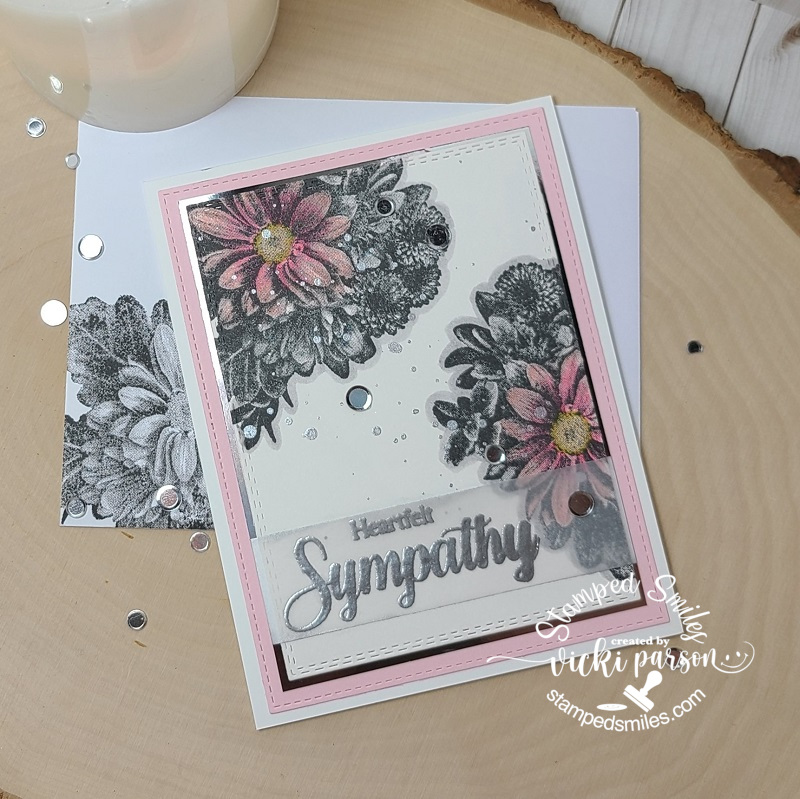
I first started with a piece of Whip Cream cardstock that was cut out with the A2 Stitched Rectangle Stax die and then stamped the large leafy image from the Dandelion Greenery stamp set with Grout Gray ink 3 times.  I also stamped the smaller leaf image 3 times over it as well.  I took the sentiment from the Deepest Sympathy stamp set and stamped it with the MFT Extreme Black ink.  I layered this panel over a top folding A2 sized Grout Gray cardstock base.

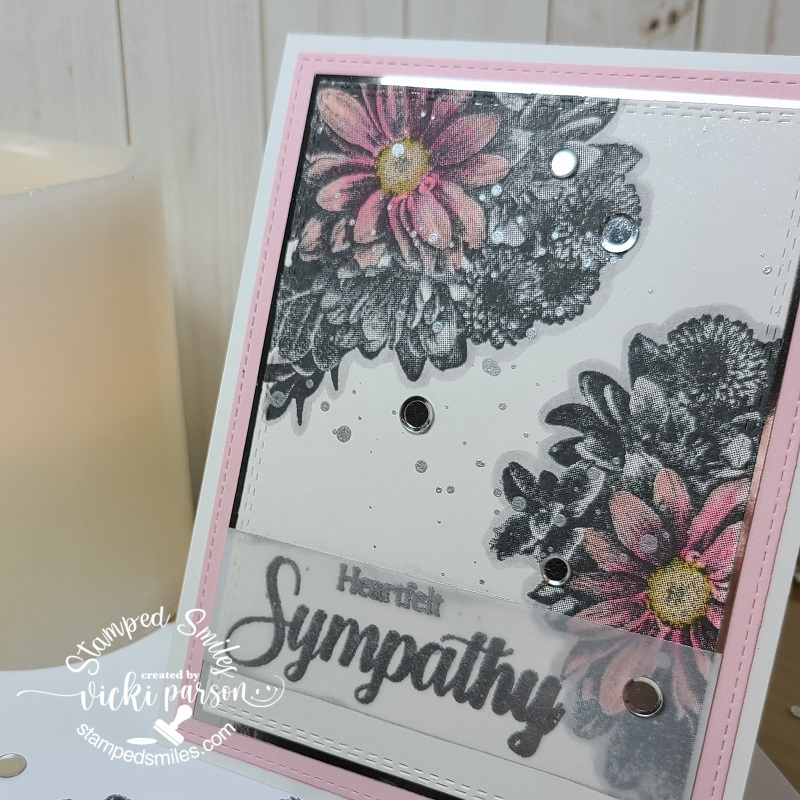
The butterflies were cut out with a die set no longer available…but I love them and can’t part with them!  I’ve used the Whip Cream cardstock for the outline of the butterflies, black for the middle sections and then I used:  Lemon Chiffon, Tickled Pink and Berrylicious cardstocks for the layers behind the butterflies.  I glued the centers only down so that the wings would pop out a bit.

Vicki-MFTbutterflysympathy-close

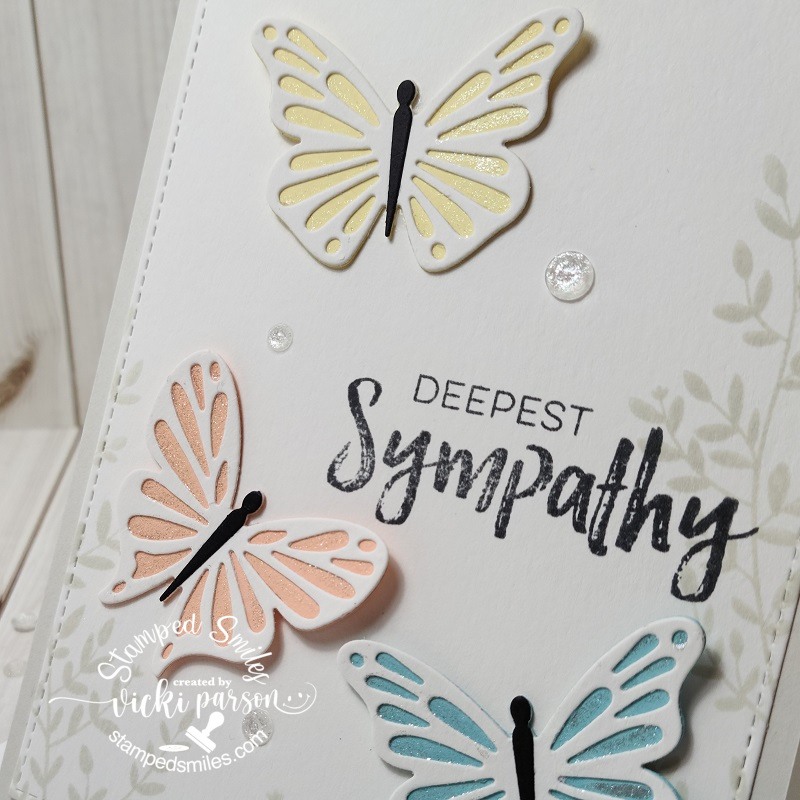
Here’s a closer look at the butterflies and you can see on the colored portion of each of the butterflies that there is a bit of a shimmer on the wings.  I took my glitter brush pen to go inside each section of them.  I’ve also added 3 Ice Sparkle Crystals to the design for a bit more sparkle.

Vicki-MFTbutterflysympathy-flat

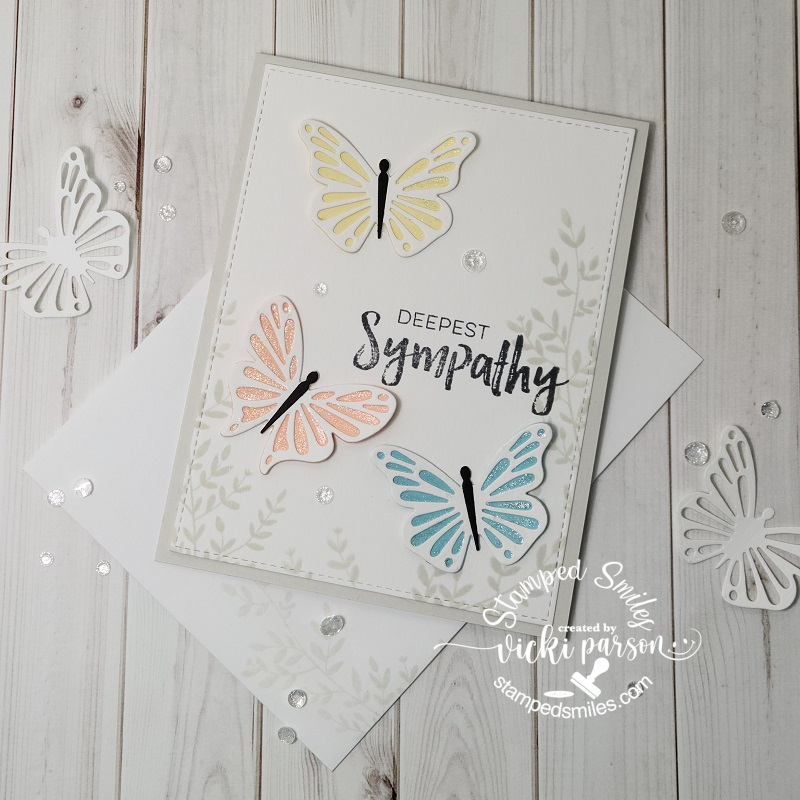
So as you’ve noticed, I took the “rule of 3” quite literally with my design here!  It actually helped me to focus on that particular lesson to finish up my card.  Sometimes, I’ve noticed it really helps to “challenge myself” with a project so that I have something to focus on when I need to complete a task that would otherwise be difficult if I was just staring at a blank piece of cardstock.  Don’t back down from a challenge or anything in particular that helps keep you focused…especially during times like these right now, as it is something that may be of help for you in more ways than you realize!  It sure is for me anyway, and I really need it!

Thanks so much for stopping by and I hope that I’ve helped inspire in some way!  Be well and happy friends.  I’ll see you again soon!

Challenges:

  1.  MFT Summer School – Lesson 1 “Visual Triangle”
  2. Dragonfly Dreams – Anything Goes
  3. Lil Patch of Crafty Friends Anything Goes
  4. Pearly Sparkles – #54 Anything Goes
  5. A Perfect Time to Craft – #8 Anything Goes
  6. A Bit More Time to Craft Anything Goes
  7. Love to Craft – LTCCB49 Anything Goes
  8. Double D – Butterflies

Nautical for {Cupcake Inspirations}⚓

Hello friends!  Happy August!  Really hope you’ve had a nice weekend!

Today starts a brand new challenge over at {Cupcake Inspirations} and the theme this time is “Nautical”!

I love the nautical theme and looking through my stash, I came across this older stamp set that someone had gifted to me and I thought I’d pull it out to play with:

Vicki-CIC499-nautical

This image is from Inkadinkadoo called “Down by the Seaside” that I’ve inked up in black ink over a piece of white cardstock.  I used some masking tape to mask off the areas around the lighthouse to make the “light beams” and then used my ink blending tool to go around the edges with blue inks with the darkest color closest to the edges.

I’ve die cut it out with a Taylored Expressions Frayed Edge Stacklets dies and then I popped it up with foam tape over a hand ripped red piece of cardstock that was sponged around the edges with white ink.  Before attaching the top layer over the red, I’ve added some twine around it and made a bow with a compass charm (by Tim Holtz) attached over top of the image panel.

These layers were attached to an A2 top folding Navy card base that I’ve stamped a compass image from a Stampin’ Up! stamp set called “Wherever You Go” with white ink.  I’ve also used a sentiment from this same stamp set and stamped it over the image panel in the top right corner with black ink.

Vicki-CIC499-nautical-close

Here’s a closer look at the image where you can see the sponging I’ve done on the background.  The rest of the image was colored in with Copic markers in certain areas.  I didn’t want to use too much color as I didn’t think it really needed it.

Hard to tell in the photo, but I’ve covered the water, sun and lighthouse “light beams” with a glitter brush pen.  You really notice it IRL when you pick it up and move it around and see the sparkle.

Vicki-CIC499-nautical-flat

I hope that you’ve been inspired with my creation today!

Thanks so much for stopping in and I’ll be seeing you soon!😉

Challenges:

  1.  Arty Divas – #27 Anything Goes
  2. Watercooler Wednesday – WWC282 Anything Goes
  3. Simon Says Stamp Wednesday– Anything Goes
  4. Krafty Chicks– #518 Anything Goes
  5. Creative Knockouts – Tic-Tac-Toe #361 (I used bottom row across: distressing, sentiment, twine)

Interactive Fun for Crafty Chefs + Video

Hello friends!  We are nearing the end of July and I wanted to be sure to try and get at least ONE “Christmas in July” project in before the month is gone, so I thought I’d keep things fun and simple as well as “kill 2 birds with one stone” so-to-speak!

Now we’re given one “must do” item from the previous chef to use on our recipe.  My item from Nana Connie was *”die cut” and so here is the project that I’ve made for this month’s “Crafty Chefs” group:

Vicki-DDSElves-squarefold

I have used a scallop square (cut from gold metallic mirror cardstock) and stitched square die cuts for layers on my project here.  I’ve taken this really cute elf image from the Christmas Elves Pairables digital set from Digi Doodle Studios on the front of my design.

I’ve printed out and colored the present from the same digital set along with another elf image (for his arm only) so that I could cut them out to make it look like he’s holding the gift.  His cut out arm was popped up with foam tape.  I’ve colored with Copic markers, added details with gel pens, liquid applique and Stickles glitter under his feet for snow affects.  I also stamped extra snowflakes for the background as well as add three snowflake rhinestones for accents.

Here’s the Crafty Chef’s August Recipe:

MUST DO:

  1.  *Die Cut (can also use electronic machine like Cricut, etc)
  2. Interactive (More than 1 fold eg: easel card, gatefold, etc.)
  3. Specialty Paper (foil, vellum, glitter, etc.)
  4. ribbon/twine/raffia

CAN DO:

  1.  Color an image
  2.  Add THREE of something
  3. **add glitter/sparkle – (this one I’m passing along to the next chef)

It doesn’t appear to be very interactive by looking at it, but when you untie the ribbon along the side, this is what it looks like when you open it up:

Vicki-DDSElves-squarefold-open

I have decorated two of the opposite panels with a greeting and then I’ve added a pocket to the top left panel so that I could include a gift card or cash to the recipient for Christmas!  I thought it was a super quick and fun interactive design to do!

If you are interested in learning how this project comes together, I’ve made a video sharing the measurements on how it’s done:  (CLICK HERE to see the video on You Tube.)

During this time of the year when it’s pretty warm over my way, it’s sort of a nice thought to think about some snow!  Plus, it always nice to get a start on some Christmas too!  (It’s not necessary for the “Crafty Chefs” to use a Christmas theme…it can be anything.)

I hope you’ve been inspired by my project today and have learned something fun in my video with it too!  (I have even more interactive tutorials on my You Tube video channel if you’d like to see other ideas!)

Thanks so much for stopping in today friends and I’ll be seeing you again soon!

Challenges:

  1.  Colour Crazy Craft – Anything Goes + coloring
  2. Daring Cardmakers – Three Musketeers (3 snowflake rhinestones)
  3. Sweet Stampin’ – Chrismas in July
  4. Lil Patch of Crafty Friends – Anything Goes (Christmas in July)
  5. Crafting Happiness– #59 Anything Goes
  6. Pammie’s Inky Pinkies – PIP2030 Anything Goes
  7. Dream Valley – Christmas in July
  8. Fab ‘N’ Funky – #492 Christmas
  9. Christmas in July 2020 Hop – Anything Christmas

{Cupcake Inspirations} Color Challenge Reminder

Hello there friends!  Hoping you’ve had a wonderful weekend!  It’s gotten pretty warm again over my way after enjoying the slightly cooler and beautiful weather for a while!  I’ve been enjoying the flowers while they’re still around!

I’m sharing some more inspiration with you today for a reminder on our current color challenge for {Cupcake Inspirations}, so if you haven’t played along with us yet, you still have another week to join us!

For some reason this color challenge still had me thinking of daisy flowers…so I went with that again for my design this week as well:

Vicki-CIC498-week2

I’ve pulled out a Pink and Main stamp set called Daisy Bugs and colored up the bundle of flowers image with Copic markers and then used the coordinating dies to cu it out with which was popped up over my design with foam tape.

I used the sentiment from the same stamp set as well and white heat embossed it over Navy cardstock and used the coordinating die to cut that out with as well which was glued over the card.

The yellow decorative papers were pulled out from my older Stampin’ Up! stash as I thought it fit with the theme and I was super happy to use some more papers up!  I’ve used a stitched circle die to cut out the white layer behind the flowers and then another fancy circle die from Gina Marie cut out with Navy to layer behind that as well.  I also die cut a border strip with a Crafter’s Companion die to place across my design and I wrapped some stitched navy ribbon (SU!) over it before attaching to the design.

I glued the bow over top of the circle image panel and then I used a navy marker to create the stitch lines around the edges to finish it off.

Vicki-CIC498-week2-close

Here’s a closer look at the flowers popped up on the design.  You can see in the centers of the flowers that I’ve added some glossy accents.

I think it really makes the flowers pop off the design!

Vicki-CIC498-week2-flat

I hope you’ve enjoyed my card today and has brought you some inspiration!

Thanks so much for joining me here today and I’ll see you again soon!

Challenges:

  1.  The House That Stamps Built – JL2220 Anything Goes
  2. Krafty Chicks – #517 All Occasions
  3. Creative Knockouts – #360 Flora and Fauna
  4. Watercooler Wednesday – WWC281 All About Occasions

Galaxy Powders with LOTS of projects + video!🚀⭐

Hello there friends!  I’m a tad late with my post today, but I ended up hurting my shoulder and it was a bit hard to get on the computer to type things up! LOL!  I tihnk I’ll be able to recover a bit over the weekend…I hope anyway!

So today, I’ve pulled out some media that I hadn’t gotten a chance to REALLY play with until now.  I had so much fun and decided to turn on my camera and do a video with it as well!  (I’m a bit rusty with video making as I haven’t done one for a while and hope to do some more in the near future!)

Here’s my play with the Galaxy Powders:

Vicki-BRMSpaceATCs

My first of projects here are ATCs!  Do you remember back in the day for the “older crafters” that we use to trade those ATCs at conventions and such?!  I loved getting them from people from other countries!  ATCs (aka: Artist Trading Cards) are 2.5″ x 3.5″ with info on the back to trade with other artists.  You could even transform these to place on regular cards, etc. which I’ve done before too!

I’ve taken a piece of Midnight cardstock and started playing around with these Galaxy Powders and also used an ATC kit for the chipboard backs and the rocket details.

To show how the Galaxy powders work up close, check out my video below!  I started by making the backgrounds and then I worked each background into finished projects…CLICK HERE if you want to see it on You Tube or just watch it below:

Sometimes it’s fun to sit and just have fun playing around getting crafty!

Vicki-BRMEnjoy

And for this card, I’ve taken the High Tide stencil and went over it on black cardstock and brushed over it with the Galaxy Powders.

I’ve used this butterfly from the Take Flight stamp set and attached it over the panel along with the sentiments.  That Mirrorstock paper is really stunning and a little bit goes a long way with that!  (You can check out my video for full instruction on how I put this card together too!)

Vicki-BRMSmileOn

My last project here shows how I’ve used the Galaxy Powders over a stamp!  I’ve used the Smile On stamp set for that.  It’s hard to see in the photo the pretty shine on it, so be sure to catch the video to see it in action!  I used a white pencil to highlight some details on the image too.

I used a stitched rectangle die to cut it out and then used a stitched scallop rectangle die to cut out a piece of white cardstock to layer behind it.  I used Kraft cardstock for the A2 sized card base panel and then used the Embossing Ink to randomly stamp the “smile face” image for the background from the So Emotional stamp set.

I also layered on a piece of the Sequin Sheets between the layers of the sentiment panel and white scallop layered panel to attach to my card and then I used some metallic clear ribbon over that along with a bow before popping up my main image panel with foam tape.

Hope you’ve enjoyed my projects today along with my video on Galaxy Powders and learned a few things about them!

Have a wonderful day and I’ll see you again soon!

Challenges:

  1. Crafting Happiness – #58 Anything Goes
  2. Pammies Inky Pinkies – PIP2029 Anything Goes
  3. Fab ‘N’ Funky – Use Real Stamp (no digis)
  4. Simon Says Stamp Wednesday Challenge – Reach for the Stars (ATCs)
  5. ATC ARound the World – Sun, Moon and Stars (ATCs only)

It’s a Color Challenge for {Cupcake Inspirations}

Hello friends!  Hope you’ve had a great weekend and enjoying your Summer so far!

Today starts up a brand new challenge over at {Cupcake Inspirations} and this time we have a fun color challenge for you to try out.

Vicki-CIC498-week1

When I saw this challenge, the first thing that went through my mind was this unique and fun bicycle image from the Blooming Bicycle stamp set.

I left the “wheels” white for daisies and colored the rest in blues and yellows with Copic markers, fussy cut it out and popped it up with foam tape over the sponged cloudy background.  I cut that panel with a stitched rectangle die, layered it over a piece of yellow cardstock and used some pretty daisy papers from my stash for the background. I’ve also used these papers for the strip on the front and stamped the sentiment from the same stamp set with navy ink. I’ve mounted these layers over an A2 sized top folding navy blue card base.  (I followed a sketch design for a challenge, see below.)

The flower from my stash was actually a bright turquoise color, but I’ve used some white gesso and painted over it.  I’ve also taken some crackle paint and went over it along with some sparkly white paint and went over the crackle with that.  (I’ve always hoarded my paper flowers because I believe you can always change the colors for your project.)  I’ve added some yellow ribbon around the strip and added a blue button and yellow bow with the ribbon over the flower to finish it off.

Vicki-CIC498-week1-close

Here’s a closer view of the bicycle colored in as well as the details of the painted flower.

I colored parts of the bike in blue colors and then left some areas on the bike that I thought would be metal and colored those areas with a clear metallic gel pen.  I popped up the bike with foam tape and left it sticking off the edges to make it look like it’s ready to get on for a ride!

You can really see the shimmer over the flower with the Lumiere acrylic paint I’ve used…love that stuff!  (The white flowers in my photo props I felt weren’t “daisy” looking enough, so I opted to paint over a colored one with longer petals.  I’m silly like that😉!)

Vicki-CIC498-week1-flat

Well I don’t know how you feel about this color combo, but it really makes me feel happy and so I thought that the sentiment was just perfect for this one!

Challenges:

  1.  Cheerful Sketches – July sketch
  2. Arty Divas – #26 Anything Goes
  3. A Bit More Time to Craft Anything Goes
  4. Fab ‘N’ Funky Creaive Free-For-All
  5. Allsorts – Flowers All Over

Slimline Waving Hello🧜‍♀️

Hello there friends!  Hope you’re having a wonderful week!  Just wanted to stop in with a Slimline style card I had made with a fun underwater scene.  (I’m thinking a magical place like this would be great to be in right now!  How about you?)

Vicki-BRM-mermaidslimline

These slimline cards are really great for creating scenes like this on and I was also having fun being able to “experiment” with my different products too!

I’ve the stamp set called Sea You Soon along with the background paper (mermaid skin) and the Lilac Shimmering Sand Paste were all items from a past card kit.

I created my underwater scene basically using the mermaid skin paper as the background.  Although it has a cool texture and smoothness to it, I was able to take the School of Fish stencil and add that Lilac sand paste over it.  Love that extra texture and purple hue it gave!  I also took the silhouette images from the stamp set and heat embossed them over this paper with black EP.

I stamped and colored the rest of the images from the stamp set with Copic markers and then fussy cut them out to arrange for my scene and popped some up with foam tape and then lastly added some clear acrylic bubbles over it.

Vicki-BRM-mermaidslimline-flat

You can see now that it’s lying flat how the color shifts and changes on the paper!

I’ve used some stitched wave border dies to help create the scene using some Kraft cardstock where I’ve also fit in to arrange the sand castle image that I colored and cut out.  I used Copic markers and gel pens to help fit the borders and image together.

I cut out the background paper with the Trinity Stamps Slimeline Stitched Card Panels and Windows die set.  I layered it over a piece of blue paper that was included with the kit and then layered that over a Slimline style card base measuring 8.5″ x 7″ folded in half from a piece of Aubergine Cardstock.  The sentiment was actually stamped from the Merfriends stamp set using black Ink.

You can see parts of the images with shimmer on them which have been colored with metallic gel pens.  I’ve also covered the mermaid tail and jelly fish with a Spectrum Noir Glitter Brush Pen.

The bubbles are looking a bit white instead of clear because my glue wasn’t quite dry enough when taking my photos, so my apology on that, but it took a couple of days to completely dry up clear for some weird reason!  Those babies aren’t going anywhere though!! LOL!

Hope you’ve enjoyed my magical underwater slimline card today!  Thanks so much for joining with me today and I’ll SEA you again soon!😁

Challenges:

  1.  Just Us Girls – #544 Trend Week:  Long & Skinny
  2. Crafting Happiness– #57 Anything Goes
  3. Pammie’s Inky Pinkies – PIP2028 Anything Goes
  4. Mod Squad – Slim Line Scene
  5. Little Red Wagon – #558 Fantasy
  6. Papercraft – Fantasy
  7. There’s a Stamp For That FB Challenge –  Summer and/or Slimline
  8. Not Just Cards – July Anything Goes

{Cupcake Inspirations} Reminder!

Hello there friends!  Hoping that you had a fabulous weekend!  Although it has been really hot over my way lately, I enjoyed spending a bit of time with hubby going out for a cold Starbucks frozen treat and time at the park.  What is something that you enjoy as part of your Summers?  In this crazy time right now, it seems we’re having to come up with different situations than we have in the past.

Today I’m sharing with you another project and reminder for our current {Cupcake Inspirations} challenge.

Vicki-CIC497-week2

For my card here, I’ve pulled out another Stampin’ Up! set that has been a favorite of mine and I think it’s from a previous year Sale-a-bration set along with the embossing folder in the background behind it.  The stamp set is called “Blossoming Basket”.

I have used the 3D “basket weave” embossing folder to emboss the white background, but before putting it through the embossing machine, I’ve taken an ink pad and inked up the folder to add the color to the background design.

I’ve also taken the “Hardwood” background stamp from Stampin’ Up! and inked it up over a piece of kraft cardstock and then used some brown ink around the edges of it and a cut strip for the bottom portion of my card to create the table area for the basket to set on.  The sentiment as well as the banner strip and the scallop kraft layer were from My Favorite Things products and then I layered everything over an A2 sized top folding yellow card base.

Vicki-CIC497-week2close

Here’s a closer look at the image and how I’ve colored it in with my Copic markers.

I ended up fussy cutting out the images with my scissors and attaching them to the card design.  I stamped the basket image a couple of different times and cut out extra flowers to place next to the basket and another set of flowers were popped up over the original image with foam tape.  I only used glue in the center of the butterfly to lift up the wings.

I added a twine bow to the basket along with some pearls in the center of the flowers along with the top corner of the design.

Vicki-CIC497-week2flat

I hope you’ve been inspired by my creation today in some way!

Speaking of which…I have some challenges I’d like to enter my card for:

  1.  Double Trouble –  I used the tic-tac-toe board in 2 ways:  emboss, insect, sponging and also insect, flowers, woodgrain
  2. Pearly Sparkles – 3 of a Kind (3 pearls and flowers)
  3. Watercooler Wednesday – WWC279 All About Occasions
  4. Allsorts – Beginning with a “B” (basket and butterfly)
  5. Cute Card Thursday – Not Square (rectangle card)
  6. Creative fingers – Anything Goes

Crafty Chefs Group and Sympathy

Hello friends!  I know I’ve said this before, but it seems that I don’t ever have a sympathy card on hand when one is needed, so this time as I was making one because I needed it, I’ve also created an additional to have in my stash.

I have also just joined with some fellow crafty friends who started a sort of “challenge group” and I think we dubbed ourselves the “Crafty Chefs” simply because our challenges consist of “recipes” to follow of “MUST DO” and another list of “CAN DO” items to follow when making our projects and we each take turns being the “top head chef” in charge of making the recipes or lists.  It’s just something non-pressure and just for fun which I think is fabulous as it helps me to use up my expansive crafty stash and join my fellow friends in paper crafting which we all have in common and love to do!😀

Vicki-PaintchipSympathy

Here’s the sympathy card that I’ve come up with for our July’s Crafty Chefs Group Challenge!  The July challenge is as follows:

MUST DO:

  1.  monochromatic
  2. sentiment as focal point
  3. paint chips
  4. decorative papers

CAN DO: (items that are optional to add)

  1.  die cut
  2. favorite color
  3. summer fruits

When I saw the paint chips on the list, it immediately made me think of this technique with the wavy die cut along the edge of the design over a card and I think I had done it before, but it had been a long time ago.  So with the decorative papers in mind, I went through my stash to find different ones in similar monochromatic color and the most I had was the yellow color.  I love yellow, but if you know me, then you know purple is my favorite color…so I didn’t do that one or the summer fruits from the list..but the MUST DO are all included!

Vicki-PaintchipSympathy-close

I die cut the word for the focal point of my design with some of the pattern papers that I’ve used and cut several to stack on each other. I also die cut a butterfly to add as an accent along with the stitched wave border die to cut my edge with.  I also took the small word stamped with yellow ink over white and die cut it with a banner die to place over the design and then the panel was mounted over a yellow A2 sized top folding card base and finished with clear sequins that were filled with glitter glue.

Vicki-PaintchipSympathy-flat

I‘m really happy how it turned out and sort of challenged myself to make it a sympathy card.  It had it’s twists and turns to complete each thing on my list, but worth the thought process to figure out!  I’m glad I had this challenge!  Hope you enjoyed it as well! 


Vicki-SUsympathy

Here’s the sympathy card that I had made and actually hand delivered in person so I know they’ve already received it.

My thought on this one was the card was for females and I based my design on the flowers that I also gave to the recipient which had pinks in the mix along with the base of the lantern being white with the candle.

Vicki-SUsympathy-close

I went through my stash of floral stamps and have always loved this one from Stampin’ Up! which was stamped in black ink over white.  I used some watercolor to just color in one of the flowers within the image.  I used a piece of vellum to silver heat emboss the sentiment which was wrapped around the panel.  I also took some silver shimmer paint that was watered down and splattered over top.

Vicki-SUsympathy-flat

I die cut the panel, layered it over a piece of silver foil cardstock and then another piece of pink cardstock that was mounted onto an A2 sized white top folding card base.  Lastly, I’ve added some silver sequins to finish it off.

Thanks so much for stopping in today my friends!  I hope you’ve gotten some inspiration from my projects and I’ll be seeing you again soon!!

Challenges: 

  1.  Dragonfly Dreams – No Pattern Paper (second card only)
  2. 613 Avenue Create – #235 Anything Goes optional: Sentiment as Focal (first card only)
  3. Daisy Chain – #43 No Design Paper (second card only)
  4. The Corrosive Anything Goes
  5. Crafting Happiness – #56 Anything Goes optional: things that fly (first card only)
  6. Pammies Inky Pinkies – PIP2027 Anything Goes
  7. Creative Craft Cottage – #131 Add a Flower(s) (second card only)
  8. Creative Moments – #194 Anything Goes
  9. Little Red Wagon – #557 embossing (second card only heat embossing)

{Cupcake Inspirations} New DT!🧁

Hello friends!  I’m so excited to announce that I’ve been asked to join the {Cupcake Inspirations} Challenge design team!!

What could be better than crafting AND cupcakes, right?!  So be sure to join me here every Monday for new challenge and reminder inspiration!  I do hope you’ll check out the challenges and join us over there to play along!  (And maybe enjoy yourself a cupcake treat while you’re at it!😁)…if you’ve followed along with me for a while, you may have remembered about 5 years back that I used to be on this team before!  So I’m excited to be joining with them once again!

So here we go with the brand new challenge and a really fun theme to play with:

The theme for this challenge is “Flowers with Pearls/Sequins

**The challenges will last for 2 weeks, so you will have that long to play for each challenge!  There is a theme challenge and then a color challenge for every other one.  There will be a reminder week in between each one as well…so be sure to subscribe and follow the blog so you can see the inspiration and play along with us!**

**We are also partnering with the Double Trouble Paper Crafting Challenge Blog with their challenge of a tic-tac-toe board!  So be sure to check out all of the up-coming details and play along with them too!**

Here’s my take on the challenge:

Vicki-CIC497

I was really inspired with the flowers and pearl theme and I’ve been wanting to play around with a past card kit I had to color with pencils, which I hardly ever do!

The flower images come from the Simon Says Stamp Stronger Together stamp set and kit.  The kit had some colored pencils with it that I used to color the image and then I just used some dies from my stash to add the layers.  I took an additional floral image from the set and white ink to stamp the background and swiped the ink pad around the edges.

To fit with the challenge theme, I thought it would be fun to add several sizes of pearls along the edges of the oval panel.

Vicki-CIC497-close

Here’s a closer view of the coloring on the flowers.  I’ve also taken a sentiment from the stamp set and inked it up with some eggplant ink using my MISTI tool.  I inked it up again with some embossing ink and then added some clear sparkle EP over top of it to heat set.  The sparkle shows up so much better in person, of course!  I cut it out with my scissors and popped it up over the image with foam tape.

Vicki-CIC497-flat

Really hope that you’ve been inspired with my creation today!

I will be back next week with more inspiration for this challenge!  Thanks so much for dropping by!

Other Challenges I’d like to enter this card for:

  1.  Crafty Creations – #411 Anything Goes
  2. A Bit More Time to Craft – #119 Anything Goes
  3. Crafts Galore Encore – #77 Anything Goes
  4. QKR Stampede – #401 Anything Goes
  5. Love to Craft – LTCCB48 Anything Goes
  6. Love to Scrap – LTSCB135 Anything Goes
  7. Watercooler Wednesday – WWC278 Anything Goes Feminine