Pink Floral Sympathy

Hello friends! Welcome to June! We’ve certainly started off our June with hot temps! Trying to stay cool in the air condition and have some crafty time! How about you?

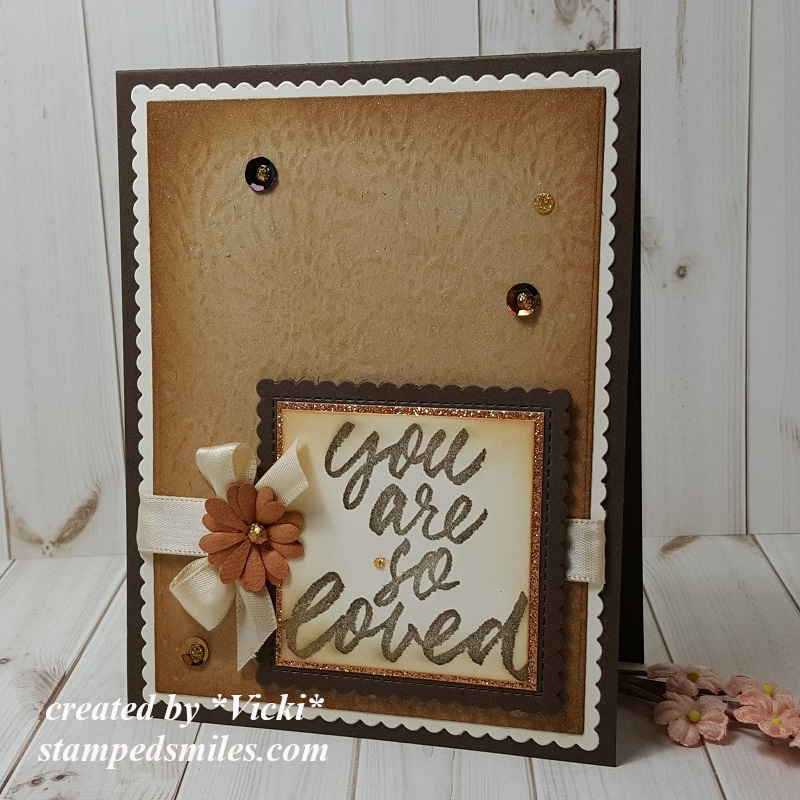
Unfortunately, it was time again that I needed another sympathy card and I don’t have any in my stash, so I’ve come up with one to send to the family of my GREAT aunt! She was always so great about sending me cards on my birthday even as she got older and it always made me smile!

So this is my final tribute to Aunt Rosella…RIP sweet lady.

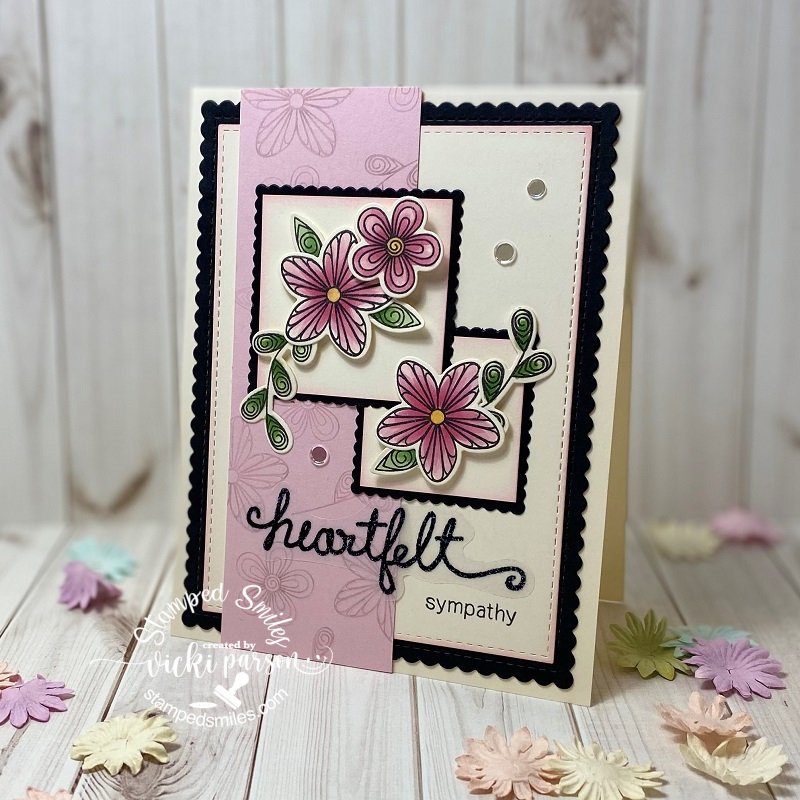
I saw a couple of challenges going on and they actually inspired me to pull out an older stamp set that I’ve had and hadn’t used it but a couple of times and I think it’s really pretty. I’ve used the Beautiful Blossoms stamp set from Newton’s Nook for my card here.

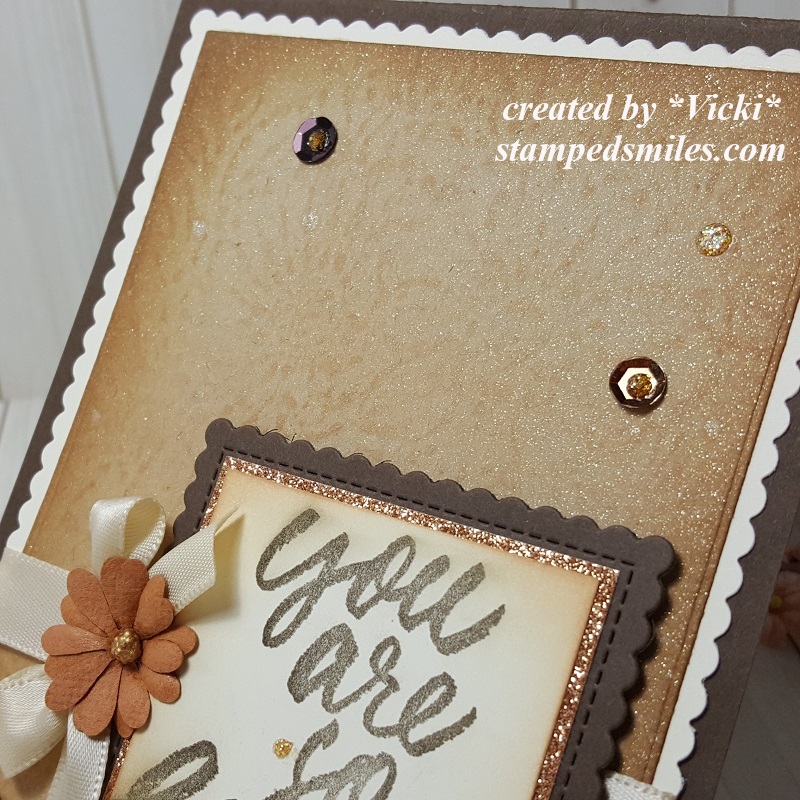
I’ve used a sketch challenge to help me with the placement of the images and how I was going to layout the design. I’ve used a vanilla top folding A2 sized card base, die cut a scallop rectangle and then layered over another vanilla piece that was cut with a stitched rectangle die. I took a strip of pink cardstock and stamped the floral images over it with VersaMark ink and attached that along with the two square panels layered with some scalloped die cut square in black. Those vanilla panels were sponged along the edges with pink ink.

I took the floral images, stamped them over another piece of vanilla cardstock with some alcohol marker friendly ink and colored them in with my Copics. They were cut out with the coordinating die cut set. I used some foam tape to pop them up over the squares.

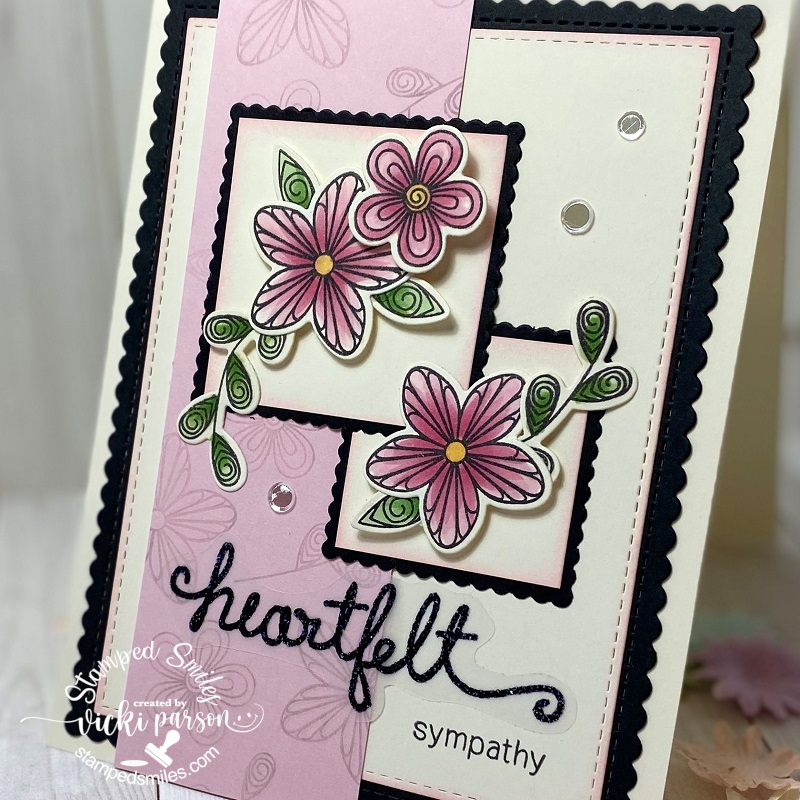
Upon closer view, you can see how I’ve done the sentiment here by heat embossing it over a piece of vellum with some Raven Sparkle EP and then fussy cutting it out. I used my Xyron matchine to make a sticker out of it and then I took the “sympathy” stamp from the Newton’s Nook “Super Sentimental” (No longer available) and inked it with the black ink under the vellum sentiment.

Of course it’s hard to see the shimmer over the flowers, but I’ve covered them some Spectrum Noir glitter brush pen and then lastly, I’ve added some clear sparkling sequins.

I hope you’ve enjoyed my sympathy card today and a reminder to all of us card makers to remember to build a small stash of these type of cards to have on hand. It’s something that I really need to do and always forget about doing it ahead of time.

I have more things that I’ve been working on coming soon, so I hope you’ll stop by again! Have a great day!😊

Challenges I’d like to enter this card for:

  1. Newton’s Nook Inky Paws Challenge – Flowers

2. {Cupcake Inspirations} – CIC494 Color Challenge: Pink, Black and Cream

3. Sunday Stamps – SSC232 Sketch “Getting Squared”

4. The Paper Players – PP493 Tic-Tac-Toe challenge: I used flowers, die cut and embossing

Caffeinated Changito☕

Hello there friends! Really hope that you have enjoyed your long Memorial weekend! The weather finally turned warm and once it turned warm, it REALLY turned warm and humid over my way! So we were able to plant some flowers in our garden pots outside and enjoy some cookout time too!

I noticed that the “Spring/Summer Coffee Lovers Blog Hop” had started up this weekend and I thought it would be a great opportunity to pull out some old stamps and have some fun with it while making a masculine card for the up-coming Father’s Day holiday too:

Does anyone remember these cute little “Changito” stamps back in the day?! I have used the Changito Coffee stamp (only found this one online) and the sentiment to go with it too! I actually bought these wood mounted rubber stamps years ago at a convention I had went to and have kept them hoarded like my other old stamps. LOL!

I stamped the image on Copic blending card and then again on some blue gingham background paper for paper piecing his PJs in! For the sentiment, I heat embossed it over my background with some appropriately named “Coffee” EP which has a metallic copper with some brown speckling in it…very cool. the store is no longer active that it came from.

For the background of this card, I had some fun playing with my Oxide Distress Inks in Vintage Photo, Broken China, Scattered Straw and touches of Espresso. I sprayed and dried layers as I went. I even took the bottom of a jar I had laying on my table to ink up some Espresso ink to make the “ring” marks over the background. I also took some more of that “Coffee” EP and sprinkled some over the background for even more distressing.

I wrapped some twine around it and attached it to an A2 sized white card base that I sponged around the edges with some Vintage Photo ink.

Here you can see a better look at the image and how I’ve got him colored up with Copic markers. You can barely see the gingham pattern in his paper pieced PJs, but I thought it was cute! I also took a black Copic liner and drew lettering on the coffee cups. I added just a hint of sparkle over the coffee inside the cups with a Spectrum Noir glitter brush pen. I also took a black gel pen to dot his eyeballs, the buttons on his PJs as well as dot the bunny slipper eyes. I think that little detail really makes his pop more with a bit of character.

The image was cut out with a stitched circle die and then I also cut out an additional circle to mat behind him, which I took a VersaMark ink pad and then used the “Coffee” EP to heat set along the edges of it so it has the same look and texture as the background and sentiment. This was attached over the background with twine.

Lastly, I’ve taken some brown colored sequins from my stash and attached them to the background and filled the centers with some Nuvo Honey Gold Glitter Drops.

Hope you’ve enjoyed my masculine and quirky card for today! Thanks so much for dropping in and I’ll be seeing you again soon!!😉

Challenges:

  1. Spring/Summer 2020 Coffee Lovers Blog Hop – Coffee/Tea/Cocoa Related Project

2. Addicted to Stamps and More – #391 Anything Goes

3. Cute Card Thursday – #635 Critters

4. Creative Knockouts – #351 Embossing Delight (wet or dry)

5. QKR Stampede – #399 Anything Goes

6. Simon Says Stamp Monday – “Going Around in Circles”

7. Pammie’s Inky Pinkies – PIP2021 Anything Goes

8. Die Cut Divas – Make it a Beverage + die cut/embossing folder

Berry Fun🍇

Hello friends!  I’m still sharing some projects that I had been working on from the previous month and hadn’t posted until now.  I’m also having fun creating “behind the scenes”, which is nice to just be able to “relax” and not rush on creating projects just for posting!  I’m keeping that in mind when I tell myself that I’m “behind”!

I think just having some fun is the key!

So earlier, I was “challenged” to use some of the pre-printed “Card Panels“.  These are card panels that are also foilable prints or you can color them, ink blend over them, etc.  So I decided to have some fun and play with a past card kit from my stash:

Vicki-BRMberrycardpanels

The Berry Thankful Card Panels were used for both of my cards.  I used some colored pencils and a water brush to color in both panels.  But because they’re not a water friendly type of cardstock, you need to be aware of possibly too much moisture in the paper.  So I kept a very light hand with it and just did some basic coloring on them.  Then after I got them colored up, I used my laminator and foiled over them with some Silver Deco Foil sheets.  For the sentiments on the cards, I took out the Berry Thankful stamp set also included in the same card kit, and heat embossed them over the grey cardstock included in the kit with some Foil Reactive EP and ran it through the laminator again with the same color foil I used on the card panels.

After running through the laminator, I used some dies to cut them out with and then I ran some glue along the edges and dipped them in some chunky flaky glitter that was also included with the card kit and popped them up over the card panels (with foam tape) that were placed onto some cardstock in the kit and layered over an A2 sized folded card base.  Before I attached the card panels, I wrapped some twine around them and tied with a bow.

Lastly I added a thin strip of decorative paper and also added some sequins from the kit. I filled them with silver glitter in the centers.

Normally, I would’ve posted a photo of each design, but really wasn’t sure that I would be posting about these on my blog.  So I hope you enjoy the “berry” shinny cards!!😂

Thanks so much for dropping by today and I wish you a very fun and happy upcoming Memorial Day weekend!!  (Wow!  Where did the month of May go?!!)

Challenges:

  1.  Let’s Craft and Create – #159 Anything Goes optional ribbons, lace, twine
  2. Crafty Creations – #409 Anything Goes
  3. My Time to Craft – Food Stuffs #432
  4. Creative Fingers – #186 Anything Goes
  5. QKR Stampede – #398 Anything Goes
  6. Sparkles – Use a real stamp (no digis) ~ sentiments heat embossed
  7. Lil’ Patch of Crafty Friends Anything Goes
  8. Pammie’s Inky Pinkies – PIP2020 Anything Goes

ATCs With Flowers, Rainbows and Stencils…Oh My!

Hey there friends!  Hoping you had a wonderful weekend and ready to start a fun week ahead!  Although we’ve been having some cool and rainy days this week, I know that some nice warm weather is on it’s way and I’m really looking forward to it and getting outdoors to my flowers!

For today, I have something a bit different that is not a card, but I think a really cool and fun way to experiment with different media and ideas…especially on a smaller “non-intimidatingly” way.  I’m talking about those ATCs (Artist Trading Cards for the newbies)!  It’s like a “fun size” candy bar in small bite form…these are like the “fun size” of the traditional A2 sized cards!  LOL!  They’re normally 3 1/2″ x 2 1/2″ which is similar to the size of a business card.  They’ve been around for years since I started stamping and newer to me are the round coin ones.  (I will attempt those at another time, I’m sure!)

I had a few challenges in mind and found some time yesterday to have a play:

Vicki-BRM-StenciledRainbowATCs-close

Rainbows seem to be a huge deal right now and I think there is even a special day dedicated to them!  I also was wanting to play with my crafty stash.

For the ATC on the left, I used the stencil and some embossing paste over a piece of watercolor paper and set aside to dry.  While that was dry, I cleaned off the stencil and used it on another piece of white cardstock and used my distress inks and ink blending tool to create a rainbow background for another ATC (right).  I ended up stamping the bicycle over it with black ink and then sprayed the panel with some shimmer spray.

Going back to the dry embossed paste panel, I took some Creamy Aqua Pigments and added rainbow colors at the top and then sprayed them with water and let it drip down.  I let the colors run and even left some white on there as you can see above.  I let it dry and then splattered some black watered down paint to splatter over it with a paint brush.  I then stamped the clouds from the same stamp set, fussy cut them out and popped them over the background.

On both ATCs, I white heat embossed the sentiments over black cardstock and cut them out with my scissors to place over top.  For the bicycle ATC, I added some metallic Fibers along with some flowers.  Part of the sentiment was popped up on foam tape for both of them.  One of the clouds was popped up with foam tape on the left one.

Super fun to play and create with!


I had made one early last month too, but never posted it, so I thought this would help fit it in for today:

Vicki-NeonshoesATC

Not really a “rainbow” theme, but this was sure fun to create and doodle around with!

For this one, I finally got a chance to play with my Neon Aqua Pigments! I used the “smoosh technique” with them for this background and let it dry.  Then I used some black embossing paste over the Wallpaper stencil.

I also stamped the shoes and colored those in with the Neon AP and popped it up with foam tape over a another piece of the metallic Fibers like I used on the “bicycle ATC” above.  I also took  glitter pen to go over the shoes and added a yellow rhinestone to it.  From the stamp stamp set, I took the sentiment and stamped it in black ink, fussy cut it out and layered it over some black CS and fussy cut it out leaving a border.  Each one glued over the background.  I took a black pen and doodled along the edges.

Vicki-NeonshoesATC-neonglow

And of course, when you shut the lights off and turn on your black light, you can REALLY see the fun and funky neon colors glow on it!!  Even this photo doesn’t do it justice because it looks so fun in person!

For my ATCs, I’ve been attaching them to Chipboard for sturdiness.  I also added the Artist Trading Card Labels for the backs of them.

Hope you’ve enjoyed my ATCs today and gave you a little inspiration to try one out for yourself!  But I have to warn you….just like those “fun-sized” candy bars, you can just have one!!  LOL!

Thanks for dropping in today friends!!  Enjoy your week!

Challenges: (For top ATCs only)

  1.  ATC Around the World – Flowers (Bicycle ATC only)
  2. Creative Crafting Uncles – Anything BUT a Card
  3. Creativ Fusion Arts & Crafts – Anything Goes
  4. Happy Little Stampers ATC – Rainbow
  5. Crafty Friends – Flowers (Bicycle ATC only)
  6. {Cupcake Inspirations} – CIC493 “Let’s Roll!” (Bicycle ATC only)
  7. A Bit More Time to Craft Anything Goes

A Salute to Healthcare Workers👩‍⚕️

Hello friends!  I haven’t really mentioned too much about what’s going on in the world right now, and I know it has tremendously affected many people around me.  In the crafting community I sense changes as well in different ways.  I do hope that crafting can help either take your mind off the situation or at least help with making you ‘feel’ that creating from the heart, as we stay at home, is a fantastic way to contribute and help bring about smiles in many ways.

I would like to ask you if you want to respond about it:  Has crafting helped you during this time or has it made it difficult to concentrate?  I have found that taking TONS of classes have actually been my savior right now especially as I was taking that break I had. (Helps me to concentrate on something like a technique.)  I found MANY having classes (free or having group parties going on with crafters teaching and sharing).  Due to this pandemic, I know many people/companies in the crafting community have revved up their classes and challenges as well… along with giving out free digital images!

This brings us to my post for today….

Vicki-TEcarddrive

I have made several stacks of “thank you” cards geared towards our healthcare workers and it has been very rewarding for me to be able to color in all these images in my post today as a salute and honor to those that have been “on the front line” dealing day to day since the beginning of this pandemic.  My heart goes out to all in this uncertain time and although there are many horrible stories related to this, there are also some good ones too.  Let’s rise up.

Taylored Expressions put on a card drive to send cards to the healthcare workers and it ended today, so these cards have already been sent.


For this particular stack of cards, I’ve made 6 of the pink and 6 of the green using this adorable MOKA Melissa Nurse free download from Taylored Expressions.  I’ve also used the Subway Tiles embossing folder for the background as well as white heat embossed the sentiments from the Life Saver Mini Strips stamp set and die cut them out with the clever Mini Strips Die.  I’ve used a heart die that came with an order I had and then I took some tiny images from other sets for the accents.

Vicki-TEcarddrive-inside

I stamped a message on the inside of all of the cards from TE Big Thanks stamp set too.  (This set came for free with an order I placed.)


Vicki-BRMSuperherocards

Here’s another set of 20 cards I made for healthcare workers using the Freebie Healthcare Super Hero Coloring Pages.  (To print these out to fit over an A2 sized card base, I used my printer settings to print out 4 pages on one sheet.)

I layered them over some pink and red cardstock and then the base of the card is some A2 sized side folding blue cardstock.  The left over pieces from the pink and red cardstock strips were ran through and embossing folder and white white Ink was ran over it.

Vicki-BRMSuperherocardsA

Here’s a closer look at the individual sets.  I used a star die to cut out some stars with Glitter paper.   I also took some blue and pink glitter glue to create extra “dots” around them.  This was good practice for me to experiment with different skin tones too.

Vicki-BRMSuperherocards-B

I’ve used Copic markers to color all of these in with and then I took some gel pens to color in parts of the image as well as the outline in the sentiment too.

Vicki-BRMSuperherocards-group

I thought this was a fun one with all of them together and I like that they’re all wearing capes and masks too.  I had these finished up at the end of April, but just now getting all of these out where I wanted them to go.  I’m sending some masks along with the cards to our local hospitals.

Vicki-BRMmailhero

One last and important card I made was specifically for my son who’s a postal carrier.  Of course I tried coloring it in with the same hair color he has too.  LOL!  After I made the batch of cards above, they came out with more superhero freebie downloads, so I grabbed the Mail Carrier Superhero Coloring Pages to make one for him too.  And this one is already on it’s way as well.  For the background, I used the Scene stencil for the clouds with blue distress ink.

I finished this one similar to the ones above.

The ONLY superhero I’m missing is one for my other son who’s a food service worker and I haven’t seen any of those images out yet.  Does anyone know where to find one?  I would love to make a “thank you” card for him as well.  I may just come up with my own version with what I already have…but have to think about how first.  LOL!

This particular song came to my mind and was something that I listened to while coloring….

It was somewhat catchy and upbeat I thought.  I always like to try and think of the positive ways that cards I make give a positive impact or inspiration somehow.  Could be wishful thinking, but it’s my hope anyway.

Thank you so much for taking the time to stop by today to read my post!  I hope that you’ve been inspired in some way!  Have a beautiful weekend my friends!

Challenges:

  1.  Colour Crazy Craft – Anything Goes + hand colored image
  2. Love to Scrap – LTSCB133 – Anything Goes
  3. Love to Craft – LTCCB46 – Anything Goes
  4. Allsorts – Anything Goes
  5. Pammie’s Inky Pinkies – PIP2019 Anything Goes
  6. Not Just Cards – May Anything Goes
  7. Fab ‘N’ Funky – Hand Colored Image
  8. Aud Sentiments – #251 Anything Goes + sentiment

Faux Emboss With a Stamp!

Hello there friends!  Hoping you had a wonderful weekend and a fabulous Mother’s Day as well!  I had a wonderful day with flowers delivered to me and wonderful phone messages.

Today I wanted to share a couple of cards that I had made participating in the “Spring Card Camp” classes from Online Card Classes. (It started April 11 and ran through the end of April.)  Although we are now on a separate Part 2 Spring Card Camp, I have enjoyed the classes each day and I thought I’d just take my time and enjoy everything.  So there may be posts spread across time as I go.  I just like to take my time and actually enjoy the process rather than hurry up and run right through it.  I feel this helps me to fully understand what I’m doing and what products I’ve used, take notes, etc.

The first class was taught from Jennifer McGuire as she showed us how to use a stamp and create our own embossing folder to make an impression with it!!  Something that I had not heard of before, so this was fun to try out:

Vicki-BMKindFloral-fauxemboss

So the idea of each class is to pretty much get a “two for one” type of design and stretch your supplies and design concept so that it makes it easier to create multiple cards at a time, which is really great right now as I seem to be making more cards and donating extra cards that I normally wouldn’t be doing at this time of the year.  (I also actually thought this could be applied towards Christmas making time as well…which I will be keeping in mind!)

I started with this panel first as this was my piece that created the faux embossng folder:

Vicki-BMKindFloral-FE

I decided to use this gorgeous large image from the Kind Floral stamp set to create my “faux embossing” piece with.  This image was heat set several times with white EP.   All of the cards I made including the sentiments were used with this same stamp set.

After using it for my “faux embossing” on my other cards shown below, I went back to it and finished it on a card by using some blending brushes and ink to color in the panel.  I took a strip of black cardstock and white heat embossed the sentiment over it and then layered it onto a white A2 side folding card base.  I finished it off with some colored bubble drops and Stickles glitter drops.

Vicki-BMKindFloral-FE1

Here’s a closer view of the white heat embossing I did on this panel with the image.  It’s very thick as I had to build up layers to create a faux embossing folder to get a good impression with it.  (See below)

Vicki-BMKindFloral-FE2

For my first card using the “Faux Embossing” piece, I took a sheet of pink cardstock and made the impression into it.  You can see it in the background.  For this panel I used the negative side of it and then sponged some darker pink ink over top of it so that you can really see the impression from the image.  I used a Wonky Stitched Rectangle die to cut it out with and layered it over a piece of kraft Cardstock.  This was attached to a top folded A2 sized white card base.

I took another sentiment from the same stamp set as above and heat embossed it with Gilded EP.  I sponged some more pink ink around the edges of this panel and layered it over another piece of kraft CS.  I popped it up with foam tape over some die cut flowers from vellum along with a strip of gold mirror cardstock and finished it off with some gold sequins.

Vicki-BMKindFloral-FE2a

Here’s a closer view at the texture in the background from the faux embossed piece.

I thought this gave a subtle but soft and pretty look to the design.  Also, that sentiment could not be at a more perfect time right now, don’t you think?

Vicki-BMKindFloral-FE3

And for my last card, I made the faux embossed background using some more kraft CS.  This image I used the positive side and ran some distress ink over the raised areas to bring it out more.  I took a darker brown ink to go around the edges.

I stamped a sentiment from the same stamp set with brown ink, layered with some Copper Glitter paper and then cut a piece of Macchiato CS from a scalloped stitched square die that was also used for the A2 Sized top folding card base, and popped up the sentiment panel with foam tape.

I layered the embossed background piece over a vanilla cardstock layer that was cut with a scalloped stitched rectangle die and then I wrapped some silk ribbon with a bow around it before placing the sentiment panel over it.  I attached the flower and the sequins to the design and finished it off with some Nuvo Honey Gold Glitter Drops.

Vicki-BMKindFloral-FE3a

Here’s a closer look at not only the texture from the embossed background piece, but I also took some Shimmer Spray and covered the background with it.  You can sort of see the beautiful shimmer over it…and it really looks incredible in person.

Hope you’ve enjoyed what I’ve learned and created for class!  Thanks for dropping in with me today!  There will be more things I have to share with you coming up, so I’ll see you soon!!

Challenges:

  1.  Pearly Sparkles – Add a Ribbon or Bow (last card only)
  2. Moving Along With the Times Flowers
  3. Crafts Galore Encore – #75 Anything Goes
  4. Simply Create Too – #160 Use Flowers
  5. The Corrosive – #15 Anything Goes
  6. Use Your Stuff– #397 Flowers and/or Butterflies
  7. Arty Divas – #21 Anything Goes
  8. Cute Card Thursday – #633 Anything Goes

Inspired By Crafty Friends❤

Hello there friends!

I have to say thank you for your lovely comments and thoughts!  Sometimes, you just never really know about something or how someone feels unless you are told or you ask!  I’m really amazed that there are people I didn’t realize that actually cared if I posted something!  Even if you have stats on your postings, you still don’t know who really DOES like to see what you’re posting.  I’ve had some blog friends that have been around for MANY years, even before this blog platform and I’m so thankful for you guys!  I am always truly inspired by you all for sure!  Thanks for being around!❤  (Even if you don’t comment!!) 😉

I have another card that I didn’t get a chance to share as it was created at the end of February and I never fit it in to post, but I pulled out a very old stamp to play with because I was inspired by a friend to use it:

Vicki-ShellysPenguin

Maybe you have heard or seen the Whipper Snapper Designs stamps?  I’ve had this adorable little penguin for a while now and I think he’s long gone from the website.  I don’t see him in the store, but the name on the side of the wood stamp is “Ice Cream Penguin” and no date.  I have a small collection of their stamps and they’re all older as I haven’t bought anything from them in years and not sure why really.  I hold them in high regard like my old Peanuts Gang/Snoopy wood rubber stamps as you can’t find those any longer either!  I don’t part with them! LOL!

Anyway, inspired by my friend Shelly that was featured on Splitcoast Stampers as the FS681 “mcshmidty” Featured Stamper.  This is a challenge where you find a project from their online SCS gallery and use it as inspiration to create something.  Here’s the card she made that I fell in love with in her gallery:

IMG_6447_12216_by_mcschmidty
card by Shelly Schmidt “mcshmidty” on SCS

I thought it would be fun to use an older stamp I had (I love penguins) and create a birthday style card with it.  I have a few birthdays to celebrate in the colder months, so I was just trying to think ahead and I liked that this could be a masculine or feminine card to give out too!  I can’t remember where I pulled the pattern paper from, but the colors really caught my eye!  Instead of the strip like Shelly has on her card, I made my strip into a banner.  I used a snowflake instead of a sun and two enamel dots.

Vicki-ShellysPenguin-close

I stamped and colored him up with Copic markers.  I used some liquid applique for the end of his hat and dotted his cheeks with a white gel pen.  I used glossy accents over top of the cherry on his ice cream cone.

The sentiment was pulled out from an older My Favorite Things stamp set that I white heat embossed over black cardstock and cut apart.  I also used MFT stitched die cuts for the banner and circle image.

Vicki-ShellysPenguin-flat

I must’ve been in the mood for ice cream before I took a blog break as I just realized my last post had ice cream too! LOL!!  Hope you like my card as I was really inspired by my friend’s card to make it!

Thanks for dropping in and I’ll be seeing you soon!!

Challenges:

  1.  Splitcoast Stampers Featured Stamper – FS681 mcshmidty
  2. Crafty Animals – #38 Anything Goes + animal
  3. 2 Crafty Critter Crazies – #38 Anything Goes + animal
  4. Challenge Up Your Life – #123 Animals
  5. QKR Stampede – #396 Anything Goes
  6. Lil Patch of Crafty Friends – #131 Anything Goes
  7. Crafting Happiness – #47 Anything Goes/optional: birds

I’m Still Crafting!!🎨

Hello there friends!! 😀

I’m doing well and healthy as is my family!  I sure hope that all of my fellow blog friends and readers are staying healthy as well!  Thank you from the bottom of my heart for reaching out to me and asking about my well being!  I really miss you guys!

I haven’t posted since I’ve not been on any design teams and I sort of just “took a personal break” from posting anything on my blog or social media.  The first reason being was that I had lost some “MOJO” and was really struggling with getting inspired and wasn’t really “happy” about what I was creating.  As I had mentioned before, it really does happen to us and sometimes it’s harder to “get over it” at times.  With all that is going on in the world right now, I also had other concerns on my mind as I’m sure many of us have.  So my blog break became even more extended.  Now that I’ve “been away”, I’m stuggling with what exactly I want to do.  I miss my blog friends very much and really enjoyed having this way of communitcating with you all…after all…we love crafting together and we have that in common and it’s something to be happy about to come together for!  So I’m sharing my heart to heart update with you!

WHAT HAVE I BEEN DOING??????🤔

Yes!  I’ve been crafting, but I just haven’t really taken the time to create a post about it.  As you know with blogging, you know that you not only need to take a photo of it, but you have to edit it, watermark it, create/type up the blog post, link all the things and then share it to all of these other social media platforms..so, with that, I just didn’t take the time! LOL!  And….I’m still trying to decide if blogging is something I should continue.  PLEASE, share with me your thoughts.

While I’ve not been posting, I sure have been crafting!  I signed up to take several different classes!   I had planned on going to a couple of retreats that were obviously canceled, so I decided that the online type classes were a way to go and to try to boost up some of that lost MOJO!  While not posting about it, I actually think that may have helped!  I was able to freely create with no time restraints and I didn’t have to worry about typing up a post for social media and “judgment”.  It just turned out to be whatever it was!  So MAYBE posting about whatever comes up for my crafting is a little more “freeing” and it can be whatever it turns out to be?  I don’t know, I guess I will find out!

____________________________________________________________________________________________

I will try and start with about where I left off from the beginning of April and just go forward from there!  Lots of things have been going on “behind the scenes”!  LOL!

Vicki-BMicecreamBday

This is a card I had actually made back in March for a birthday card for someone and just never posted it.  I had pulled out an older birthday card kit and used the stamp set along with the papers from the kit.

I also used the circle shaker pouch as well as some dies from My Favorite Things to create the shaker panel.  the confetti and sequins all came from the card kit I used.

Vicki-BMicecreamBday-close

I used Copic markers to color in the ice cream cone and then I also die cut a heart from the Glitterstock that was included with the birthday card kit and glued it on top.  I took some white twine as I felt a bow on the cone would help tie everything together nicely.  I white heat embossed the sentiment over a strip and swiped some white ink along the edges of it.  It was glued over top of the polka dotted paper and die cut out with a stitched rectangle die.

Vicki-BMicecreamBday-flat

As you can see, I even took an additional image from the stamp set and stamped the envelope to match. (something I’ve been trying to work on when making cards)

I didn’t photograph it, but I also used a gift card pocket die on the inside of the card to tuck a gift card in.  Those little pocket dies come in handy for when you want to mail a gift card!

So please let me know that you’re here and what you think!

Thank you for your continued support during my crafty journey!!  I have more things to post that I’ve been working on, so I’ll be seeing you soon!!

Challenges:

  1.  Crafty Cardmakers Celebrations
  2. A Bit More Time to Craft Anything Goes
  3. Creative Fingers – #185 Anything Goes
  4. Stamp & Fun = Creativity – #367 Eat & Drink
  5. Pammie’s Inky Pinkies – PIP2018 Anything Goes

WINNER of the Purple Day Blog Hop Give Away!💜

Hello friends!

First, I want to thank you so much for your support and kind comments for the Purple Day Epilepsy Blog Hop!  It’s a fantastic cause to be apart of and I was happy to help my friend bring awareness for it!💜

I had a total of 12 entries left from the comments after it closed and drawing from those names….

The winner of my blog candy chosen by random.org  is……..

#10 Karen Ladd

Yay!!!🎉✨🎈  Congratulations on your win!!  Please be sure to contact me with your snail mail address so that I get these goodies sent out to you asap!

Thank you again for your support in raising awareness about epilepsy!💜

Celebrate For 2 Crafty Critter Crazies + Other News

Hello friends!  Happy April 1st which means it’s time for a new monthly challenge for the 2 Crafty Critter Crazies Challenge!  Remember that it’s always an “ANYTHING GOES + CRITTER” challenge to enter your creation.  We’re looking forward to seeing your projects!

This month we’re being sponsored by Digi Doodle Studios!  They were kind enough to provide images for the design team to create their projects with, so here’s what I’ve made for my challenge project:

Vicki-2CCCwithDDS

I think I could probably celebrate with these cute little hedgies, couldn’t you?!🦔🦔

This image is called Hedgie Party from Digi Doodle Studios and it was super fun to color up for my card!  We can always use birthday cards in our stash, so I pulled out some papers from my stash…including some left over pieces to assemble the design.

I used a Simon Says Stamp stamp set to heat emboss the stars over the green decorative paper with gold EP.  I stamped the sentiment at the bottom of the paper from the same stamp set with black ink.  I cut out this panel with a square stitched die, layered over white cardstock and then attached it to a piece of orange top folding 5″ square card base.

I pulled out some gold mirror cardstock cut with a scallop square die and layered it over the design, wrapped some gold ribbon around it, placed the layered image panel over top of that with craft foam and added the bow.

Vicki-2CCCwithDDS-close

Here’s a closer view of the image I’ve colored with Copic markers.  I’ve also used a white and gold gel pen to create some polka dots over parts of the image.

Hard to see in the photo, but I covered the big present bow with a glitter brush pen too.

Vicki-2CCCwithDDS-flat

I hope you’ve enjoyed my card today using this sweet DDS image! Thanks for stopping in!

Other news:

Just FYI that this post will be my final creation as a design team member for not only 2 Crafty Critter Crazies, but also for Digi Doodle Studios as well.  Although I adore everyone on these design teams very much, it’s just time for me to let DTs go for a while.

Challenges:

  1.  Krafty Chicks – All Occasions
  2. Di’s Digi Challenge – Birthdays
  3. QKR Stampede – #391 Anything Goes
  4. Creative Knockouts – #343 Anything Goes
  5. Pammie’s Inky Pinkies – PIP2013 Ribbon
  6. Country View– Animal Magic