Raggedy Love

Happy Valentine’s Day my friends!!  Hope that you’re “feeling the love” and have a wonderful day today!

I wanted to share a card I made for Valentine’s Day.

Vicki-RaggedyLove

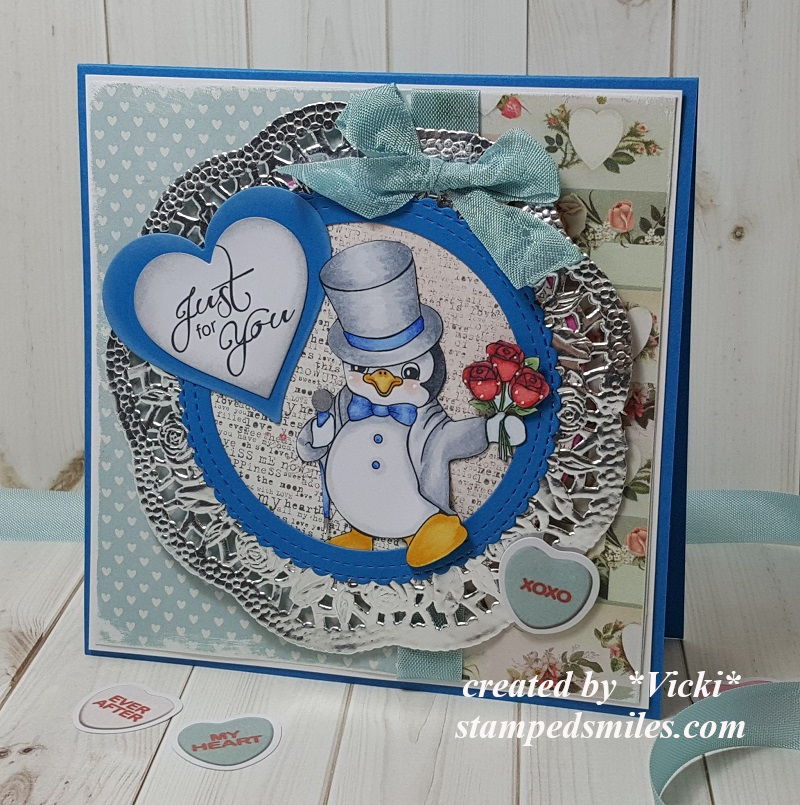
This really cute images is from Stamp On It called “Love You” digital stamp by QKR Stampede.  I wanted to try and keep to the “original” Raggedy Ann style of colors as I could, so I ended up Google searching for photos so that I could use that as a basis for my coloring.  I also thought that the rectangle die cut panels would go great for cutting her out with.

I sponged around the edges of the image panel with some blue distress ink, added some heart confetti pieces along with a white twine bow to the center of the heart.

Vicki-RaggedyLove-close

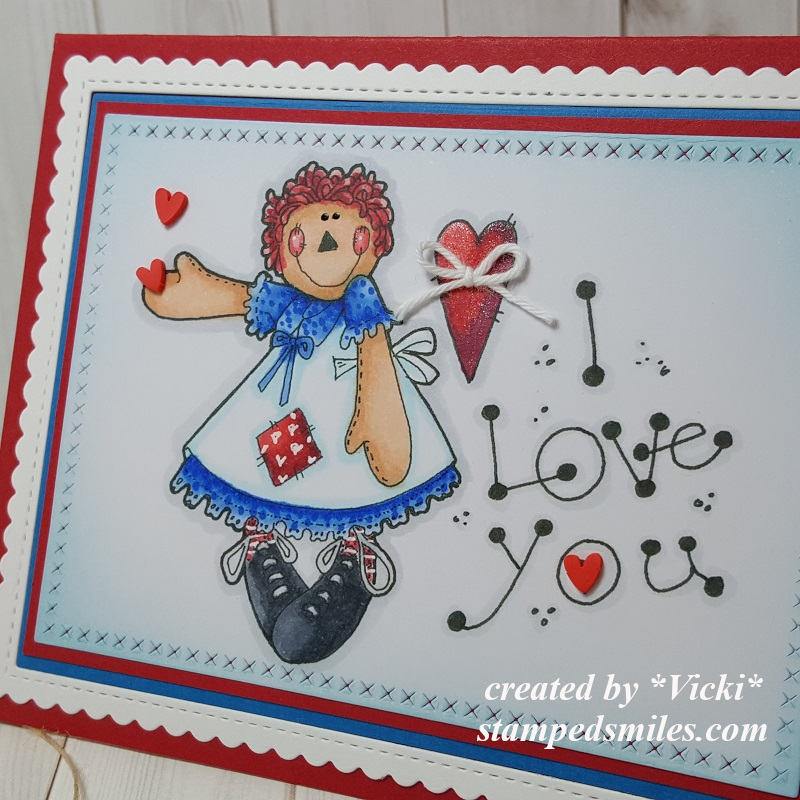
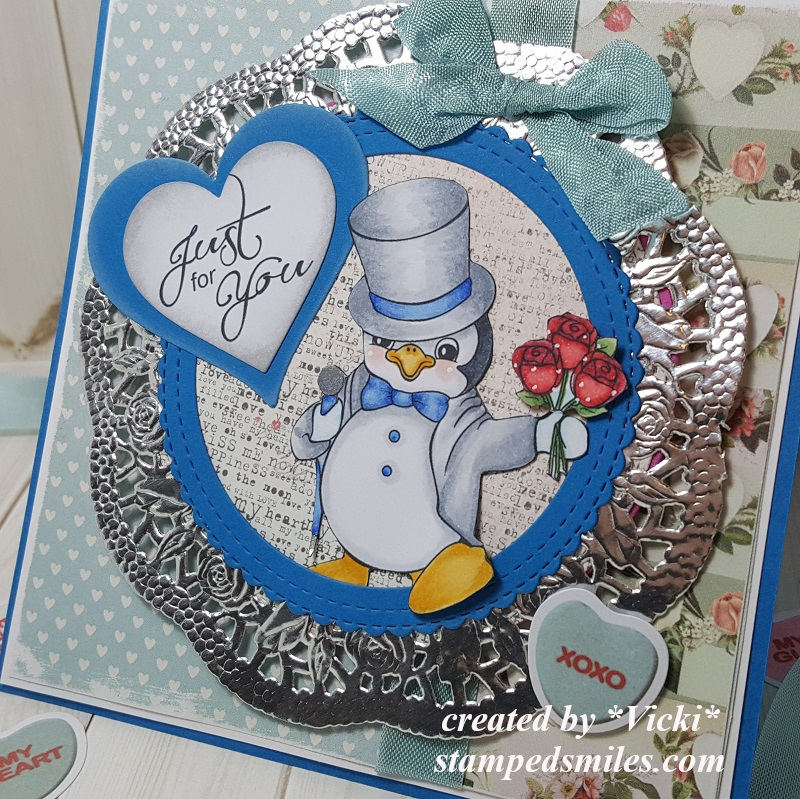
Taking a closer look at the image, you can see how dimensional those confetti hearts are.  There is actually a heart that prints out in the center of the “o” in the sentiment, but I decided to place one of those confetti hearts over it.

There is also some shimmer you can see in the heart with the bow that I’ve covered with a glitter brush pen.  And in coloring her in, I’ve added some extra “dots” on her blue dress and then I took a white gel pen to add a pattern on her red patch on the apron and then also to add some “stripes” to her socks and “dots” to her cheeks.

If you look at her eyes, I’ve taken a black gel pen which gives them a slight dimension and makes them stand out a bit more.

Vicki-RaggedyLove-flat

I really hope you’ve enjoyed my “Raggedy Love” card today and that you have a wonderful Valentine’s Day today!

Thanks so much for stopping in and I’ll see you again very soon!

Challenges to enter this card for:

  1.  QKR Stampede Anything Goes
  2. Pearly Sparkles – Include some red
  3. Lil Patch of Crafty Friends Anything Goes
  4. Make My Monday I Heart You
  5. Try It On Tuesday – Share the Love
  6. Double D – Hearts
  7. The House That Stamps Built – DCC F520 Hearts
  8. Aud Sentiments – Love/Valentine Sentiment

Seally For You

Hello there friends!

There’s something brand new in the Digi Doodle Studios store this month and it’s just perfect for making an adorable Valentine’s Day or love themed card!  Check out this sweet card I’ve made for you today:

Vicki-DDSSeallyForYou

Aren’t these snow seals just the sweetest?!  I’ve used the brand new Pairables digital set called Seally for You from Digi Doodle Studios for my card here.

It’s really easy to create a scene on your computer with the images and then just print them out to color!  I have this cute couple arranged in a “Titanic” situation (If you’ve seen the movie, then you know what I’m referring to! LOL!)  on my scene here, but also have printed out a couple of extra hearts along with the fish and floating ice cube to fussy cut out and add to my scene later after assembling it.  The “water waves” that I’ve added to my scene is actually from the DDS Otterly Loves Pairables.  That is what is so cool about these Pairables sets, is that you can use the different elements together with another set to create some fun & unique scenes!

I used cut out vellum for the water and added another strip that I actually clear heat embossed the sentiment as it came out of the printer.  You can heat emboss over vellum as the ink stays wet a little longer after printing it out.  (Not for too long though!)

I added the colored up fish, hearts and ice cube to the design as well as sponged some soft pastel clouds with a stencil.  I was also trying to be different by tilting the image layer over the card.  The card front panel was embossed with a falling snow embossing folder, I wrapped some ribbon around the corner and attached this piece to an A2 sized top folding white card base.

Vicki-DDSSeallyForYou-close

I’ve colored the images with Copic markers.  You can see that I’ve fussy cut out the smaller heart and then popped up the top heart with foam tape.  I tucked the ice cube and one of the fish behind the vellum and then popped up the fish over the ice cube with foam tape.  I took one fish and attached next to the heat embossed sentiment.

You can also see the hearts long with the ice cube and ice platform that I’ve taken a glitter brush pen to add some shimmer to them.

Vicki-DDSSeallyForYou-flat

I hope you’ve enjoyed my card today or have been inspired to create your own fun digital scene to play with too!  Thanks so much for dropping by today and I’ll see you soon!

Challenges I’d like to enter my card for:

  1.  Challenge Up Your Life – Winter Landscape/Scene (6 total challenges)
  2. Crafty Friends – Love/Romance
  3. Get Creative – Use Hearts
  4. Creative Inspirations – Anything Goes
  5. C.R.A.F.T. – Love/Valentine’s
  6. Creative Moments – #184 Anything Goes with twist:  love

Guest Design Spot for The Paper Girls With Birthday Fun!

Hello friends!

I’m very excited to share my post with you today for The Paper Girls Challenge as I’ve been invited to be a guest designer for their current challenge of “BIRHTDAY“!  We all need birthday themed projects, so this is a great way to join in the fun and add to your birthday card stash too!  Hope you will join us!

I wanted to pull out some stamps that I had bought a while back and never pulled out to use yet, so this was fun!  Here’s my card:

Vicki-PCGguestDT-MFTbday

Who could resist a couple of cute party animals! LOL!  I’ve pulled out this adorable “Sending Sweet Celebration Wishes” stamp set from My Favorite Things and made a fun party scene with it!

For the card front, I’ve die cut some Summer Splash cardstock with the Gift Box Cover-Up Dienamics and then used it to also cut some older MFT pattern papers to fit inside the die cut squares.  I layered these pieces over a piece of MFT Daffodil cardstock (looks to be retired) and then mounted it over an A2 sized top folding white card base.

I’ve used the same Summer Splash cardstock to stamp the sentiment from the stamp set and used a banner die to cut it out with and used the Gift Box Cover die to cut the end of it to match with the upper right box area.

For the Gift Box Cover-Up “frame”, I took a sentiment from the MFT Penguins in Paradise and stamped the “cheers” image randomly with VersaMark ink all over it, but then decided that you couldn’t see it very well, so I added the word to the yellow banners with a black pen in my own writing.

I’ve used the coordinating die set for the Sending Sweet Celebration Wishes set to cut out the colored images and attached them to the card front.  Some I’ve popped up with foam tape and the others were glued.  I also wanted to add a little sparkle, so I’ve attached a few confetti sequins to finish it up.

Vicki-PCGguestDT-MFTbday-close

Here’s a closer look at the coloring I’ve done on these cuties.  I’ve used a white gel pen for their cheeks as well as adding some polka dots to the party banner.

You can see where I’ve used a marker to write the words on the banners and I also used it to create stitches along the top of each banner too.

I’ve also added some shimmer with a glitter pen over the cupcake frosting.

Vicki-PCGguestDT-MFTbday-flat

I hope you’ve enjoyed my birthday party animals card today and have been inspired in some way!

Thanks so much for stopping in today and I’ll be seeing you soon!!

Challenges:

  1.  MFT Birthday Project– Jan “Cheers”
  2. Crafty Calendar – Use die cuts/punches
  3. Seize the Birthday– Creatures Great & Small or Anything Goes
  4. Creative Knockouts – Birthday Wishes
  5. Crafty Animals – Anything Goes + animal(s)

Turner Syndrome Awareness Blog Hop

Hello friends!

February is TSA month and If you’re not familiar with this, please read about it below:

Turner Syndrome is a genetic disorder where a female is born with only one X chromosome, instead of two, leaving her with life-long medical issues and learning disabilities. This condition occurs one in 2,500 female births worldwide, but is more common among pregnancies that do not survive to full term. That is why Turner Syndrome Females are considered MIRACLES!

My TS related project is inspired by the TSA official color board:

For my project, I have combined two different digital sets that were kindly made especially for this blog hop and the TSA cause:

Vicki-JansDigi-TSAbloghop

I was really inspired by the wonderful colors along with the images from the inspirational board above, but it was fairly easy since the images were already pre-colored in the set to create with!

I’ve used the TSF Key digital set from Jan’s Digi Stamps for the images on my card.  Also what’s cool about this set is that all of the proceeds from this set go directly to the Turner Syndrome Foundation!  It’s a stunning set to have plus a great way to help with a terrific cause too!

I have printed out the images over a piece of white cardstock and cut them out.  I also added one of the images in a repeat pattern to print out over a piece of green cardstock for a decorative strip on the background of my card design.

I took an embossing folder and embossed only the top portion of my card base, added the green printed strip with ribbon wrapped around it and sponged the edges.  I layered some pink cardstock and cut a scallop square piece of lavender colored cardstock for behind my vanilla panel and popped it up over the card base with foam tape.

Lastly, I’ve attached the bow, button and twine to the side of the image panel and attached the cut-out butterfly to the top corner of the image panel.  I glued only the center portion of the butterfly so that I could pop out the wings.

Vicki-JansDigi-TSAbloghop-close

Here’s a closer view of the images.  I’ve used a Copic marker on the vanilla-colored panel to create a “shadow” around the key image and then I attached the cut-out key over top of that.  I’ve used the same Copic marker for a few more shadows around the key.  For that butterfly, I’ve used a glitter gel pen to color portions of the butterfly and then a clear glitter brush pen to go over the wings.

You can see that TSA symbol on the key which is the same image used for the green background panel I created on the computer.

Vicki-JansDigi-TSAbloghop-flat

I hope you’ve enjoyed my card today!

Thank you so much for stopping by!

Challenges I’d like to enter my card for:

  1.  Jan’s Digi Stamps Challenge Anything Goes
  2. Pammie’s Inky Pinkies – PIP2004 Anything Goes
  3. Arty Divas – #14 Anything Goes
  4. Through the Craft Room Door – Anything Goes
  5. Allsorts – A Touch Vintage

Just For You at 2 Crafty Critter Crazies

Hello friends!  It’s not only the weekend, but it’s also the first of February!  It’s what we call the “love dovey month”! LOL!  The first of the month also brings us a new challenge starting over at the 2 Crafty Critter Crazies blog!  It’s always an “ANYTHING GOES + ANIMAL” for your project each month.  We look forward to seeing your creations!

For this month we’re being sponsored by Jan’s Digi Stamps and here’s what I’ve come up with for my project:

Vicki-2CCC35-JansDigi-BlueRitz

Check out this dapper little penguin stepping out to hand his loved one a bouquet of flowers! 🙂  I’ve used the adorable Puttin’ On the Ritz digital set for my card here.  It had me at penguin! LOL!

I have pulled out some of those cool vintage looking papers from that SSS Valentine card kit that I had used earlier this week on my parent’s anniversary card and just loved the blue tones in them, so I went with that color scheme for my design!

The penguin was colored and fussy cut out.  The way he was positioned looked like he was popping right through an opening to hand out the flowers, so I’ve used some circle die cuts with more of the vintage papers for the background and tucked him in there with his foot and flowers outside the circle frame.  I’ve placed a silver doily behind him.

The base of the card measures 5″ square, I’ve taken a couple of strips of the papers and layered them over a white card panel that I’ve sanded the edges on before mounting it over the blue card base.  I took some seam binding ribbon to wrap around it and then attached the circle panel to the front with a bow and candy heart accent over top.

The sentiment was printed out from the same stamp set and cut out and layered with a heart die set.  I’ve also sponged around the edges of the white heart with grey ink.

Vicki-2CCC35-JansDigi-BlueRitz-close

Here’s a close view of the image and how I’ve got him all colored up with Copic markers.  I’ve used a white gel pen for dots on his cheeks as well as dots around the flowers.  Sometimes those bouquet of roses have the baby’s breath with them…for some reason I think it makes the bouquet look extra special!

For part of the penguin’s “cane” or “umbrella”…not sure, I’ve used a silver metallic gel pen to color in parts of it.

I kept his hands white as I felt like he was wearing white gloves.  LOL.

Vicki-2CCC35-JansDigi-BlueRitz-flat

I hope you’ve enjoyed my fancy little love penguin card today and have been inspired!

Thanks so much for stopping in!

Challenges:

  1.  Jan’s Digi Stamps Challenge Anything Goes
  2. Simon Says Stamp Monday – All Loved Up
  3. Cute Card Thursday – Valentines
  4. Krafty Chicks – Anything Goes
  5. As You Like It – Warm or Cool Colors (love the cool tones)
  6. Daring Card Makers – Layer it Up!
  7. QKR Stampede Anything Goes

A Vintage Love

Hello friends!  I hope you’re having a great week!  I must be really wishing for flowers as this seems to be my theme this week!…along with watercolor and heat embossing! LOL!

Today I wanted to share a card I’ve made for an anniversary:

Vicki-SSSBeMyValentine-Anniversary

As you can see from the card itself, my parents have been married for 55 years.  So when I saw this Simon Says Stamp LE Valentine 2020 card kit, I knew that this would be a great way to start using the kit immediately!

I actually really didn’t know what direction I was going to go with this anniversary card and I just started pulling things out and switching different items to see what I wanted to do.  I sampled the stencil with the metallic paste from the kit and really liked it, but when I pulled out my copper metallic mirror cardstock, I decided to heat emboss over the stencil with the same copper EP that I used on the sentiment for this card.

I’ve also cut out the numbers with the copper metallic mirror cardstock along with the layer behind some of the papers from the card kit.  I’ve added another heart strip of the papers from the kit at the top and used one of the butterflies from the kit to go over the piece of lace I’ve added from my stash.  The layers were all attached over an A2 sized top folding card base.  Lastly, I added some white hearts that were actually from a different card kit.  LOL!

Vicki-SSSBeMyValentine-Anniversary-close

I wanted to share a closer look at the flower.  The stamp set in that card kit is so stunning!  I’ve white heat embossed the flower and leaves over some watercolor paper and then used my Clean Color Real Brush markers to color it with.  I’ve used some foam tape to pop up the flower over the stenciled heat embossed piece that was cut out with a circle die and attached to the card front.

You can see the shimmer over the butterfly wings that I’ve covered with a glitter brush pen.  I only glued the center of the butterfly so that I could pop out the wings a bit.

Vicki-SSSBeMyValentine-Anniversary-flat

Although this card looks a bit simple, there were a few steps to the stenciling and heat embossing some of the elements.

I hope you like it!  Thanks so much for stopping in and I’ll see you soon!

Challenges:

  1.  Simon Says Stamp Wednsday – Anything Goes
  2. QKR Stampede – #382 Anything Goes
  3. Allsorts – Take Flight
  4. Creative Fingers – #178 Anything Goes
  5. Watercooler Wednesday – WWC256 All About Occasions
  6. Lil Patch of Crafty Friends Anything Goes

Guest Design Spot For Retro Rubber Challenge and Playing Tic-Tac-Toe!

Hello there friends!  I hope that you’ve had a great weekend and found some enjoyable moments for yourself!  I had a nice and cozy weekend with my hubby!

Today, I’m thrilled to share my post for the Retro Rubber Challenge Blog as I’ve been asked to do a guest design spot for their challenge!  Retro Rubber is known for their challenges in which they challenge you to pull out those neglected older stamps from your stash and use them!  (They ask that you use a stamp that is at least 1 year or older to enter).  For this particular challenge, they’re asking you to follow along with a fun Tic-Tac-Toe board.

For my card, I was going for a diagonal direction one way, but it ended up fitting with several different directions on this board!  LOL!  I just had fun playing I think:

(My card below utilizes the top row across, and diagonally in both directions!) Squares used for my card are:  green, twine, pattern paper, die cut or punch, sympathy and nature.

Vicki-RRCB127GDT-EHMondoHydrangea

Isn’t this such a pretty floral stamp?!  Hydrangeas are pretty much my fave all time flower!  The colors amaze me and I have a line of them in my backyard along my fence and look forward to seeing them bloom every year!  I take photos of them too!

Well I have this container sitting on a shelf in my stamp room where this particular stamp and die set is just “staring at me” awaiting for me to pull it out!  I didn’t realize that it was actually a 3 year old set until I pulled it out, but do you remember this Mondo Hydrangea from Ellen Hutson by Julie E?  Fell in love with it immediately, purchased it and think I may have used it one time!  I was excited about pulling it out to make my card for today as it’s one that I really love!

I started by heat embossing the image with some Brutus Monroe Gilded EP and then used my Clean Color Real Brush markers and a water brush pen to blend out the colors over the images.  I then used the Mondo Hydrangea coordinating dies to cut out all of the images.  I also took some vanilla cardstock to die cut the top border with the MFT Stitched Scallop Basic Edges die as well as cut it out along with the green pattern papers with the MFT A2 Stitched Rectangle STAX die.  These layers were attached over an A2 sized vanilla top folding card base.

I’ve used a sentiment from the Whimsy Stamps Furever in Our Hearts stamp set and heat embossed that over that vanilla die cut panel as well. (Adorable pet sympathy set to have on hand!)

The flowers were popped up over the design with foam tape, but before I attached the large hydrangea to the card, I took some metallic gold twine and tied a bow around the stem.  Lastly, I added some clear confetti sequins.

Vicki-RRCB127GDT-EHMondoHydrangea-close

Here’s a closer look at the watercolor I’ve done over the flower.  I don’t do this very often, but it’s always satisfying when I play around with it!  At first I thought it would be intimidating to color, but it’s really not.  I just added layers of watercolor as I wanted it to look.  You can really see where the EP shines on this!

I had thought about adding some glitter over it, but wanted to keep it soft since it’s a sympathy card.

Vicki-RRCB127GDT-EHMondoHydrangea-flat

It seems that I hardly ever have a sympathy card on hand when I need one, so this will be a great one to have on stand by for my collection.

Thanks for stopping by today and I’ll see you soon!

Other challenges I’d like to enter this card for:

  1.  Cute Card Thursday – Green
  2. Krafty Chicks – KCC491 All Occasions
  3. Crafty Catz Anything Goes + optional twist:  Flower Power

Foxy Skater Spinner Card in Action With Video Tutorial!

Hello friends!  Really feeling the cold air around here, so I’m still thinking in winter mode and have another interactive winter card to share with you again today!  (Please be sure to check out THIS POST to see another interactive winter card and video tutorial if you’ve missed my last posting!)

What’s a better way to embrace the cold than to create interactive cards in your nice warm crafty space, right?!  So sit back, have a warm sip and get creative with me today!

Vicki-DDS-Spinner Fox Card video

This cute little guy is so fun to watch him spin around doing his cool ice skating trick!  I’ve used the Foxy Skater image from Digi Doodle Studios for my card here along with the Winter Plaids N’ Patterns Digi Paper Pack and Snow Days Sentiments set as well!

I’ve used several dies from My Favorite Things for the front of the card!  I’ve cut out the plaid papers with the A2 Stiched Rectangle die and mounted it over an A2 sized side folding white card base.  The spinner “window” was cut out with a Circle die that was also used to cut the center for the Scallop Stitched Circle frame around the opening.  The sentiment was printed out and cut with the MFT Slanted Banners die (not finding link in store).  I’ve also used MFT dies for the snowflakes (also not shown in store), that was cut from some Brutus Monroe Fallen Snow Glitterstock.  I’ve added some silver Stickles to the centers of the snowflakes and dotted around the front of the card.

I’ve also used some snowflake papers for the inside area of the card from the Candy Land Paper Pack from MFT as well!

Check him out below as he spins around:

What’s different about this particular spinner card is how I’ve used a single digital image to create the front AND back of this Foxy Skater guy!

To see how I’ve put together this card for the spinner action, check it out in my video below or you can watch it on You Tube HERE:

I still have this card along with the other interactive card from my last post sitting here on my desk playing around with them! Not sure I can give them up quite yet as I’m having fun!! LOL!

Vicki-DDS-Spinner Fox Card video-close

Here’s a closer look at the cute “Foxy Skater” guy that twirls around on the card.  I was going for a bit of a textured look on his fur, so I also used a white gel pen to mix in some white fur on his cheeks, chest and tail areas. I’ve also used a gel pen for the cheeks and a metallic gel pen for his skate blades.   It was a little more time consuming to color in two fox images, but as you can see, it’s totally worth having both sides for this spinner action design! 🙂

To flip the image in the opposite direction, I used Word doc. on my computer, copied the original image so that it was the exact size, pasted him again and then used the “rotate” setting to flip him in the opposite direction.

Check out the video to see how I was able to fussy cut him down for my card design.

Vicki-DDS-Spinner Fox Card video-flat

I hope you’ve enjoyed my spinner card today and that the video is helpful for you to create your own fun version during the wintry cold months ahead of us!

Thanks so much for stopping in today my friend and I’ll be seeing you soon!

Challenges I’d like to enter this card for:

  1.  Shopping Our Stash – Winter blues
  2. Through the Craft Room Door – Anything Goes
  3. The Male Room – It’s Snowing!
  4. Creative Moments – Anything Goes
  5. Penny’s Paper-Crafty – Anything Goes #463
  6. CCEE Stampers– CCEE2004 “Ice, Ice Baby!
  7. Aud Sentiments – Anything Goes + sentiment

The Skiing Bandit Raccoon in Action with Video!

Hello friends!  I hope you’re having a great week!

As I mentioned in my last post, it’s really cold and snowy over my way so I thought I’d join in with the winter season and have a little interactive fun in my craft room!  (Where it’s much warmer inside! LOL!)

I have used some Digi Doodle Studios products to create this really fun interactive card design:

Vicki-DDS-Pull Tab Slider Racoon

This cute little critter is just having a blast! 🙂  This card was so fun to play with and I couldn’t put it down!  This cute critter is the Skiing Bandit Raccoon digital stamp from Digi Doodle Studios.

I’ve colored him up with my Copic markers and used a glitter silver gel pen to color up his skiing poles.  He was fussy cut out with scissors. You will notice that his scarf and mittens resemble the background papers too, which were paper pieced from the Digi Doodle Studios Winter Plaids N’ Patterns Digi Paper Pack.

To create the scene, I’ve die cut some ‘hill slopes’ with a die cut, but you could use just scissors to cut one yourself.  I die cut a set of trees for the background  and ended up inking up the edges of the snow hills along with the banner sentiment at the top.

What’s fun about this card is that when you grab that little arrow at the bottom left of the card, this little skiing bandit starts flying down the glittery snow hills!

If you’d like to see how this card moves along and how to create one for yourself, be sure to check out the video below or watch on You Tube HERE!

I thought that the invisible way he flies over the hills along with the idea of how to create your own slider mechanics with scraps is something fun that anyone can put together with items they have on hand!

Vicki-DDS-Pull Tab Slider Racoon-close

And of course here’s the view of him flying down the hill as the arrow slider tab gets pulled from the card!  The pull tab slider sentiment comes from the Digi Doodle Studios Snow Days Sentiments set, which is what I’ve also used at the top front of the card.

For the sentiment on the pull-tab slider, I’ve taken a marker and underlined part of the sentiment and added an explanation mark on the end.

I also decided to stamp a black arrow at the end of this slider so that when it’s tucked inside, you can see that arrow so the recipient knows what to do!  You could of course just use a pen to draw your own arrow as well.

Vicki-DDS-Pull Tab Slider Racoon-flat

I hope you’ve enjoyed my interactive slider card today!  I’m still having fun pulling that skiing raccoon over the snowy hills! LOL!  I think this would be a really fun card to send along to a friend for a smile during these cold months, don’t you?

Thanks so much for stopping in!  I’ll be seeing you again very soon!

Challenges I’d like to enter for this card:

  1.  Sparkles Monthly – Winter Blues
  2. QKR Stampede – #381 Anything Goes
  3. Allsorts – More Than a Single Word
  4. Crafty Friends – Anything Goes
  5. Lil’ Patch of Crafty Friends – Anything Goes
  6. Pammie’s Inky Pinkies – Anything Goes #2003
  7. The Paper Girls – Winter Color Palette

Oh BABY! It’s Shaping Up!

Hello friends!  Hope that you’ve enjoyed a fantastic weekend whatever it was you were doing!  It’s been SO freezing over my way and I’ve been covering up with electric blankets!  Brr!

Today I’d like to share with you a couple of shaped baby cards made with a newly released and adorable Pairables set from Digi Doodle Studios along with a few other fun products from their store…

Vicki-DDSPeciousBabies-Jan21

Check out these shaped baby style cards I made with these ADORABLE little baby images from the Precious Babies Pairables set!  You may remember not too long ago the other baby card I made on THIS POST with the other new set called Little Ones Pairables.

Vicki-DDSPreciousBabies-Jan21-close

I wanted to share a close-up look at the coloring I’ve done with these two sweet little baby images.  I’ve used Copic markers to color them with and then just used a white gel pen for highlights on the cheeks as well as creating polka-dots for the baby girl’s dress on the yellow portions.

It’s hard to tell in the photos, but I covered the baby bottle with a glitter brush pen.

The baby girl was cut out with a circle die and layered over another die cut scallop circle from pink cardstock.  I’ve used my scissors to fussy cut out the baby boy and pop him over the design with foam dots.

Vicki-DDSPreciousBabies-Jan21-girl

For this baby onesie shaped design, it’s actually REALLY simple to do!  It’s just a matter of measuring in, cutting and then circle die-cutting where you need to put the neck hole and leg holes is all!  It is a standard sized A2 top folding card and will easily fit inside a standard A2 sized envelope for mailing which I love!

The pink gingham paper that covers the entire front panel of this card comes from the Digi Doodle Studios Bundles of Joy Digi Paper Pack.

I’ve used the same ribbon for behind the circle panel as well as for the “ruffles” around the neck area.  I just folded up the ribbon to give it that look and attached it along the neck hole line.  I’ve attached a couple of pink ribbon bows on each side as well.

For the arm and leg hole areas, I’ve just used scallop style die cuts and sized them over the ‘openings’ and trimmed them down to fit.

I’ve taken the printed out sentiment from this same Pairables set and trimmed it down to attach along the side of the onesie, used some foam tape to pop up the baby girl image panel and added some pearls to the bottom of the onesie card.

Vicki-DDSPreciousBabies-Jan21-lilboy

For this baby boy bib card, it’s just as simple!  You could use ANY circle die cut you have, but I didn’t happen to have a size that I was looking for, so this scallop circle design was cut from my Cricut machine.  It cut out the light blue and the dark blue layer behind it.  I ended up cutting out an additional dark blue panel to create my full shaped card design.  (This card measures exact size as above for regular A2 sized envelopes!)

The next step was using a circle die to die cut through all of these scallop circle layers for the neck opening on the bib.  I’ve used a score board to score a line on the top layer only (as the bottom was the back/inside of the card and didn’t need score lines.) and added the ribbon before securing the top two ends (behind the buttons) to the back of the card panel so that it opens like a regular top folding card.  (I also added an additional light blue circle panel to the inside for a message.)  The ribbon is secure and doesn’t interfere with the opening of the card.

I’ve used another circle die to cut a piece of paper from the Digi Doodle Studios Baby boy Digi Paper pack.  Obviously this was also cut out for the bib neck line as well.  I tied a bow with white twine on the buttons before gluing them down on the top ends of the bib.  I printed out the sentiment from the DDS Little Ones set and cut it out with the same circle die that I’ve used for the papers and trimmed it down into a strip and added another dark blue layer behind that to attach to the front of the bib.  I popped up the baby boy and the wood block with foam dots over the card and added some blue pearls along the side.

Thanks so much for joining me here today and I’ll see you again soon!

Challenges I’d like to enter:

  1.  Daring Cardmakers – Something ‘NEW’
  2. Arty Divas – Anything Goes #13
  3. Through the Craft Room Door – Anything Goes
  4. A Bit More Time to Craft – Anything Goes
  5. The Creative Crafters – Anything Goes
  6. Cute Card Thursday – What’s New?
  7. As You Like It – Anything Goes