Lavina Christmas

Happy Friday friends!  As my “Countdown to Christmas” continues, today I’m bringing you a card I’ve made using some “new to me” stamps!

Vicki-LavinaChristmas

I’ve been very intrigued with seeing some of my blog friends out there using these very magical silhouette style stamps and loving what they’ve come up using them!  So I decided to make a purchase or two or so of these and have a play!  🙂

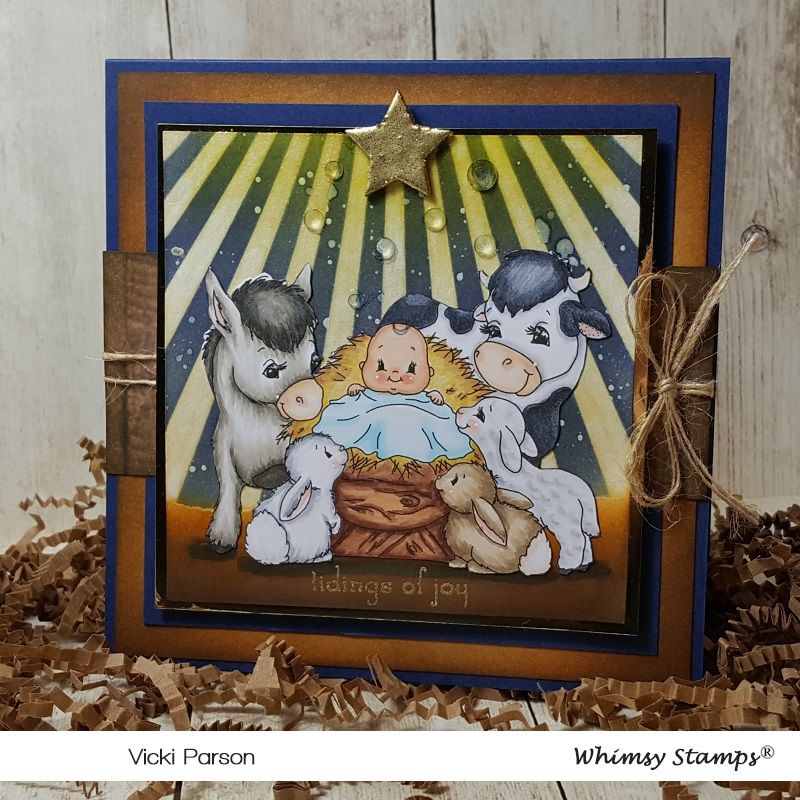
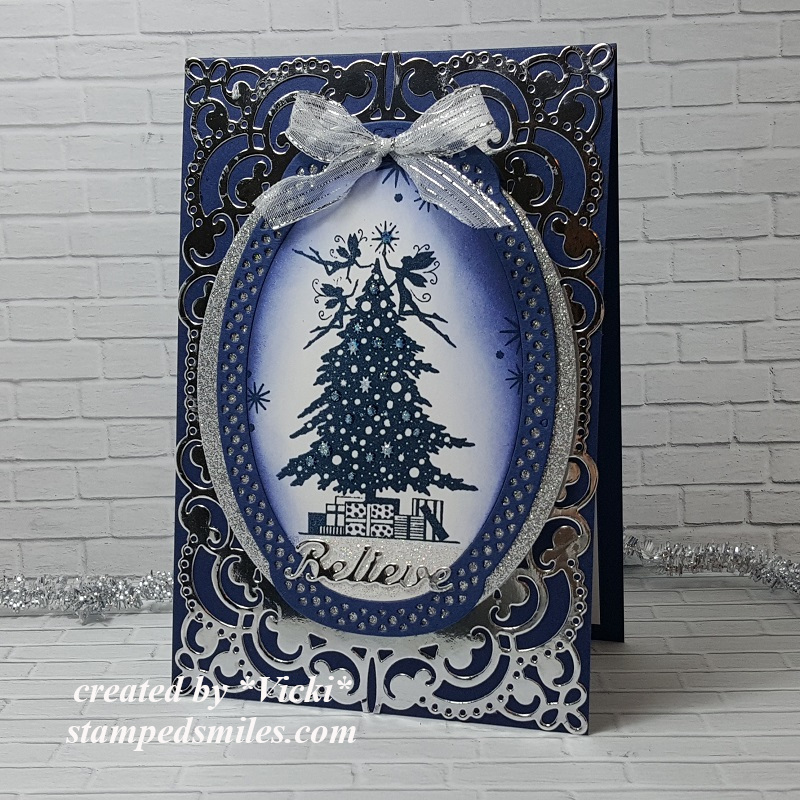
I’ve used the Christmas Eve and the Stars 2 Miniature Lavina World stamps for my card design here.  I’ve stamped the images out over some white cardstock with a Navy ink and then used some blue distress ink to sponge around the edges with.

For the layering of this card, I’ve used the Spellbinders “Chantilly Paper Lace” die along with some of my regular oval shaped dies.  I’ve also used an older Die-Versions “Believe” die cut for the sentiment.  That along with the large background panel were cut from some Silver Mirror cardstock.

The oval layers in the background were matted with some Silver Glitterstock along with some Navy cardstock which is also what was used for the card base.  I’ve added a silver metallic ribbon bow at the top.  I based the size of my card with the die cut so it is more of a 4″ x 6″ sized card rather than a standard A2 size.

Vicki-LavinaChristmas-close

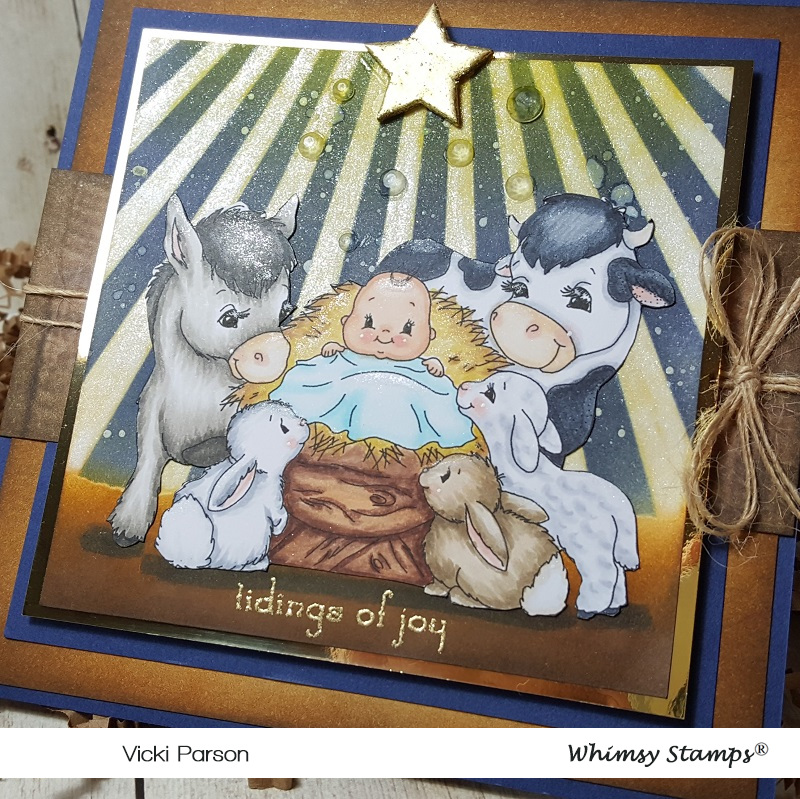
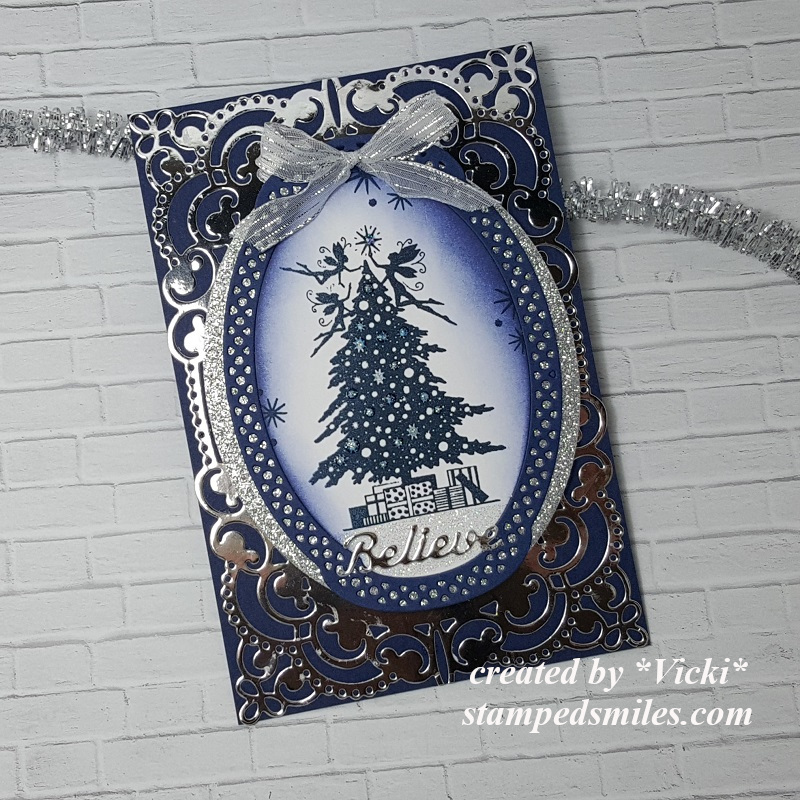
Here’s a closer view of the image where you can see that I’ve added some Stickles “Star Dust” glitter in certain areas on the tree as well as the star on top.

I also covered the bottom of the image panel with a glue pen and then sprinkled on some dazzling diamonds glitter to give the appearance of snow on the ground.

Vicki-LavinaChristmas-flat

This isn’t my usual “coloring in” cute style that you’re used to seeing from me, but I really enjoyed putting this one together and playing with my new stamps!  I hope you’ve enjoyed it as well!

Thanks so much for stopping by today!  I’ll see you again soon!

Challenges:

  1.  Lavina World Challenge – Anything Goes + NO digital
  2. Sparkles – Add Glitter & Sparkle
  3. Jan’s Digi Stamps – Anything Goes
  4. Watercooler Wednesday – WWS252 Anything Goes
  5. Cute Card Thursday– Anything Goes
  6. Creative Knockouts– Anything Goes
  7. The Paper Girls – Holiday Lights (Fairies lighting the tree!)

Gnome Better Holiday!

Hello friends!  Have you noticed the craze over the gnomes this season?!  Well I guess I jumped right on board with it and got a little love crazy with them myself! LOL!  This particular one really grabbed my heart though…

Vicki-DDSGnomeSanta

Check out this guy!! LOL!  This image is called, of course, Santa Gnome from Digi Doodle Studios!

Again, with this being a Christmas card for mailing, I wanted to keep it somewhat simple and flat, so I used the entire image panel for my card and trimmed it down to layer over an A2 sized black card base.

I thought it would be fun to pair this image with a couple of strips of the digital paper from the Digi Doodle Studios Buffalo Flannels Collection, so I added a strip to the top and bottom.  I also used a scallop die cut border to cut out a piece with black cardstock along the edges as well as a strip of gold cardstock under those strips for a border.

Before attaching the bottom buffalo check strip, I wrapped some gold twine with a snowflake button and bow over it.  I took the sentiment and a couple of snowflake stamps from the SSS Gnome for the Holidays stamp set and stamped them on the image panel with black ink.

Vicki-DDSGnomeSanta-close

Here’s a closer view of the image and how I’ve got him all colored up with Copics.  I used a red gel pen to color in the “hollies” on his hat and a gold gel pen to color in his belt buckle.  I then took a glue pen and covered his outfit trim with glitter.

You will also notice a bit of dimension on his face.  I printed out this image twice and one of them I only colored up his nose and moustache, fussy cut it out and then used some foam tape to pop it up over my colored up image panel.  Just thought it would be cute!

Vicki-DDSGnomeSanta-flat

Really had so much fun making up this card and this cutie really has me feeling festive for the Holidays now!  So what do you think?

Thank you for stopping by today!  I sure enjoy hearing your thoughts as they make me smile!

Challenges:

  1.  Sunday Stamps– SSC220 Keep it Open Sketch
  2. The Sisterhood of Crafters – Anything Christmas
  3. Penny’s Paper-Crafty– Anything Goes
  4. Use Your Stuff – It’s Christmas Time!
  5. Always Fun – Santa Claus
  6. Arty Divas – Anything Goes
  7. Tuesday Throwdown – Anything Goes
  8. Crafty Gals Corner– ‘Tis the Season

Christmas for a Cleaning Lady

Hello friends!  As I continue on here with my “Countdown to Christmas” sharing, I’ve also received a request for a Christmas card that I needed to work on along with my own Christmas cards! LOL!  The request was from someone that wanted me to make something special for their “cleaning lady” and here’s what I came up with:

Vicki-CAAB-Comission

I actually didn’t realize how hard it was to find  a variety of this type of occupation in a digital stamp.  (I didn’t have time to purchase anything and wait for it to get here, so I had to look up something in digital format.)  This person was requesting this type of image specifically and so I sent photos of different images I found and this is the one that was picked out for me to color.

I’ve not heard of this company before, but in searching for this type of image and the one that was ultimately picked is called Spring Cleaning-Version 1 from Cute As A Button Stamps and Design.

Because it needed to be a Christmas card, I needed to make it more “Christmas” than “Spring”…so I just tried using more traditional Christmas colors with it.  Found a nice plaid background paper with a pretty die cut to go along the edge that was cut from some silver mirror cardstock and then added the Christmas sentiment with a bow from some seam binding and then a twine bow with a glossy dot in the center.

Vicki-CAAB-Comission-close

Here’s a closer look at the coloring I’ve done on the image.  The eyes were requested to be brown, but I just took the image and again, added in the red and green colors for a Christmas themed look to it.

For the vacuum wheel, I added a silver brad in the center and the handle was colored with a gel pen as well as the “grommets” on her shoes. I used a white gel pen to create the “dots” on the bottom of her apron.  I covered the pail and the liquid in her spray bottle with a glitter brush pen.  You can also see the “foam” from her pail that was made with some liquid applique.  I just heat set it to make it “puffy”.

I used a stitched rectangle die to cut her out with and then sponged on some light green around the edges.  I did the same for the sentiment that was cut from a stitched circle die and then layered with a green piece cut from a scallop circle die.

Vicki-CAAB-Comission-flat

I think the colors and the silver accents really helped pull this together for a fun Christmas card tailor fit for a “Cleaning Lady”!

The person who commissioned the card has received it and was very pleased with it and even gave me an extra tip for it!  That was not necessary, but very appreciated of course!  I’m happy that it was well received and I enjoy the coloring too!

Hope you’ve enjoyed my share today and I’ll be back again tomorrow with some more Crafty Christmas sharing!  Thanks so much for stopping in!!

Challenges:

  1.  Cute As A Button Challenge – Anything Goes #51
  2. Not Just Cards – December Anything Goes
  3. QKR Stampede – Anything Goes #376
  4. A Bit More Time to Craft – Anything Goes
  5. The Creatie Crafters – Anything Goes #23
  6. Createful Heart Design – Anything Goes #15
  7. Lil Patch of Crafty Friends – Anything Goes
  8. Pammie’s Inky Pinkies – PIP1950 Anything Goes

Christmas Makes Countdown!

Hey friends!  I hope you’re having a great start to your week!  I have been in the Christmas making card mode the last few days and just finished sending out over twenty cards I believe.  I had previously made a few and already had those sent out over seas too.  I actually still have just a couple more to make for a few people close to me and I’ll be finished.

So I thought since I’ve been doing Christmas makings, I’d share some things that I’ve been working on with you!

Vicki-WS-snowglobe-KACCristmasswap

Here’s a fun “Snow Globe” shaped card that I had actually made for the Kit And Clowder Christmas card swap.  I made it in November and had actually sent it out the last week of November.  I just wanted to make sure she received it before I posted it anywhere and she did!

I have used this really sweet digital image from Whimsy Stamps called Snowman and Snowflakes by Crissy Armstrong.  I had to make it a certain size so that it would fit with my “Snow Globe” design.  So I’ve used a stitched die cut circle to cut it out with so that it could be placed on the inside of the card design.

If you would like to see how to put one of these shaped cards together for yourself, then you can check it out HERE on Splitcoast Stampers for the tutorial.

I’ve used some fun papers for the bottom and die cut a stitched scallop circle frame from some gold mirror cardstock and then used my MS “goo border punch” for the snow drip edge at the top.  I even took some white Staz On ink and stamped a few snowflakes over top of the acetate piece on the front of the card.  I added some gold ribbon and a holly sprig from Prima around the bottom.

Vicki-WS-snowglobe-KACChristmasswap-close

Here’s a closer view of the image and how I’ve got him all colored up with Copic markers.  I’ve also taken a glue pen and added some extra glitter to the snowflakes around the image as well.

Vicki-WS-snowglobe-KACChristmasswap-open

And when you open the inside of the “Snow Globe” card, this is what it looks like with the sentiment.  I have used a retired Whimsy Stamps clear stamp set called “Christmas Greetings” to stamp both the “happy” sentiment in red ink as well as the snowflakes on the piece of acetate with White Staz On ink.

I then took the Whimsy Stamps Christmas Large Word die and cut it out with a piece of gold mirror cardstock and glued that to the inside bottom of the card.  I also took some white ink and sponged around the edges of this entire inside.

I haven’t made one of these Snow Globe cards for quite a while, so that was fun to do!  I hope that you’ve enjoyed it too!  Thanks so much for stopping in today and I’ll see you again soon!

Challenges: 

  1.  Make My Monday – Anything Christmas
  2. Crafty Cardmakers – Christmas
  3. The Holly & Ivy Christmas – Anything Christmas
  4. Papercraft – Christmas
  5. Sweet Stampers – Anything Goes
  6. Try it On Tuesday – Christmas is Coming!
  7. Crafty Creations – #404 Anything Goes
  8. Cute Card Thursday – Anything Goes

Bringing You Joy With Digi Doodle Studios

Hello friends!  I hope you are having a wonderful weekend!  It’s getting closer to the big day now!  Only 11 more days until Christmas!  If you’re like me, then you wait until the last possible minute to mail out all of your Christmas cards!   So guess what MY plans are this weekend?! LOL!  Have you got all of your Christmas done and ready to go?  I keep telling myself that NEXT year I will be prepared! LOL!

To help inspire those that are still looking for a fun and simple Christmas card, I have a cute one to share with you today using a Pairables set from Digi Doodle Studios:

Vicki-DDSWintertimePenguins-Joy

You probably remember not too long ago the fun tags I made on THIS POST.  I’ve used that same Pairables Wintertime Penguins digital set that I’m using on my card today!  I love that you can get a whole set of digital stamps that coordinate together so that you can use them to create fun scenes or have them doing different things!  Do you recognize the sled that this penguin is pulling full of gifts?  I took that same sled image and used it as “ice skates” for the penguins feet on my tags in the previous post!  That’s how fun and versatile this set can be!

This time my card is really simple.  I just arranged the images how I wanted them on my computer and printed it out.  I printed it again over some masking paper so that I could mask off the images to create my background.

To create the background, I ripped a piece of the masking paper to go along the bottom of the die cut panel after I masked off the images.  I used ink blending for the background and then spritzed with water and dried it with a towel.  I then took watered down white paint and splattered it for the snow effect.

Once it was dry, I removed the masks and colored up the images, made the sentiment (also from this same digital set) banner and mounted both pieces with some red cardstock which was mounted over an A2 sized white card base.  I added some glitter to the snow ground at the bottom and on the penguin’s hat.  Topped it off with some twine and a snowflake rhinestone.

Vicki-DDSWintertimePenguins-Joy-close

Here’s a closer look at the coloring details of the penguin and his sleigh full of gifts.  I used a white gel pen for dots on the one present and his cheeks.  I also took some pencils for a few highlights.

I kept this card flat except for the sentiment banner so that I can mail it better.  You could even leave it more flat than that if you prefer.

Vicki-DDSWintertimePenguins-Joy-flat

If you know me, then you know how much I love penguins.  I have a special collection of stamps and will probably always keep them around.

I hope you’ve enjoyed my card today and perhaps this little cutie has brought you some joy too!

Thanks so much for stopping in today friends!  See you soon!

Challenges:

  1.  Arty Divas – Anything Goes
  2. Tales From the Craft Room – It’s Christmas!
  3. Penny’s Paper Crafty– Anything Goes
  4. Cardz for Galz – Cute Christmas
  5. CRAFT – Christmas Present
  6. Let’s Craft and Create – Anything Goes with optional:  “Let it Snow!”
  7. Crafting With an Attitude – Anything Goes
  8. Winter Wonderland– Anything Christmas Goes

DDS and PND Collaboration Blog Hop is Here!

Hello friends!  Today is the “special day” of our really fun and festive Collaboration Blog Hop!  Hope you will be joining along with us for lots of inspiration and prizes!  Woohoo!

MY HOLIDAY HOP PROJECT:

I am on the Digi Doodle Studios Design team and here is my interpretation of combining each companies’ images together to come up with this fun snow scene for the Holidays:

Vicki-DDSandPND blog hop

For my card here I have taken the Digi Doodle Studios Penguin Wobbles Special Delivery digital stamp along with the Paper Nest Dolls Holiday Friends digital stamp and printed them out over a piece of Copic Blending Card.  I’ve colored them up and fussy cut them out for my scene here.

To create the scene, I’ve used some blue cardstock for the background and splattered some watered down gesso over it and then used a die cut to create the fun frame within it.  I layered it over a piece of gold cardstock so it shows through.  I also die cut some snowy hills with white glitter cardstock and some pine trees with green cardstock.

I arranged them over my blue cardstock panel  and created the scene.  I popped up the front layer of snow hill along with the penguin image with foam tape.  I covered this snow hill layer with some texture snow paste…it’s so glittery!!  I also added some more glittery details here and there on the images too.

I white heat embossed the sentiment and placed a peppermint candy embellishment next to it and attached the strip over the blue background.  I then mounted this entire scene layer over some fun and festive foiled striped papers and then onto another blue piece which was then mounted over a top folding white 5.5″ square card base.

Vicki-DDSandPND blog hop-close

Here’s a bit of a closer look at the images and how I’ve colored them up with Copic markers.  You can see that I’ve used my white gel pen for details on the bow in the present along with the shinny look on the candy cane and the cheeks of all the images.  I’ve added a few dots on the deer’s back tail too.

I’ve used a gold gel pen to color in the sleigh runner, the band around the gift sack, the “lettering and dots” on the penguin’s sign as well as the bells the little girl is holding.  I used a red gel pen to color in the little deer’s nose.  I’ve used a green gel pen to create “dots” on the penguin’s present and the deer’s bow.

I’ve also added some glitter to the heart candies and the girl’s outfit trim.

You can also see just how puffy and dimensional that snow is too! It’s really glittery and was so fun to add to the scene!  It looks like they’re gearing up to deliver some presents and the cute little Mr. Penguin Wobbles is all loaded and ready to go! LOL!

Vicki-DDSandPND blog hop-flat

I really hope that you’ve enjoyed my card today and have been inspired with it in some way to get you into the festive Holiday spirit!

Thanks so much for stopping in today my friends!

Challenges:

  1.  Stamping Sensations– Dec Anything Goes
  2. Love to Craft – LTCCB41 – Dec Anything Goes
  3. Lil Patch of Crafty Friends – Anything Goes
  4. Shopping Our Stash– Happy Holidays!
  5. Crafting By Designs – Dec Anything goes
  6. The Paper Funday – Dec Anything Goes with optional twist:  Christmas Holiday
  7. Winter Wonderland – Anything Christmas Goes

I’ve Been Published!

Hey friends!  This is just a quick post to share my excitement with you about having a card I made for Whimsy Stamps published in the December 2019 “Handpicked” article on p. 38 of the Making Cards & Papercraft Magazine!

Vicki-published in Making Cards magazine

I would’ve shared this a bit sooner, but I wanted to take a photo of the issue in hand with me here.   The stamp set that I’ve used for my card is from the brand new December release at Whimsy Stamps called “Winter Wonderland“.  It’s a clear stamp set with lots of really sweet snowman images in it!  It’s one of my faves from the new release too!

Vicki-WSmagazine-WinterWonderland

Here’s a photo of it that I took myself before sending it along to the magazine back in October.  🙂

I won’t go into great detail about it, but I’ve also paired this with the Whimsy Stamps Winter’s Magic Blue Digital Papers Collection as well as the Whimsy Stamps No-See All Seasons Tree die set (snowflakes only die) for my card design.

If you get the magazine, then you can see below in the article how it was put together.

Vicki-WSmagazine-WinterWonderland-close

Here’s a closer view of the image and you can see the bits of glitter over it.

Vicki-WSmagazine-WinterWonderland-flat

This was just a really fun card to make and quite simple to put together too!  I really enjoyed it and how fun to get published with it as well!

Thanks so much for stopping in and letting me share my excitement with you!

P.S.  I have a spot along the sidebar of my blog where there will be a photo of the magazine to click on my blog post link in case you’re interested about my card.

Cute Card Thursday – Anything Goes with Reindeer Farts

LOL!  Hey friends!  Did I grab your attention with my title today?!

Today starts a brand new challenge over at Cute Card Thursday and it’s an easy ‘ANYTHING GOES!’  Since it’s the first Thursday of the month, we are being sponsored by Whimsy Stamps!  Yay!  So please be sure to remember to add whatever creation you’re working on over in our gallery this week!

*News update:  This will be my last challenge as a design team member for Cute Card Thursday.  I have really loved being apart of the team and the wonderful ladies over there for over a year and a half. I wish them all well.  I’m sure I’ll be playing along in future challenges of course!*

Here’s the card I made with products from our sponsor:

Vicki-CCT611-WSReindeerFarts

BWHAA!! HA! HA!  Yep, I’m most positive it’s probably been that cold out over my way!  LOL!  It’s supposed to get down to the teens next week! Brr!

This hilarious digital image is called Reindeer Farts by Dustin Pike from Whimsy Stamps.  It comes with the sentiment which I wouldn’t want it without that!  LOL!  This image was released back in October, but with all of the Halloween going on, it sort of didn’t get a good “spotlight” on it, so I thought now would be a good time to pull it out and perhaps send it out to my brother for Christmas…which he’ll get a kick out of!  🙂

I started out with a white cardstock panel cut with a stitched rectangle die with the printed out sentiment at the top of it.  I pulled out the Whimsy Stamps Snow Flurry clear stamp set and white heat embossed some snowflakes in the background.  I ink blended some  Distress Oxide Inks over top of them in the colors:  Salty Ocean, Wilted Violet, Mermaid Lagoon and Blueprint Sketch.  I spritzed some water over it, dapped it with a paper towel and once completely dry, I stamped out some more snowflakes in a few of the Distress Oxide Inks over that to give it a little depth.  The ink marks left over the white snowflakes were easily wiped away because the heat embossing resists the inks.  I covered this entire panel with a Shimmer Spray.  (You can see it in the photo below!)

I layered this piece onto a purple cardstock base and then layered it over a blue piece of cardstock cut from a stitched A2 sized rectangle die which was then mounted over a top folding A2 sized white card base.

I’ve used some White Glitterstock and cut a “snow hill” for the deer with a stitched hillside border die and glued that to cover the entire bottom of the card.  I also took another strip of that Glitterstock and used my MS goo border punch to create the small border above the sentiment, which generates a more “cold feeling” to the card.

Vicki-CCT611-WSReindeerFarts-close

I’ve printed out the deer image with Copic Blending Card, colored it up with Copics and then fussy cut it out…including the “fart cloud” and popped it up over the snowy hill with some foam tape.

Before attaching it to the glittery snow hill, I took a couple of Copic markers to create a bit of shading for the deer standing on the snow.  I also took a white gel pen and added some dot markings on the back of the deer.

You can also see where I’ve added some glossy accents to his eyeballs and I even took some Star dust glitter and added it to the snowflake in the “fart cloud”.

Vicki-CCT611-WSReindeerFarts-flat

Well I hope you got a giggle from my card today! LOL!  This will be a fun one to send along!

Thanks so much for stopping in today and I’ll see you soon!

Challenges:

  1.  Creatalicious – #176 Anything Goes with optional Winter
  2. Sparkles Christmas– Winter Wonderland
  3. A Bit More Time to Craft – Anything Goes
  4. Crafts Galore Encore – Anything Goes
  5. Cute As a Button – Anything Goes with optional twist:  Let it Snow!
  6. Cardz 4 Guyz – Christmas Critters
  7. Creative Inspirations – Festive Fun

Tidings of Joy with Whimsy Stamps

Hello friends!  It’s December and that means Whimsy Stamps has fun things coming out!

I have this really sweet card just perfect for this time of the year….

Vicki-WSChristmasManger-Dec3

Today I’m sharing this really sweet image called “Christmas Manger” by Crissy Armstrong.  Isn’t this just as precious as can be!  You may remember a card I did last year IN THIS POST with a penguin style manger.  Really love Crissy’s sweet images and I’m thinking I may have to start collecting her mangers she comes out with each year now! LOL!

After coloring up this image, I’ve fussy cut it out while I worked on the background design.  I started by ripping a piece of masking paper and covered the bottom portion of a square 4″ piece of cardstock.  I took a “Light Ray” stencil and ink blended some Chipped Sapphire distress ink over it.  While the stencil was still on it, I took some white watered down paint and splattered over the background.  After removing the stencil, I let that dry while cleaning up my stencil and work area.  After it was dry, I took some Scattered Straw and Mustard Seed distress inks and blended over top.  I then took a glitter brush pen and went over each of the yellow strips in the background.  (I also covered the tops portions of the images too.  You can see this all better in the photos below.)  Lastly, I’ve used the other side of the masking paper that I ripped to cover up the sponged rays and ink blended with Rusty Hinge, Walnut Stain and Ground Espresso.  I used a marker to add some shading around the image and glued it down.

For the card, I’ve used a navy 5.25″ square card base and I’ve also used it as part of a layer behind the image panel along with a piece of gold mirror cardstock.  It’s hard to completely see this, but I’ve printed out some digital papers from the Whimsy Stamps Christmas Red, Gold and Green collection as well as the Whimsy Stamps Rustic Wood and Brick Collection.  The background was sponged with the same colors that I’ve used for the bottom of the image panel.  I’ve used some twine for the center strip area and tied a bow along the side with it.  The image panel layered with the Gold Mirror cardstock was popped up with some craft foam over that.

I’ve used a wooden star that I’ve heat embossed several times with some Gold Sparkle EP which is what I’ve used to heat emboss the sentiment at the bottom of the image panel from the Whimsy Stamps Holiday Mini Sentiments.  To finish it off I’ve decided to add some Studio Katia Sparkling Crystals.

Vicki-WSChristmasManger-Dec3-close

Here you can better see the sparkle and shimmer on the yellow “light rays” as well as the tops of the images where the light might be shining on them.  I’ve got the image colored up with my go-to Copic markers.

You can also see the sparkle and shine on the wooden star and sentiment from the gold sparkle embossing powder.  Plus of course the shine from the gold mirror cardstock.

Vicki-WSChristmasManger-Dec3-flat

I hope you’ve enjoyed my card today!  I sure had fun putting it together and I know someone special that this needs to get sent to as soon as I can!  Time is running out for it to make it on time!  Oh yes…that dreaded time running out is near isn’t it?! LOL

Thanks so much for stopping by today!  I appreciate you being here!  I will be seeing you again soon my friends!

Challenges I’d like to enter this card for:

  1.  Creative Knockouts – Winter/Holidays
  2. Daring Cardmakers – Anything Crafty with theme Shining Lights
  3. Crafty Friends– Anything Goes
  4. Merry Little Christmas – December Anything Christmas Goes
  5. Country Views– Stars
  6. Crafty Animals – #33 Anything Goes

Teddybear Tags for 2 Crafty Critter Crazies

Hello friends!  Welcome to December!  We have already arrived at the final month of the year!  Can you believe how quickly this year went by?!  The first of the month means it’s time for a new challenge to start over at 2 Crafty Critter Crazies!  Remember that it is an always “ANYTHING GOES + A CRITTER“.   I love adding critters to my crafty projects so it’s easy for me!  🙂

Since I’ve been on a tag making binge, I’ve got some more to share today:

Vicki-2CCC33-tags2

Isn’t this the cutest little bear?!  We’re sponsored this month by Beccy’s Place and I have opted to try out this cute freebie that she has offered on her blog called Stanley’s Bauble.

I thought he was too cute and I wanted to try coloring him up in a couple of different ways and even a couple of different sizes too!

I just took my Sunny Studios scallop circle tag dies and die cut a couple of them in my selected color choices of course to match up with his bauble and then I’ve die cut some coordinating circles and pattern papers to match.  He was fussy cut out and placed over top of the tag.  I’ve added some silk ribbon for both and added a twine bow around them.

Vicki-2CCC33-tags-red

Here’s  closer view of the Stanley’s Bauble red and black tag.

For this tag, he’s a bit larger than the other an he was popped up over the tag with some foam tape.  I’ve colored the bauble hanger with a gold gel pen and then went over the red bauble with a glitter brush pen.

Vicki-2CCC33-tags-blue

Here’s a closer view of the smaller tag.  The light has caught this one just right to where you can really see the glitter brush over the blue bauble.  I’ve also colored his bauble hanger with a silver gel pen.

The circle layer behind the snowflake paper was cut from some silver glitter paper.  I’ve taken a Simon Says Stamp sentiment strip and cut it out, sponged it with blue ink and glued it above the bear.  Since he was smaller than the other bear, I had room for a sentiment.   He was just attached with glue this time.

I hope you’ve enjoyed these teddy bear tags today!

Challenges:

  1.  Fab ‘n’ Funky – Anything Christmas Goes
  2. Penny’s Paper Crafty – Anything Goes
  3. Polkadoodles – Anything Goes
  4. QKR Stampede – #374 Anything Goes