Guest Designing for Digi Doodle!

Hello friends!  I’m back today to share some fun news with you!!!!

I’m very excited to finally be able to share with you that I’m guest designing for

Digi Doodle Stamps!

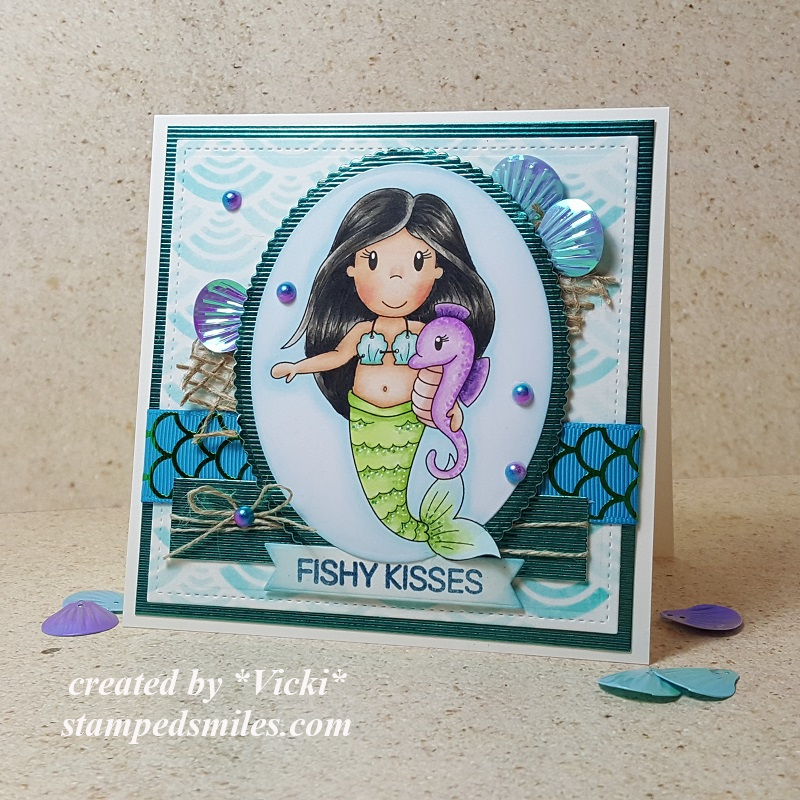
Today, I’m sharing my first card for them with this really adorable image:

Vicki-DDLovesMeNot-June7

I have used the Loves Me Loves Me Not digital stamp to create my card.

What I had in mind when making this card was all of that crazy rain we were having this past month and how it seemed to never end.  I also loved the flowers she was holding because my daisies came up in my back yard and they really make me happy seeing them bloom.  So I combined this image with some rainfall in the background and took away the petals from the image to make it appear as if she’s holding out her hand in the rain!  🙂  Hubby has been taking extra great care of me while all of this rain was happening around us and I think this would be a special card for someone who always seems to bring out that happy sunshine no matter the weather!  (His favorite color is blue!)  Wink wink

Vicki-DDLovesMeNot-June7-close

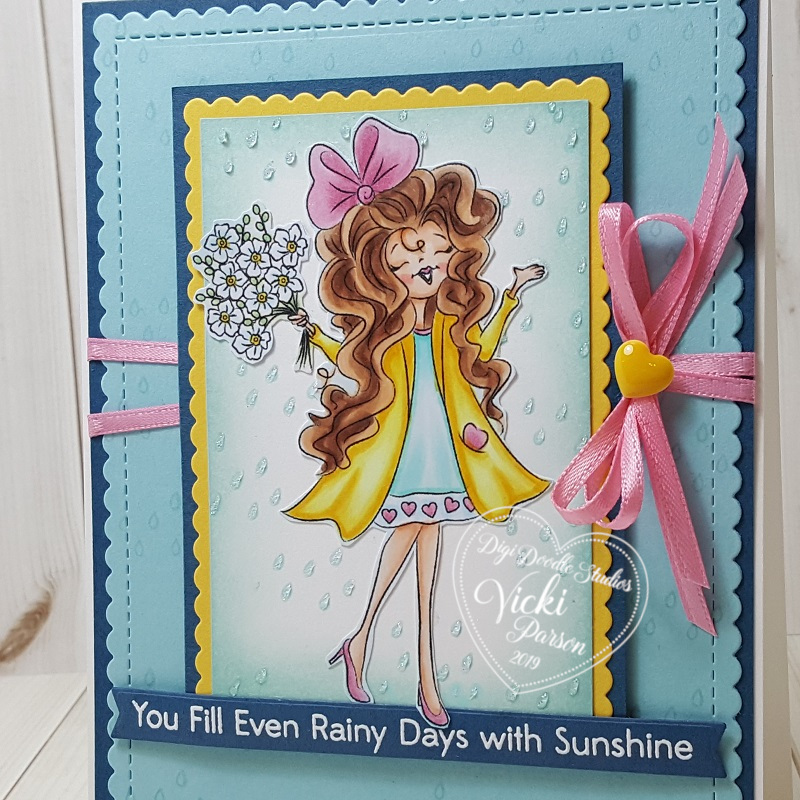
Here’s a closer view of the coloring I’ve done on her with Copics.  For the background, I’ve taken a white panel and stamped some rain drops from another stamp set in my stash.  I fussy cut out my colored image and attached her over top of that rain panel.  I took some Nuvo Glitter Drops and added them over the rain drops in the background behind her.  I also white heat embossed the sentiment (From MFT) and cut it out with a banner die and slipped that under her foot when placing it on my card.

It’s hard to tell in the photo, but I’ve covered her bow and top of her hair with a glitter pen to make it look like she’s been wet in the rain.

Vicki-DDLovesMeNot-June7-flat

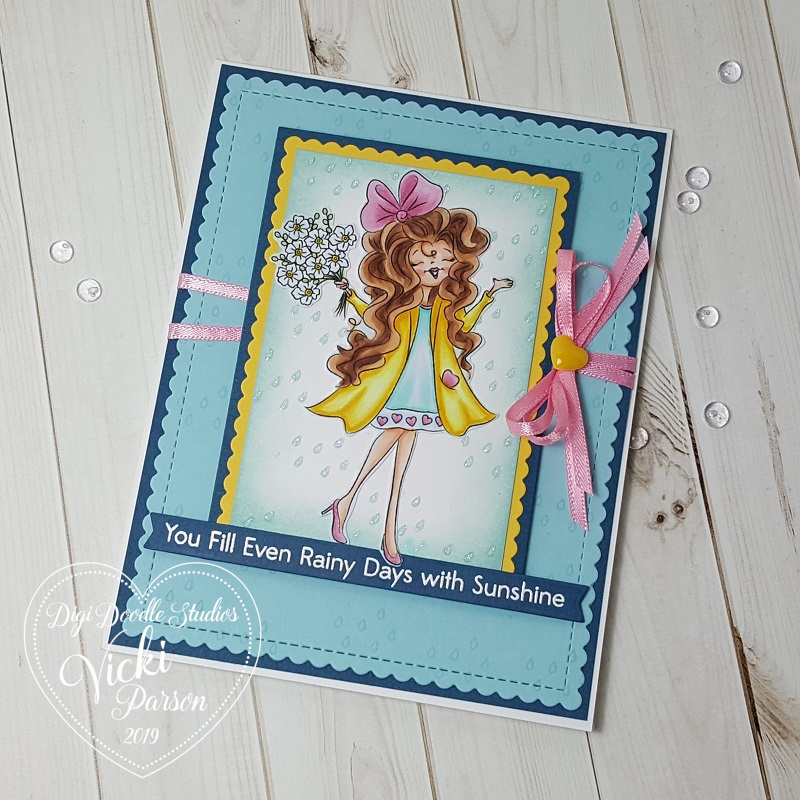
For the rest of my card, I’ve added the raindrop background light blue stitched scallop card panel over a dark blue layer and attached some pink ribbon around them.  I’ve added the bow to the side and then attached a yellow enamel heart over that.  These panels were mounted over an A2 sized white top folding card base.

Lastly, I’ve added the image panel and mounted it over the yellow scalloped panel and another piece of dark blue cardstock that was attached with foam tape.

I hope that you’ve enjoyed my card today and it brought you a smile!  Thank you so much for stopping by with me today!  I will be having another really super fun post to share with you tomorrow, be sure to stop by!

Challenges:

  1.  Love to Scrap – Anything Goes
  2. Creative Craft Cottage – Eileen’s Anything Goes (Digi Doodle is sponsoring!)
  3. Pammie’s Inky Pinkies – PIP1922 Anything Goes
  4. The Paper Girls – Top 5 Faves (Coloring, sparkle, hearts, ribbon, flowers)
  5. Watercooler Wednesday – WWC224Anything Goes Feminine
  6. Crafting with an Attitude – Anything Goes

Anything Goes at Cute Card Thursday With Curly

Hello friends!  I hope you’re all having a wonderful week so far!!  It’s really starting to feel like Summer now with the warmer temps!

Today is a new challenge this week over at Cute Card Thursday!  This week we have our “Anything Goes” challenge with our sponsor Whimsy Stamps!  So of course, I am using a cute image from Whimsy Stamps for my card today:

Vicki-WSCurly-June6

Tee hee!  This little guy holding the tiny “sea creature” makes me smile and giggle!  I’m not really sure what reaction he has about it!  His name is just as cute too!  This is Curly from Whimsy Stamps.  I thought he needed a scene, so I made one for him.

I started with some Bristol Smooth watercolor paper and masked off the line between the sky and the sand.  I used my Distress Inks to blend in the colors.  After doing the sky, I thought that it was a bit too dark, so what I did was take a baby wipe and swiped it across which lightened up the colors the way I wanted them for the sky.  The bottom “sand” portion was also masked, and I blended the bottom blue color into the sandy colors which created a nice shoreline.  I then took a water bottle and spritzed some water droplets over it to create “texture” for the sand.  I also took some Copic markers to create more texture with the pointillism technique, plus added some white ones with a gel pen.  the water at the bottom was covered with a glitter pen.  (You can see better details in the photos/description below.)

Vicki-WSCurly-June6-close

So, I’ve got him all colored up in the following Copic markers:

  • Flippers/water gear – B32, B34, B37, Y11
  • Swim Trunks – R32, R35, R37, Y11, Y15
  • Sea Creature – BV23, BV29
  • Hair – E41, E43, E44, E47
  • Skin – E000, E00, E02, E11, E21, R20
  • I used gel pens to color lines on trunks and cheeks, I’ve used a glitter pen over the “sea creature” and his flippers along with the bottom water area.

I fussy cut this image and used some liquid glue to attach over my scene.

Vicki-WSCurly-June6-flat

For the scene, I stamped the birds in the sky and a star fish image from an older Whimsy Stamps clear stamp set. I then took the sentiment from the WS Everyday Mini Sentiments and white heat embossed it over a black strip of cardstock and then used my scissors to cut out a banner to attach over the scene.  I layered this over another piece of black cardstock that was attached to an A2 sized top folding white card base.

Lastly, I’ve taken some WS It’s a Party enamel dots and added them to the card.

Hope you’ve enjoyed my card today! Thanks for stopping in!  I’ll be seeing you tomorrow for some fun news!

Challenges for this card:

  1.  A Bit More Time to Craft – Anything Goes
  2. Crafty Friends – Men/Boys
  3. Sweet Stampin’ – World Ocean’s Day/Anything Goes
  4. Use Your Stuff – Summer Fun
  5. Always Fun – Summer Fun
  6. Unicorn – For the Men/Boys

Bee Happy for Whimsy Stamps June Release!

Hello friends!  There is so much to “bee” happy about for sure!  It’s been sunny out lately; it’s the weekend and I have some fun creations to share with you for the Whimsy Stamps June digital release today! 🙂

Vicki-BeHappy-June1-Trio

Check out these ADORABLE bees!!  I have made 3 different cards because I just couldn’t stand not being able to color each one of these which are all included in this set!  I have used Crissy Armstrong’s “Bee Happy” digital stamp set.  This is a set that was previously released as a stamp set, but now available in digital format starting this month!  Good news that you can now choose between either format you prefer!

I’ve sized each of these bees in the format to fit onto a 4″ square card design.  I’ve cut them out with a hexagon die cut and layered another black piece of cardstock behind each one.

For the background, I’ve taken a yellow piece of cardstock slight smaller than the 4″ square top folding white card base and embossed it with a fun hexagon embossing folder.  Before attaching them to the card base, I’ve added some black ribbon at an angle over it.  I then attached the image panels and added the ribbon bow which I then placed a bee wooden accent to the center of each one.

The story with the black splatters actually came about from an accident I had!  I opened up a black shimmer pen over top one of the cards and it had a leak in it!  When I popped open the cap, it spilled all over my card!!  OH NO!!!  Obviously, I had all of my cards done at this point and I loved the way I had colored them….so I just decided to “go with it” and added some more splatters to each one.  I actually like the way it looked after I completed it!  They look like “busy bee’s” now! TEE HEE!

Vicki-BeHappy1-BeeMine

Here’s a closer look at the “couple bees” image.  For each one of the hexagon image panels, I’ve taken a black marker along the edges to make the stitch lines.  I went around the edges of the image panel with some Tumbled Glass Distress Ink and ink foam blending tool for each card.  Also, for the sentiments on each card, I found an old “bee” style stamp set and used it to go with them.  I believe that the “Bee Happy” rubber stamp set comes with sentiments that go perfectly with these cuties!

Here’s how all of the bees were colored up with the Copic colors:

  • Wings/around bees – B00, B000
  • black stripes/nose/feet and hands – W9, W7, W5
  • Yellow stripes – Y17, Y15, Y13, Y11, R20 (cheeks)
  • The tiny heart from the sentiment was colored with Y15 and then I’ve added some Nuvo Glitter Drops over it.
  • All the wings for each card were covered with the Wink of Stella Glitter Pen.

Vicki-BeHappy2-BirthdayBee

This little dude was so fun to color up with his party accents! 🙂  Here are the Copic colors I’ve used for the accessories:

  • bag – E87, E84, E81
  • hat balloon, party hat, tissue from bag – V12, V15, YG11, YG13, YG25, YR04
  • I’ve covered the purple on his hat with the Nuvo Glitter Drops
  • The wings and balloon were covered with the Wink of Stella Glitter Pen

Vicki-BeHappy3-BzzzFriend

I just love how he’s trying to hand out a flower to you! 🙂  Here’s the following Copic colors that I’ve used for the flower:

  • flower stem – YG61, YG63
  • flower middle – Y15 (I covered it with the Nuvo Glitter Drops again)
  • flower petals – R32, R35, R37
  • His wings were covered with the Wink of Stella

I hope you’ve enjoyed my bee creation today!  Please be sure to BUZZZZ on over to the Whimsy Stamps store!

Thanks so much for stopping by and I’ll see you again soon!

Challenges I’d like to enter:

  1.  Through the Craft Room Door – Anything Goes
  2. TGIF – #TGIFC214 Create a Set!
  3. Aud Sentiments – Nature + a sentiment (hoping bees are apart of nature)
  4. Creative Knockouts – Embossing Delight (embossing folder on each card)

2 Crafty Critter Crazies Has So Mushroom

Hello friends!!  Yay!  Welcome to June!  I am hoping that this month will be a bit more dry than what it has been lately.  I’m growing tired of flash floods!  Rain vibes sent to those that need it too!

Today starts a brand new monthly challenge over at 2 Crafty Critter Crazies as well!  So please hop on over there and play along with us!  It’s an easy challenge!  All you have to do is add a critter somewhere on your project!  That’s it!

So here’s what I’ve made for the challenge:

Vicki-2CCC27-RickDennis

Isn’t he a cutie?  Now, I’ve never seen a teddy bear on a mushroom before, but they look so happy together, so I think it works! 🙂  Our sponsor for this challenge is Rick ST Dennis and we were provided some images to use.  I’ve used one of the images from the 2 Bearii Kawaii digital stamp set.

After coloring him up, I’ve used the Lawn Fawn Stitched Rectangle dies to cut him out with and then I’ve used some Tumbled Glass Distress Ink and an ink blending tool to go around the edges with it.  I also used this ink and tool to sponged some clouds in the background on a white piece that was cut with another Stitched Rectangle die.  I thought it would be fun to add some splatters, so I carefully covered up the image and added some splatters with the same distress ink that was watered down and splattered both the cloud background and image panel.

For the bottom of the card, I cut a piece of green card stock with the LF Mushroom Border die.  I also used this die set to cut out the mushrooms with some vanilla and red cardstock.  I white heat embossed the punny sentiment at the bottom of the grass border from the LF Oh Gnome stamp set.  I’ve attached these borders to the bottom of my cloud panel and lined it up to cut it out again with the stitched rectangle die so that it matched with the background of the card.

I then added some twine around the cloud panel and then attached this piece over top of a white top folding A2 sized card base.  Lastly, I took some foam tape and added it to the image panel and then attached the twine bow with the chipboard heart in the center of the bow.

Vicki-2CCC27-RickDennis-close

Here’s a closer view of the image details.  I’ve colored the image with Copic markers and then went over the bear’s bow with a glitter brush pen.  The white dots on the mushroom was covered with some Nuvo Glitter Drops.  For a bit more personality, I have decided to take a black marker and make dots in the center of the eyes on both the mushroom and the teddy bear.  I’ve also added some white dots on the teddy bear’s cheeks.

Vicki-2CCC27-RickDennis-flat

I have to say that this card was so fun to put together!   I hope you have enjoyed it too!  Thanks so much for stopping in today!

I will have another post coming up shortly to share a new release with you!

Challenges I’d like to enter:

  1.  Double Trouble – (Doesn’t begin until June 3rd!) – Use a Critter and used cloud stencil in the background.
  2. Sweet Stampers – Animals
  3. Simon Says Stamp Wednesday – Anything Goes

It’s Masculine at Cute Card Thursday!

Hello friends!  Hope you are all having a wonderful week so far!   I’m ready for this rain to end over my way and would love to send it along to those that need it!  June is a hop-jump and a skip away, so I’m hoping that Summer will dry things up.

Speaking of June, Father’s Day will be coming up shortly for us here in the U.S. so the new challenge at Cute Card Thursday is a very timely one to have!  We’d like to see your “Masculine” creations this week!  Here’s what I’ve come up with:

Vicki-CCT584-Bugaboo

LOL!!  Our sponsor this week is Bugaboo Stamps!  I have used this hilarious image called Gus Tidbits Unconsciousness.   He’s a really good one to use for not only masculine, but humorous creations too!

For the card, I’ve printed out both the image and sentiment together and then cut out the panel with a stitched rectangle die and then layered a piece of Stampin’ Up! Soft Suede behind it.  Before attaching these pieces together, I’ve sponged some ink around the edges of it.

The checkered paper that I’ve used on my design came from a My Favorite Things paper pad collection.  I die cut a piece to layer over a top folding A2 sized white card base with another stitched rectangle die and then placed the image panel over top it on the card.

I also cut out a banner with the same papers and added it to the upper right image panel and then added on a chipboard clock button from my stash with some twine ribbon tied around it and placed it over the banner with some foam tape.  I’ve added a wooden button in the center of the bow.

Vicki-CCT584-Bugaboo-close

Here’s a better look at the coloring on Gus.  You can see on his eye glasses where I’ve added some glossy accents.  It was a really fun and simple card to create!

Vicki-CCT584-Bugaboo-flat

I hope you’ve enjoyed my masculine creation today!

*P.S.  Here is another update on the bird nest…we have a baby!!

baby bird nest

baby bird nest2

If you remember, there were 3 blue eggs in the nest.  We can’t tell for sure, but it looks like just one baby bird in there.  As you can see, there is one egg in there.  We see what looks like a crack on it, but it hasn’t hatched and we’re not sure it will.  We have no idea where the other egg/bird went to!  There is nothing on the ground.  With all of these severe thunderstorms and rain, I can imagine they’re having a hard time out there.  It shouldn’t be too much longer that this little guy will be taking flight!  So we’ll see if we can keep track of what’s going on from here! 🙂

Challenges I’d like to enter my card for:

  1.  TGIF – #TGIFC213 All About That Gingham
  2. Papercraft – For Men & Boys
  3. Watercooler Wednesday – WWC223 Anything Goes
  4. Simons Says Stamp Wednesday – Anything Goes

Thinking of You with Fleur

Hello friends!  I hope that you had a lovely weekend!  Here we are with the last week of May already and Summer is showing itself in many ways right now.  I do love seeing the flowers everyone has been sharing posts of with their yards full of blooms coming up everywhere!

Today I have this card using a cute Whimsy Stamps Digital stamp:

Vicki-Fleur-May28

This cutie was released this month by CC Designs called “Fleur“.

I just love the ring of flowers in her hair!  I’ve actually printed her out twice so that I could cut a few extra flowers to add to the accents of my design!

For my card, I’ve taken a panel from the Rustic Woods and Brick digital papers and used that for the background of my design.  I took a marker and added some dash marks for a stitch look.  I added this piece to a 5″ square top folding suede card base which I sponged around the edges with some white ink.  I did the same for the die cut fence panels and the circle layer behind the image.

I’ve taken a piece of decorative paper from my stash and sponged some ink around it and also wrapped some organdy ribbon around it before attaching to the card front base.  I then die cut some grass to go over my fence border.  My image was cut with a stitched circle die and sponged around the edges with the same ink as the decorative paper.  This was layered over top of the suede circle panel, and these were popped up with some craft foam.  I’ve added the bow and the cut-out flowers from the extra printed out image and then I’ve added a flower gem in the center of the bow.  Each flower including the ones on the image were filled with some Nuvo Honey Gold Glitter Drops.  I stamped a sentiment from the Whimsy Stamps Everyday Mini Sentiments clear stamp set with the same suede color ink.

Vicki-Fleur-May28-close

Here’s a closer look at the coloring on this image.  I’ve used the following Copic colors to color her in with:

  • Hair – Y00 (used for base), Y11, YR21, YR24, YR27
  • Skin – E21, E11, E00, E000, R20
  • Outfit/Shoes – E89, E87, E84, E81
  • Flowers – BG000, BG10
  • White gel pen used for cheeks and around hair flowers.
  • Ground/shadow – C1, E0000

You can also see the details from the Nuvo Glitter Drops that I’ve used in the center of the flowers including the one in the center of the bow.

Vicki-Fleur-May28-flat

Thanks so much for stopping by!  I enjoy reading your thoughts! 🙂  See you soon!

Challenges:

  1.  Little Red Wagon – Flower Frenzy #498
  2. The House That Stamps Built – M2219 Anything Goes
  3. Pammies Inky Pinkies – PIP1921 Anything Goes
  4. Crafting From the Heart – Anything Goes

Paper Nest Dolls Guest Design Spot with Fishy Kisses!

Hello friends!  Happy Memorial Day and I hope you’ve been having a great weekend!  I would like to take a moment on this day to stop and give thank you and remembrance to all of the U.S.  service men and women who’ve served our country.  Your service will never be forgotten.

I am very excited to share a card I made with an image that Christine sent me to play with from the Paper Nest Dolls!  I’m sharing my card as a Guest Designer for her and I’m thrilled to be apart of it with her adorable images!

Vicki-PDMermaid Ellie Seahorse

I am using this CUTE image called Mermaid Ellie with Seahorse for my card. Isn’t that little seahorse she has her arm around adorable?!  She was so much fun to color too!

There is just so much shimmer/shine and sparkle on this…so I hope I can capture it all for you!  For the card, I’ve used the Tonic Basic Oval dies to cut her out with, but I’ve used the “Out of the Box” technique and cut out her tail before cutting the rest of the oval.  You can see in the photo below how I’ve slightly curled her tail upwards.

The background of the card was done with a stencil and ink blending.  I thought it was so fun as it reminded me of the scales!  I cut this piece out with a square stitched rectangle die and then layered a piece of aqua colored mirrored cardstock that I’ve also used as an oval layer behind the mermaid image as well as a strip at the bottom.

For the strip at the bottom, I’ve wrapped around some linen thread and tied a bow with it.  I’ve also wrapped around some ribbon to the layered stencil and mirror cardstock panels and then attached them to a 5″ square top folding card base.

I’ve taken a sentiment and heat embossed it with some “Mermaid Tail” EP and cut it out with a word banner die and sponged around the edges of it which I slipped under the first layer of the oval cut mermaid.  I’ve added some burlap and a few of the sea shell sequins behind the oval image panel and popped her up along with the sentiment banner with some foam tape.  Lastly, I added some half-back pearls randomly over the design.

Vicki-PDMermaid Ellie Seahorse-close

Here’s a closer view of the image and all of the shimmer and sparkle details.  I’ve colored her up in the following Copic markers:

  • hair – 100, W9, W7, W5, W3, W1
  • Mermaid shells – BG13, BG10 (covered with glitter brush pen)
  • Mermaid Tail – YG25, YG13, YG11, BG000 (pointillism with darkest and blender 0 and also green and white gel pens.  The fin at the end was also covered with a glitter brush pen.)
  • Mermaid Skin – E21, E11, E02, E00, E000, R20
  • Seahorse – V17, V15, V12, R11, R00, R000 (pointillism with V colors and blender 0)
  • Shading – BG000

Vicki-PDMermaid Ellie Seahorse-flat

It’s hard to see it from the other angles of the card, but it looks like the sentiment heat embossed with “Mermaid Tail” shows more of the shimmer in it as well as the ribbon.

Challenges:

  1.  Cheerful Sketches – using sketch
  2. Tuesday Throwdown – Stenciling
  3. CCEE Stampers – CCEE1921 – Use a die
  4. QKR Stampede – #349 Anything Goes
  5. Cupcake Inspirations – CIC471 – mermaids

More Calendar Months

Hello friends!  Yay!  Happy Friday!! 🙂

So I know that I haven’t been on here in a while to share calendar months that I’ve been working on and would you believe that I had actually had forgotten about continuing on with them?!   The first week in May came by and I went to look for the next calendar month to display….and it wasn’t made yet!!  LOL!

So here I am almost at the end of May with my calendar…it has been displayed for the last week though! 🙂

Vicki-Calendar Month May

It has most certainly been the “sneezin’ season” around where I live!  The wind blows that pollen everywhere!  I know how this little guy is feeling!!

Again, for all of these, I have used the Taylored Expressions 3×4 Calendar panels with the printed design at the top.  (of course mine are the 2019, but if you click on the link, it will take you to the 2020 calendars!)  I have slightly cut the edges off so that I could make a layered panel behind them and still keep the 3×4 size.

All images came from the Taylored Expressions Calendar Grumplings stamp set and coordinating dies.  I’ve used the sentiment from the set and made a banner with it that I’ve tucked underneath the elements from the Build-a-Scene Calendar dies.  I’ve colored all the critters with Copic markers.

Vicki-Calendar Month June

LOL!  This is my June month and I’ve decided to color this guy with spots!  the only thing different I did here was introduce the tree with the TE Build-a-Scene Trees dies.

Vicki-Calendar Month July

OMG!  I had so much fun with this guy!  It reminds me of the kids when, you know, you’re out celebrating for the Holiday and they want something, you say “no” and they’re grumpy and tired…so they have that frown face holding a sparkler!! LOL!  The little stars were cut with silver sparkle paper from the TE Build-a-Scene 5×7 Calendar dies and the frame was cut with blue sparkle paper from the TE Build-a-Scene Calendar 2 dies.  I die cut the sentiment out with a banner die from MFT.

Vicki-Calendar Month August

I’m thinking that when it gets August over my way, I will probably be feeling like this!  LOL!  I’ve used the TE Build-a-Scene Calendar dies for both the frame and the sun on this one.  I’ve covered the center of the sun with some glitter and the sentiment was cut out with the same banner die from MFT.

Vicki-Calendar Months-May-Aug

So now that I’m all “up to date” on my calendars, I will have some time to not only finish out the rest of this year, but hopefully when the next time comes to make another batch of these to finish out the year, I will also start making up the calendars for 2020 so that I’m finished and AHEAD of it before the year starts!!  Remind me about August to see if I’ve been making those calendars, will you?

I hope you’ve been enjoying seeing these calendar months progress as I’ve been making them…those grumplings really make me smile!

Thanks so much for dropping in today!  Have a great day!

Challenges:

  1.  Addicted to Stamps & More – Make Your Mark (Copic coloring)
  2. Crafting By Designs – Feature a Creature
  3. Creative Moments – Anything Goes

Cute Card Thursday is Square

Hello friends!  It’s “Hip to be Square”, right?!  That’s what the theme of this week’s new challenge is over at Cute Card Thursday!  So please hop on over and check out the inspiration and play along with us!  Here’s the card I’ve made for the challenge:

Vicki-CCT583-square

What better card to make than one for a crafty friend! 🙂   I’ve used a past Simon Says Stamp card kit from February 2018 for this one.  I thought that I would carry the “square” theme throughout the design. – It’s great to pull out past kits and have a play with them!

The stamp set is called SSS Crafty Friends and I’ve randomly stamped some of the images on a vanilla-colored cardstock and then cut out each one with a stitched square die cut.  I’ve also used the same die to cut out a square piece of decorative paper contained in the kit which also has a colorful square pattern on it.

For the paint pallet image as well as the tube of paint panels, I took some of the watercolor provided in the kit and added it for some color with a water brush.  I took some twine and wrapped it around the top left panel with the hearts and sentiment and then placed the bow over top.  I then added the scissors wood veneer over top which was also included in the kit.  The turquoise-colored cardstock base and squared layered panels also came from the kit as well.

Vicki-CCT583-square-close

Here’s an even closer look at the different squared panels.  You can better see the watercolor over the panels as well as the turquoise colored Nuvo Glitter Drops that I’ve added to the paint tube on the bottom panel.

Vicki-CCT583-square-flat

Hope you’ve enjoyed my “SQUARE” card today!

Thanks so much for dropping in!  I’ll see you soon!

Challenges:

  1.  Crafty Friends – Anything Goes
  2. Pammie’s Inky Pinkies – PIP1920 Anything Goes
  3. Through the Craft Room Door – Anything Goes
  4. Crafty Creations – Anything Goes

It’s Party Time!

Hello friends!  It’s been sort of a crazy few days with our weather!  Usually it’s pretty warm and sunny, but we’ve been having some severe rain and cooler temps.  Plus more rain coming, so I guess I’ll be in my craft room playing!  🙂

Today I have this happy party fellow from Whimsy Stamps to share with you:

Vicki-WSPenguin Bday Party-May21

Isn’t he adorable?!  This image is called Penguin Birthday by Crissy Armstrong.  This was previously released as a rubber stamp, but this month it has been released in digital format so you can have either option available!

I have cut him out with the Whimsy Stamps Notched Squares die set and cut an additional piece in black cardstock for a layer behind him.  For the base of my card, I’ve used a green colored 5″ square top folding card base and attached a piece of striped paper across the lower section and sponged some white ink along the edges of the green card base panel.  I then used a piece of 1/2″ score tape across the top of the striped strip panel and then used some fun glitter over top of it and burnished into the tape.

I’ve also used this same glitter to go over the Whimsy Stamps Happy Large Word die cut out from some double-sided sticker paper.  I white heat embossed the “birthday” over a strip of black cardstock that I’ve cut into a banner and placed it directly underneath the glittered word die.  This came from the Happy Everything Clear Stamp set.

Vicki-WSPenguin Bday Party-May21-close

Here’s a closer look at the coloring I’ve done on this cutie.  You can also see the fun details of the glitter that I’ve used on the word die.  I love the sort of “confetti flex” contained in this glitter.  It’s something I got in a sample size from a card kit a couple of months ago and it’s great for birthdays! 🙂  Hard to see in the photo, but I’ve also used a clear glitter pen to go over the balloon and present.  I sponged around the image panel with some of the same green ink that I’ve used for the card base cardstock color.  I’ve used the following Copic markers to color him with:

  • Penguin – C8, C5, C3, C1, R00, R000, YR27, YR24, Y32
  • Balloon, party hat, present – YG01, YG11, YG13, V17, V15, V12
  • Shading, shadows, ground – C3, C1, E0000

Vicki-WSPenguin Bday Party-May21-flat

It’s always nice to have a good selection of birthday cards on hand when you need to hurry up and send one out and I think this one is great for any gender or age.

Challenges:

  1.  Little Red Wagon – Happy “BIRD”day!
  2. Creative Fingers – Anything Goes
  3. QKR Stampede – #348 Anything Goes
  4. Allsorts – Happy Birthday!!!
  5. Seize the Birthday – Anything Goes + toppings=Balloons!!

P.S.  I know that many of you have been asking for updates on the bird nest situation and so here’s another photo of what we were able to capture:

20190520_185442

After the flowers were done blooming, we were able to get more of a clear shot and CAREFULLY get close enough to get the mother Robin sitting on her nest!  Like I had mentioned, she doesn’t like it when we go out there.  She chirps at us and waits for us to leave.

20190520_184645

Here is one of her standing in the nest.  We think that she may have hatched those eggs as it looks like she might be feeding the babies!  So next time we’ll check back in and see if we can get a look at those babies in there! 🙂

Hope you’ve enjoyed my post today!  Thanks for stopping by and I’ll see you soon!!