Creative Artiste Guest Designer with Altered Mixed Media Frame

Hello friends and welcome to May!  I’m happy to see this month come with all of the beautiful Spring things that pop out like the flowers and sun with the warmer temps!  I look forward to going out and working in the yard soon!  Hope that you’ve had a wonderful week and look forward to a great weekend!  I’m getting ready for a fun crafty retreat and I’m really looking forward to crafting with friends!

5 May 2023

I’m super excited to be a guest for this month’s challenge over at the Creative Artiste Mixed Media Challenge!  If you’ve been around, then you know how I enjoy creating a few mixed media projects once in a while besides my Art Journaling that I do each month.  The theme is always “Anything Goes” with Mixed Media, so this time, I decided to make some altered art with an old frame:

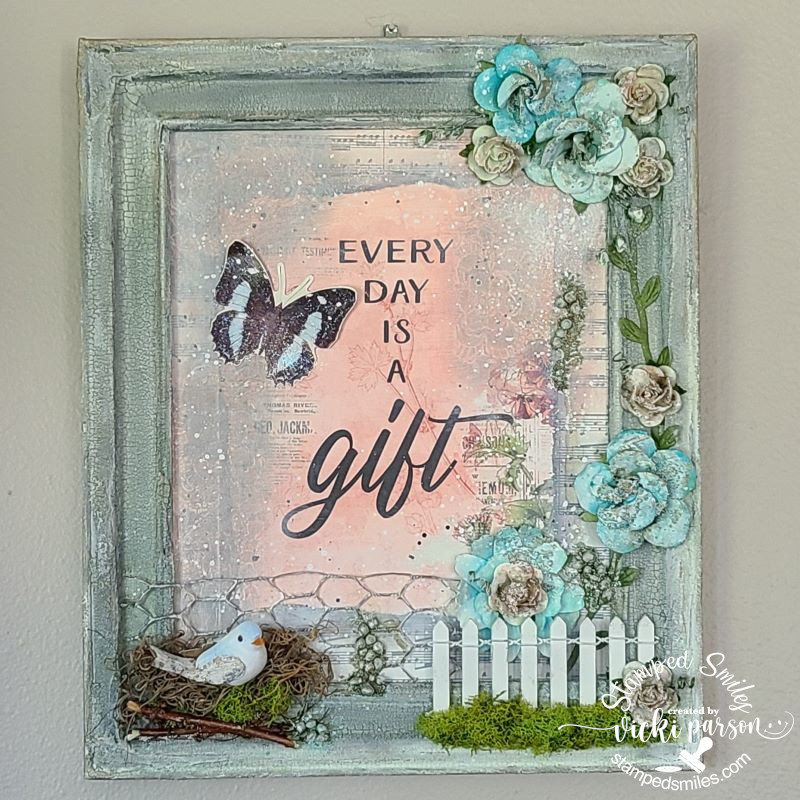
I thought this would be a perfect item to alter with a Spring theme in mind.  I know the frame “looks old”, but it was actually a really old wooden frame that was stained/varnished about 30 years ago!  I’ve sanded, painted, added some crackling paste, and painted over it some more to give it a Vintage “falling apart” look.  I like the texture and the crackling from the paste that came out in it. The total frame size is about 9″x13″ and it’s shown hanging on my wall.

The center of the frame was done using a piece of cardboard sized to fit inside the frame.  (I threw out the glass front as I didn’t have a need for it.)  I had some papers that I thought was so pretty along with the sentiment.  The sentiment was way too large for a card and I thought it would work great for this project.  Of course, the size of the paper wasn’t quite large enough, so I worked on collaging some musical papers around the edges for a border.  I also went over it with a floral stencil and paste, paint splatters and waterproof ink before inserting behind the frame.

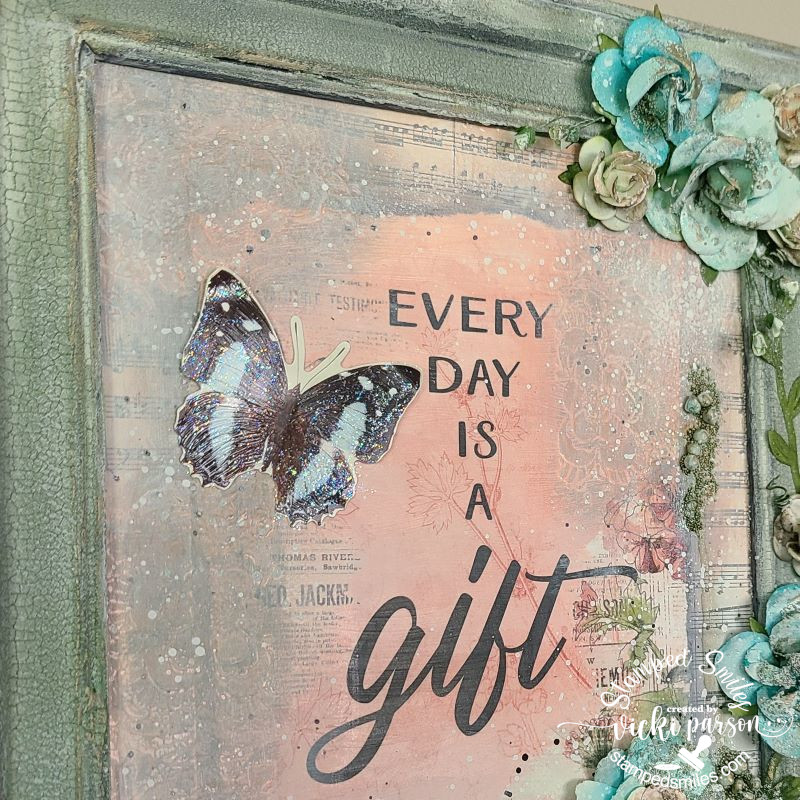
Here’s a closer look at the top of the frame where you can see that I’ve added a butterfly ephemera that was painted with some clear glitter paint and attached next to the sentiment with glue and foam dots on the wings.

I have tons of flowers in my stash, so I’ve created an arrangement along the frame with a vine and different sized flowers that I’ve added with twirled vines.  I’ve used more paint and even some art stones around the flowers as well as various places over the background for texture and interest.  More paints and metallic wax was used over all of these places to keep the Vintage feel to the design.  I tried to keep them coordinated with the papers in the background.  (It’s weird how the colors vary so much when you take a photo compared to what it looks in person.  The top frame photo looks more blue, but it’s actually more this muted green color.)

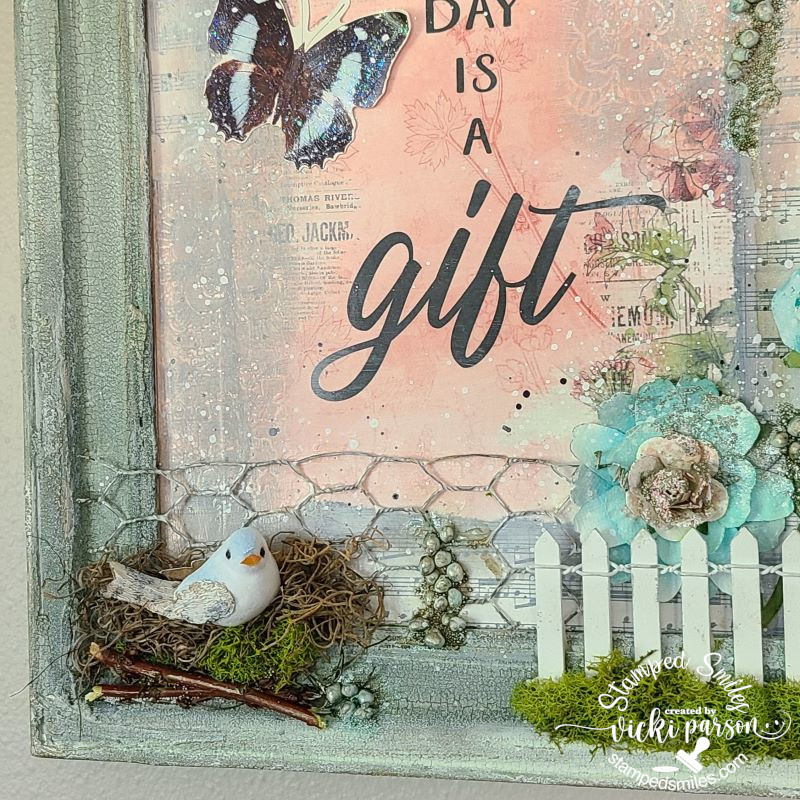
And as you scroll down to the bottom of the frame, you see I have this 3D arrangement with the painted chicken wire against the back panel with the papers.  (the flowers were added on top of that.)  On the bottom left you see I’ve made a “nest” for my bird with Spanish moss and even added a couple of twigs from my backyard underneath it.  I’ve also added a pinch of green moss in there which is also what I’ve used over top of the white picket fence section to the bottom right.  It actually sticks out in front of the flowers.

You can also see where I’ve added some more art stones and paints.  I’ve finished the whole design with some Finnabair white gold metallic wax.  This is hard to capture unless you get really close, but it adds a wonderful detail that brings out lots of the texture in your finished piece.

I really enjoyed creating this altered frame while I was thinking about Spring coming to life outside!  It was also fun to be able to find something I’ve had for so many years and give it some new life!  I hope you’ve enjoyed it as well and I look forward to seeing what mixed media art you make this month for the challenge

Thanks for dropping in today!

Challenges:

  1. Crafting From the Heart – Anything Goes (NO CARDS) challenges are back after 4 years!
  2. Crafting Happiness – Flowers
  3. Pearly Sparkles – Anything BUT a card
  4. Simon Says Stamp Monday – Paint It!
  5. Love to Craft – Anything Goes

Crafty Retreat Results

Hello friends!  I finally found the time to make a post and gather all of my photos together so that I can share a post with you from last week’s “Crafty Retreat” that I went to at my friend’s house.

So the “theme” for the crafty retreat was called “Hats off to Painting!”  The majority of the group likes to tole paint, but we all (including myself) like to try our hands at many other crafting avenues to try different products that we may not be familiar with…so there are some “mixed” projects today I’m sharing!  I had such fun during the entire 3 days!

7558

Here we are with our decorated hats on for a group photo!  Even little ‘Gizmo’ had his hat on, but not sure he was feeling the fun like the rest of us! LOL! (Unfortunately the host was taking the photo!)  We all had our Dick Blick aprons and shirts on which was very kindly donated for our “Painting Divas” group…they were VERY generous with the bag of goodies they gave us!  We had all 3 days worth of fun, classes and prizes!

20190501_141117

So, the reason for all of the fun crafty hats is that we were to take a hat and decorate it for a challenge.  Here is a photo of all of our hats.  There were some really fun and creative ideas as you can see!  One of the girls was quite tired from all of the crafting and decided to take a little siesta during the festivities!  LOL!  It was very cool that I was the winner voted for my created hat design.  (You can see on the table above and here’s a closer look below):

Vicki-Sreampunk Hat

I guess it’s a bit hard to see in the photo above of me wearing it, but I had hubby bring home one of his hard hats from work along with a pair of goggles and then I went to decorating it in “steampunk” style!  I had fun with it and enjoyed the process!

Vicki-Configuration Spell BookVicki-Configuration Spell Book open

Here is the altered “Potions and Spells” book that I taught for the class!  Last year at the “Crafty Retreat” they saw my “altered book” that I had previously made during my time as a Splitcoaststampers.com “Dirty Dozen” DT member and asked if I could teach how to make one for this year’s class.  So instead of the “altered book” idea, I had them all use a Tim Holtz Configuration Book.

20190501_132745

Here are some of the book covers all lined up that we were waiting on to dry before we were able to start painting them.  A couple of the book covers were left at the work table, but while those were drying, we worked on the inside of the book.

20190501_175745

Here’s another photo of me standing there holding one of the books and everyone was finished with their books looking at them at the end of class.  They seemed to really enjoy this messy project!  I just loved teaching these fun ladies too!

Vicki-Santa Gourd Ornament Class

This is from my mom’s class where she taught us this cute Santa ornament that we painted on a gourd.

Vicki-PenguinChill Class

The host lady is the one that taught this cute penguin class!  I adore penguins and I’m so happy that I took the time to finish this up when I got home!

I really hope that you’ve enjoyed all of these projects as much as I enjoyed creating them!  I also had another set of calendars that I finished, but I’ll share on another post on another day as this one is pretty full!!  LOL!

7590

One more thing to share is that we have a robin’s nest with one little blue egg inside.  We have a a Prairie Fire Crab Apple tree in our backyard full of pretty blooms and I guess the robin thought it was a nice place to make a nest…so we’ll wait and see if there is a baby bird coming soon!

HAPPY MOTHER’S DAY to all of you moms out there!  Hope you have a wonderful weekend!!  Thanks so much for stopping by and I’ll see you soon!!

Christmas Non-Card Creations and Final ICAD Week 9 Results!

Hello friends and TGIF!!  Hope you have some happy plans laid out for the weekend!  I will be doing various things including helping my son move!

If you remember my post from last Friday, I shared some hand-made cards that I had entered into my local County Fair.  There are a few other items that I’ve entered besides cards for certain categories and I thought you’d enjoy seeing a few other things that I’ve created just for the fair:

Vicki-Christmas Center Piece-Snowman Hat

My first project was entered into the “Christmas Centerpiece” category, and I was excited to see that I had won first place with this!  Can you tell what I’ve used to create the “snowman hat” design?

Let’s take a closer look…

Vicki-Christmas Centerpiece-Snowman hat1

I asked hubby to save me one of his empty coffee cans and I’ve spray painted it in black.  I’ve also bought a $1.00 charger plate from Hobby Lobby in black and then attached them together to form the snowman hat.  Then I took some white paint and splattered the entire thing for a fun “snow fall effect”.  I then began to decorate it by attaching some ribbon, pine tree sprigs and pinecones.

Vicki-Christmas centerpiece-snowman hat2

I bought a really pretty snowflake ornament with lots of sparkle to use as a center piece for the front of the snowman hat.  The ribbon bow was attached below that and then the pinecone and sprigs were placed and attached in the center of the bow.  (Even the plaid ribbon has some pretty sparkle in it!)

Vicki-Christmas centerpiece-snowman hat-3

For the pinecones and the “snow” over the top of the hat, I have used some embossing paste mixed with some texture stones to give it a thick snow appearance.  While it was still wet, I’ve added some glitter to all of it.  Love the way this turned out!  It will be a great center piece at Christmas time! 🙂

And since I was in a Christmas mood, I also made another item for the Fair:

Vicki-Christmasbasket

This poinsettia basket was entered into the “handmade basket” category, and I was happy to see that I had won first place for this entry as well!  For the fair entry, you can have a basket made of anything as long as it was handmade…so of course I made a paper one! 🙂

Vicki-Christmasbasket3

I remember a while back this awesome basket with a tutorial that someone had made from Heartfelt Creations, and I knew I wanted to give it a try.  It is such a sturdy basket too as I’ve used some pretty heavy-duty paper to compile it together.

Vicki-Christmasbasket1

The papers that I’ve used are actually some pretty old ones from a past Stampin’ Up! collection.  They’re double-sided and you can see the pretty poinsettia pattern on the other side from inside the basket walls.  The poinsettia die was a purchase I had made from a sale item in a booth at that Stamp Convention I went to earlier this Summer.  I love the embossing details it made with the poinsettia flower.  I also took some white ink to pop them out a bit so they’re more noticeable.  There is one on each side of the basket and a smaller one at the top of the handle.

Vicki-Christmasbasket4

I’ve used some gold foil paper for the center of the flowers and then added some gold enamel dots on random spots for the centers.  I took some thin and narrow gold ribbon to the edges of the handle and then tied a triple bow with it and placed the poinsettia in the center.  I just filled the basket with pinecones that I had on hand, but I could see so many things that this basket would work for!  Maybe I need to make one for another Holiday too?!

Well although I made these for the fair, they will be nice to use for my own home and of course the photos do not do justice to what they look like in person!  I had so much fun with these projects too!  (I may still have another project or two to share with you from the fair entries…so keep watching!)

Lastly, I’m also very excited that I have fully completed my ICAD challenge for 2018!!  Yay!!  I cannot believe that I kept up with it the entire time and did a card for every single day the last 61 days in June and July!!  I know that I’ve posted every week what I’ve done, and this is my final set for week 9:

Vicki-ICAD2018-week9

These were so much fun!  Some days were really hard and others I zoomed right through it!  I learned many things not only from other ICADians, but also about myself with art and how it affects me physically, mentally and emotionally.  I am very surprised in more ways than one.  Just when you think you don’t have it in you…you can surprise your own self! Have you ever done something like this?  I urge you to try as it is such a learning experience.

Vicki-ICAD2018-completed

There is just NO WAY I would have enough room to get every single one of these cards in a photo shot!  I had a huge ring binder that I kept them all on and they actually just barely fit on it!  LOL!  Such a fun thing to see all of these together at once and it will be great to go back and look at later too!  Glad I wrote on the back of what each one was.

I hope you’ve enjoyed my post today and have been inspired in some way!  There are SO many crafty things I enjoy doing…. there are just never enough hours in the day sometimes! LOL!!  We crafters can understand that! 🙂

Thanks so much for dropping in, I really appreciate your kind thoughts and read each and every one!  See you soon!

Crafting Retreat Hang-over Plus ICAD Week 7

Hello friends!  Oh no…It’s been a week since my last posting!  I have a “crafting hang-over” if there is such a thing! LOL!  There were so many things to get done after my 3 day crafting stint and I just couldn’t get it all in!  I ran out of steam!

For my 3 day crafting event, it was a local friend who puts together 3 days full of classes, prizes and food! I am still a true blue stamper to the end, but since it was mostly painting, I brought my painting supplies with me and not my stamping supplies.  Here’s a mixed media sample I helped teach for a class:

Vicki-Halloween-AlteredBottle

I had a Jack Daniels bottle to alter and went with that for my sample.  The advantage that I had compared to everyone else is that I had four flat sides which made it a tad bit easier to attached items to it.  These girls were creative and made it work and had fun!  The window that I put on even glows in the dark with some special glow-in-the-dark embossing powder!  I then covered it with some glossy effects for a “window” look.  They are all so cool looking and I loved seeing all the different results!

Vicki-Halloween-Alteredbottle1

A closer look at the bottle and turned to the other side, you can see all of the texture that I attached to the bottle with the flowers, embossing paste, gears, bats, etc.  I was going for a steam punk look for the bottle portion (which is why I went over the texture with just a gold metallic texture paste.)  and I thought it would be cool to make the green goo coming out at the top, so that was fun to paint with a metallic green.  There were lots of little tips and tricks everyone learned along the way.  It was funny because everyone didn’t understand why they were painting over everything they worked so hard putting onto the bottle.  LOL!  After the texture paste, there was the excitement!

Vicki-Halloween-alteredbottle2

This is just another side view of the bottle with the added texture I’ve put on it.  I was able to collect some unique items for everyone’s bottle through my husband’s work in a manufacturing setting that had little metal pieces…no idea what they are, but it was something fun and unique to add texture to the bottle.  And of course I had gears, buttons, stencils with embossing paste, flowers, etc.  The windows and bats were all cut out with some dies that I had.  That window die is actually from Lawn Fawn!  The tiny bone sticking out on the window is of course Tim Holtz.

Painting Divas 2018

Here are some of the girls having fun with their bottles in class.  They are very intently working on getting their bottles just right! 🙂  Of course it’s hard to get everyone together at one time in a photo, but there were a couple more people there including myself not shown.

Painting Divas-2018-Doris-mixedmedia bottles

Here’s a look at the bottles from class!  I think everyone enjoyed this concept and I even had an additional bottle that I made they really enjoyed the other sample that I made too.  So I made a different theme on this one:

Vicki-Mermaidbottle-main

For those that are not Halloween fans, I showed them a completely different look with the bottle.  This is my “Mermaid bottle” that I’ve made with Patina Effect Texture Pastes and copper metallic paints.  I used some sea shells that I have along with some rope, beads, texture paste, cheese cloth and lots of other little tid bits I had on hand.  I  got a cork and used it for the top of the bottle and added a gem on top.  I really like how texturized the paste made the bottle look.

Vicki-Mermaidbotle1

Turning the bottle around, you can see more detail on the bottle along with the charm and tiny jar I have hanging down around the cork at the top.  I painted a silver mermaid charm with some Mermaid Sparkle metallic paint of course and then touched up the edges of it some copper texture paste.  For the bottle, I had a package of tiny bottles and I filled one with some blue sequins and made this tiny tiny label over vellum and attached it to the bottle.  It says “Mermaid Tears”.

Vicki-Mermaidbottle3

On the back side of the bottle, you can see that I’ve made a little “path” for the beads and sea shells to flow all the way around it.  I have taken a mermaid die cut and cut it out several times to create a dimensional look by adding several layers of cardstock together.  I had her sitting on top of one of the stone pieces I’ve attached to the bottle along with some gems above her for a “bubble” affect.  This mermaid die along with some of the stones, gems, pebbles, mermaid charm and the gem on top of the cork all came from a past card kit.

Vicki-Mermaidbottle2

And here is just another angle of the bottle before we come back to the front of it.  It just gives you a better idea of what all the dimension is on the bottle and how I’ve highlighted it with copper metallic paint.  I even had a little toy compass to attach to the front.  I had a piece of decorative paper from an older paper collection that I cut of piece of to attach to the front of the bottle and then wrapped the rope around it.  I gave it a bit of a white wash over it with paint so it fit with the theme of the bottle….old looking.

And finally, yes, when I got home I realized that I was behind on chores around the house as well as my ICAD challenge!  So I sat down yesterday to try and catch up with those so that I don’t get too far behind!  I’m happy to say that I’m all caught up and there is not many left to go either!  Another 2 weeks and it will be complete!

So here are the results of Week 7 ICAD:

Vicki-ICAD2018-Week7

With the theme and prompts given this last week, I didn’t expect mine to be as colorful as they are, but some of them turned out very colorful!  I also enjoyed playing with some things I rarely get out to play with!

So now you know what I’ve been busy with this past week and maybe you’ll excuse me not being around so much! 🙂  Hope you’ve enjoyed my mixed media projects.  I’d love to know what you think!  Have you ever tried mixed media?  Do you like the concept of it?  Just curious how many of you out there enjoy it!  Thanks for stopping in!

Challenges I’d like to enter my bottle(s) for:

  1.  A Inky Mess – Just For Fun (mixed media)
  2. Creative Artiste – Anything Mixed Media Goes
  3. Altered Eclectics – Anything Mixed Media Goes (no cards)