Taylored Expressions Sept Birthday Challenges & Exciting News!🥳

Hello friends!  Happy Friday and are you ready for the weekend?  I’m supposed to be helping hubby with some outside work, but my allergies have been bad and I’m not feeling well.  Hopefully some medicine will be helping so we can get things finished up!

I have been a “grumpy” fan of Taylored Expressions for a few years as you might have seen in some of my past posts…so of course I get “pulled in” by other cute products too and that’s what happened…my story anyway!  In their FB fan group there is a monthly #TEmakerchallenge with prompts to follow as long as you use at least one of their products.  So I’ve made a fun card for this month I’d like to share:

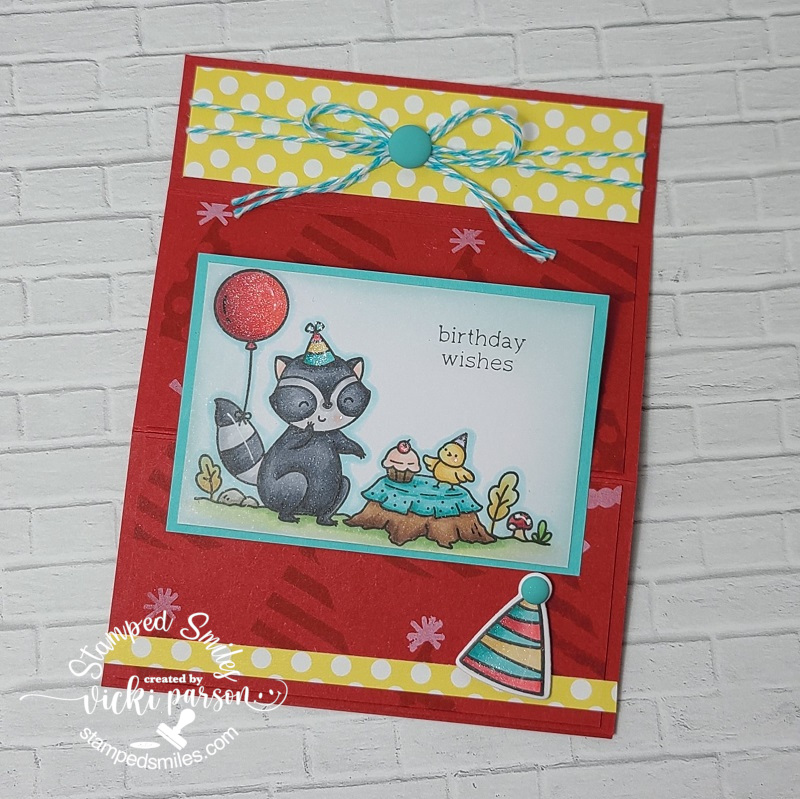
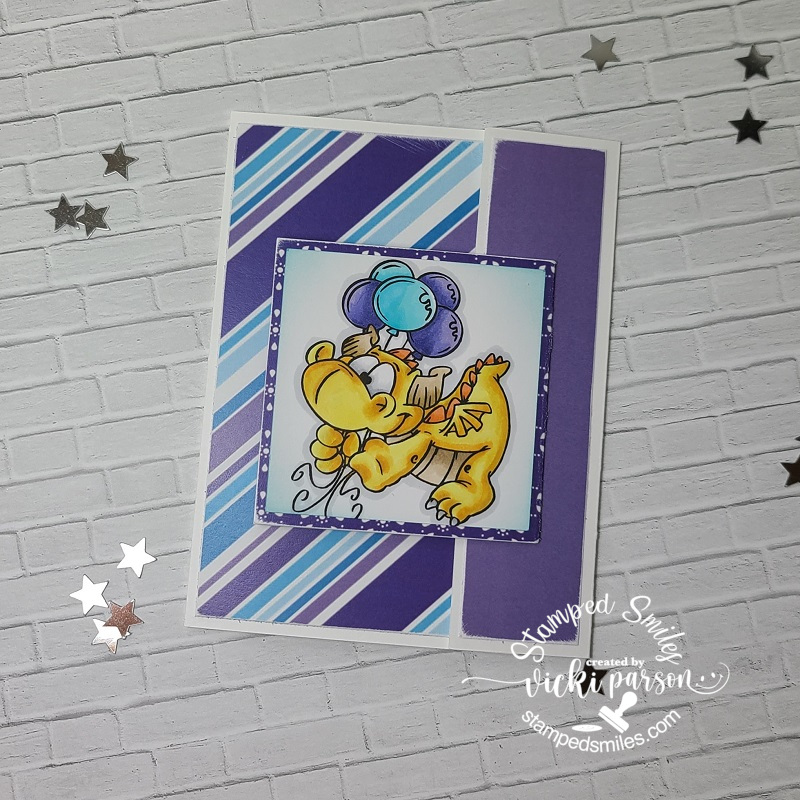
Now how CUTE are these little critters?!  During TE’s Sept birthday month (13 years in business), they released a collection of birthday related items, and this is the introduction of “Chip & Charlie Party“!  I’m saying that Chip is the bird and Charlie is the raccoon…not sure, but that’s what I’m saying! LOL I’ve colored them up with Copic markers and added some shimmer to the balloon, party hats and cherry on cupcake with a glitter brush pen.  I’ve also added some highlights with a white gel pen.

I wanted something in the background, but not too distracting from the critters, so I stamped the Party Time background stamp in the same cardstock color (Cherry Pop) I then used the stencil from this combo set to white ink blend the tops of the hats.  The paper strip accents came from a TE paper pack I had in my stash.  I thought it needed an extra little image element on the front of the card, so I added some Doodlebug Twine and the party hat from Big Grumpy-Birthday, colored with Copics and popped up with foam tape on bottom corner. It was covered with a glitter brush pen, and I also added a Doodlebug Matte Sprinkle at the top of the party hat and in the center of the twine bow.

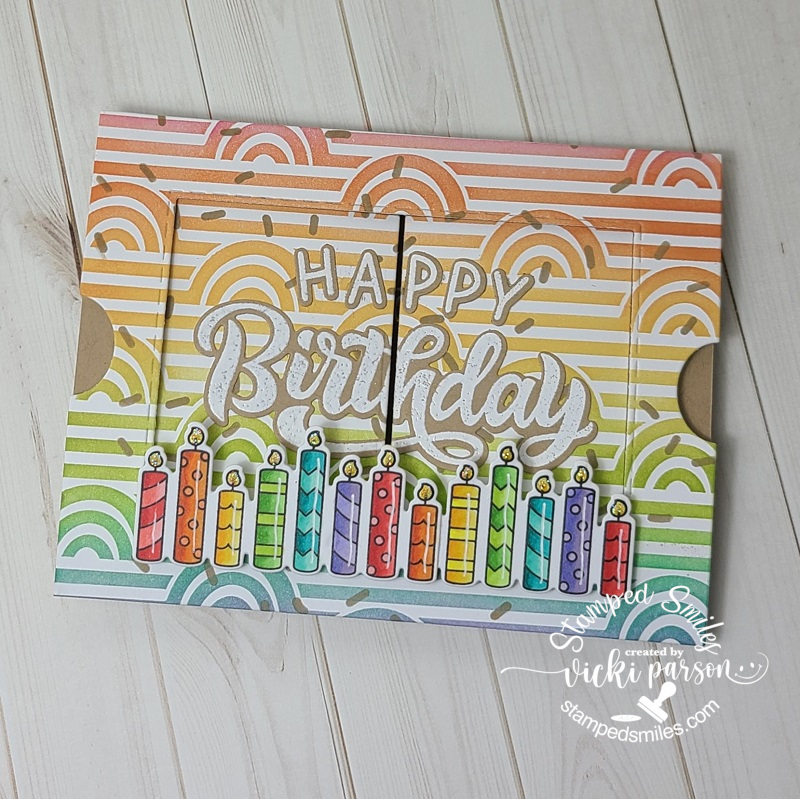
You might notice that the image panel is not completed adhered to the card front and there’s a score mark in the center as well.  So, I was going for something a bit different than a regular A2 birthday card…and the Sept challenge prompts are 1. Heat or non-heat embossing, 2. Napa Valley color quad and/or 3.  Something that begins with “E” You have to pick at least one of these along with a TE product.  So, for the “E” I’ve decided on making an Easel card…

So, when you open up the bottom flap, you place it behind the popped-up sentiment that was white heat embossed (also a challenge prompt) and cut out with the coordinating die from the “Get the Word Out-Celebrate” set.  I’ve also added some more of those yellow polka-dot papers and a thin strip of Cookie Monster cardstock which is what I used to mat behind the image panel as well as for the sentiment.  There is still room to line the inside of the card with a special birthday message.

I hope you’ve enjoyed my card and please see at the end of this post for other challenges I’ve entered…PLUS a special birthday give away if you’re interested!

____________________________________________________________________________________________________________________

**Now for some EXCITING NEWS**

Taylored Expressions was holding a special set of birthday challenges this month in their FB fans group with certain prompts for each one.  There was a set of four different challenges, and I decided to make something for each challenge, and I ended up winning a future guest design spot for a future release!  WHAT?!  Taylor shared which one was her favorite I made in THIS FB ANNOUNCEMENT, but I will share all the creations I made here: (click on the photos to enlarge them if you are viewing them on my blog.)

I honestly wasn’t thinking about winning anything! I was basically just enjoying the process of creating and pulling out some stash that I hadn’t yet used and wanted to use so I thought I’d just play along.  I was very surprised to see that I was picked as a winner!  Very humbled and honored by that!  So be watching for an upcoming GDT post!

I have actually joined several of Taylor’s classes, virtual events, etc. and have made many cool things during the time that I wasn’t blogging, so I never shared them… but like I said, I’ve been creating and having fun!  I do remember something fun she taught in a virtual event from July I was a part of that was Halloween themed, so I’ll have to pull those cards out soon as well since the time is coming up and I do love me some Halloween! 🎃

One last thing!  With all of the fun and exciting things going, I realized it’s my birthday month as well!  I’m not 13, but let’s just say a few years older!😁  So I think the best thing to do for my birthday is to give rather than receive!  If you feel the same and think someone would enjoy this little Taylored Expressions bundle that I have shown above in the photo, let me know!  If you’d like to gift this for yourself, let me know!  I would love to give someone these extra set of items already in my stash to someone!  There is a Banner Simple Strips die, a 3 piece balloon layering stencil with a clear stamp set combo, a Cupcake ink pad (unwrapped, but NOT used at all, I just noticed I already had one after unwrapping it!) and a tiny cake and celebrate stamp set all from Taylored Expressions and perfect for party making! (There may be a few other things added as well!)

**Please just leave me a comment that you are interested in the TE give away by October 10th, 2021 and I will be happy to pick someone to send it out to!**

Whew!  I think that’s about it!  Thank you for stopping by friends and enjoy your weekend!

I’d like to enter the top easel card ONLY in these challenges:

  1. Taylored Expressions FB Fans Group Sept #TEmakerchallenge – heat/dry embossing and easel card for something beginning with “E”
  2. Festive Friday – #FF0093 I used: balloons, red & twine
  3. Krafty Chicks – All Occasions (birthday)

Classes, Donation and Challenged

Hey friends!  Hope you’ve had a wonderful weekend and will be enjoying the first ‘official’ day of Autumn tomorrow!🍂 Yay!  I know that this is my most favorite time of the year and today it seems like it has finally cooled off a bit which is very welcoming to give the air condition a break!  Decorating for Fall/Halloween is also a favorite thing I like to do along with being outside…so I’ll be doing that this week and weekend for sure!

Today I have some creations that I’ve been working on.  The first one comes from a challenge that I wanted to enter along with breaking out a new stamp set, but excited about using an older embossing folder and some paper that has been in my stash for far too long:

He even looks like a wise old owl…and I thought he would be cute with a little bow around his neck too!  This is not a ‘new’ stamp set from Inky Stamper, but it’s the first time I’ve broken out to use this Owl stamp set!  Their challenge issued this month was “embossing” and so I pulled out a VERY old embossing folder (remember the Cuttlebug days?! LOL) I think it was one of my very first ones!  Plus, I pulled out some Coordination’s textured and colored cardstock.  It is weathered looking, but when you sand over it, the color comes out underneath…really cool stuff that I haven’t used very much!  You can get the coordinating dies for this ‘Owl’ set which also cuts out the owl and the leaf in the set.  I’ve colored them up with Copic markers and used the die to cut them out with.

For the embossing folder card front, I took a piece of the Coordination’s paper, die cut it out and then ran that piece through the selected embossing folder and then sanded over it with a sanding block.  I also die cut a frame the same color as the card base and took a separate embossing folder from Stampin’ Up! to go over that with and sanded it a bit as well before popping it up on the card front.

Before placing all of the elements on the card front, I decided to add some white and black paint splatters over the background.  I also copper heat embossed the sentiment underneath the owl, die cut the strip and popped it up with one of the leaves over top. (You can also see along the edges that I’ve heat embossed too!)  I popped up the owl but left him grounded to the frame and then finished it with copper sequins filled with glitter drops.  The copper twine bow was a last element decision.  LOL🦉    

Speaking of sanding, it reminded me of this class I took with Inky Stamper making these cards. (couple weeks ago)

Anyway, the sanding reminded me of this class because at the bottom of the card, the kit included sandpaper for the beach.  Really love the look it gave to the design with the texture and tiny bit of sparkle in it!

And the same day I had the class above, I had this class from Craft Fancy during their OOAK event.  These were made from their “Alcohol Pearls Butterfly card kit” (I think they have some left in store if interested).  The kit came with one alcohol ink color in Celestial Pearls, which is beautiful, but I decided to also add some copper metallic from my stash for another bit of color.  I also went on my own a bit with the white heat embossed sentiments at the bottom.  I really had fun playing with the alcohol backgrounds and being able to cut them out in one pass for different looks.

I thought this set of four cards would be perfect to add to my donation box to The Butterfly Project in support of domestic violence.  So, I was able to send off a batch of cards for that this past week too.

Hope you’ve enjoyed my mixed collection of projects here and I’m sure I’ll have more fun things coming soon!  Thank you for stopping in!

Challenges I’d like to enter for OWL CARD only:

  1. Inky Stamper Inkspirations FB Sept Challenge – Embossing (heat or dry)
  2. Let’s Squash It! – embossing folder (Cuttlebug & SU! used on mine) with letters or #s and sand it
  3. Pammie’s Inky Pinkies – Anything Goes
  4. Lil’ Patch of Crafty Friends – Anything Goes
  5. Allsorts – ‘real’ animal/creature
  6. My Time to Craft – embossing (heat/dry)
  7. Splitcoaststampers – SC871 Wednesday Sketch

Guest Designer for Addicted To Stamps & More – Any Occasion

Hello friends!  Hope you’re having a great week so far and have been enjoying the September month!  I look forward to the Autumn Season and all of the beautiful changes it brings!  Today, I have a fun post to share with you!

Super excited to have won a guest design spot over at the Addicted to Stamps and More Challenge blog!  Have loved playing along with the challenges over there for years!  A few years back I had been on the DT for a bit which was really fun too!

They have fun challenges every other week with a select set of 5 categories/themes that alternate for each challenge which makes it nice so that you can plan your creations according to each one!  So, the category/theme for this challenge happens to be “Any Occasion.

This turned out to be a really great category to work with because my husband came to me and said one of his friends that he used to work with broke his leg.  So he’d asked me to make an “interactive” get well card for him:

The first thing that came to mind for this was the cute Lawn Fawn stamp set “Get Well Before n Afters” along with the “Magic Picture Changer” die set.  Once you’ve made one of these picture changers, it’s not hard at all and it’s really fun to see it change.  I had made a card a couple of years ago for someone else with this set and it was a really fun card to make! So I grabbed the items and started with the scene for the background.

As you can see, there’s not much showing once you place the pull tab picture changer layer over it.  So I just sponged some clouds over the white background and die cut a grass border for the bottom section of the card.  I also white heat embossed the sentiment at the bottom of the grass section, but waited until the picture changer area was done so that I could use that for placement of the sentiment.  I also added one of the band-aids for decoration to the right of it.

I wanted a tiny scene inside of the picture changers with the cute turtle.  If you’re familiar with the stamp set, then you know there is a turtle on his back not feeling well and then there’s also a “healthy turtle” image too.  So for the “sick turtle” I sponged the sky and grass behind him and the stamped clouds by using masks I cut out from the images.  I then colored him up with Copics.

And then of course when you pull on the slider tab, the picture changes and you see the “healthy turtle” with the sun and rainbow instead of the clouds and rain.  LOL, I colored the images with Copics again and made masks for the images so that I could sponge over them for the sky and ground.

I popped up the picture changer section with foam tape over my background panel and then layered it over a top folding A2 sized card base so that there’s message inside too.  Lastly, I’ve added another band-aid image on the green frame and stamped some band-aids on the envelope for mailing too.

It’s certainly no fun to be laid up with a broken leg, so maybe this will help cheer him up!

I hope you’ve enjoyed my card today!  Please stop on over at the Addicted to Stamps and More Challenge Blog to check out the inspiration and come play along with us!

Thanks so much for stopping in!

Challenges I’d like to enter this card in:

  1.  Crafty Animals – Anything Goes featuring an animal.
  2. 2 Crafty Critter Crazies – Anything Goes featuring an animal (last challenge-closing)
  3. Colour Crazy Craft – Anything Goes with coloring (turtled colored with Copic markers)
  4. Watercooler Wednesday – All About Occasions
  5. Happy Little Stampers – Anything Goes with Dies
  6. Creative Fingers – Anything Goes

Soaking it All in!

Hello friends!  Really hope your week is going well.  My thoughts go out to all of those that are experiencing difficulties in their life and hope things turn better for you very soon.  I hope to bring a smile for you today.

I’ve really had such a fun time playing around as a guest designer this month for Inky Stamper and this will be my final project for them this month.  Chelsea has some really cute stamps and I hope you’ll check them out!  (I have the badge on the sidebar of this blog if you need to come back later to find it.  Just click on the badge to get to the store.)

For my final project, I’ve decided to create a mini slimline card with an interactive component!  If you’re not familiar with a “mini slimline” size, you take a piece of cardstock measuring 6″ x 7″ and then fold it in half on the 7″ side so that your card base is 6″ x 3.5″.  I really don’t mind any size of card really as I have been known to make my own envelopes too.  But I first learned about this “mini slimline” size from Taylored Expressions as she has many products in this size including the envelopes.  (I have used one of the “slimline stitched dies” from TE to cut one of my panels on this card.)

I’ve used BOTH of the Chaise Lounge stamp set with “Freida the Frog” (as she is named) as well as the Splash stamp set with “Rosie” (as she is named) from Inky Stamper on my card here today!  I think they’re so CUTE!  Ever have those moments with a friend floating around in the swimming pool and just soaking in the sun and some secrets?!! LOL!  That sounds like a fantastic summer event to me!

For the “water” background, I took some Bristol Smooth cardstock and white heat embossed the “water wave” image (both stamp sets have one of these images in it).  I took out some of the Nuvo Shimmer powders from my stash and made a fun watercolor panel with them.  I haven’t used these in quite some time, so it was fun to play with and I forgot how shimmery they are!  Obviously, the white embossed waves resisted the watercolor.

I cut out the panel with the TE slimline stitched die and mounted it over a piece of dotted paper from the Doodlebug Swiss Dot Paper Pad. I stamped and colored the images, die cut them out and popped them up over the floaty tubes.  (Remember the tip about using a white gel pen to go around the edges to get rid of those lines you see when you cut them out.) I then punched a hole on this watercolor panel where I wanted the images to be, so they weren’t too close to each other to freely spin around!  Inky Stamper has these awesome interactive elements called “Clear Move-Its” and I LOVE them!  They snap together and voila!

You can see bits of the shimmer from the watercolor background here too!

I popped up this panel with foam tape and then layered it over my black mini slimline card base so the spinners could move freely.  I’ve also added a black sentiment banner that was white heat embossed with the Chaise Lounge stamp set.

I couldn’t resist adding a bit more “bling” so I also pulled out the Picket Fence Mermaid Water sequins being careful not to interfere with the spinners and then filled the centers with some Stickles from my stash.  I could just keep spinning these all day long! LOL!

Really hope that you’ve enjoyed my projects this month as a guest designer for Inky Stamper and you’ll pop by to check them out!  Super fun stuff!  (Be sure to join the InkyStamper Inkspiration FB Group for more fun!)  I’m sure I’ll play with their stuff again in the future!

Thanks for popping in today and finding my posts!  Glad you’re here!

Challenges to play in for fun:

  1.  Dragonfly Dreams – Summer Fun
  2. Penny’s Paper-Crafty – Anything Goes using Paper

What’s Up With Washi and Camping Fun!

Hello friends!  Hope you’re having a great week so far!  Today, I have some cards I made for my GDT month at Inky Stamper using washi tape!  I have loads of washi tape because I have a “squirrel moment” when I see it and think how pretty…and it’s not that expensive and easy to craft with and whatever excuse I can come up with!😁  Then it sits around unused!  

This is why I’m glad that the “Washi Tape Challenge” came up for this month in the InkyStamper Inkspiration FB Group!  You just need to use at least 1 Inky Stamper product and your washi tape…any you have!  I decided to go for 2 cards:

For both I cards, I took a scrap piece about 4.25″ x 5.5″ of black cardstock and covered it diagonally with 3 different types of washi tape.  One was from the Inky Stamper Doodlebug Lily White Swiss Dot washi tape, another from some metallic shiny silver washi tape and another from some clear sparkly washi tape in my stash.  The white turned up almost grayish over the black and the clear sparkle turned up differently as compared to it on the crab card in the background over white cardstock.  I thought it was cool the different looks I got with it.

I then decided to use some dies to cut it out with and then cut the remainder in different sized strips for my cards as well so I wouldn’t have to waste the rest of it…

Vicki-InkyStamperGDT-Washi Challenge-cat

For this card, I took a “hello” die from my stash and cut it out of the washi tape piece I created on the black cardstock piece.  I then cut out the “negative” sentiment with a rounded corners rectangle die and layered another piece of black cardstock behind it that was cut out slightly larger and popped up over an A2 card base that I’ve also layered with more of the washi tape strips I cut out from the left over.  I added this cute kitty from the Inky Stamper Cat stamp set along with the sentiment at the bottom.  I thought it would be fun to add a couple of paw prints at the bottom in white ink from the Inky Stamper Dog stamp set.  Lastly, I thought it needed some Doodlebug Twine too!

Vicki-InkyStamperGDT-WashiChallenge-crab

And for this card, you see that I’ve taken the die cut “hello” sentiment from above and added it to the crab’s claws to hold up in the air…so fun!  I still had a couple more left-over strips from above and added that to the top and bottom of the scene I’ve created on this card. 

So, for the scene, I’ve used the cute Inky Stamper Crab stamp set along with the sentiment at the bottom.  The sparkly looking “sea” in the background comes from a couple of different glitter washi tapes I had in my stash.  I then used a border die cut to cut it out to go across the card front.  Die cut some waves for the sand and tucked in all of the stamped and colored elements over a stenciled cloud background.  I added this card front scene to an A2 sized black card base.

How about you?!  Do you hoard your washi tapes?  I sure had fun playing around with it making these cards and I think it’ll be fun to sit and play some more with it as I have so much of it!  I think it was fun to die cut too! 


Just wanted to share some projects with you I’ve made this past weekend from a Craft Camp that I went to with Inky Stamper.  We made lots of fun projects: (click on photos to enlarge!)

Thanks so much for stopping by today!  Really hope you’ve enjoyed my washi tape cards and you can come join in the challenge with us this month!  Have an amazing crafty day!

Challenges:

  1. Aud Sentiments – Anything Goes + sentiment
  2. Allsorts – Add some sparkle 
  3. Sweet Stampin’ – Feature an animal
  4. Lil Patch of Crafty Friends – Anything Goes
  5. Crafty Sentiments – Anything goes

Say NO to Pot!

Hello there friends and happy Wednesday!  Hope you’re all doing well and having a great week so far!  It’s so hot over our way with a heat advisory in triple digits, so it’s a good time to stay in and craft, right?!

Stopping by today with another project I’ve made for Inky Stamper!  This one sort of cracks me up a bit as you can see by the title of my post! 😂

Vicki-InkyStamperGDT-Crab-circle easel

So, the sentiments from this Inky Stamper Crab stamp set are hilarious and I know many of the stamp sets come with funny sentiments like this too!  It’s always great to have different options for sentiments to go with an image!  Now, I don’t think that I’ve ever been to a crab boil, but I do love me some crab legs! 🦀 How about you?!

I’ve used some of the Doodlebug Paper Pads (also in the Inky Stamper store) and made that for the base of my background for the large “pot” image to sit over.  The sentiment was stamped directly onto the “pot” image before I colored it with Copics.  For the “flames” behind the pot, I’ve used the Inky Stamper Bear stamp set.  I’ve found so many different uses for that set.  I think it’s one of my faves from this store!

As you can see, the “crab” is inside the pot.  So for this, I used a craft knife to cut a slit for the “crab”, but when you use the coordinating die to cut out the “crab”, he will not exactly fit…so I dismantled the “crab”…like you would for cooking…and placed the cut up parts so his hands were in the air and his eyeballs are sticking out.😆  I taped him on the back of the pot so he would stay put through the slit in the pot and popped it up with foam tape over the flames.  I took the other images from the Crab stamp set and die cut the salt and pepper shakers and fussy cut the seashells to add to my easel card.

For the easel style card, I’ve used some circle dies for the easel as well as to create the frame for the “port hole” around the cooked crab scene.  I’ve used some brads and rubbed some mixed media silver paste around it.  I’ve also added a piece of rope/twine that I randomly tied a knot on for an accent.  I’ve also added some gems from the Picket Fence – Sand collection (also sold at Inky Stamper) above the crab…for seasoning of course!  The seashell on the inside grouping of the card has foam tape to secure the card front in place for the easel design.  This card will fit perfectly inside an A2 envelope so I can give someone a chuckle of course!

Hope you’ve enjoyed my easel card today and had a chuckle!  Thanks for dropping by!

Challenges I’d like to enter:

  1.  Addicted to Stamps and More – Make Your Mark (all images colored with Copics)
  2. Crafty Sentiments – Anything Goes
  3. Penny’s Paper-Crafty – Anything Goes using paper
  4. The Crafter’s Cafe – August Anything Goes
  5. Crafty Creations – Aug Anything Goes
  6. Pearly Sparkles – Aug Anything Goes
  7. Creative Knockouts – Anything Goes

Choose to be Grateful for Crafty Chefs

Hello friends!  I hope that you’re having a wonderful week so far!  The weekend is here, but it sure has been a beautiful couple of days this week with sunny and warm days so hubby and I were able to go out to walk around a bit before the snow starts hitting us!

Something that is great to go out in nature to see are the critters with the birds and the silly squirrels…we have them EVERYWHERE!  They’re busy gathering and burying their food for wintertime around here.  My thoughts turned to the Simon Says Stamp “Big Thanks Autumn” November card kit (sold out, but not papers) as I love all things Fall/Autumn and this card kit with those beautiful papers spoke to me and I wanted to create with it to make my project for this month’s Crafty Chef’s Group recipe from our lovely friend Meg’s recipe:

There were some blue colored A2 card bases already cut and scored inside the kit, so I used one for my side folding card base here and then layered a dark brown cardstock piece from the kit as well as a piece of copper mirrored cardstock which was then layered over a piece of the decorative papers (I mentioned above) in the kit, which is also where the critter, mushrooms and leaves images came from on this card.

The leafy background paper was cut from a MFT Wonky Stitched Rectangle Die and then I took a strip of the copper mirrored cardstock across the bottom third of the layered pieces and also added some twine wrapped around the bottom of the layers before popping them up with craft foam over the card base.  I die cut a branch from a die in my stash and then fussy cut the images out from the papers included in the kit which were glued or popped up with foam squares over the panel.  I sponged some Tea Stain Distress Ink around the edges of these pieces before attaching.

Lastly, I’ve taken one of the sentiments from the sentiment strips sheet included in the kit and ran it through my laminator with a piece of copper Deco Foil.  (I think that is a cool way to add a little extra something to those sentiments.)  I made a banner out of it, sponged it with some of the ink I used for the images and popped it up over the leafy background piece with foam tape.  

Here’s a closer look at the critters I’ve cut out and how I’ve arranged and popped some of them up to create my scene.  There was also a very pretty SSS Autumn Sequins Mix included in the kit, and I took some of those and added it to the layout and then filled the centers with some gold Stickles glue.

For the Crafty Chef’s recipe that was given, here’s what I MUST use:

  1. Mirror cardstock
  2. 3 layers or more
  3. ribbon (I hope my twine counts!)
  4. image of garden visitors (birds, hedgehogs, etc)

CAN do items:

  1. Sparkle/Glitter (I used sequins and Stickles)
  2. pearls/gems (I did not use) *passed onto next chef.
  3. dry embossing (I did not use)

There is a new recipe given for each month and no pressure to follow along or even when you want to follow along and play…which is great and I’m happy to be able to use up some of the goodies from my stash (NEW AND OLD) and just have fun with it.

I hope you’ve enjoyed my creation today as well and I will be seeing you all again soon!  Thanks so much for stopping in today friend, as I’m very grateful for you!

Challenges:

  1. 2 Crafty Critter Crazies – Anything Goes + animal(s)
  2. Crafty Animals – Anything Goes + animal(s)
  3. Creatalicious – #199 Anything Goes optional Autumn/Thanksgiving
  4. The Paper Girls – #212 Thankful/Grateful
  5. The Divas That Cut Paper – Thanks or Thanksgiving
  6. A Bit More Time to Craft – #128 Anything Goes
  7. Lil Patch of Crafty Friends – #146 Anything Goes
  8. QKR Stampede – #408 Anything Goes

Retirement Time and More Whimsy Stamp Workshop Retreat Projects

Hello there friends!  It’s hard to believe that we’ve made it to November and rounding the corner to end 2020!  It’s been a very strange year all the way around, but I have to say that it’s a bitter sweet day today as hubby will have his last day of work on his 40 year career as an electrician.  So today I’m dedicating my post to him:

This would be a perfect situation for my hubby and something he talked about all the time…which was to go out to the lake, relax, enjoy some fishing time on a boat including staying in a cabin.  Sure look forward to spending some time with him doing just that next year too!⛵🌅  He is a hard worker and certainly deserves it.

The stamp set that I’ve used for this card was a perfect scene image from Whimsy Stamps called Happy Place.  I colored it up with Copic markers and cut it out with an oval die and layered another oval piece from black cardstock.

I found some papers in my stash that I thought would be perfect with this, so I’ve used the Whimsy Stamps Pierced Border Trio Dies to cut it with to fit half-way on my A2 white side folding card base.  Before attaching the piece down over the base, I took some Mustard Seed Oxide Ink and sponged across the middle of it and then used some Tumbled Glass Oxide Ink slightly at the top.  I then attached all piece including the image panel.

I took the sentiment from the Happy Place stamp set and stamped one of the sentiments at the top of the oval panel and then I white heat embossed the “relax” sentiment over black cardstock and cut it out with the Whimsy Stamps Quick Strips die set, glued it along the edge and trimmed off the excess.  Lastly, I’ve added some Whimsy Stamps It’s a Party Enamel Dots.

Then of course I wanted to share the inside of the card which you can see that I’ve used the same image from the stamp set from the front of the card and just stamped that in a lighter grey ink color.  I masked off the edge of the inside of the card so it didn’t stamp completely.  I also used it in the same way on the envelope as well.

For the greeting, I took the Whimsy Stamps Happy Large Word Die and cut it out with some black cardstock and then attached it with liquid glue.  I stamped the “retirement” greeting right underneath it from the Whimsy Stamps Happy Sayings stamp set with black ink.

It may be hard to tell in the photo above, but I’ve also taken a glitter brush pen and went over the sun as well as the water for some added sparkle.

This card was actually fun to put together and I was thinking about the future and all the things we had talked about the last few years and getting ready for this day.  Things are a bit different than we had envisioned of course, but we will have “our time” for sure.  We’re so excited about it!

This card is being handed to him this morning while we have our coffee before he leaves for work on his last day!😀


And now I also have some more finished kits that I’ve been working on since the Whimsy Stamps Virtual Workshop Weekend!  I’m still really enjoying finishing them up and still have MANY more to do!  I’m so amazed at how much we received and very happy that there were several Christmas projects which I’ll be working on next!  For now…here’s more of the finished kits:

This was for kit 12 and I LOVED the cute dragon in the purples! This card is going to my youngest grandchild as she is my “PURPLE girl”!!
This is the INSIDE of Kit 12. It was a really cool “FUN FOLD” design! I put my image off to the edge so I had room to write a message.
This was for Kit 6 and the entire scene was made using Copic coloring including the sky background! The squirrel and pumpkins were popped up with foam tape.
This was for kit 21 and my first time practicing with no-line coloring!
This was for kit 22. This mega large sunflower is gorgeous! Loved coloring and fussy cutting it out!

I hope you’ve enjoyed my projects and post today!  I sure have been having fun just playing and trying out different things with my cards.  I do look forward to finishing up these kits as we get near the Christmas time!  So be watching for more of those!

Thanks for dropping in with me today and I’ll see you again soon!

Challenges: (For Retirement Card ONLY)

  1. Colour Crazy Craft – Anything Goes + coloring
  2. A Perfect Time to Craft – Anything Goes Nov
  3. A Bit More Time to Craft – Anything Goes
  4. Crafts Galore Encore – Anything Goes Nov
  5. Love to Craft – LTCCB52 Anything Goes Nov
  6. QKR Stampede – #407 Anything Goes
  7. Lil Patch of Crafty Friends – #145 Anything Goes
  8. The Corrosive Challenge – #11Nov Anything Goes
  9. Pammie’s Inky Pinkies – PIP2044 Anything Goes

Sending a Smile to a Hunter and Winner on You Tube!

Hello friends! Welcome to the month of September! I cannot believe that Fall is at the door here! The weather has already started to cool us down a bit and Summer is starting to fade as you can see the flowers starting to die off. Now I will look forward to the changing color of leaves which is always amazing.

Today I have a project to share that I’ve made for the Splitcoaststampers Teapot “Make it Pop” challenge. This card is in need of a special SCS friend’s father who is having some difficulties with health and I wanted to help with a smile for him if I could:

“Pop” as he is lovingly called, enjoys the outdoors and hunting which is something that several men in my own life enjoy, so I knew that this would be a direction I was going in with some stamps I have from Newton’s Nook.

For the background, I took a woodgrain embossing folder before fully assembling the card.

Since this is a hunting theme, I thought it would be fun to make a camouflage background and so I’ve used the fabulous tutorial on SCS HERE to create the look.  I also cut off a thin strip towards the bottom to add some interest to the design as well.  Over top of the background, I layered the sentiment from MFT and also cut it out with a banner die.  I used a grassy feilds border die from MFT for the strip at the bottom of the panel and stamped the “Pop…” over it in brown ink.  I stamped and cut out the deer from the Newton’s Nook Serene Silhouettes set with coordinating dies.  I also die cut a few green leaves with an older MFT die for a few accents inside and out.

When you open up the card…

vicki-mmtpt632-forpop-open-1

Because of the name “Pop”, the challenge was “Make it Pop”, we needed to show some sort of element like this on our design.  So I found this really fun “Pop-Up Diorama” card tutorial on SCS for my design.

I’ve used an oval die to cut the center of my card and then used a piece of cardstock for the background to attach behind it.  On this panel, I created a scene with blending inks and adding stamped and die cut elements from the Newton’s Nook Whispering Pines stamp set that I’ve also used the sentiment from on the inside.

For the rest of the card, I’ve used the same stamp set that I used on the outside of the card and arranged them to create this scene with different layers that are popped up.

Hope this helps bring a smile over to “Pop”.  Thanks so much for stopping in today and I hope you were inspired in some way too!

Have a great day friends and I’ll see you soon!

Challenges:

  1.  Splitcoaststampers Teapot Tuesday – Make it Pop
  2. International Art & Soul – Include an animal
  3. Crafting Happiness – #64 Anything Goes
  4. 2 Crafty Critter Crazies – Anything Goes + animal
  5. Moving Along with the Times – Create a Scene
  6. Crafty Animals – Anything Goes + animal

We’re On the Farm for {Cupcake Inspirations}!🐄

Hello friends!  Hope that you’ve had a wonderful weekend!  I sure enjoyed my time with hubby relaxing and enjoying the cooler temps for sure!  After all the “partying”, are you ready for a new challenge?

Today we’re starting with a brand new challenge over at {Cupcake Inspirations} with the theme “On the Farm“!  So whatever farm related project you’re working on, please be sure to link it up in our challenge!  We look forward to seeing what you all come up with!

Here’s what I’ve made for the challenge:

Vicki-CIC501-week1

I’ve been wanting to use this fun barn die from My Favorite Things for a while and this was super fun to create a farm scene with!  It even has the little embossed markings on the barn along with a bail of hay!🐓

I started out using the MFT cloud stencil and Tumbled Glass Distress Ink for the background panel, then layered over a grass border at the bottom and then cut this panel out with the stitched rectangle die.  I also stamped the sentiment as well as a few animals from the MFT The Whole Herd stamp set, colored and cut them out with the coordinating dies. (can’t find in the store!)  I then placed my fence border over top of the grass border, popped up the barn with foam tape where I wanted it and then placed all of the other images arranging them over the scene.  This front panel was attached to a top folding A2 red card base.

Vicki-CIC501-week1-close

So I love how the door on the barn can open up with that die cut!  Of course I had to add something inside the barn and with the nest of eggs sitting on top, it only felt right to place the chicken in there!  For the backing of the barn, I’ve taken a piece of paper from the MFT Woodgrain Whimsy Paper Pad and attached it from behind before popping it up with some foam tape.  I’ve also taken a pen and wrote the “milk” word over top of the colored can next to the cow.

Vicki-CIC501-week1-flat

Hope you’ve enjoyed my creation today!

Thanks so much for stopping by and I’ll be seeing you again soon!

Challenges:

  1.  Cardz 4 Guyz – #252 Explore Outdoors
  2. 613 Avenue Create – Anything Goes