Anything Goes at Cute Card Thursday!

Happy Thursday friends! 🙂  It’s Thursday and that means it’s time for a NEW Cute Card Thursday challenge this week!  So this week it’s our beginning of the month “ANYTHING GOES” challenge!  We can’t wait to see your creations!

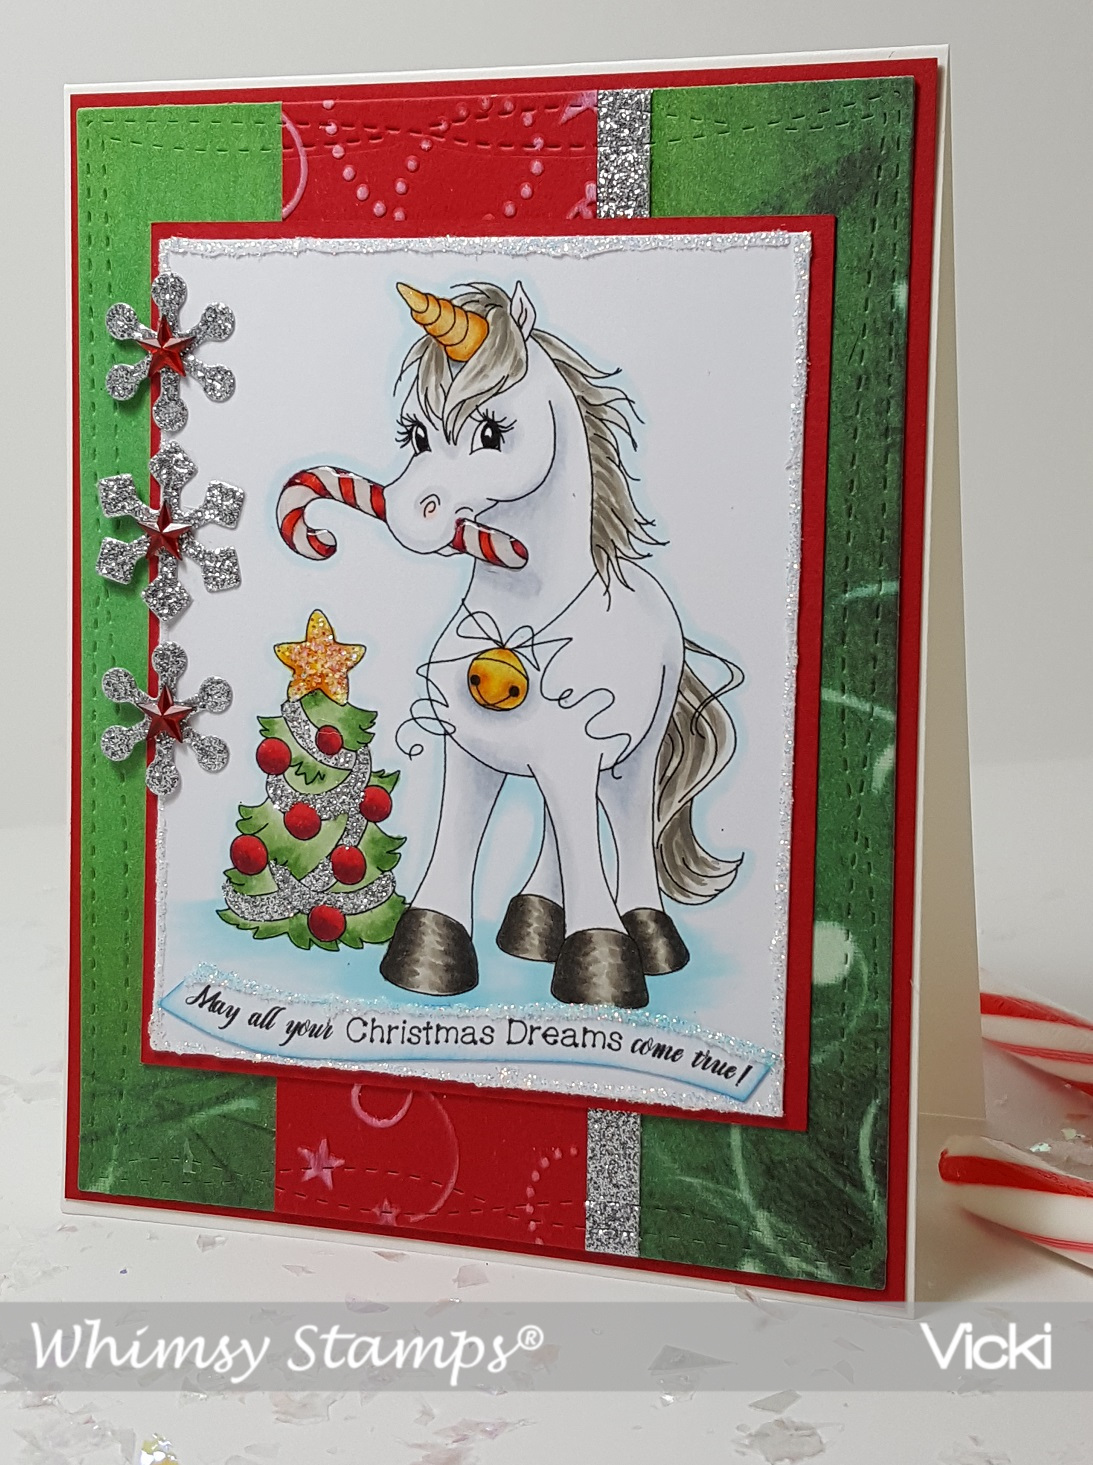
Our sponsor for this challenge is Whimsy Stamps.

Vicki-WS-ThinkSpringBunnies-Feb7

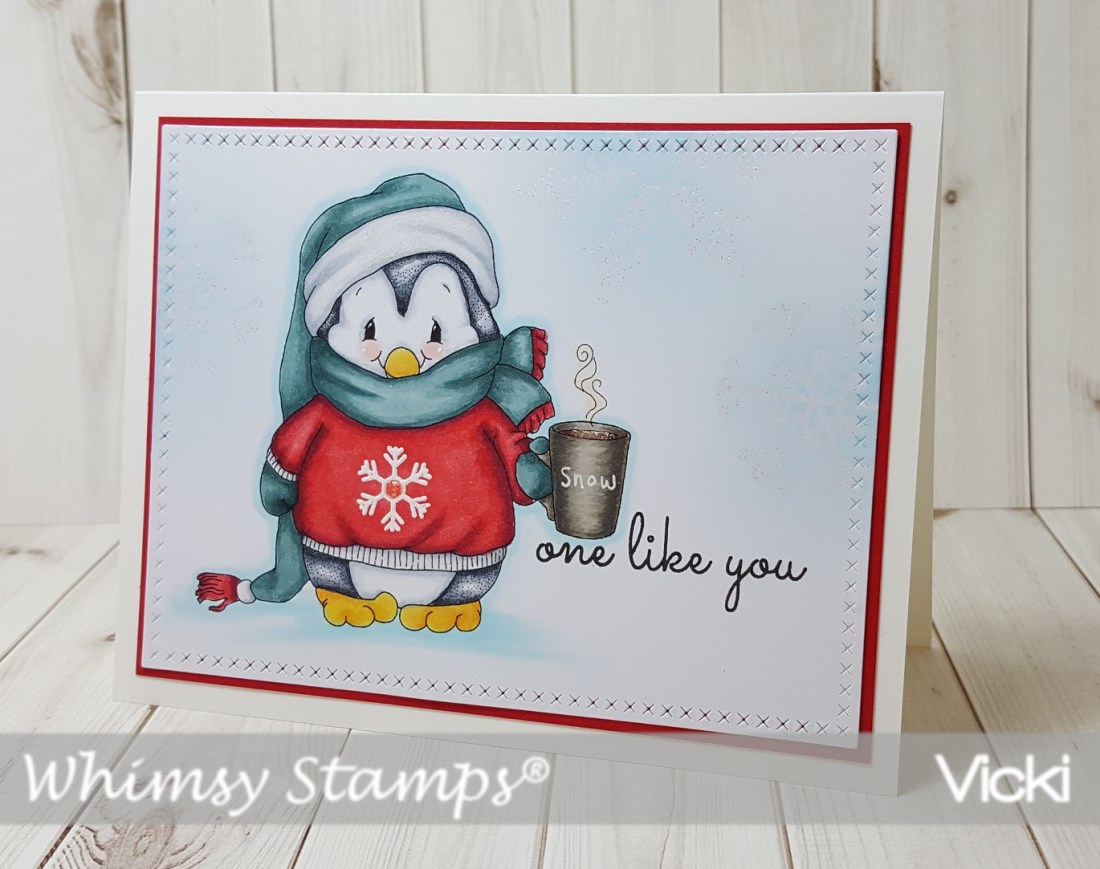
Are YOU thinking Spring too?!  I am, but I don’t think it’s working very well with the snow, cold and ice we’ve been getting! LOL!  So I will stay warm inside and bring my thoughts of Spring to my craft room!

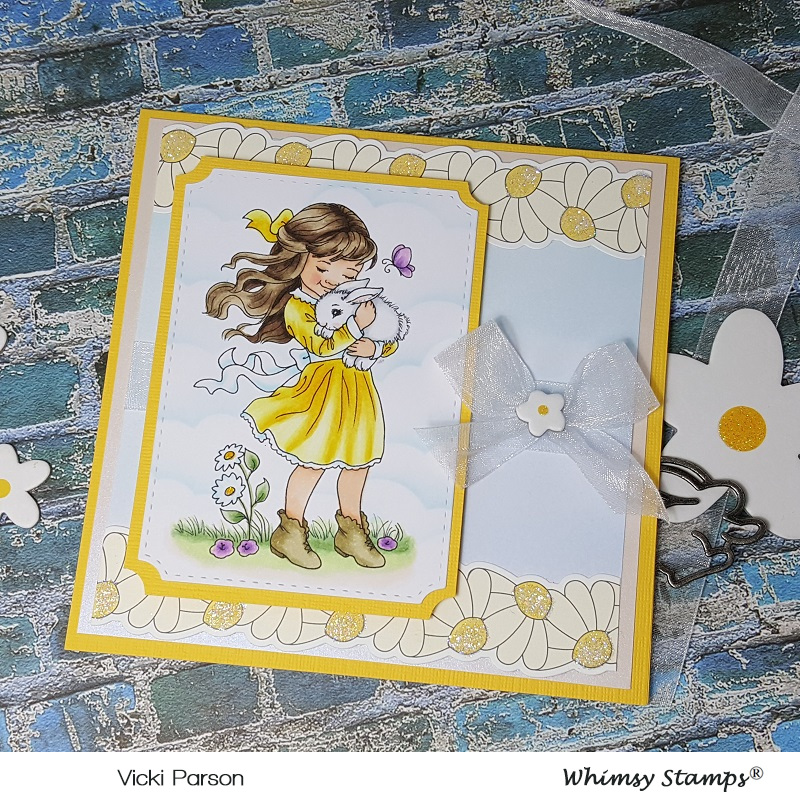
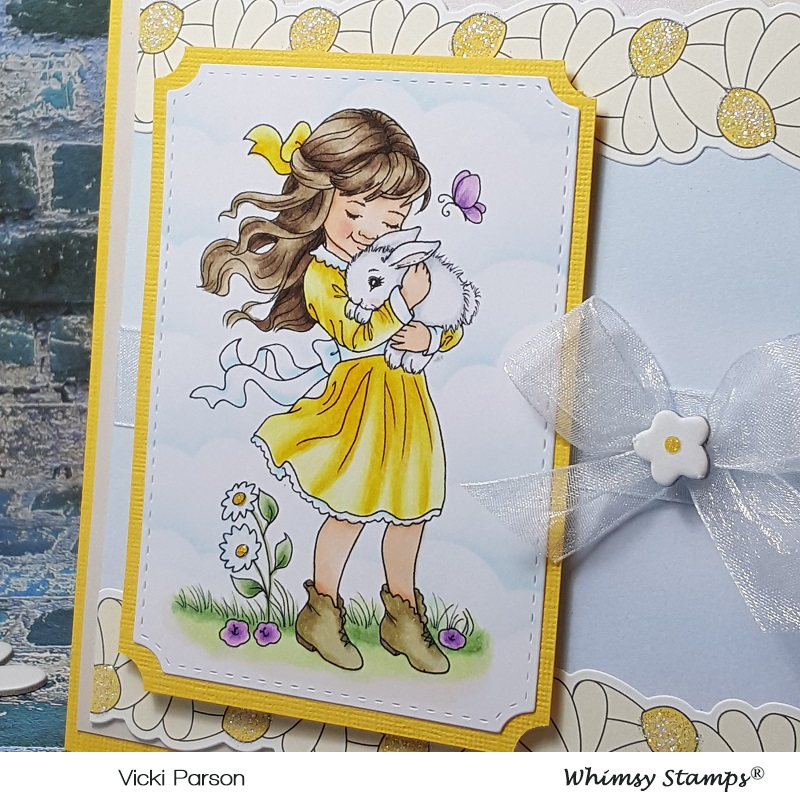
I am using this really sweet digital image from Whimsy Stamps called Think Spring Bunnies by Crissy Armstrong.  It was previously released as a rubber stamp, but now it’s available in digital format!  I have printed out this image and used the following Copic Markers for coloring:

  1.  Bunnies – W5, W3, W1, W0, E33, E31, E30, C3, C1, C0 (tails)-, E44, E42, E40, Blender 0 (spotted bunny)
  2. spotted bunny inside ears, nose face – R20, R00
  3. Wooden sign – E25, E23, E21 (E23 used for center of yellow flowers)
  4. flowers – Y17, Y15, Y11, V17, V12 – YG67, YG61 (leaves/stems)
  5. grass – G24, G21, G20
  6. butterfly – Y11, R00
  7. sky around image – B01, B00, B000, B0000

Vicki-WS-ThinkSpringBunnies-Feb7-close

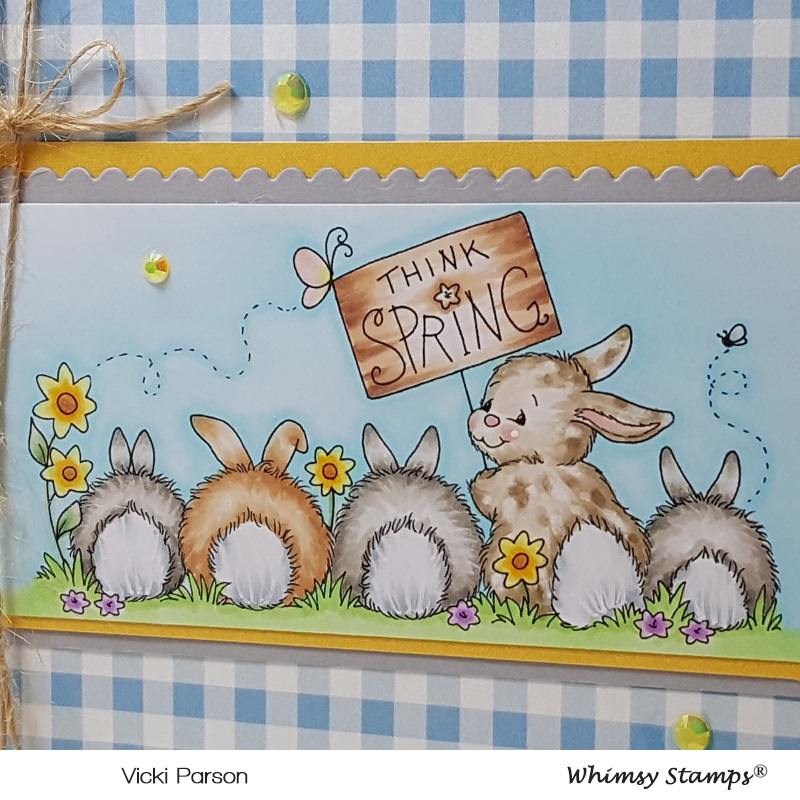
Here’s a closer view of the colored image.  I have also used a white gel pen in the bunny’s tails as well as the spotted bunny’s cheeks.  I also took a Wink of Stella clear glitter brush pen to go over the butterfly and the flying bug’s wings.

It was so fun to color these furry bunny butts!! 🙂

Vicki-WS-ThinkSpringBunnies-Feb7-flat

I’ve used some of the digital papers released last month called Oh Boy…really loving the ginghams in this set!  So, I’ve cut out both these papers along with some solid yellow papers (from same set) and the colored bunny strip with the Whimsy Stamps Hand Stitched Nested Rectangles dies.  I also took a strip of gray colored cardstock and used an older border die from Whimsy Stamps to create the scalloped edge.

These were all layered onto a white A2 sized top folding card base.  I wrapped some twine along the edge and tied it in a bow and then lastly, I’ve added some yellow crystals from Pretty Pink Posh randomly over the card.

Challenges:

  1.  Crafty Animals – Anything Goes + animal
  2. A Bit More Time to Craft – Anything Goes
  3. Crazy 4 Challenges (C4C469) – Ground Hog or Critter
  4. Send a Smile 4 Kids – Anything Goes/Easter/Spring
  5. 613 Avenue Create – Anything Goes with optional: use a critter
  6. Crafting From the Heart – Anything Goes

Valentines for Cute Card Thursday

Hello friends!  It’s Thursday already!  And you know what that means….It’s time for a new Cute Card Thursday challenge!  For this week’s challenge, we’d like to see your Valentine’s projects!  (A great way to get going on your love cards!)

Our sponsor this week is Odball Art Co. and I have used one of their images on my card for this challenge today:

vicki-cct567-valentines

This cute little fellow is called Valentine Giraffe and so I thought he’s the perfect image for this challenge and he was so fun to color too!  I have used my Copic markers to color him with.  It went rather quickly, and I knew I wanted this to be a bit simple because you never know if this one need to be delivered to a male! *Wink

For the hearts sprinkling down as well as the sentiment, I’ve used an older Simon Says Stamp set from my stash and stamped the hearts with a rose-colored ink and then shifted the image slightly to do a “double generation” stamp over it.  The sentiment was stamped in black ink next to the giraffe and then I’ve added some stitch lines around the panel as well as around the “xo” papers with a black marker.

I then added the ribbon to the “xo” papers and then popped the giraffe image over some craft foam and mounted it over the papers which was then mounted onto an A2 sized top folding white card base.

vicki-cct567-valentines-close

Taking a closer look at the image, you can see how I’ve colored it in and I’ve added some white gel dots to his eyeballs and cheeks.

For a bit of shimmer, I took a clear glitter brush pen and went over the sprinkling hearts with it.  I then took some Nuvo White Blizzard glitter drops to add some extra sparkle to the heart dangling from his mouth.

vicki-cct567-valentines-flat

I think this is a great masculine style Valentine as it has the neutral color palette with the pops of bright pink/rose for the hearts.  And just a touch of shimmer thrown in!

Thanks for dropping by today!!  See you tomorrow for several projects I will be sharing!  Stay tuned!!

Challenges:

  1.  QKR Stampede – #332 Anything Goes
  2. Crafty Friends – Animals/Birds
  3. Sisterhood of Snarky Stampers (SOSS127) – ‘V’ is for Valentine
  4. Crafting By Designs – Animals

It’s Critters at Cute Card Thursday!

Hello friends and happy Thursday!  We are getting ready to start the weekend and I’m ready to have some time to catch up on a few things!  How about you?  Do you have any plans for the weekend?

Today starts a new challenge over at Cute Card Thursday!  Yay!  The challenge for this week is probably a favorite of mine which is “critters“!  Looking forward to seeing all those critters in the gallery this week!  🙂

My project for today is another one of those that I had actually wanted to start last year, but of course it gets pushed aside for another day, so here’s the day I start!  When I went to a stamp convention this last Summer, I really enjoyed the vendor booth for Taylored Expressions and just fell in love with these grumpy critters:

vicki-cct566-critter calendar

LOL!  I plan on making myself this fun little calendar for my stamp room.  I also thought about making a couple more of them for some gifts too!  So here’s my start with them.  Really simple and fun little calendar cards to make up!  I have a die coming that will help to display all of the months which I will share later on.  So stayed tuned for up-coming Calendar months made with the Taylored Expressions Calendar Grumplings stamp set!

vicki-cct566-critter calendar-jan

So is this how we all feel when January rolls around?  LOL!

When I went to the stamp convention, I picked up this package of the 2019 3×4 calendar cards that were pre-printed with a special little rectangle on top with a decorative background print on it.  This is where I’m using the spot to create my “calendar scenes”.  There are dies that you can get that fit these to help you create your designs.

So I took the unhappy/surprised kitty and colored him in with Copics and cut him out with the coordinating die.  I took the frame from the calendar scene die set to cut out a frame with black cardstock and then placed some ribbon behind it to make it appear like curtains. and then I had a speech bubble punch which I punched from white cardstock and stamped the sentiment over it and sponged around the edges with some gray ink.  I took some foam tape and popped the speech bubble up over the scene.  I mounted this card onto some coordinating colored cardstock.  I wanted to keep these smaller, but I could see this work for some really cute cards too!

vicki-cct566-critter calendar-feb

And here’s the February Calendar Critter with the grumpy love pig!! LOL!

I stamped, colored him in with Copics and a red gel pen for accents and cut him out with the coordinating die set.  I also took the frame die from the calendar scene die set and cut it out from some red glitter cardstock and attached it over the pink heart background.

I then popped him up with foam tape and stamped the sentiment right next to him.  I took the heart sequins and glued them around the pig.  I used a gel pen to draw a heart around Valentine’s Day.  Lastly, I layered this calendar onto a piece of coordinating pink cardstock.

Hope you’ve enjoyed my “Grumpy Calendar Critters” today and please be sure to stay tuned in for more months in the future!  Thanks so much for stopping in! 

Challenges:

  1.  Use Your Stuff – numbers (hope a calendar counts!)
  2. Crafty Creations – Anything Goes
  3. Crafting By Designs – Layer it Up

Cuddle Bunny at Whimsy Stamps

Hello friends!  Hope you’ve had a great weekend!  The last time I posted I mentioned it was so nice that we could cook out on the grill, well this week it’s snow conditions and very cold!  With life in the Midwest, you never know what you’re going to get.

I thought it would be nice to turn that warm weather feeling to the inside of my craft room and create with this January released digital image from Whimsy Stamps:

vicki-wscuddlebunny-jan15

Fell in love with this darling image by Crissy Armstrong called Cuddle Bunny.  This had been a previous rubber stamp that is now available in digital format!  I think there are many advantages to getting a digital version:  1) It NEVER runs out of stock in the store because it’s a digital file, PLUS, you don’t have to wait for it to come in the mail!  2) You can size the image(s) whatever size you want it to be!  3) You can easily combine other images with it and arrange them as you’d like before printing it out.  4) You can color with Copic markers without worrying about anything getting smeared and lastly:  5) You can still feel like you’re “getting your hands crafty” by coloring and finishing out your creation with other products!  So, if you haven’t jumped on the “digital wagon”, an image like this would be a great one to try out!

vicki-wscuddlebunny-flat

For my card, I have colored my image with Copic markers, see the detail list below and then sponged some Tumbled Glass distress ink with an ink blending foam tool and a cloud stencil.  I then cut it out with the Whimsy Stamps Notched Rectangle dies and added a yellow layer behind it that I’ve notched out by hand.

For the background I’ve taken a piece of blue watercolor paper panel and lined the top and bottom of it with a strip of flower borders from my old stash.  I used a glue pen for the centers of the flowers and attached some glitter over top.  I added a strip of sheer white ribbon across it and attached it to a piece of shimmer luster paper which was mounted onto a 5″ square yellow card base.

Lastly, I used some craft foam behind the image panel and attached it over my card and then added the ribbon bow with a chipboard flower in the center.

vicki-wscuddlebunny-close

Here’s a closer look at the image where you can see how I’ve colored it.  Hard to capture in the photo, but I’ve also taken some Nuvo White Blizzard Glitter Drops and added a tiny dot in the centers of the white flowers.  I have also used the Wink of Stella Clear Glitter Brush and went over the butterfly.

I hope you’ve enjoyed my creation today and I thank you so much for stopping in!  I look forward to sharing another project with you tomorrow!  See you soon!

Here’s the list of Copic markers I’ve used:

  1.  Dress, Hair Bow & White Flowers:  Y17, Y15, Y13, Y11, B00, B000
  2. Shoes:  E87, E84, E81
  3. Hair & Skin:  E49, E47, E44, E42, E21, E11, E00, E000, R20
  4. Bunny:  C3, C1, R00
  5. Butterfly & Flowers:  V15, V12
  6. Grass & White Flower Stems/Leaves:  G24, G21, G20, YG67, YG63, YG61

Challenges I’d like to enter this card for:

  1.  Crafty Creations – Anything Goes
  2. Crafty Animals – Anything Goes #22
  3. Creative Knockouts – Anything Goes
  4. QKR Stampede – Anything Goes #330
  5. Use Your Stuff – Furry Friends

What’s New at Cute Card Thursday

Hello friends!  It’s Thursday time again and we have a new challenge for you over at Cute Card Thursday today!  The challenge for this week is…..”What’s New?

And remember these challenge themes are always your own interpretation!  Here’s what I’ve created for it:

vicki-cct564-adu-new

I thought this image was so TWEET!! 🙂  It is a “new to me” image from our sponsor this week by All Dressed Up Stamps called Home Sweet Home.  I thought this would be such a nice card for someone with a “new home”.

It was also nice to be able to use some older items from my stash as well!  I have colored up the image and used a heart die to cut it out with.  I’ve also sponged some color around the edges and added some stitching details with a marker.  For the patterned papers in the background, I’ve used a paper piercer tool and made stitch marks over the holes with a white gel pen.  I layered it onto a piece of white cardstock which I then layered onto a piece of 5″x5″ Sahara Sand top folding card base.  BEFORE attaching my white layer onto the base, I’ve added some twine around it.

I cut out a smaller heart from the die set I’ve used from some craft foam and attached it to the image heart panel and placed it over the twine on the front.  Lastly, I’ve added the wood veneer bird cage and flowers and twine bow.

vicki-cct564-adu-close

Taking a closer look at the image, you can see that I’ve used various colors of Copics to color it in with.  I went around the images with a W0 which matched up nicely with the colors of the main card panel.  You can also see places where I’ve added a bit of sparkle from some colored gel pens and extra “dots” around the image with a white gel pen.  It was actually a really simple and fun image to color!

vicki-cct564-adu-flat

Thanks so much for stopping by today and I wish you a wonderful day!

Challenges I’d like to enter for this card:

  1.  CRAFT – New (year/job/baby, etc.) – for me:  new home and new stash
  2. All Dressed Up Stamps challenge – Anything Goes + ADU image
  3. Cardz 4 Galz – New Year/New Stash (image and hearts dies)
  4. Alphabet Challenge – ‘U’ is for ‘Use Some Stitching:  faux or real’
  5. Crafting From the Heart – Anything Goes
  6. Try it On Tuesday – Something old/something new (new image/wood veneer, new home and old papers, old flowers, old tools!)
  7. Words 2 Craft By – HOPE (W2CB61):  “Hope is the thing with feathers that perches in the soul & sings the tunes without the words & never stops at all.” ~ Emily Dickenson                     Absolutely LOVE that!!

Whimsy Stamps + Anything Goes at Cute Card Thursday!

Hello friends! I’m not only here to share my creation for the new release at Whimsy Stamps, but also another new challenge for Cute Card Thursday which is also being sponsored by Whimsy Stamps this week!  The new challenge for Cute Card Thursday this week is another “Anything Goes“!  We look forward to seeing your creations, plus if you enter this week, you put your name into a draw for a win from our sponsor!  Don’t miss out!

Vicki-Cratefulkittens-Jan3

Now how adorable are these little cuties?!!  This is the newly released digital stamp called Crateful of Kittens from Whimsy Stamps.  I have also paired it with the newly released Oh Boy – Digital Papers.  I thought that the solid yellow and gingham would work nicely with this image to give it a happy feel!  For the sentiment I’ve used the Whimsy Stamps Bold Statements clear stamp set to stamp over some of the yellow solid paper and made my own fishtail banner with it.

I’ve added some white ribbon with a bow to go around the yellow papers and then attached it to an A2 sized white top folding card base.  For the banner, I’ve added a white daisy flower and placed a rhinestone in the center that I’ve colored yellow with a Y17 Copic Marker.

Vicki-CratefulKittens-close

Here’s a closer look for you on how I’ve colored up this image!  I’ve used a stitched square die to cut the image out with and additional die to layer some of the solid yellow digital papers behind it.  For the background of the image panel, I’ve used a cloud stencil and very lightly inked some clouds in the background.  I added some sparkle to the center of the flowers on the image with a glue pen and clear loose glitter.  I’ve also added some dots to their cheeks with a white gel pen.

Here are the Copics I’ve used to color with:

  1.  wooden crate:  E23, E25, E27, 0-blender
  2. Flowers, leaves, grass:  Y11, Y15, Y17, YG61, YG63, YG67, G20, G21, G24
  3. Kitties:  C1, C3, C5, E41, E43, E44, R20 (cheeks), W1, W3, W5

Hope you’ve enjoyed my creation today and see you soon!

Challenges:

  1.  My Time to Craft – Something NEW (New image, new papers and new friends!)
  2. Always Fun – Something NEW (ditto above!)
  3. A Bit More Time to Craft – Anything Goes
  4. Classic DT Challenge – open (Anything Goes)
  5. The Crafty Addicts – Anything Goes with optional:  “It’s a purrfect day!”
  6. Little Red Wagon – Hey Newbie! (new image, new papers and new friends!)

Celebrating at 2 Crafty Critter Crazies With a New Challenge For 2019!

Hello friends!!  Happy New Year to you!!  I hope you’ve enjoyed the celebrating with your family and friends!  Are you excited about a brand new 2019?!  I sure am!  I’ve got lots in store to share with you this year!  Hope you’re looking forward to it as much as I am!!

Let’s start this year off with a brand-new challenge over at 2 Crafty Critter Crazies, shall we?  Every first of the month there’s a brand new “Anything Goes” challenge…BUT you must use a critter somewhere on your project is all!

Vicki-2CCC22-Bugaboo

Isn’t this guy adorable?!  I have used one of our sponsor’s image for my card today from Bugaboo.  This is the Critter Balloons – elephant digital stamp.  I have actually cut him out twice and colored him in, but I cut just his head and the balloon to pop them up with some foam tape for a little dimension.

I’ve made a Center Step Card for my design today.  I kept the dimensions at an A2 standard size when it lays flat so that it will still fit inside an A2 envelope for mailing.

I’ve used some fun birthday style papers from my old stash and then I’ve used a sentiment from My Favorite Things More Essential Sentiments and white heat embossed it over a piece of black cardstock that I cut out with the Die-namics Essential Fishtail Sentiment Strips.  Lastly, I added some silver ribbon above that.

Vicki-2CCC22-Bugaboo-close

Here’s a bit of a close-up to see the dimension over the image.  I’ve also taken a glue pen over the balloon image and added some clear sparkly glitter over it.

Hope that you’ve enjoyed my card today and I’ll be back very quickly with a second post today!

Challenges:

  1.  QKR Stampede – Anything Goes #328
  2. A Perfect Time to Craft – Anything Goes

Anything Goes for Cute Card Thursday

Well can you believe the first week in December is almost already done?!  Yikes!  Christmas is coming very quickly, so I’m happy to be making up some more Christmas cards as I post along here! 🙂

Today starts another new challenge over at Cute Card Thursday and this week it is an easy “Anything Goes“!  So play, create and have fun to your heart’s content and share it with us in the gallery over there!  We look forward to seeing what you’re working on!

Vicki-WS-Christmas Unicorn-CCT559-Dec6

Now I don’t know about you, but I think a unicorn for Christmas would be a “yes please”!  I have used the new December image by Crissy Armstrong called A Christmas Unicorn.  I thought there was lots of opportunity to really bling up this fun image!

First, I have colored up this image with the following Copic markers:

  1.  Unicorn mane/tail/hooves: W9, W7, W5, W3, W1, W0
  2. Unicorn body:  C3, C1, C0, R00 (nostril/ear)
  3. Unicorn horn:  YR24, Y23, Y21
  4. Candy Cane/Ornaments:  R39, R37, R35, C1 (white areas)
  5. Tree:  YG67, YG63, YG61
  6. Star/Bell:  YR24, Y17, Y15, Y13
  7. Ground/Around entire image:  B00, B000

Then I thought one of the sentiments from the Whimsy Stamps Penguins Christmas Sentiments 1 digital set fit perfect with this image.  I fussy cut it out by hand as to capture the curve in the design and then I used a sponge dauber to apply a bit of ink around the edges of it and glued it right underneath the image.  (I think it makes it look sort of like a little ‘snow drift’ in front of the unicorn.)

For the card front base, I’ve picked out some papers to use from the Whimsy Stamps Christmas Red, Gold & Green digital collection and then added a silver glitter strip as well as a red cardstock strip that I ran through an embossing folder and then rubbed some white ink over the raised areas.  I glued these pieces to the green paper and then cut it out with a stitched rectangle die.  I mounted this piece over a piece of red cardstock that I attached to an A2 sized top folding white card base.

Vicki-WS-Christmas Unicorn-CCT559-close

Now for the details of my image, I’ve used a Spectrum Noir clear glitter brush pen to go over the unicorn horn and bell around his chest.  I then covered the candy cane with some glossy accents.

For the garland around the tree, I took a Nuvo Precision Glue Pen and sprinkled on some Sassy Silver Glitter.  For the star, I used Diamond Dust Glitter, and then, for on top of the sentiment as well as along the edges of the image panel, I ran some Nuvo Liquid Glue over it and then sprinkled on some Waterscape Glitter.  (You can see the difference in the glitters next to each other.  The Waterscape is finer than the one I used on the star.)

Vicki-WS-Christmas Unicorn-CCT559-1

I’ve then mounted the image panel onto a piece of red cardstock and attached it to the front of the card front.  I took some silver sparkle cardstock and die cut three snowflakes and attached them to the left side of the image panel and added a red star rhinestone to the center of each one.

Really had fun with the festive colors and details on this one!  Hope you’ve enjoyed my card today!

Here are some challenges I’d like to enter my card for:

  1.  Tuesday Morning Sketches – TMS482 (I flipped the sketch around)
  2. Fussy and Fancy Friday – Winter/Christmas
  3. Inkspirational – Anything Christmas
  4. Crafty Animals – Anything Goes + animal
  5. Crafty Friends – Christmas
  6. Crafty Calendar – It’s Christmas Time

We’re Recycling at Cute Card Thursday!

Hello friends!  I’m back to share our new challenge for Cute Card Thursday this week!  I have to say that I enjoyed this challenge, and I can’t wait to see what you come up with for this one.  We would like to see some “Recycling” on your projects this week!  There are so many different ways you could go…do you have a box full of “trash treasures” waiting to be used?  Now is the time to pull it out! 🙂

Here’s what I’ve come up with for the challenge:

Vicki-CCT558-Recycle-PolarBearSoup

I haven’t made these for a couple of years, but I like to save those Crystal Light plastic containers and decorate them and use them as “gift holders” or like I have here for some “polar bear/snowman soup” containers!

I try and keep the decorating somewhat simple, but I enjoy adding ribbon, glitter, etc. just for the fun of it!  I’ve used an oldie but a goodie and my fave set from My Favorite Things called “Cool Day“.  I’ve used both of the polar bear images and colored them in, fussy cut them out and attached to the containers.  I’ve also white heat embossed the sentiments from the set and cut them out with a banner die for them to stand on.  I found some matching ribbon that I’ve wrapped around the top of the container and then added the bow.  Although I didn’t take a photo of the top of the lid, I’ve also cut out some matching pattern paper to decorate the top of the lid.  I’ve used some liquid glue to add some faux snow at the bottom of the containers and then some glitter under the polar bears feet.

Vicki-CCT558-Recycle-PolarBearSoup-back

This is actually the first time that I’ve done polar bears for these.  I usually use a snowman with the snowman soup poem, but since these were polar bears, I sort of changed out the wording to make it work with my design.  LOL.  I’ve just printed it up on the computer and added a coordinating mat behind it and attached it to the back of the containers.  It slightly sticks out on each side, but I could always trim it down more if I wanted it to fit, but I was fine with it.

Vicki-CCT558-Recycle-PolarBearSoup-containters

I just wanted to share a photo of the original packaging of these containers.  I have my family save these up for me and I will create with them each year.  I have about 10 of them saved up for now.  As a crafter, we always keep our eyes peeled for something we can save and create with! 🙂

Vicki-CCT558-Recycle-PolarBearSoup-close

And here’s a closer look at the details of the polar bears.  I used my Copics to color them.  For the green one, I used the pointillism technique to create the look on the sweater.  I also made the elbow pads and the circles on the mug.  I covered the mug with some glossy accents.  I added some glitter to the top of the hat on the red one.

Thanks for stopping in today!  See you soon!

Challenges I’d like to enter:

  1.  Always Fun – Anything Goes
  2. Christmas with the Cuties – Anything but a Card
  3. Use Your Stuff – Mood board (inspired by the sweet treats, mugs and red/white colors!)
  4. Double TroubleThing 1:  My sweet treat is inside the containers!  Thing 2:  I used the mood board above from “Use Your Stuff” challenge!  Thing 3:  I used lots of “sprinkles” with faux snow and glitter!
  5. Crafty Card Makers – Anything but a Card
  6. Artistic Inspiration – Just for Fun Challenge – Anything Goes

Snow One Like You

Hello friends!  Stopping in to share a card I’ve made with an adorable Whimsy Stamps image and to remind you of the December challenge going on over on the Whimsy Stamps Inspiration Facebook Group.  If you are creating with any of your Whimsy Stamps products, I hope you will stop by and add your creation to the gallery!

Vicki-WS-CoffeePenguin-Nov20

This is the really adorable Penguin Coffee Break Digital stamp set by Crissy Armstrong…always LOVE using her adorable penguin images! 🙂  You actually get THREE digital images within this set.  You get the penguin alone like I’ve used on my card here, you also get one with the winter scene background behind him as well as just the scene by itself!  Pretty nice deal for one low price if you ask me!

I’ve made this a pretty simple card by printing out the image, coloring it up with Copics and then for the “snowflake” on the penguin’s shirt as well as the sentiment and the sparkly snowflakes in the background, I’ve pulled out the Whimsy Stamps Snow Flurry Clear Stamp Set.  I have heat embossed the smallest snowflake on the penguin’s shirt with white embossing powder and then I heat embossed the snowflakes in the background with some Sprinkle Embossing Powder and lightly ink blended some Tumbled Glass distress ink over top of it.  I wrote the “snow” letters over the cup with a white gel pen and then stamped the sentiment from the Snow Flurry stamp set underneath the cup.  I’ve cut this panel out with a cross-stitch rectangle die and then layered it over some red cardstock and then mounted this onto a top folding A2 sized white card base.

Vicki-WS-CoffeePenguin-Nov20-close

Upon a closer view, you can sort of see the sparkly embossed snowflakes in the background as well as the coloring details.  For coloring up my penguin, here’s the Copics that I’ve used:

  1.  hat/scarf/mittens:  BG78, BG75, BG72
  2. sweatshirt/hat & scarf trimmings:  R39, R37, R35 for trimming: C3, C1, blender 0
  3. Penguin Body:  C8, C7, C5, C3, C1 for feet/beak:  Y35, Y21, Y11 cheeks:  R00, R000
  4. Cup:  W9, W7, W5, W3 liquid/steam:  E29, E25, E50
  5. Snow/shadow around and under penguin:  B00, B000, B0000

I’ve also covered the trim on his hat along with the trim on shirt with a Spectrum Noir glitter brush pen.  I added a dot of Nuvo White Blizzard Glitter Drops to the center of the snowflake on his shirt as well as the liquid in his cup.

Vicki-WS-CoffeePenguin-Nov20-flat

It’s hard to capture the shimmer on his white hat trimmings, but you can see the sparkle in his cup and the center of his snowflake.   I was thinking of all of the things that you could add to his shirt besides a snowflake…so that would be fun to play with too!

Hope you’ve enjoyed my card today!  Thanks for dropping in!  I’ll be back soon!

Here are some challenges I’d like to enter this card for:

  1.  CAS Colors & Sketches – color challenge:
  2. Fab ‘N’ Funky – With an Animal
  3. 4 Crafty Chicks – Snowflakes
  4. QKR Stampede – Anything Goes #322