Halloween Hauntings

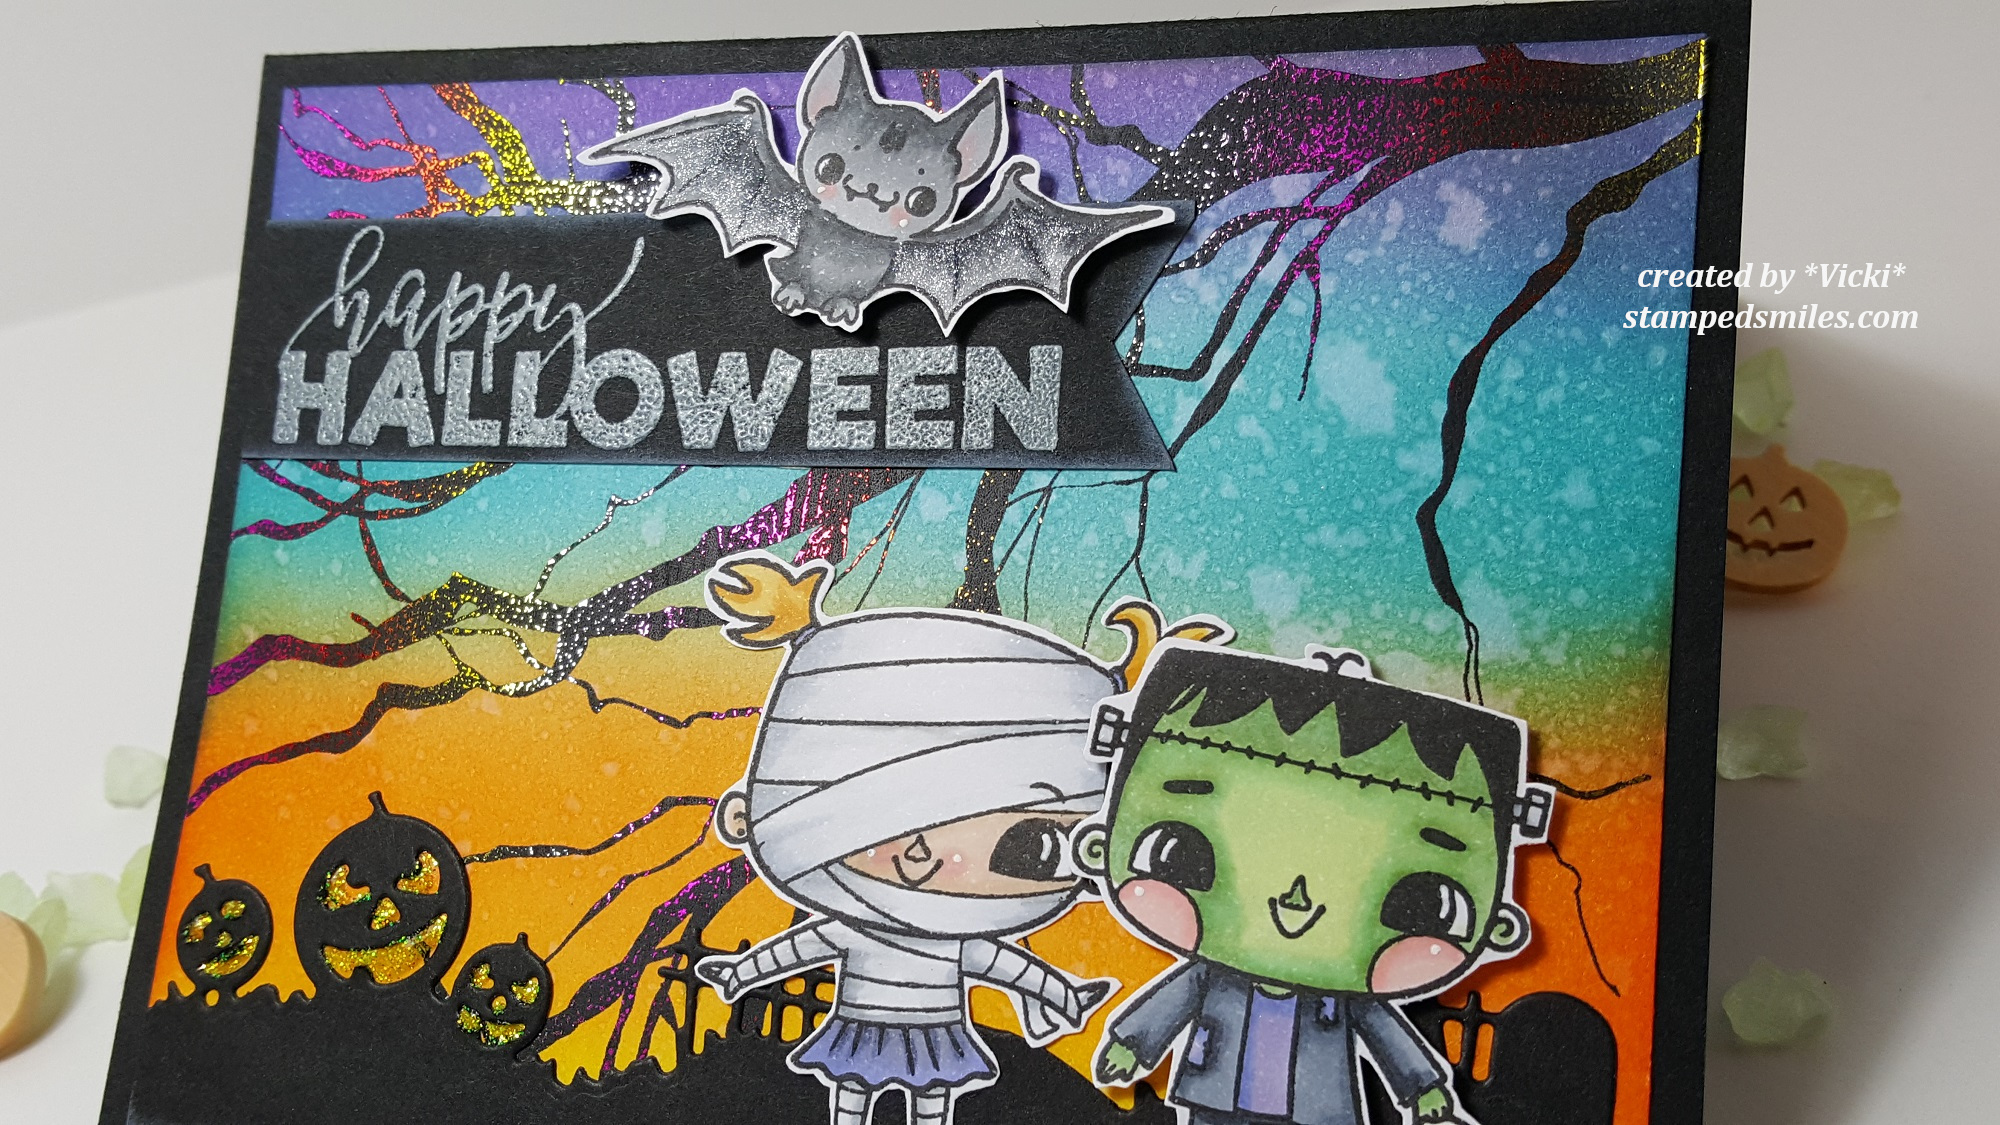
Hello friends!  It seems like this month has really flown by as I now realize that Halloween will be here next week and I wanted to get some cards sent out that I’ve made!

So here are my Halloween cards for this year….I had so much fun!

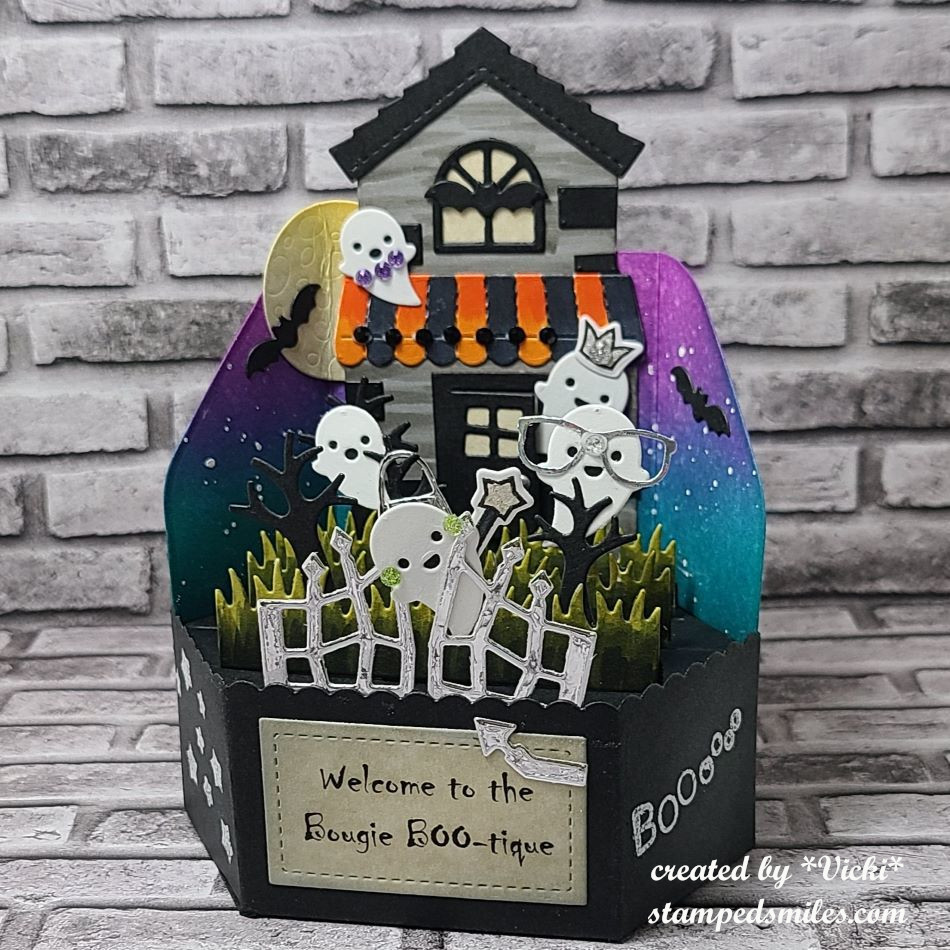
This one was so much fun putting together and it wouldn’t have been put together if it weren’t for the parameters on Craft Roulette #237 this week!  The four parameters consisted of these – 1. Project: Pop Up Card, 2. Colors: Trick-or-Treat, 3. Element: Boutique and 4. Random: jewelry

I used the Lawn Fawn Platform pop-up die and the build a house die with the Halloween add on plus a few other dies and stamp sets all from Lawn Fawn.  The front “welcome” sentiment was printed out from my computer and I made up the “Bougie BOO-tique” language to fit with the parameters of the challenge.😆  These ghosts are all blinged up and hanging out around their favorite “BOO-tique” to catch up on all of the latest trends in style!  One is wearing a necklace, another a tierra, another carrying a purse, another styling glasses with bling and the front ghost has earrings and a sparkle wand.

The background was done with the Lawn Fawn Platform Pop Up Add On around the back of the pop up.  I ink blended and then splattered with white Copic Opaque White mixed with water to get the starry night background.  This card went to my husband because he really enjoyed it and said that it wasn’t going anywhere, but it does lay flat for mailing.


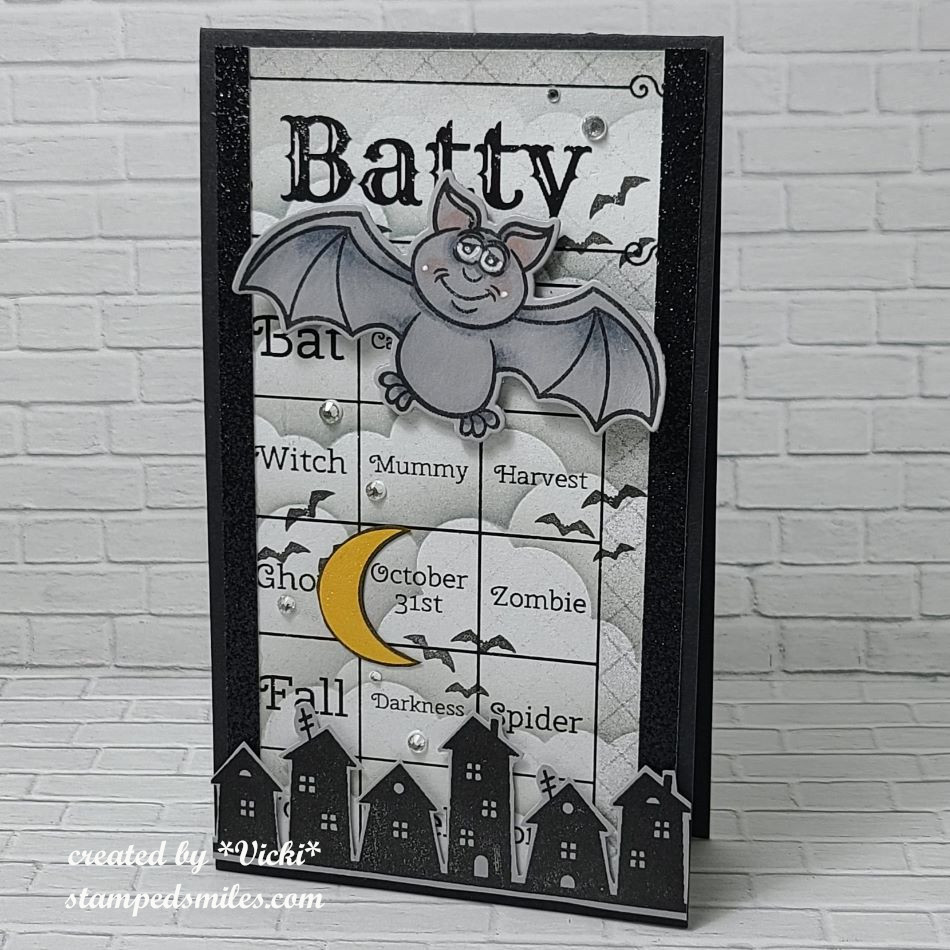
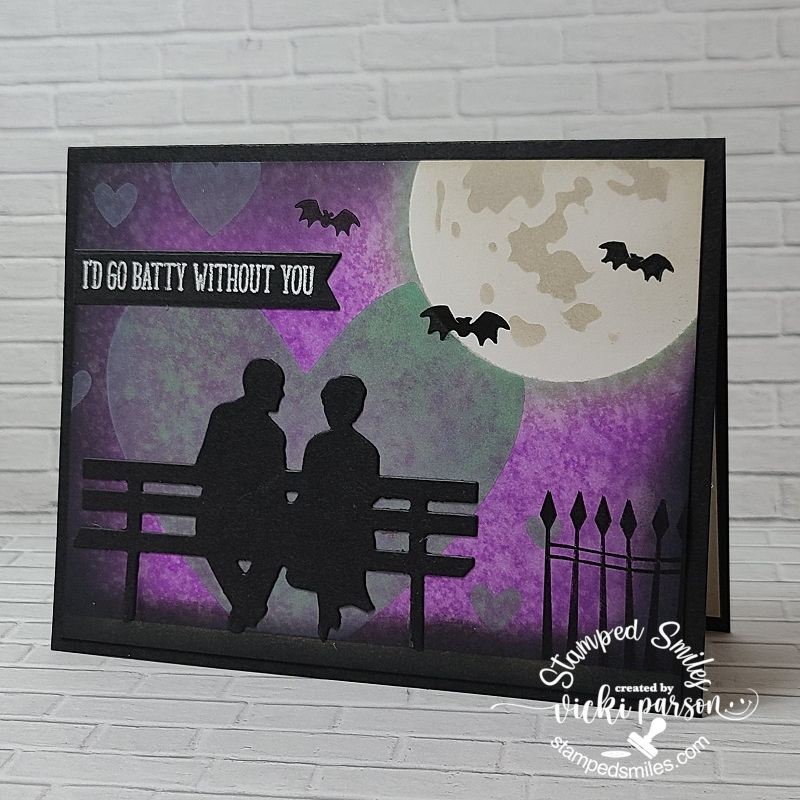
This card was done for an Inky Inkspiration Challenge over on FB for September and they were asking for a slimline card.  I’m more into making the mini slimline size rather than a full size, so that’s what I went with!  I’ve used the cute Bat stamp set for all of the images, except for the background panel, which you’ll notice it looks like a BINGO card and it is!  It was the game that we played in a Zoom class that I took with Inky Stamper and we actually used this Bat stamp set for the projects we made and the BINGO card was included.  I decided instead of throwing it away, that I would use it as background paper for my card.  I just stenciled in some gray clouds over top and stamped some bats from the set with it.  The rest were just cut out and placed on the card with the bat being popped out with foam tape.

(I would’ve showed photos from the class, but I forgot to take photos of them!)

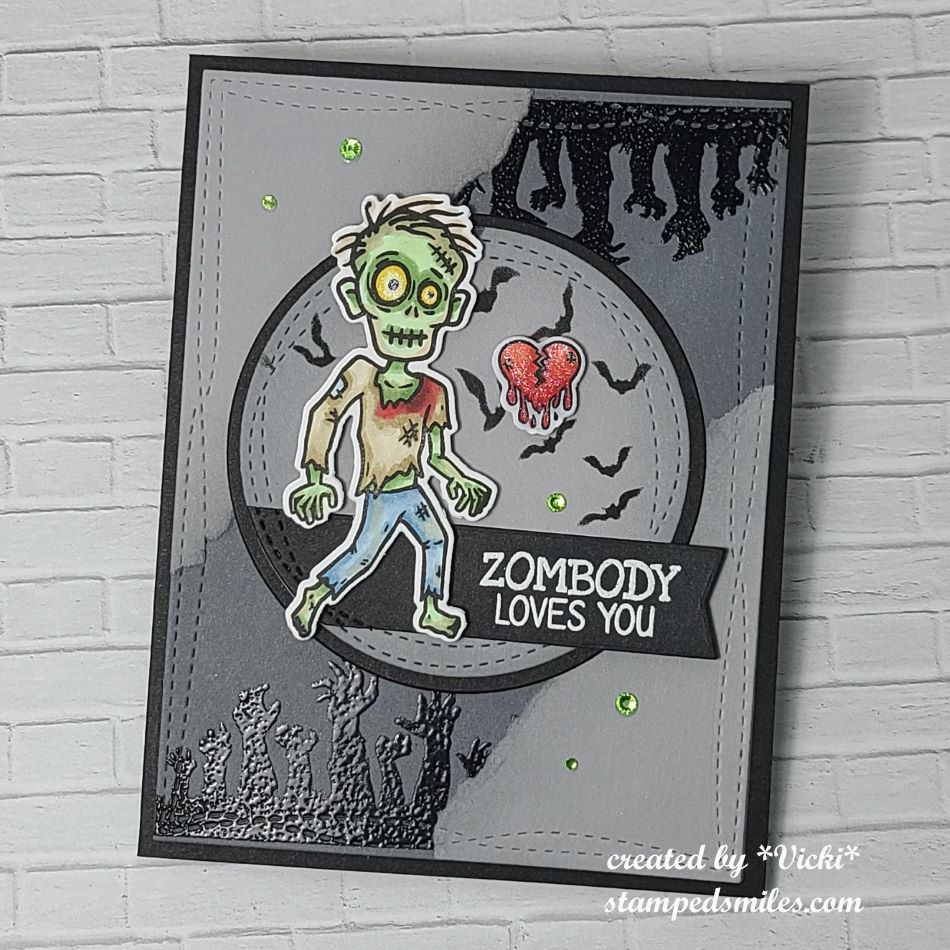
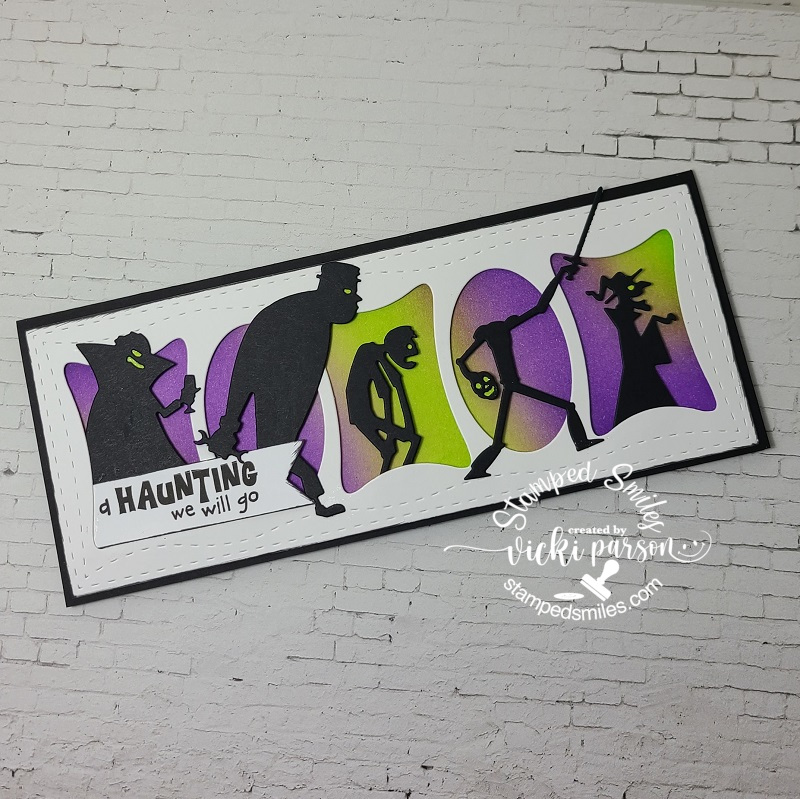
And here’s another card I made for World Card Making Day using the fun sketch from the Inky Stamper Inkspiration Group on FB.  I’ve used this really CUTE Zombie stamp set from Inky Stamper for this card.  I had so much fun coloring him up!


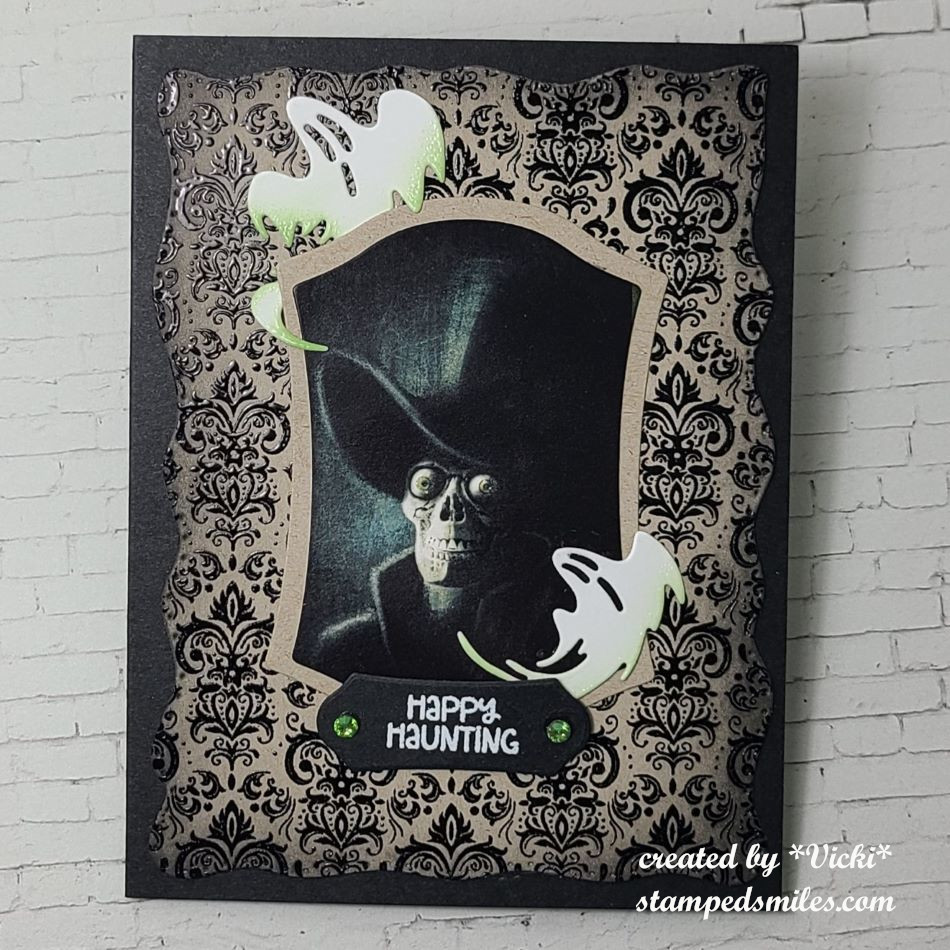
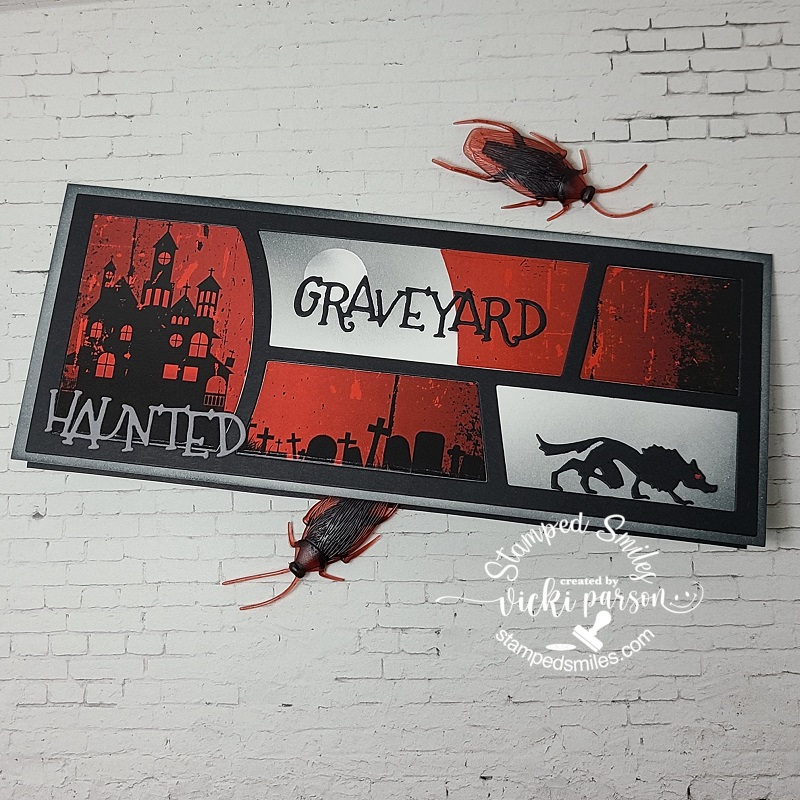
And this last card I made for someone who loves the spookiness of the season almost as much as I do!  I pulled this really cool image from an older paper pack by Whimsy Stamps.  In fact, all of the images on this card came from this store.  

I die cut the image out with the WS ATC Antique Frames including the sentiment that was white heat embossed.  The background was black heat embossed with the WS Vintage Wallpaper stamp over kraft cardstock.  I sponged some black ink around the edges which was also cut out with the WS Wavy Pieced Rectangle dies.  I cut out a few ghosts from white cardstock using the WS Boo die set and sponged some green ink at the very bottom edges.

I thought it would be fun to make the eyeballs of the skeleton and the edges of the ghosts glow in the dark, so I used some glow-in-the-dark embossing powder over them and finished off the sentiment panel with green gems.  (It’s too hard to take a photo of the glow-in-the-dark!)


Well that’s it for me today with all of the Halloween cards!  I hope you’ve enjoyed them or have been inspired in some way!  Thanks so much for stopping in and I’ll see you again on Saturday with another Art Journal Page for the month! 

Challenges:

  1. Creative Fingers – #287 Anything Goes
  2. Sisterhood of Snarky Stampers ‘H’ is for Halloween
  3. Lil’ Patch of Crafty Friends – #240 Anything Goes
  4. Pammie’s Inky Pinkies – #PIP2442 Anything Goes
  5. Make My Monday – #237 A Spooky Halloween
  6. Two Old Bats – Anything Goes Halloween
  7. Crazy for Stencils – Anything Goes using stencils + Halloween (2nd bat card)
  8. Unicorn Autumn/Halloween

It’s a Spooky Kind of Love

Happy Friday friends!  We’re now upon Halloween weekend!🎃  Are you ready?!  Lots of candy on hand to give out and some to enjoy for yourself…check.  Scary movies at the ready…check.  Ready for lots of fun before the weekend ends!

Not really sure exactly where my love for Halloween comes from, but I love it so much that even my wedding anniversary comes real close too!  So today is our 22nd year anniversary and I couldn’t have made it in this crazy life without my “Boo”!  I’ve made a card to let him know how I feel:

And yes, this is probably something we would certainly be doing under that moon as we’ve done before including watching bats fly around in the sky!  We do weird and wonderful things which is just ONE of the gazillion reasons why I love him so!  I’ve made a card with a bit of a “love/Halloween” theme.  I’m not sure I’ve ever really made a Halloween style card for him before, but I know this will make total sense for him and he’ll get a kick out it.

Started with the background using some Oxide ink blending keeping careful with leaving the “moon” area clean.  I sprayed water over top of the purplish/black background for that texture and then took a Taylored Expressions heart stencil over the background and introduced another color of oxide ink.  I ink blended the edges and bottom with black.  I have a Tim Holtz “Moon Mask” to create the moon with…which makes it super easy!  I stamped the fence at the bottom right and the bats with black ink.  The couple on the bench (TE “Love Story” die) was die cut from black cardstock and glued in the center of the large heart.  Lastly, I white heat embossed the sentiment over another piece of black cardstock and cut it out with a sentiment banner attached to the top left edge.

It’s really a simple card, but I loved creating the background with a “spooky love” feel that I know he’ll like too!

And since we’re going “all batty” here, I thought I’d share my creation that I’ve made for this months’ Inky Stamper challenge using a recycled item!  I thought this might be a good opportunity to create a fun treat!  I took an empty paper towel holder to cut a 2″ tall container with a handle and covered it with some Doodlebug papers.  I layered some trim and ribbon around it and added a punched-out circle for the bottom.

I’ve used the Inky Stamper Bat stamp set for the bat that I’ve stamped, colored and die cut for the front of my treat holder.  I’ve cut out a stamped sentiment banner to tie onto the handle.  Really easy and fun to create!  You could get about 5 containers per empty roll which I thought was a lot!

I sure hope you’ve enjoyed my “BATTY” makes today and I wish you a very frightfully FUN weekend!

HAPPY HALLOWEEN!!!!!!

Challenges:

  1. Creative Knockouts – Anything Goes
  2. Alphabet – ‘O’ is for Outdoors
  3. Sweet Stampin’ – All Hallows Eve
  4. Pammie’s Inky Pinkies – Anything Goes
  5. Make My Monday – (E)scape it (scene)
  6. Little Red Wagon – Outside (outdoors)
  7. Simon Says Stamp Wednesday – Anything Goes
  8. CCEE Stampers – Create a Scene
  9. Stamping Sensations – Animals, Birds & Bugs

Boo!👻 It’s Halloween!!!🎃

Hello my crafty friends!!  Today is Halloween and I thought it would be a great time to share several Halloween themed creations that I had made during the Whimsy Stamps Virtual Retreat!  I’m actually STILL working on the project kits because there were SO MANY of them and I’m such a slow crafter there was no way that I could’ve done them within that weekend time frame!  It sure was so much fun and so many treats along with it!  So happy that I decided to join the virtual event!  I encourage everyone to join the next!!

So what I decided to do was to go through all of my 23 kits and pick out the Halloween themed ones to get them finished up before Halloween so that I would have them to share and give out!  Enjoy the spooky creative fun:

Kit 1 – spooky green behind the eyes! Slimline design
Kit 2 – Slimline design with a spooky graveyard! The cockroach bugs were a nice little “surprise gift” from our lovely instructor for the first two kits! LOL
Kit 5 – All Copic coloring and something brand new to me was coloring a scene freehand! So scary!! But I made it!
Kit 7 – a slimline die used two different ways…LOVED the ink blending!
Kit 10 – Cutest little treat box! Added crystal eyeballs to my skull and sparkled it up with sparkly clear EP. I’ve rubbed white ink around the black edges.
Kit 11 – The ink blending on this was awesome too! I have so many new combos now! The black sparkly die cut is my fave!
Kit 16 – Last but not least, this really adorable card made me giggle the whole time! I’ve added some glossy accents to the eyeballs.

So there are still SO many more kits left to do and I look forward to crafting them and sharing more with you as I go too!  Obviously these kits were created and put together by the talented group of people for Whimsy Stamps, so they’re the ones that get the credit for the creativity on these, and therefore, I won’t enter these into any challenges.

Hope you’ve enjoyed my share from the retreat and I’ll be sharing more soon!


I also have finished one more treat bag that I’ve made with the special Halloween Creative Kit from Brutus Monroe:

I used the stencil from the kit to ink over the stencil from the kit and then added the fun stamped and colored elements over the pattern paper from the kit.  I used the spooky graveyard stamp and heat embossed it over the pattern paper with Raven Sparkle EP including the moon image at the top left.

I even used the ribbon and sequins from the kit to decorate with and then added a tag from my stash to tie on the bow.

This is the little poem that I’ve attached to the back of the bag that was a fun little print out from Brutus Monroe as well as the colorful strips that I’ve used on the top and bottom portions of the image panel on the front of the treat bag.  I thought they were fun little elements to add and give out to my goblins this year! LOL!

Hope you’ve enjoyed my Halloween projects and thanks so much for dropping in!

**Please don’t forget to add your “Monsters/Ghouls” projects to the {Cupcake Inspirations} challenge too!

Want to wish all a very happy, spooky and SAFE Halloween!🎃💀👻

Happy Halloween – All Treats & No Tricks! :)

Hello friends!  I want to thank you thank you thank you from the bottom of my heart for everyone of you that has left such sweet comments full of birthday wishes and lots of kindness that you’ve shared through something we have in common which is creating and sharing smiles!  I so enjoyed the stories that you’ve left about how you share your handmade creations with others.  PLEASE continue to create doing what you love and share those smiles with as many people as you can!  It really makes the world a much better place when we can serve one another in kindness.

I have always loved Halloween as a child and have so many fond memories dressing up each year and thinking about what I would be.  I tried to pass that tradition onto my children, and I dressed up right along with them!  For me, Halloween is full of lots of fun things besides just treats!  I wanted to celebrate those memories with a card today:

Vicki-BM-HalloweenBox

I’ve stamped the trick-or-treaters and bat and then colored them up with my Copic markers and fussy cut them all out and put them aside while I worked on the rest of the card.

For the background of the card, that “tree branch” panel came in the kit, so I ran it through my laminator to foil it…it turned out awesome!  (See photo below!)  I then took my distress inks and blended in a night sky over it.  I spritzed it with water and dried it off with a towel to get the water drop look.

I took this awesome border silhouette die from Impression Obsession and attached to the bottom of the scene for the trick-or-treaters to stand on.  I sponged the bottom edge with white ink.  Speaking of white ink, this is what I used to stamp the sentiment on a piece of black cardstock as well as sponge around the edges with it.  I used the glow-in-the-dark embossing powder over top of it.  (Unfortunately, I couldn’t get a good photo of it glowing in the dark…. but it does, and it looks cool!)  I made a banner with that strip and attached it to the left side of the card and then popped the bat up over it with foam tape.

Vicki-BM-HalloweenBox-foiled

Here you can capture a better look at the foiled tree branch in the background as well as the heat embossed sentiment.  I glued down the mummy girl and then I took foam tape to pop up the Frankenstein for dimension and depth.  I also added some yellow Stickles to the eyes and mouths on the pumpkins.

This card was so fun to do!  Hope you’ve enjoyed it as well!

Wishing you all a very fun Halloween however you choose to spend it!  I think I will be watching some scary movies and eating some popcorn which is something I enjoy doing with hubby!

Challenges I’d like to enter:

  1.  Creative Moments – Anything Goes with optional twist: Spooktacular
  2. Crafty Gals Corner – Halloween Colors
  3. Simon Says Stamp Wednesday – Halloween/Spooky
  4. The House That Stamps Built (O2418) – Anything Goes
  5. Moving Along With the Times – Halloween
  6. Crafty Catz – Anything Goes with an Optional Twist:  Halloween
  7. Always Fun – Halloween