Batty Anniversary

Hello friends!  I wanted to share the anniversary card I made for hubby this year.  Now that I’m posting this (without him knowing), I think I made a bat style card last year too!  It just happens to fit with this time of the year and we got married close to Halloween…so it works, right?!😉  I’m just thankful that we BOTH like Halloween!

So I fell in love with these cute cuddly bats (Yep, I said that!) from Lawn Fawn called Fangtastic Friends.  I stamped, colored and die cut out the images that I wanted before I started to work on the background.

For the background, I pulled out a cloud stenciled and mixed purple, black and blue oxide inks to blend in a night sky.  I spritzed it with water for the water droplets.  I then die cut the full moon from the LF Full Moon die set and then used some Distress Mica Stain Harvest Moon and sprayed over it so it has a bit of a shimmer to it.  I placed it where I wanted to go over my sky background and then cut them both out with a double-stitched rectangle die and attached the panel to a side folding A2 black card base. (The sentiment strip was added before attaching)

The sentiment was heat embossed over a black strip of cardstock using some white glitter embossing powder.

I attached this strip at the bottom of the sky panel and cut off each end.  I added the rest of the elements and images to my scene and stamped the “eek!” by the bat on the right and a couple of hearts on the moon above the hanging couple.  I added some shimmer to the hearts with a purple glitter gel pen.

I thought I would share the inside of the card with the stamped hanging spider, the sentiment and the hearts I stamped around it with some more of the purple glitter gel pen coloring.  I also used some purple and black distress oxide inks to blend around the edges of my white inside panel which was also cut out with the double-stitched rectangle die.

I certainly do love hanging out with my husband, but hopefully not in the manner on the card!😅

  • We’re enjoying time together right now as this has been scheduled to post, so I hope you enjoy and thanks for dropping in!  I’ll see you soon!

It’s a Spooky Kind of Love

Happy Friday friends!  We’re now upon Halloween weekend!🎃  Are you ready?!  Lots of candy on hand to give out and some to enjoy for yourself…check.  Scary movies at the ready…check.  Ready for lots of fun before the weekend ends!

Not really sure exactly where my love for Halloween comes from, but I love it so much that even my wedding anniversary comes real close too!  So today is our 22nd year anniversary and I couldn’t have made it in this crazy life without my “Boo”!  I’ve made a card to let him know how I feel:

And yes, this is probably something we would certainly be doing under that moon as we’ve done before including watching bats fly around in the sky!  We do weird and wonderful things which is just ONE of the gazillion reasons why I love him so!  I’ve made a card with a bit of a “love/Halloween” theme.  I’m not sure I’ve ever really made a Halloween style card for him before, but I know this will make total sense for him and he’ll get a kick out it.

Started with the background using some Oxide ink blending keeping careful with leaving the “moon” area clean.  I sprayed water over top of the purplish/black background for that texture and then took a Taylored Expressions heart stencil over the background and introduced another color of oxide ink.  I ink blended the edges and bottom with black.  I have a Tim Holtz “Moon Mask” to create the moon with…which makes it super easy!  I stamped the fence at the bottom right and the bats with black ink.  The couple on the bench (TE “Love Story” die) was die cut from black cardstock and glued in the center of the large heart.  Lastly, I white heat embossed the sentiment over another piece of black cardstock and cut it out with a sentiment banner attached to the top left edge.

It’s really a simple card, but I loved creating the background with a “spooky love” feel that I know he’ll like too!

Here’s a collection of just a few snippets of some current moments we’ve had:

And since we’re going “all batty” here, I thought I’d share my creation that I’ve made for this months’ Inky Stamper challenge (over on the FB InkyStamper Inkspiration Group) using a recycled item!  I thought this might be a good opportunity to create a fun treat!  I took an empty paper towel holder to cut a 2″ tall container with a handle and covered it with some Doodlebug papers.  I layered some trim and ribbon around it and added a punched out circle for the bottom.

I’ve used the Inky Stamper Bat stamp set for the bat that I’ve stamped, colored and die cut for the front of my treat holder.  I’ve cut out a stamped sentiment banner to tie onto the handle.  Really easy and fun to create!  You could get about 5 containers per empty roll which I thought was a lot!

I sure hope you’ve enjoyed my “BATTY” makes today and I wish you a very frightfully FUN weekend!

HAPPY HALLOWEEN!!!!!!

Challenges:

  1. Creative Knockouts – Anything Goes
  2. Alphabet – ‘O’ is for Outdoors
  3. Sweet Stampin’ – All Hallows Eve
  4. Pammie’s Inky Pinkies – Anything Goes
  5. Make My Monday – (E)scape it (scene)
  6. Little Red Wagon – Outside (outdoors)
  7. Simon Says Stamp Wednesday – Anything Goes
  8. CCEE Stampers – Create a Scene
  9. Stamping Sensations – Animals, Birds & Bugs

Color Challenge Reminder Bagged for {Cupcake Inspirations}

Happy Monday morning to you friends!  As I have pre-scheduled this post, I’m sure that I’m probably worn out from a weekend of crafty fun!🥱  Sleeping is over-rated anyway, right?!😆  (I will share some fun things with you all later though!)  But for now, I’d like to remind you about our color combo challenge for {Cupcake Inspirations} and hope you will join in the fun with us using Olive, Red & Lavender:

From my last post, I’m continuing on with making Halloween treat bags for my grands so I thought I’d pull out the colors that would work for this color combo challenge too! Plus, I’m also adding this to another entry for the Whimsy Stamps 31 Nights of Halloween:

Halloween-31-Nights-blog-banner-2018-whimsy-stamps

I fell in LOVE with those Whimsy Stamps Haunted papers!  I thought it would be a fun backdrop for this darling little Whimsy Stamps Frankie digital stamp to be in front of!  I colored her up with Copics and fussy cut her out and popped her up over the background paper.

Before I placed the background paper over the bag, I took the Batty Stencil from Brutus Monroe and went over the paper sack with some Black Soot Distress Ink.  I cut a couple of strips of cardstock to go with the color combo and white heat embossed the sentiment from the Whimsy Stamps Corny Candy Corns stamp set.  I’ve also added a couple of the silver mirror cardstock stars around it and then used some foam squares to pop up the Frankie girl with.

To close up the treat bag, I folded over the top and then punched a couple of holes in the top and added a tag from a paper pack in my stash, rubbed some Black Soot Distress Ink around it and tied it on the bag with the olive colored yarn string that was tied in a bow.

Here’s a closer look at the colored up image and how I’ve incorporated the colors into it.  I did use a silver metallic gel pen to color in the “bolts” on the sides of her head and then used a white gel pen to dot her eyes and cheeks with.  I think that hair is my favorite part about her!  She’s just too cute to spook, I think!😁

Please be sure to hop on over to the {Cupcake Inspirations} blog to see what the rest of the talented DT has for inspiration for you and join in the challenge with us!  

Thanks so much for dropping in today!  I hope you’ve enjoyed my project and I’ll be seeing you again soon!

Challenges:

  1. The Cutie Pie Challenge – Too Cute to Spook
  2. Aud Sentiments – #262 Halloween/Fall Sentiment
  3. A Bit More Time to Craft – #126 Anything Goes
  4. QKR Stampede – #406 Anything Goes
  5. Crafty Catz – #523 Anything Goes
  6. Creative Fingers – #195 Anything Goes
  7. My Time to Craft – #443 Halloween or Cats
  8. This is Halloween – #2 Anything Goes Halloween (3rd and last entry) NEW!!!
  9. Two Old Bats Halloween – #1 Anything Goes Halloween “Jump Start” (3rd entry) NEW!!!

👻🦇🕷👁🎃(Please support the Halloween challenges and get them going!  All lovers of Halloween unite!)

Crafting Retreat Hang-over Plus ICAD Week 7

Hello friends!  Oh no…It’s been a week since my last posting!  I have a “crafting hang-over” if there is such a thing! LOL!  There were so many things to get done after my 3 day crafting stint and I just couldn’t get it all in!  I ran out of steam!

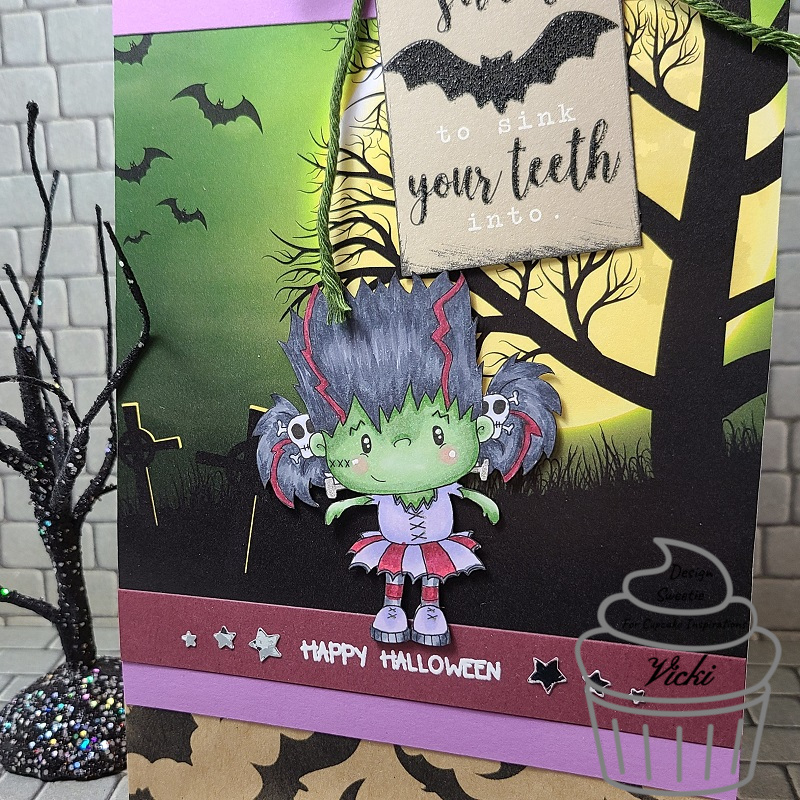
For my 3 day crafting event, it was a local friend who puts together 3 days full of classes, prizes and food!  They mostly get involved with painting because there are 3 of them there (including my mom) that are very talented advanced tole painters.  This is something that I’m slowly learning how to do with the help of my mom.  It’s fun to be able to spend time with her doing something she enjoys and I get to learn a new craft too!  Don’t worry, I am still a true blue stamper to the end! 🙂  But since it was mostly painting, I brought my painting supplies with me and not my stamping supplies.  I even taught a class with my mom and here’s my version of the mixed media sample we taught for class:

Vicki-Halloween-AlteredBottle

There are several people that enjoy making Halloween projects there, so mom and I came up with this fun altered mixed media bottle with a glow-in-the-dark window and green ooze bubbling out the top with some flying bats coming out!

Mom had her idea all mapped out and sketched on a piece of paper and was having a hard time getting going with it.  So I asked her if I could take her sketch of what she wanted and give it a try.  At the time I started it, 
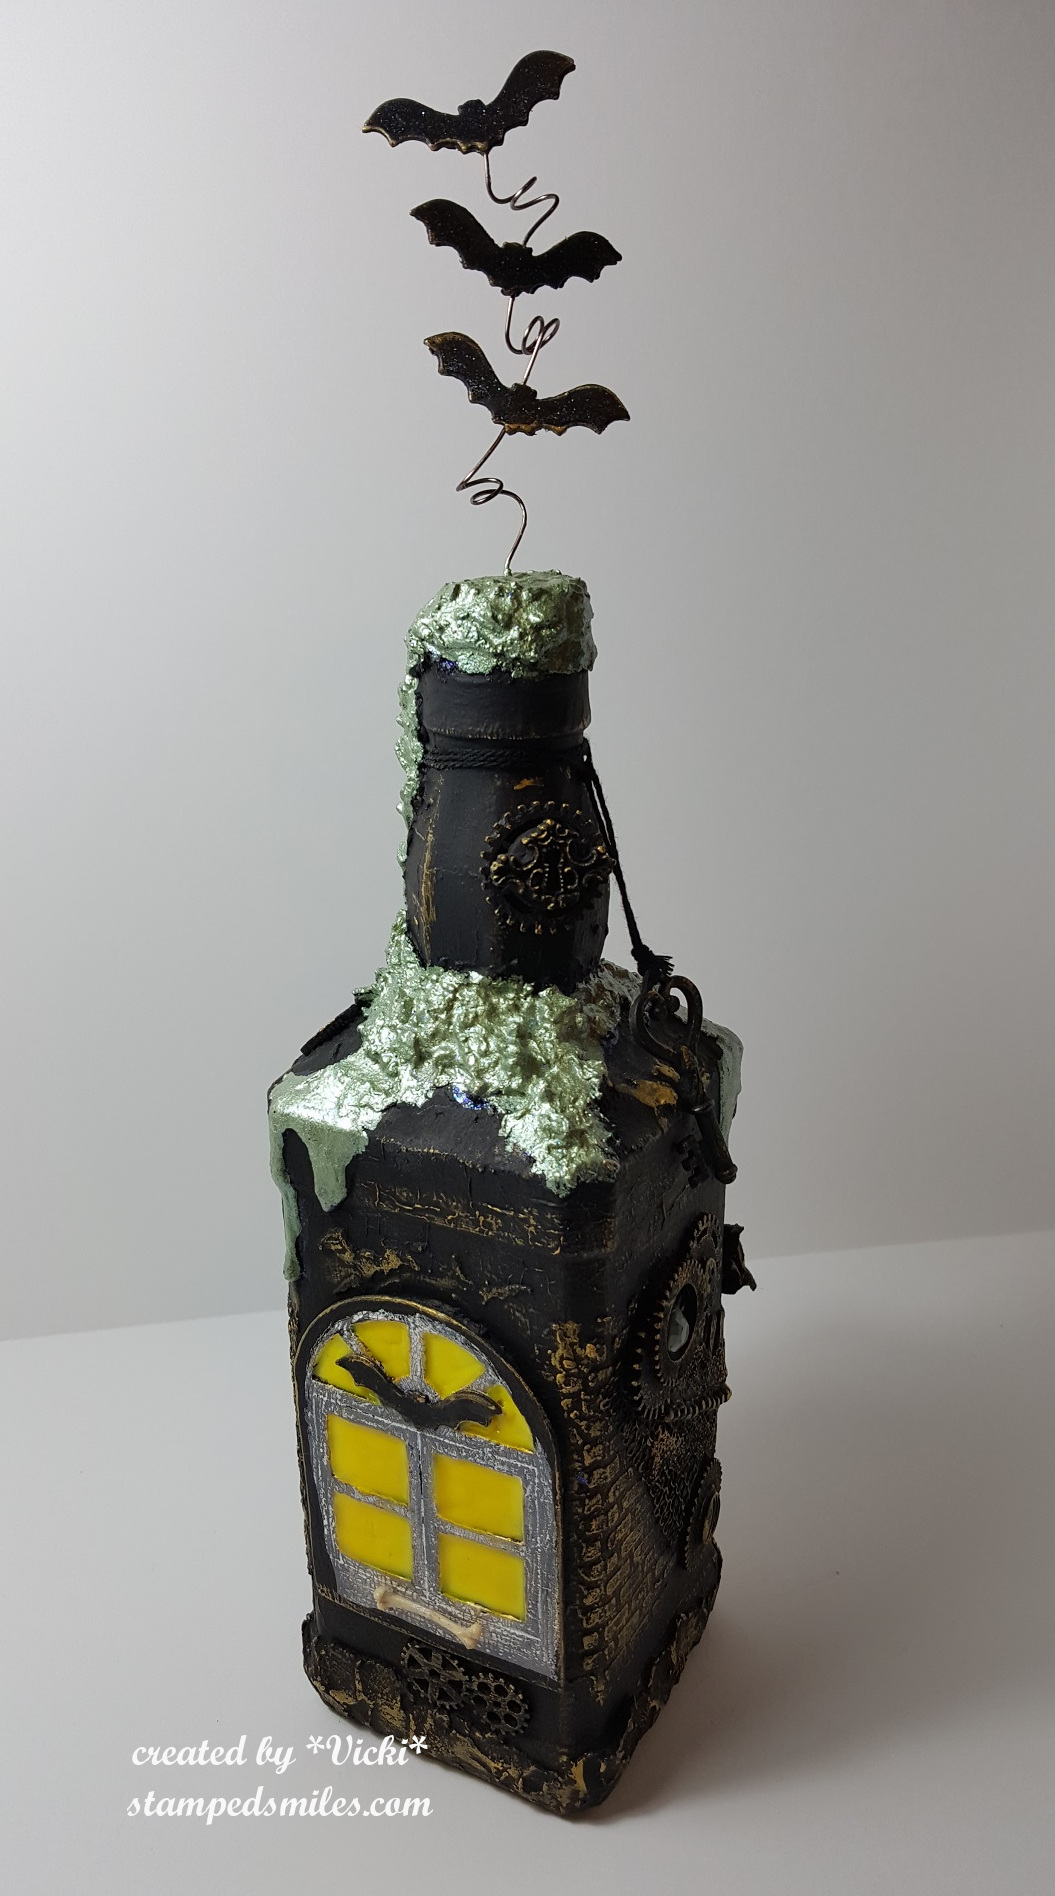
I had a Jack Daniels bottle to alter and went with that to follow her sketch.  The advantage that I had compared to everyone else is that I had four flat sides which made it a tad bit easier to attached items to it.  These girls were tough and creative and made it work and made it fun!  The window that I put on even glows in the dark with some special glow-in-the-dark embossing powder!  I then covered it with some glossy effects for a “window” look.  Of course my mom had special glow-in-the-dark paint and that’s what everyone in class used for their windows.  They are all so cool looking and I loved seeing all the different results!

Vicki-Halloween-Alteredbottle1

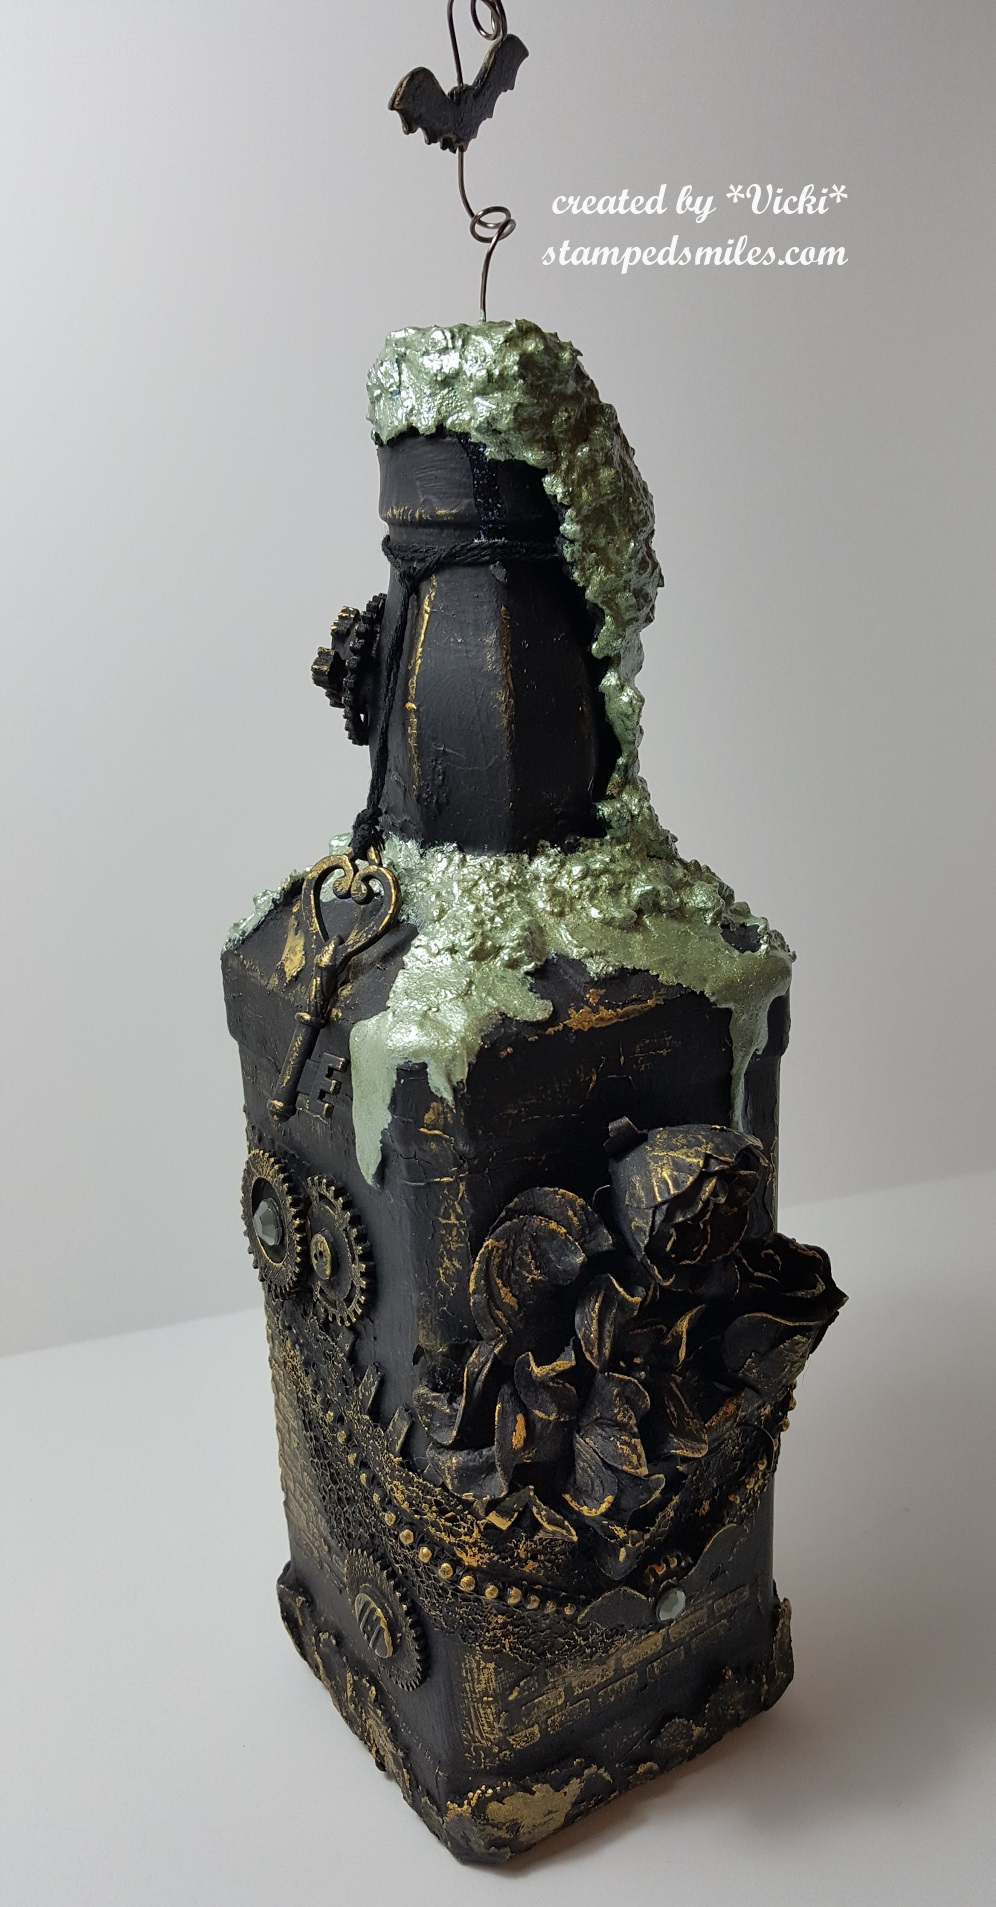
A closer look at the bottle and turned to the other side, you can see all of the texture that I attached to the bottle with the flowers, embossing paste, gears, bats, etc.  I was going for a steam punk look for the bottle portion (which is why I went over the texture with just a gold metallic texture paste.)  and I thought it would be cool to make the green goo coming out at the top, so that was fun to paint with a metallic green.  There were lots of little tips and tricks everyone learned along the way.  It was funny because everyone didn’t understand why they were painting over everything they worked so hard putting onto the bottle.  LOL!  After the texture paste, there was the excitement!

Vicki-Halloween-alteredbottle2

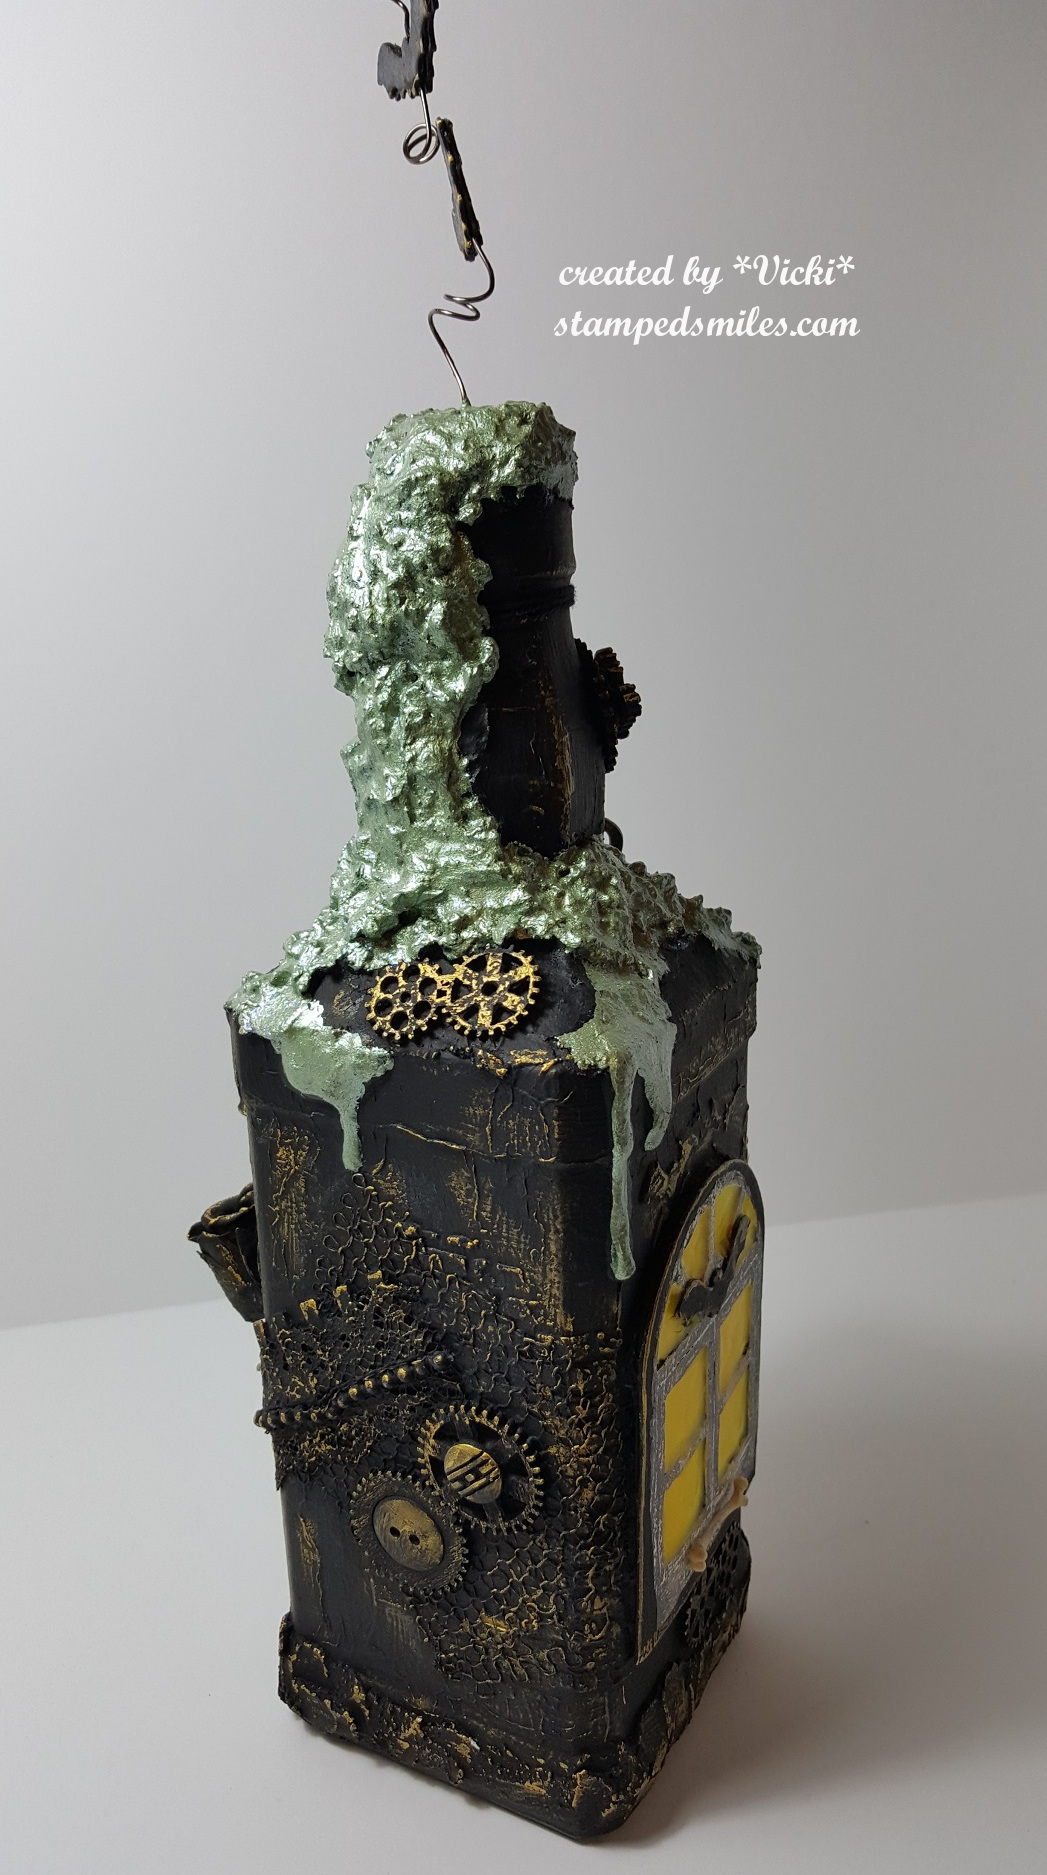
This is just another side view of the bottle with the added texture I’ve put on it.  I was able to collect some unique items for everyone’s bottle through my husband’s work in a manufacturing setting that had little metal pieces…no idea what they are, but it was something fun and unique to add texture to the bottle.  And of course I had gears, buttons, stencils with embossing paste, flowers, etc.  The windows and bats were all cut out with some dies that I had.  That window die is actually from Lawn Fawn!  The tiny bone sticking out on the window is of course Tim Holtz.

Painting Divas 2018

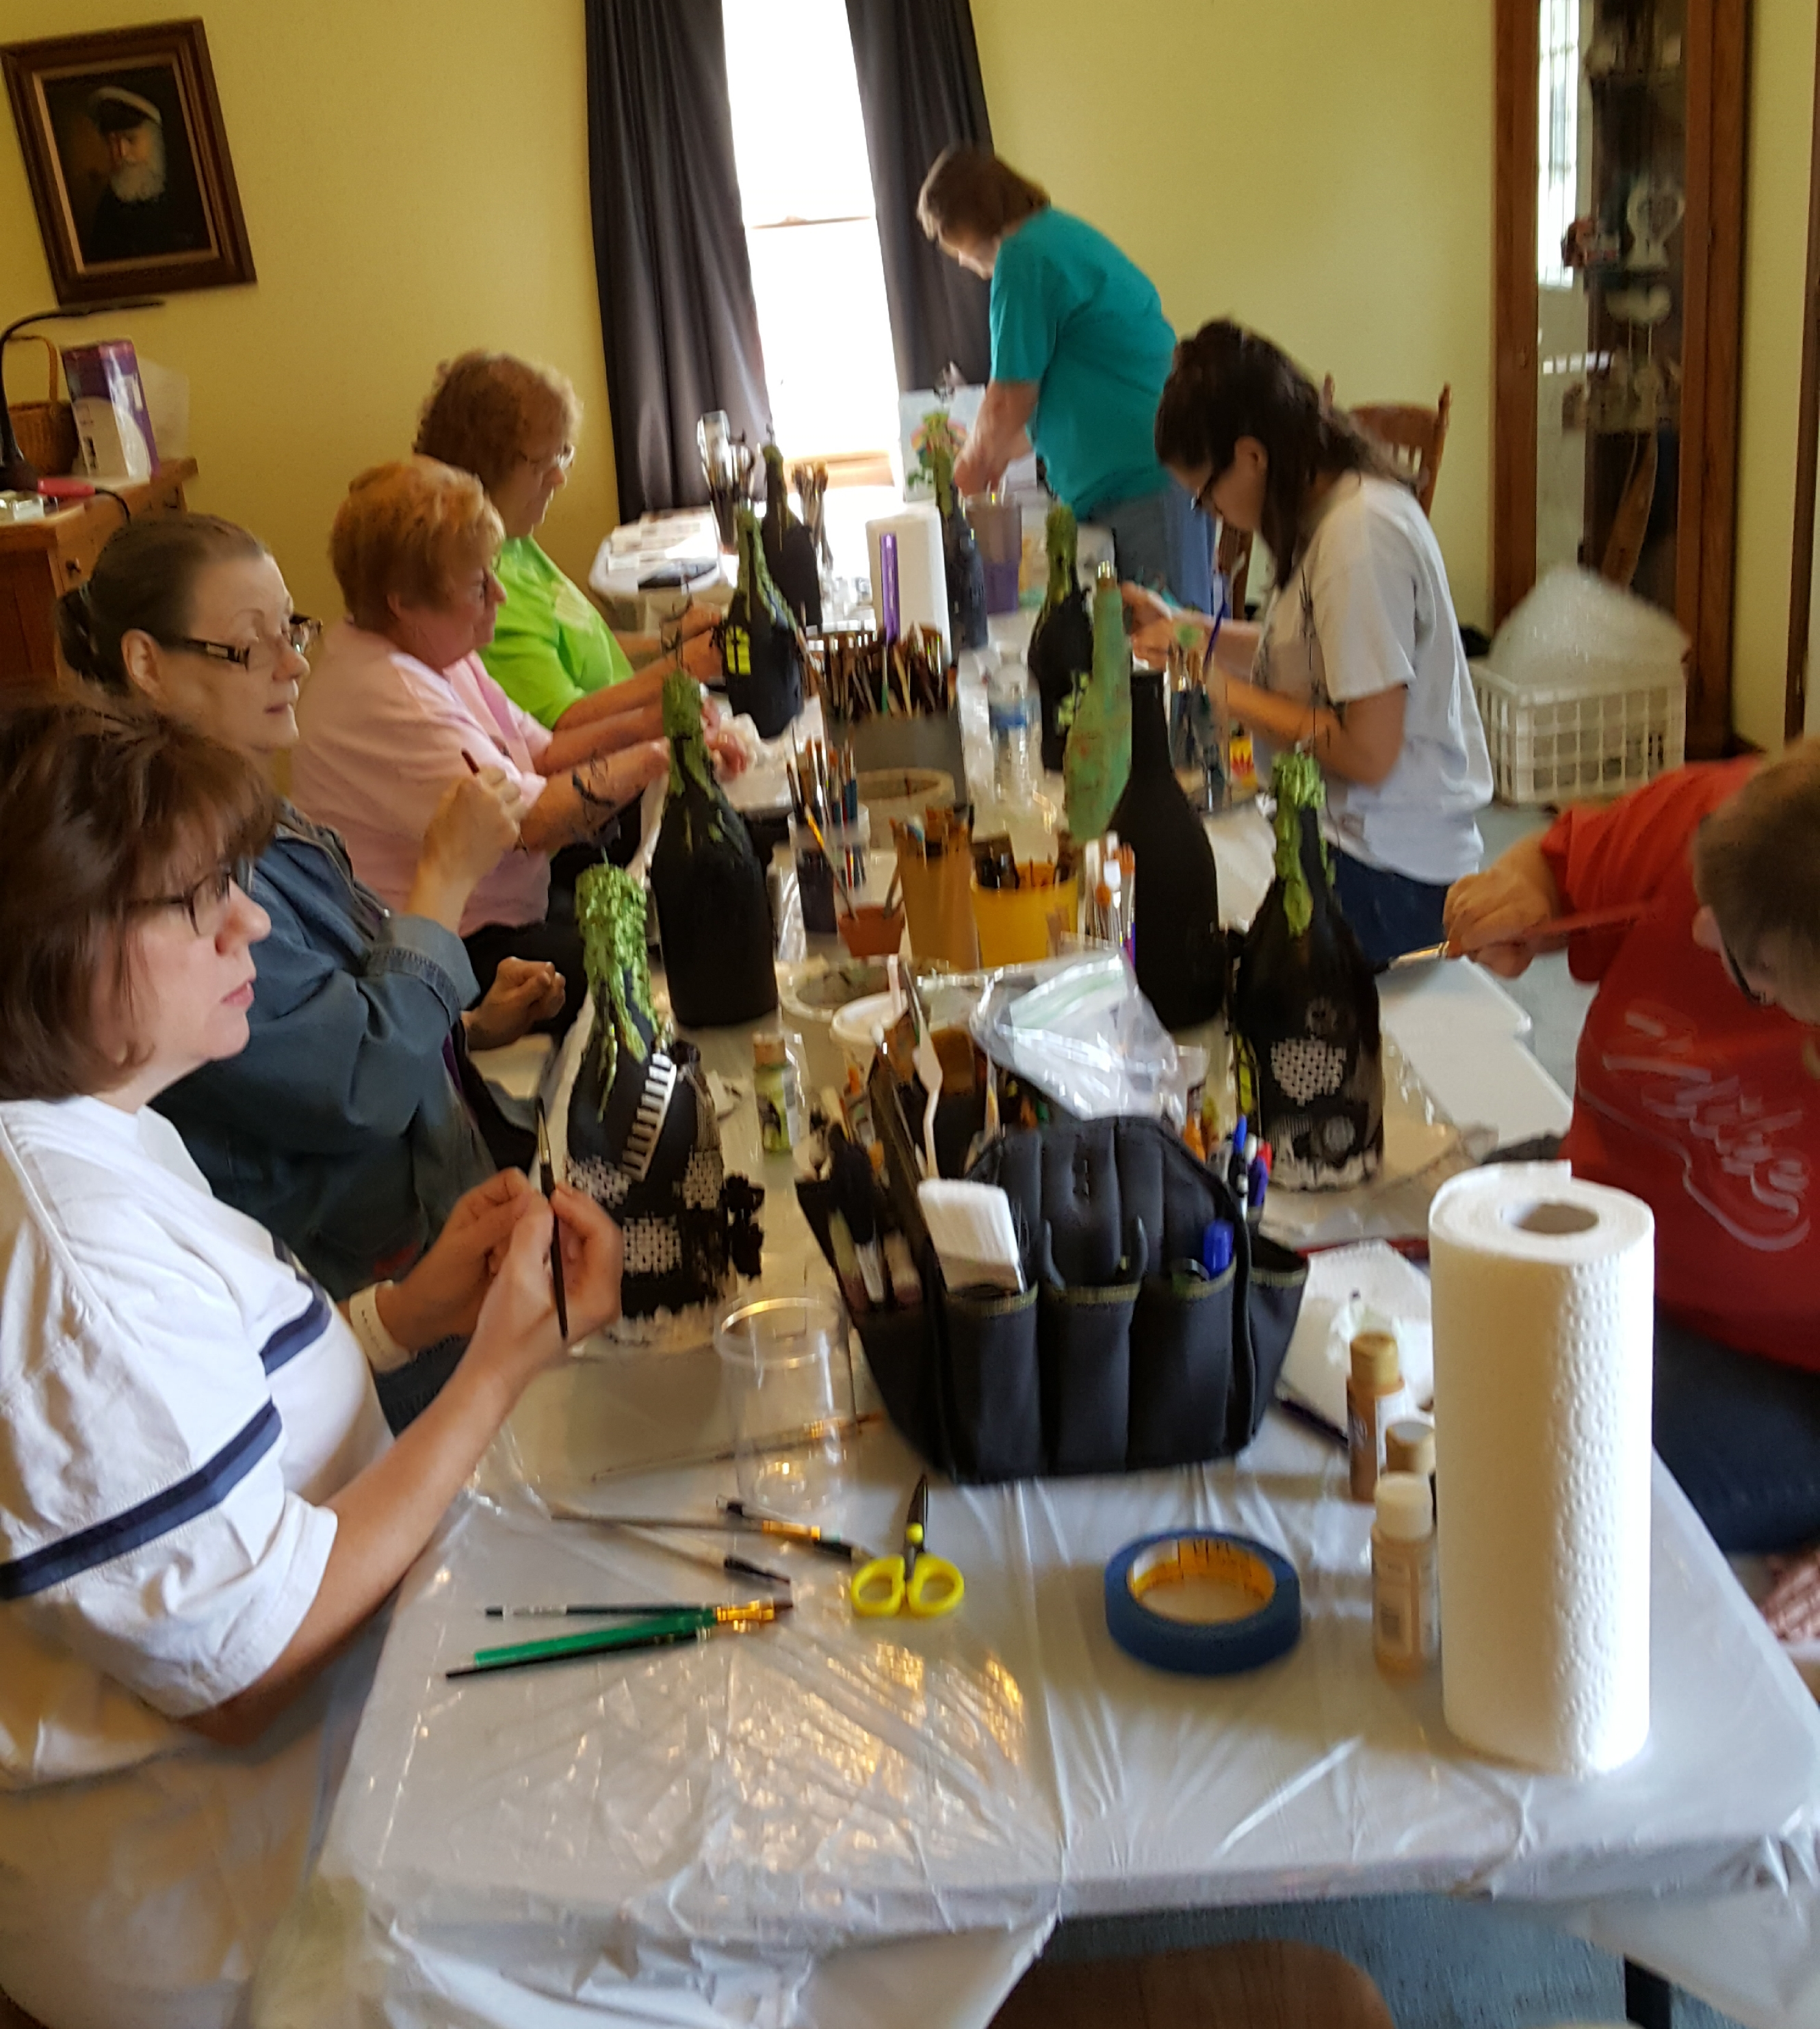
Here are some of the girls having fun with their bottles in class.  They are very intently working on getting their bottles just right! 🙂  Of course it’s hard to get everyone together at one time in a photo, but there were a couple more people there including myself not shown.

Painting Divas-2018-Doris-mixedmedia bottles

Here’s a look at the bottles from class!  I think everyone enjoyed this concept and I even had an additional bottle that I made they really enjoyed the other sample that I made too.  So I made a different theme on this one:

Vicki-Mermaidbottle-main

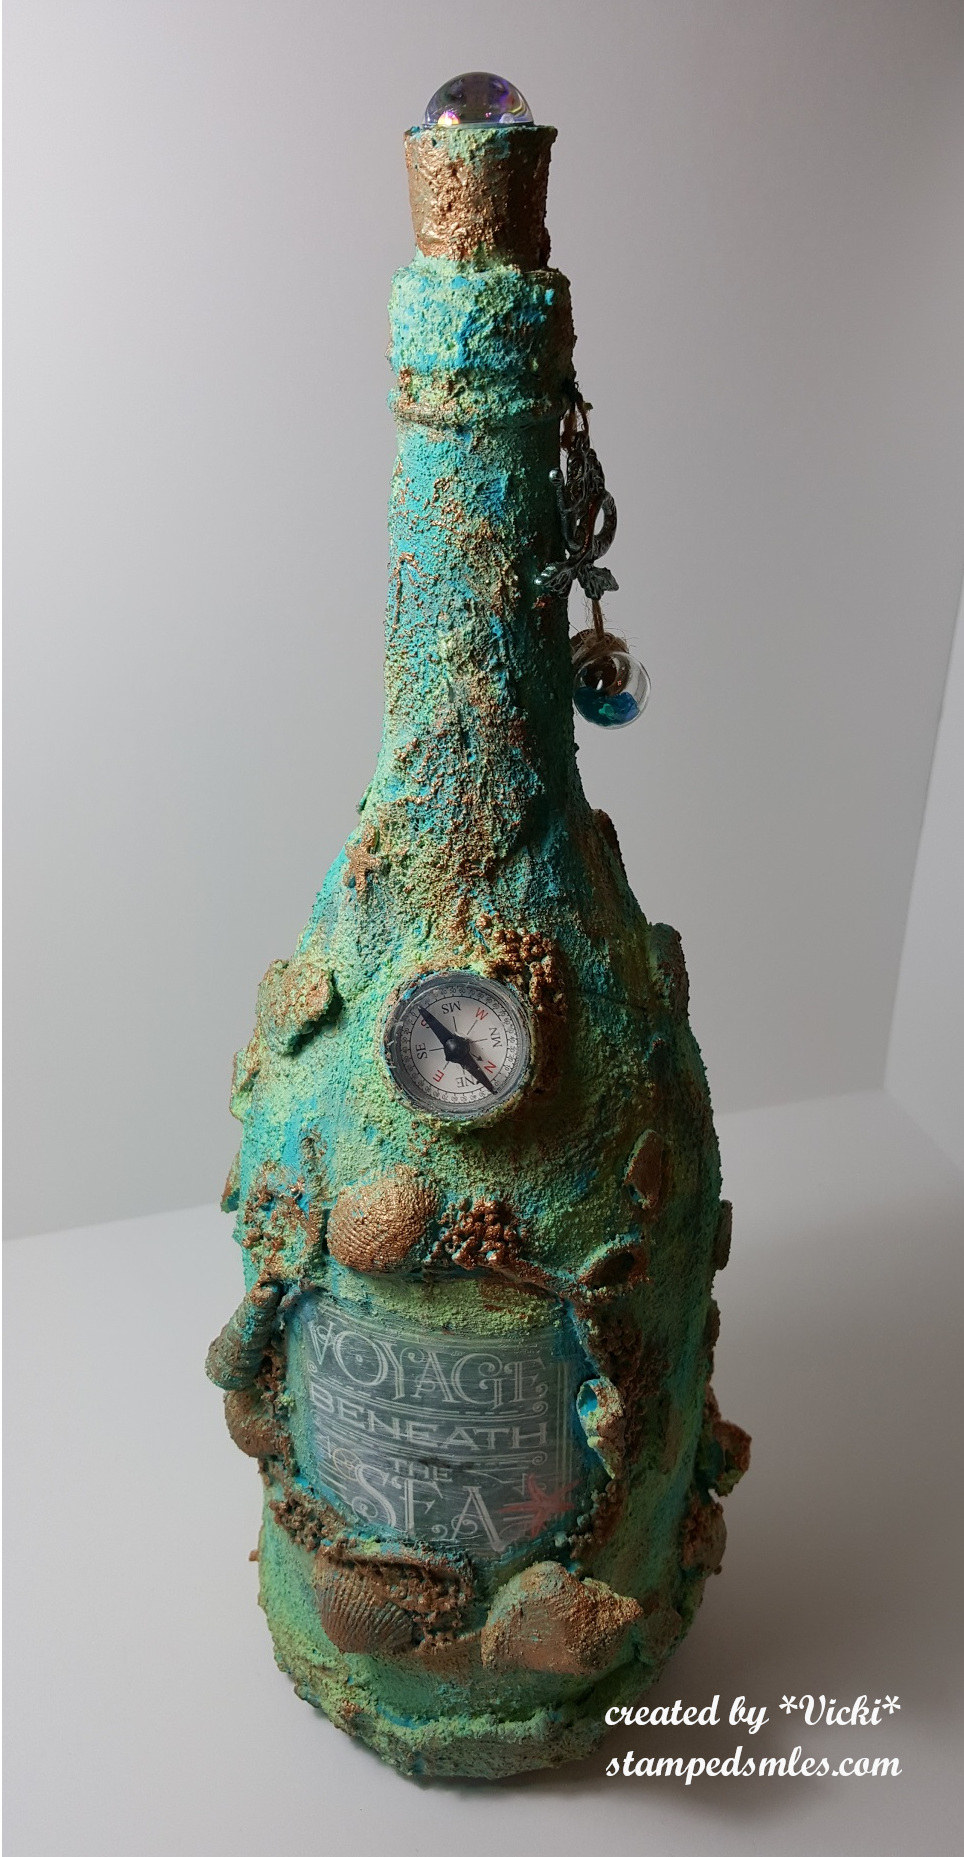
For those that are not Halloween fans, I showed them a completely different look with the bottle.  This is my “Mermaid bottle” that I’ve made with Patina Effect Texture Pastes and copper metallic paints.  I used some sea shells that I have along with some rope, beads, texture paste, cheese cloth and lots of other little tid bits I had on hand.  I  got a cork and used it for the top of the bottle and added a gem on top.  I really like how texturized the paste made the bottle look.

Vicki-Mermaidbotle1

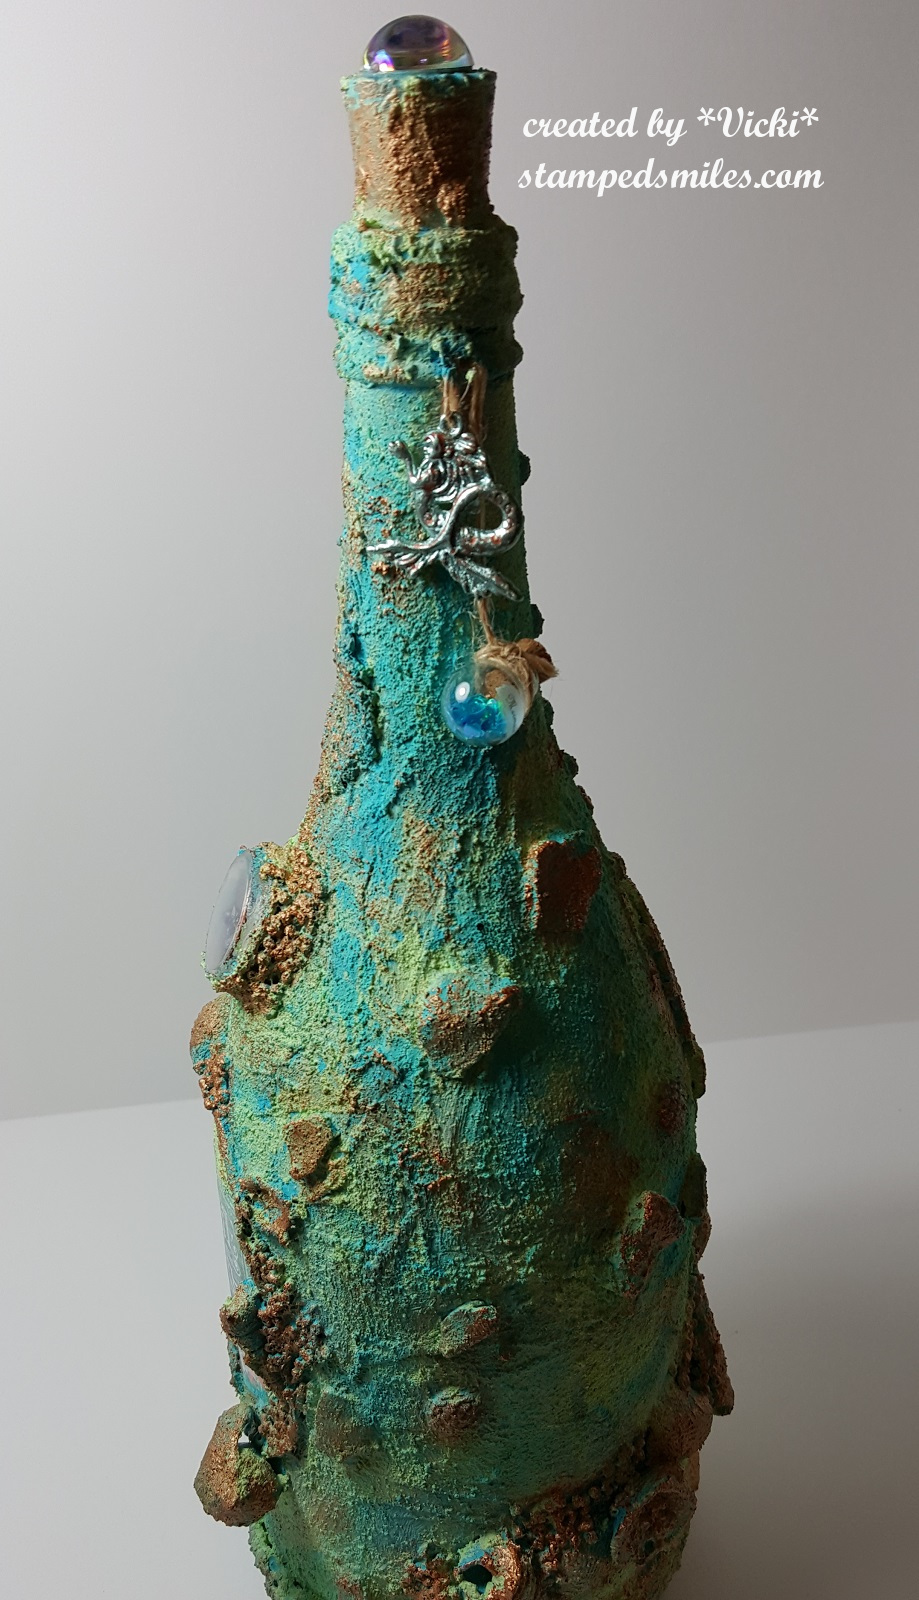
Turning the bottle around, you can see more detail on the bottle along with the charm and tiny jar I have hanging down around the cork at the top.  I painted a silver mermaid charm with some Mermaid Sparkle metallic paint of course and then touched up the edges of it some copper texture paste.  For the bottle, I had a package of tiny bottles and I filled one with some blue sequins and made this tiny tiny label over vellum and attached it to the bottle.  It says “Mermaid Tears”.

Vicki-Mermaidbottle3

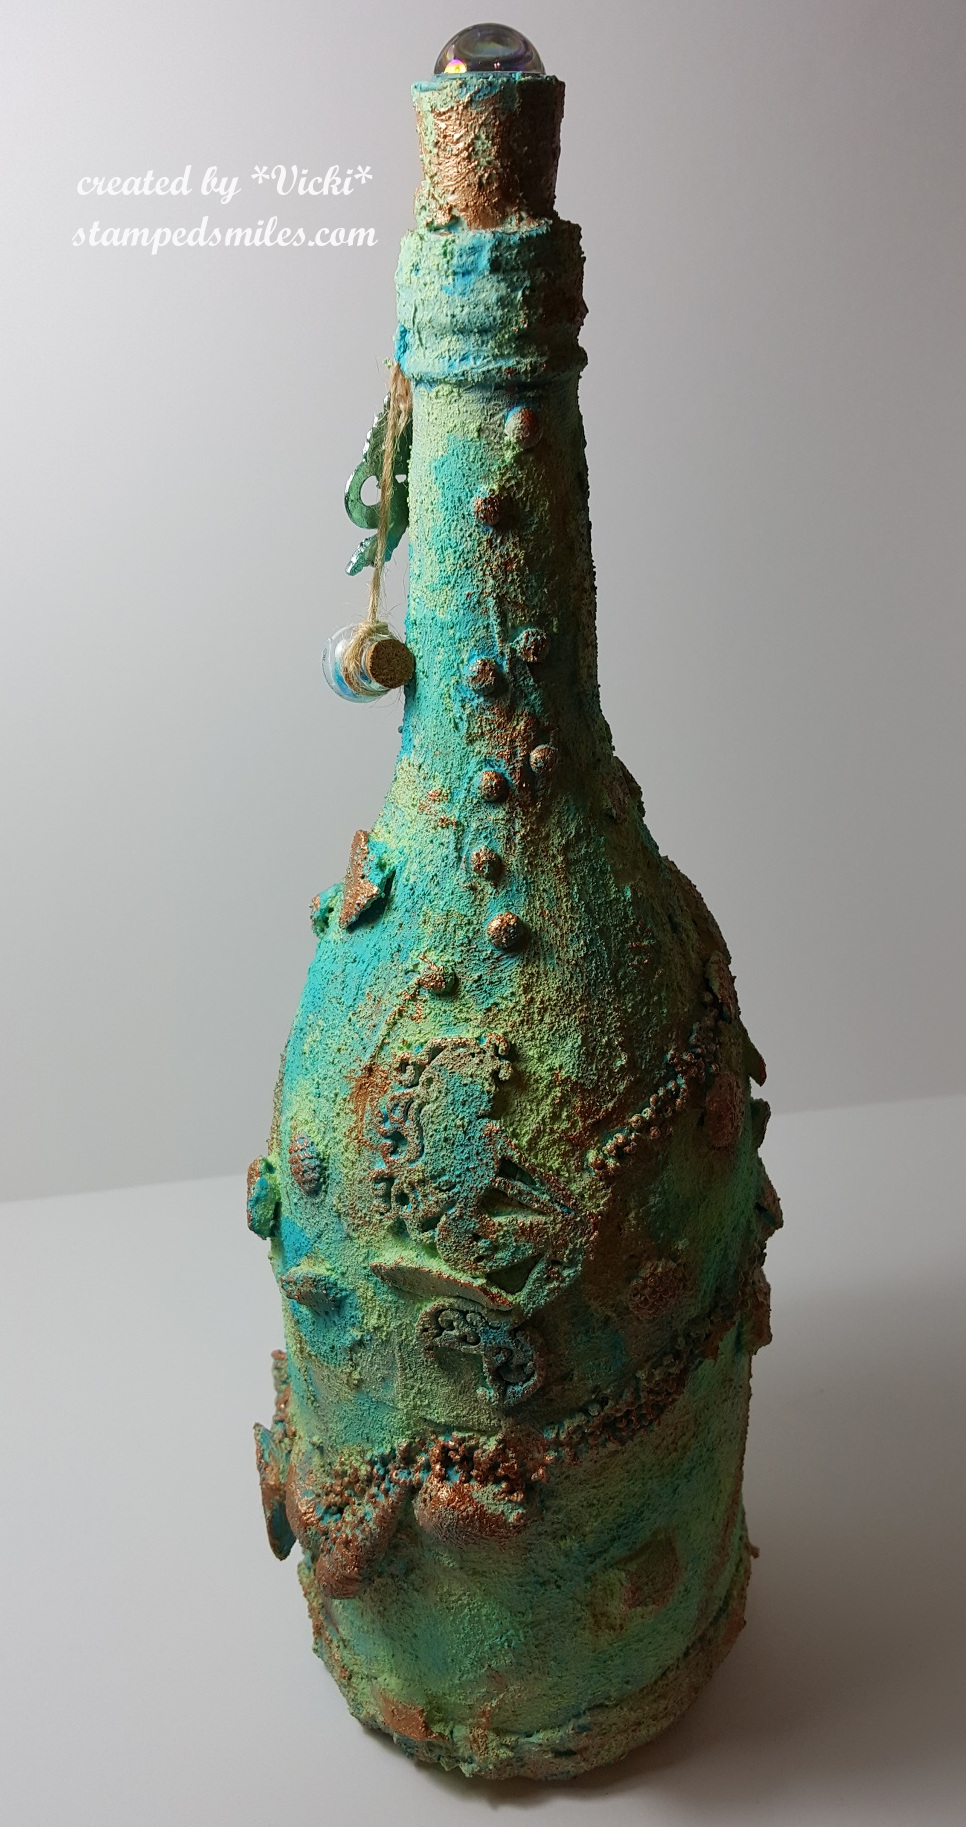
On the back side of the bottle, you can see that I’ve made a little “path” for the beads and sea shells to flow all the way around it.  I have taken a mermaid die cut and cut it out several times to create a dimensional look by adding several layers of cardstock together.  I had her sitting on top of one of the stone pieces I’ve attached to the bottle along with some gems above her for a “bubble” affect.  This mermaid die along with some of the stones, gems, pebbles, mermaid charm and the gem on top of the cork all came from a past card kit.

Vicki-Mermaidbottle2

And here is just another angle of the bottle before we come back to the front of it.  It just gives you a better idea of what all the dimension is on the bottle and how I’ve highlighted it with copper metallic paint.  I even had a little toy compass to attach to the front.  I had a piece of decorative paper from an older paper collection that I cut of piece of to attach to the front of the bottle and then wrapped the rope around it.  I gave it a bit of a white wash over it with paint so it fit with the theme of the bottle….old looking.

I also shared another mixed media project with them that I had done, but they wanted me to do it for class next year…so I guess I will be sharing it with you all then whenever we get together for that class! LOL!!  I’m sure I’ll be making another version of it in the meantime! 🙂

And finally, yes, when I got home I realized that I was behind on chores around the house as well as my ICAD challenge!  So I sat down yesterday to try and catch up with those so that I don’t get too far behind!  I’m happy to say that I’m all caught up and there is not many left to go either!  Another 2 weeks and it will be complete!

So here are the results of Week 7 ICAD:

Vicki-ICAD2018-Week7

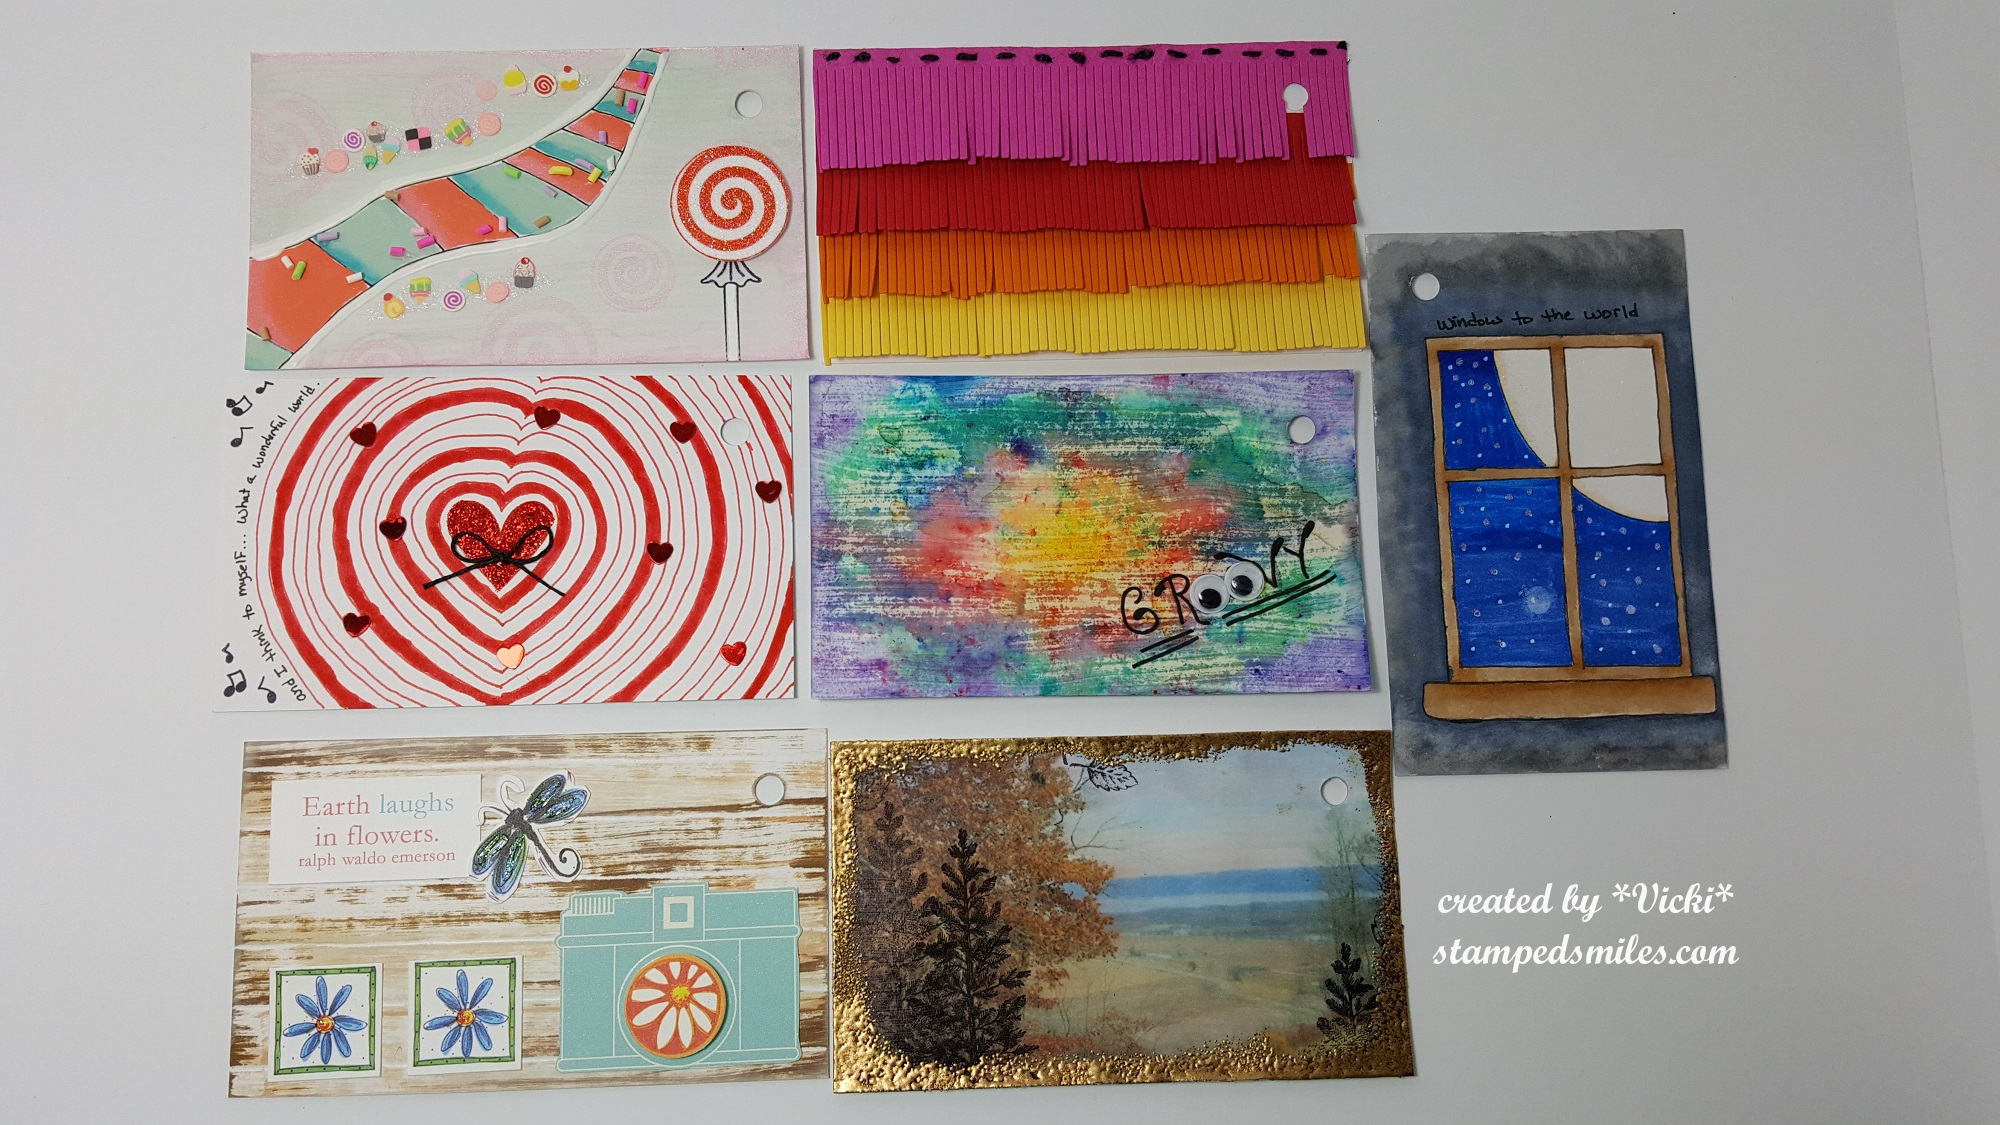
With the theme and prompts given this last week, I didn’t expect mine to be as colorful as they are, but some of them turned out very colorful!  I also enjoyed playing with some things I rarely get out to play with!

So now you know what I’ve been busy with this past week and maybe you’ll excuse me not being around so much! 🙂  Hope you’ve enjoyed my mixed media projects.  I’d love to know what you think!  Have you ever tried mixed media?  Do you like the concept of it?  Just curious how many of you out there enjoy it!  Thanks for stopping in!

Challenges I’d like to enter my bottle(s) for:

  1.  A Inky Mess – Just For Fun (mixed media)
  2. Creative Artiste – Anything Mixed Media Goes
  3. Altered Eclectics – Anything Mixed Media Goes (no cards)