F is for Feather(s)

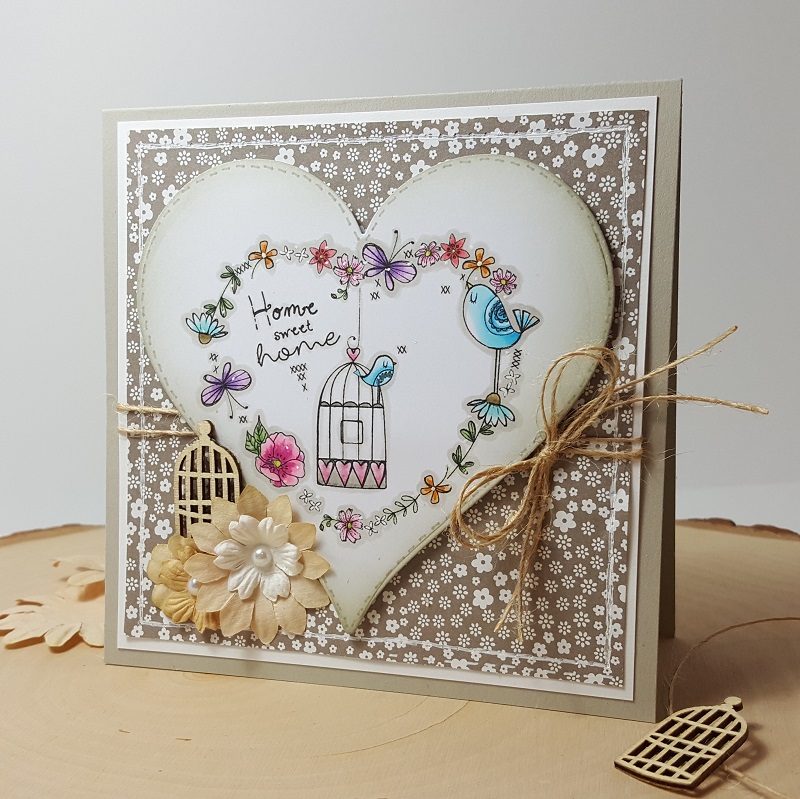
Hello friends and happy Friday to you!  It’s been so crazy warm over my way and I’m hoping this day finds us with a bit of a break in temperatures.

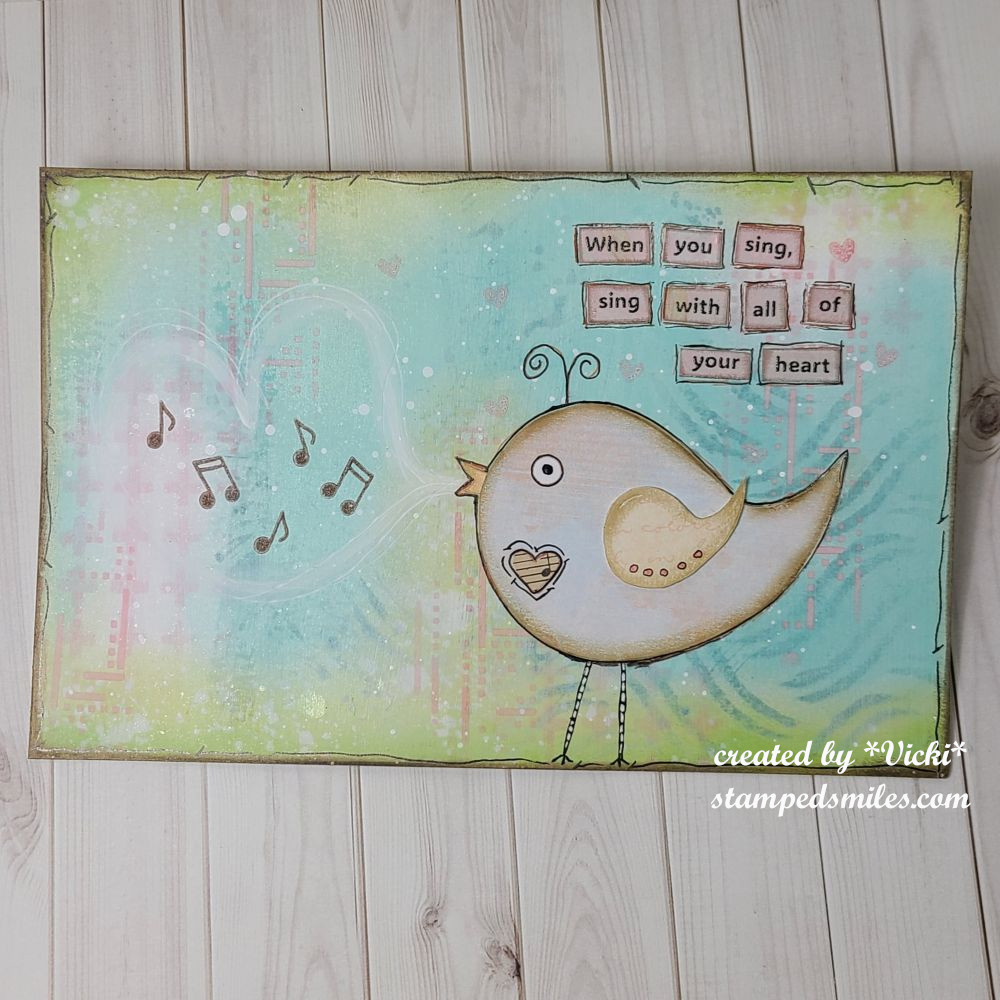
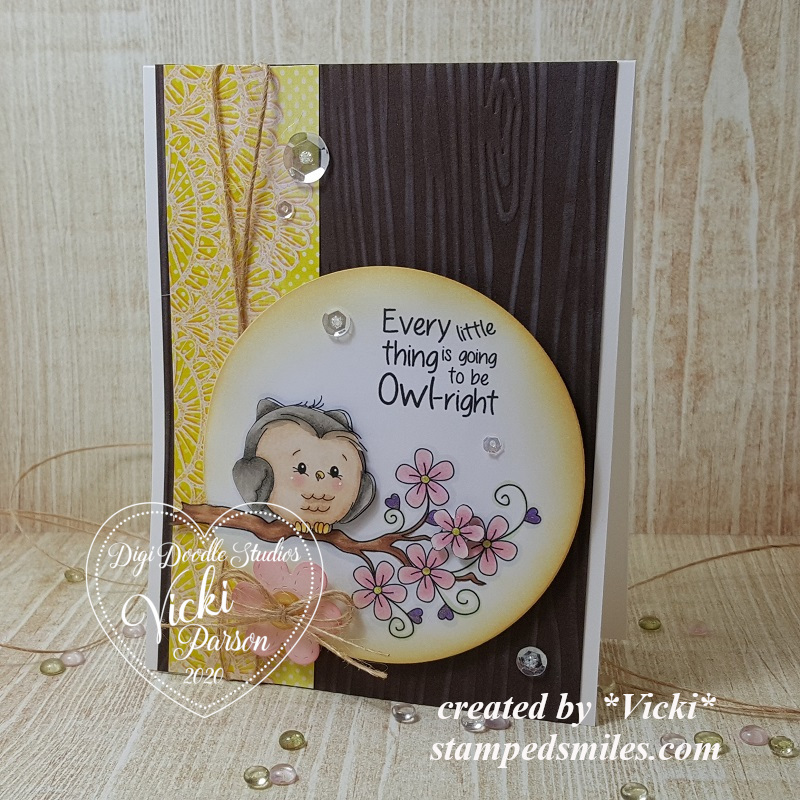
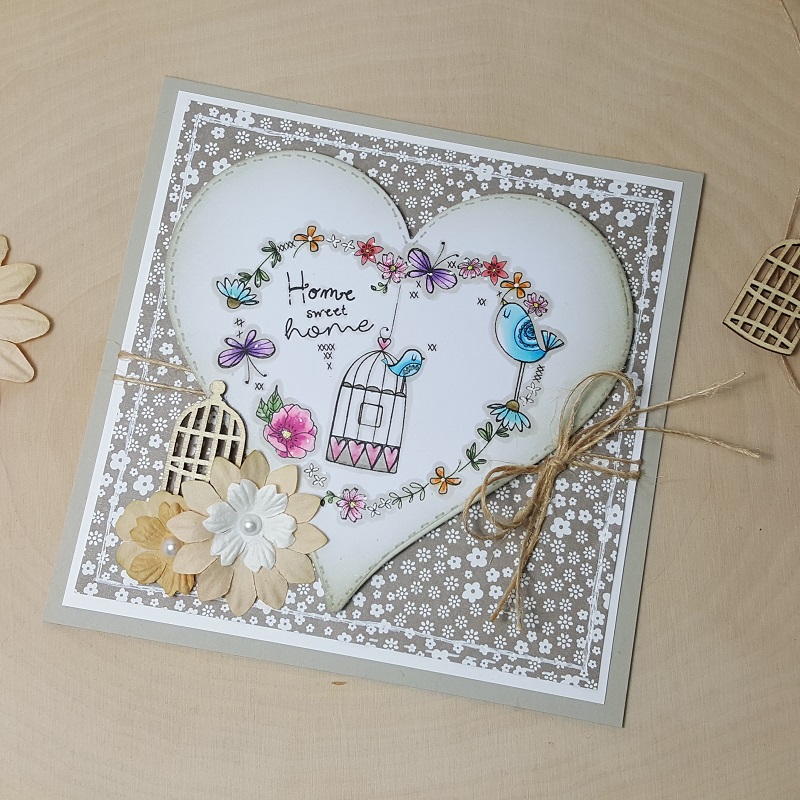
Today starts a new challenge over at the Alphabet Challenge Blog!   Our next letter is F and it was my turn to choose a theme for this letter, so I  have chosen “F” is for Feather(s)  *Remember that this is a bi-weekly challenge, so you have two weeks to enter*  I hope you will find some time to play along!  Here’s what I’ve created:

I thought this would be a fun theme to play around with as you could just add a bird or anything with feathers.  I look forward to seeing the projects for this one!  I was happy to have this chance to pull out some things in my stash that I hadn’t used yet.

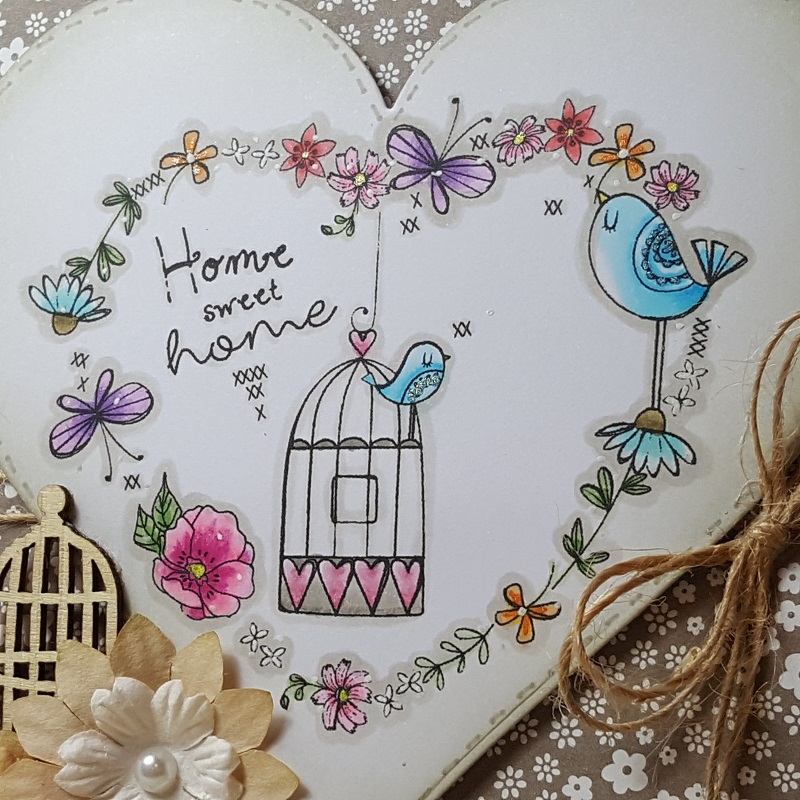
I’ve used the Taylored Expressions “The Thing With Feathers” stamp set and long with the “Wings of Love” stamp set for this card.

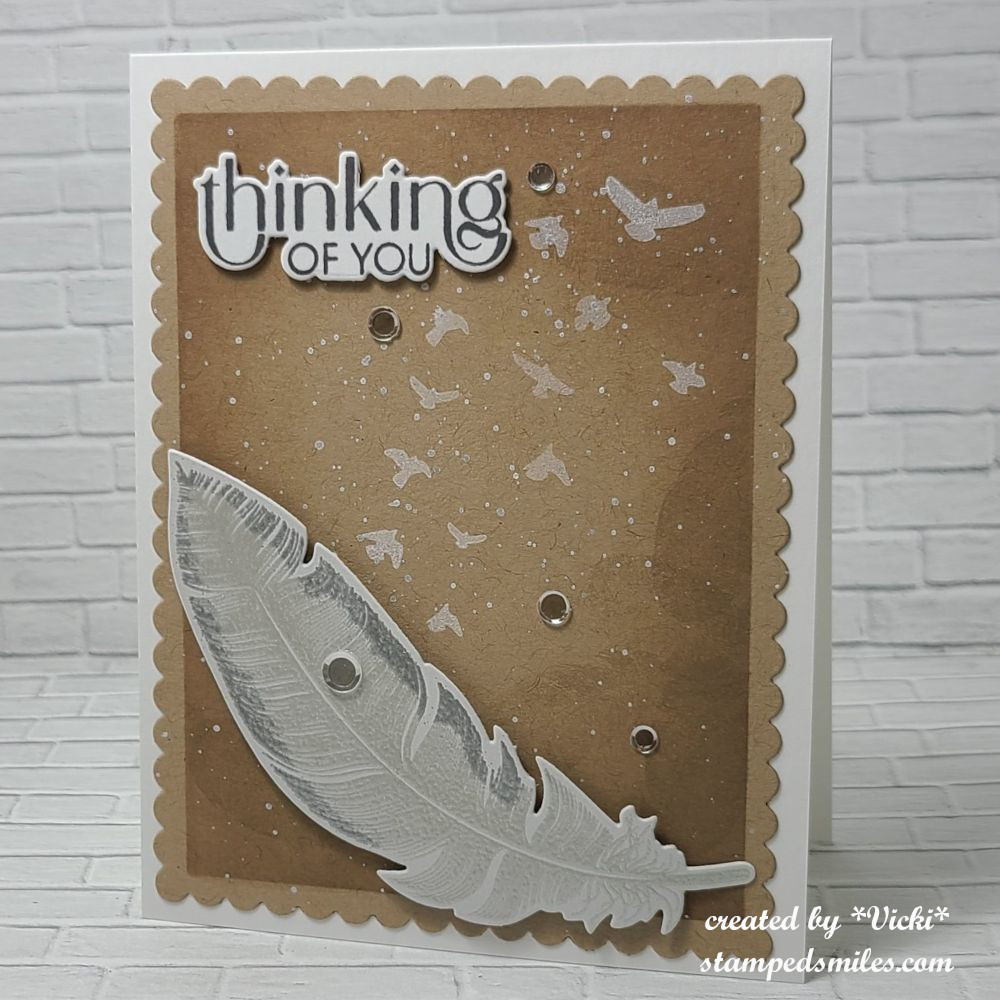
I started with a kraft colored cardstock cut with a scallop rectangle die and masked off the edges to ink blend and stamp a smaller feather around the edges with brown ink.  I then took the flying birds image from the “Wings of Love” stamp set and stamped it in white ink.  I also decided to add some white splatter over that.  This panel was then attached to an A2 top folding white card base.

For the large feather at the bottom: I used my VersaMark ink pad to just ink up the edges of the feather, then I silver heat embossed just the edges of the feather.  Without removing the feather stamp from my MISTI, I inked up the entire feather with VersaMark ink and then used a white opal embossing powder over the entire image.  Since this embossing powder is translucent, the silver edges that I embossed still showed through.  I die cut it out with the coordinating die and popped it up with foam tape at the bottom of the card.

The sentiment was stamped with grey ink and cut out with a coordinating die that I attached with thin foam tape at the top of the kraft panel.  I added some clear sequins to finish it off.

Thanks so much for stopping in today!  I hope you will grab your feather(s) and play along with us!  I’ll see you tomorrow for a new Art Journal Page!

Challenges:

  1. Gem of a Craft Challenge Anything Goes
  2. Ally’s Angels Anything Goes
  3. The Creative Crafters Anything Goes
  4. Crafter’s Cafe Anything Goes optional: masculine
  5. Pammie’s Inky Pinkies – PIP2525 Anything Goes

Art Journal Inspiration-Sing From Your Heart

Hello friends!  When it’s winter time, something I miss hearing are those birds happily chirping throughout the day.  We get the occasional bird chirp, but nothing like it is when the weather is warm.

So in honor of those singing birds, I have more inspiration to share for the “MUSIC” prompt I’m hosting this month at Art Journal Journey:

I had fun putting this one together with a quirky bird who’s singing with all his heart!

For the background:  I started with a 5.5″x8.5″ Bristol Smooth cardstock piece so that I could do some ink blending.  With a stencil, I inked over it with Salt Water Taffy oxide and then painted over it with a layer of white gesso.  (I was trying to keep the colors soft and light.)  I then took a different stencil and sprayed over it with Speckled Egg Oxide Spray and then used the left over from that in other places.  I then took Shabby Shutters, Mowed Lawn and Salvaged Patina oxide inks to go over the rest of the stenciled layers until I got the look I wanted.  I used a water spray over top and then splattered white paint over the page for more texture.

For the bird: I cut out the body, wing and beak shape in different pattern papers, used a distress crayon rubbed along the edges and pieced it together with the wing being popped up with foam tape.  I used a pen to doodle around the bird and create the legs.  The eye and heart on the bird were punched out pieces. (the heart paper is from a music sheet scrap)

The words were printed on my computer over some pattern paper.  While the ink was still wet from the printer, I clear heat embossed over it.  I cut out each word and attached over page.  I took a pen to doodle around each section.  I also doodled around the edges of the entire page with the same pen.

Lastly, I took some white paint and brushed a “heart bubble” coming from the bird’s beak.  I stamped a few music notes inside the bubble with brown ink.  I also stamped a few solid hearts around the words in pink ink to finish it off.

  • I hope you like my page today and have been inspired to play along with us this month!  I have enjoyed seeing all of the wonderful inspiration so far in the gallery!  Thanks so much for stopping in and I’ll be seeing you soon!

Challenges:

  1. Anything Goes in a Card Free Zone – No Cards
  2. Art Journal Journey – Music 

Creative Artiste Guest Designer with Altered Mixed Media Frame

Hello friends and welcome to May!  I’m happy to see this month come with all of the beautiful Spring things that pop out like the flowers and sun with the warmer temps!  I look forward to going out and working in the yard soon!  Hope that you’ve had a wonderful week and look forward to a great weekend!  I’m getting ready for a fun crafty retreat and I’m really looking forward to crafting with friends!

5 May 2023

I’m super excited to be a guest for this month’s challenge over at the Creative Artiste Mixed Media Challenge!  If you’ve been around, then you know how I enjoy creating a few mixed media projects once in a while besides my Art Journaling that I do each month.  The theme is always “Anything Goes” with Mixed Media, so this time, I decided to make some altered art with an old frame:

I thought this would be a perfect item to alter with a Spring theme in mind.  I know the frame “looks old”, but it was actually a really old wooden frame that was stained/varnished about 30 years ago!  I’ve sanded, painted, added some crackling paste, and painted over it some more to give it a Vintage “falling apart” look.  I like the texture and the crackling from the paste that came out in it. The total frame size is about 9″x13″ and it’s shown hanging on my wall.

The center of the frame was done using a piece of cardboard sized to fit inside the frame.  (I threw out the glass front as I didn’t have a need for it.)  I had some papers that I thought was so pretty along with the sentiment.  The sentiment was way too large for a card and I thought it would work great for this project.  Of course, the size of the paper wasn’t quite large enough, so I worked on collaging some musical papers around the edges for a border.  I also went over it with a floral stencil and paste, paint splatters and waterproof ink before inserting behind the frame.

Here’s a closer look at the top of the frame where you can see that I’ve added a butterfly ephemera that was painted with some clear glitter paint and attached next to the sentiment with glue and foam dots on the wings.

I have tons of flowers in my stash, so I’ve created an arrangement along the frame with a vine and different sized flowers that I’ve added with twirled vines.  I’ve used more paint and even some art stones around the flowers as well as various places over the background for texture and interest.  More paints and metallic wax was used over all of these places to keep the Vintage feel to the design.  I tried to keep them coordinated with the papers in the background.  (It’s weird how the colors vary so much when you take a photo compared to what it looks in person.  The top frame photo looks more blue, but it’s actually more this muted green color.)

And as you scroll down to the bottom of the frame, you see I have this 3D arrangement with the painted chicken wire against the back panel with the papers.  (the flowers were added on top of that.)  On the bottom left you see I’ve made a “nest” for my bird with Spanish moss and even added a couple of twigs from my backyard underneath it.  I’ve also added a pinch of green moss in there which is also what I’ve used over top of the white picket fence section to the bottom right.  It actually sticks out in front of the flowers.

You can also see where I’ve added some more art stones and paints.  I’ve finished the whole design with some Finnabair white gold metallic wax.  This is hard to capture unless you get really close, but it adds a wonderful detail that brings out lots of the texture in your finished piece.

I really enjoyed creating this altered frame while I was thinking about Spring coming to life outside!  It was also fun to be able to find something I’ve had for so many years and give it some new life!  I hope you’ve enjoyed it as well and I look forward to seeing what mixed media art you make this month for the challenge

Thanks for dropping in today!

Challenges:

  1. Crafting From the Heart – Anything Goes (NO CARDS) challenges are back after 4 years!
  2. Crafting Happiness – Flowers
  3. Pearly Sparkles – Anything BUT a card
  4. Simon Says Stamp Monday – Paint It!
  5. Love to Craft – Anything Goes

Choose to be Grateful for Crafty Chefs

Hello friends!  I hope that you’re having a wonderful week so far!  The weekend is here, but it sure has been a beautiful couple of days this week with sunny and warm days so hubby and I were able to go out to walk around a bit before the snow starts hitting us!

Something that is great to go out in nature to see are the critters with the birds and the silly squirrels…we have them EVERYWHERE!  They’re busy gathering and burying their food for wintertime around here.  My thoughts turned to the Simon Says Stamp “Big Thanks Autumn” November card kit (sold out, but not papers) as I love all things Fall/Autumn and this card kit with those beautiful papers spoke to me and I wanted to create with it to make my project for this month’s Crafty Chef’s Group recipe from our lovely friend Meg’s recipe:

There were some blue colored A2 card bases already cut and scored inside the kit, so I used one for my side folding card base here and then layered a dark brown cardstock piece from the kit as well as a piece of copper mirrored cardstock which was then layered over a piece of the decorative papers (I mentioned above) in the kit, which is also where the critter, mushrooms and leaves images came from on this card.

The leafy background paper was cut from a MFT Wonky Stitched Rectangle Die and then I took a strip of the copper mirrored cardstock across the bottom third of the layered pieces and also added some twine wrapped around the bottom of the layers before popping them up with craft foam over the card base.  I die cut a branch from a die in my stash and then fussy cut the images out from the papers included in the kit which were glued or popped up with foam squares over the panel.  I sponged some Tea Stain Distress Ink around the edges of these pieces before attaching.

Lastly, I’ve taken one of the sentiments from the sentiment strips sheet included in the kit and ran it through my laminator with a piece of copper Deco Foil.  (I think that is a cool way to add a little extra something to those sentiments.)  I made a banner out of it, sponged it with some of the ink I used for the images and popped it up over the leafy background piece with foam tape.  

Here’s a closer look at the critters I’ve cut out and how I’ve arranged and popped some of them up to create my scene.  There was also a very pretty SSS Autumn Sequins Mix included in the kit, and I took some of those and added it to the layout and then filled the centers with some gold Stickles glue.

For the Crafty Chef’s recipe that was given, here’s what I MUST use:

  1. Mirror cardstock
  2. 3 layers or more
  3. ribbon (I hope my twine counts!)
  4. image of garden visitors (birds, hedgehogs, etc)

CAN do items:

  1. Sparkle/Glitter (I used sequins and Stickles)
  2. pearls/gems (I did not use) *passed onto next chef.
  3. dry embossing (I did not use)

There is a new recipe given for each month and no pressure to follow along or even when you want to follow along and play…which is great and I’m happy to be able to use up some of the goodies from my stash (NEW AND OLD) and just have fun with it.

I hope you’ve enjoyed my creation today as well and I will be seeing you all again soon!  Thanks so much for stopping in today friend, as I’m very grateful for you!

Challenges:

  1. 2 Crafty Critter Crazies – Anything Goes + animal(s)
  2. Crafty Animals – Anything Goes + animal(s)
  3. Creatalicious – #199 Anything Goes optional Autumn/Thanksgiving
  4. The Paper Girls – #212 Thankful/Grateful
  5. The Divas That Cut Paper – Thanks or Thanksgiving
  6. A Bit More Time to Craft Anything Goes
  7. Lil Patch of Crafty Friends – #146 Anything Goes
  8. QKR Stampede – #408 Anything Goes

It’s Going to be “Owl-right!”

Hello friends and welcome to the weekend!  I hope you have some great plans ahead of you and have some fun!

Today I’d like to share this card I’ve made with a darling feathered cutie and the punnyness that goes along with him….

Vicki-DDSOwlright

Isn’t this little guy the cutest owl you’ve seen?  This image was actually created on my computer with the “Owl-rageous” Pairables digital stamp set from Digi Doodle Studios.  The owl, the branch and the sentiment are all separate images, but I’ve pieced them together on my computer and printed it out to create this scene!

I’ve actually printed out an “extra” owl and flower to color in and pop up over the image for added dimension.  I used the “out-of-the-box” technique to circle die cut out the image.  The branch is sticking outside the circle.

I’ve used a woodgrain embossing folder and rubbed some white ink over it and also added a strip of yellow paper from my stash wrapped in twine along the edge.

I die cut a flower and rubbed some pink ink over it, attached a button and twine bow over it to pop up over the owl panel.  Then added some sequins filled with glitter glue in the centers.

Vicki-DDSOwlright-close

Here’s a closer look at the coloring I’ve done on the images.  I’ve used a purple glitter gel pen for the tiny hearts on the branch and then a yellow glitter gel pen for the centers of the flowers.  I’ve used some yellow ink to sponge around the circle panel.

Vicki-DDSOwlright-flat

This card actually has me longing for Spring to come with those flowers!  He’s letting us know that everything is OWLright!! ha ha ha!!  Hope you’ve enjoyed my creation today and I really appreciate you stopping in!  See you soon!

ETA:  Hubby said I should include the song….

Challenges to enter:

  1. Cheerful Sketches – Feb sketch
  2. Love to Craft – LTCCB43 Anything Goes
  3. Crafts Galore Encore – #72 Anything Goes
  4. Pammie’s Inky Pinkies – PIP2006 Anything Goes
  5. Not Just Cards – Feb Anything Goes
  6. Arty Divas Anything Goes
  7. Through the Craft Room Door – Anything Goes
  8. Alphabet Challenge – ‘W’ is for “Anything You Wish”

Snowman’s Birdie Friend For Whimsy Stamps

Hello friends!  I really can’t believe how COLD it’s been our way especially for October!  We even have SNOW in the forecast!  Eeek!  Now that’s scary for Halloween!

So since Christmas is on the way, I suppose it’s a good time to get into the spirit of the cold with a cute little snowman and his friend from Whimsy Stamps:

Vicki-WSSnowmanBirdie-Oct29

This guy looks so happy that his bird friend found a place to rest on his hat! 🙂  This image is called Snowman’s Birdie Friend by Crissy Armstrong for Whimsy Stamps.

I wanted to make a nice little “snowy scene” for the image, so I took out the Whimsy Stamps Snow Flurry clear stamp set and stamped some of the snowflakes from the set around the top of the image panel.  I then die cut the image out along with creating a red “frame” with the Whimsy Stamps Notched Rectangles die set.  (To do this, I just glued the red frame made with the die onto a piece of white cardstock and then glued the image panel inside the red frame.  It’s the same size, so it fit into each other.)  At this point, I added some glue to the bottom area under the snowman and sprinkled on some chunky white glitter for the snow-covered ground.

Since I was following a card sketch (see challenges below), I took out some papers from my stash and cut them on a diagonal and attached them over a piece of white cardstock and then wrapped some white organdy ribbon around it before attaching it to the top folding red 5″ square card base.

I took the Whimsy Stamps Holiday Mini Sentiments clear stamp set and white heat embossed the sentiment over the red cardstock and cut it out with a banner die from my stash.  I popped this up with foam tape over the image panel.  I also had a snowflake die and a border snowflake die that I cut with some glitter cardstock and attached around the card design and added some rhinestones in different areas.  (I thought this helped add to the wintry scene of the image too.)

Lastly, I’ve added a brown button and natural twine over top of my white organdy bow.

Vicki-WSSnowmanBirdie-Oct29-close

Here’s a closer view of how I’ve colored in the image.  As you can see, I’ve done a bit of paper piecing on the image by taking the same paper from the right edge of the card design and using it for the scarf, mittens and hat band.  (I’ve used Copics to give it a bit of shading too, which you can see details below.)

Maybe a bit hard to tell in the photo, but I’ve added just a small dot of Glossy Accents to his blue nose.  There are also highlights with a white gel pen on his nose, cheeks and the bird’s cheeks.

Here’s the Copic markers I’ve used to color the image with:

  • Snowman’s Hat – E89, E87, E84
  • Bird & Buttons – E39, E37, E35, E32 (Y17 for beak)
  • Snowman’s nose – B26, B24 (R00, R000 for cheeks)
  • Snowman’s Shadows – B00, B000, B0000
  • Scarf and Mittens Shadows – W3, W1

Vicki-WSSnowmanBirdie-Oct29-flat

Hope you’ve enjoyed my card today and it has brought you joy in some way! 🙂  I sure had lots of fun putting it together!  Thanks so much for joining me today and I’ll see you soon!

Challenges:

  1.  Sketch Saturday – Sketch #587
  2. Crafty Creations – Anything Goes #401
  3. Jingle Belles – Rudolph and Friends
  4. Crafty Catz – Anything Goes
  5. Winter Wonderland – Merry and Bright
  6. QKR Stampede – Anything Goes

Eggs in One Basket

Hello friends!  Back today to share a fun Easter card with you!

Before I get to my card, I wanted to let everyone know that this will be my last post as a design team member.  I have enjoyed creating with the products and I’m sure I’ll be pulling them out to play with on my blog from time to time!  Sometimes we just have to lighten up our “baskets” to make things a little easier to carry.

Vicki-SNSEasterChick

This little chick dressed in bunny ears just makes me giggle!!  I had so much fun with this cute stamp set called Easter Parade by Jan Mahew.  The other chick has this fancy hat on and is adorable too! 🙂

To start out with, I thought it would be fun to take this basket weave embossing folder to create the background of the card (resembling a basket of course!) and I rounded the top corners of it along with taking some of the new colors of Super Thick embossing powders in the Spring Lilac and Pink Cheeks and sprinkling some over top of this background.  I heat embossed it from underneath so it wouldn’t fly all over.  (Remember that you don’t need anything to attach it with, just heat set it from underneath!)

I’ve also used these embossing powders to create the look over the eggs as well!  I stamped out the open image egg from the stamp set and then layered the Spring Lilac, Pink Cheeks and Neon Super Thick Embossing Powders in strips and very carefully heat set it from underneath.  (I did this BEFORE they were fussy cut out.)

I thought that my images needed grounding, so I took a grass border die and cut a strip to place at the bottom of the card front.  I wrapped some yellow ribbon around the basket background and also stamped out the CUTE sentiment from the stamp set and made a banner with it that I’ve also added a bow, button and twine in the center of.  I’ve attached all of this to an A2 sized top folding card base.  I flipped up the edges of the banner to give it a bit of dimension.

Vicki-SNSEasterChick1

Here I wanted to point out to you this adorable little chick!  If you look at his belly area, you will see that he looks quite fuzzy!  After I colored him in with my Copics and fussy cut him out with scissors, I took the Nuvo Medium Tip Glue Pen to go over his belly area with and then sprinkled over it with the Canary Flocking.  I always press it into the area for good adhesion and let it dry.  Now you have a fuzzy feeling peep!  I added him to the background and nestled him in the grass border.  I used the Dimensional Glue to adhere the flat images down.

Vicki-SNSEasterChick2

For the eggs, as mentioned above, I melted the powders (carefully trying to keep it contained within the lined stamped egg image) and then fussy cut them out with scissors.  Then I took some foam tape and nestled them among the grass too.  As you can see, I have cracked eggs which accidentally happened when I pushed down on the eggs to stick them.  I actually thought it was sort of cute with the basket theme and funny chick dressed like a bunny, so I cracked them even more and kept it that way!  (It was hard to capture in the photo, but the eggs with the embossing have a pretty shinny sheen over them.  It was sure fun to play with those embossing powders!

Vicki-SNSEasterChick-flat

I hope you’ve enjoyed my card today and that you hop on over to check out this fun stamp set along with those super thick EPs!!

Thanks so much for dropping in today!  I enjoy reading each comment and what you have to say!

Challenges I’d like to enter this card for:

  1.  Crafty Catz – Anything Goes with optional twist:  Spring
  2. The Creative Crafters – Anything Goes
  3. QKR Stampede – #339 Anything Goes
  4. Crafting From the Heart – Just for Fun (Anything Goes)

What’s New at Cute Card Thursday

Hello friends!  It’s Thursday time again and we have a new challenge for you over at Cute Card Thursday today!  The challenge for this week is…..”What’s New?

And remember these challenge themes are always your own interpretation!  Here’s what I’ve created for it:

vicki-cct564-adu-new

I thought this image was so TWEET!! 🙂  It is a “new to me” image from our sponsor this week by All Dressed Up Stamps called Home Sweet Home.  I thought this would be such a nice card for someone with a “new home”.

It was also nice to be able to use some older items from my stash as well!  I have colored up the image and used a heart die to cut it out with.  I’ve also sponged some color around the edges and added some stitching details with a marker.  For the patterned papers in the background, I’ve used a paper piercer tool and made stitch marks over the holes with a white gel pen.  I layered it onto a piece of white cardstock which I then layered onto a piece of 5″x5″ Sahara Sand top folding card base.  BEFORE attaching my white layer onto the base, I’ve added some twine around it.

I cut out a smaller heart from the die set I’ve used from some craft foam and attached it to the image heart panel and placed it over the twine on the front.  Lastly, I’ve added the wood veneer bird cage and flowers and twine bow.

vicki-cct564-adu-close

Taking a closer look at the image, you can see that I’ve used various colors of Copics to color it in with.  I went around the images with a W0 which matched up nicely with the colors of the main card panel.  You can also see places where I’ve added a bit of sparkle from some colored gel pens and extra “dots” around the image with a white gel pen.  It was actually a really simple and fun image to color!

vicki-cct564-adu-flat

Thanks so much for stopping by today and I wish you a wonderful day!

Challenges I’d like to enter for this card:

  1.  CRAFT – New (year/job/baby, etc.) – for me:  new home and new stash
  2. All Dressed Up Stamps challenge – Anything Goes + ADU image
  3. Cardz 4 Galz – New Year/New Stash (image and hearts dies)
  4. Alphabet Challenge – ‘U’ is for ‘Use Some Stitching:  faux or real’
  5. Crafting From the Heart – Anything Goes
  6. Try it On Tuesday – Something old/something new (new image/wood veneer, new home and old papers, old flowers, old tools!)
  7. Words 2 Craft By – HOPE (W2CB61):  “Hope is the thing with feathers that perches in the soul & sings the tunes without the words & never stops at all.” ~ Emily Dickenson                     Absolutely LOVE that!!