Hello friends! I hope you all had a wonderful Easter and have been enjoying the wonderful Spring weather outside! We have all sorts of blooms and buds everywhere which is really exciting to see! I think I need to trim some lilacs from my bush to put in a jar and enjoy the lovely smell from them!
Today is our monthly AJ page with my crafty friend Carol (from Crafty-Stamper) who is collaborating with me to “SMASH OUR STASH”! We get creative trying to use up our never-ending stash piles along with a prompt for each month. I know she always has great inspiration to share, so please check out her blog too! Here’s my AJ page with the “SMASH OUR STASH” April prompt of “RECYCLE/UPCYCLE”:
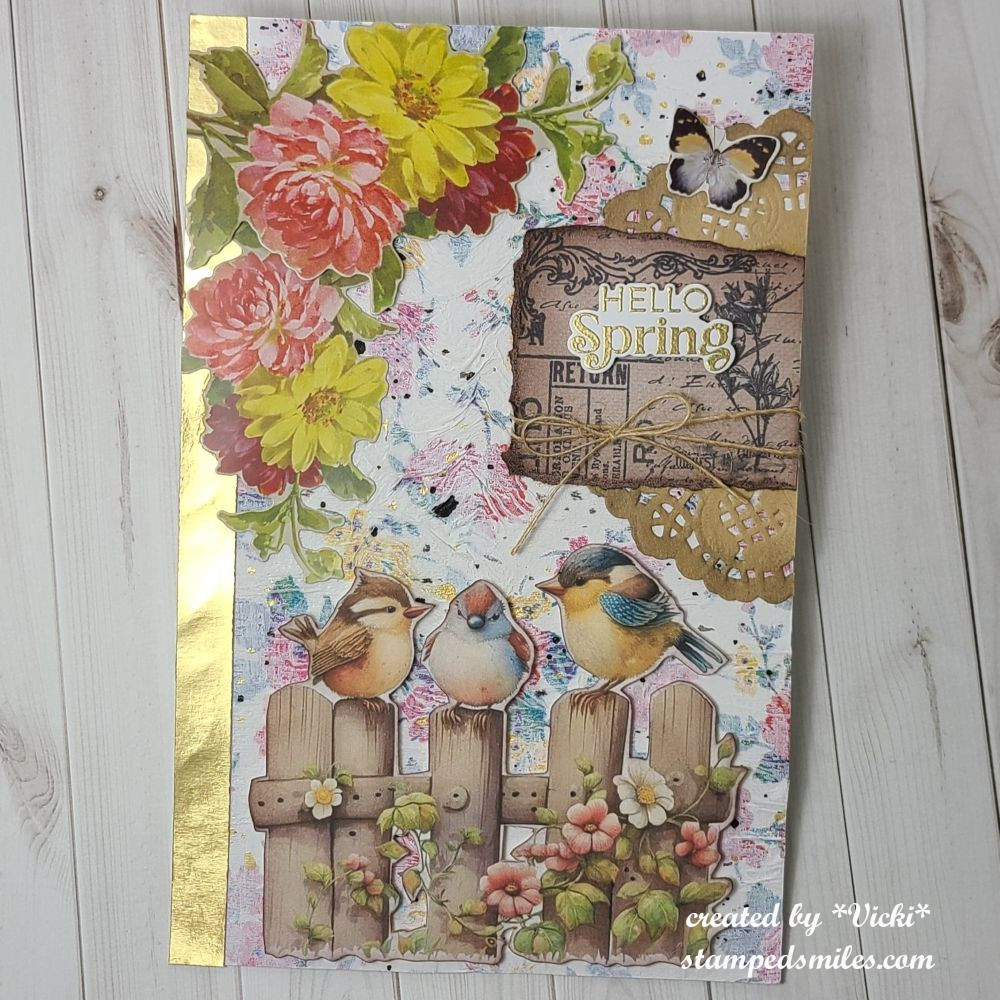
Flowers are everywhere, so I thought I’d place them all over my page today too!
For my “recycled” elements, I have used a floral napkin in the background which gives it some wonderful texture and I’ve also painted some white paint over it for a “wash” so that it wasn’t so bright and vibrant and too busy for the background. I splattered some black and gold watercolor over it as well.
I found a darling image with these gorgeous Spring birds perched on the fence, cut it out and popped it up at the bottom with foam tape.
I thought that a strip of gold cardstock (left over from a project) would make a nice bright accent to go with my gold embossed “HELLO SPRING” sentiment and gold splatter.
I’ve also “recycled” an old part of an ATC project and half of a doily to add on the side with the sentiment and I’ve tied some old twine around that ATC panel.
Lastly, I’ve added some flowers and a butterfly from my old collection of ephemera pieces left over from years ago!
I hope that you’ve enjoyed my art journal page today and it gives you all the feels of Spring in the air! I had fun putting this one together! Thanks so much for dropping in!
(Feeling a little bit under the weather this week and I’ll catch up as I can! Thanks for understanding!)
Hello friends! Happy March! I’m happy to see this month come as signs of Spring start popping out everywhere! Pretty soon the flowers will start coming up too! Are you ready for Spring?
Today starts a new challenge over at the Mix It Up Challenge Blog! There is always lots of wonderful inspiration from the team, so please go check it out and play along! The challenges are always ANYTHING GOES with an optional theme. This month’s theme is FANCY FOLD! For these challenges, you have plenty of time to enter as they run for 6 weeks! I look forward to seeing what you come up with! Here’s the project I made:
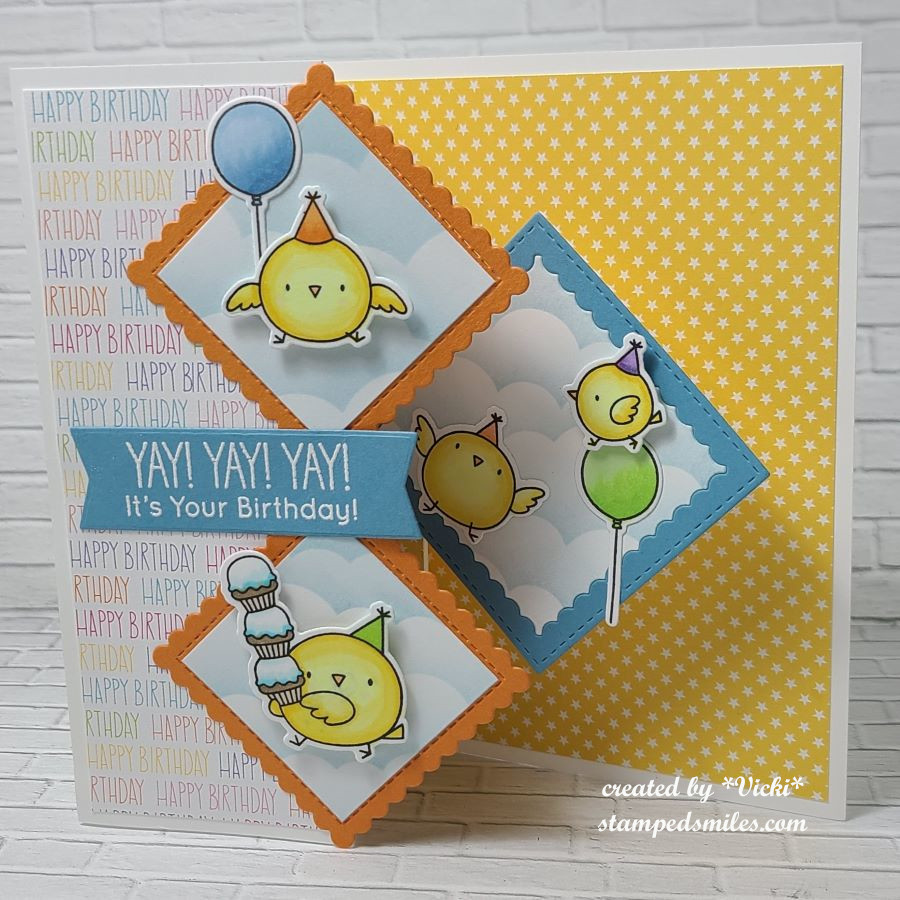
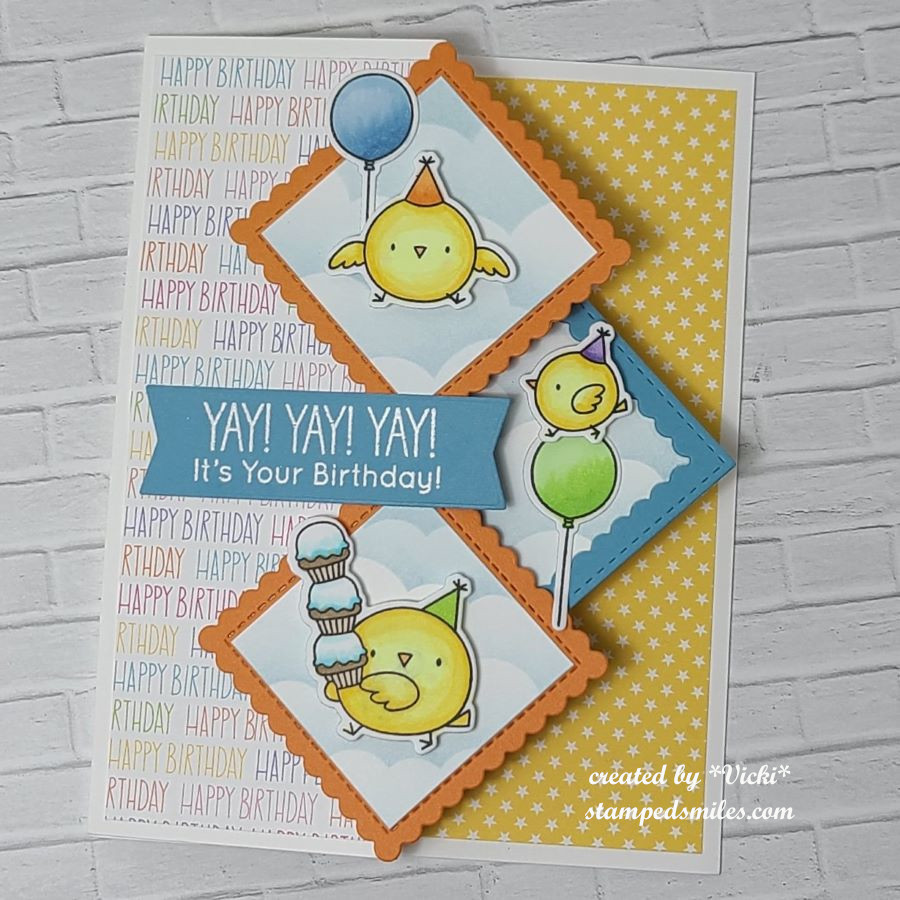
These birds are ready to party! How fun are those party hats?! I’ve found this really cool take on a “Z” fold card, but this one has been named “Diamond Z Fold Pop-Up Card“. There are so many variations of this that I found on You Tube, but they’re all the same concept of the two diamond shapes on front and then an additional diamond pop-up mechanism on the inside that moves when you open the card. (Click on the card name for a tutorial.) The only thing I did differently than hers was using scallop square die cuts and I covered the pop-up mechanism on the inside with pattern paper so it’s not as noticeable.
I’ve used the My Favorite Things (retired) Birthday Chicks that I stamped, colored and die cut out and arranged over the design. I’ve also used the My Favorite Things (retired) pattern papers and of course the same for the scallop stitched squares. For the white squares, I’ve used a MFT cloud stencil with blue ink for the clouds and the sentiment was white heat embossed and cut out with a banner die.
When this card is closed, this is what it looks like. Notice that you do not see the bird on the inside panel next to the bird on top of the balloon as he is hidden until you open it.
It folds up just like a Z fold would and it’s A2 and ready for a regular A2 envelope. I’ve placed an extra panel on the back of the card for a special handwritten message and decorated it a strip of pattern paper and another party bird. I didn’t put anything on the inside stars pattern because I thought it took too much away from the front of the card and you don’t want an inside message to show on the front of the card. It takes a bit of maneuvering to decorate images and sentiments as to where to put them strategically on the card, but it was so fun!
I hope you’ve enjoyed my card today and go check out the challenge to come and play along with us! I really look forward to seeing all of the different fancy fold projects in the gallery this month!
Thanks so much for dropping by and I’ll see you soon!
Hello friends! The weather has been really nice over my way so I’ve been taking advantage of it by enjoying the outdoors before it starts changing into more chilly temperatures. All of the prize winners have contacted me and the packages have all been sent out. I have received notice that the U.S. winners have gotten their packages and hopefully the overseas will be arriving soon. My thoughts are also with those that were affected from Storm Ian and hope for healing and recovery as soon as possible.
Although it’s been a while since I last posted, I have been working on some things for SWAPs and a few other cards that I had created as well to share with you.
please click on the photos below to see them close-up
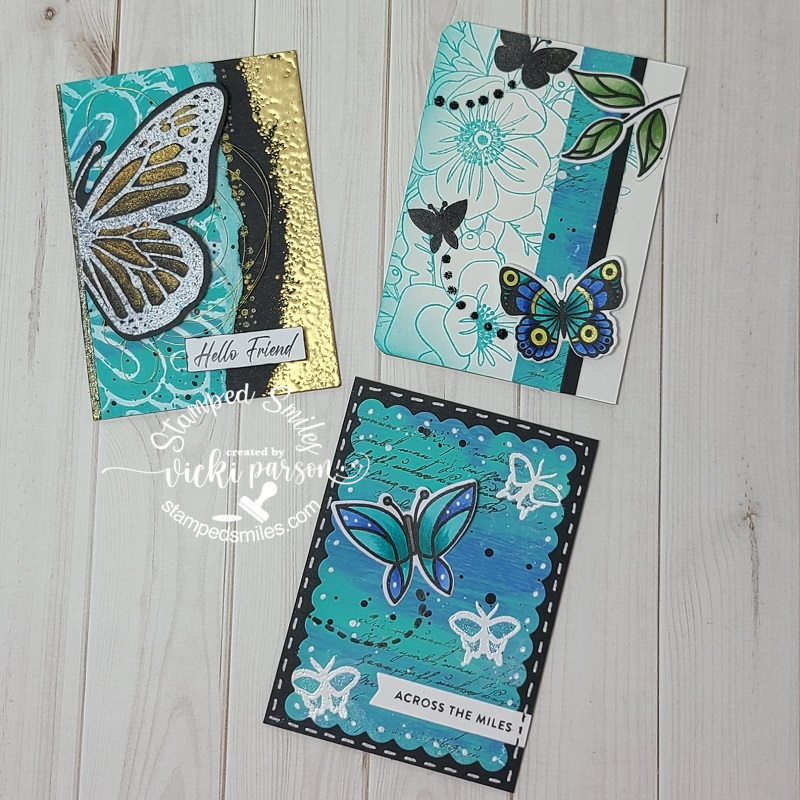
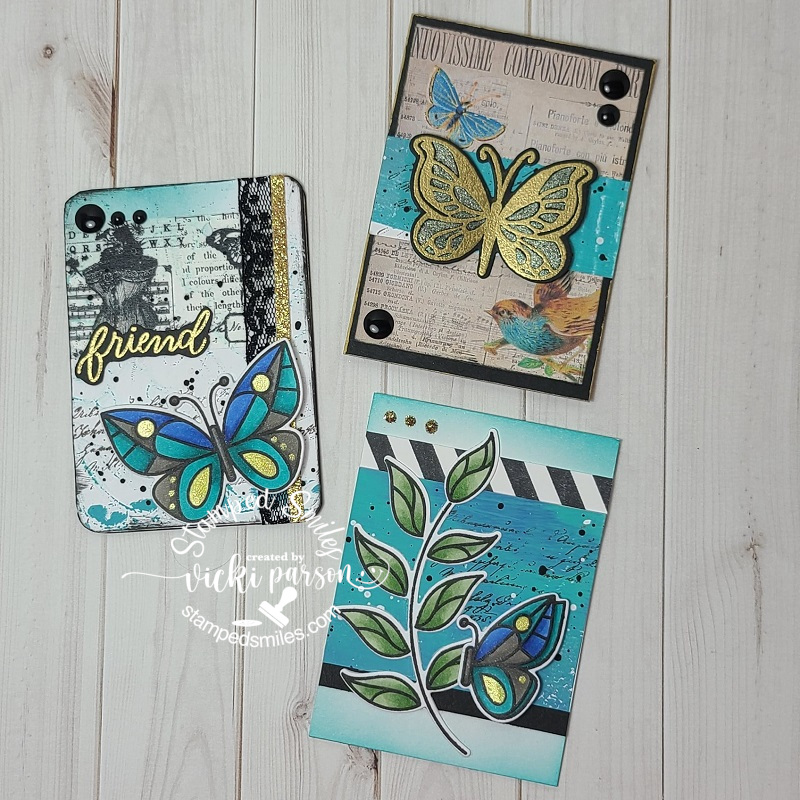
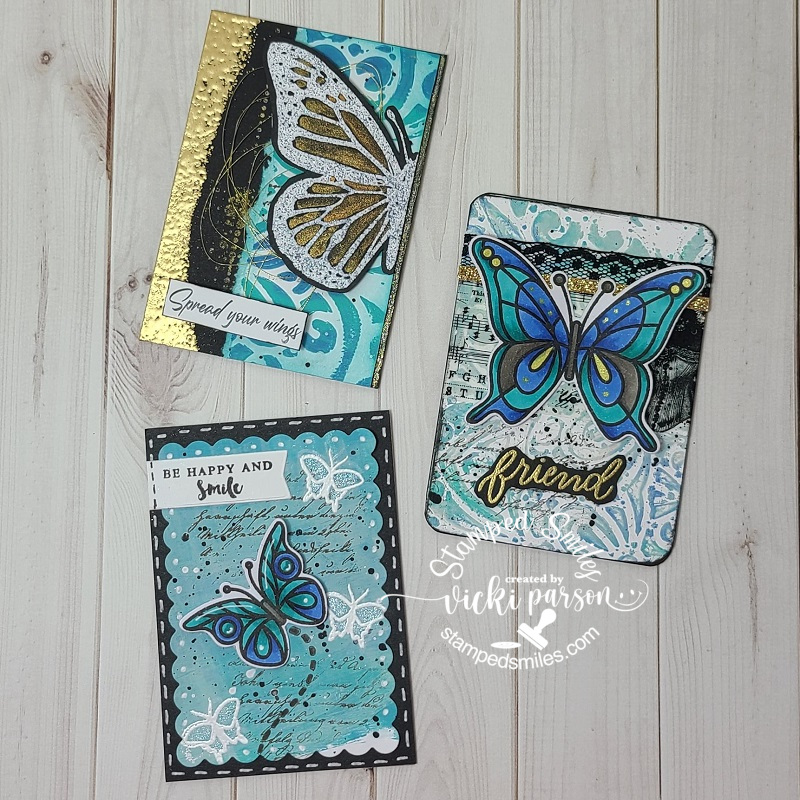
Within a FB Group that I’m in, we could choose to join an ATC SWAP with the theme of “Friendship” and these are the cards that I had created. I swapped with two others and then kept one set of three for myself. I was excited because this is the first ATCs I’ve sent overseas and really enjoyed making the collection. I thought the butterfly theme with similar colors would work keeping the “Friendship” in mind…
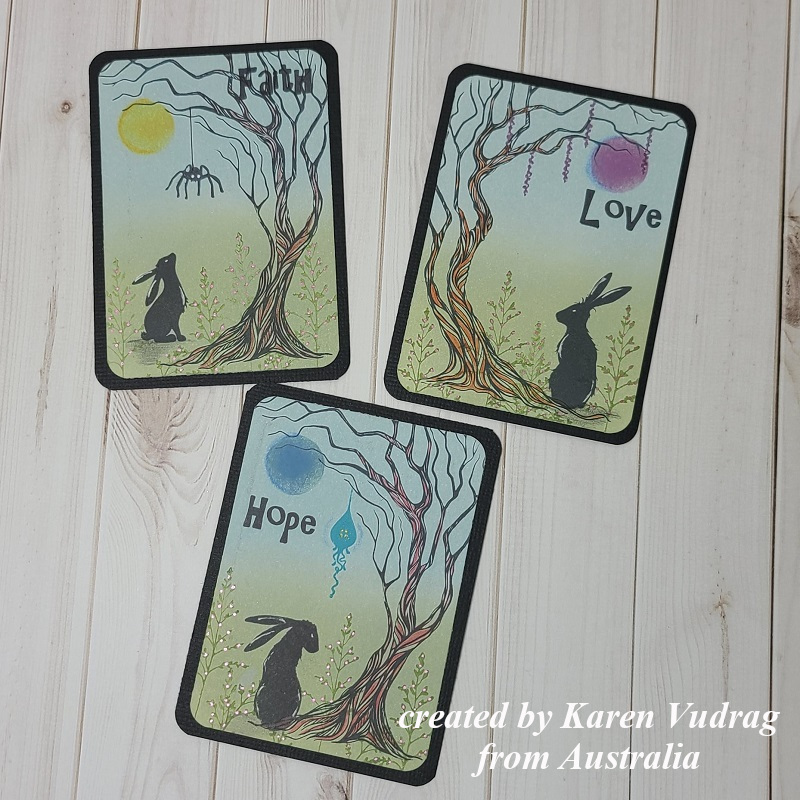
And then below are the set of ATCs I’ve received from my SWAP partners in return. The first lady sent her ATCs from Australia and the other lady was from the UK I believe. Love them and was excited to receive them to add to my book.
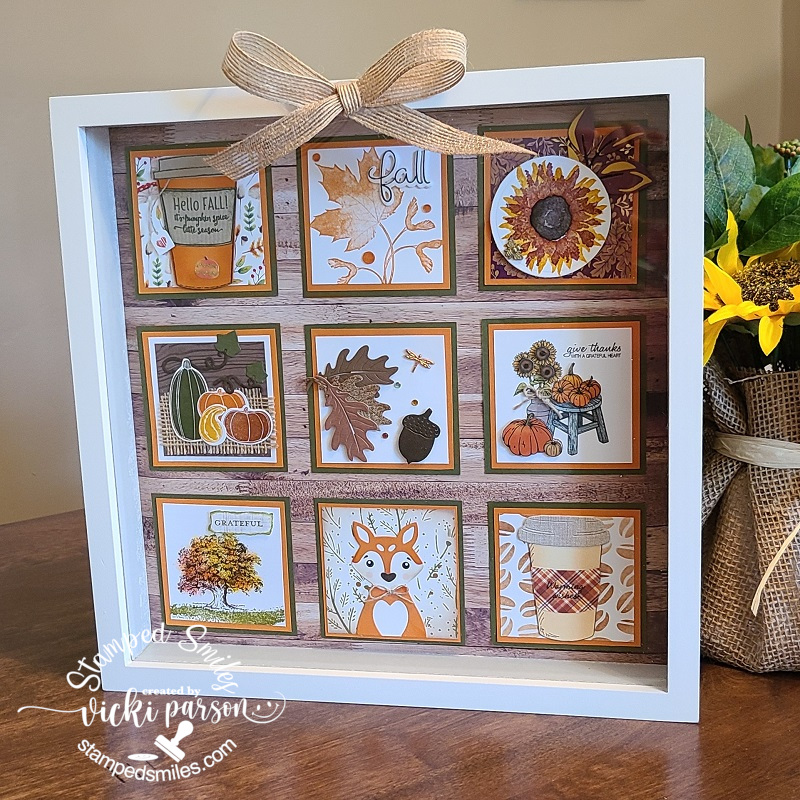
I was also involved in another “StampedSampler SWAP” making those squares like I had done with my Summer one if you remember that with my friends Patti, Shirley and Donna. This time our squares were the theme of Autumn/Fall using the Stampin’ Up! colors Pumpkin Pie and Mossy Meadow. It’s so fun to see them come in and then put it all together in the frame! Here’s how mine finished out:
For my Sampler frame, I used some different colored woodgrain pattern paper to attach the squares to and this frame is a bit different than my Summer Sampler (Check it out in THIS POST if you want to see that one.) It can stand on a table surface or you can hang it up. I also decided to add a burlap bow at the top of the frame using a hot glue gun.
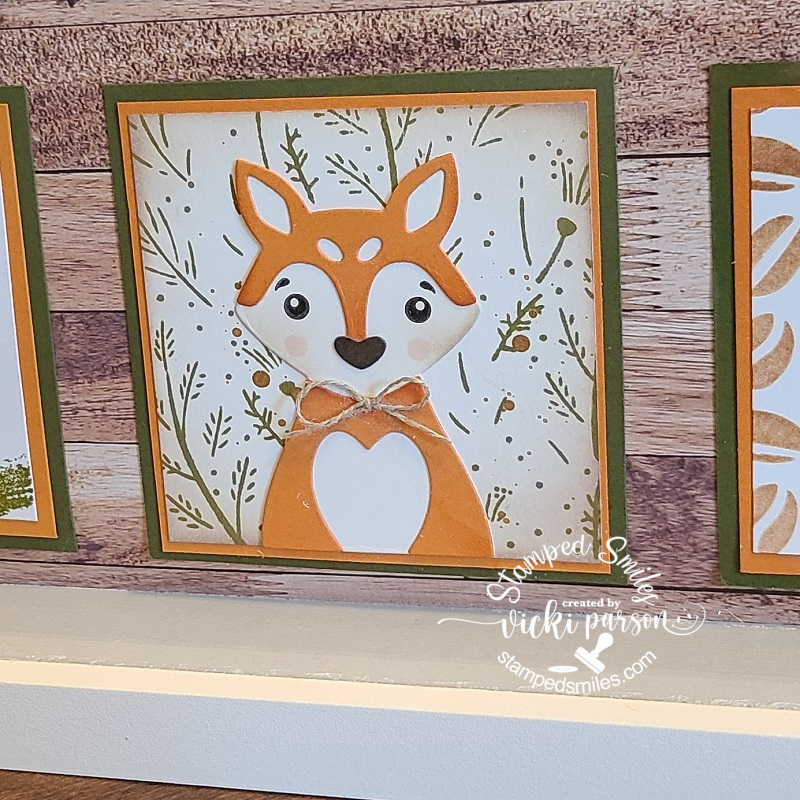
This is the Sampler Square that I had made using the adorable fox from the Taylored Expressions Woodland Squad Die & Clear Stamp Combo set. The background was stamped with the TE Four Seasons Stamp & Stencil Combo set using ONLY the background stamp in one color. I then using some gold acrylic paint to splatter over it. I also added a twine bow to the fox. I believe we’re going to be doing another one for Winter too…stay tuned!
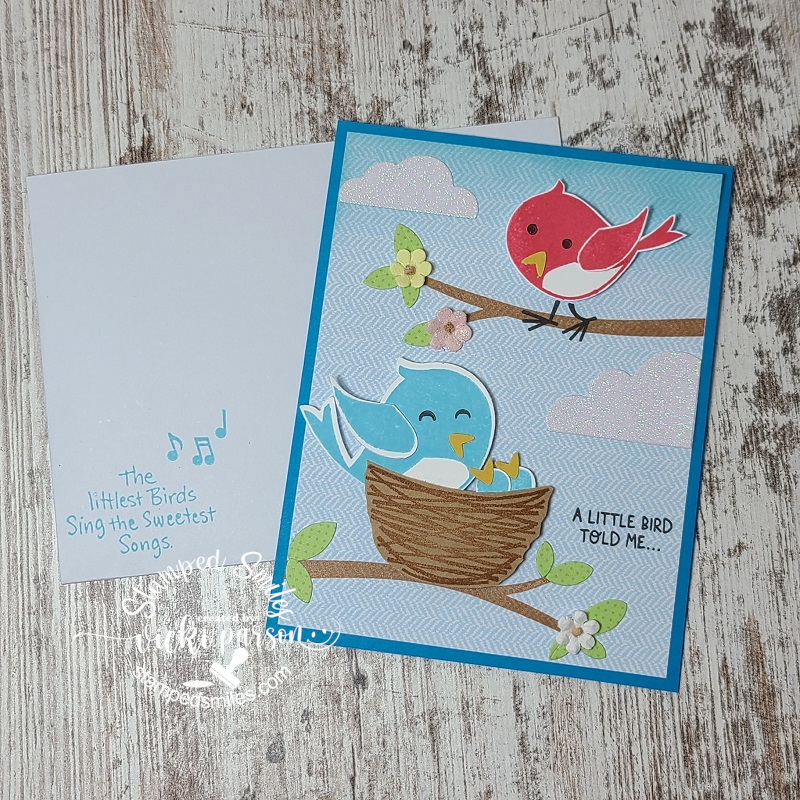
My friend Patti had also sent me an extra card kit from one of her classes along with her SWAP square, which I thought was so nice…so I had some fun putting it together as I don’t have this set which I believe is a Stampin’ Up! one.
The card kit had all of the pieces in it along with the stamped birds cut out, the stamped branches and sentiments (even on the included envelope) along with cut glitter clouds and flowers! There was a sheet with photo and instructions so I just followed along except I die cut some leaves for the branches from a piece of scrap green paper I had. Now I have a cute little birthday card ready to send out, so thank you for the fun Patti!😉
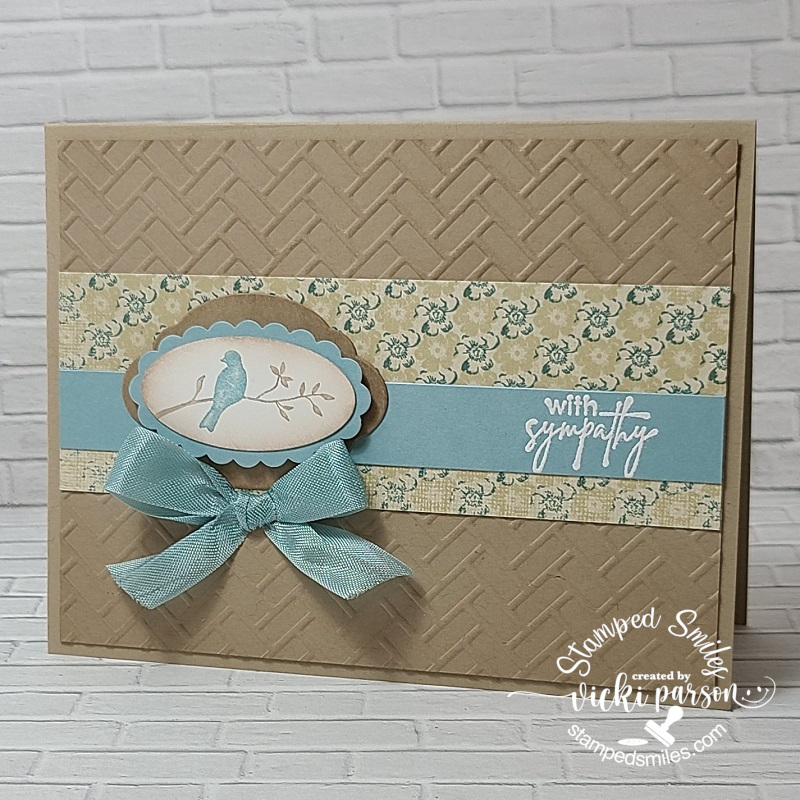
And speaking of birds and Stampin’ Up!, I had to make a sympathy card for someone that lost their pet bird. I was looking through my stash and found an older Stampin’ Up! set with a bird silhouette which I thought would be good for a sympathy card like this. I was inspired to pull out more of my older Stampin’ Up! stash to use so I used some old punches, ribbon and paper for my card as well.
I hope you’ve enjoyed the inspiration today and I thank you so much for stopping in! If you have any questions about my post, please let me know. Have a great day and see you soon!
Hello friends! My fellow U.S. friends will be celebrating Memorial weekend which means that the end of the month is here already! Summer is coming very quickly and it seems that time is really flying by!
The end of the month also brings the monthly AJ page collaboration with my crafty friend, Carol (from Crafty-Stamper), so please check out her blog for more inspiration too! We’re trying to get creative by using up our never-ending stash piles! So here’s my Art Journal inspiration with the “SMASH OUR STASH” May prompt of: “ephemera/chipboard/cut-outs, etc.“:
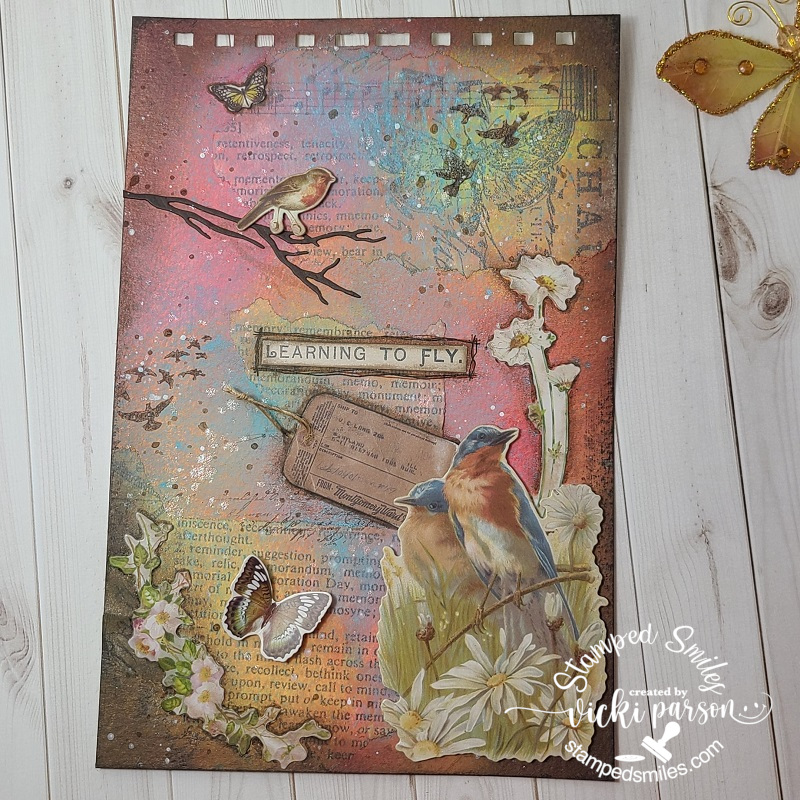
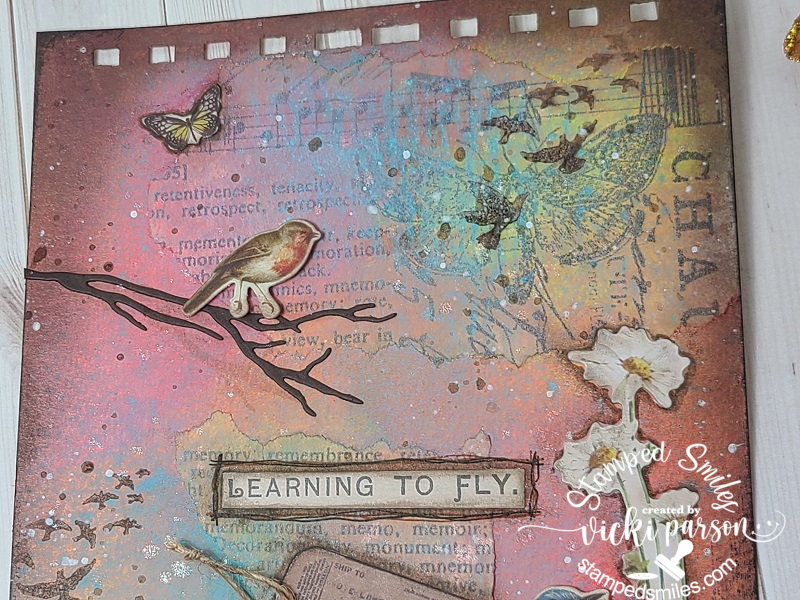
With the AJ prompt this month of “ephemera” my first thought turned to the the H-U-G-E pile of packages that I have of those Tim Holtz Idea-ology ephemera and paper dolls packs. There are actually SO many different pieces in just one package that I decided to concentrate on just one of those packages from the “Botanical” collection. (I did pull in one more layer from the “Snippets” pack as well.) I actually love the images which pulled me in to purchase them, but there they sit and never get used…so I’m using some today! Yay! That “Botanical” pack is my fave with the birds and butterflies in there!
For my page background: I started with my usual 6″ x 9″ watercolor 140# paper with the pre-cut holes at the top for my book. I glued some of the “Tim Holtz Idea-ology Tissue Wrap” ripped pieces over the blank background first. I then took a baby wipe and several colors of “DecoArt Media Fluid acrylics” and blended them together until I achieved desired look. Trying to get another color over top, I decided to pull out the “Distress Oxide Spray Salvaged Patina” after the paint had dried up. To help spread some of it around, I also sprayed with water too. I was pleased with all of the coloring in the background, but felt it needed a toned down border because of the Vintage looking ephemera, so I blended some “Vintage Photo and Black Soot Oxide Inks” at the edges.
At this point, I started adding images by working on the stamping around the edges with a script text stamp using a hybrid brown ink in random places. I also used the same ink to stamp a couple of the flying birds in the background. This is where I thought it would a good idea to add some splattering with white and brown paint. I finished it with more splatters of some “Liquid Pixie Dust” which gave it some pretty subtle sparkle all over.
So starting at top of my page, I decided to start adding the images to create my scene. I ended up die cutting a branch from some dark brown cardstock and attached it to the edge of the page and then took one of those ephemera birds and popped it with foam tape over the branch. I glued the butterfly above the bird and the “daisy” flowers off to the right were glued down while keeping in mind the placement of the large birds at the bottom.
The sentiment came from one of the stickers from the “Tim Holtz Idea-ology Clippings Sticker Book”. I used a brown Micron pen to sketch around it, but decided it was too light, so I went around it again with a black one too.
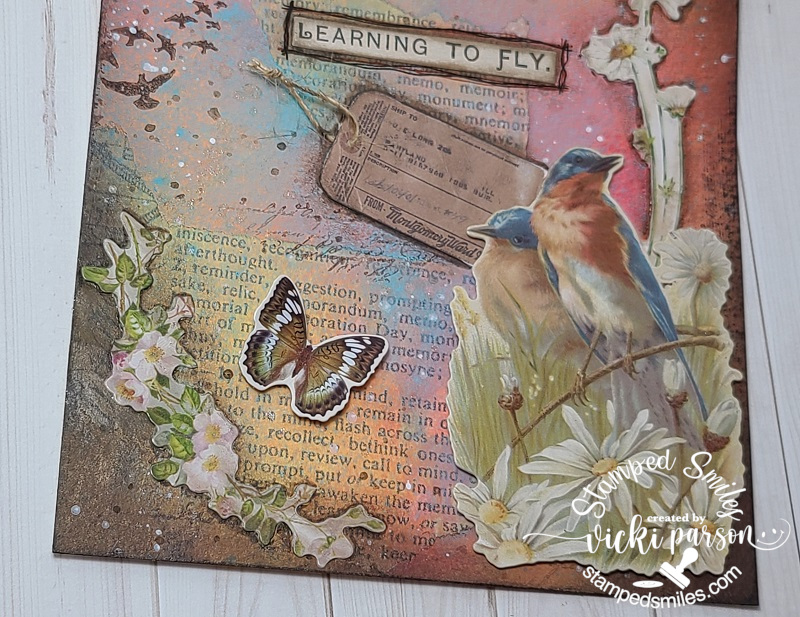
For the bottom portion, you can see that I’ve glued down the little tag under the title. (I added a piece of twine around it before I attached it.) I also glued the corner floral spray in the bottom left of the page. I’ve used foam tape to pop up the large birds as well as the butterfly above the floral spray.
The last thing I did was to grab the dark brown “Big Brush Marker” to add some shading around some of the ephemera pieces. I didn’t do anything to the pieces that were popped up with foam tape.
Hope you’ve enjoyed my Art Journal inspiration today! Thanks so much for joining me and Carol for our fun collaboration and you can always have fun following along with us every month!
Enjoy your Memorial Day weekend and please stop to remember and honor those who’ve sacrificed for us.
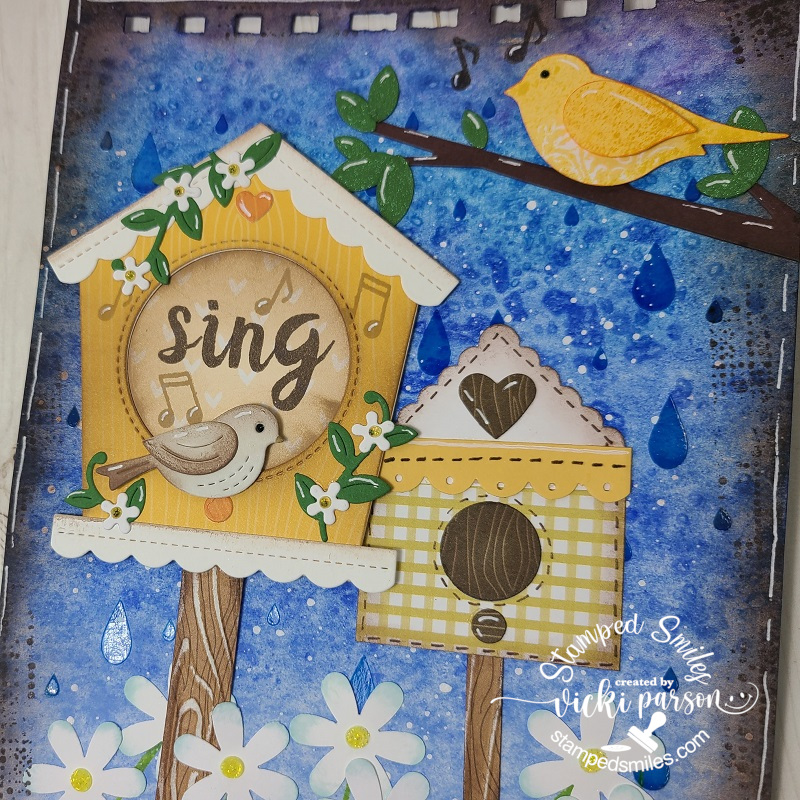
Hello friends and a happy weekend! I really can’t believe that we’re already on the last Saturday of March right now! This month flew by, but I’m so happy to get even further into the Spring months, how about you? The chirping birds seem more intense as Spring gets into her song!
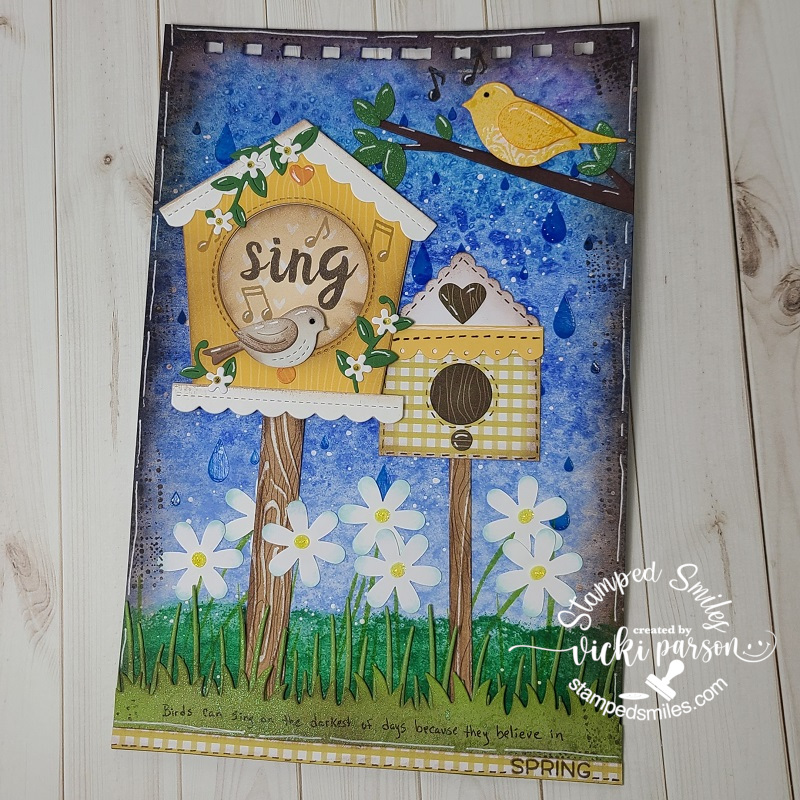
Today I’m sharing my monthly Art Journal page and collaborating with my blog friend Carol as we both try and get creative with journaling by using up our never-ending stash piles! So please pop on over to her blog to see some more inspiration with our “SMASH YOUR STASH” prompt of: “Die cuts/punched out pieces/tags(unfinished to decorate)“! Let’s get to creating!
Well, I don’t know about you, but I sure do have TONS of those punches that I hardly ever use any more. I also keep piling up tons of die cuts too! So this was my focus on my page today by pulling out lots of those to come up with a Spring theme in mind…
I started out with my usual 6×9 thick watercolor paper with the binder holes at the top. My first thought was to create a blue “watery” background by using my Zig Kuretake Gansai Tambi watercolors to paint an ombre blue. It was nice to pull these out to play with as I haven’t used them in quite a while. While it was still wet, I covered the panel with some Sea Salt crystals and let it dry. After it dried, I scrapped off the salt. If you’ve never tried it, it makes for a really unique look. I then took a raindrop stencil and went over it with some blue Chroma Glaze. I really like how the glaze makes it look shinny. I mixed some blue and yellow Deco Media Fluid Acrylics to make the green color and sponged it over the bottom to create my grass scene. I also had a tall grass stamp that I stamped over it with green ink. Lastly, I used white paint to splatter over the background.
So this is where I moved onto the rest of my separate pieces to create my scene. I pulled out circle, square, heart, scallop border, birds, leaves, flowers, branch, grass borders, etc and began cutting out all of my pieces! The yellow bird at the top was stamped and then punched out. The birdhouse on the right is all punches and the daisy flowers at the bottom are all punches. The larger birdhouse with the bird and flower vines is a die set by Lawn Fawn, the branch and leaves at the top right is a die set from My Favorite Things and I’ve also used a couple of different grass die cut borders at the bottom from My Favorite Things. This is my very first time using that birdhouse die set and I’ve had those grassy border dies forever but use quite often.
I was also quite happy that I was able to pull out several pieces of scrap papers from my stash to punch and die cut all of them too! That’s a good way to use up more of your stash when you’re using punches and dies!
Trying to zoom in a bit so you can see the background and how it looks with the watercolor salt technique as well as the shine from the raindrops. For the birdhouse posts, those are just strips of woodgrain looking pattern paper that I’ve cut into strips and then ran through an embossing folder. I used a sander to bring out the texture.
I stamped the music notes next to the birds and also stamped the “sing” letters in the center of the birdhouse. I’ve got both of the birds popped up with foam tape. I’ve glued the birdhouse posts to the page, but popped up the large birdhouse with foam tape as well. You can also see where I’ve went all the way around the edges and I sponged brown ink around everything. I also stamped a random image around the edges with brown ink too.
At the bottom of the page, you can see that I’ve taken a brown marker to write “Birds can sing on the darkest of days because they believe in” and then I stamped “SPRING” over a strip of pattern paper and attached at the bottom and used the brown marker to create the dash lines. Also did this on my made up punched birdhouse.
Both the last grassy border and the leaves above on the branch were die cut from green cardstock, but I’ve also used some green mica spray and sprayed over top of them which gives a pretty shimmer to them. Before popping up the yellow bird at the top, he was also sprayed with a yellow mica spray.
To finish it off I’ve added all of the white gel pen details and along the edges of the page. Lastly, I used some yellow Stickles to center each of the daisy flowers as well as the flowers on the birdhouse. I used black Stickles to the bird’s eyeballs.
Really enjoyed putting this one together and playing around with more stash items! Hope that you’ve enjoyed as well and have been inspired in some way! I thank you so much for stopping in! Have a great weekend!
Hello friends! It’s been a while since my last post, but the reason is that I was of course having some computer problems! I had to reset my whole computer back to the factory setting and try to get it back up and going to what I had. Thankfully because of my drive, I didn’t loose any photos or anything! I think it’s back up to “normal” now, but it was scaring me there for a few days!
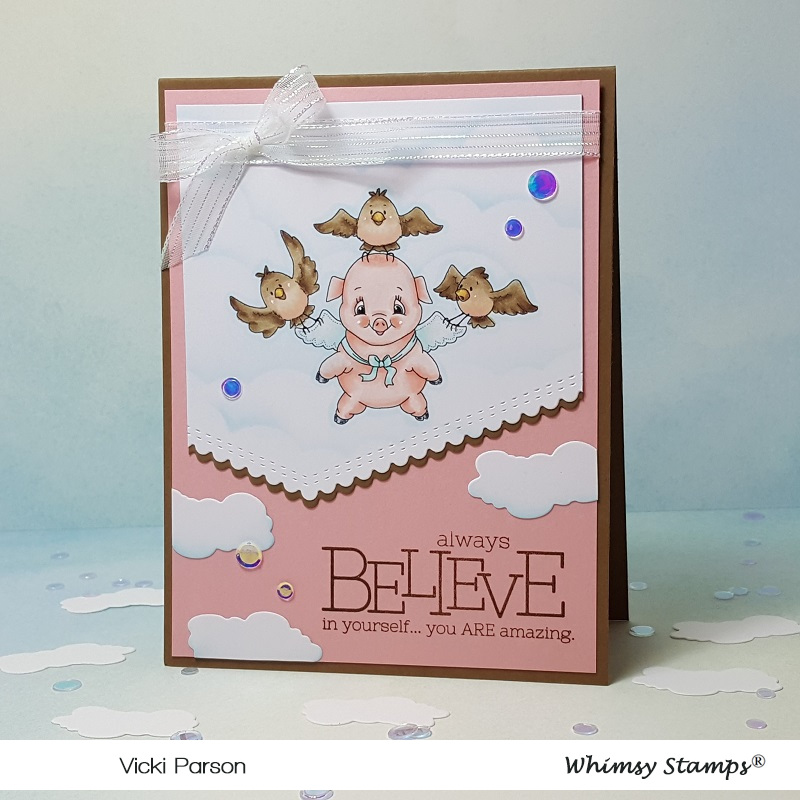
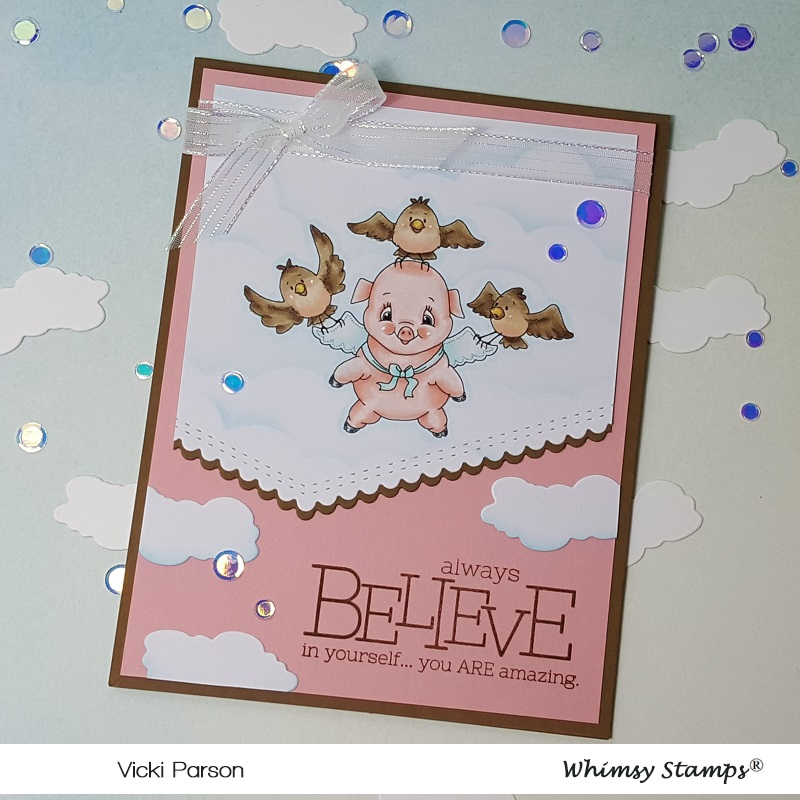
Speaking of “normal”…I’m not sure pigs can fly, but boy is this image so CUTE!
I’m using this new April digital stamp by Crissy Armstrong for Whimsy Stamps called When Pigs Fly. I love how he’s looking down as if he’s looking at the clouds below him with a huge smile! I thought the sentiment from the Whimsy Stamps Bold Statements clear stamp set was the perfect compliment for this image too.
I took a cloud stencil and some Tumbled Glass distress ink with the foam blending tool to sponge on some clouds around the image. I cut off the bottom portion of the image panel with the Whimsy Stamps Envelope Edger die set and cut an additional piece from the suede-colored cardstock for a layer behind it. I also cut out some clouds from an older Whimsy Stamps die that I had and sponged some more of the distress ink on the bottom of each one to layer and stamp the sentiment in suede ink over a pink panel. I added some pretty shimmer ribbon with a bow at the top of these layers and then attached it all over a top folding A2 sized suede card base. Lastly, I’ve added some Studio Katia Crystal Clear Confetti sequins randomly over the card.
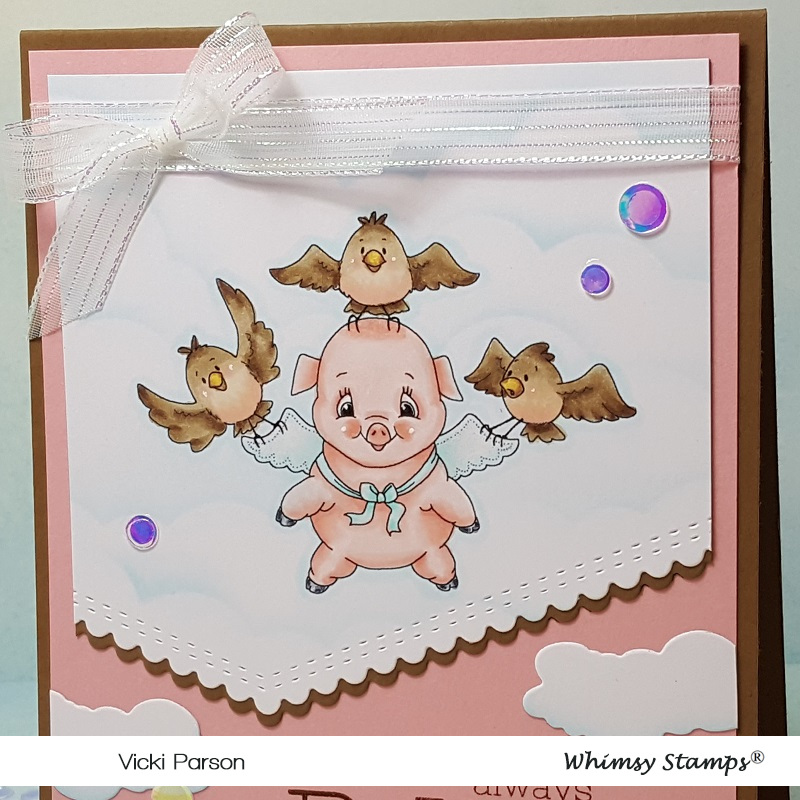
Here’s a closer view of the image and how I went about coloring it in using Copic markers. Here’s what I’ve used:
I used white gel pen for cheeks and covered the wings with Wink of Stella
Something to note about my card is that because this was a digital stamp, I was able to size it the way I wanted to accommodate my card design. This is what is great about a digital stamp. You may not like it as small as what I’ve made mine for coloring purposes, but I didn’t mind it at all and enjoyed putting this together. Hoping to give it to someone special soon! 🙂 Hope you like it too!
Thanks so much for dropping in today! Now that computer is back up and running, I will be back again tomorrow with another post! Have a great day!