Sweet Treats for Sparkles Monthly

Hello friends!  I hope that you’re having a great week!  Do you have any up-coming plans this weekend?  I think I’m going to catch up on some craft things because it’s going to be a bit cooler and rainy over my way.  The flowers are starting to come out and some of the daffodils have bloomed…so I hope the weather holds!

Today begins a new challenge over at Sparkles Monthly and Helen would like to see some “Sweet Treats” this month!  I always think of birthday cards with this theme, so I thought I’d get ahead and make another birthday card to add to my stash especially since my son’s birthday was yesterday!  So here’s my card for this challenge:

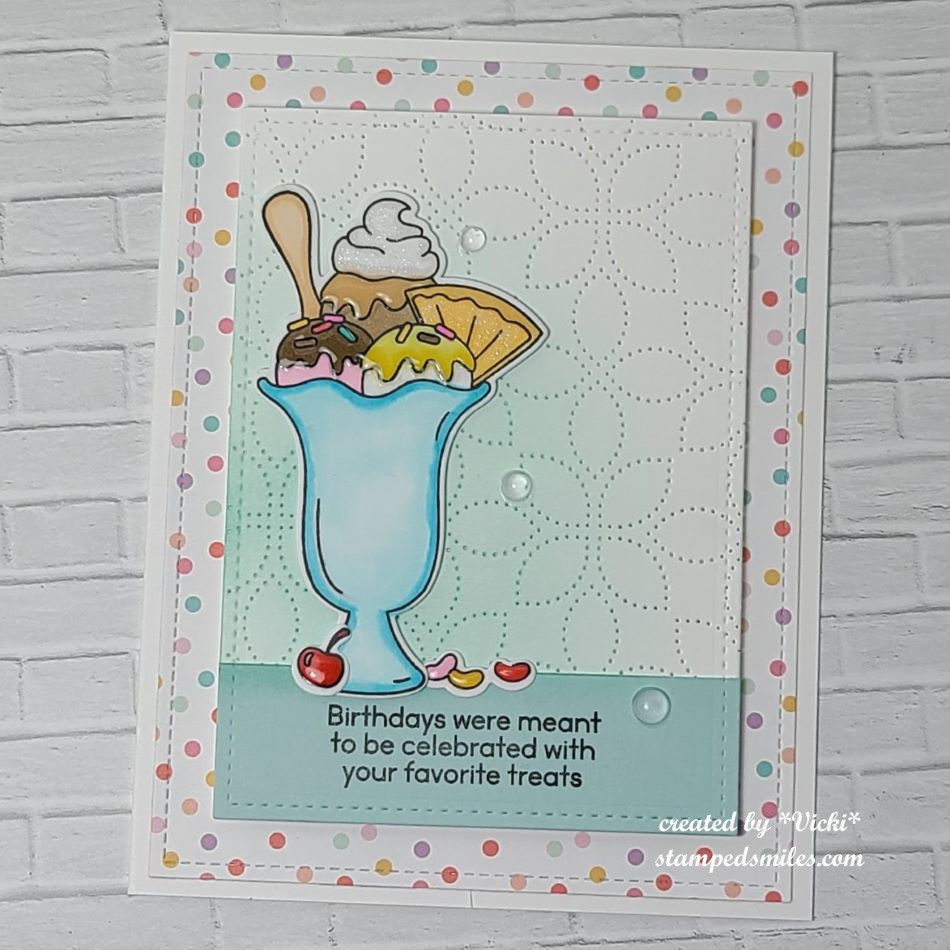
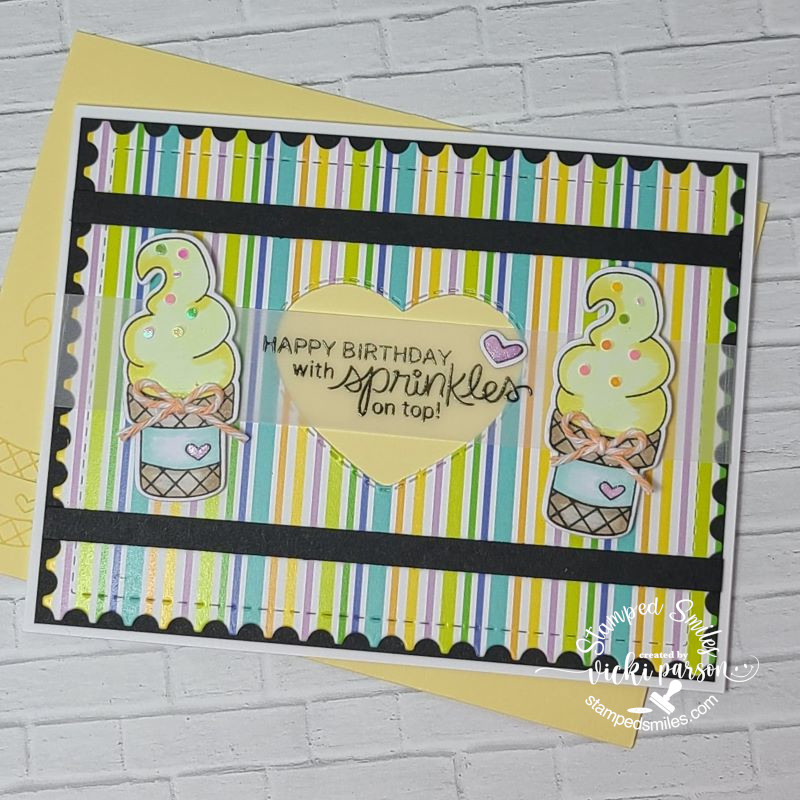
YUM!  I’ve used the Simon Says Stamp Sundae Afternoons set and had lots of fun coloring up this image, and as I did, I was thinking of all of the different flavors of ice cream and toppings!

I realized that I needed a background and a surface for the sundae to be placed on, so I created a background with a cutting plate and sponged over the area where I was placing the sundae image.  I also took a strip the same size and sponged the top area where the sundae would set on and then cut both pieces out with a stitched rectangle die.  I also used some fun polka-dotted papers from my stash and added another stitched rectangle piece behind it before placing in on an A2 top folding white card base.  The die cut background front panel was popped up with foam tape.

For finishing it off, I stamped the sentiment at the bottom from the stamp set, added some shimmer with a glitter brush pen over the whip cream on top and the fruit slice.  I took some glossy accents over the cherries, toppings and jellybeans.  I also added a few clear bubble drops to the background.

This was a really fun card to create and now I have a birthday card ready for someone!  I hope you’ve enjoyed my card today and have been inspired to join the challenge with us this month as I’d love to see what everyone comes up with!

Thanks for dropping by and enjoy your weekend ahead!

Challenges:

  1. Pammie’s Inky Pinkies – Anything Goes PIP2410
  2. Penny’s Paper-Crafty – Anything Goes Using Paper #567
  3. Crafts Galore Encore – Anything Goes
  4. Love to Craft – Anything Goes #79
  5. Lil’ Patch of Crafty Friends – Anything Goes #225
  6. The Male Room – Food & Drink #184

Mix it Up With a Fun Fold

Hello friends!  Happy March!  I’m happy to see this month come as signs of Spring start popping out everywhere!  Pretty soon the flowers will start coming up too!  Are you ready for Spring?

Today starts a new challenge over at the Mix It Up Challenge Blog!  There is always lots of wonderful inspiration from the team, so please go check it out and play along!  The challenges are always ANYTHING GOES with an optional themeThis month’s theme is FANCY FOLD!  For these challenges, you have plenty of time to enter as they run for 6 weeks!  I look forward to seeing what you come up with!   Here’s the project I made:

These birds are ready to party!  How fun are those party hats?!  I’ve found this really cool take on a “Z” fold card, but this one has been named “Diamond Z Fold Pop-Up Card“.  There are so many variations of this that I found on You Tube, but they’re all the same concept of the two diamond shapes on front and then an additional diamond pop-up mechanism on the inside that moves when you open the card.  (Click on the card name for a tutorial.)  The only thing I did differently than hers was using scallop square die cuts and I covered the pop-up mechanism on the inside with pattern paper so it’s not as noticeable.

I’ve used the My Favorite Things (retired) Birthday Chicks that I stamped, colored and die cut out and arranged over the design.  I’ve also used the My Favorite Things (retired) pattern papers and of course the same for the scallop stitched squares.  For the white squares, I’ve used a MFT cloud stencil with blue ink for the clouds and the sentiment was white heat embossed and cut out with a banner die.

When this card is closed, this is what it looks like.  Notice that you do not see the bird on the inside panel next to the bird on top of the balloon as he is hidden until you open it.

It folds up just like a Z fold would and it’s A2 and ready for a regular A2 envelope.  I’ve placed an extra panel on the back of the card for a special handwritten message and decorated it a strip of pattern paper and another party bird.  I didn’t put anything on the inside stars pattern because I thought it took too much away from the front of the card and you don’t want an inside message to show on the front of the card.  It takes a bit of maneuvering to decorate images and sentiments as to where to put them strategically on the card, but it was so fun!

  • I hope you’ve enjoyed my card today and go check out the challenge to come and play along with us!  I really look forward to seeing all of the different fancy fold projects in the gallery this month! 

Thanks so much for dropping by and I’ll see you soon!

Challenges:

  1. Make My Monday – Fun Folds #220
  2. Penny’s Paper-Crafty – Anything Goes using Paper #566
  3. Simon Says Stamp Wednesday – Anything Goes
  4. Crafty Catz – More Than One Fold/Anything Goes #666
  5. Krafty Chicks – #705 Anything Goes

Hearts and Flowers for Sparkles Monthly Challenge

Hello friends!  I hope you’re having a great week so far and enjoyed a nice Valentine’s Day yesterday with some yummy sweets!  We enjoyed some treats of our own! 😉

Today I have a new challenge to share with you for the Sparkles Monthly Challenge blog and this month the lovely Dawn would like to see some “Hearts & Flowers” on your creations!  Although Valentine’s Day is over, I think hearts are great for adding any time of the year, so check out the inspiration from the design team and here’s what I’ve made:

I’ve made a mini slim card using the Taylored Expressions Hearts in Bloom Layering Stencils which are so great for mass producing several cards at once.  For this card and the other cards below, I decided I wanted to use the TE Hearts in Bloom Foil Panels which works with these stencils. I foiled them with gold foil.  I think the foiling adds such a pretty shine and glitter.  I also used the TE Love & Hugs Foil Panels for the sentiment and die cut it out with the coordinating die set.

So after foiling everything, I used the stencils to create the pretty bouquet of flowers with the hearts in it and then added a frame around the edge with a TE Diagonal Stitch Mini Slim die that doesn’t cut anything, but adds those slash marks.  I used some foam tape to pop up the foiled sentiment and just attached everything to a coordinating mini slim card base.

I couldn’t just make this one to show you, so here is the whole set of cards I’ve made together:

Those stencils create all of these patterns at one time.  I just lined the foil panels up at one time and then used each stencil for the colors.  If you didn’t want to use the foil panels, you could also just use the stencils on one sheet of cardstock and then cut them apart to make the card fronts.

I found these sets to become very addicting!  And just like that, two of them have been sent out!  

I’ve been really busy with creating behind the scenes and I will be sharing more soon!  I will be around to see what’s been going on with you all shortly!  I really appreciate your kindness and support…it really means so much!❤️  Thanks for stopping in!

Challenges:

  1. Try it On Tuesday – Hearts &/or Flowers
  2. Make My Monday – Love
  3. Allsorts – Anything Goes/Hearts
  4. Ally’s Angels – Anything Goes
  5. Little Red Wagon – Show Us Some Love/Valentine
  6. Crafty Gals Corner – Add a Heart
  7. Simon Says Stamp Wednesday– Fun with Foil

Occasional Blooms

Hello friends!  I hope that you’re having a wonderful week!  I’m excited about the changes I’m seeing outside with the weather!  Looking forward to that cooler temperature and pretty colors!

  • I wanted to do a bit of “house keeping” regarding my blog.  I apologize if you’re having problems trying to leave a comment.  I’ve had a few people contact me about this and I noticed that when I cleared the “cookies/cache” from my end…it somehow changed the appearance of my blog comment area…I don’t know why!?  I did find out that if you start typing in the comment box, buttons above the box will appear in which you can choose how to login.  I suggest that if you don’t have a WordPress/Gravatar account, to choose the envelope button to leave your name and e-mail address that way. (The Facebook login does not work.)  Then you can hit the reply button below the box to publish it.  I tried letting the commenter leave an anonymous reply (without having to type in name and e-mail), but then I’ll have NO idea who it is unless a name is given within the comment, so I had to re-engage that again.  I have also contacted a support person to help me navigate what’s going on and maybe I can get it back the way it was before.  I do apologize if it’s giving you a problem.  You can also go to gravatar.com to create an account which will work with ANY WordPress platform blog….but you don’t have to unless you want to do that!  You should still be able to leave a comment regardless.  Thank you for taking the time to care enough to share your support with me…I deeply appreciate it!

So now to get on with some crafting projects!  I’ve had to change gears on the seasonal makes and create some cards that I needed to send out to some people and they all happen to be in blooms:

First up is a “thinking of you” card creating for a friend using several Lisa Horton products.  These particular LH products all came from Inky Stamper.

I started with the craft background and embossed it with the LH Variegated Leaf 3D embossing folder and went over the texture with white ink.  I then used the LH Hydrangea Stencil/Die/Embossing Folder to create the blooms…love how it turned out!  I took some gold ink on the last layer of the stencil to go over the centers of the flowers.  I popped the bloom up over the embossed craft background and white heat embossed the sentiment from the IS Pig Cause stamp set and cut it out in a banner to place over the blooms.  I finished it with some gold gems.

My next card is a sympathy card needed for a craft friend who lost a loved one.  This person likes to cross-stitch and quilt, so I thought this MFT stitched quilt die (this one retired) would be fun to do over some pretty floral papers.  I had to die cut several white frames with it and lay the centers of the paper cut pieces on the first frame and then I layered two more of the white frames over top with the last pattern paper over that to give it that 3D look.  (Not sure where the paper came from other my stash!)

I cut the sentiment from the Whimsy Stamps Sympathy/Heartfelt/Condolences die set and layered it in the same way I did the quilt frame die.  I also white heat embossed the sentiment from the WS Deepest Sympathy stamp set and cut it out from a banner to attach right underneath the “p” in the die cut word.  I finished this one off with some clear gems.

And on a happier note, I’ve made another bloom card to wish someone turning 75 years young a happy birthday!  This is the first chance I’ve had to use this fun die set from Taylored Expressions!  The bottom container came from the TE Antique Pails die set.   I stamped the TE Burlap Background over it with the same color ink as the cardstock as well as Butter Cream ink to give it some texture.  The flower arrangement was cut out from the TE Garden Variety die set in various colors.  I also brushed some of the same colors in the centers of the flowers.  The centers of the flowers have a silver metallic enamel dot.

For the frame, I’ve used the TE Diagonal Stitch Rectangle die that only leaves the marks but doesn’t cut anything out.  The sentiment was stamped and cut out with the TE All Together-Occasions 2 set/die and popped up with foam squares over the panel.

I think the most fun was arranging the flowers in the container!

I hope you’ve enjoyed my cards today and you’ve been inspired!  Thank you so much for stopping by!  I appreciate you!  Have a wonderful weekend!

Challenges:

  1. Addicted to Stamps & More – Any Occasion
  2. The Sisterhood of Crafters – Die Cuts/Anything Goes
  3. Lil’ Patch of Crafty Friends – Anything Goes
  4. Pammie’s Inky Pinkies – Anything Goes
  5. Cardz 4 Galz – Use a Stencil, a Sentiment, an Image (top card only)
  6. Crafts Galore Encore – Anything Goes
  7. 613 Avenue Create – Anything Goes no twist
  8. The Corrosive – Anything Goes

Alice in Wonderland for Sparkles Monthly

Hello friends!  Hope you’re doing well and have had a great start to September!  It’s hard to believe we’re almost into Autumn already!  I’ve been enjoying the outdoors for as long as I can and Autumn around my area is so pretty, so I need to go out in it!  Crafting will be waiting for me soon!

Today starts a new challenge for Sparkles Monthly with the theme of: Alice in Wonderland!  So I hope that you will stop by the blog to check out the inspiration and join us this month!  Here’s what I’ve come up with:

This was really fun to put together!  I have always loved the Alice in Wonderland stuff and I actually have quite a bit of it for crafting, but this stamp set by Visible Image was new to me and something that I had gotten from a win for a challenge I entered a few months back.  I also used the Supernova Stencil for the background from the same company.

For the background:  I ink blended several colored and then spritzed with water for the watermark effect.  I went over it with the stencil in a darker blue ink and spritzed it again.  I then added some gold and white ink splatters over top for more texture.  It was cut out with the wonky stitch rectangle die and layered over mirror gold cardstock.

I had some Alice in Wonderland papers and used s strip of the blue checks to cut out a wavy border and attached it to the bottom of the stenciled panel.  I added these layers to an A2 top folding blue card base.  I had some old-fashioned looking stamps which I had for years and stamped a few on the background in blue ink.

I colored “Alice” with Copic markers along with the piece of cake and key and then used the coordinating die to cut them out and attach to the card front.  I added some pink glitter to Alice’s drink in her hand and the filling in the cake.  I also added some gold sequins over the card.  The sentiment was cut out with a banner die which I thought would make for a fun birthday card.

Thanks for stopping by to check out my card and I hope you’ve got some inspiration with it!  (I’m a bit behind with so many things, so I will be checking out to see what you’re up to!)

Challenges: 

  1. Crafter’s Cafe – Clothing Styles for Children
  2. Lil’ Patch of Crafty Friends – Anything Goes
  3. Alphabet – ‘L’ is for Literature (inspired by a book) Alice in Wonderland
  4. Creative Fingers – Anything Goes
  5. Pammie’s Inky Pinkies – Anything Goes
  6. Penny’s Paper-Crafty – Anything Goes using Paper
  7. Love to Craft – Anything Goes

I Scream, You Scream

Did you say “We All Scream for Ice Cream”? or did you think this was about Halloween?  Well although that season is quickly approaching and I do love all the spooky things, this one is actually about ice cream today.  As hot as it has been and going to be this weekend, it might be nice to have!  However, I do have some on my card today:

I made a birthday card for someone that loves a local ice cream parlor that sells lemon ice cream, so that’s why it’s all in the bright yellow colors!  I’ve used some yummy goodies today from Newton’s Nook for my card.  I also followed along with a sketch challenge for the Inky Paws Challenge, and it’s about over, so I needed to get it in! (see details below)

I pulled out the NN Summer Scoops stamp set and stamped a couple of the cones, colored and cut them out with the coordinating dies.  I also took a strip of vellum and heat embossed the sentiment in black over the pattern and black layers. The striped pattern was from the NN Birthday Woofs paper pad, and I used the largest of the NN Frameworks die set to cut it out. For the center of the striped panel, I used the heart die from the NN Furr-ever Friends die set and cut out the center where the vellum sentiment strip was placed.  I added a piece of yellow cardstock behind the heart so that the sentiment would show up and layered the striped panel onto a black layer which I placed over a top folding A2 sized white card base.  After popping up the ice cream cones, I added two black strips above and below them to fit the sketch design.

The Summer Scoops set also had the extra heart which I colored and cut out to place next to the sentiment. I added some shimmer to all of the hearts with a glitter brush pen and then I took some individual sprinkles from the NN Celebration Embellishment Mix and glued those on top of the ice cream.  I saved the twine that came with my order from Newton’s Nook and tied a couple of bows to go on top of the ice cream cones.  It was the perfect color to go with the sprinkles!

Of course, I need to make the envelope yellow too and I stamped an additional cone image on the bottom left corner of that too.  And yes, the birthday person was also gifted some lemon ice cream!

I hope you’ve enjoyed my lemon ice cream card today or found some inspiration with it!  Thanks for dropping by and I hope you’re able to enjoy yourself something refreshing this weekend even if it isn’t ice cream! 😉

Challenges I’d like to enter:

  1. Inky Paws Challenge – #204 Sketch challenge using NND productIPC204
  2. Cupcake Inspirations – CIC575 Add a bow/ribbon
  3. AAA Birthday –  Game #52 Anything Goes Birthday#52 bottom
  4. The Crafty Addicts – Anything Goes
  5. Tic Tac Toe – TTTC222 I used middle down: patterned paper, free, birthday
  6. Penny’s Paper-Crafty– #553 Anything Goes using paper
  7. Pammie’s Inky Pinkies – PIP2332 Anything Goes

Margarita and a Rainbow

Hello friends!  I hope you’re having a great week so far and that you’re able to keep cool as I know it seems to be pretty warm for many of us in the U.S.  It’s a great time to do some crafting, so I thought I’d share a few cards that I made that I needed. (Scroll down in this post to see the ‘rainbow’ card.)

I think a margarita sounds pretty refreshing in this heat!  Newton here seems to be enjoying it anyway!  All of the stamps I’ve used are from Newton’s Nook and I’ve made this card for a special person’s birthday.  This person I’m making this card for had gotten me hooked on mango margaritas and I wanted to represent that in the card.  (Note the salt rim on the glass.)  The color is more a strawberry color, but I wanted to go with the colors for the Inky Paws Challenge. (See below in the challenge list.)

I stamped the “happy birthday” sentiment (retired set from Newton’s Nook) repeatedly in the background on the pink panel and then I splattered it with white Copic and water with a brush.  The panel was cut from the Newton’s Nook Framework die set and layered with colors that match with the challenge.  The blue card base was repeated stamped with the taco and I stamped, colored and cut one out to place behind Newton with the margarita.  I took a strip of Doodlebug green polka-dot paper and white heat embossed the sentiment.  I cut a tiny strip off and turned it over to glue at the top of the strip.  I used foam tape to add the margarita kitty, finished it off with white twine and sequins with a spot of Stickles in the centers.

Challenges for margarita card:

  1. Inky Paws – #203 color challengeIPC203
  2. Country View – 4 legged friend
  3. The Diva’s That Cut Paper – Birthday theme
  4. NBUS – #52 July (Never Before Used Schtuff!)  New Newton’s Nook products!
  5. Crazy for Cats – Anything ‘CAT’ goes optional: festive
  6. Daring Cardmakers – summer drinkscover
  7. Simon Says Stamp – Anything Goes

Here’s another card I wanted to make for Beccy’s Place challenge using the free image that was provided this month and I thought it would make a great card for encouragement to send for a special cause I’m donating for:

I’ve used the non-colored version of this image and before printing it out, I’ve added a sentiment at the bottom from the Seasonal Window digital set from Beccy’s Place.  (There are quite a few uplifting quotes in that one.)  I colored the image with Copics and added a bit of shimmer on the sun with a glitter pen.

I think I’ve made this popped up frame around the image more complicated than what it needed to be, but I cut out the scallop frame twice for thickness, and also printed out a piece of the rainbow looking papers that was also a part of this month’s Beccy’s Place Challenge free image.  I cut it out with the scalloped frame and attached it to my double thick frame layers.  The image was placed over a black cardstock and the popped-out rainbow frame was placed over the image keeping a portion of the black frame showing.  These layers were mounted over a 4 1/2″ square white card base.

Hope that you’ve enjoyed my cards today!  Thank you for stopping in and I’ll be seeing you Saturday for another Art Journal Page!

Challenges for ‘rainbow’ card:

  1. Beccy’s Place Challenge – July Anything Goes using Beccy’s Place image optional: animal(s)
  2. Crafts Galore Encore – Anything Goes
  3. The Corrosive – Anything Goes
  4. The Crafty Addicts – Anything Goes
  5. Pammie’s Inky Pinkies – Anything Goes
  6. Love to Scrap – Anything Goes
  7. Love to Craft – Anything Goes

Class Fun & Square Samplers + Give Away

Happy April friends!  We have finished March already and onto Easter very quickly approaching!  I hope you’re enjoying all things Spring coming up your way!  We’ve had several storms and we’re in the tornado season as well, so I hope everyone is staying safe out there whatever the weather.  I do have some things that I had previously finished and wanted to share:

First, I wanted to share about the Virtual Stamp Joy Event by Taylored Expressions that I participated in a few weeks ago.  I always have so much fun and enjoy the motivation that it seems to generate!  I’m sharing them in the gallery below, so if you’re on my website post, then just click on each photo to enlarge it.

  • The first four photos were from a class using the same floral stamp set and the others are from the next day of make-n-take projects.  Please let me know if you have any questions about any of them!

The last set of four cards were a “mass production” using a background stamp in different colored cardstock panels and clear heat embossing over them.  The class sample had “hello” sentiment on each one, but I changed up the sentiments and have placed them in a card box to give them out with envelopes as a gift for someone.

Hope you’ve enjoyed the inspiration as much as I enjoyed putting them all together!


From the end of last year up until this last month, I didn’t have much time with the Holidays and everything going on, but as you may have seen in previous posts, I participate in a “square sampler swap” and when everyone sends out their squares, we then complete a home décor piece with all of the squares, so I thought I’d share mine finally completed:

  • CLICK PHOTOS BELOW TO ENLARGE

This was for the Christmas Sampler SWAP and you can see that I’ve used a black shadow box frame for my sampler and placed some red with red metallic dotted paper behind it.  The square on the right is the one that I made. (I’ve used My Favorite Things products for my square.)

This was for the Winter Sampler SWAP and I went with a white shadow box for this one.  I’ve placed some soft blue snowflake papers for behind my sampler as I thought it was soft enough to not look too busy.  The square on the right is the one that I made. (I’ve used Inky Stamper products for my square.)

And recently we finished up our Spring Animals Sampler SWAP that I used another white shadow box for the sampler.  I’ve added a piece of pink colored “Watercolor Wishes” paper from Lawn Fawn behind it.  It looks a little off in the photo, but it looks better IRL.  The square on the right is the one that I made.  (I used Taylored Expressions products for my square.)

Not sure if we’re doing any more or not, but I had so much fun making the squares to swap with friends!


Lastly, I have a fun little thing to give to whoever is interested in these Taylored Expressions dies + foil-it panels package. (It’s not sold in stores anywhere as it was a free gift with purchase) I have an extra and so I thought I’d give it away to someone!  Just leave me a comment below if you’re interested and I’ll pick someone from the comments.
Leave a comment below if you’re interested!

That’s all I have for today!  Thanks so much for stopping in!  I’ll be seeing you soon!

Party Pandas

Hello friends!  I had another birthday card to make and this person likes panda bears, so I thought I’d go through my stash and see what I had for that.  Here’s what I came up with:

So, I found this cute little guy that I believe was a “freebie” a few years back for your birthday month from Lawn Fawn called “Party Panda” and the extra was that “Happy birthday” sentiment as well.  There was also a set of coordinating dies with it that cut out the panda as well as the tiny cupcake.

So, to make it a good party, you need more than one panda, so I stamped him out three times and stamped out some “party elements” as well from the Lawn Fawn Party Animals stamp set, colored and cut everything out with the coordinating dies.  These little guys turned out so cute with their party hats on and holding their birthday items to celebrate with another panda friend, of course!

I thought it would be fun to create a green colored frame with the Watercolor Wishes paper cut out with the Outside In Stitched Rectangle and the Reversed Stitched Scallop Rectangle dies to create a frame.  I had some additional metallic gold polka dotted papers for the background behind it that were also a freebie with one of my orders.  Before attaching it to the back of the green frame, I also added a piece of Noble Fir cardstock cut from the Grassy Border die.  Attaching this border to the frame only gave me some room to tuck the pandas behind the grass.

I stamped the sentiment in black, cut it out with my scissors to make a banner and sponged some green ink around it before attaching to the card.  Lastly, I added some gold sequins and placed it over an A2 sized top-folding white card base.  I decided to create my own envelope with more of that green Watercolor Wishes paper to mail it in.

  • Well, the green and grass have me thinking of Spring coming and I think I might party like a panda myself when it finally arrives!! 😆🎈 I’m sure ready to be outdoors! 

Hope that you’ve enjoyed my card today and have been inspired!  I’ll be back Saturday for this month’s Art Journal Page and hope to see you then!  Thanks for dropping in!

Challenges:

  1. Creative Knockouts – Add a Sentiment
  2. Lil’ Patch of Crafty Friends – Anything Goes
  3. Pammie’s Inky Pinkies – PIP2311 Anything Goes
  4. Lawn Fawnatics – Inspired by Book/Movie/Song (My book inspiration came from Xander’s Panda Party by Linda Sue Park)BandN
  5. The Corrosive – Anything Goes
  6. Creative Fingers – Anything Goes

Going CAS at Sparkles Monthly

Hello friends and happy Wednesday!  Today starts a new challenge over at the Sparkles Monthly Challenge Blog and this time we would like to see your CAS (or “clean and simple”) creations!  I hope you will hop on over to see the inspiration from the team and consider joining in the fun with us!

Here’s the DT creation that I’ve made for it:

Sometimes I feel that CAS can actually be even more difficult than regular cards and I struggle with thinking I’ve added too much, or it doesn’t look right.  I think it’s more of me over-thinking something, though!

It was my son’s birthday yesterday and I thought this would be a great opportunity to make a card for him.  He’s a postal carrier, so I thought this cute owl from the Lawn Fawn Special Delivery would work great for this.  I started with the LF Stitched Cloud Backdrop and the LF Stitched Rectangle Frames dies to create the main focal panel.  I lightly blended some blue ink in a circle before adding the Copic colored postal owl popped up with foam.

Over some red cardstock, I white heat embossed the sentiment.  (I don’t remember which LF stamp set it came from) I die cut it with a banner die and popped it up over the cloud panel.  I also had an extra die cut heart lying on my table, so I thought it would be great to add with the owl.

Thanks so much for stopping in today!  Hope you’ve enjoyed my CAS card and have been inspired to join us this month with your take on the challenge too!

Challenges:

  1. Country View – Birthday card for a man
  2. Love to Scrap – Anything Goes
  3. 613 Avenue Create – Anything Goes optional: CAS
  4. Lawn Fawnatics – All things birthday
  5. Sunday Stamps – SSC304 sketchSSC304