May Art Journal Page-BEE YOU

Hello friends!  Here we are at the end of another month for the year!  It seems like we’ve only just barely started the year and now it’s almost at the halfway point?  Time seems to fly away!  Which reminds me that today is our monthly art journal page!

Yes, it’s our monthly AJ page with my crafty friend Carol (from Crafty-Stamper) who is collaborating with me to “SMASH OUR STASH”! We get creative trying to use up our never-ending stash piles along with a prompt for each month.  I know she always has great inspiration to share, so please check out her blog too! Here’s my AJ page with the “SMASH OUR STASH” MAY prompt of “WINGS”: 

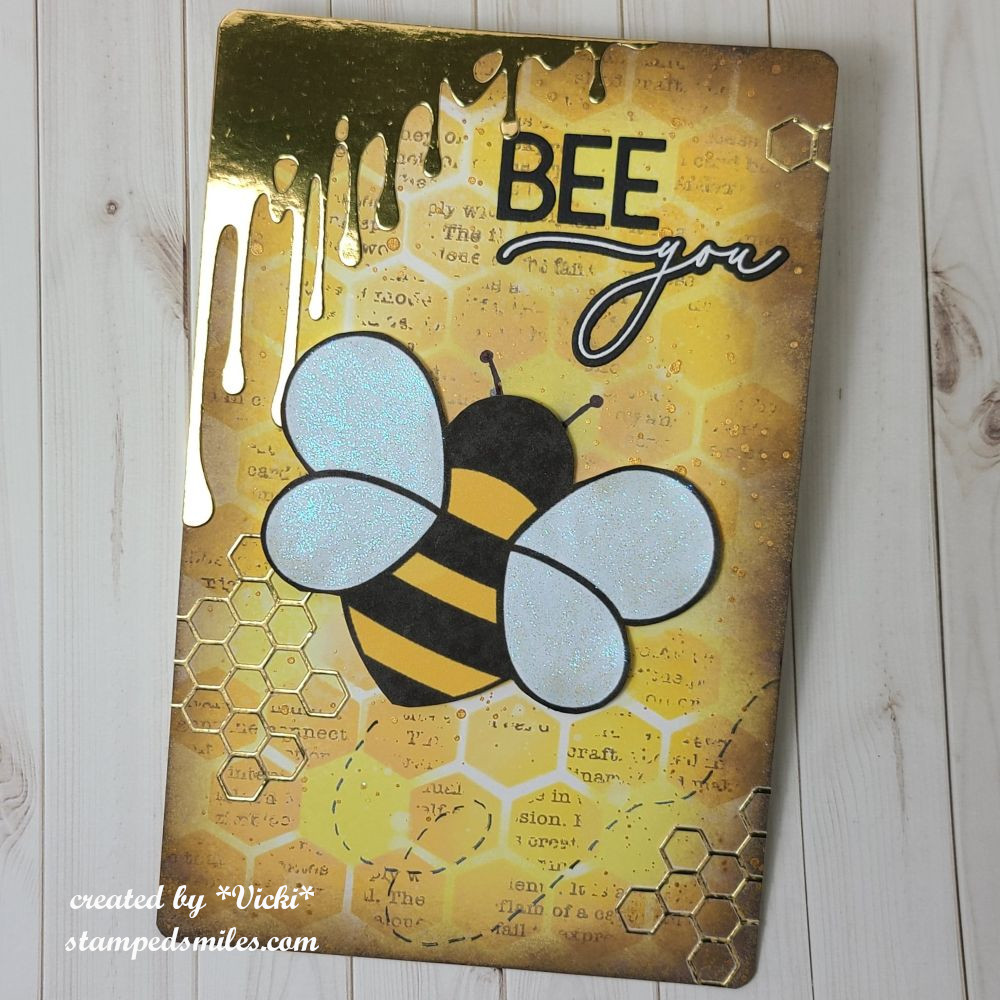
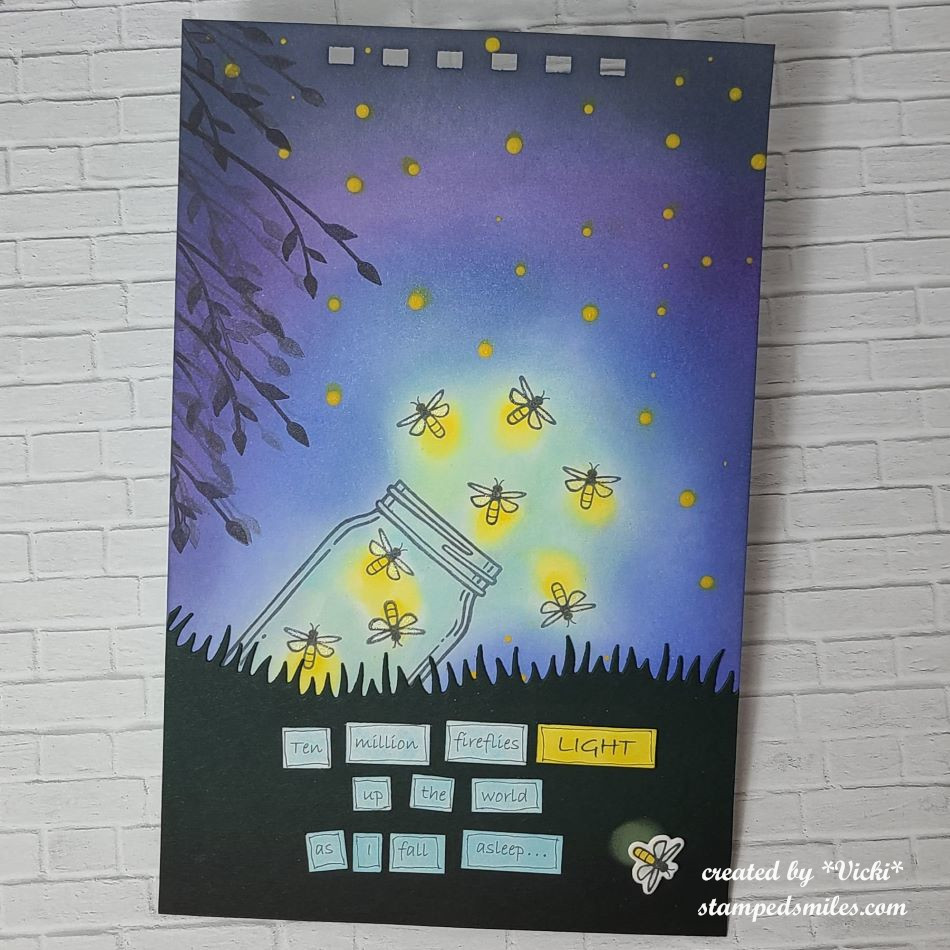
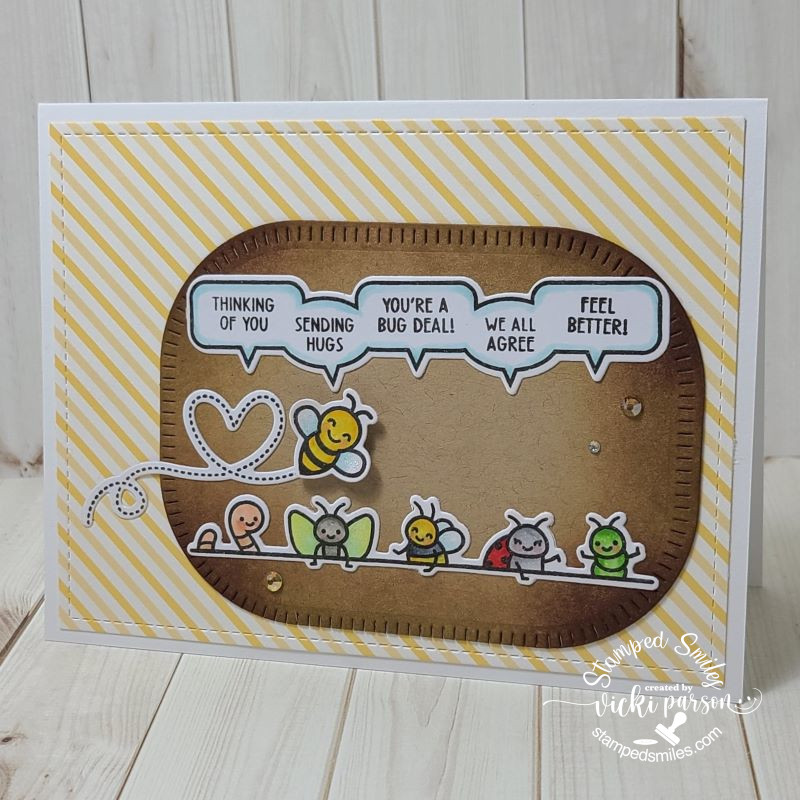
There happens to be wings on many things, but my attention has been focused on bees lately.  I have been working on several projects and this was one of the things that I had used on something, so I thought I’d print me out an additional one to use on this month’s page!  (This image is a digital file that I printed out and hand cut with scissors.)

For the background:  I started with 8.5″x 5.5″Bristol Smooth Watercolor paper that I chomped the corners to get a rounded edge.  I used a Dina Wakley Media Stencil along with yellow tones Oxide Distress inks to blend over it.  While the stencil was still in place, I used a text stamp to go over it with brown ink. (water proof).  Lifted off the stencil and added some more bright yellow ink in various places and then spritzed it with water to blend a bit.  Since the text ink was water proof…it didn’t run.  I then went around the edges with brown ink and then splattered the entire page with gold watercolor.

I die cut the hexagon and drip corner with gold mirror cardstock and attached to page.  I used a black marker to make the “bee lines” and “bee antennas”.  I took the fussy cut bee and popped him up with foam tape over the marker lines.  I then used some glitter paint to paint over his wings.  (I’m glad it shows up nicely in the photo.)

Lastly, I cut out the letters for the sentiment in “BEE”.  for the “you”, I white heat embossed a sentiment that originally says “you are” and then die cut it out with a coordinating die.  I cut off the “are” portion so that I could use just the “you” to place under my “BEE” lettering.

Thanks so much for checking in today!  I hope you’ve enjoyed my page!  I will be back next week to share some items that I’ve been working on!  Have a great weekend!

Challenges:

  1. Art Journal Journey – Must Have Wings
  2. Simon Says Stamp Monday – Emboss It (embossed “you”)
  3. Try it On Tuesday – Things with Wings
  4. Anything Goes in a Card Free Zone – May Anything Goes- no cards
  5. Creative Artiste Anything Goes Mixed Media

“W” is for WINGS

Hello friends and happy Friday!  It has been very cold over our way and I’m staying indoors as much as I can which means some crafting time is happening!  I do like looking from my window and seeing the chickadee birds along with the squirrels in the feeders!  I enjoy seeing those bright red cardinals, but I don’t get to see those as often.

Today is a new challenge over at the Alphabet Challenge and we are on the letter “W”.  The hostess has went with the theme “W is for “WINGS“.  You will have 2 weeks to join us, so I hope to see your creations in the gallery!  Here’s my card using this theme:

Since it’s so cold out, I decided to skip on over through winter and go straight to warm spring/summer with a dragonfly!  We usually don’t see dragonflies over my way until it gets pretty warmed up.  (It has to be above 60 degrees Fahrenheit, on average, for them to come out.)  I also was happy to finally pull out a stamp set that I got from STAMPtember of last year created by Kitchen Sink Stamps.  Unfortunately, this company is no longer operating.  There are a couple of stamp sets available for purchase on the Simon Says Stamp website I see.  But this particular stamp set called “All Aflutter” was only available during the STAMPtember event.  I’m happy to get it even though I didn’t make it in time to grab the die set before it sold out, but it’s a beautiful set.  It’s actually the only Kitchen Sink Stamps I own.

I started out with the green flower stems at the bottom.  This is a layering stamp set, so they very cleverly put the numbers in order to stamp.  I then added three purple colors for the flowers to go on top of the green stems.  I stamped the sentiment from the set with the “Hi” done in purple ink.  I ink blended like colors around the card panel.

I stamped the dragonfly body onto the card panel BEFORE stamping the sentiment for the placement of the design.  I attached the card front to a purple A2 top folding card base.

Dragonflies have to have that shimmer on their wings!  It’s so hard to take a photo of the shimmer from the glitter pen and I wanted that to come through for my dragonfly wings!

The dragonfly was stamped in the corresponding layers for his body and wings on a separate piece of cardstock.  The lightest grey was the wings.  I used my scissors to fussy cut him out and blended some light blue ink around his wings.  I glued the middle section of him only so that I could pop up the wings a bit.  

Lastly, I added some shimmer to his wings with the glitter pen and attached some gems.

  • I hope you’ve enjoyed my card today and you’ve been inspired to join in the challenge with us!    Be sure to check out the rest of the inspiration from the team!
  • Thanks for stopping in and I’ll be back tomorrow with my AJ collaboration with Carol!

Challenges:

  1. Ally’s Angels – Anything Goes
  2. Creatalicious Anything Goes + optional:  use green
  3. Lil Patch of Crafty Friends – #248 Anything Goes
  4. Pammie’s Inky Pinkies – PIP2507 Anything Goes
  5. Moving Along With the Times Things With Wings
  6. A Place to Start – #020325 Anything Goes + optional:  Things in the Sky

Art Journal Inspiration-Fireflies and Gallery full of card classes!

Hello friends!  I hope that your week has been going great!  I had planned on posting earlier in the week, but I got so focused on completing my classes that I ran out of time!  (Check out the gallery below…LOTS of cards!)  I thought while I’m working on laundry today, I’d make a post sharing some things I’ve been doing…so grab yourself a beverage and take some time to enjoy!  First up is my art journal page:

  • Remember that I’m a guest host over at Art Journal Journey this month and the theme that I’ve chosen is “LIGHT“.  I hope you’ll stop over to see all of the wonderful inspiration that everyone has been creating with this theme and join in the fun!  

This so reminds me of Summer!  Remember as a child going outside in the dark and seeing tons of those flashing lights going off?!  I was always amazed that when I ran over to chase that flashing light, it disappeared on me and I was forever trying to capture those lights!

For the background:  I’ve chosen some Bristol Smooth cardstock in 5.5″x8.5″ pre-punched holes at the top cut with my Zutter machine.  I have started with stamping the jar and placing it where I thought it needed to be and then stamped those fireflies around it.  Starting with the fireflies, I dabbed on some yellow where they emit light and then used some soft blue around them working out with darker shades of blues as I reached the edges.  Bristol cardstock works great for ink blending with Distress Oxides.  To make sure that the yellow light was showing over the dark ink (without smudging it), I took some yellow paint and the end of my paint brush to make various sized yellow dots for the look of those fireflies in the distance.

I decided to take a leaf branch to generation stamp it along the edge for the illusion of a tree being there.  Although it looks black, I die cut a grass border in very dark green cardstock for the bottom portion of the page.  I also added another firefly at the bottom that was die cut and popped up with foam tape.  I used yellow ink for underneath his light glow.  The firefly wings have been covered with a glitter brush pen.

For the bottom lettering:  I printed it off my computer and then cut out each word, added some color with inks over them and then doodled around each word with a pen.  These words and this AJ page was totally inspired from a song called “Fireflies” by Owl City.  If you’re interested in listening to the song, check out the video below:

I learned that this song artist has insomnia and came up with this song during one of those times he had trouble sleeping.  I can relate and so it inspired my light page.


Next, I would like to share with you a card class event that I took part in called “Celebrations Delivered” provided by Scrapbook & Cards Today magazine.   It was a one day event with virtual live learning class videos and each instructor provided at least 3 different projects.  I have listed below each photo who the class instructor was.  

  • If you are on my website, just click on each photo to enlarge it and see the details about each one underneath the photo.  I have made 15 total cards from this:

Really had fun making these and using the products provided to us.  This also reminds me that I have more classes coming soon that I’ll be doing and that I’ve also forgotten to share some things that I had done last year, but hadn’t posted!  If anything else, you can hopefully enjoy or be inspired in some way as I post!  But more will come soon if my arms don’t fall off!😉

Thank you so much for stopping in today and I’m happy you’re here!  I will be dropping around to see what everyone is up to and I will be back on Saturday for our “Smash Your Stash” AJ inspiration!  Have a wonderful day!

Challenges:

  1. Art Journal Journey – LIGHT/KEEPING IT LIGHT 
  2. Simon Says Stamp Monday – NOT a card (art journal page at top)
  3. Try It On Tuesday – Spotlight It!  (Fireflies are spotlighted with yellow dots)  Hopefully this works for the challenge!

Bugging Out With Sketches

Hello friends!  I hope you’re having a good week so far and staying safe wherever you are in the world.  Sending hugs to all experiencing a troubled time.  I hope that my post can bring a smile to you today.

I needed to create some get well type of cards and so I thought I’d try to incorporate some challenges while working on them which helps me to concentrate more in what I’m doing and maybe think outside the box a bit.

My first card is made with the Beccy’s Place Challenge freebie this month and she also challenged us with a sketch which I’ve decided to use for my card. (see sketch below)  I was really happy to use up some more pattern papers with it and I also decided to add a tiny dragonfly at the top to enter another challenge and to adhere to my “bug” theme today!

I printed the image in black and white and colored with Copics.  The dragonfly and the center pink strip were stamps that I cut out and added to the design.  The rest is pattern paper from my stash except the scalloped kraft border in the center that I cut out with a die.  I stamped the sentiment and cut it out to go with my twine around it. *You will notice in ALL of these cards that I’ve used some sparkly gems.  I wasn’t aware until posting them!  I must be on a kick of wanting to use them!*

Challenges for 1st card:

  1. Beccy’s Place – August challenge + sketch
  2. Paper Dragonfly Creative – Anything Flies (Goes) or Party
  3. Kreativ-Tanten – Anything Goes
  4. The Crafty Addicts – Anything Goes
  5. Crafty Calendar – Anything Goes
  6. Dragonfly Dreams – Dragonflies

And for this next card, I’ve played with a large bug:

Around my area this time of year, you can hear the sound of these cicada bugs with their distinct noise throughout the trees.  My husband likes the sound when a bird catches one! EEW!  This bug is a cute one from Inky Stamper called Cicada and I’ve colored it up with pencils this time.  Hard to see, but I’ve also added some shimmer with a glitter pen on his wings.

I’ve used the Picket Fence Tree Bark stencil over kraft on the background and then splattered it with brown and white paint. The leaves under the bug and the accent came from the Lisa Horton Variegated Leaf EF+die that I cut over light green cardstock.  I used some metallic green wax to go over the details in them.  I also used some gel pens to make some doodles around the strip, the circle and under the sentiment along with following a sketch. (details below) You will also notice more sparkly gems!  I’m also entering this in the Inky Stamper FB challenge this month which is using an IS bug image.

Challenges for card

  1. Sketch Saturday – #732 sketch + twist: add a doodle
  2. Creative Knockouts – #501 Anything Goes
  3. We Love Stamping – Masculine
  4. Lil’ Patch of Crafty Friends – Anything Goes
  5. Pammie’s Inky Pinkies – Anything Goes
  6. A Place to Start – Anything Goes optional: leaves/trees
  7. The Corrosive – Anything Goes

For my last card I decided to keep this one simple’ish’:

So, I know these aren’t real bugs because I’m not squealing, but these guys are too cute! They’re popping up out of the dirt for a special greeting!  I mixed in both a new and older stamp set from Lawn Fawn on this one. I’ve used another sketch for this one and decided to keep it very simple.  The hardest part of this was the coloring which honestly wasn’t all that difficult either because they’re small images.  I’ve also added some shimmer with a glitter pen on the wings and of course, there’s those sparkly gems again!

Challenges for card

  1. Sunday Stamps – SSC316 in the corner sketch
  2. The Paper Players – CAS using any Bug
  3. Simon Says Stamp Wednesday – Clean and Simple
  4. Krafty Chicks – CAS (Clean and Simple)

Thanks so much for stopping by today!  I appreciate your time and thoughts!  I’ll be seeing you again on Saturday with another AJ page!

Playing with Roulette and Colors

Hello friends!  Hope your week is getting off to a great start.  I can’t believe that January is over and we’re starting a new winter month already, but at the same time I’m already feeling like this cold weather can move along faster to Spring!

Today I have a couple of creations that I’ve made using those Inky Stamper products and playing a little “Craft Roulette” too!  Chelsea was on Craft Roulette and if you’ve never seen it play out in action, take a look at the You Tube channel to see what it’s about!  She was on episode #146 and here’s my card that I’ve made with her perimeters:

I had so much fun with this and I’ve never made a tag shaped accordion card before, but it was stuck in my head to give it a try and pull out the Inky Stamper Craft Room set to create it.  The “Roulette Wheel” spun on: Double Tags, shelf/shelves, 2 shades of green and something in the background.

The two shades of green were easy with using the Doodlebug Paper Packs and adding in a few other greens to the coloring.  I’ve also made two tags and placed them inside the pocket area in the middle of the accordion design.  I used a stencil in the background of the other two panels and of course I added some crafty goodies to the shelves in Rosie’s craft room!  The accordion card was easier than I had anticipated and just made a mini slim line size design by cutting off the edges to create the tag shape.  The hole and reinforcers were made using punches and dies.  You can see that I’ve colored up, cut out “Rosie” in her craft room where she is cutting her design going through her creative head!

When it’s all folded up and closed, this is what the card looks like.  I could always add a sentiment on the back, but I thought this would be fun to send to a fellow crafter for sure!  I just wish my shelves looked this organized!  And I always try to use another thing from my stash as I pulled out lots of twine that gets thrown in a bin, so it was nice to use for the tops of each tag area. (Maybe on the back of the card, the crafter can add items to use up on their next project and display it! LOL)


And here’s another card that I’ve done for the January challenge on the Inky Stamper Inkspiration FB Group which was to use: Black, white plus one other color:

I decided to pull out the Grasshopper set and make everything in the background black and white, but just color the grasshopper in green.  All of the elements including the sentiment came from the same stamp set.  I splattered some black paint over the background and the images were colored with some cool gray Copic markers.  I white heat embossed the sentiment over black and cut it out with a banner die.

Behind the white panel, I took a piece of the black floral paper from the Doodlebug Floral & Graph Paper Pad and attached that to a white top folding A2 card base.  It was a fun and easy card to put together!

Thanks so much for “hopping” over here today!  Hope you’ve been inspired or smiled!😊

Challenges:

  1. Cardz 4 Galz – Shaped Card (top card-tag shaped)
  2. Creative Fingers – Anything Goes
  3. Passion for Markers – use die cuts (both cards use dies and are colored with Copics)
  4. Creatalicious – Anything Goes optional love &/or hearts (top card has hearts)
  5. Papercraft – Anything Goes
  6. Sparkles Monthly – Friendship (both cards evoke friendship to me!)

Inky Stamper Fun

Hello friends!  Lots of fun crafty things happen during the month of October with the start of World Card Making Day to kick us off, then there’s the changing seasons with Fall, then Halloween with the treats which then turns into the Holidays of Thanksgiving and Christmas!  I have taken the time to participate in some fun challenges and classes this month with some Inky Stamper inspiration for today’s post.

Although it says “EEK” next to the spider, I think he’s a cute one and not one to run away from!  This cute spider comes from the Inky Stamper Spider stamp set that I’ve used on the tag for my Hershey Nugget treat holder. (I made this for the October challenge in the Inky Stamper Inkspiration FB Group with the theme of “Treat Holder”.)  I’ve stamped and colored the spider with Copic markers, used the coordinating die to cut him out and pop him over the green oval tag with the spider web and EEK stamped over it.  I’ve used the green colored markers to his eyes to match my project.

For the treat package, I’ve used the Inky Stamper Scallop Candy Wrappers die cut out from some black Doodlebug Gingham/Linen paper to wrap around the candies.  I made a “holder” for the nuggets with regular black cardstock and scored each side 1/4″ for a container to hold the nuggets in place.  I used some stickers from my stash to add the “B-O-O” letters and then slid the container into an Inky Stamper Hershey Bag that was gathered and tied up at the top with a piece of Doodlebug Limeade Twine.  I punched a hole in my spider tag/gift card and threaded the twine through it to wrap around the treat and then took a piece of black ribbon to tie a bow around it all.  These were so fun and easy to make!

Another thing I did was participate in the World Card Making Day Challenge in the Inky Stamper Inkspiration Group. The challenge was to create a card using a sketch that was given and turn in by a certain time frame.  This was my take on the sketch using the Inky Stamper Cow stamp set.

I used the “cow pattern” image from the stamp to create my background, white heat embossed the sentiment strip over black cardstock and sponged white around the edges of the banner.  I popped it up with foam tape, stamped, colored and popped up the cow image over the banner as well.  I also used the Inky Stamper Bunny set for the balloon image and the Inky Stamper Goat set for the party hat over the cow’s head.  The balloon string was attached behind the cow and then I made a bow for around the cow’s neck with the Doodlebug Beetle Black Twine.  To make my card fit with the sketch, I added some silver glitter cardstock strips behind the oval layers.  I also added some silver Stickles glitter over the party hat to bring in the silver as well.  So glad I ended up playing as I was picked to win a gift certificate!

I also participated in a “game night” class making these fun projects all made with the Inky Stamper Bug Catcher set.  This class was a kit and all of the pre-cut items were included.  I already had the stamp set so I didn’t need to purchase that with it.  Even the candy spiders and magnifier came with it all!  I had fun putting it all together and I really liked the versatility of the projects we did.

  • If you’re on my website, just click on the photos below to take a closer look at each project.

Hope you’ve enjoyed the projects that I’ve made and been inspired in some way!  Thanks so much for stopping in!

Challenges:

  1. Two Old Bats – Anything Goes Halloween (spider treat)
  2. Creative Fingers – Anything Goes
  3. Pammie’s Inky Pinkies – Anything Goes
  4. Make My Monday – Birthday Wishes (COW CARD)
  5. Happy Little Stamper Birthday – Anything Goes Bday (COW CARD)
  6. Penny’s Paper-Crafty – Anything Goes using paper
  7. CRAFT – Gift Bag or Box (spider treat)
  8. This is Halloween – Gothic and/or Halloween (spider treat)

Pray Until Something Happens With Inky Stamper

Hello friends!  How is your Summer going?  It seems like it is really flying by for me!  After getting back from the wedding, I have a PILE of things to get finished up, literally!  I signed up for classes knowing that I couldn’t participate during the class time, but figured I would finish them up on my own, so along with doing that I’ve decided to also throw in a current challenge project as well and share that today:

So, this cute little fella came from Inky Stamper called Praying Mantis, of course.  The challenge for the month of July in the Inky Stamper Inkspiration FB Group calls for “watercolor” of any kind and so I pulled out my Zig CC Real Brush markers to color him with, cut him out with the coordinating die and even added a bit of the Liquid Pixie Dust on his wing.

For the watercolor on the background, I’ve used an Inky Stamper Watercolor Panel and ran a few different colored Distress Oxide ink pads over it without touching the colors.  I then spritzed it with water to saturate and let the colors run together over it.  I picked up any extras on my glass mat to completely cover the panel and then I took the Picket Fence Geo Squares Stencil and laid it over top while it was wet, pressed it in and let it just sit until it was dry. I picked up the stencil that had dried ink on it, spritzed it with water and turned the stencil the other way with the ink on it and pressed it onto the panel again and let it dry.  This is how the darker ink color showed up on the lighter end.  I took some green and black watercolor to spritz over top.  Really fun background to play with!

I then white heat embossed a sentiment over a black strip and attached it to the bottom portion of the background and then die cut the panel with a double-stitched rectangle die.  I used foam squares to pop up the bug and wrapped some Doodlebug Limeade Twine under the sentiment.  This panel was layered over a black piece which was attached to a top folding A2 white card base.  I finished it with some Doodlebug rhinestones.

And continuing on with my “Inky Stamper projects”, There was an OOAK event a few days before I left.  I didn’t have time to do my projects during the time but finished them up when I returned.  We made this fun and unique fold design with a gorgeous butterfly and then of course the mini card to go along with it. 

For mine, I colored the butterfly with Copics, popped up the wings with foam tape and added some of that Liquid Pixie Dust which is hard to see in the photo.  Then for the mini card, I used some watercolor to color the hydrangea with.  The sentiment was white heat embossed.

Super fun projects as always! (I usually make my “mini card” into TWO ATCs, I just did the one so far here.)

And for my last set of “Inky Stamper projects”, this was for a special class Chelsea held during the time that I was gone.  Even though I wasn’t able to attend the fun and games with them live, I went ahead and purchased the kit anyway so I could watch the video at a later date to make all of these fun projects centered around this ADORABLE Sloth!

I pretty much followed along with the way the class projects were made.  I added some gold thread on the card in the back with the clocks so that it could hang from the sloth’s claw.  I added a glittery heart for the treat container for the sloth to hold as well.  The candy inside the container are slow pokes!! 😂   Super cute and fun projects to make!  I sort of treated myself to the candy while I was creating!

I also think that there were a few days where I could relate to the sloth too, but glad to get things done!

Really hope you’ve enjoyed my projects that I’ve shared today and are inspired in some way too!  Thanks so much for stopping in today…I’ll be sharing more soon! 😉

Challenges: (For top card only)

  1. Happy Little Stamper Watercolour – Anything Goes + watercolor
  2. Happy Little Stamper Stencil – Anything Goes + stencil
  3. Aud Sentiments – Anything Goes + sentiment
  4. As You Like It – Favorite warm/cool colors and why? (Always been attracted to the cool tones even as a child!)
  5. Krafty Chicks – Week 1: Stamp Act
  6. Crafty Catz Anything Goes
  7. Creative Fingers – #235 Anything Goes
  8. Colour Crazy Craft – Week 27: Anything Goes + coloring
  9. Pammie’s Inky Pinkies – PIP2228 Anything Goes