It’s Easter at Sparkles Monthly!

Hello friends!  Hope your March is going along well and you’re starting to see some signs of Spring coming!  We even have a few flowers trying to pop up out of the ground which is so fun to see!  I hope they can hold out for a few cold days ahead.

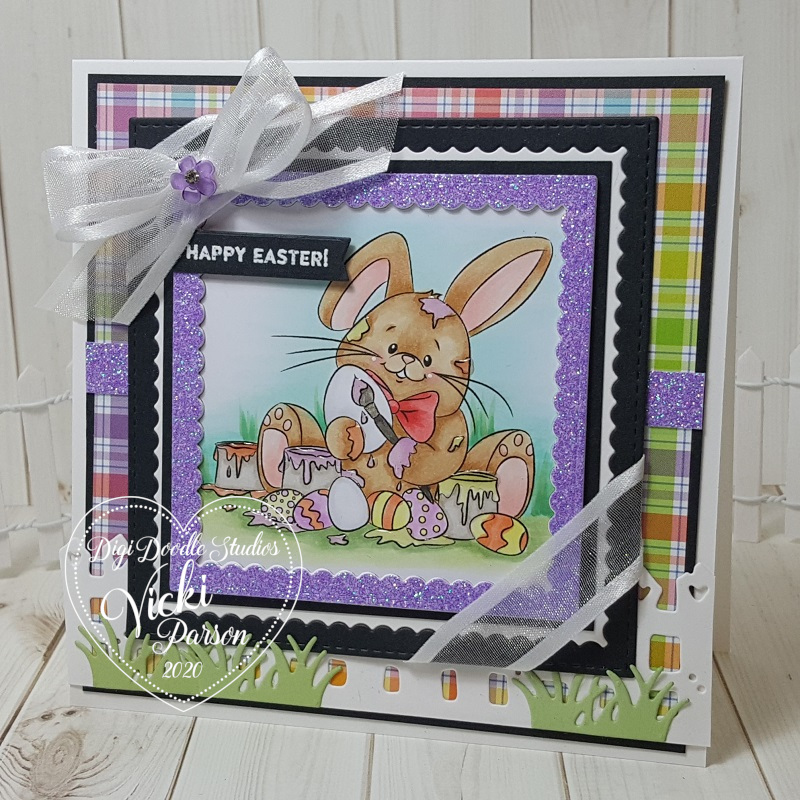
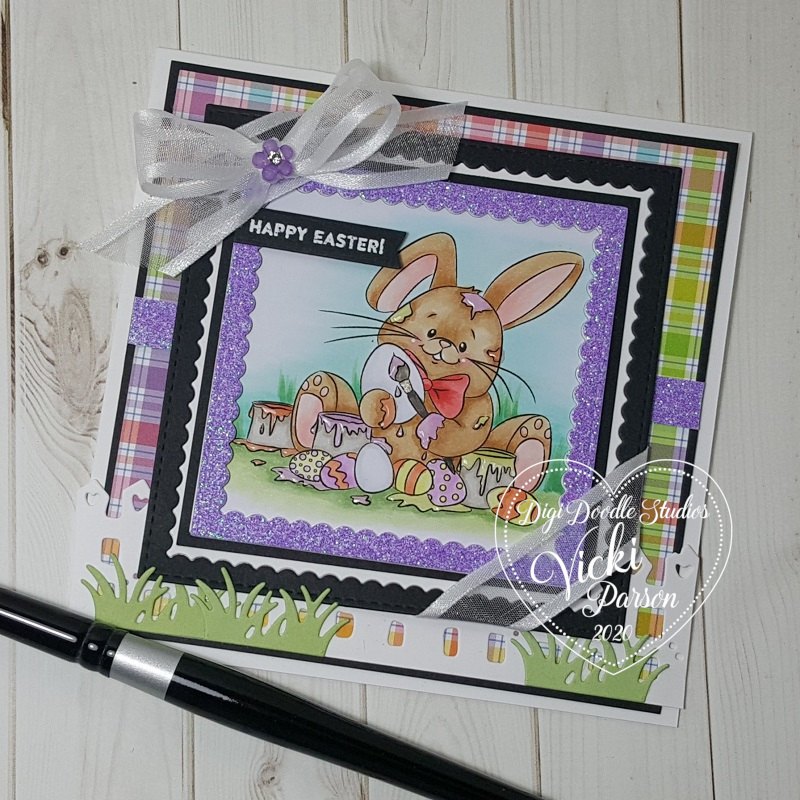
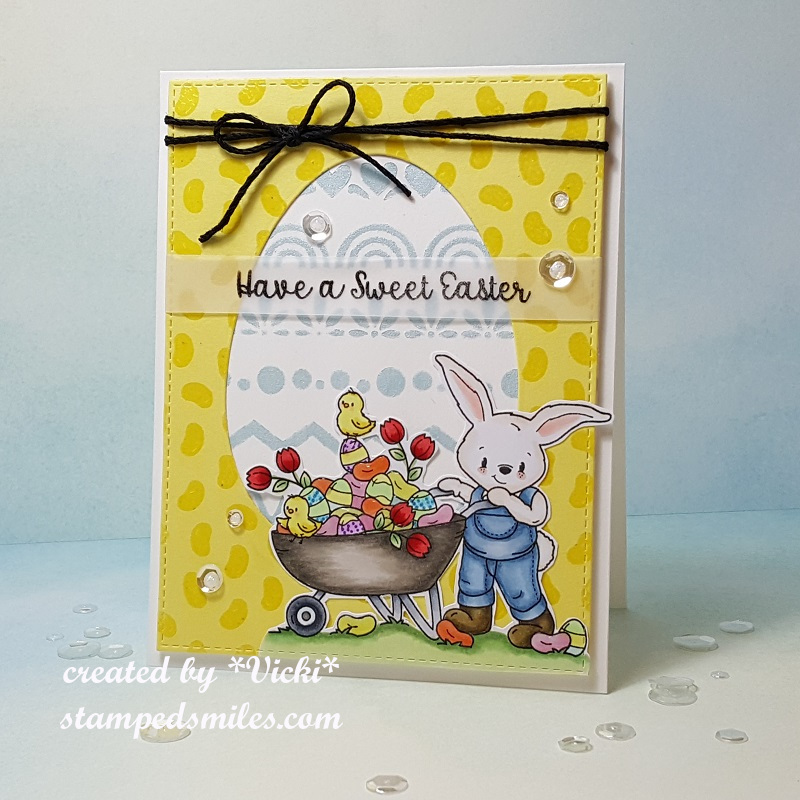
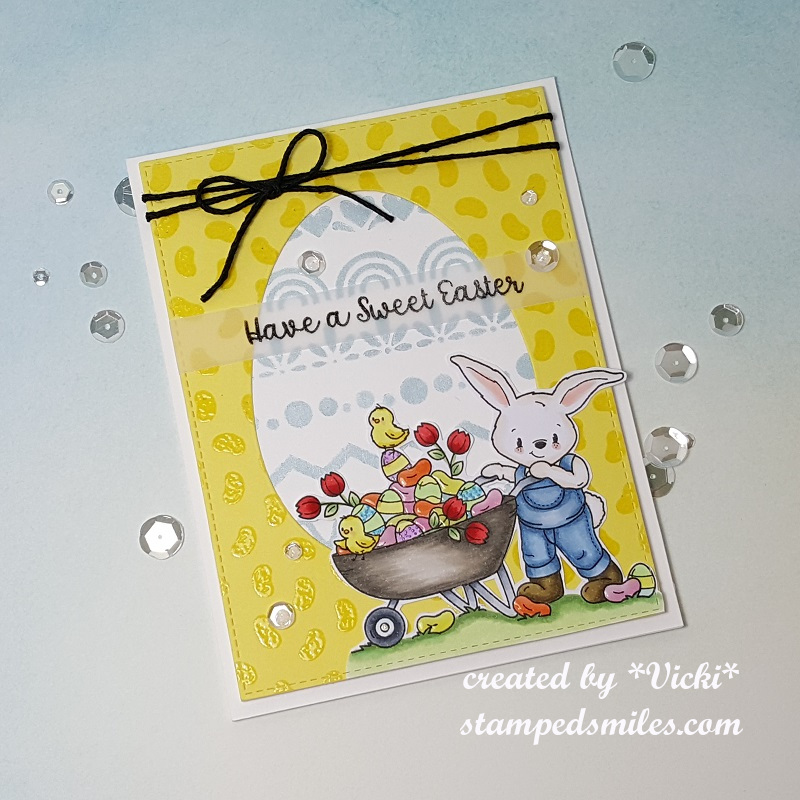
Today I’m stopping in to share my card for the new challenge over at Sparkles Monthly and we have a very fitting theme of “Easter” this month.  I think I’m more than ready to start some Spring related projects, so I look forward to seeing the gallery.  Here’s the card I came up with:

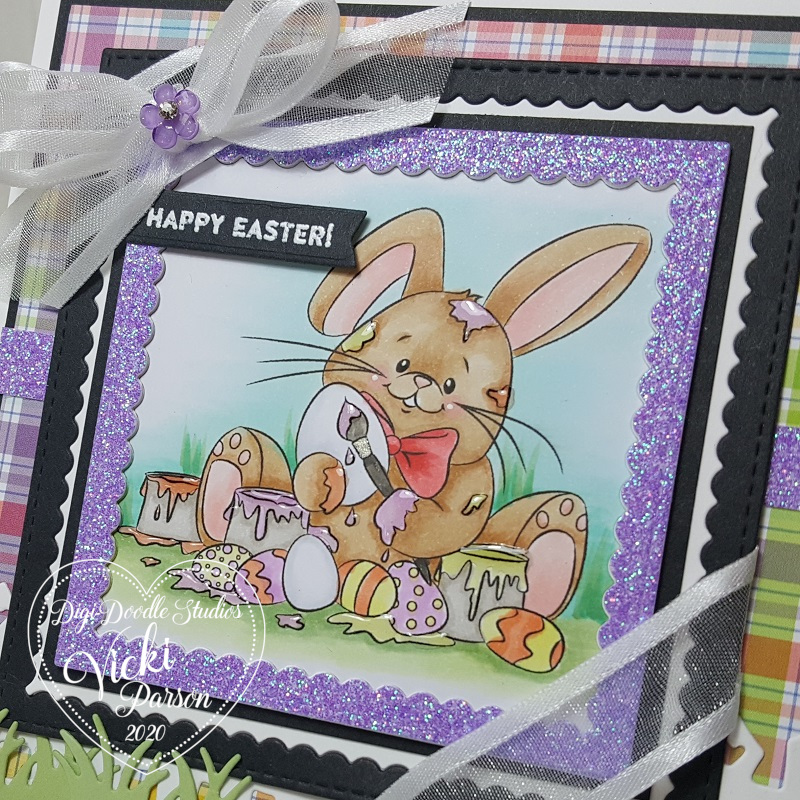
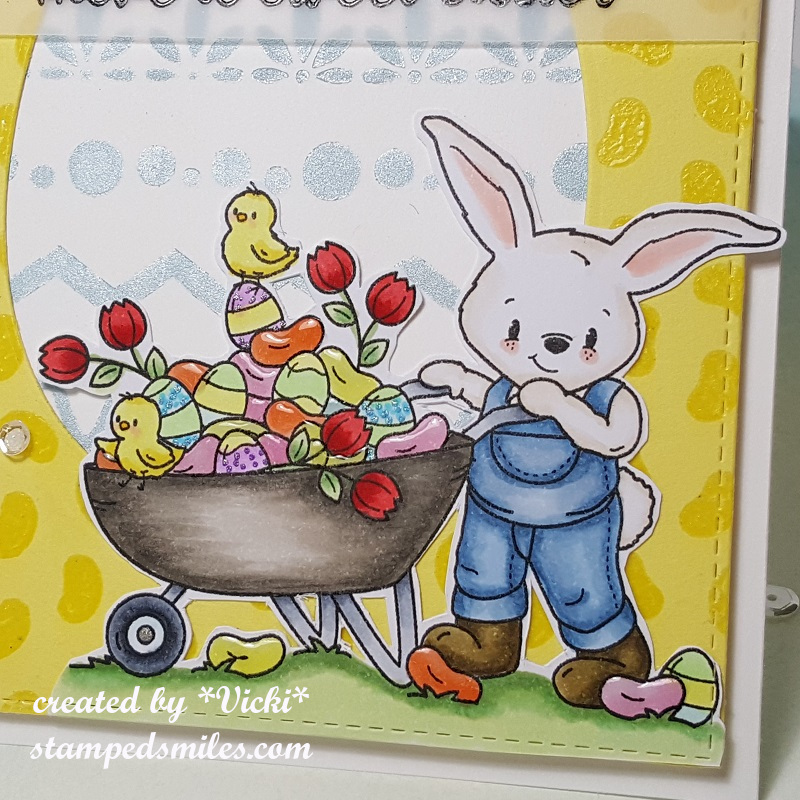
How sweet is that bunny passing out his colorful eggs!  I pull out an older card kit (2019) and it had this adorable Simon Says Stamp set called “Bunny Wishes” (no longer available) mixed in with the kit which I don’t think came with it, but I wanted to use it with some of the other items that were in the kit like the papers.  It was like getting a brand new order and forgetting what I purchased! 😆 

I also used this beautiful oval die (not available) from SSS that cuts the oval, the flowers and the stitching marks around it.  I added a border of grass to place at the bottom and then I stamped the sentiment from the set and also stamped the “Easter” greeting on another piece of light blue cardstock cut with a banner die.  The gingham background was cut with a double stitched rectangle die and then I used the oval die to cut an opening for the bunny scene.  I added foam tape around the edges to pop up the panel on an A2 top folding pink card base.

Here’s a close-up view of the cute images that I’ve colored with Copic markers, cut out with the coordinating dies and then popped up over the floral oval scene with foam tape.  The extra Easter egg behind the basket was just glued to the scene.  It’s hard to see in a photo, but I’ve covered each egg with a glitter brush pen.  It’s sparkly IRL.

I did recently get this pretty Iridescent White Cord from SSS and took two strands of it to create a bow and then I attached it to the top of the oval.  It gives it a nice sheen and I might be using it again soon!

Thank you for stopping in today!  Hope you enjoyed my card and will join us for the challenge this month!  Have a great weekend!

Challenges:

  1. Pammie’s Inky Pinkies – PIP2510 Anything Goes
  2. Make My Monday Use a Die/Punch 
  3. Passion for Markers Dies &/or Punches + markers (used dies and Copics)
  4. Little Red Wagon Start Easter Projects
  5. Penny’s Anything Goes Using Paper
  6. Tic Tac Toe I used 3rd down or middle across
  7. Four Seasons – Spring/Easter

Playing With Paper Blocks and Bunnies

Hello friends! Easter is coming for us for very soon and I’ve been enjoying all of the Spring that’s starting to come up outside with flowers and buds on the trees!  It’s still a little cool, but hopefully the weather will even out and stay warmer!

Since I’ve been trying to get motivated for Easter, I’ve pulled out some papers from my stash and have been inspired to CASE (copy & share everything) a friend that really inspires me to use things I have!  First, I’d like to share a fun Easter card that I’ve made for a sketch challenge that I was inspired by as well:

That sitting bunny is so cute!  (Thank you Carol…more on that later in post!)  If you check out the sketch from the Sketch Saturday challenge blog (see in challenge list below), you will see all of the fun angle strips in the sketch.  I thought it would be fun to pull out some Easter papers from my stash.  I wasn’t sure how to do the background until I saw that this sitting bunny worked perfect for a part of the paper pad that had this wheelbarrow image in it!  I cut it out from the paper and placed the bunny on it.

For the background of the card, I thought it would be fun to use my stencils to create a scene with grass and clouds.  The wheelbarrow bunny fit in the open area and then I used the angles from the sketch to cut pieces with the same Easter paper pad.  I just eyeballed everything by marking notches and lining those notches in my paper trimmer to get a straight cut.  Even the solid paper on the base layer came from the paper pad.  I just cut it A2 size to fit over an A2 top folding white card base.

The sentiment was stamped and cut out with the coordinating die.  I added some shadow under wheelbarrow with a green marker (not really the color I wanted, but it worked), and colored a bit of pink on the bunny too.  I added teal rhinestones next to the sentiment and done.


Next, I wanted to share something else that I was inspired by from my friend Carol at https://ourlittleinspirations.blogspot.com who sent me a very cool card and kind gift:

She always inspires me with her “snippet” creations and coming up with cards like this one to utilize those pattern papers we hoard so much!  The pattern is very pleasing to the eye and so I wanted to create one myself!  With all of the papers I have, I’m sure I could make a zillion cards! 😆  I also love how she used a monochromatic green theme with it…which I will need to try another one with this idea!  You should go check her blog out and be inspired too!

Also, she was very kind in sending me these die cut sitting bunnies & stools!  I do not know exactly where this bunny is from, but I’ve seen it around the craft world.  So cute!  Thank you so much for your kindness and inspiration my friend! 

So here’s the card that I created inspired by Carol.  I really love plaids and I thought it would be fun to re-create her design which I measured out her pieces and cut based on what I thought they were.  It was really fun and not as hard as it looks like it might be.  I wrote the measurements and cut from the same Easter paper pad as I used on the card above.  I started with a white base…that way if I messed up, it wouldn’t matter too much.  The sentiment piece was also from the same paper pad.  I just white heat embossed the sentiment and added some stitch details with a white gel pen.

I used one of the sitting bunnies that Carol provided me with, and tried to match up what I had from my stash the best I could to die cut some hearts along with the A2 side folding card base.

I brushed the hearts with a glitter brush pen and called it done.


I had so much fun playing with these paper blocks and bunnies!  I hope you’ve enjoyed my creations and inspiration today as well!  Thanks so much for stopping by!  C U SOON!

Challenges:

  1. Sketch Saturday – #746 optional twist: feature an animal (top card)
  2. Simply Create Too – Bunnies & Blooms #198 (top card)
  3. Make My Monday – Spring, Flowers, Weather, etc. #221 (top card)
  4. Fab ‘N Funky – Spring (top card)
  5. Daring Cardmakers – Spring is in the Air (top card)
  6. The Paper Funday – Anything Goes optional: dies #63 (top card)

Hopping By For an Easter Hi

Hello friends!  I don’t make too many Easter cards, but I sure do love those cute bunnies, the Spring theme and of course who doesn’t love a good chocolate candy or two?!  I’ve been seeing some bunnies hopping around my yard lately and so they’ve inspired me!  Since the month of March is starting to run away from me, I wanted to participate in a few challenges going on.

This cute little bunny waving out his hand to say “hello” is Bunny from Inky Stamper!  He comes with the bow tie I have colored and popped up with foam tape.  He also comes with the sentiment as well as the smaller egg hiding among the grass.  Such a CUTE stamp set not just for Easter, but other occasions too!

For the Inky Stamper Inkspiration FB Group, the challenge for the month of March is “stitching” and it can be any sort of stitching.  I’ve pulled out some Doodlebug Swiss Dot papers along with a special Doodlebug Cute & Crafty paper pad (used for the large egg) to create my scene.

I’ve used lots of fun stitched style dies to help me out including the stitched hexagon die from the Inky Stamper Mini Envie Die set you see at the top to create a border. I’ve also used the Taylored Expressions Stitched With Love Cutting Plate over my stitched oval piece. (You will see this same cutting plate in the card below too.)  I’ve also used some stitched cloud dies from Lawn Fawn.  I’ve also used a grass border die for the bunny to stand on too.

Once I’ve die cut and placed all of my images and die cut pieces together on my card front, I took a black marker and a white gel pen to create stitch lines for the challenge theme as well.  I even added stitch marks to the small egg and the bunny’s bow tie.  The sentiment was white heat embossed over a black strip and attached to the large oval “egg” and I’ve added some glossy accents to the bunny’s eyes.  I think he turned out pretty cute!

This card was made for the #TEMaker challenge in the Taylored Expressions FB Fan Group.  The challenge for March is using the colors Lavender Glaze & Potato Chip and/or Easter Parade (Easter/Spring theme).  There are SO MANY cute Easter products, but I was trying to use some things that I haven’t pulled out yet.

As in the card above, I’ve used the TE Stitched With Love Cutting Plate over a piece of Toffee cardstock.  I used a double stitched circle die to cut it out along with another piece of white cardstock to layer behind the Toffee.

The center of the circle was made by taking the Lavender Glaze and Potato Chip cardstock and using the Easy Strips 1/4″ die and layering them over a double adhesive sheet.  Once I’ve cut it down to size, I attached it over the white A2 top folding card base and stamped the Full Circle -Easter stamp in Toffee ink.  I took a white pencil to color in portions of the images within it.

I then used foam tape to pop up the toffee layer over top centering the circle image through it.  I white heat embossed the sentiment from the stamp set and die cut from a banner die in my stash and popped it up over the center of the circle image.  I also die cut a Lavender Glaze frame from the TE A2 Think Frame Cutting Plate and attached to the card along with a little white bunny from the TE Little Bits-Oh Hoppy Day die set. I sponged some brown ink around the edges and glued a white pom pom for his tail and attached him right above the frame on the right bottom of the card.

It looks like he’s getting ready to hop into the hole to join his other Spring friends.

Well, I HOP you’ve enjoyed my Easter cards today, or at least gotten a smile or been inspired in some way!  Thanks so much for taking the time to stop in as I enjoy hearing from you!

Challenges:

  1. Cardz 4 Guyz – Equinox Seasonal Change-Spring
  2. CRAFT – Anything Goes
  3. Colour Crazy Craft – Anything Goes with Colored image (top card)
  4. Crafty Catz – Anything Goes Optional Easter
  5. Pammie’s Inky Pinkies – Anything Goes
  6. A Bit More Time To Craft – Anything Goes

Dir-Tea Birthday Bunny Coffee Card🐰

Hello friends!  I’m back again today with another fun card that I wanted to enter before the time runs out!  So check it out:

Vicki-TSDir-teaBunnyCup

This adorable smiling bunny is so fun and I really loved creating this coffee themed cup shaped card using some products from Trinity Stamps.  I’ve used the Dir-Tea Bunny stamp set along with the coordinating dies that also cut out his hands so you can stick stuff between them like I did with the coffee cup and balloon!  The coffee cup came with the stamp set and I added that sentiment to it!  The balloon is a die set from MFT.  I cut out the balloon with vellum and used my Copic marker to color it in.

I used the Trinity Stamps Coffee Mug Card die set in white cardstock and then took the Slimline Stripes stencil to sponge over it.  I completely sponged over the handle of the cup and then I sponged the center of the cup in grey colored ink for the bunny to be on top.  I also stamped a few coffee beans from the stamp set with the same sponged ink.  I took some Glitterstock to cut the die cut piece for the top of the coffee cup and for the inside of the card is where I added my gift card holder which comes with this die…which is pretty cool!  It’s already to go for my coffee loving birthday person now!!

I did not have a Trinity Stamps birthday sentiment, so I pulled out one from my stash and white heat embossed it over a strip of cardstock that is the same color of ink from my cup.  The banner was actually cut out with the Trinity Stamps Slimline Scalloped Card Panels and Banners die set.  (I just shortened it as needed.)  I used foam squares to pop up the die cut bunny to sit on top of the banner.

Vicki-TSDir-teaBunnyCup-close

Here’s a close up view of the details on the card.  I’ve used Copic markers to color in the bunny and added dots to his cheeks with a white gel pen.  I’ve also took some glitter and added it to the inside of his coffee cup to make it look as glittery as the larger cup!

Hard to tell in the photos, but the blue vellum balloon was also covered with a Spectrum Noir glitter brush pen for a bit of shimmer.  To attach the vellum balloon, I ran it through my Xyron Machine so you couldn’t “see” any glue marks.

(I love how he can hold different items!) 😀🎈

Vicki-TSDir-teaBunnyCup-flat

Wished I remembered to take a photo of the inside of the card, but it just has a coffee gift card holder on the inside along with a greeting and more stamped coffee beans.

Hope you’ve enjoyed my funny bunny shaped coffee cup card today!  I sure appreciate you stopping in and I’ll be seeing you again soon!!

Challenges:

  1.  Trinity Stamps Crafty Troop Birthdays + Trinity Stamps products
  2. Pammies Inky Pinkies – PIP2025 – Anything Goes
  3. Dream Valley – #228 All Occasions
  4. Always Fun – #168 Anything Goes
  5. The Male Room Use Die Cuts
  6. The House That Stamps Built – J2420 Anything Goes
  7. Watercooler Wednesday– WWC277 All About Occasions

Peyton is Painting Eggs for Easter!

Hello there friends!  Where have I been?  Well, I went off looking for my “MOJO” and he’s doing some disappearing acts on me for sure!  I’m having such a hard time getting motivated and feel that my creative juices have completely dried out!  Do you ever feel this way too?  What are some things you have done to help you?  I will keep trying for now!  LOL!  So sorry for being MIA lately!

Today I must share with you a card I came up with using this really adorable image from Digi Doodle Studios just in time for Easter!

Vicki-DDSPayton-March13

Isn’t he adorable?!  This digital image is called Peyton’s Painted Eggs from DDS and he’s busy at work painting up eggs to get them done in time for Easter!  I’d say he looks like myself getting messy and into the job!  LOL!

After coloring him up, I used a MFT die to cut him out and create the layered frame around him with some purple glitterstock along with some black and white cardstock.  I white heat embossed a sentiment (from Simon Says Stamp) and cut it out with a banner die to go over the image panel.

I took some white ribbon and wrapped it around the corners and attached a bow on the top corner with a flower embellishment in the center…found in my stash.

Also “found in my stash” was the fence and grass dies that I used to attach to the bottom of the card front panel.  Some of the “grass” was placed behind the image panel and some in front of it.  I also attached in the center a strip of the purple glitterstock Lawn Fawn Spring Plaid paper for the front of the card and this was layered over another piece of black cardstock which was mounted over a top folding 5″ square white card base.

Vicki-DDSPayton-March13-close

Here you can see how I’ve got him all colored up with Copic markers.  He was actually really fun to color up.  My first notion was to make him a white bunny, but I thought he would really stand out if he was brown in color instead.  I added some blades of grass around him with my markers.

I left the egg he was in the process of painting white along with the plain one on the ground…after all, he IS in the process of working on them! LOL!

I’ve only used the white gel pen for his cheeks and  I’ve used a clear metallic gel pen on the paint brush.  The “shinny” areas you see on the “fresh paint” colors are the places that I’ve covered with glossy accents.  The light is naturally highlighting them!

Vicki-DDSPayton-March13-flat

I hope that you’ve enjoyed my Easter bunny card today and it’s helped get you in the mood thinking warm Spring thoughts!  I know I’m really looking forward to warmer weather and being outdoors for sure!  Easter is just around the corner now!

Challenges:

  1.  Crafty Animals – Anything Goes + animal
  2. A Bit More Time to Craft – Anything Goes
  3. Crafts Galore Encore – #73 Anything Goes
  4. Love to Craft – LTCCB44 Anything Goes
  5. Lil Patch of Crafty Friends – #127 Anything Goes
  6. Creative with Stamps – #48 Egg
  7. Pammie’s Inky Pinkies – PIP2010 Anything Goes
  8. Crafty Creations – #407 Anything Goes
  9. Creative Fingers – #181 Anything Goes
  10. Sweet Stampers – #42 Easter or Spring
  11. The Sisterhood of Crafters – Easter

Fairy Princess Bunny With a Pocket!

Hello friends!  Hope you have enjoyed your weekend.  Yay!  We are finally getting some decent weather to be outside in!  It’s been rainy and chilly for a while, so it’s been nice to see some sun the last few days!

Today I have this really sweet image to share from Whimsy Stamps May Digital release and a fun extra added element with it!

Vicki-PC Fairy Princess Bunny Tag

I have made a tag using this really sweet Pollycraft image from Whimsy Stamps called Fairy Princess Bunny.  Isn’t she so sweet?!  I found some pretty papers to go with her and placed it over a purchased kraft colored tag that I sponged some white ink around the edges.

After placing the papers where I wanted them and trimming it down, I also attached a lace trim on each end of the papers over the tag.  The papers also had a bunch of sentiments included in the pack, so I added the circle sentiment to the tag and then die cut a kraft piece to layer behind it.  I also added some flowers and the ribbon at the top and then finished it off with some clear sequins.

Vicki-PC Fairy Princess Bunny Tag-close

Here’s a closer view of the coloring I’ve done on this cutie.  I’ve used Copic Markers to color her in with using the following markers:

  • Dress, shirt, shoes, socks – B37, B34, B32, B01, B00, B000
  • Bunny, bunny ears – R11, R00, R000, C3, C1, C0
  • Wings – R00, R000, E000, BG000
  • Hair – YR30, E41, E43, E44, V95
  • Skin – E000, E00, E11, E21, R20, R00
  • Grass – G24, G21, G20
  • I used gel pens to make dots on wings and color in the crowns on the girl and bunny heads.  I also used a Wink of Stella glitter pen to go over the wings.

After I colored her in, I cut her out from a circle stitched scallop die and then sponged around the image with a cloud stencil and distress ink.  I also sponged around the edges of the scallop circle with another color of distress ink and mounted her over the tag with a piece of craft foam behind her.

Vicki-PC Fairy Princess Bunny Tag-otherside

So, when you flip the tag over, you can see that I’ve made a little pocket with the same papers I’ve used on the front of the tag.  I thought this would be a cute way to give out a gift card to your “Fairy Princess”.  The tag happens to be the perfect size for adding a pocket for a gift card to fit into.

Vicki-PC Fairy Princess Bunny Tag-flat

I hope you’ve enjoyed my little tag creation today!

THANKS SO MUCH FOR DROPPIN BY!!  HAVE A GREAT DAY!!

challenges:

  1.  Crafty Creations – Anything Goes
  2. Fab ‘N’ Funky – Anything Goes #437
  3. Crafty Catz – Anything Goes with optional twist of females
  4. QKR Stampede – Anything Goes #347
  5. Crafting By Designs – Fantasy

It’s Easter at Cute Card Thursday!

Yes!  Hello friends!  Easter IS on the way, isn’t it?!  I remember many Easters ago of hiding the eggs for the kids and then forgetting where I hid all of them myself, so I had to join in the Easter egg hunt too!  LOL!  Do you have any fun Easter memories?

So since it’s Thursday, it’s time for a fun new challenge at Cute Card Thursday!  Obviously, the theme this week is “Easter“!  We look forward to seeing what Easter makes you’re making this week, so come join us!  Here’s my card:

Vicki-CCT577-SSSEgg-stra Sweet Easter

I had a lot of fun creating this card!  I couldn’t help myself, I had to snatch up that Simon Says Stamp Limited Edition Egg-Stra Sweet Easter card kit. (Sorry, it’s sold out, but you can still purchase the stamp set, Background stamp, egg dies, and stencil separately from the kit though.  I have actually used all of those items on my card today too!

For the background, I took the jellybean background stamp and clear heat embossed it and then while I was cutting it out with a stitched rectangle die, I also took one of the eggs dies and cut out the center of the yellow card panel.  I cut a piece of white cardstock the same size as the yellow layer and then used the stencil and the Nuvo mousse that came in the kit and sponged it over the white panel.  I layered this piece along with a black heat embossed sentiment over vellum on a strip to wrap around the yellow panel along with a piece of black cord at the top.  I took some foam tape and mounted these pieces onto a white A2 sized top folding card base.  Lastly, I’ve added some clear sequins filled with some Nuvo glitter drops in the centers.

Vicki-CCT577-SSSEgg-stra Sweet Easter-close

Here’s a closer look at this sweet little Easter bunny that I’ve colored in with Copics.  I fussy cut it out and then decided to line up the bottom of it and cut it out with the same stitched die that I used on the yellow background panel.  I kept his ear out of it.

I took the glossy accents that also came in the card kit and covered the jellybeans with it.  I also took a couple of metallic gel pens to make some dots on a few of the Easter eggs and center of wheel.  Up close, you can see some of the shimmer from the Nuvo mousse in the white background egg that I stenciled on.

Vicki-CCT577-SSSEgg-stra Sweet Easter-flat

Lots of fun little details going on in this card, but that’s what I love about Easter…so many colorful and happy things going on!

Thanks so much for dropping in today!  I will see you soon!

challenges:

  1. Simon Says Stamp Wednesday – No Designer Paper
  2.  My time to Craft – Easter or Hedgehogs
  3. Brown Sugar – Spring or Fall
  4. Creative Craft – No Patterned Paper
  5. Crafty Cardmakers – Easter
  6. Crafty Gals Corner – Easter is on its way
  7. Crafting By Designs – Easter Challenge

Cute Card Thursday Has Spring Fever!

Hello friends!  Hope you are having a great week so far!  It is Thursday already and we are getting closer to the weekend and even closer to the end of March already! WOW!

Since it’s Thursday, it’s time for a new challenge over at Cute Card Thursday!  The theme of the challenge this week is “Spring Fever“!  I can feel it for sure!  Hope you can join us this week with your Spring creations!  Here’s what I’ve made for the challenge:

Vicki-CCT574-SpringFever-BM

For this card, I did the “smooshing” technique with a couple of distress inks and the little Aqua Pigment bottle from the kit (see photo) for an added color and shimmer.  I set that aside and worked on the images.

Taking a couple of the scene images from the stamp set, I put them together to create this scene over some X-Press It Card and colored everything in with Copics.  I then cut it out and sponged along the edge where the grass is and attached it over the smooshed watercolor panel.  I took both the bunnies from the set, colored them as well and fussy cut them out and popped up the one in the front with foam tape and glued the one in the back.  I cut both of these panels with the MFT Wonky Stitched rectangle die.

I stamped the clouds in the upper portion and colored them with a white gel pen.  I then took a sentiment from the same stamp set and heat embossed it with EP and die cut a banner strip.  I layered this piece over a piece of black cardstock and then took some of the paper from the kit and layered it behind the black.  This is where I took the ribbon and wrapped around the layers and added the bow too.  This was all attached to a white A2 top folding card base.

Vicki-CCT574-SpringFever-BM-close

Here’s a closer look at the image panel.  You can see the pretty shimmer in the background.  I also took some liquid applique and put it on the bunny tails so that when I heat set them, they puffed up.  Always hard to photograph, but I’ve added some shimmer to the carrots with a clear glitter brush pen and colored the shovel parts with a silver gel pen.  Lastly, I’ve attached some sequins from the kit and filled the centers with some Nuvo White Blizzard Crystal Drops.

Vicki-CCT574-SpringFever-BM-flat

From a different angle you may be able to see more of the shimmer on the card.  I love how it turned out and it certainly has me getting that “Spring Fever” where I can’t wait to go outside!!  How about you?  What do you look forward to in the Spring?

Thanks so much for dropping in today my friends!!  Have a wonderful day and I’ll see you soon!

Challenges I’d like to enter my card for:

  1.  Alphabet Challenge – ‘Z’ is for Zesty Colors (I’ve used Squeezed Lemonade and Spiced Marmalade distress inks for background)
  2. Pammie’s Inky Pinkies (PIP1911) – Anything Goes
  3. Allsorts – Favorite image, stamp or die (I love using stamps and coloring them!)

Anything Goes for Cute Card Thursday!

Hello friends!  It’s time for an easy peasy “ANYTHING GOES” challenge over at Cute Card Thursday this week!!  Our monthly sponsor Whimsy Stamps will be joining us this week and I’m thrilled to share some of those products on my card today:

Vicki-WS-PenguinLovesBunny-March7

I have used this really sweet digital stamp on my card called “Penguin Loves Bunny“!  He is holding him ever so tightly and not wanting to let go!! 🙂

As I’m trying to get back into the swing of things here, I wanted to be sure to join some challenges and so I’ve picked out a nice sketch to start my card with here.  (See the details below the post for all challenges.)  I’ve been wanting to get out these yummy plaid papers that I’ve had for a couple of years.  This seemed like the perfect image for that too!

So I took the panel of plaid papers and layered it with some kraft cardstock.  I took some white organdy ribbon and wrapped a piece around the left side of it and tied on a bow at the top before attaching it to the upper right of my A2 sized top folding white card base.  I’ve cut out the image with an oval die and then layered another oval piece that was cut out with the kraft cardstock.  This oval panel was layered over the plaid.

I took a sentiment from the Whimsy Stamps Everyday Mini Sentiment clear stamp set and stamped the “miss you” underneath the image.  I also used the Whimsy Stamps Friend Word & Shadow die set to cut a piece of vellum with the shadow and then cut the word out with some pink cardstock and then attached them right underneath the stamped “miss you” sentiment.  Lastly, I’ve added some of the pink enamel dots from the Whimsy Stamps It’s a Party enamel dots set.

Vicki-WS-PenguinLovesBunny-March7-close

Here’s a closer look at the coloring of this image.  I’ve colored it in with Copic markers in the following colors:

  • Penguin:  C8, C5, C3, C1, Y38, Y35, Y32, R00
  • Bunny:  E47, E44, E42, E41, W5, W3, W1, R20, R11, R00

I also used a blender 0 and a white gel pen for cheeks and bunny tail.

Vicki-WS-PenguinLovesBunny-March7-flat

I thought this image would be so fun for Easter too!!  I can see it used in so many different ways!

Hope you’ve enjoyed my card today!!  Thanks so much for dropping in!!  See you soon!

Challenges I’d like to enter my card for:

  1.  Tuesday Morning Sketches – #493
  2. Crafty Animals – Anything Goes + related to animals
  3. Creative with Stamps – Friends
  4. {Cupcake Inspirations} – Plaid CIC465
  5. QKR Stampede – Anything Goes #337

Whimsy Stamps March New Release!

Hello friends!  I don’t think I ever remember being so sick before! WOW!  I was literally stuck in the bed for a couple of days there!  I’ve been taking some meds from doctor and starting to feel a bit better now, just regular cold and not so much the fever and chills any more.  Thank you SO MUCH for the very kind get well thoughts as I truly appreciate that!  So glad that’s over with now!

Have you checked out the new release over at Whimsy Stamps yet?  There are lots of really adorable digital stamps this month and I’m excited to be sharing one of those with you today:

Vicki-WSBunny-NewRelease

I have used this sweet little image by C.C. Designs for Whimsy Stamps called Bunny.  (And that little bunny is too cute wrapped up in the garden hose!!)

I have also used some fun new digital papers for the background on my card here too!  I’ve printed out a piece from the Whimsy Stamps Rustic Wood and Brick Papers digital collection and used it on the background of my green card panel.

I also used some die cuts to add some fun elements to my design as well as wrap some ribbon at the top and add a white flower with a rhinestone in the center of it.  I heat embossed a sentiment in white EP over a piece of the green cardstock and cut it out with a stitched die cut banner.

Vicki-WSBunny-NewR2

I have it all colored up with my Copic markers and then I’ve used some metallic gel pens for the dots and for the water sprinkling from the hose.

Here you can better see how I’ve colored in the image and the details of sparkle with the gel pens.  I’ve used some craft foam behind the image panel for a bit of dimension too.

Vicki-WSBunny-NewRflat

I hope you’ve enjoyed my card for today and have been inspired to go check out the rest of the new release at Whimsy Stamps!

I’ll be back again tomorrow for some more inspiration!  Thanks so much for dropping in!!  Have a great day!