It’s CAS at Cute Card Thursday!

Hello friends!  I hope you’re having a great week so far!!  I had forgotten to give updates on the “bird nest” situation, but actually the last time we had checked, the baby bird hopped onto the roof next door and the mother bird was chirping at us and then the baby took off and flew away!  We never were able to get any more photos.  I think there was just that one baby bird that survived.  Now we have the empty nest in the tree.  We think another bird may be trying to build on it, but we don’t see anything.

Today is Thursday which means it’s time for a brand new Cute Card Thursday Challenge!!  The theme for this week is CAS (clean & simple)  Our sponsor is All Dressed Up, so be sure to play along for your chance to win!

Here’s my take on the challenge:

Vicki-CCT586-ADU

I have used this really cute image kindly donated by our sponsor called Dreaming of Summer.  I love the “dreamy” pose she has!  I thought she would look so cute propped up over a fence, so I made one for her!

**Sometimes, CAS puzzles me as to the “definition” of what it TRULY is.  To me, it is a bit different to some than others.  I feel it to be more like an “art term” where everything is subjective in it’s form and if I have to think about it TOO much, I’m not being “me” and having my fun with it…so I just create weather it is considered simple or not.  🙂  For me, this seemed like a CAS design.**

First, I colored up the image and then stenciled on some clouds behind her.  I took a craft knife and cut out just the bottoms of her elbows.  I stamped another panel with a woodgrain stamp in gray colored ink and then used a punch with a sharp point to create the “planks” for the fence.  I sponged around the edges with more gray ink and then I tucked the fence panel underneath her elbows and attached it to the image panel.  I cut out these pieces with a stitched rectangle die and layered that onto a piece of black cardstock that was layered over an A2 top folding white card base.  Lastly, I added the die cut “hello” with black cardstock in the corner.

Vicki-CCT586-ADU-close

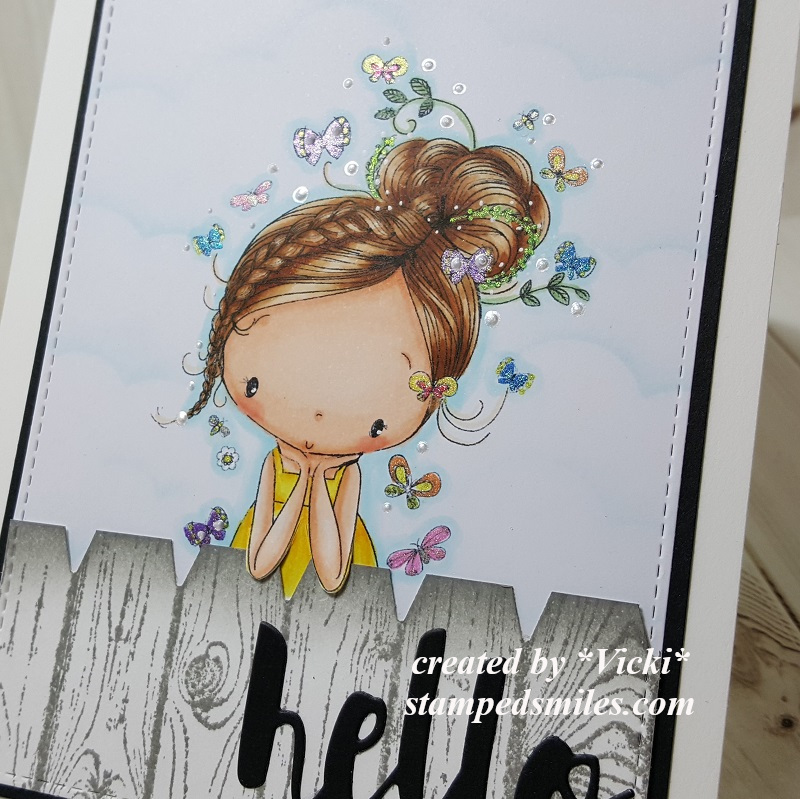
Here’s a closer look at the coloring I’ve done on this image.  I’ve colored her in with Copic markers and then for the tiny butterflies, bees and flowers around her, I’ve used some metallic gel pens to color them with.  You can see the shimmer on them.

I’ve also taken some liquid pearls to place some dots around her as well.  I thought it made her look a bit more whimsical.

You can also see where her elbows are lifted up over the fence panel too.

Vicki-CCT586-ADU-flat

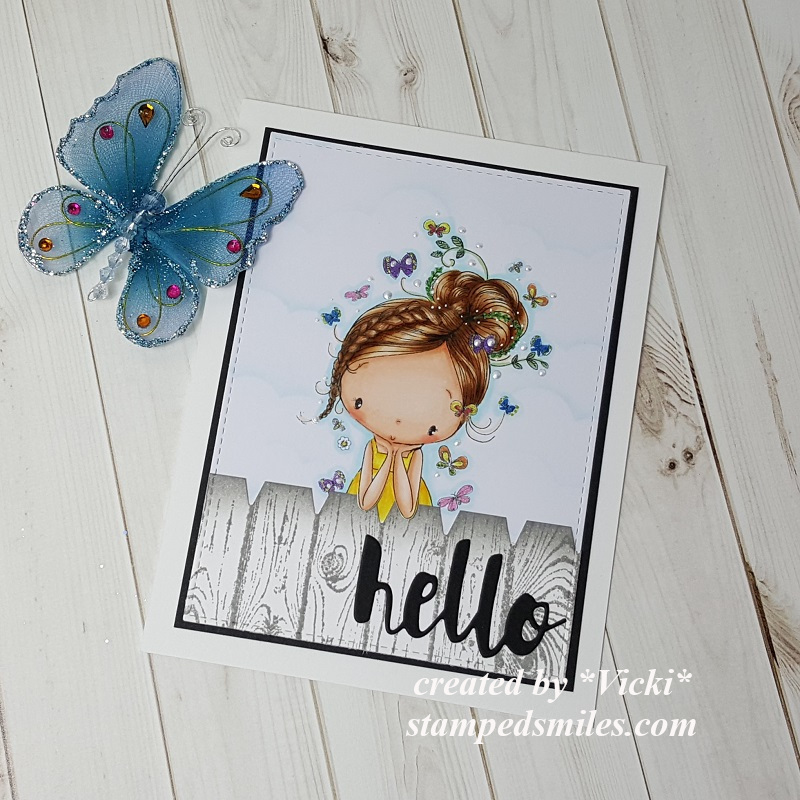
Thanks so much for stopping by!!  See you soon!!

Challenges for this card:

  1.  All Dressed Up Challenge – Anything Goes + ADU image
  2. Craft Rocket – Summer is Coming
  3. Happy Little Stampers – Anything Goes with Dies
  4. Crafting From the Heart – Anything Goes
  5. Crafty Creations – #392 Anything Goes

Cute Card Thursday Has Wings!

Hello friends!  It’s Thursday already which means it’s time for a brand new challenge over at Cute Card Thursday!  This is a really fun one to play with!  This week we’d like to see your “Wings” things!  Can’t wait to see what everyone makes!!

This week we are being sponsored by All Dressed Up Stamps and I have used one of their lovely images for my card today:

Vicki-CCT569-ADUWings

Isn’t she the sweetest little thing?  I have used the Fairy Magic image that was kindly donated from our sponsor, and I have colored her up using Copic markers.  I’ve also sponged some light blue ink around the image panel before matting it onto a green sparkly layer cut with a scallop square die.  I also used some craft foam to pop up the image panel over my card for a bit of dimension.

I have just bought these gorgeous Fairy Garden papers from Kaiser Craft and used them on the background panel of my card.  I also used some gorgeous shimmery light green cardstock to go with it!  I’ve taken a thin strip of the glitter cardstock and attached it up against the butterfly papers and then attached some lace over it.  I then mounted this entire panel over a white top folding 5″ x5″ card base.

Vicki-CCT569-ADUWings-close

Here’s a closer view of the coloring and the little sparkly details I’ve added to her.   For the wings, I’ve taken a glitter brush pen over them and then used some metallic colored gel pens to add some dots to her wings as well as the butterfly wings along with some gold dots around her ribbons and the sentiment.

Here you can also see the wood veneer butterfly accent that I’ve added at the top.  I painted it with white gesso and then painted over it with some pretty pearl shimmer paint before attaching it to the card.

Vicki-CCT569-ADUWings-flat

Lastly, I’ve added three pearls at the bottom left corner of the card.  In this photo you can see the pretty shimmer on the light green background cardstock.  It was hard to capture in the photos, but the butterfly papers are sparkle embossed as well.

Thanks so much for dropping in today!

Challenges I’d like to enter this card:

  1.  All Dressed Up Challenge Anything Goes + ADU image
  2. Not Just Cards – Anything Goes
  3. Crafty Creations – Anything Goes

2 Crafty Critter Crazies February Challenge is Here!

Hello friends!  Today starts our new February challenge over at 2 Crafty Critter Crazies!  Remember that this is an always ANYTHING GOES challenge, but you must include a critter somewhere on your project to enter!

Here’s what I’ve created for the challenge:

vicki-ribbonsoflove-glittercard-project4

I have used this digital stamp set called Ribbons of Love.

For this card, I’ve used the uncolored images and placed the images together how I wanted them to appear in a Word doc and then printed it out.  I printed out an extra butterfly so that I could cut it out and pop it up over the design for dimension.  All of the butterflies were colored with Copics.

For the background of my card, I took some Lace and placed it over top of a piece of cardstock that I’ve covered with a Super Adhesive Sheet.  I then sprinkled some Caspia Sea glitter and burnished it over the lace layer.  (Sometimes I use the backing from the adhesive sheet to help burnish it in.)  After I felt it was burnished in, I removed the lace layer and sprinkled on some Lemonade glitter over the rest which gave me the unique glittery lace background!  As you can see, I’ve also taken a small strip of it to add to my design.  I have layered that piece with a strip of black fishtail banner and tied a white ribbon bow to attach over it.  The butterfly image panel was cut, layered with black cardstock and attached over the middle of the glittery background which as also layered with black cardstock and attached to an A2 sized white top folding card base.

vicki-ribbonsoflove1

Looking more closely at the card, you can better see the glittery background along with the coloring on the butterflies.  The two butterflies at the top were brushed with some Glue and then I sprinkled some Diamond Dust glitter over top of their wings for a bit more sparkle.  I glued the center of the yellow butterfly down and popped up the wings with my finger for a bit of dimension.

Thanks for stopping in… stay tuned in for my next special post!!

I’m Joining a Critter Challenge Design Team!

Hello friends!  Welcome to October!  There are so many fun and exciting things yet to come this month and I’m thinking it will probably fly right by me!  But first, this exciting news is something that I will share with you first!

I have been invited to join the 2 Crafty Critter Crazies challenge blog as a design team member and I’m truly honored to be crafting alongside several of my blog friends already on the team!  Thanks so much for welcoming me to this wonderful team! 🙂  If you are not already familiar with this challenge blog, please stop by and check it out!  Obviously you must use a critter on your creation (any crafty style make), plus it’s an always “anything goes” as long as you use a critter and you have an entire month to enter!  Of course I am a huge critter fan and love using those type of images on my creations…so I hope you’ll come along and play! – The challenges are always the very 1st of each month.

So for my creation this month, I have used a gorgeous image kindly provided by our sponsor:

Vicki-2CCC-Ching-Chou Kuik

I have used Flutter Butterflies Grey Scale digital image from Ching-Chou Kuik on my card for today.  for this image, I decided to pull out my case of Prisma pencils to color it in as I thought it would be a good one to practice with.  Including the background, I’ve colored the entire panel with pencils.  It took some time to do the blending and such, but it was very therapeutic, and I enjoyed the process of it.  I used a white gel pen for a few highlights in areas on the butterflies.  (Some of it was also from a white pencil.)

I cut out the colored panel with a stitched rectangle die and mounted it onto a black scallop rectangle panel that I’ve popped up with craft foam.  I’ve also added a kraft doily that I’ve cut in half on both the top and bottom of the panel.  I found some pretty black and ivory design paper to mount her on.  I took some sparkly black ribbon to go across that paper and then mounted it all over a top folding A2 sized black card base.

Lastly, I’ve cut out some extra butterflies in black cardstock to accent my image panel and then I’ve added some clear glitter Stickles along the edges of the image panel to finish it off.  I really wanted the image to be the main focal of this especially since I spent so much time in the coloring.

Here’s a closer look at the image and coloring:

Vicki-2CCC-Ching-Chou Kuik-close

Looking at this photo, I also added some shimmer to the colored butterflies with a Spectrum Noir clear glitter brush pen.  Sometimes you have to angle it just right to capture the shimmer on it.

I hope you have enjoyed my card today!

Thanks so much for stopping by today!  See you soon!

challenges:

  1.  Crafty Creations – Anything Goes #375
  2. Fab ‘n’ Funky – All Creatures Great & Small
  3. Creative Moments – Anything Goes
  4. Creative Knockouts – Anything Goes

Rainbows and Butterflies

Hello friends!

That was quite a post yesterday and I thank you from the bottom of my heart for all of your kind words…it was even hard to read those, but please know I appreciated your kind hearts immensely!

I have a very fun and cheerful card for you today!  Although I had missed the Cute Card Thursday challenge this last time, it is still going on and you have a few more days to enter if you wish to play along with us using your Bugs and/or Butterfly creations!  I just love playing with butterflies and the first thing that came to my mind was that past Simon Says Stamp card kit called “Beautiful Butterflies”.  There was some awesome rainbow patterned paper in the kit as well as a butterfly stencil and so I decided to mix them together!

Vicki-CCT539-rainbow butterflies

I used the rainbow papers (from Lawn Fawn) for the base background of my card.  I took the butterfly stencil from the kit and sponged in some Distress Oxide inks for the different butterflies in rainbow ink color!  I’ve used:  Picked Raspberry, Orange Marmalade, Squeezed Lemon, Twisted Citron, Mermaid Lagoon, Wilted Violet and sponged them in with a sponge dauber.  Mounted it onto a strip of black cardstock and placed over the rainbow background.  I heat embossed a sentiment from the stamp set included in the kit with white embossing powder and then used some foam tape to mount it over the card.  I finished off the card with some black enamel dots.

Simple and fun card to make!  Thanks so much for stopping in today!!  See you soon!

Challenges:

  1.  Addicted to Stamps & More! – Anything Goes
  2. Butterfly Challenge – Butterfly wheel on letter ‘O’:  butterfly, orange, over the edge (sentiment banner)
  3. Casual Friday (CFC204) – Rainbows & Butterflies
  4. Crafting From the Heart – Anything Goes
  5. Artistic Inspirations – Anything Goes

Fluttering By

Hello friends!  Have you already seen a couple of different styles now on my blog?  LOL!  I’m trying to get one on here that I think I would be comfortable with for a while…so far I’ve settled on this one! 🙂

So I’ve been “outta the loop” for a while and feel a bit rusty, but I thought the BEST place for me to start is with some of those card kits that I keep on hoarding and then it just sits and never gets used…so I’m going to stop hoarding and start using!  Besides, all of the contents are already right together and you can’t go wrong with that, right?!

So I’ve pulled out an April 2018 Simon Says Stamp card kit  (sold out) with some butterflies and thought it would be great to work with!  I needed some “pick me up” cards that I’m sending out to a couple of fellow crafty friends who need a lift in spirit and hope this will help send a smile their way:

OLYMPUS DIGITAL CAMERA

This card was simple as I just used some papers from the kit, colored the images with my Copic markers and attached to design.  I colored some white glitter paper with a yellow Copic to get that color above the patterned paper.

OLYMPUS DIGITAL CAMERA

This is probably my favorite one as I love the pop of black everywhere.  I used some of the Mermaid Lagoon Oxide ink from the kit to ink blend, distress with water and then added the Copic colored butterflies.

OLYMPUS DIGITAL CAMERA

This one was inspired by Sheri Carrol’s card design.  I obviously like her design better, but I find it amazing just how different a design can turn out from each person.

I saw that the Coffee Lover’s Blog Hop just started today (Yay!) and so I hope to be back later this evening with something fun for that!  I haven’t played in challenges for a while and it’s always fun to create using some fun themes!

Hope you’ve enjoyed my butterfly cards today and please let me know if you’ve stopped by so I can see what everyone is doing!  Would love to know how you are!

*Don’t forget to share a smile today!  🙂

I would like to enter one of these cards into the following challenges:

  1.  Simon Says Stamp Wednesday – Use More Than one Stamp
  2. QKR Stampede #297 – Anything Goes!