Creating Calendars…Do You Need One?

Hello friends!  How are you dealing with the 2022 year so far?  I hope that you have a fantastic start and look forward to a brilliant and crafty future ahead of you!  Speaking of starting a New Year, I realized that I needed to start my crafty calendars…which really should’ve been started sooner!🙄  I actually enjoy putting them together, especially the coloring as it’s very relaxing for me.

I’ve had this set of calendar cards along with this stand since this last Spring from Taylored Expressions and of course I’ve waited until recently to get them finished up!  I’m glad I did though as I think these will be so fun to look at and chuckle to change out each month:

Tee hee!  What got me interested in Taylored Expressions from the start were these adorable and funny Grumpy characters that she has in one of her product lines!  (You may have seen a “Grumpy” calendar I’ve made in the past on THIS POST.)  She has LOTS of different types of calendars and accessories to choose from, but this is a set that had came out this past year.  Check out all of calendar products at Taylored Expressions HERE.  I thought this would be a fun way to help motivate me this year for creative inspiration!😁

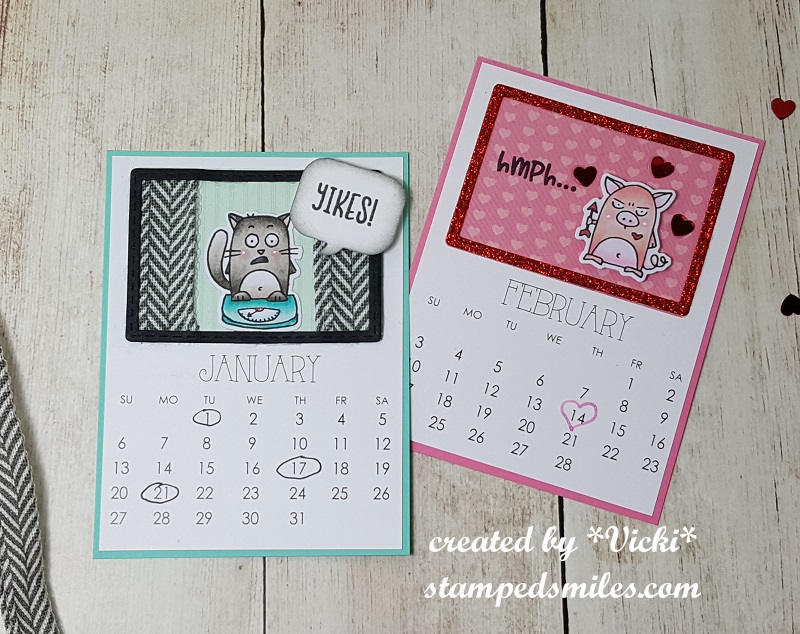
I’ve taken a white piece of cardstock cut to size my calendar stand that would accommodate the tear-off calendar pad and hold the “snarky cards” in place with the gold clip.  I’ve used some TE inks and blender brushes to blend over top of the white piece.  I then used the TE Striped Squares stencil to go over it using the same colors and then mounted this piece over a black cardstock layer.  (This piece and the changeable cards are held to the stand with the gold clip.)

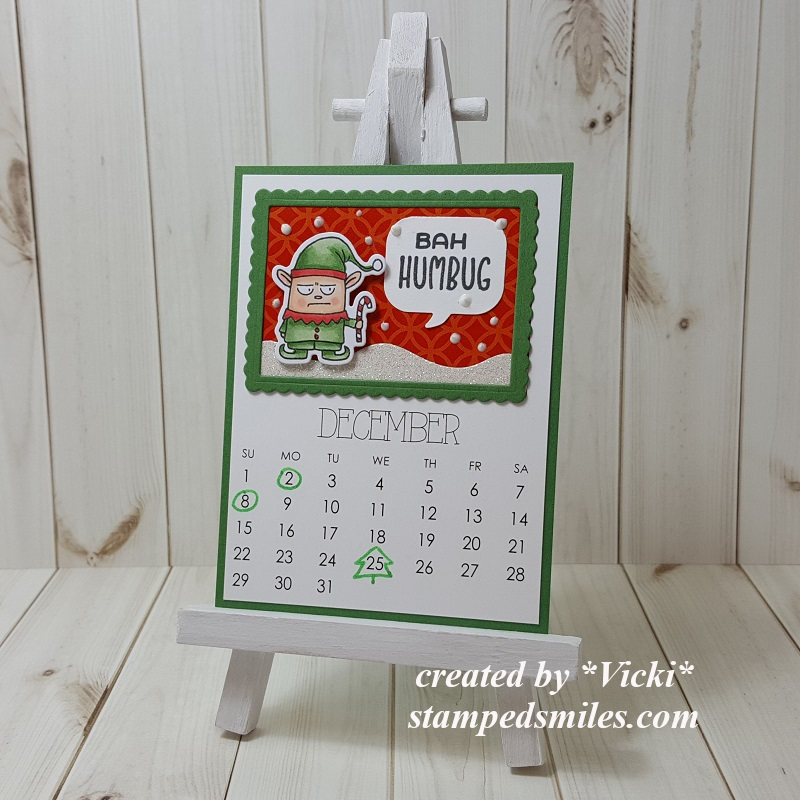
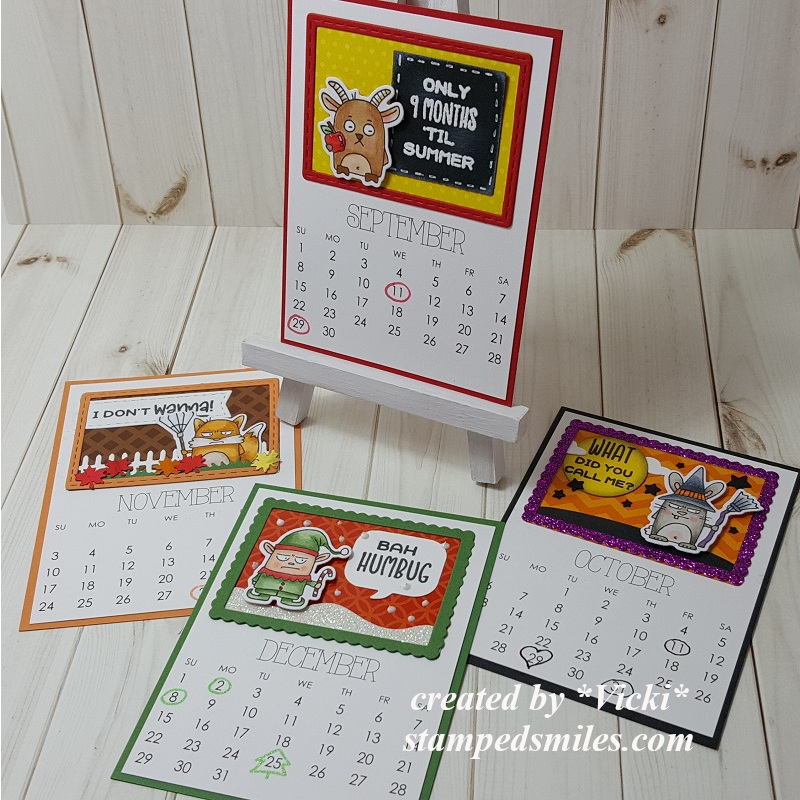
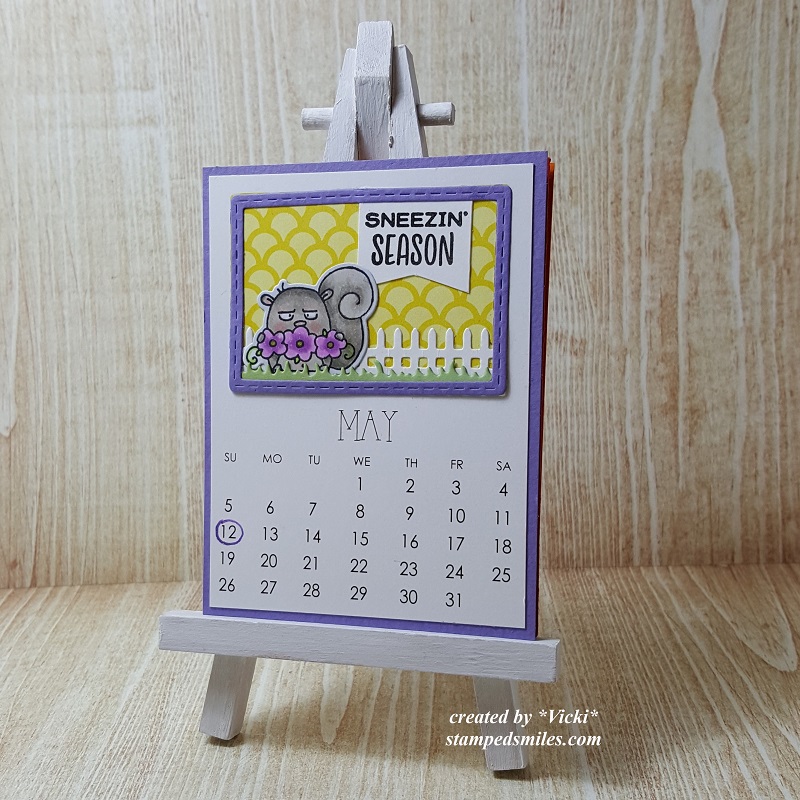
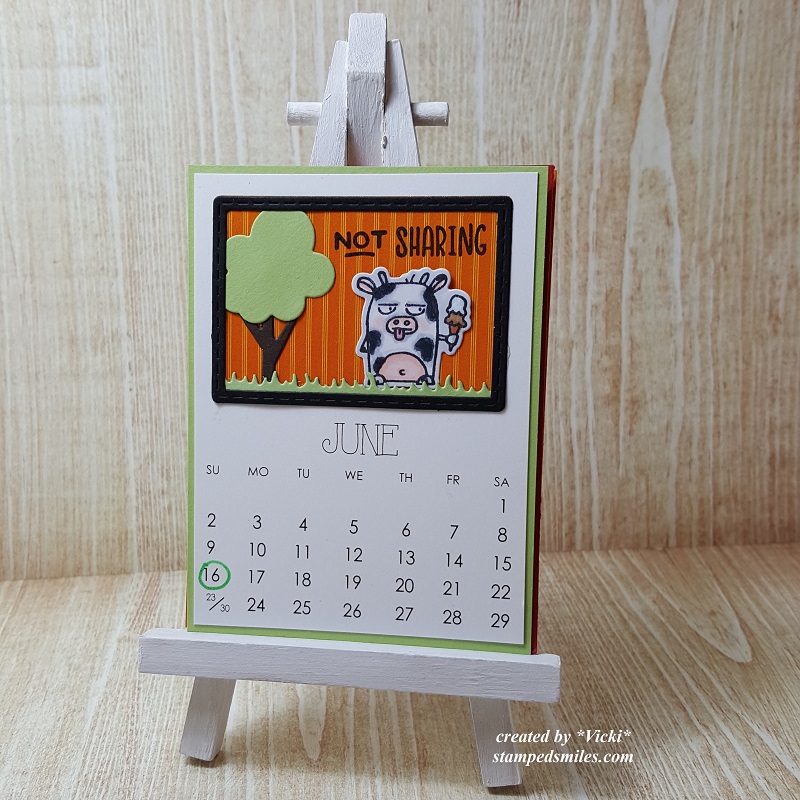
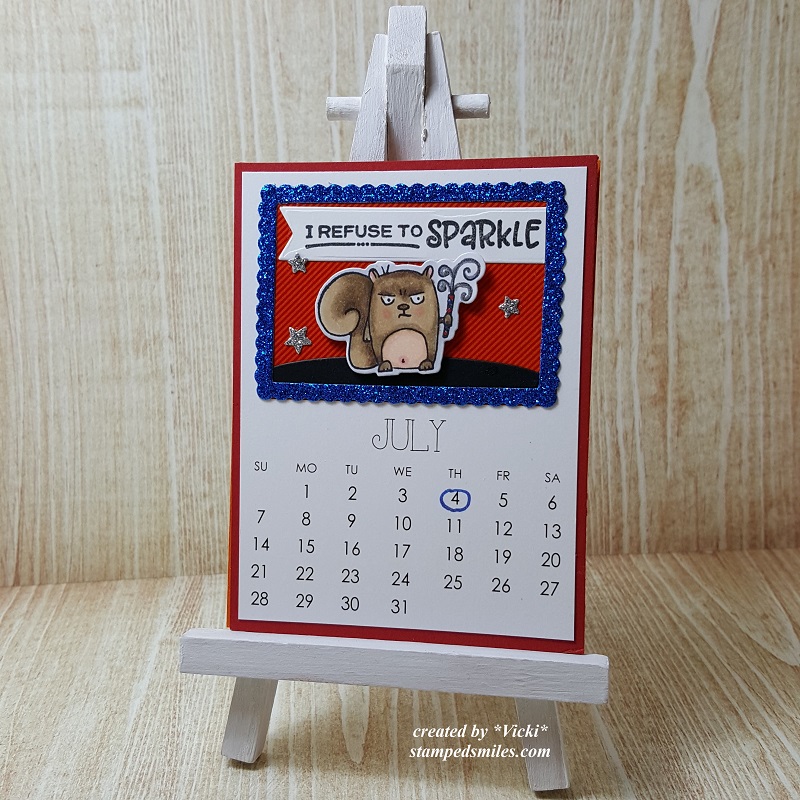
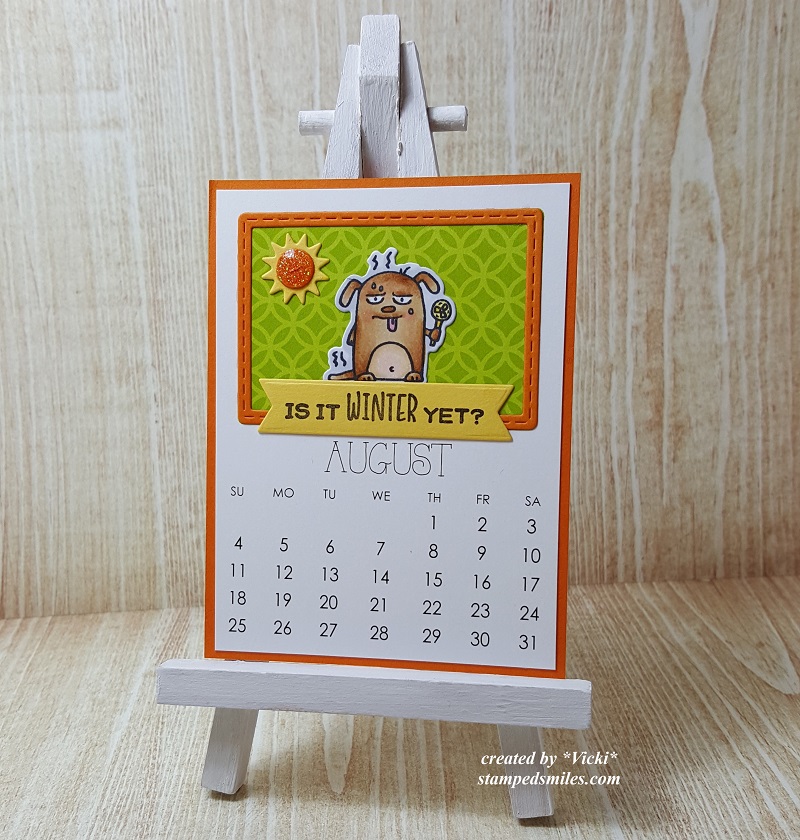
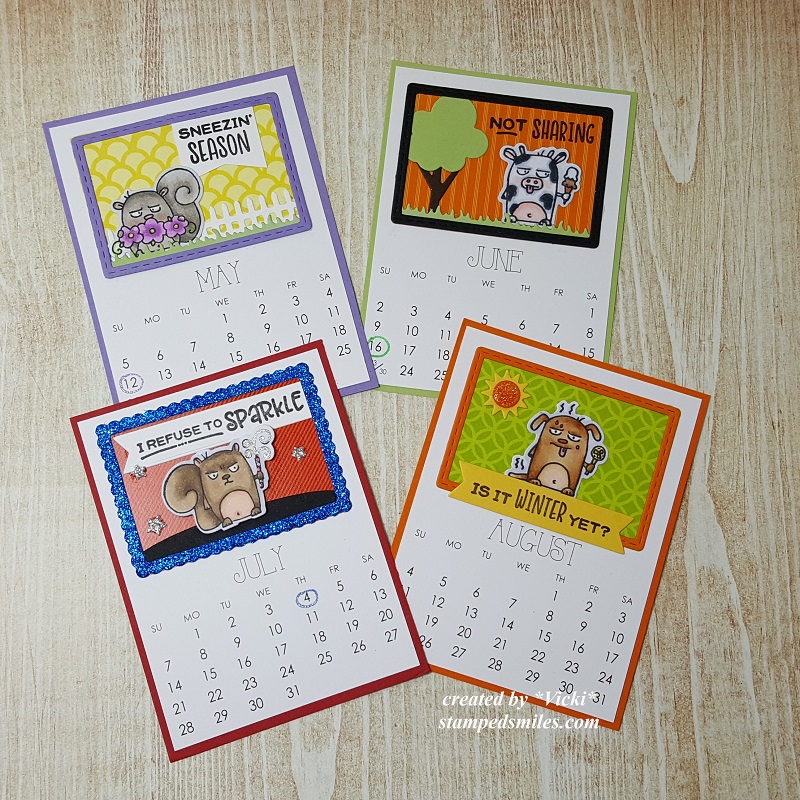
Here are all of the completed cards in the set that I can change out each month or whenever I want.  I’ve used the TE Clipboard Calendar Cards-Snarky for my own personal calendar that I’ve colored up with Copic markers.  The frames were colored with coordinating colors that matched up with the rainbow stenciled background for my calendar front.  Really enjoyed coloring and giggling while making this set!

I also wanted to show you the back side of this TE Walnut Wood Clipboard Stand so that you can see how I store all of the extra cards on my calendar when I need to change one out.  You can choose to add a package of the TE Calendar Storage Sleeves with the stand if you get one, but I thought this whole system was a nice and sturdy option of creating a calendar that you can personalize for yourself or for a gift.  I ended up creating a calendar last year for Mother’s Day and gave it as a gift. I used the TE Clipboard Calendar Cards-Sweet for that one and did some foiling on them.  (Just don’t forget to purchase the next year’s tear-off calendars to replenish the recipient for next year!)

——————————————————————————————————————–

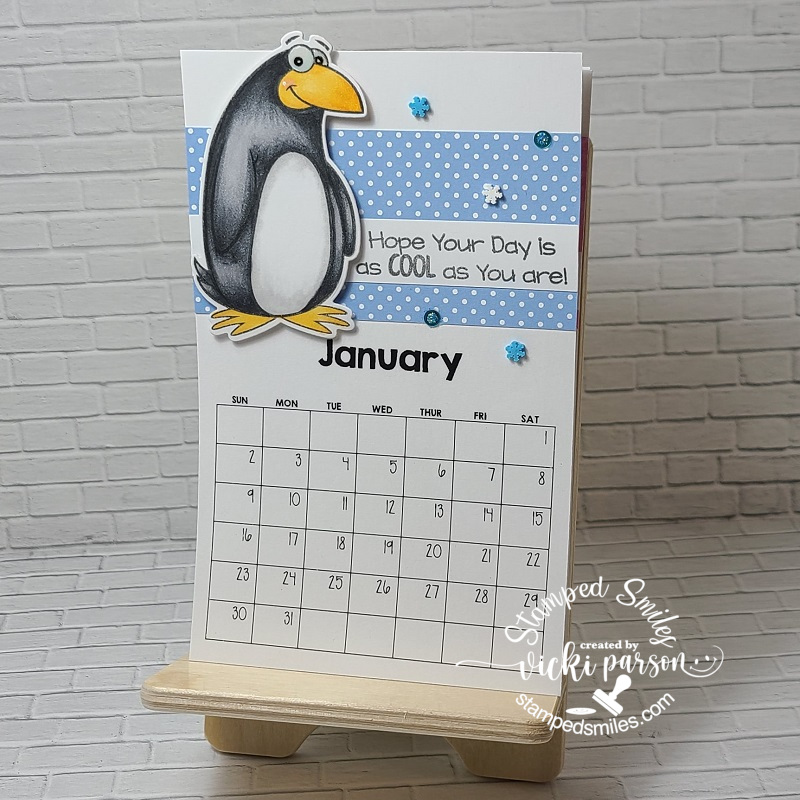
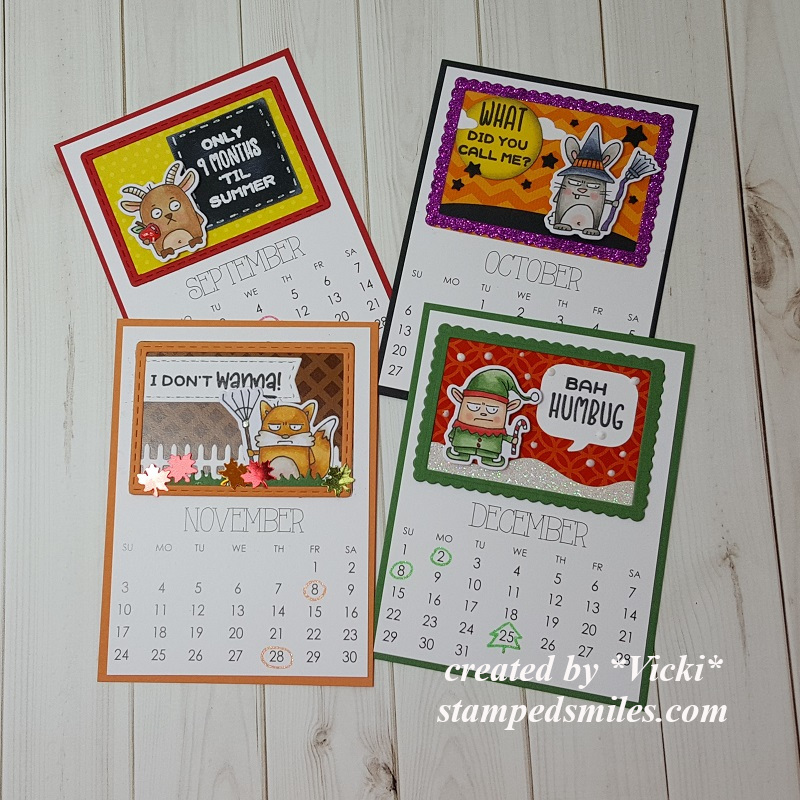
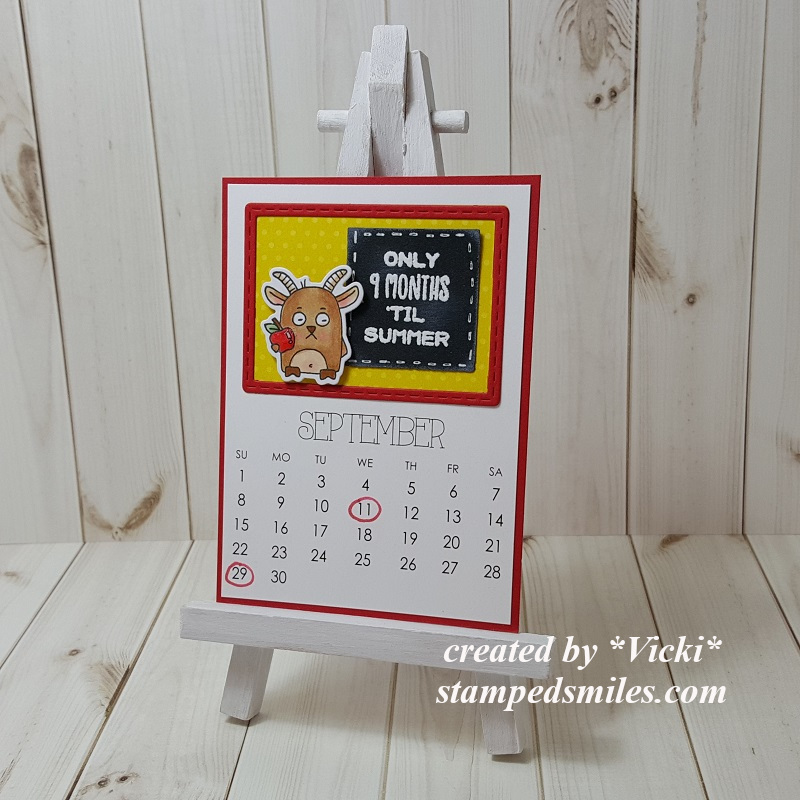
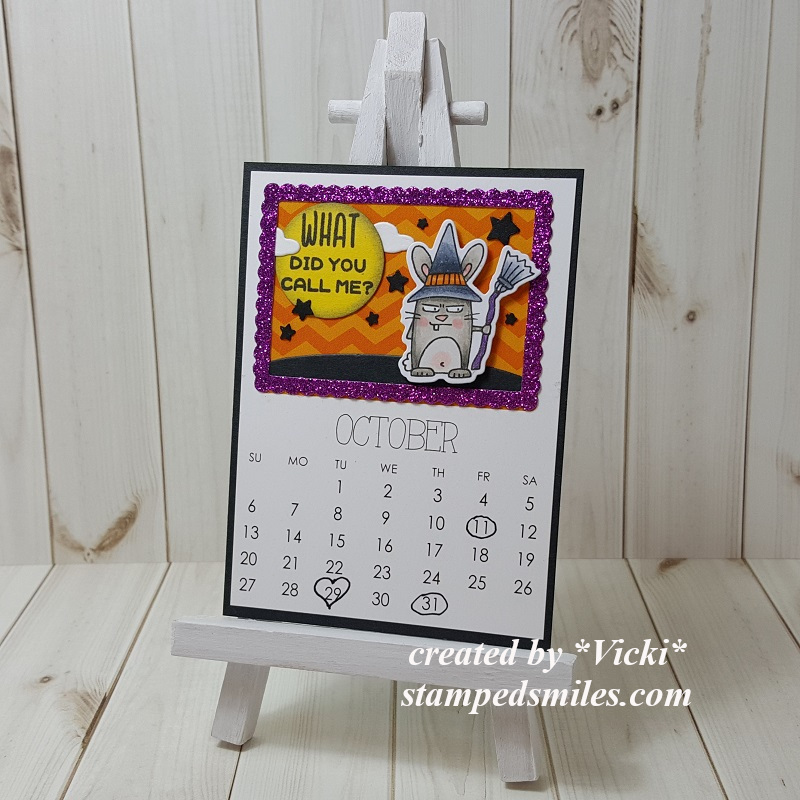
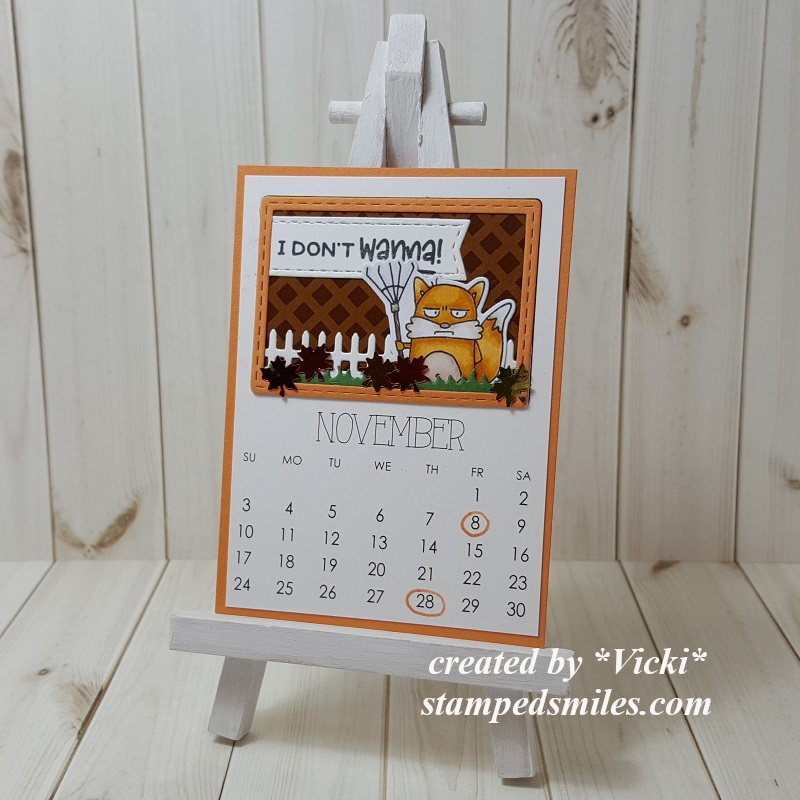
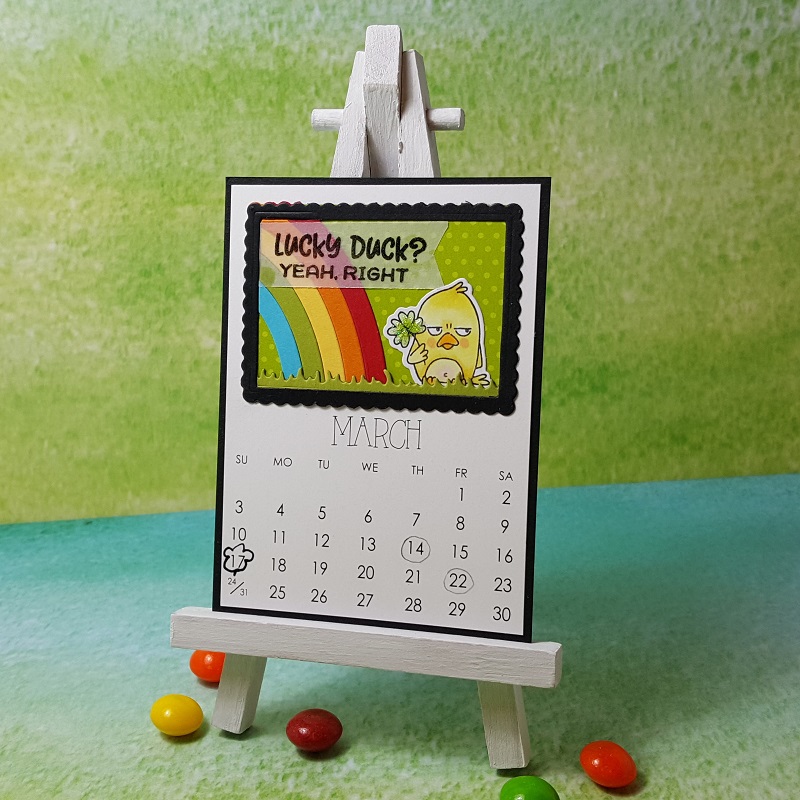
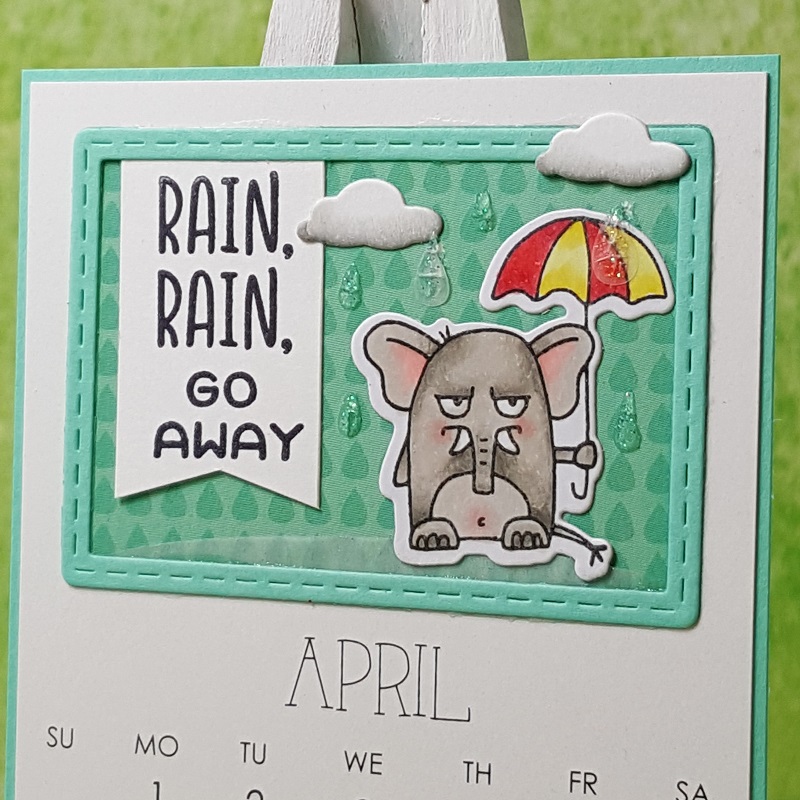
And I also wanted another calendar for my computer area which also brings a smile to me each month!  I bought a calendar set last year from Inky Stamper and really enjoyed flipping the cute characters each month as the year went on.  Happily, she came out with another new calendar set for this year and I happily purchased it BEFORE it ran out! (So sadly, it sold out quickly!)

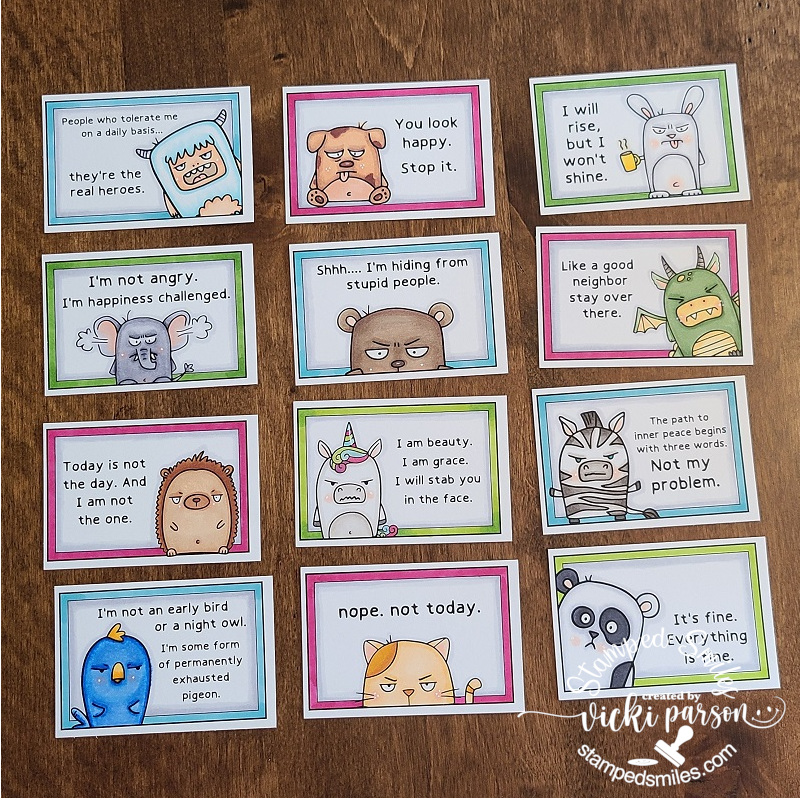
With these calendar kits, the stand, the monthly calendar cards as well as all of the pattern paper strips, stamped and die cut characters and sentiment strips ALL come with this kit!  I think it’s a pretty good bargain for all that was included with it.  Of course you have to color and put together each card…but THAT’S what the fun is about!  

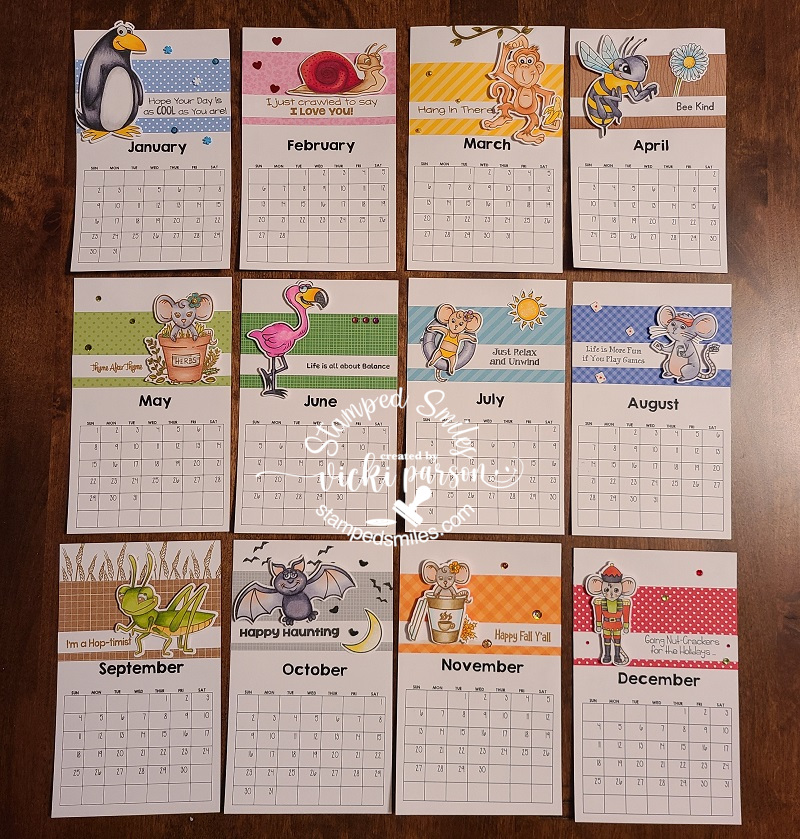
And here’s a look at the entire set of calendar cards that I colored and put together.  There were instructions for each card along with the Copic markers used in the examples.  For some of the cards, I already owned the stamp set, so I added a few extra details to some of them and I also added a few of my Inky Stamper Gems and Sequins mixes to some of them.  Square dots and a strip of gold enamel dots were also included to decorate with.

So I had an awesome time putting this one together as well!  I look forward to seeing these every single month throughout the entire year!


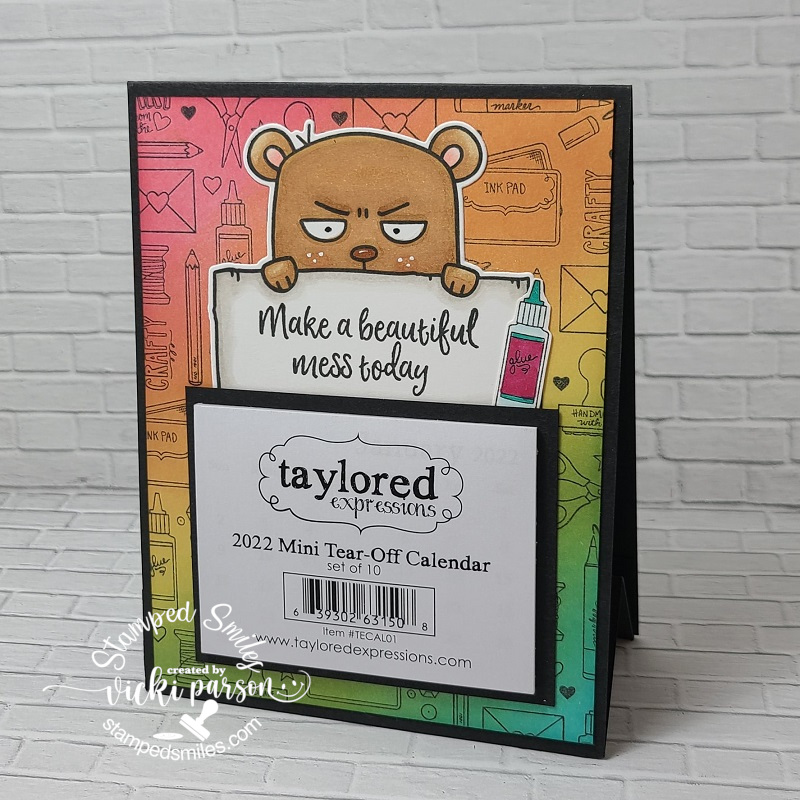
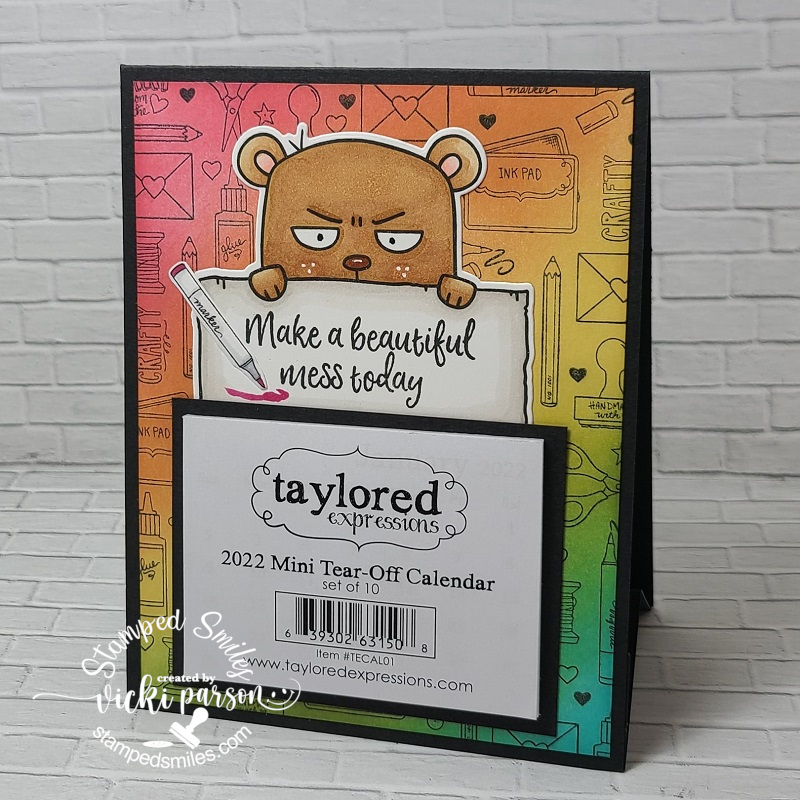
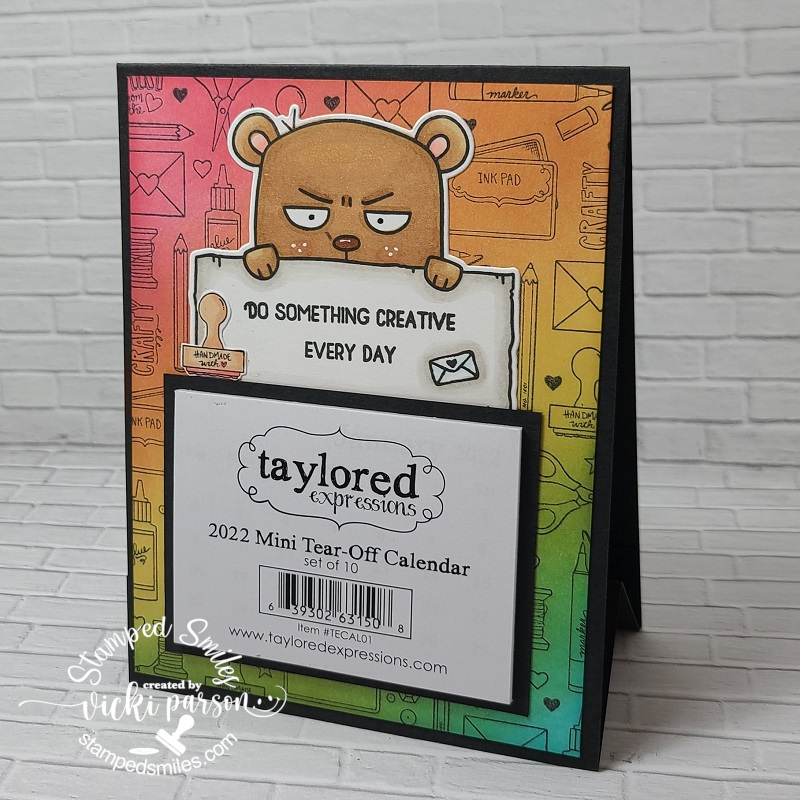
Since I had a couple of left over Taylored Expressions 2022 Tear-Off calendars, I thought it would be fun to just create a “calendar card stand” for crafters and give them out to whoever wants one!

EDITED UPDATE:  All of the calendars have been claimed!  Sorry if you’re looking to get one as I have no more left.  Hope everyone enjoys their calendar all crafty year!
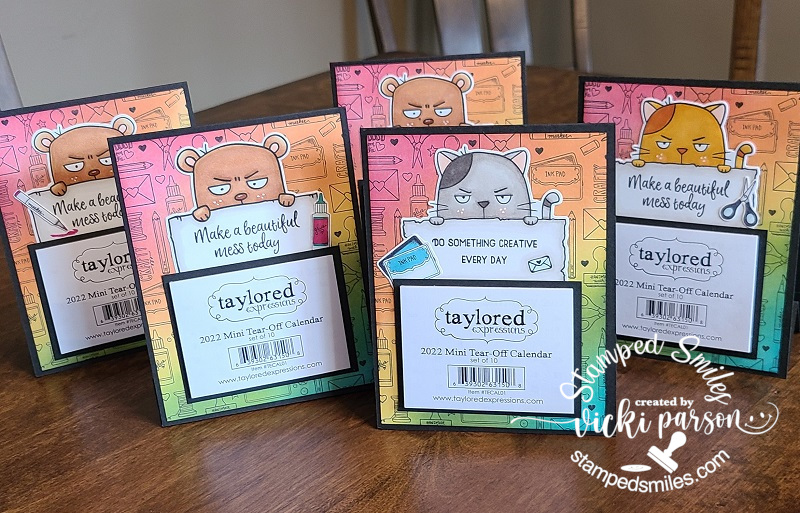
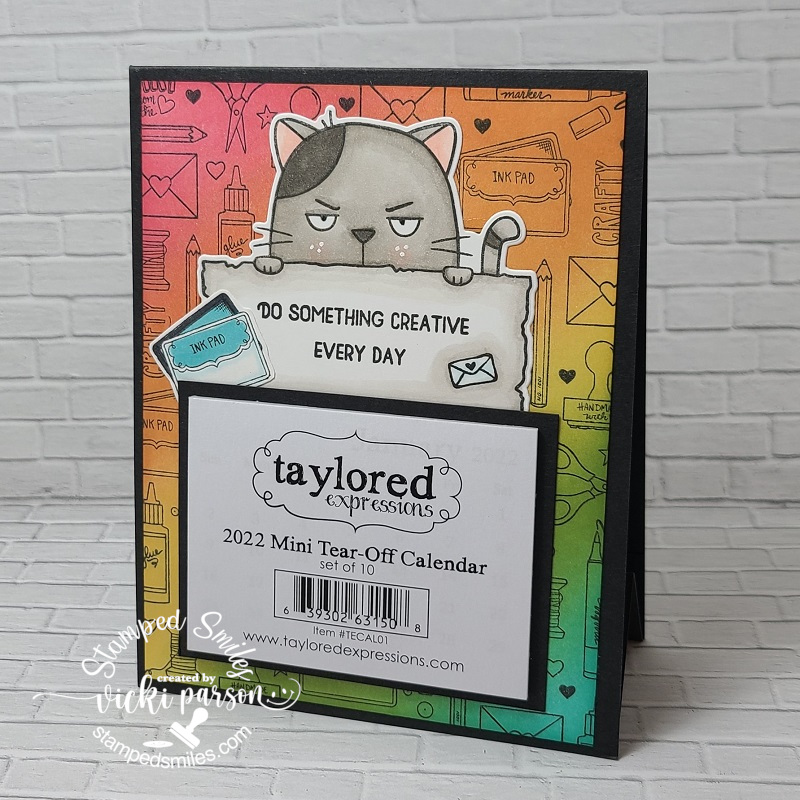
So I had 5 of these calendars left over and I knew I wasn’t going to use them, but of course I didn’t want to just throw them out either!  So I took the TE Big Grumpy Bear and the TE Big Grumpy Cat sets to help motivate a fellow craft friend throughout the year! TEE HEE!  I’ve made a rainbow colored background for these by taking the TE Art From the Heart background stamp and stamping it with black over a white piece of cardstock.  I used some TE ink and blender brushes to blend in the rainbow colors.  I stamped an extra background image to color in some of the images and fussy cut them out for accents.

I attached the “Grumpies” over the background and layered the calendar with a black layered piece behind it to go over top of the “Grumpies” with their “feet” underneath so you can see them.  I then added the fussy cut out images that I colored in a corner of each one.

I made a “stand” for this by creating a valley fold piece to attach in between the top folding A2 black card base.  This will make for a permanent stand to display your calendar through the year! (And hopefully motivate someone’s crafty process through the year too!❤)  I receive so much inspiration from many of you crafty friends, so it would be nice if I could possibly reciprocate that in some way!

Check out each one of these calendars I’ve made below in detail!  Just click on the photos to enlarge them if you’re on my website:


So now that we’ve got the year started and in place, let’s hope for a really creative and productive one ahead!

I have some more craft projects that I’ve been working on as well as a really BIG craft project that I’m taking on for the love and excitement of it all!  I look forward to sharing with you soon!

Thanks for stopping in and I wish you a happy, healthy and productive rest of your week!

Challenges:

  1. Sweet Stampin’ – NEW (stamped New Year calendars with new products!)
  2. Critter Crazy – Anything Goes + critter
  3. Creative Inspirations – Anything Goes
  4. River of Creativity – Anything Goes
  5. Penny’s Paper-Crafty – Anything Goes using paper
  6. CRAFT – New (New Year calendars with new products!)
  7. Creative Fingers – Anything Goes
  8. Colour Crazy Craft – Anything Goes + coloring

Anything BUT a Card for Cute Card Thursday – Calendars Finished!

Hello friends!  We are already here on the last Thursday of August!  I can’t believe we are already getting close to the end of the year soon!  Time seems to just go by so fast for me anymore!

Today stars a brand new challenge over at Cute Card Thursday and for this week we’d like to see your “Anything BUT a Card” creations!  We look forward to seeing what you all come up with!

So I bet you thought that I had forgotten about my finishing up those calendars?  Well as soon as I saw that this was the last week of the month, I went to try and find the next month and of course it wasn’t there!  LOL!  Then I realized that I needed to finish out these “Grumpy” calendars for the remainder of the year!  To see the past months I had already created, you can find all the posts by CLICKING HERE.  I had so much fun with these!  So here’s the last of them:

Vicki-CCT597-Calenders

I think these are fairly quick and easy to do, plus they’re so much fun putting together by creating the scenes for them and they give me giggles everytime I look at it!  (There are days that we can relate to these guys, right?!)

Again, for all of these, I have used the Taylored Expressions 3×4 Calendar panels with the printed design at the top.  (of course mine are the 2019, but if you click on the link, it will take you to the 2020 calendars!)  I have slightly cut the edges off so that I could make a layered panel behind them and still keep the 3×4 size.

All images came from the Taylored Expressions Calendar Grumplings stamp set and coordinating dies.  I’ve used the sentiment from the set and made a banner with it that I’ve tucked underneath the elements from the Build-a-Scene Calendar dies.  I’ve colored all the critters with Copic markers.

Vicki-CCT597-calendars-Sept

The eyeballs on this dude are too funny!  I’ve white heat embossed the sentiment on this one over black to mimick a chalk board.  I added lines around the edges with a white gel pen.  I’ve popped up the grumpling with foam tape.  I’ve added some glossy accents over the apple in his hand.  This is my birthday month too!! Woo hoo!

Vicki-CCT597-calendars-Oct

BWHAA! HAA!!  This one is probably my fave not just because of the sentiment and the cute grumpling, but I love Halloween anyway.  I stamped the sentiment over some yellow cardstock and then punched it out with a circle punch so it looked in the shape of a moon and then die cut a couple of clouds to go around it.  I had a punch that punched out lots of stars and so I glued those on the background.  His broom handle was colored with a purple glitter gel pen and the frame was cut from some purple Glitterstock.

Vicki-CCT597-calendars-Nov

Oh yes, all of those leaves pile up about this time and there’s always tons of yard work to clean up along with all of those dead flowers before winter gets here…this is usually how I feel about it too!  The leaves at the bottom are from a sequins mix that I had.  I do love the different colors of leaves in the Fall!

Vicki-CCT597-calendars-Dec

Last, but not least is this funny “Bah Humbug” grumpling!  Things tend to get hurried this time of year for sure and by the time the end of the month rolls around, that’s about my take on it!  LOL!  I’ve used some white Nuvo Drops for the snow in the background.  The ground was die cut from Glitterstock.  The sentiment was punched out with a really old speech bubble punch I have.

Vicki-CCT597-calendars-last

I hope you’ve enjoyed catching all of the months of this year’s calendar with me as much as I had fun putting them together.  Now, the trick is to pull out the 2020 calendars and start working on that earlier than just as the time gets here! LOL!  Thanks for hanging in there with me for it!  Hopefully you’ve been inspired in some way or at least had a few smiles with the process!

Now please do pop on over at the Cute Card Thursday blog to see what the rest of the design team has for inspiration and play along with us this week!

Thanks for stopping by and I’ll see you soon!

Challenges:

  1.  CRAFT – Back to School (Sptember month)
  2. Always Fun – Back to School (September month)
  3. Kat Scrappiness – August Back to School (September month)
  4. Through the Crafttoom Door – Anything Goes
  5. Crafty Creations – Anything Goes

More Calendar Months

Hello friends!  Yay!  Happy Friday!! 🙂

So I know that I haven’t been on here in a while to share calendar months that I’ve been working on and would you believe that I had actually had forgotten about continuing on with them?!   The first week in May came by and I went to look for the next calendar month to display….and it wasn’t made yet!!  LOL!

So here I am almost at the end of May with my calendar…it has been displayed for the last week though! 🙂

Vicki-Calendar Month May

It has most certainly been the “sneezin’ season” around where I live!  The wind blows that pollen everywhere!  I know how this little guy is feeling!!

Again, for all of these, I have used the Taylored Expressions 3×4 Calendar panels with the printed design at the top.  (of course mine are the 2019, but if you click on the link, it will take you to the 2020 calendars!)  I have slightly cut the edges off so that I could make a layered panel behind them and still keep the 3×4 size.

All images came from the Taylored Expressions Calendar Grumplings stamp set and coordinating dies.  I’ve used the sentiment from the set and made a banner with it that I’ve tucked underneath the elements from the Build-a-Scene Calendar dies.  I’ve colored all the critters with Copic markers.

Vicki-Calendar Month June

LOL!  This is my June month and I’ve decided to color this guy with spots!  the only thing different I did here was introduce the tree with the TE Build-a-Scene Trees dies.

Vicki-Calendar Month July

OMG!  I had so much fun with this guy!  It reminds me of the kids when, you know, you’re out celebrating for the Holiday and they want something, you say “no” and they’re grumpy and tired…so they have that frown face holding a sparkler!! LOL!  The little stars were cut with silver sparkle paper from the TE Build-a-Scene 5×7 Calendar dies and the frame was cut with blue sparkle paper from the TE Build-a-Scene Calendar 2 dies.  I die cut the sentiment out with a banner die from MFT.

Vicki-Calendar Month August

I’m thinking that when it gets August over my way, I will probably be feeling like this!  LOL!  I’ve used the TE Build-a-Scene Calendar dies for both the frame and the sun on this one.  I’ve covered the center of the sun with some glitter and the sentiment was cut out with the same banner die from MFT.

Vicki-Calendar Months-May-Aug

So now that I’m all “up to date” on my calendars, I will have some time to not only finish out the rest of this year, but hopefully when the next time comes to make another batch of these to finish out the year, I will also start making up the calendars for 2020 so that I’m finished and AHEAD of it before the year starts!!  Remind me about August to see if I’ve been making those calendars, will you?

I hope you’ve been enjoying seeing these calendar months progess as I’ve been making them…those grumplings really make me smile!

Thanks so much for dropping in today!  Have a great day!

Challenges:

  1.  Addicted to Stamps & More – Make Your Mark (Copic coloring)Make Your Mark badge
  2. Crafting By Designs – Feature a Creature
  3. Creative Moments – Anything Goes

Late Valentine Share and Looking Into Future With More Calendar Months!

Hello friends!   (Long post with lots of photos!!)

I wanted to share the Valentine card I made for my hubby on Valentine’s Day yesterday, but I couldn’t share it on my blog until after he got it because he can be known to be a “stalker” on my blog to see what I’m up to!!  LOL!

Vicki-BMLoveBug-Valentine

Vicki-BMLoveBug-Valentine-close

I’ve colored up these “wasps” with Copics and for the wings and hearts there is a bit of shimmer on them as you can see in the photo.  For that I have used the Aqua Pigments Valentine Collection plus the Aqua Pigment Pearl for the wings.   I heat embossed the sentiment from the stamp set with EP and I cut the banner myself with scissors and mounted it over the card with the Foam Tape. The little wooden Convo heart accent was added too.  Lastly, I took some Nuvo White Crystal Drops and added a few dots here and there around the hearts.

I’ve cut the “wasps” out with a stitched circle die and mounted it over some cardstock from the kit that was cut with a scallop circle die.

Vicki-BMLoveBug-Valentine-flat

So for the background of my card, as I had mentioned above, I used the stencil in the background which is a huge heart with several hearts inside of it.  I took some Ink and sponged it over my white card front background.  I was able to take some Nuvo Moonstone Glitter Paste and go over it to add sparkly dimension to it!  LOVE how it turned out!  I stamped a couple more hearts in the bottom corner and colored them the same as the hearts with the “wasps” using the same Aqua Pigments collection.  I also added more dots with the Nuvo White Crystal Drops.  I layered this onto a piece of red cardstock (from the box) and cut it out with a scallop rectangle die and then mounted this entire design onto an A2 sized top folding white card base.  The envelope underneath was used to house the card in and I embellished it with some heart glitter stickers that was included in the box as well.

Challenges I’d like to enter this above card for:

  1.  Crazy 4 Challenges (C4C470) – Valentine’s Day Card
  2. Crafty Cardmakers – Love, Love, Love
  3. Always Fun – Love/Valentines
  4. Tuesday Throwdown – Falling Hearts
  5. Try it On Tuesday – Romance
  6. Crafting By Designs – Love is in the Air
  7. Crafty Gals Corner – Love is in the Air (Add a Heart)
  8. Creative Knockouts – Love is in the Air

Now if you remember this post I had a few weeks ago where I had started (late of course) making up my calendar pages for 2019 to put in my stamp room, I needed to make up a couple more of them as the time keeps on ticking…..

Vicki-TE-March and April Grumplings Calendar

LOL!  These cute Calendar Grumplings from Taylored Expressions so crack me up!  🙂

Oh I can’t believe we are getting ready to look into the month of March soon!  I think after having so much cold, ice and snow, I’m about ready to see some pretty flowers in my back yard! Yay!

Vicki-TE-March Grumplings Calendar

So here’s my March calendar and like the entire calendar card set, I’ve used the Taylor Expressions pre-made 3×4 Calendar set for 2019.  I’ve cut down this panel very slightly so that I could mat a black piece of cardstock behind it.

For the image area, I’ve used a rainbow die from Lawn Fawn and cut it out in several different colors to create rainbow strips which I’ve added to the backside of the black scallop frame from the TE Build A Scene – Calendar 2 die set.  I’ve also cut out a strip of grass from the Build A Scene – Calendar die set.  The sentiment (from the same stamp set) was stamped with black pigment ink and clear heat embossed over a strip of vellum which I cut into a banner with scissors and then attached it to the corner of the black frame.

Vicki-TE-March-Grumplings Calendar-close

Here’s a closer view of the image panel.  I colored the image with Copic markers and then cut it out with the coordinating TE Calendar Grumplings die set.   I’ve also added some Nuvo White Blizzard Glitter Drops over the clover.

Vicki-TE-April Grumplings Calendar

And here’s my April Calendar card using the same stamp set, coordinating dies and 2019 pre-printed calendar cards.  I slightly cut the edges to mat the blue cardstock behind it as well.  I’ve used this same color of cardstock to cut the frame from the TE Build A Scene – Calendar Dies.  I stamped the sentiment onto a strip of white cardstock and made a banner with my scissors and attached it behind the frame on the top left side.  (I’ve also used this same die set to cut a couple of clouds and sponged some gray ink at the bottom of each one.

For the bottom of the frame, I took a piece of vellum and cut out that piece from the Build A Scene – Calendar 2 dies.  I took a glitter brush pen to add some sparkle to this piece of vellum so it make it look like a “rain puddle” he’s standing in.

Vicki-TE-April Grumplings Calendar-close

For this elephant image, I also colored him up with Copic markers and cut him out with the coordinating dies.  I attached him along with the clouds over the panel where I wanted them to be.  I cut out some “rain drops” with vellum, but ended up not being able to see them very well, so I took the Nuvo White Blizzard Glitter Drops and went over them and then created more “rain drops” with it….I ended up liking that effect better, but I had already attached the vellum and just decided to leave it and go over them.  LOL!

There you go, that just tells you that I’m either getting old and my sight is failing me or I just have been continuously crafting until I’m blinding myself!!  ha!

I hope you’ve enjoyed my crafty makes today and I will be back again tomorrow to share a special post with you for a VERY special cause and I hope you can join me to share in this event!!  So please be sure to come back tomorrow!

Have a great Friday evening and thanks for dropping by!

It’s Critters at Cute Card Thursday!

Hello friends and happy Thursday!  We are getting ready to start the weekend and I’m ready to have some time to catch up on a few things!  How about you?  Do you have any plans for the weekend?

Today starts a new challenge over at Cute Card Thursday!  Yay!  The challenge for this week is probably a favorite of mine which is “critters“!  Looking forward to seeing all those critters in the gallery this week!  🙂

My project for today is another one of those that I had actually wanted to start last year, but of course it gets pushed aside for another day, so here’s the day I start!  When I went to a stamp convention this last Summer, I really enjoyed the vendor booth for Taylored Expressions and just fell in love with these grumpy critters:

vicki-cct566-critter calendar

LOL!  I plan on making myself this fun little calendar for my stamp room.  I also thought about making a couple more of them for some gifts too!  So here’s my start with them.  Really simple and fun little calendar cards to make up!  I have a die coming that will help to display all of the months which I will share later on.  So stayed tuned for up-coming Calendar months made with the Taylored Expressions Calendar Grumplings stamp set!

vicki-cct566-critter calendar-jan

So is this how we all feel when January rolls around?  LOL!

When I went to the stamp convention I picked up this package of the 2019 3×4 calendar cards that were pre-printed with a special little rectangle on top with a decorative background print on it.  This is where I’m using the spot to create my “calendar scenes”.  There are dies that you can get that fit these to help you create your designs.

So I took the unhappy/surprised kitty and colored him in with Copics and cut him out with the coordinating die.  I took the frame from the calendar scene die set to cut out a frame with black cardstock and then placed some ribbon behind it to make it appear like curtains. and then I had a speech bubble punch which I punched from white cardstock and stamped the sentiment over it and sponged around the edges with some gray ink.  I took some foam tape and popped the speech bubble up over the scene.  I mounted this card onto some coordinating colored cardstock.  I wanted to keep these smaller, but I could see this work for some really cute cards too!

vicki-cct566-critter calendar-feb

And here’s the February Calendar Critter with the grumpy love pig!! LOL!

I stamped, colored him in with Copics and a red gel pen for accents and cut him out with the coordinating die set.  I also took the frame die from the calendar scene die set and cut it out from some red glitter cardstock and attached it over the pink heart backround.

I then popped him up with foam tape and stamped the sentiment right next to him.  I took the heart sequins and glued them around the pig.  I used a gel pen to draw a heart around Valentine’s Day.  Lastly I layered this calendar onto a piece of coordinating pink cardstock.

Hope you’ve enjoyed my “Grumpy Calendar Critters” today and please be sure to stay tuned in for more months in the future!  Thanks so much for stopping in! 

Check out the Cute Card Thursday blog for more critter inspiration from the design team and enter your critter creations too!

Challenges:

  1.  Use Your Stuff – numbers (hope a calendar counts!)
  2. Crafty Creations – Anything Goes
  3. Crafting By Designs – Layer it Up