Hello friends and happy weekend to you! As we inch closer and closer to Thanksgiving at the end of this month, I think this is a perfect time to create a few thank you style cards to use throughout the year!
This brings us to a new monthly challenge over at Sparkles Monthly and we have the theme of “Thank you Card” this month. I look forward to seeing all of the projects in the gallery for this one. Here’s what I came up with:
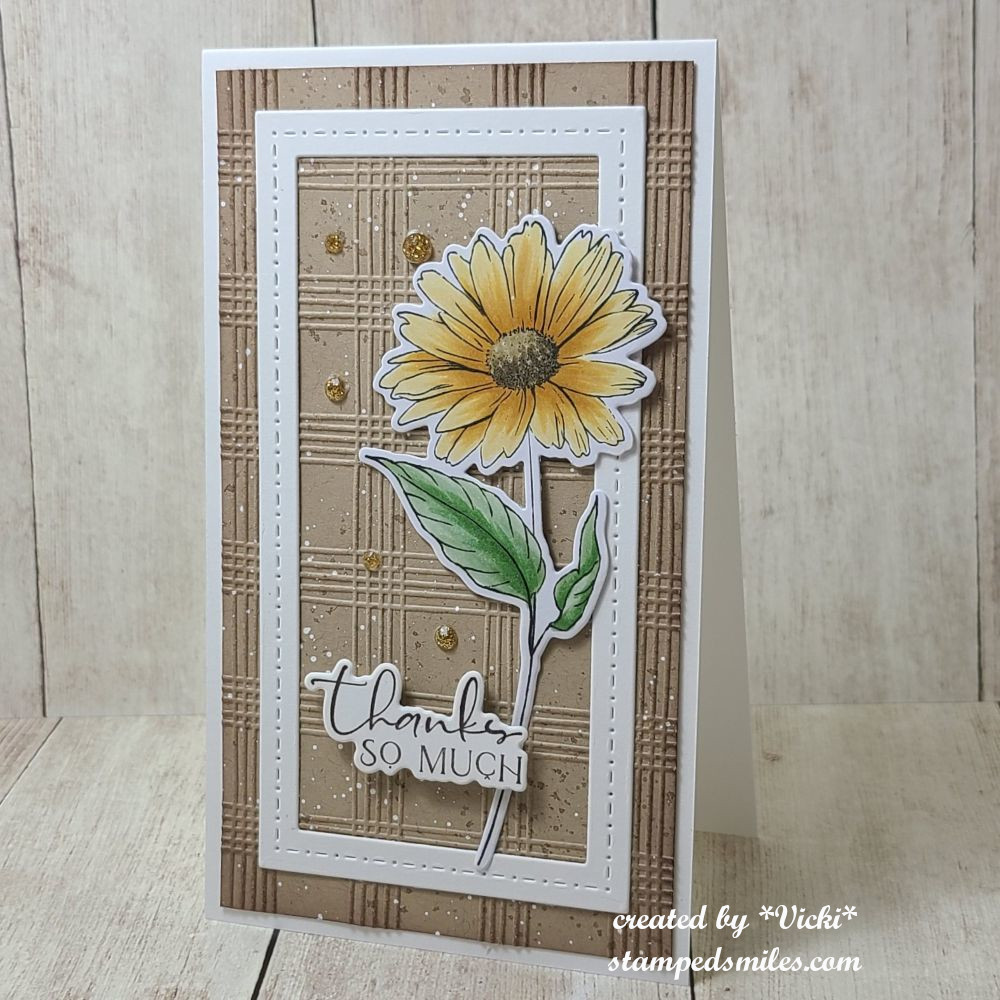
I thought I’d try out a mini slim sized card for this one and the tall larger flower was a great fit for it! I used the Taylored ExpressionsNatures Canvas Card kit (no longer available).
For the background panel, I embossed a kraft cardstock piece with the TE Sketched Plaid embossing folder and the went around the edges with the same color ink and then added some brown and white splatters before attaching it to a mini slim top folding card base. I also die cut a frame from the TE Mini Slim Frame in Frame dies out of white cardstock to place over the embossed layer.
I stamped, hand colored and die cut the flower. I used one of the greeting panels (from card kit) to gold foil and cut out the coordinating sentiment with it to pop up with foam tape over the flower stem. It was then finished off with some gold gem/rhinestones.
I hope you’ve been inspired by my thank you card and will join in the fun with us this month for the challenge! **NOTE** This will be my final project for the Sparkles Monthly Challenge as a design team member. I have enjoyed my time and wish Caz all of the best for the challenge blog in the coming year as well. Thank you!
Hello and happy Friday my friends! After things got heated up the last couple of days, I think I’m ready for a couple of days of cooler weather! I don’t want to skip Spring by going straight into a hot Summer! Hope you have some great things planned this weekend!
Today starts a new challenge over at the Alphabet Challenge Blog! We are now onto the letter “C” and the hostess has chosen “C” is for Circles *Remember that this is a bi-weekly challenge, so you have two weeks to enter* I hope you will find some time to play along! Here’s what I’ve created:
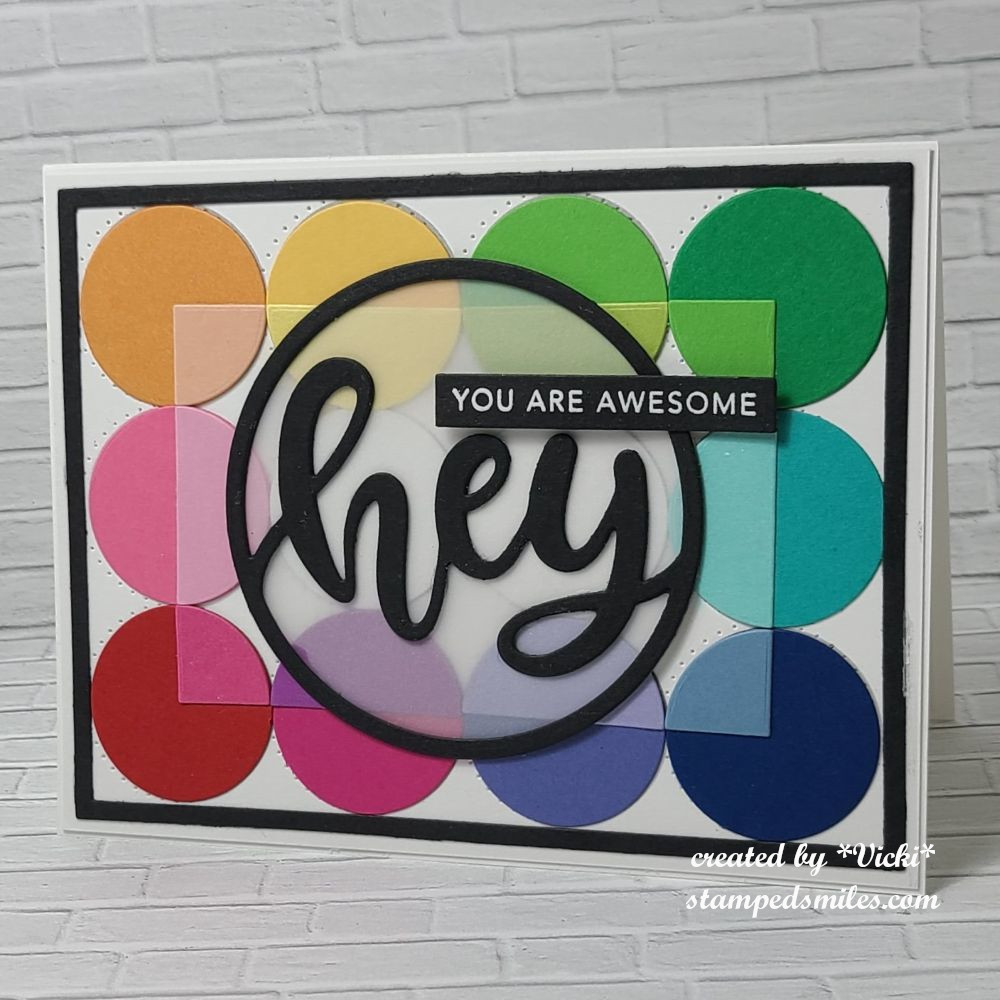
I do love me some circles and I thought I would just use them all over the place for this challenge! I pulled out my Taylored Expressions “Talking in Circles card kit” that came out earlier in the year and no longer available. However, the panel that I’ve used to create this design are still available in the store called “Talking in Circles A2 Sugar Cube Maps“. They make it easy to follow where placements need to be and lined up.
I used the TE A2 Thin Frame Cutting Plate for the black frame around the circles. I thought I would try and use another cutting plate, but the design pretty much covered it up. I layered this whole panel over a top folding A2 white card base.
For the sentiment in the center, I used another circle die from the TE, but I don’t think it’s in the store any longer. I cut the “HEY” circle out from black cardstock and layered some vellum behind it. I white heat embossed the “You are awesome” sentiment over black and cut that out with a Simply Strip die. This was popped up with a foam strip over the design.
Thanks so much for stopping over today! I hope you’ve enjoyed my card and you will take a hop on over to the challenge blog to see what the rest of the team has come up with.
See you soon! In case you need to know…you are awesome!
**THIS IS POST TWO OF TWO FOR TODAY! SCROLL BELOW TO SEE MY POST FOR THE GDT CREATIVE ARTISTE. THANK YOU!**
Hello friends and a happy November! I think that the last two months completely flew by and here we are getting closer to the end of the year…what?! I hope that you look forward to happy times ahead and lots of crafting fun too! I’m thankful you’re here with me, so let’s get this month started.
Today begins a new challenge over at the Mix It Up Challenge Blog and it’s always “Anything Goes with an optional theme“. The optional theme this time is “Paper Piecing“! (This challenge is open for 6 weeks, so you have plenty of time to enter!) Here’s what I came up with using this theme:
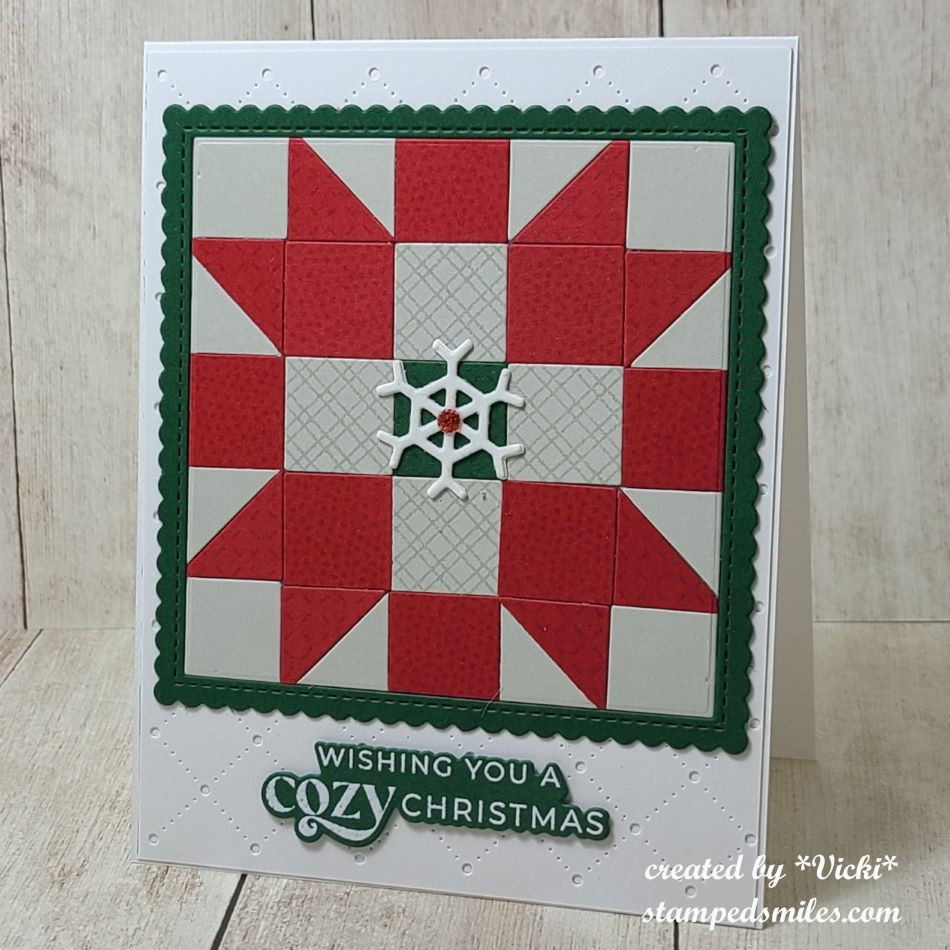
I absolutely love the look of quilts, but I like to keep my making of quilts done with paper! So I thought this theme would be great for making a quilt pattern design for Christmas. I normally paper piece stamped images, but I wanted to do something different this time and pull out more stash items and use them!
Several months ago, I purchased a card kit from Taylored Expressionscalled “Pieced Patterns” and I loved the concept of cut out squares attached over a “map” to follow along on how/where to place the squares. It’s really easy to piece different colors/patterns together to make a design. Some squares were also cut diagonal and I stamped a tone on tone pattern over some of the squares before they were cut out. Then they were placed over the “map” design and cut out with a square die. I also cut the stitched scallop frame to go around the square pattern. I die cut a white snowflake twice to layer in the center of the pattern and added a red gem in the middle of it.
I can see this might be fun with several different squares cut out ahead of time to place over the different “map” designs to create multiple design patterns ready for cards! It’s just a matter of taking the time to cut out all of the squares.
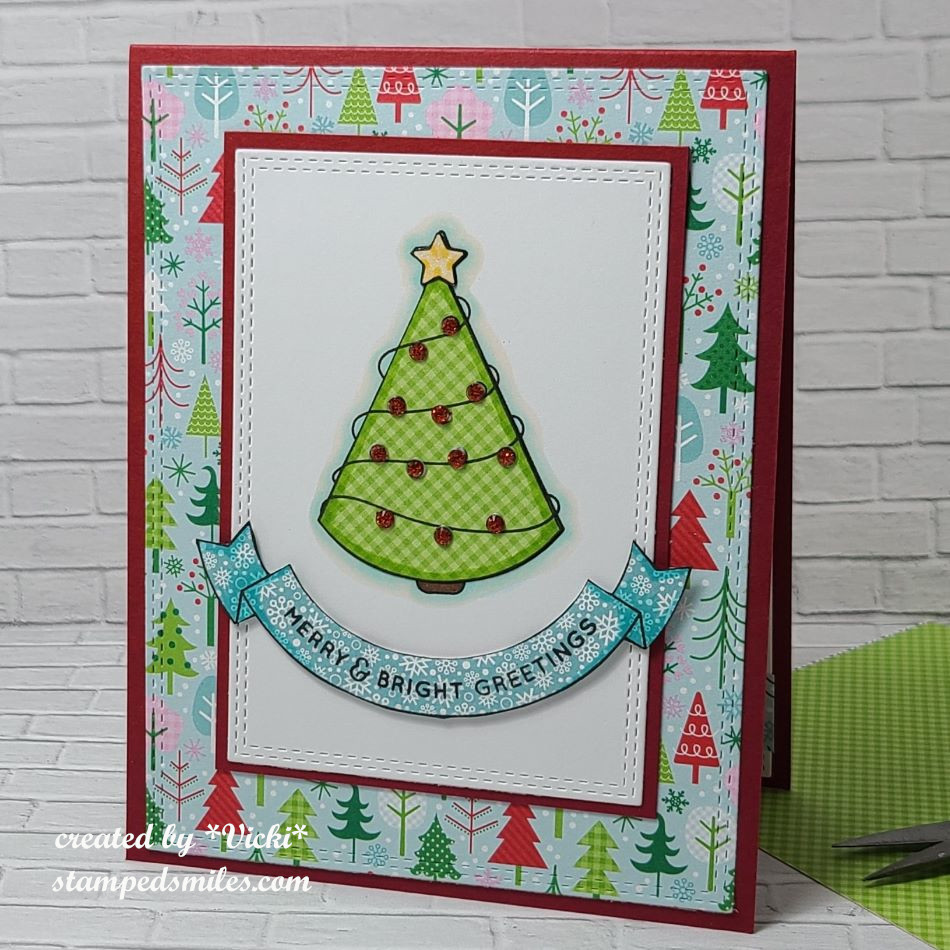
I have decided to create a “bonus” card using the same “paper piecing” technique, but with a stamped image this time…as we all need more Christmas cards, right?!
For this card, I pulled out an older card kit from my stash (2016) and used the Doodlebug pattern papers that was included with the kit. The papers are too cute not to use and hoarding them is not a good idea!
I stamped the tree onto a stitched white rectangle, then stamped the tree, star and banner over some of the pattern paper, carefully cut it out and attached it to the stamped tree and white panel. Before I attached the stamped pattern pieces, I used my Copics to color in the tree stump and outline around the tree. I also added some details to the pattern pieces for shading as well.
The banner was popped up with foam tape and I attached all the layers together over a top folding red A2 card base. All the cardstock/papers were included in the kit. I’ve added some red rhinestones on the tree where the ornaments were to finish it off.
Anyway, hope you’ve enjoyed all of my projects today and I hope you will take some time to check out the challenge blog to see what the other talented designers have made. I look forward to seeing what you make! Have a great day!
Hello friends! Have you’ve been enjoying the month of July so far? We finally got some rains, but now it’s humid and warmer. That’s OK because it’s always warm this time of year anyway and a great time for crafting indoors with the air conditoning!
Today starts up a new challenge for the Sparkles Forum Monthly Challenge Blog with the theme: Christmas in July! It’s a favorite for many card makers this month so that they can get an early start on those Christmas cards without having to wait last minute to get them all done. I don’t have an outrageous amount to send out, but I do like to donate and I have done 5 Christmas so far! So if you’re up for it, make a Christmas card and join the gallery at the challenge! Here’s the card that I’ve made:
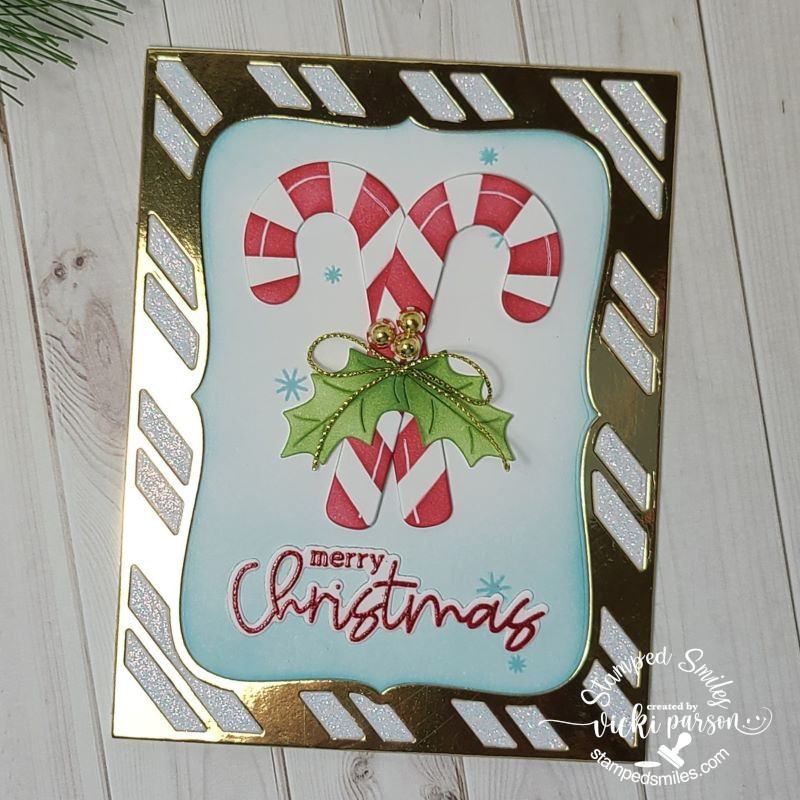
There’s nothing like the smell of peppermint for Christmas (for me anyway!) I had gotten this Candy Cane Lane card kit from Taylored Expressions last year and never really used it, so I thought this would be a good time to pull it out.
In the set, there came this cover plate die and I cut it out in the following, gold mirror, white glitter and white cardstock in A2 sizes. I paper pieced each one over an A2 sized white card base front. I added some light blue ink blending around the edges and bottom of the center panel and stamped a few “snowflakes” in the same color.
I die cut the candy canes and leaves and ink blended/stenciled those stacked together. I used a white gel pen for the highlight over the canes, added a gold cord bow and some gold drip drops for the “berries”. There was a stamp set with sentiments that I stamped out in red and then went over top of it with VersaMark ink so that I could emboss some Peppermint smelling embossing powder over it…that’s where the smell of peppermint came in for me! I die cut it out with the coordinating die and glued it at the bottom of the candy canes.
Hope you can join the challenge with your Christmas cards this month! Thanks so much for dropping in today!
Hello friends! I hope you’re having a great week! We got a tiny break from the hot weather, so I had to spend the last few days enjoying it and was happy to get away from being indoors! Now as the temps climb back up, it’s time to get busy and craft some more!😃
As promised, I’m catching up with my postings to share the wedding invites, thank you cards and special wedding card I made from my son’s June wedding. I made them a few months back, obviously, but I thought it would be nice to condense it altogether here in one posting.
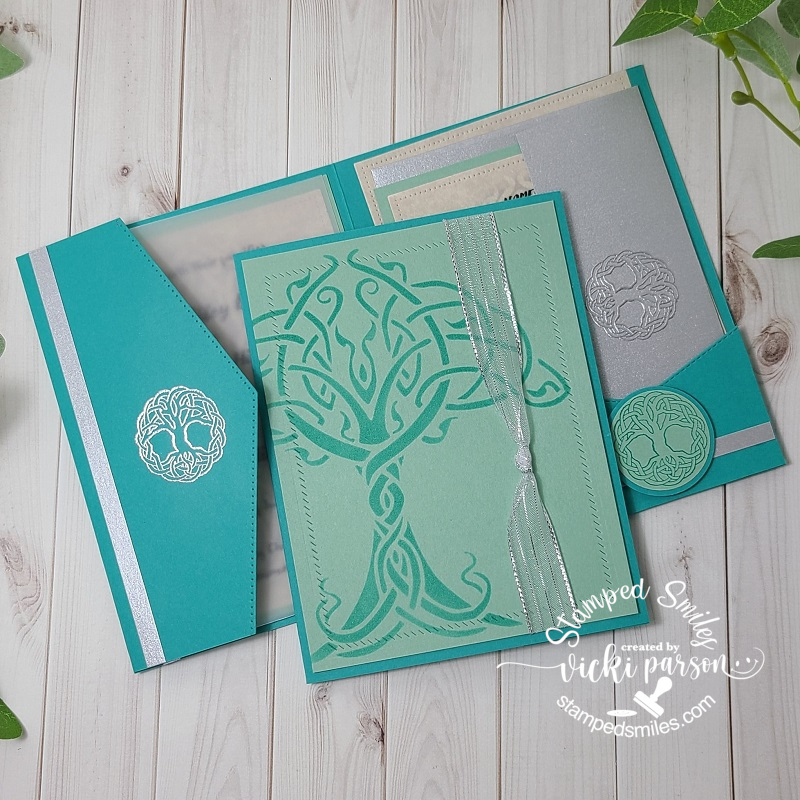
The couple had asked for me to make their invites for them and of course it was a great honor to be able to do that for them. I was given a photo of an image and was educated about the “Tree of Life” to incorporate that into a design as well as a sample of some color shades. Making a total of 50, here’s what I came up with:
I was able to find some similar Stampin’ Up! colors that closely resembled the samples given and come up with Bermuda Bay and Mint Macaron for the design. I wanted both the ink and cardstock colors and worked it out from there.
For the base of the design, I’ve used the darker Bermuda Bay and on the front panel, I used a piece of Mint Macaron with a stenciled “tree of life” over top of it with Bermuda Bay ink. I actually found a fairly inexpensive stencil on Amazon and thought it looked very similar to the image I was given and thought it would be perfect for the front with a partial side off the edge. I never inked up 50 panels before, but this stencil certainly got a workout! I was thinking it needed a bit more to it than just the stenciling, but I didn’t want to do too much with having 50 to make! I took the Taylored Expressions Diagonal Stitched Rectangle die to impress a design around the edge, wrapped silver ribbon around the front with the knot and layered it over the front of the invite.
So being happy with that, the hardest task was to figure out the inside details….
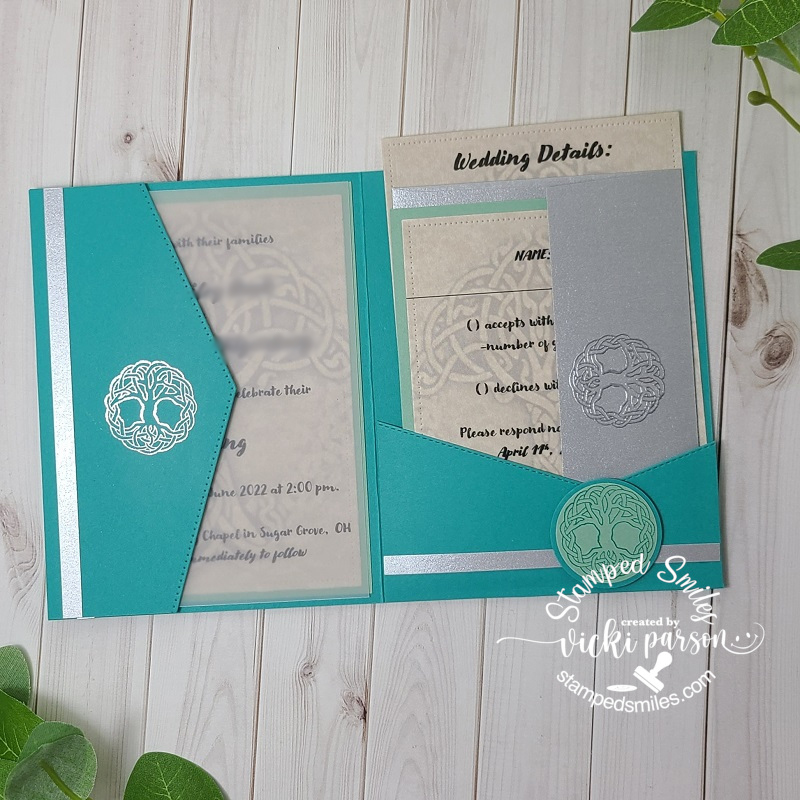
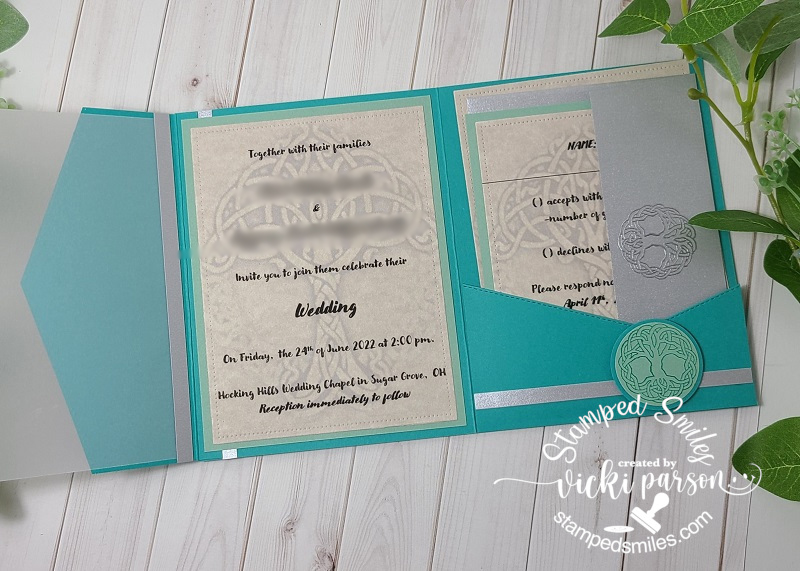
I wanted to make the inside a portfolio style with a pocket containing the wedding details as well as the RSVP/envelope inside and then the actual “announcement” on the other side. As I was piecing it together, I thought a decorative flap with some vellum would be pretty over the announcement too.
I’ve used the Stampin’ Up! Basic Borders die set to die cut the pocket front as well as the vellum flap on the left side. I had to adhere two Bermuda Bay card panels together and cut out the areas I didn’t need. (I ended up using the left over pieces to punch out a circle layer. To add a bit more of a decorative detail, I cut strips of silver cardstock as well as silver heat emboss the “tree of life” circle stamp. (I was happy to also find this really inexpensive rubber stamp image for a couple of dollars to use for this too!) For the image on the pocket area, it was stamped with Bermuda Bay over the Mint Macaron cardstock, layered with that left over Bermuda Bay circle punched pieces and popped up with foam squares over the silver strip. I was happy with how the portfolio design was working.
And now once you open up the vellum flap on the left side, you will see the announcement portion. The silver strips were strategically placed to cover up where all of the layers are glued/attached together, but still looks like it “belongs” there. The image that was given to me via digital photo was used at the “back drop” behind the wording. It was a very bright image that I altered on my computer and muted it down so that it was faded in the background, but yet still clearly visible on the design. I thought it worked out nicely and still coordinated with the stenciled area on the front.
Because this invite was so thick in nature, I didn’t want to add more layers of cardstock, so I used a thinner parchment style copy paper as everything was printed out from the computer anyway. The parchment made it feel a bit more professional I thought. I die cut ALL of the printed parchment pieces with a Lawn Fawn RETIRED Small Dotted Rectangle dies. (I thought the “small dots” went with the SU! edges I used on the flaps.) I placed the announcement over a piece of Mint Macaron and then layered it inside the card. I layered the RSVP card over a piece of Mint Macaron and the “wedding details” card was left on its own.
Finally, you can see that on the silver envelope flaps, I silver heat embossed the image. This was also done for the larger silver envelopes for the whole invite to fit in as well. I even used the “Tree of Life” computer generated image to create some address sticker labels for them and give them extras ones to use.
Of course, after the wedding, you need to send out the thank you cards, so I also made 50 of those….
I really didn’t want to event a new wheel with it, so I had plenty of cardstock colors and just repeated the same design on the front as I did with the invites except for this one, I used the Taylored Expressions On Occasion stamps. I stamped them out with the Bermuda Bay over the Mint Macaron cardstock, cut it out with the coordinating dies and popped it up with foam tape over the silver ribbon. Stenciling another 50 panels with this same stencil gave it another work out yet!
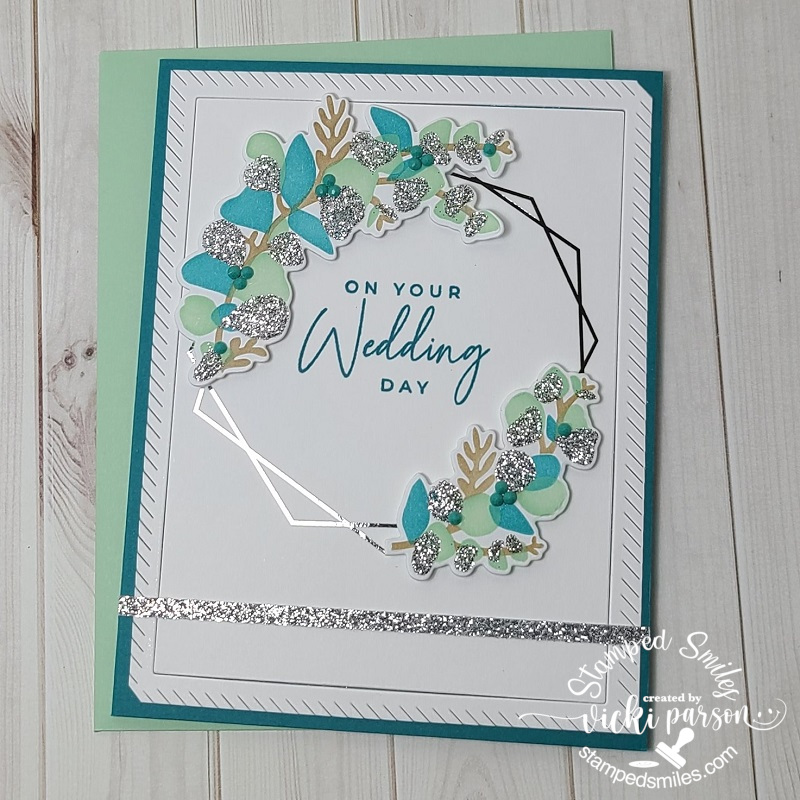
So, for the actual day of their wedding, this is the card I made FOR the couple. I was able to get a little more “intense” with this one as it was only ONE card!
I was so excited when I saw this stunning card kit come out from Taylored Expressions called “Modern Eucalyptus” (no longer available) and I thought it was the perfect colors to create something with for their wedding. The white panel was silver foiled and then I stenciled the colors of the wreath pieces, stenciled some silver paste, die cut them out and popped them up over the foiled wreath. I stamped the sentiment in the center, added some TE Tiny Diamonds to some areas and cut a strip of silver glitter cardstock to go across the bottom.
Around the edge of the panel, I used a free gift that I got with purchasing items and tried it out and on my panel without realizing that it cut the center. I went ahead and attached it down anyway as I liked the decorative look to it. I had a matching envelope and off we went to the wedding!!!!!
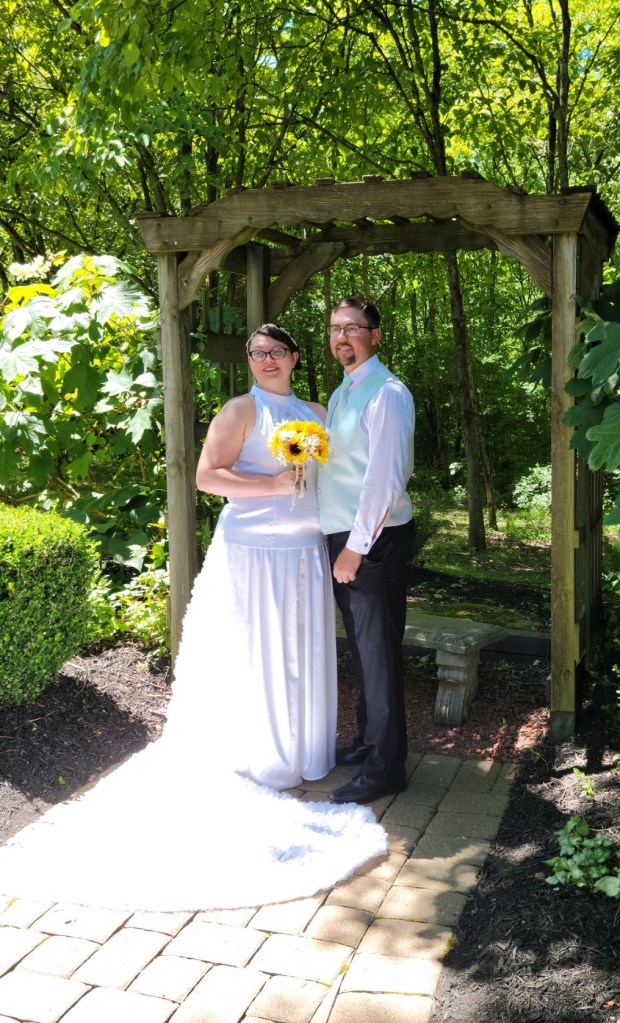
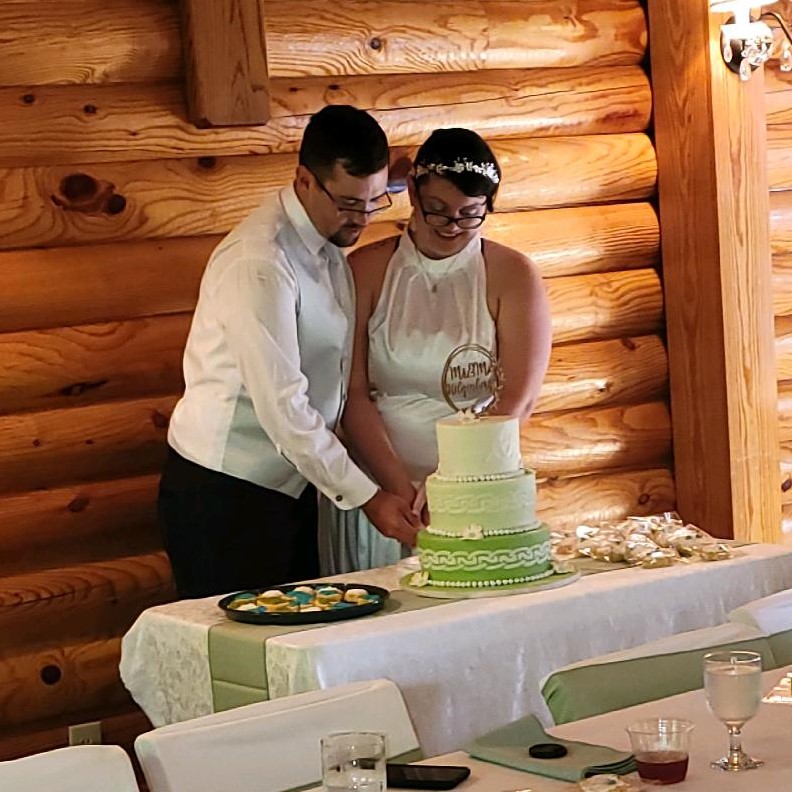
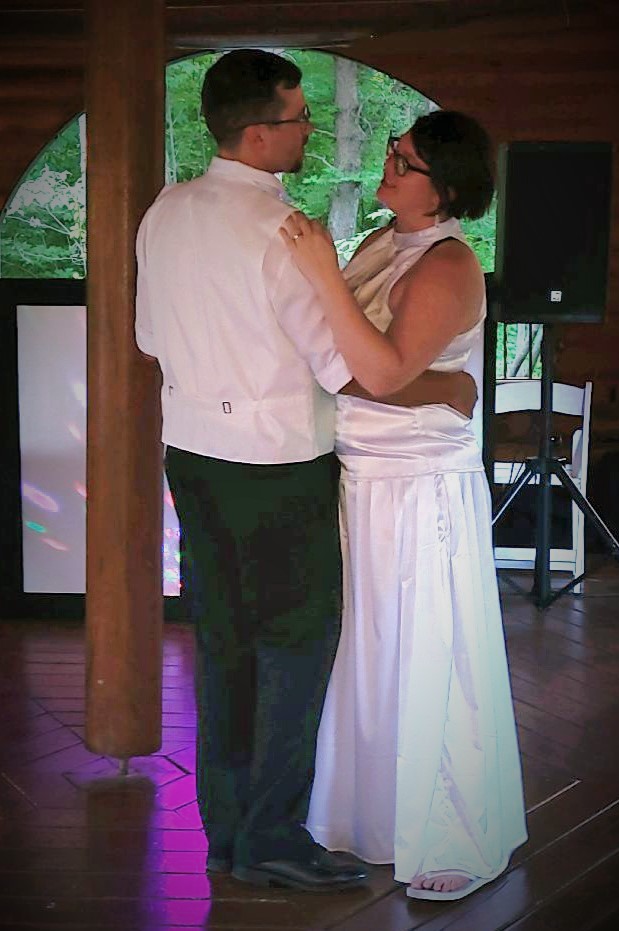
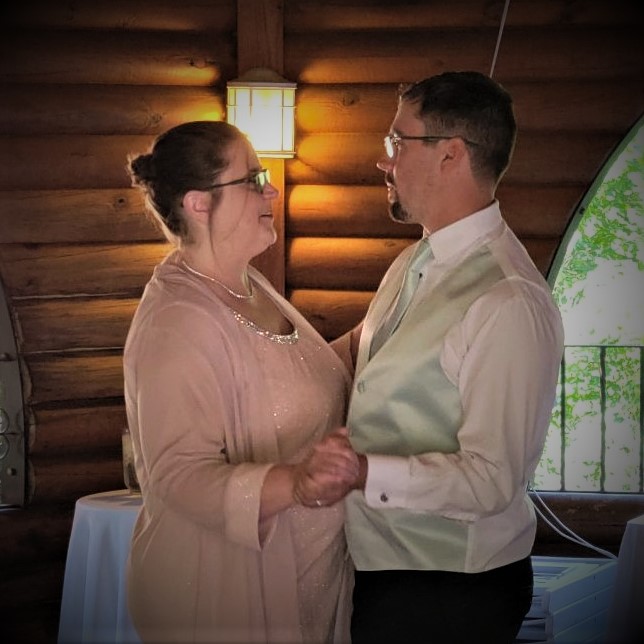
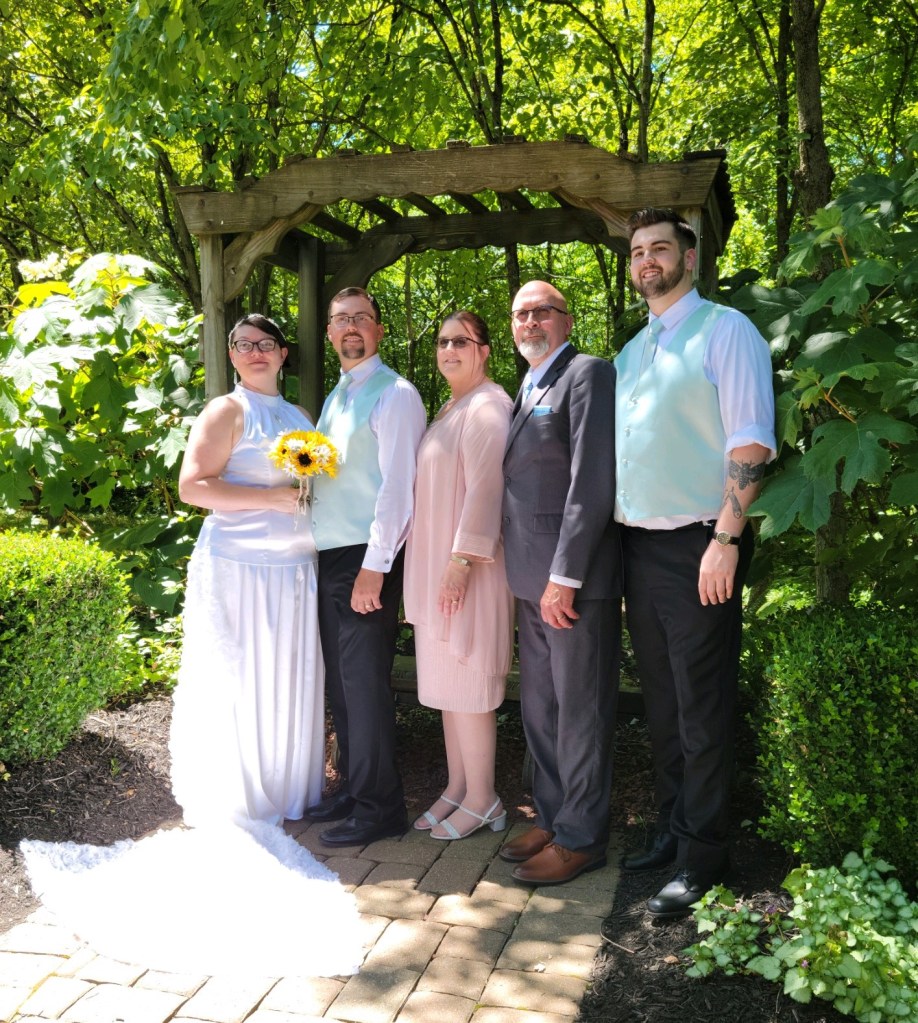
The couple was married in Hocking Hills (Ohio State Park area) and it was absolutely beautiful over there! The venue they used only had a certain capacity limit and so this is why there were only 50 invitations that went out. It was a very nice private wedding with everything done and organized for them. I do not have any professional photos of the wedding as of yet, but I had to rely on my husband for taking a few photos on his phone and then handing the phone to someone for photos as well…my dress didn’t allow me for handy phone carrying. LOL But here a just a few photos (not professional) of the wedding.
As being a first time “mom of the groom”, it is quite an experience and very emotional especially when my son picks out a song for our dance with a song I used to sing to him as a baby in my belly! We both had tears!! LOL It was such a joyous occasion and I’m thrilled to welcome our new family into our lives for years to come! May they always feel the joy and love together for ever after!
Hope you’ve enjoyed my wedding post today and have been inspired in some way to brighten your day. I thank you so much for taking the time to stop in and say hello! It means so much to me! See you soon!
Challenges:
Crafty Friends – Embossing Wet/Dry (heat embossed on invites)
Hello friends! I have LOTS to catch up on with all of the blogging of projects that I’ve been working on over the last few months, so I will probably share several projects within one post until I can get caught up!
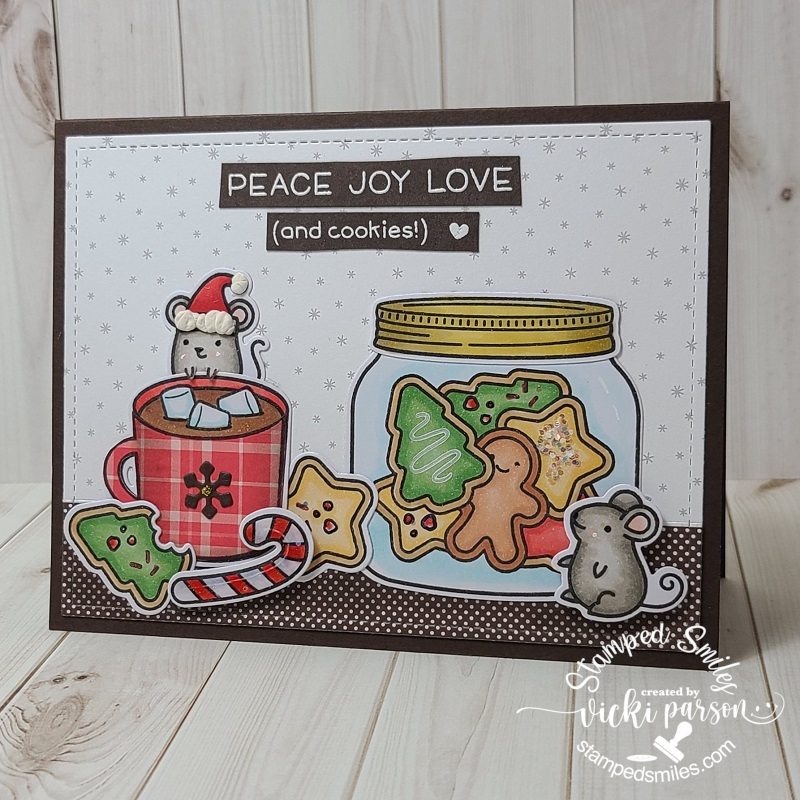
I know that Christmas in July is going on everywhere right now, so I thought I’d share that along with a few other projects I had going on during my “Lawn Fawn Fever” episode! I have loved their cute little critters for so long and hope you enjoy what I’ve made:
It’s been a while since I even played along with a Lawn Fawnatics challenge, so I decided to join this one which is asking to see your Lawn Fawn “Fun with Food” challenge projects. What could be more fun than sharing Christmas cookies?! I’m not sure I’d share any with mice…but these guys are too cute and add some more fun to the scene. They’re a bit older and I know I’ve had the set for several years as it was one of the STAMPtember sets called “Merry Christmouse“.
I used some older Lawn Fawn papers from my stash to create the table and backdrop setting and then cut it out with the Lawn Fawn Outside In Rectangle dies. I used the following sets which include the one mentioned above for my scene: How You Bean?, How You Bean? Christmas Cookie Add On, and Thanks a latte. I Copic colored them and even added a few stamped images over the cookies including some Chunky Glitter.
For the mouse hanging over the hot cocoa cup, I cut around his arms to fit over the cup. I popped up the candy cane as well at the mouse next to the jar for depth on the scene. I added some touches of glitter and then on the mouse Santa hat, I took some liquid applique and heated it up until it was puffy. The sentiment was white heat embossed over the dark chocolate cardstock and then I just used my scissors to cut it out and attach at the top. Really fun scene to create!
I also took part on Friday with the “Hive Five Kit” class they did using the adorable new Hive Five card kit they came out with recently.
For the first card, I made my sentiment too high, so I had to “arrange it” how it worked for me, and I wanted it to be a birthday card instead. The other project was just the hexagon tag. I changed mine into a shaker and then added to a card. I also added the speech bubble on this one.
The products included with the card kit were really fun and I’m glad I got it!
The majority of this card came from a fun little kit that my sweet blog friend Shirleygifted me included with a SWAP that I was in with her. (Details of that are below.) Really love that she included the backdrop for the sky which worked out perfectly! I actually already purchased this awesome Lawn Fawn Platform Pop-Up die along with the Platform Pop-Up Add-on and the Upon a Star stamp set and dies, but she was so very kind to have all of these pieces already stamped and cut out for me! I just colored in the critters and the stars, added a few more here and there along with some glitter, white heat embossed the sentiment over the navy cardstock and put it together.
I hadn’t even broken out my Platform die at the time, so this was my first time putting one together! It looks a little more intimidating than what it really is, so I had lots of fun with it! Thanks so much for sharing the fun with me my friend! I can’t wait to attempt another one soon! (Thanks for helping me with my addiction! 😁)
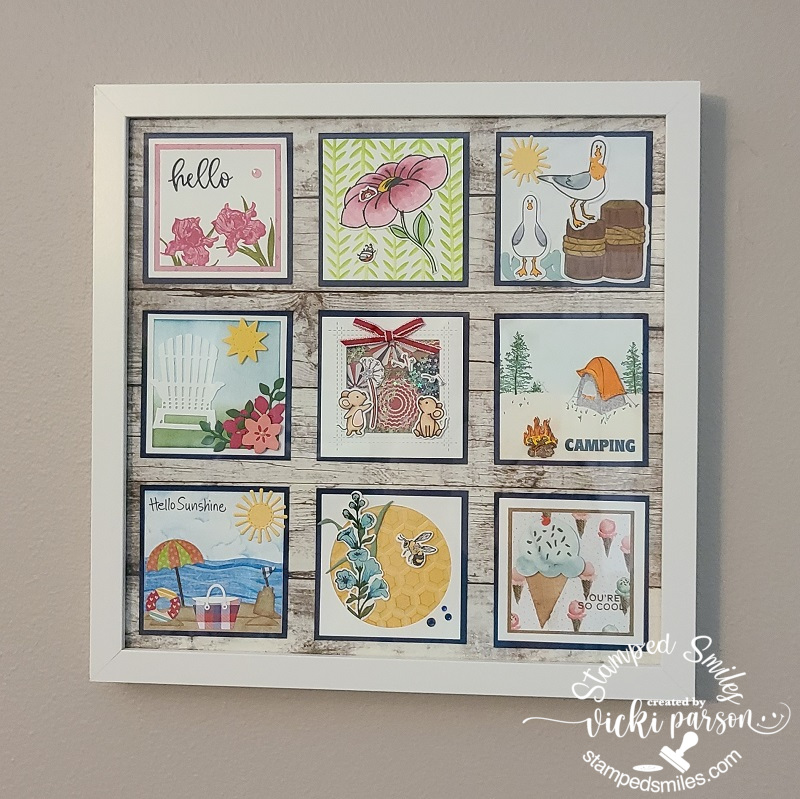
And as I had mentioned above, I was asked if I’d be interested in joining this “Summer Sampler SWAP” with my wonderful blog friends Patti, Shirley and Donna along with a few other ladies to take part with! When it was described to me, I quickly realized that I had seen these 12″ x 12″ sized papercraft stamped samplers all over Pinterest. Of course, I had thought to myself that would be fun to create and never did.
Each square is 3-1/4″ and we each were to use the same color for the back layer so it was all similar for the finished project to coordinate well. So 9 of us created 9 squares, kept one for ourselves and then mailed out the others to each person in the swap. Really fun to see everyone’s idea here with the theme of “SUMMER” too! I love them all and thought how fun that each one is so different from the others!
This is my finished 12″ x 12″ shadow box framed piece with everyone’s squares that I’ve attached to a wood panel background paper. I have it hanging on the wall. I think this would be so fun for each season or even gifts! Hope we can do another one!😉
And here’s the square that I did for the swap. I zoomed in to take the photo and it’s behind the glass, so it’s not a real great look at it, but as you see, I’ve used Lawn Fawn again! LOL
I had some fun 4th of July papers and thought it would be neat to make somewhat of a shaker element with confetti stars. I’ve used the Lawn Fawn Dandy Day Flip Flop set along with a mouse from the Bubbles of Joy set for the front of my square. I was trying to give the impression that the mouse had a sparkler, and the sparks were flying while the other mouse was enjoying the show. I used glitter and die cut a star from silver glitter cardstock for the center of the dandelion. I added a red bow at the top. I thought with using a shadow box frame that the dimension wouldn’t be an issue and it wasn’t.
There’s always something fun to keep me hopping, so I know you’ll see more soon including the wedding & painting class projects! I promise I’ll get there! Thanks for dropping by!!
Double Trouble – Christmas in July Thing 1, Thing 2 & Thing 3 (I’ve used old stamp sets, papers and added some fun bling on my cookies -plus added to the partner challenge in first card!)
Hello friends! Really hope that you’re having a great week as we start to dip down into cooler temps and that means that Autumn is coming to a close (sadly) and winter is upon us along with Christmas! Are you ready? I’m working on things…that’s all I can say! I need to get more motivated for sure! Many things are already done, but it’s the double checking to make sure…and sometimes it’s not! LOL
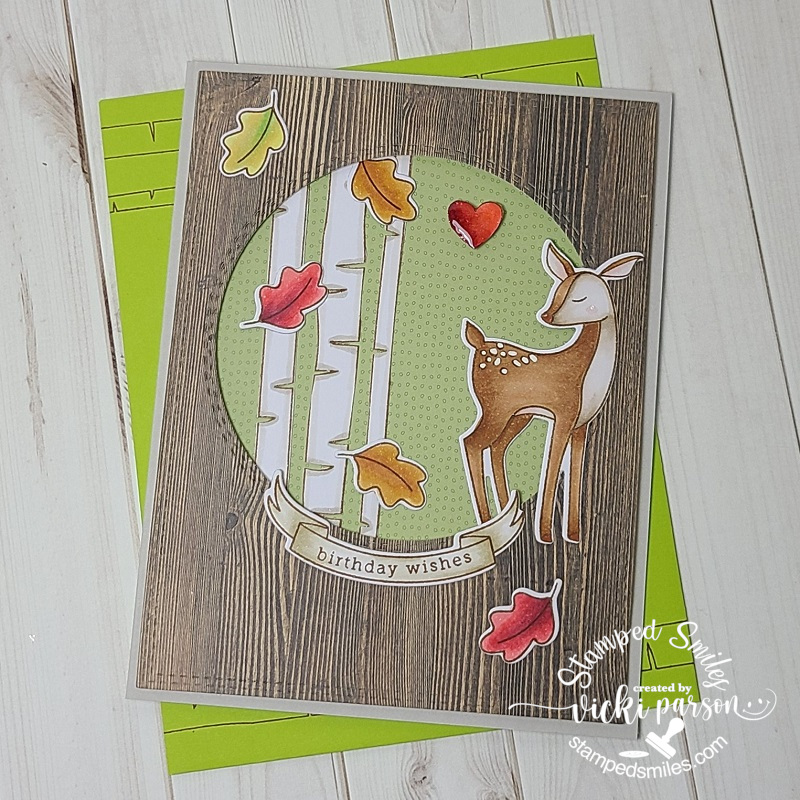
Recently, I needed to make a birthday card for hubby, so I pulled out a card kit I had from last year and came up with this one for him:
This was a really fun one to do from the Simon Says Stamp Woodland Whimsy card kit from last year. (I linked the stamp set and dies still available.) My husband is a huge fan of outdoor wilderness and especially deer in the Autumn season as they can be easier to spot with the falling leaves. So it just seemed like the type of card to make suited for him.
I’ve colored in all of the images with Copic markers and die cut them out with the exception of the birch trees as there were no dies included with the set. I placed them behind my die cut circle from the woodgrain paper included with the kit. I backed it with another piece of the paper from the kit as well. I even tucked in the back part of the deer’s feet along with a leaf to make it part of the scene. I like the banner from the set which is left blank so that you can add whatever greeting you want with it.
The little heart above the deer was also fussy cut out and then I covered it with a glitter brush pen as well as some crystal effects over top for the shine. I thought about adding some sequins, but decided it wasn’t needed. The scene was layered over a piece of cardstock included with the kit and then I stamped some of the birch trees onto a coordinating envelope as well.
Also thought I’d share some other projects that I’ve been working on since my last post. It seems that I’ve become a little addicted to taking those classes and events…honestly don’t need to be taking them, but sometimes it’s just fun to participate in the fun with fellow crafters! I do enjoy sharing with those like-minded crafters like me! 😁
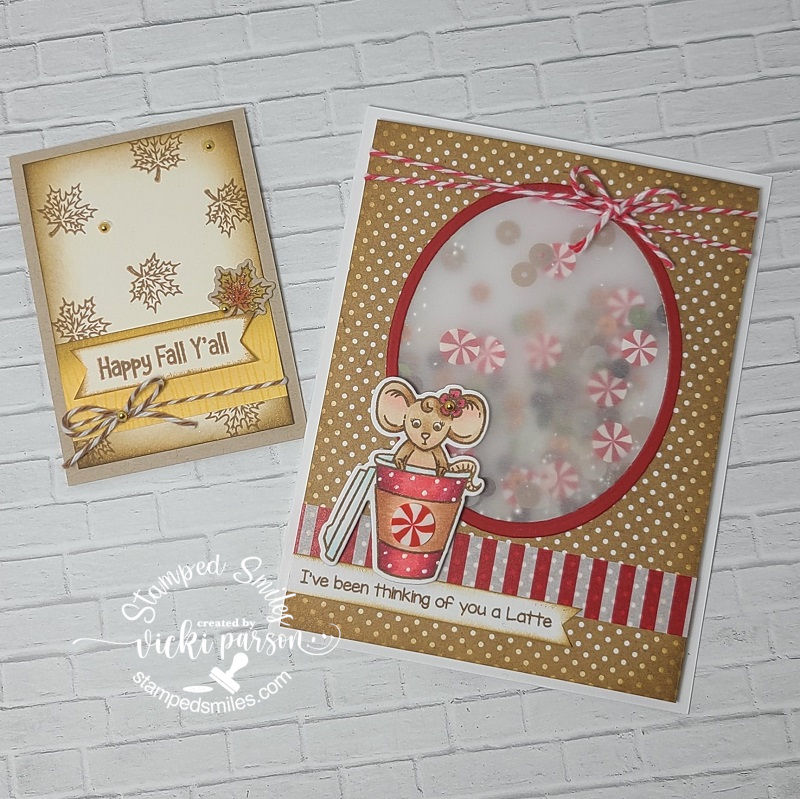
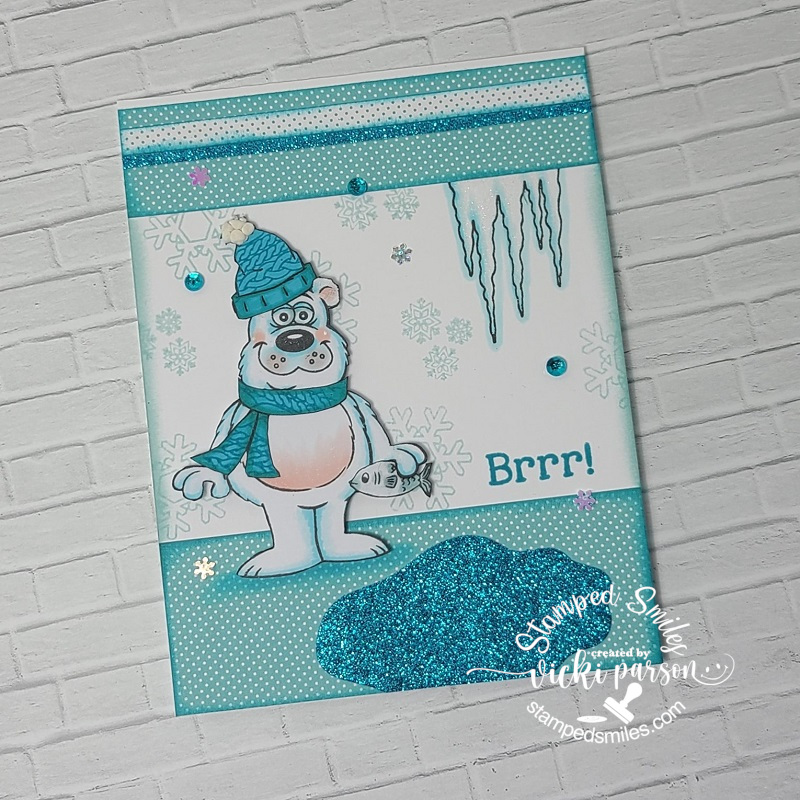
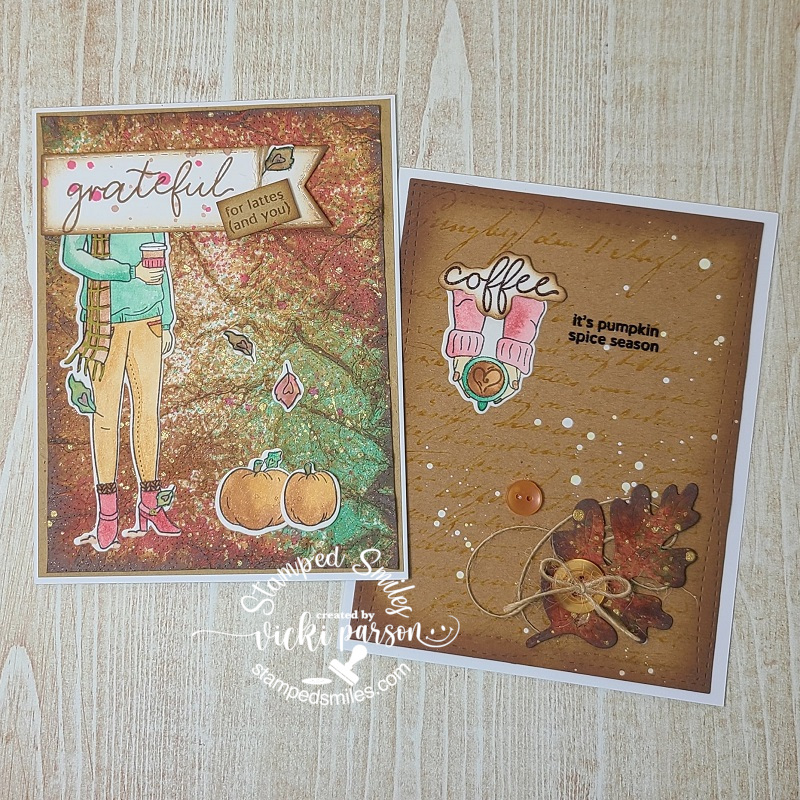
These are all projects I’ve made using products from Inky Stamper. ***If you are on my website, just click on the photos to enlarge them to see better and the wording will also be more visible.
These are projects we made during a “Game Night” event! Cute fun fold card, a mini card and the little round container is decorated with a deck of circle playing cards inside! It has a magnetic closure! Super fun event!This is a set of projects made during an OOAK event class with Chelsea from Inky Stamper. We made the fun vellum shaker card and the mini Fall card with this class. The kit is still available in the store here – Peppermint Mocha Latte KitThis card was made up by me for the Inky Stamper Inkspiration FB Group using the colors Blue and White for this month’s challenge. I used “Bear” for my main image.
I’ve also been working on some Christmas things that I will share soon as well as some other requested commissioned cards that I’ve recently finished. I would like to get those Christmas cards finished up early for a change! How about you?! Are you all done creating for the Holidays yet?
Until next time, thanks for stopping in today friends!
Hello friends! Happy October! I hope that you’re having a great week so far and looking forward to doing something crafty this weekend for World Card Making Day!!🌍😀 I have decided to post something a bit early as I know there will be tons and tons of special posts planned by many, so I thought it best to post today instead!
IN THE MEANTIME, I DO HAVE A FUN GIVEWAY LOCATED ON MY POST BELOW OR CLICK HERE TO SEE IT!! YOU HAVE UNTIL OCTOBER 10th TO ENTER…JUST LEAVE ME A COMMENT THAT YOU’RE INTERESTED!!
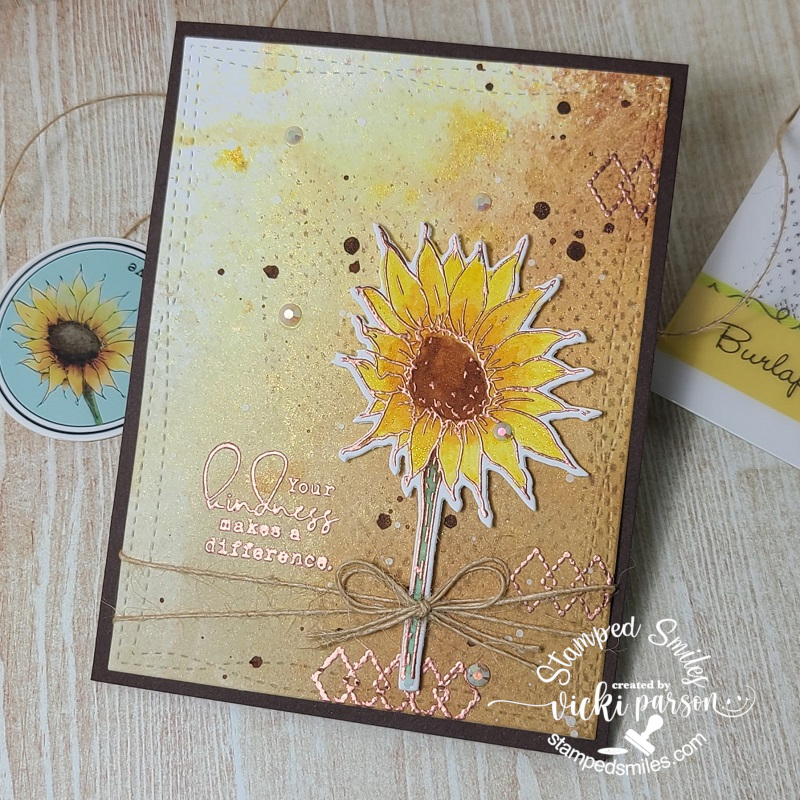
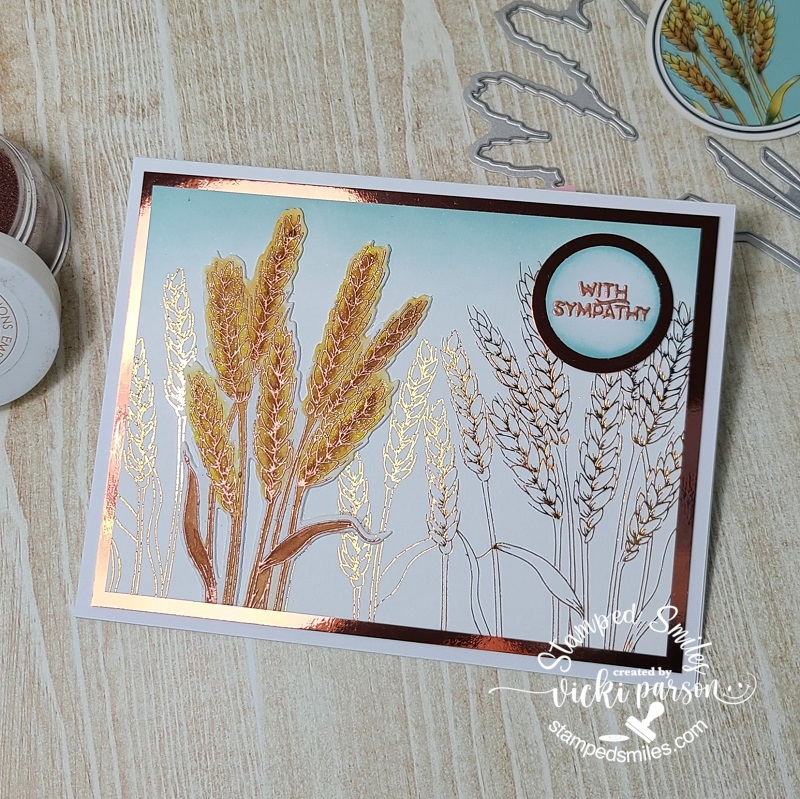
There are SO MANY things going on this time of the year and maybe that’s why I love Autumn so much. (WCD, Halloween, birthday, Cooler temps, warm clothes, Harvest, yummy foods, pretty colors, changing leaves, Halloween…oops already said that…but you know!) I am thankful for all of it! I have a couple of cards from a TE kit I recently got (yes, I know…another one to pile on!), but I fell in love with it so much & I am using it right away! 😁
There is some copper EP that comes in the kit, so I heat embossed both the sunflower and wheat images together so that I could color them both at the same time with some watercolor. I then cut them both out with the coordinating dies and set aside to work on my background.
The background was so fun! I’ve used a Bristol Smooth watercolor panel and pulled out some Mica Stains and other sprays from my stash with a spray bottle filled with water and just played. Some of it I splattered to make “dots”. I used the “Burlap” background stamp in the kit and randomly stamped the background as well as heat embossed an element and sentiment from the stamp set. I cut this panel with a die and wrapped some twine around it before attaching to a chocolate truffle card base. I used some foam strips to pop up the flower and added a twine bow to it. Finished it off with some Iridescent Rhinestones.
And this is the second card I’ve made using the wheat image that I previously colored with the sunflower image above. What’s nice about this card is that the background was done using one of the foilable panels from the kit. I found some copper foil and ran it through my laminator. I lined up the cut out wheat image with the background and glued it over top cutting off the bottom portion that stuck out. I also heat embossed a sentiment from the TE clear set in my stash and then punched it out with a circle punch. I used my blender brush to very lightly add some Sea Salt ink at the top of the foiled panel as well as around the sentiment circle.
Lastly, I attached both the image and sentiment panels onto a piece of copper foil cardstock and then mounted it onto a side folding A2 white card base. It was simple, but I like the shine it gives.
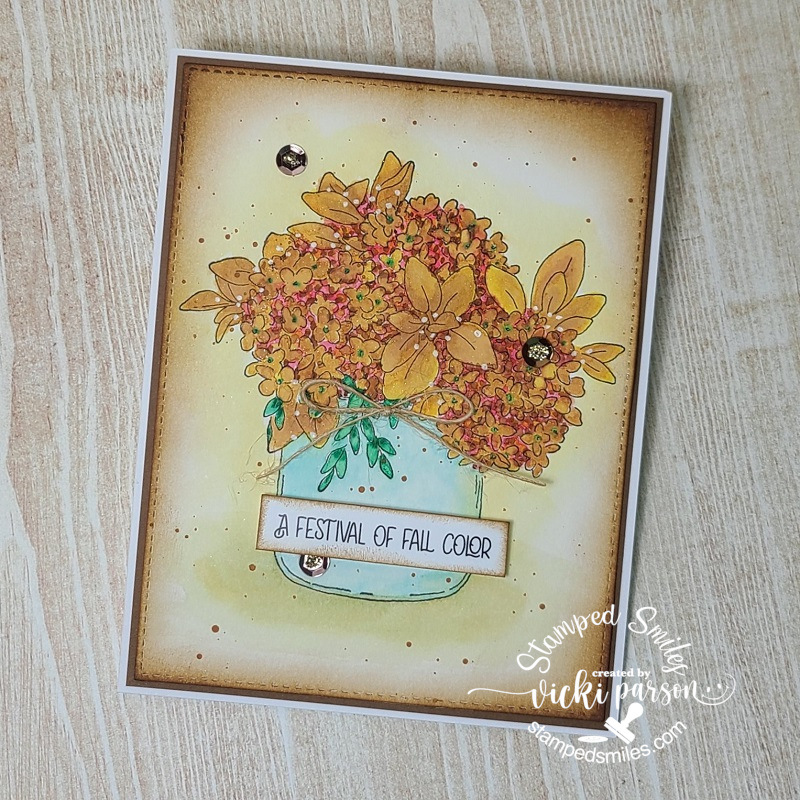
I had been discussing with someone recently how I really need to make more sympathy cards to have on hand…so here’s a start to getting a pile going hopefully.
Speaking of needing cards, all of the birthday cards from my last post have been spoken for! Everyone seems to really need birthday cards and like having them on hand. I can totally relate to that! I think I need to get some “sorry I forgot” ones thrown in there too! 😂
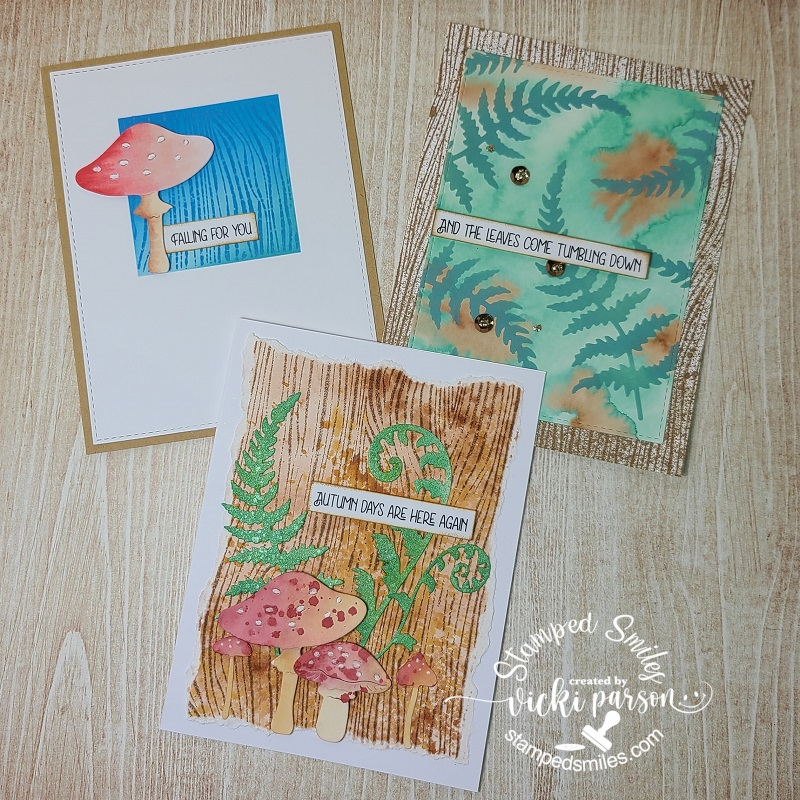
I still have some projects that I’ve been working on in the background from some classes I took over the Summer but still haven’t shared yet, so I thought I’d start a little bit at a time and I think these “Autumn themed” cards work with my post today: (If you’re seeing this post on my website, just click on the photos below in the gallery to see them up close.)
These projects were from a class taught by Daniel West for Hero Arts and we received a large woodgrain background stamp for the class. It was fun to make the backgrounds!This is an image from Impression Obsession that was more of a “Spring like” image, but changing up the colors for Fall gave it a different look. I sponged around the image and panel and added some splatters.This was a Simon Says Stamp class using an older stamp set. We used some sprays and also colored with them for the images.
I have taken SO MANY classes, so I still have many more projects to share as I go here! Hope that you enjoy seeing what I’ve been up to! It’s just fun to play around and in the process…no matter how little a piece I use…I am using my stash somehow and I’m very happy about that! At least I’m still crafting anyway! LOL
Thanks for dropping in and have a great crafty weekend!
Hello friends! I hope that you’ve had a great weekend! The weather has really started to cool down over the weekend and I can feel the Autumn breeze in the air right now!
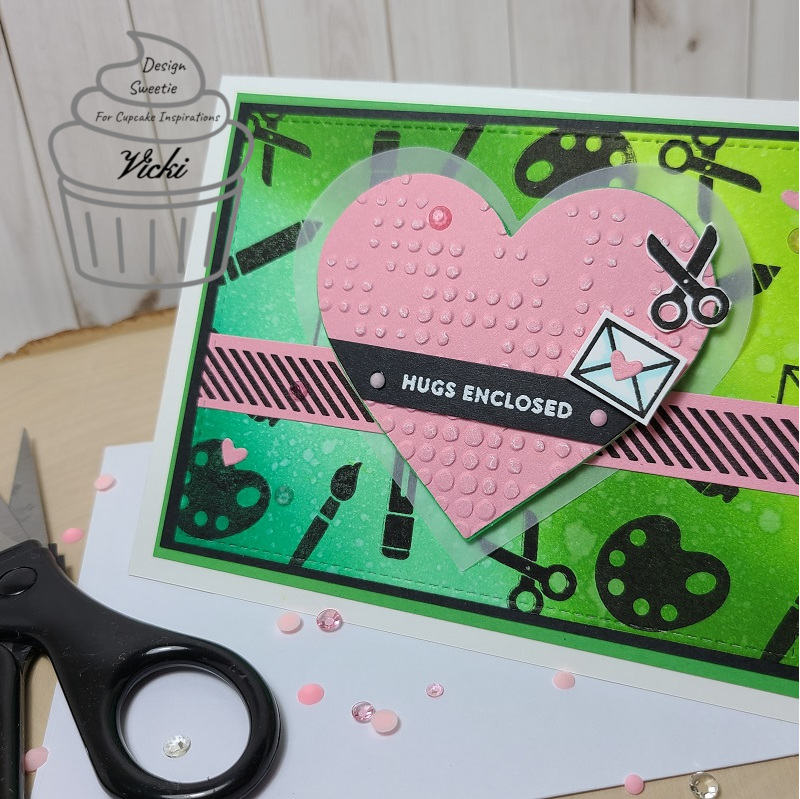
I’m swinging in today to remind you about our current color combo challenge over at {Cupcake Inspirations} and the second card I’ve made using the colors GREEN, PINK and LIME:
If you remember my card from last week, I had so much fun blending the green ink colors on the grass, I thought I’d continue with another panel of the ink blending on this background too! I also spritzed it with water and then once it was dry, I stamped the images from a Simon Says Stamp Crafty Friend stamp set with black ink. I’ve used the stamp set throughout the card with the cut out scissors and envelope accents and the strip across the pink piece too.
I did white heat emboss the sentiment from the stamp set over the black strip on the heart. I used just a set of Hero Arts Inifinity Heart dies to cut out the pink heart and another will vellum behind the heart and pink strip. The pink heart was popped up with craft foam and so was that little envelope over top of it. I did run the pink die cut heart through a Tim Holtz embossing folder and rubbed some white ink over it.
The blended ink and stamped background was cut out with a stitched rectangle die and layered over a black and then a green panel, which was then layered over top of an A2 sized top folding white card base. I finished the card with some pink die cut hearts and some Studio Katia Cupid’s Kiss Crystals. (So happy to have again pulled out an older card kit!)
Here’s a closer look at the images on my card. I just fussy cut the envelope and scissors WITH my scissors.😂 For the open areas in the handle of the scissors, I just took a small hand held circle punch to create the circle openings.
I have taken one of the pink hearts that I die cut for my background and used one over the tiny envelope on the heart. The crystals add a nice bit of sparkle to the design too.
I think this will be a nice card to send out to one of my crafty friends! I think maybe we could all use a crafty hug right now so maybe this will help! Thanks so much for stopping in today and I’ll see you again soon!
Hello friends! I hope that you’ve enjoyed your weekend. I’m still spending some time with my husband as it’s a long Labor Day weekend for him. The weather over our way will certainly start to shift now and I’m looking forward to everything Autumn which is my favorite time of the year! Such a great time to be outdoors before the Winter sets in!
Today is our midway reminder over at the {Cupcake Inspirations} challenge blog with our “On the Farm” theme. So if you haven’t played along with us yet, I hope you’re able to share your project with us within the next week! We are enjoying seeing the wonderful creations so far!
Here’s my reminder project for this week:
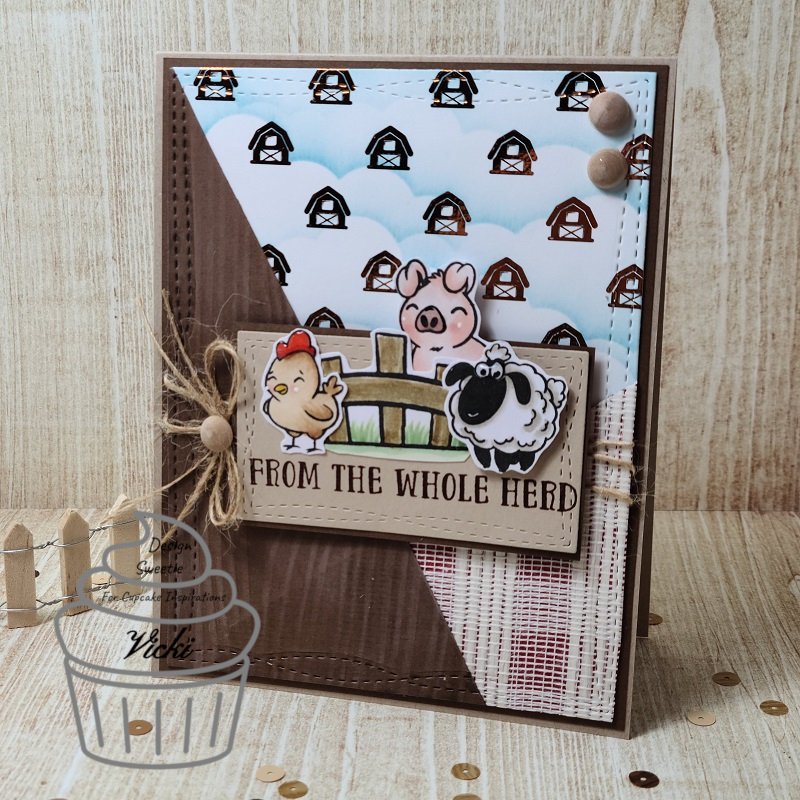
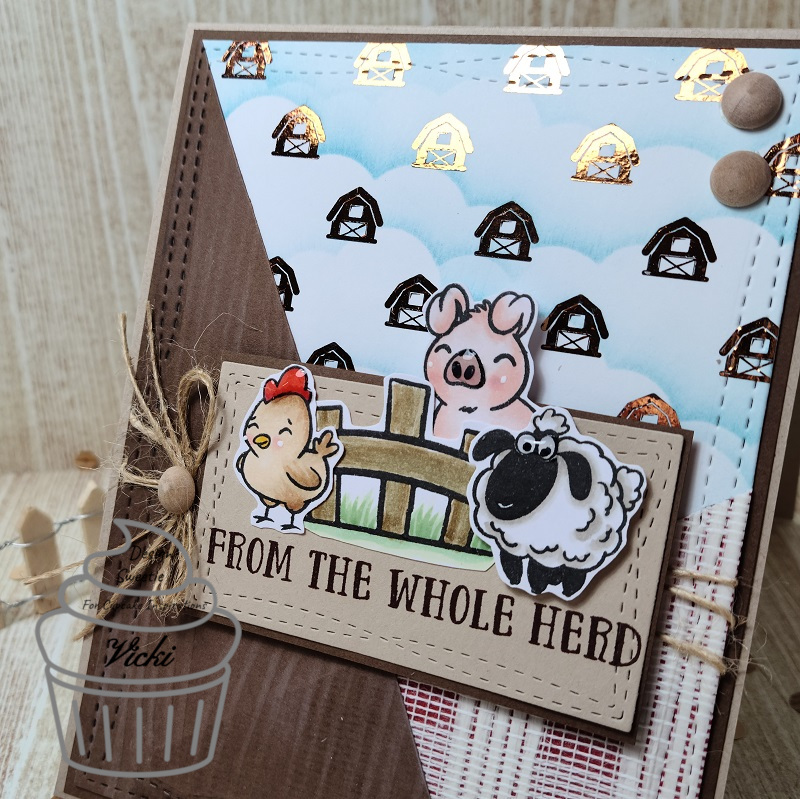
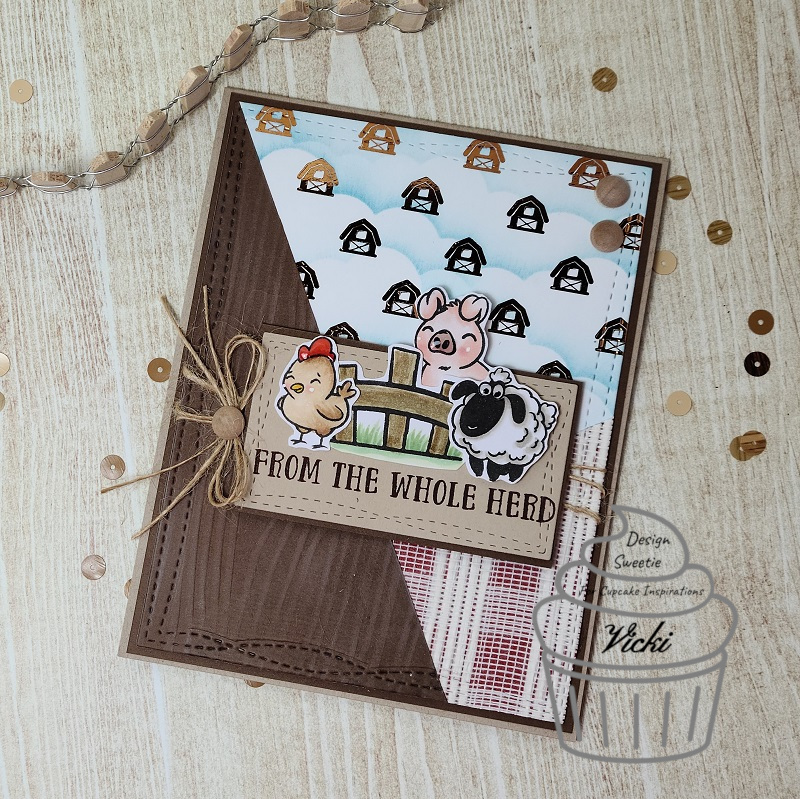
I decided to pull out one of my past card kits that I didn’t get much a chance to play with and put together a card with that Farmhouse Friends stamp set included with it.
There were lots of different textures included with the kit including that piece of buffalo check pattern mesh fabric that I put a layer of red cardstock, included in the kit, behind it. I ran a piece of brown cardstock through an embossing folder as well as stenciled a cloud background over one of the printed panels included in the kit. I also took some copper DecoFoil Transfer papers and foiled over the printed barns on it. I put together this fun layout with those different pieces, cut them up and then die cut the entire panel with a Wonky Stitched Rectangle die from MFT. I used the die again to cut an additional panel out with some kraft cardstock.
That layer is where I’ve added the stamped, colored and cut out images from the stamp set. I’ve also stamped a sentiment from the set at the bottom of the panel as well. I layered this piece over some more of the brown cardstock and popped it up with foam tape. Before attaching it to the panel, I wrapped some twine around the front panel and added a bow next to the animal panel. I added another layer of brown cardstock behind this and attached it all to an A2 sized top folding kraft card base.
Here you can see the shine from where the printed barns were foiled over the cloud stenciled background.
There was a “stain pen” included with the kit that you could actually use on the tiny wooden fence also included in that kit which you can see as a prop in my photo. But I used it to color in my stamped fence on the card this time. I’ve also taken a white gel pen for highlights on the animals and then I added some glossy accents to the chicken’s head, the pig’s nose and the sheep’s eyes which you can sort of see the reflection of light over those parts.
I lastly added some real wooden dots over the design including in the center of the twine bow.
Have you ever been to a farm or are familiar with the setting of a farm? I grew up out in the country and have pretty much lived most of my life either near a farm or in a rural small town setting, so farm surroundings are very familiar to me and I forget that not everyone has had the experience of it. I can’t imagine not being able to hear the sound of a cow “moo” for instance. If you’ve not been on a farm, it’s quite an experience and lots of hard labor, but also a rewarding experience at the same time…so check it out sometime in your life if you can!
Hope you’ve enjoyed my creation today friends and thanks for stopping in!