What? It’s Christmas Already?!

Hey there friends!  Wow, so my last post was Thanksgiving and I pretty much missed the entire month of December it seems like, right?!  It has been a very crazy month with lots of different things (including personal) going on so pardon me for going MIA!

I HAVE been working on some projects here and there and I would be happy to share those, but for right now, let’s focus on the Christmas projects that I’ve been working on getting ready for the up-coming Holiday next week! 

I have already sent out my Christmas cards, thank goodness, as I wasn’t even sure that was going to happen either!  I was very impressed with the new Taylored Expressions Create-in-Quads Mistletoe Layering Stencil and how quickly I was able to knock out 4 card panels at a time, which was a huge time saver to get my Christmas cards finished up!  There is actually a set of 4 designs here (like shown below), but I was in the middle of addressing the cards and forgot to photograph some before shoving into envelopes! LOL  This set was using the white cardstock with the green and red colors which turned out very pretty.  I also used the red glitter paste for the highlights on the berries.

And here is the other set of four cards that I made using the Toffee colored cardstock with green and white inks for the stenciling.  I’ve also splattered these with brown and white paint.  The sentiments were white heat embossed over some TE Chocolate Truffle cardstock and cut out with some MFT dies.  Before attaching to the pre-made white A2 card bases, I also wrapped some twine around some of the panels or added a bow with it. (I love the homespun look of the white mistletoe!)

These all turned out great because they were pretty much flat and fairly easy to mail off.  I think I was short just a few which is where I’m glad that I still have a few extra cards that I had made throughout this year and I have previously given out some “extra special” Christmas cards earlier in the year as well.  I think you may have already seen them from a previous post…I will have to take a look and see under my “Christmas” section!

If you’re looking for a last minute Christmas gift/tag, these wood slice things are so quick easy and fun to create!  I’ve had a huge box of these wood slices for a long time, so I pulled one out to make a project for the Inky Stamper December challenge on FB.  (I also believe that Chelsea sells some wood slices in her store!)  I had hubby drill out a hole for me at the top before decorating so as I knew where to put everything.

I’ve used the Inky Stamper Christmas Bauble stamp set for the stamping on the wood and colored in with pencils and gamsol.  I’ve added details with a glitter brush pen on the ornament and added some snowflakes with Nuvo White Crystal Drops.  I had to mask the frog to stamp the Santa hat on him.  I’ve used some silver twine for the hanging portion and then I glued a silver bow with some silver ribbon from my stash under the hole.

And lastly, I’ve also been working on some commissioned cards as well!  Last year, I had a request from someone to create a special Christmas card for his cleaning lady.  I had him pick out an image and asked about the colors…you may remember it as I had posted it last year.

a few months back, someone had asked me to re-create the same design for them with pretty much the exact design with the exception of the sentiment which I changed out for this person.  This one went to another country and I was concerned about the shipping costs, but it was not a problem.  The package had taken an unexpected journey because of the crazy mailing system going on at this time, but it arrived eventually and was in “perfect condition” as reported to me, so I was so thrilled with that and they seemed very pleased with it.

With the square size of the design (5″ x 5″), I’ve handmade the envelope for this one as well.  I found the exact papers used in the designs for these cards, but I don’t think I have any more left after completing this one.

Here’s how I’ve decorated the inside of the card and left blank as requested for their own personal use.

So now, I just want to take this time to say THANKS SO MUCH for hanging in there and stopping in today!  I don’t have too much time on my hands right now as I’m getting ready to make some Christmas treats and the Holidays will soon be over.  I hope you are all doing well and I wish each and every one of you a very safe, happy and healthy Holiday Season!

See you again in the New Year 2022 friends!!

Christmas Cards, Projects and Cookies…ready for Santa!🎅

Hello friends!  We’re here!  We made it to Christmas Eve!😀  My cards have been sent out, my cookies are done and delivered as well as my other little gifts.  This is quite a long post, so grab your hot cocoa or whatever your favorite beverage is and a Christmas cookie or treat and let’s see what I’ve been doing this past week:

So starting with my Christmas cards, I usually make around 40ish cards each year give-or-take and I only like to make a handful of them at a time for not only boredom of the same design, but for product depletion as well.

So back in July, I purchased this really adorable card kit from Taylored Expressions (included was the Frosty Background Cling and Clear Combo set + more.) that came with coordinated colored envelopes as well as the seals.  So I made a set of four different colored designs in two of each one.  The snowmen were popped up with foam squares over the backgrounds and I added some fun Snowflake bits that were included with the kit as well.

Next up is another set of cards I made using some more gorgeous products from Taylored Expressions.  I’ve used the Seasonal Sprig stamp and die combo along with the stencil to color them in with.  Some of these I ink blended the backgrounds, so I just used cardstock with a watermark effect and a white heat embossed sentiment.  I used the die to cut an extra frame behind the stamped one for added stability.  I made 4 of each design shown here for a total of 16.

I then made another set of four using the same products, but for these I gold heat embossed the image and sentiment and then used some watercolor for coloring it in with.  I also got some of these coordinating envelope seals to use on about 10 of the 16 cards.  (No longer available in store.)  I’ve also partially ink blended the background behind the frame on these as well.

Here are some cards that I’ve actually made a total of 8 similar designs using the large wording background dies from My Favorite Things.  I’ve used the “Sending Christmas Joy” and “I Really Miss You” dies for all eight of these, but only after I stamped the backgrounds.  I used the MFT Knitted Sweater BG stamp and the Alley Cat BG stamp for a couple of backgrounds before I die cut them.  Then I used the die cut letters to place into the other backgrounds on the cards to get that look.  So it was like creating 2 cards with one cut and filling it all in.  (For the Alley Cat background stamp, I ink blended the background and stamped it as a watermark effect over it and then took the “left over” ink from that to stamp it again to create an additional BG.) I then cut out each of the panels with the MFT Wonky Stitched Rectangle die and placed over a white A2 sized side folding card base.  The penguin image is from the MFT Holiday Penguins set and the bird on the other one is from the MFT “Tweet Holidays” (Not found in store.)

And then of course you don’t want to waste any backgrounds you’ve made, so you make more cards!  I’ve used a couple more images to personalize the design for people too.  I combined the sets Newton’s Nook Whispering Pines and the Lawn Fawn Winter Skies.  I think I took a set from them to create a sentiment to fit my cards as well. (not sure from which set.)

For the other card, I took this cute image from the Whimsy Stamps Gnome for Christmas stamp set, colored him up with my copics and cut him out with the coordinating die to pop him up over my card.

And then for these set of 4 cards, I’ve just die cut a snowflake from some glitter paper and glued in the center of the “O” on each design and popped up a sentiment over that with foam tape stamped and die cut from the Taylored Expressions Mini Strips – Holiday and Mini Strips die.

And as you remember in a previous post those “recycled Crystal Light containers” that I make, I made another set of three of them here.  This time, I’ve used this snowman stamp.  I just used my scissors to fussy cut those cute snowmen out as they were pretty simple to do and then I popped them up over an ink blended tag using the stencil over them.  I used coordinating cardstock and silver heat embossed the sentiment strip at the bottom and of course added my “snowman soup” poem on the back of the containers.  I’ve also added a layer of silver mirror cardstock behind the tags.

And I made a couple of these darling ornaments from a fairly “new to me” company that I was actually introduced to with product during my time as a {Cupcake Inspirations} sweetie DT when they sponsored a challenge a while back.  P.S.  There are a few more days left to enter their current challenge of “SNOWFLAKES” if you want to pop on over to join us too!!

But I was so taken with this darling image and kit from Inky Stampers from this Snow Much Fun Kit.  You get the snowflake ornament (with string), the stamp set and die, papers, wobbler, along with glitter to complete it too!  Well I wanted to make more than one, so I grabbed another set of Snowflake Ornaments from the store and just added my own papers and glitter from my stash to make it.  

And of course, last, but certainly not least, here’s all of the Christmas treats that I’ve made to give out to family and of course for hubby to eat up as we went along too!😋  I have made from top left on down:  Homemade caramel corn, white chocolate covered pretzels, peanut butter fudge, molasses cookies, chocolate covered caramel pecan clusters, scottish peanut butter cereal cookies, chocolate fudge, snickerdoodles and chocolate crinkles.  Of course each family member has a favorite they like me to make and there are a couple of old recipes passed down from grandparents/parents that I like to add in as well.  They’re all delicious and I enjoyed making them.

Whew!  I’m ready for that “Looong winter’s nap” now!!🥱  I hope you’ve enjoyed my post today and it has brought you some inspiration and/or a smile somehow!  I have received some beautiful Christmas cards and I so appreciate them and have them all displayed by being pinned around my garland in our pass-through in the living room/dining area.  I think after a bit of rest, I need to finish up my projects for the “Bugaboo Christmas Chaos” that I haulted in the middle for to finish up Christmas projects….so I’ll be back soon with that.

In the meantime, I wish a MERRY CHRISTMAS TO ALL AND TO ALL A GOOD NIGHT!!🎅

“tis the Season for Holiday Chaos and Update on Christmas Cards for Danny🎅

Hello friends!  This is my second post for today, so please scroll down to see it or CLICK HERE for the {Cupcake Inspirations} Reminder post.

I have several creations to share with you today because while I’m working on trying to get some last minute Christmas projects finished, I thought that I would join in the fun week long “Holiday Chaos” challenges over at the Catch the Bug Blog for Bugaboo Stamps.  I’ve caught up with all of the challenges up to today and then hopefully later this week I’ll be able to post the remainder of them:

This card is for the Day 1 challenge of “Reindeer Games”, so I had this really cute Bugaboo image called Little Penguin Reindeer and colored him up for my card.  I had these fun reindeer papers in my stash to pair with him and then found this fun sentiment strip to add with it as well.😂

I’ve used some gold glitter paper and added some gold glitter enamel dots in the corner.  The bells on the penguin’s waist was covered with a gold glitter pen and then I added some faux snowflakes along the circle image border too.

This next card was created for Day 2 Challenge of a sketch.  I’ve colored up this adorable Bugaboo image called Christmas Teddy 2 Ornaments all in blue colors!  Hard to tell in the photo, but I’ve used glitter gel pens to color in the stripe of the ornament and the silver tops.

I have been itching to pull out my Martha Stewart papers that have been lurking in my stash and I really love the colors in them along with the silver foil!  I white heat embossed the sentiment from the Brutus Monroe “Holiday Essentials” stamp set and cut it out as a banner with my scissors and popped it up over the card with foam tape.  I finished the design with some Drip Drops from Taylored Expressions.

And of course here’s my project for today’s challenge Day 3 ABC/Anything But a Card.  I make these little “snowman soup” containers every year for my family and sometimes sneek in an extra “surprise” or 2 inside!  You may have recalled these on my blog before, but they’re just recyled Crystal Light containers and they fit the hot cocoa, candy cane, marshmallows and a few chocolate kisses all in there perfectly together.  I’ve decorated them in many different ways.  CLICK HERE to see a previous post that shows another way I’ve made them in the past.  This time, I just made tags to attach around the containers.  I have made another set of 3 of these containers (different images) that I will show in a future post too!

I’ve used these adorable snowmen from Bugaboo Stamps called “Snowman Snowflakes” (right) and “Snowman Snowballs” (left).  I colored them up with Copics and added a sentiment that was stamped at the bottom from Whimsy Stamps Holiday Mini Sentiments stamp set.

I’ve had this “snowman soup” poem for years and years and just printed it out on my computer and attached it to the back of the containers.  The top of the lids are also covered with pattern papers.  P.S.  If you haven’t tried the “Hot Cocoa Hershey Kisses”…oh my goodness they’re so good!😋

UPDATE:

I also wanted to share an update on the “Christmas Cards for Danny” post you may remember that I posted about a few weeks back.  I’ve actually seen an update in my own hometown newspaper about all the cards he’s received and as of December 10th, he’s received 2,544 Christmas cards from ALL OVER THE WORLD! How cool is that?!  Please CLICK HERE to read the newspaper article about the overwhelming support and heartfelt Christmas wishes people have sent him!  This really touches my heart and uplifts me about the kindess in the human spirit.  Thank you to those that took the time to send a Christmas card his way!  It’s really what Christmas is all about.

Challenges:

  1. Catch the Bug – Holiday Chaos Day 1: Reindeer Games (card 1)
  2. Catch the Bug – Holiday Chaos Day 2: Sketch (card 2)
  3. Catch the Bug – Holiday Chaos Day 3: ABC Anything But a Card (snowmen soup)
  4. Christmas Crafts All Year ‘Round – December Gifts/Containers (snowmen soup)
  5. 2 Crafty Critter Crazies – #45 Anything Goes + critter (card 2)
  6. Crafty Animals – #45 Anything Goes + animal (card 2)
  7. Daring Cardmakers – Animal Antics at Christmas (card 1)
  8. The Sisterhood of Crafters – Anything Christmas/Winter (snowmen soup)
  9. Crazy 4 Challenges – C4C565 past sketch from 2020 (I used sketch C4C553 for card 1)

Shades of Blue at {Cupcake Inspirations}

Hello friends!  Hope that you’ve had a great first weekend of December and are ready to roll on with the spirit of the Season!  I know the world is a bit different, but it’s been great to get out the Holiday decorations and try to keep things as “normal” as we can be.  We went out and drove through our local park filled with Christmas lights while sipping some Starbuks coffee and the baking of cookies always gets me in the spirit.  What do you like to do around the Holidays?

Today, I have a new challenge to share with you over at {Cupcake Inspirations}:

The new challenge for the next two weeks is a color challenge in “Shades of Blue“!  You need to be sure to use at least three different shades of blue when making your project.  So any theme or occasion you can think of just use these colors!  We look forward to seeing what you come up with for this challenge!  Here’s my project:

I think my favorite colors to decorate with for Christmas are blue and silver!  So I knew I wanted to pull out this GORGEOUS stamp set from Whimsy Stamps called Elegant Ornaments and have a play with it!

I started with a Bristol Smooth Watercolor panel and took the Whimsy Stamps Beaded Curtain Stencil and went over the top with some Blueprint Sketch, Salty Ocean and Tumbled Glass Oxide Distress Inks.  I ended with the lightest color and faded it into the white.  I took the lightest color and also went over the top of the panel too.  I then cut the panel out with the Whimsy Stamps Zig-Zag Stitched Rectangle die.

I then took a couple of the ornaments along with the sentiment from the stamp set and heat embossed them where I wanted to place them with Ranger Liquid Platinum EP.  I took my Zig CC Real Brush Markers and colored in the heat embossed ornaments and blended them together with a watercolor brush.  I then stamped the “curved beads” images in navy colored ink and then heat embossed the strings to the ornaments so that it all looked layered.

This image panel was layered over a piece of silver mirror cardstock and then layered over an A2 sized side folding navy cardbase.  Lastly, I added some blue sequins and filled the centers with some Nuvo Dazzling Blue Glitter Drops.

Here’s a closer look at the ornaments and how that pretty embossing powder looks.  I noticed that the navy beads caught some of the EP when I heat embossed the strings to the ornaments, but I don’t mind that as I think it gives a bit of shimmer over them and gives more depth to it.  The card looks very pretty and sparkly and I’m happy with how it turned out.

I hope that you’ve enjoyed my “shades of blue” creation today and it has inspired you to pull out your blue colored goodies to play along with us!  Please be sure to check out the {Cupcake Inspirations} Challenge Blog to have a look at the wonderful inspiration from the rest of the DT to help inspire you more!

Thanks so much for joining me here today and I’ll be seeing you soon!😉

Challenges:

  1. Cute Card Thursday – Anything Goes
  2. Dream Valley – #238 Christmas
  3. Winter Wonderland – Anything Christmas Goes
  4. 52 Christmas Card Throwdown – Pick a Precious 2020 Challenge – February 52CCT6-20 3 shades of blue
  5. Through the Purple Haze – #174 Holiday – Make it Blue
  6. Crazy 4 Challenges – C4C564 Elvis “A Blue Christmas”
  7. Merry Little Christmas – MLCCB29 December Anything Goes Christmas
  8. The Paper Funday – #24 December Anything Goes optional: Christmas/Holiday
  9. Crafty Calendar – December Christmas theme

It’s Time for Foiling Fun!

Hello friends!  Happy Saturday!!  I hope you have a fun weekend planned!  🙂

I’d like to share with you a couple of creations that I’ve made with new Deco foil products:

For this card, I used both the Red and Gold Static transfer sheets and foiled it with the  Ornamental Toner Sheet.  I first  foiled it in red (but that sheet wasn’t used for this.)  I took the negative of that red piece and placed it over a full Deco Foil Toner Sheet and then the black areas where the ornaments are, I took the gold transfer sheet and foiled the ornaments in that.  So it’s sort of a double foiling!

I added this foiled panel over a piece of white cardstock that I wrapped some gold ribbon around and then I heat set the sentiment from the Yuletide Greetings stamp set with Gilded embossing powder.  The sentiment was stamped with Embossing Ink from a Yuletide Greetings Cut File.  I also had fun making a Halloween card too:

For this card, I pretty much did the same as the card above in where I took the “negative” from the foiled Webbed Toner Sheet using the Gold Transfer Sheet which made the webbing black.  I left it like that for the background of my card.

For the “ground” I took a piece of black cardstock and ripped some strips for the “dirt” and sponged the edges of it with a gold ink.  I took the images from the Trick or Treat stamp set and colored them up, fussy cut them out and arranged a scene at the bottom.  I took a Copic liner to write in my own grave markers.  🙂

I took the silhouette bat from the stamp set and heat embossed it over the foiled background with Raven Sparkle embossing powder.  I also used this for the sentiment banner that I made from some Speckled Egg card stock.  I also took some of the same cardstock and layered it behind the card front and then mounted this over an A2 sized top folding card base.

Hope you’ve enjoyed my cards that I had so much fun foiling!   Thanks for stopping in today and I’ll see you again soon!!

Challenges:

  1.  Always Fun – Create a Scene #127 (bottom Halloween card)
  2. Pammies Inky Pinkies – PIP1936 Anything Goes
  3. Simon Says Stamp Monday – Stamp It
  4. Sweet Stampers – Use a Sentiment
  5. Through the Craft Room Door – Anything Goes
  6. Crafty Creations – Anything Goes

Follow Your Dreams and More Christmas Fair Project Entries

Hello friends!  I have usually posted on Fridays to share some updates on my crafty projects and such, but had some other things to take care of and hubby has been working different hours here and there, so I thought I’d pop on here for Saturday instead!

I made a card for the Sparkle N Sprinkle FB Group yesterday, but thought I’d share it here as well:

Vicki-SnS-dreamcatcher-Aug

I fell in love with this image last year as this was from the Sparkle N Sprinkle Video Kit Club for August 2017.  I have pretty much used everything from the kit with the exception of a few things explained below.

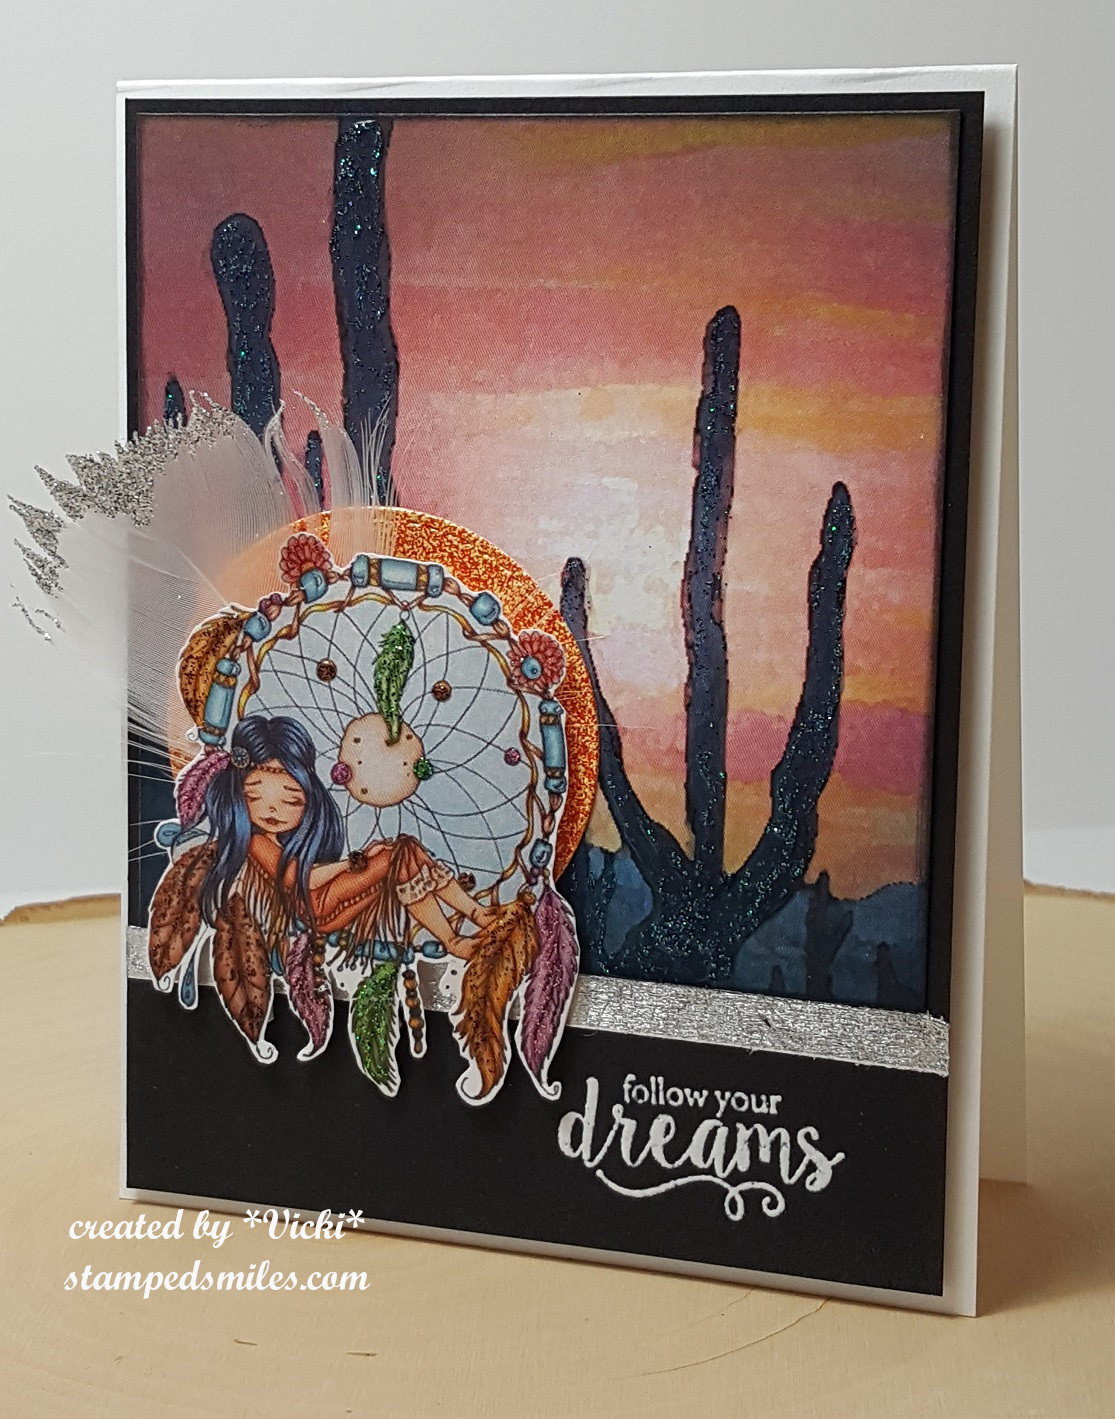
The background papers were included with the kit and I have cutted a portion of a piece to put on the top section of my card front.  For the cactus silhouettes, I have taken the Nuvo Dazzling Blue Glitter drops from the kit and used a brush to push it around.  (You can see a closer view of all of the glitter in the photo below.)   I took a piece of black card stock from my stash to mount this piece and then I heat embossed the sentiment (from the kit) with white EP.  I then took some 1/4″ Tear-iffic Tape to go across the bottom portion of the background piece.  I then took the guilding flakes from the kit and attached it to the tape. – You can see how to use these products from the kit by watching the video from Demo Donna, CLICK HERE to see it on You Tube. (P.S.  She’s fun too! :))  I then took that entire black piece and mounted it onto a piece of craft foam.  I then attached it to a top folding white A2 sized card base which also came from my stash and not the kit.

Vicki-SnS-dreamcatcher-Aug-close

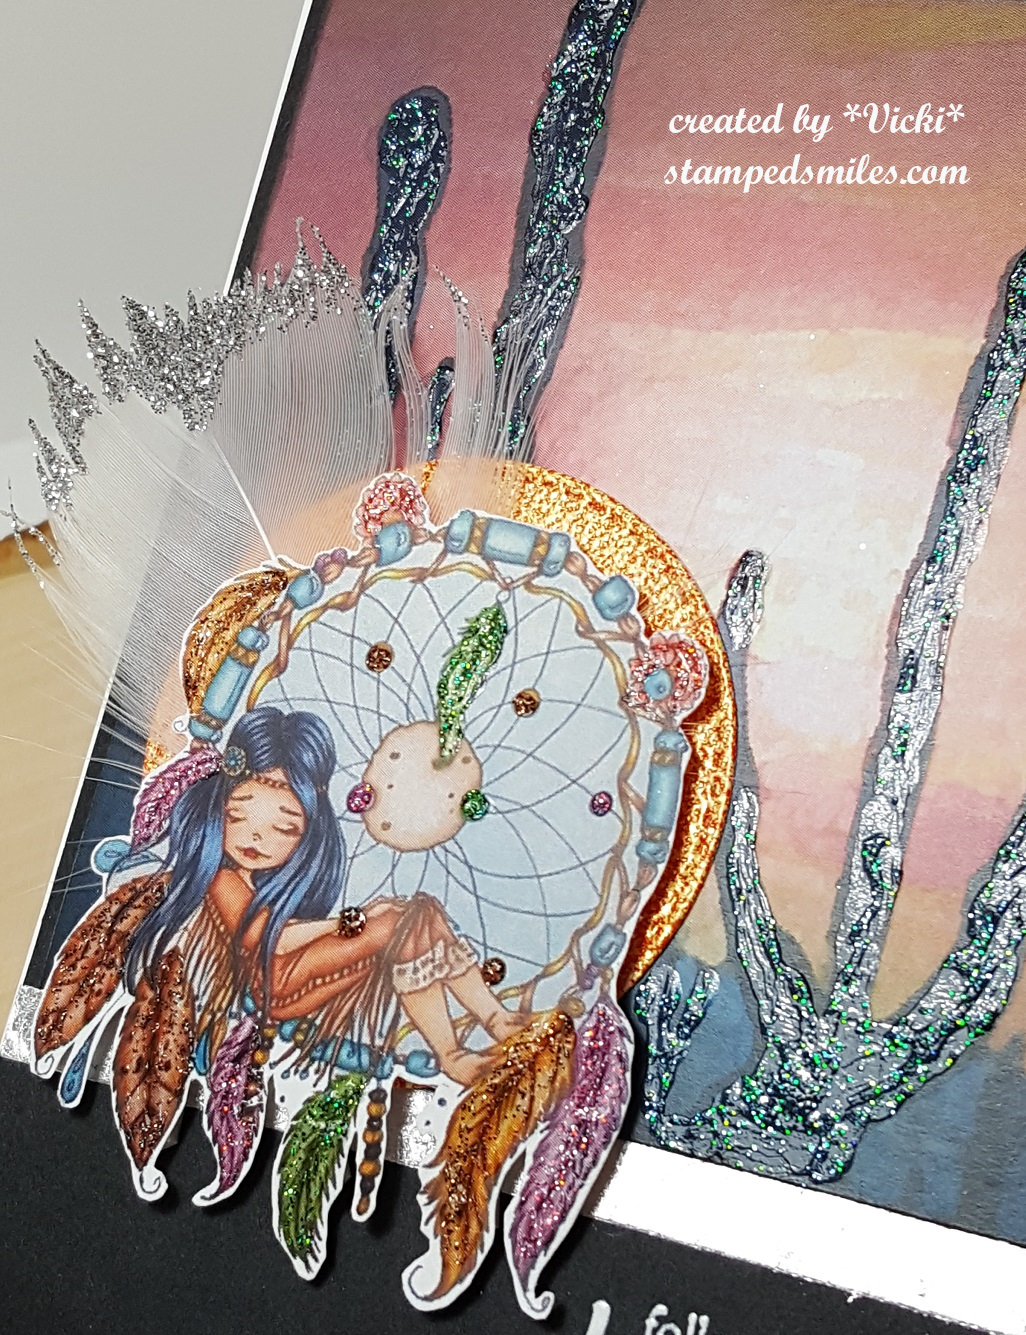
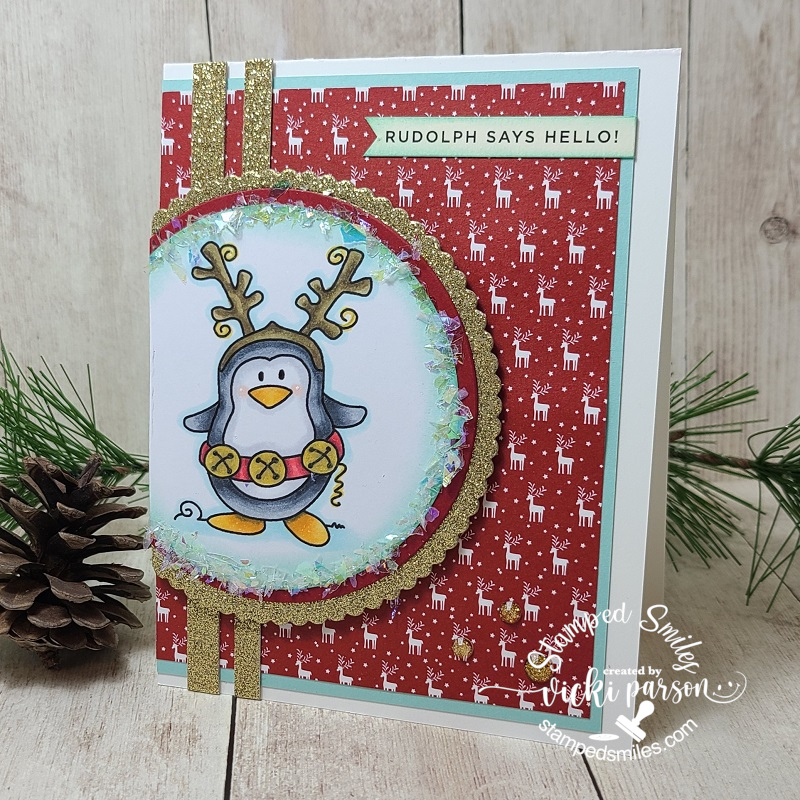
Here’s a closer look at the image and all of the glittery fun texture on this design!  (You can see here how the cactus in the background really shimmer and have a unique texture by applying it!

If you take a look at that circle behind this image, I have cut out a white piece of card stock with a stitched circle die and then covered the entire piece with the Sparkle N Sprinkle Orange Marmalade embossing powder…it is so stunning how this EP looks IRL!  There are some very fine gold mica powders in it that make it really amazing looking!  Not what I expected the first time I used this, in a good way! 🙂  I then took the feather that came in the kit and added some Nuvo Liquid Glue to the ends of it and then sprinkled on some SnS Ultrafine Sassy Silver Glitter and attached it behind the image with foam tape.

For the image itself, it came in the kit already pre-colored and sized to fit on the card.  I have fussy cut the image and put some foam tape on the back with the feather and embossed circle.  I have used the rest of the Nuvo Crystal Drops from the kit and used these to color in the image with a small brush to push the glitter around.  (I was following the tutorial from Demo Donna on that one.)  Very cool as I have never tried “coloring” with glitter in this way before!

I sure had fun with this card and will be pulling out my kit again to make more I’m sure!  I like to “mix” things up a bit with them instead of making them all uniformally the same.


I also have some more projects that I haven’t finished sharing with you from what I’ve entered into my local County Fair this year, so here’s some more Christmas projects that I’ve made and had entered:

Vicki-HoopOrnaments-Fair3rd

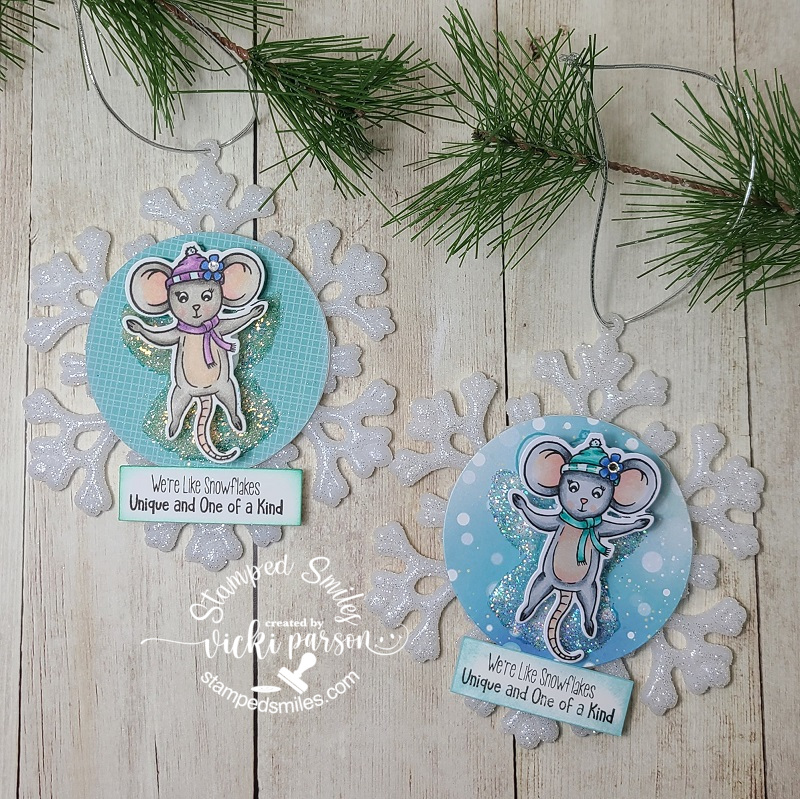
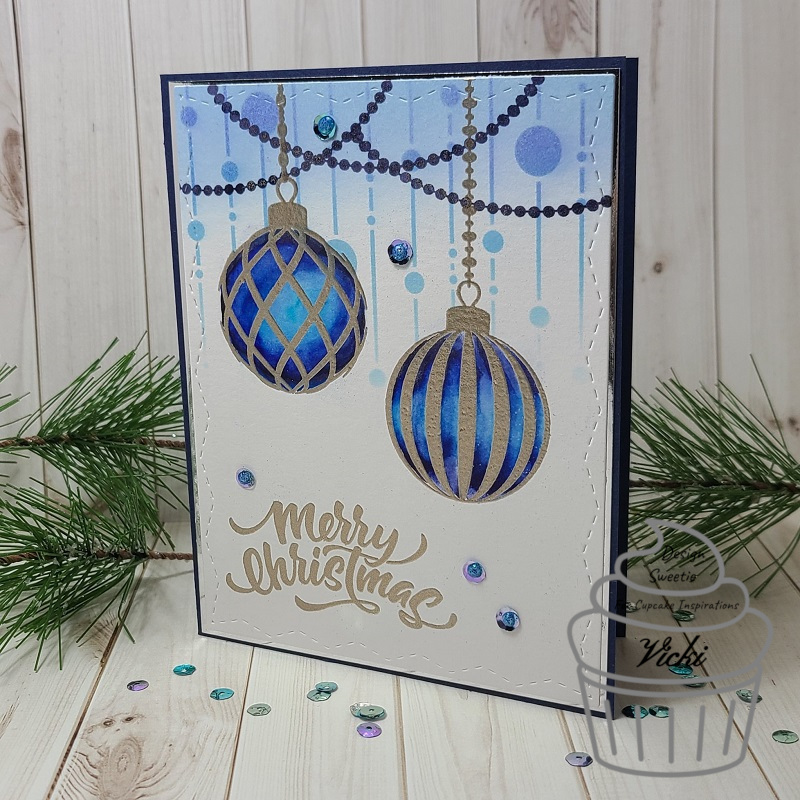
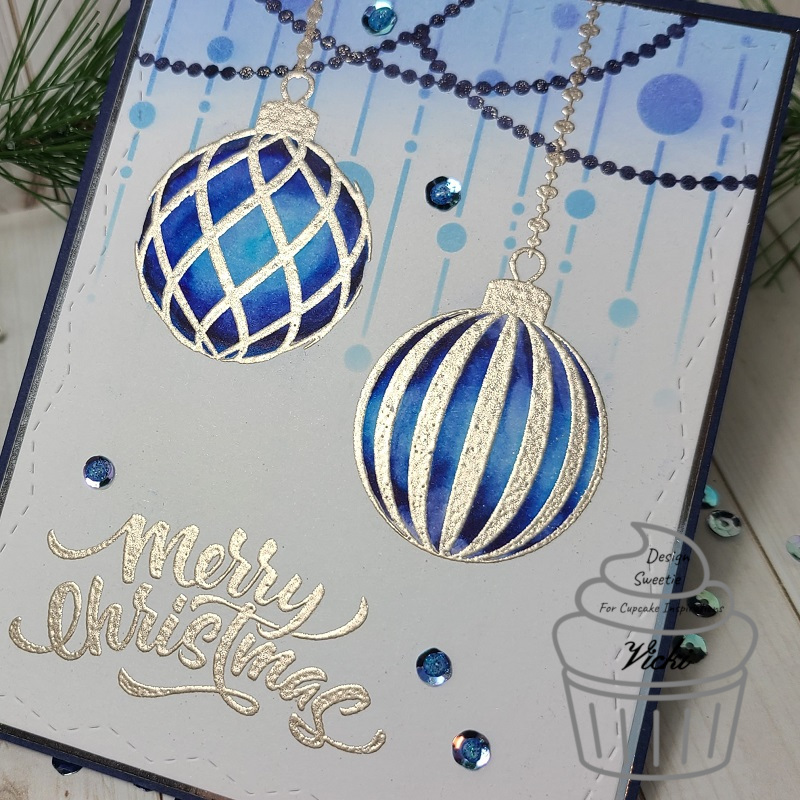
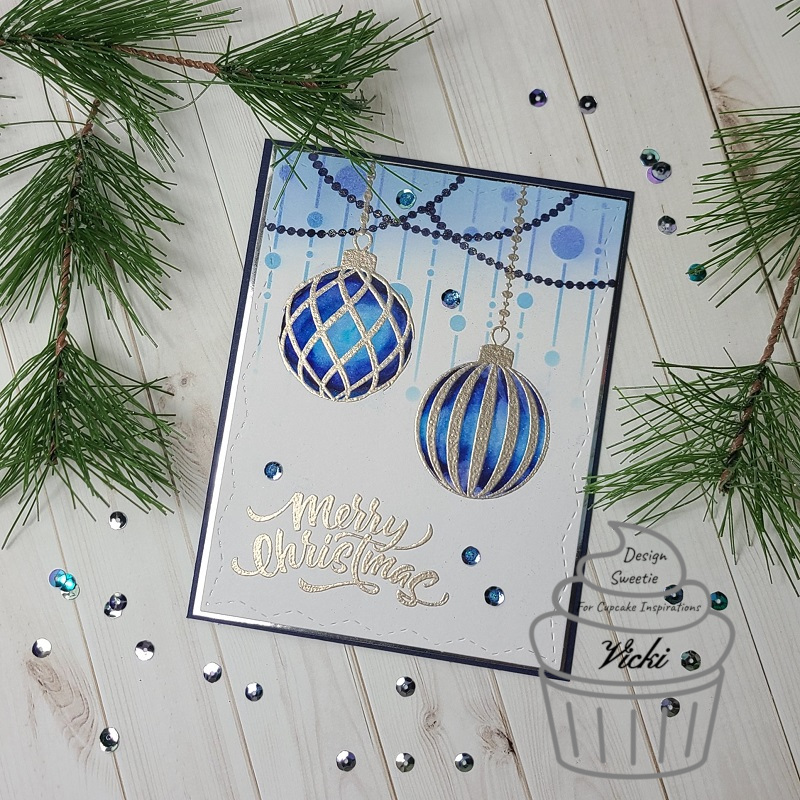
The category for this one was “handmade ornaments – set of 3” (They were all supposed to be similar in nature as well), so of course being the paper crafter that I am, I made 3 ornaments using paper crafting items from my stash! 🙂

A while back I had bought a large supply of bambo embroidery hoops because I wanted to have a try at making these ADORABLE ornaments that I found a tutorial for last year on Splitcoaststampers.com – CLICK HERE to check out the tutorial and make one for yourself! (That tutorial called for a 3″ hoop, but mine are a bit larger at 4″ here.)

Vicki-HoopOrnament

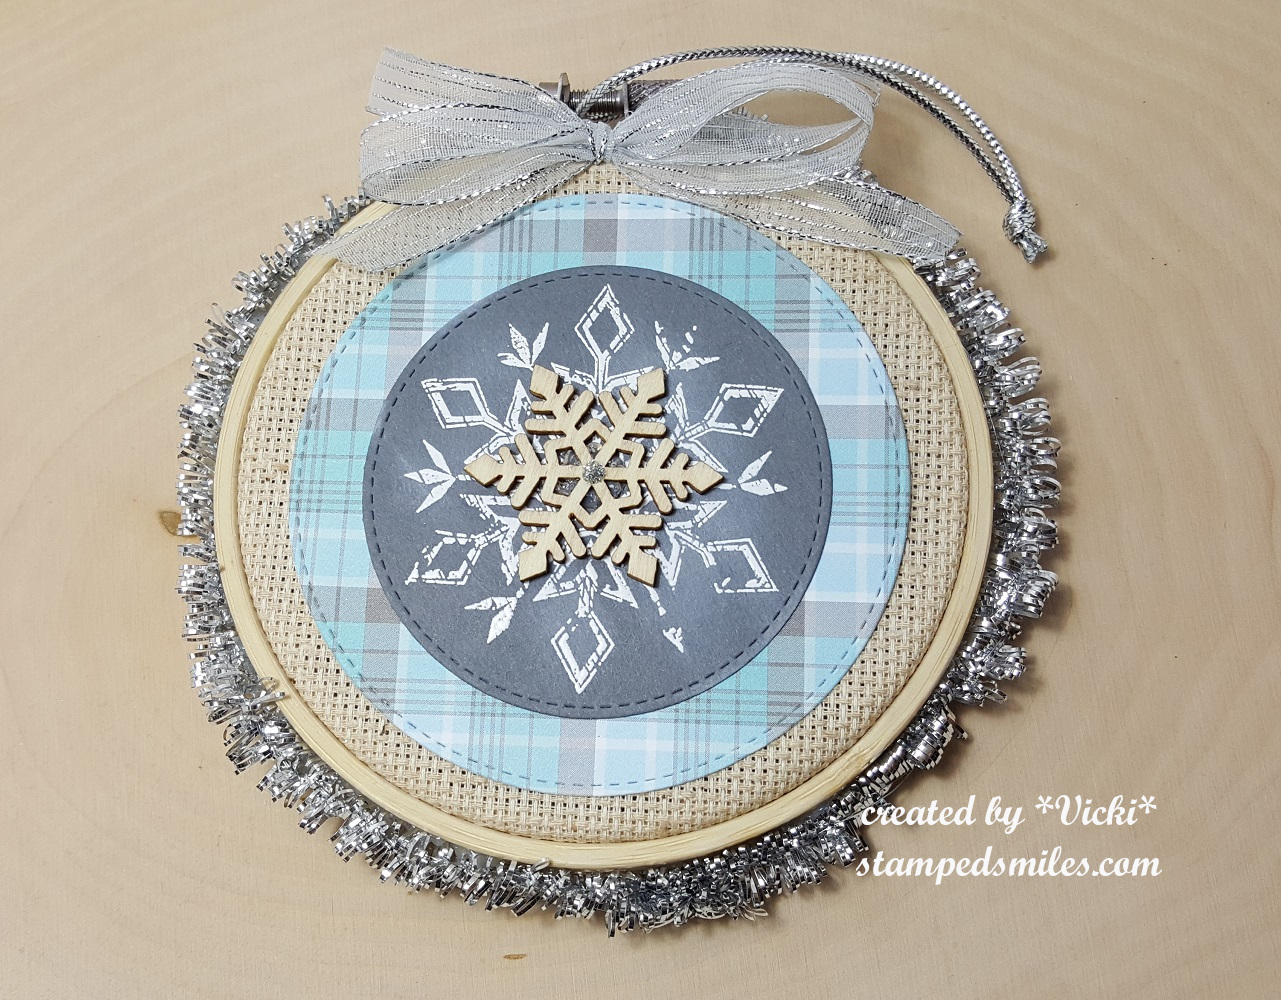
So for my ornament here, I used a stitched circle die to cut those lovely plaid papers from Lawn Fawn (looks like it retired!) and then I also cut another stitched circle from some gray colored papers to match.  On the Gray circle, I white heat embossed the Tim Holtz Mini Weathered Winter Snowflake and then took a sponge dauber to add a bit of white ink in some places.  I placed a wood veneer snowflake over top the center of the heat embossed snowflake and then added a dot of silver Nuvo Crystal Drops in the center.

For the outside of the hoop, I’ve had this silver tinsel in my stash for a few years (looks like the package says it is for a mini tree decoration.  LOL…IDK!)  I glued it around the edge of it, attached a silver bow at the top and then ran some silver cord around the top for hanging on the tree.  They are simple, quick and easy to make, but I had lots of fun with it for sure!  So it was nice to have placed third as a bonus!

Vicki-ShakerGiftCard-Fair3rd


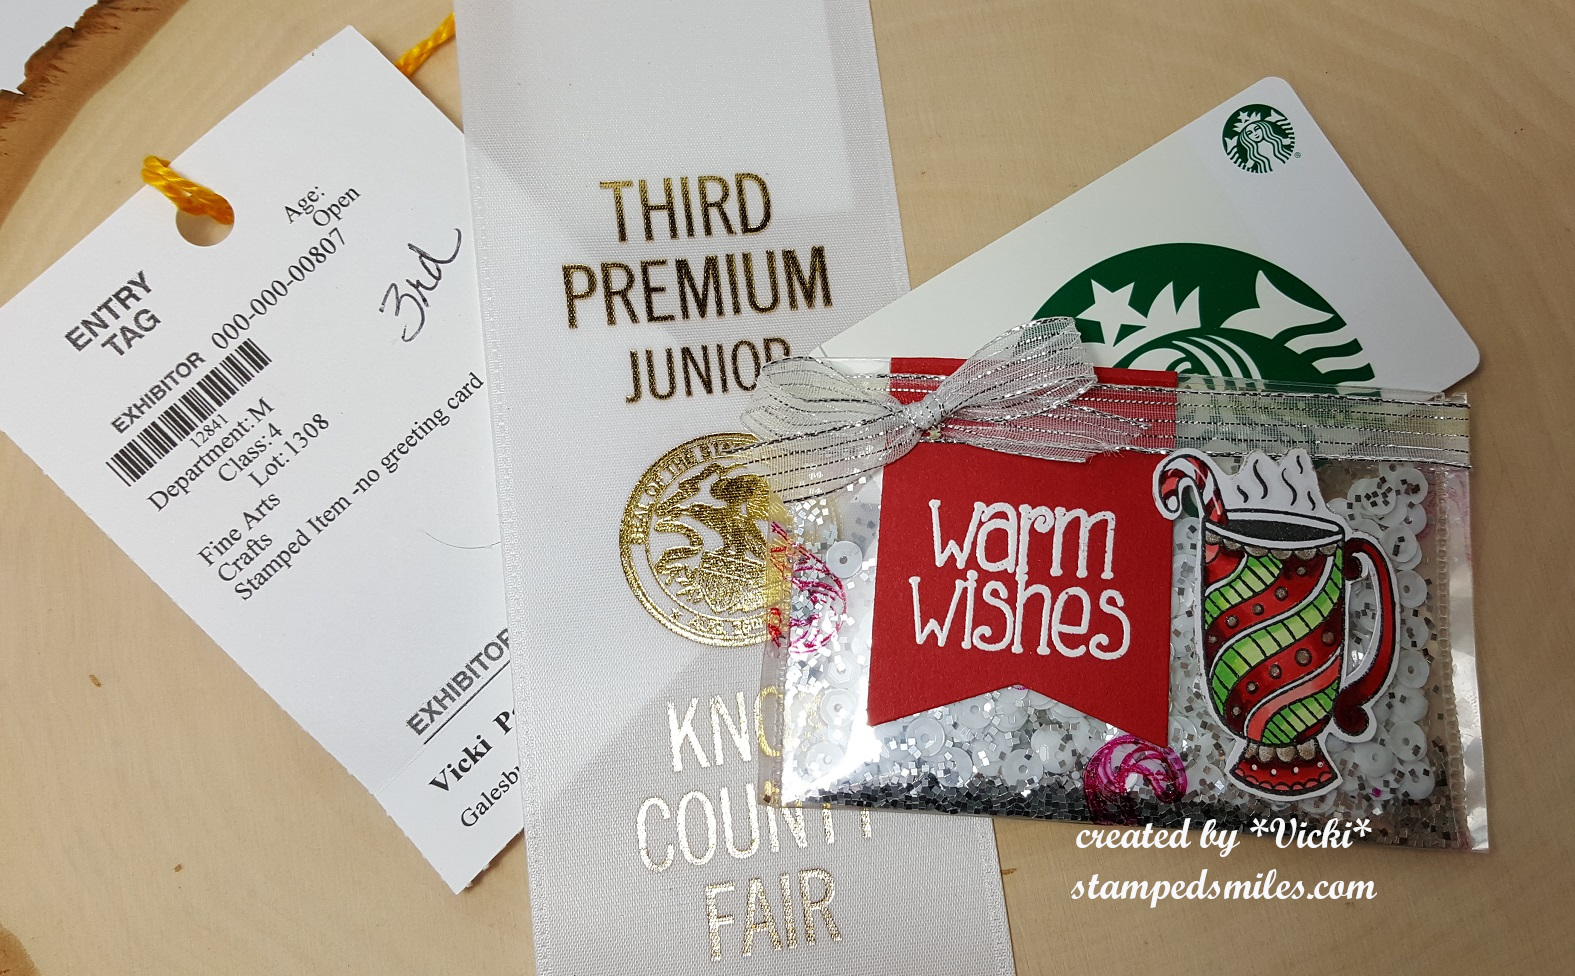
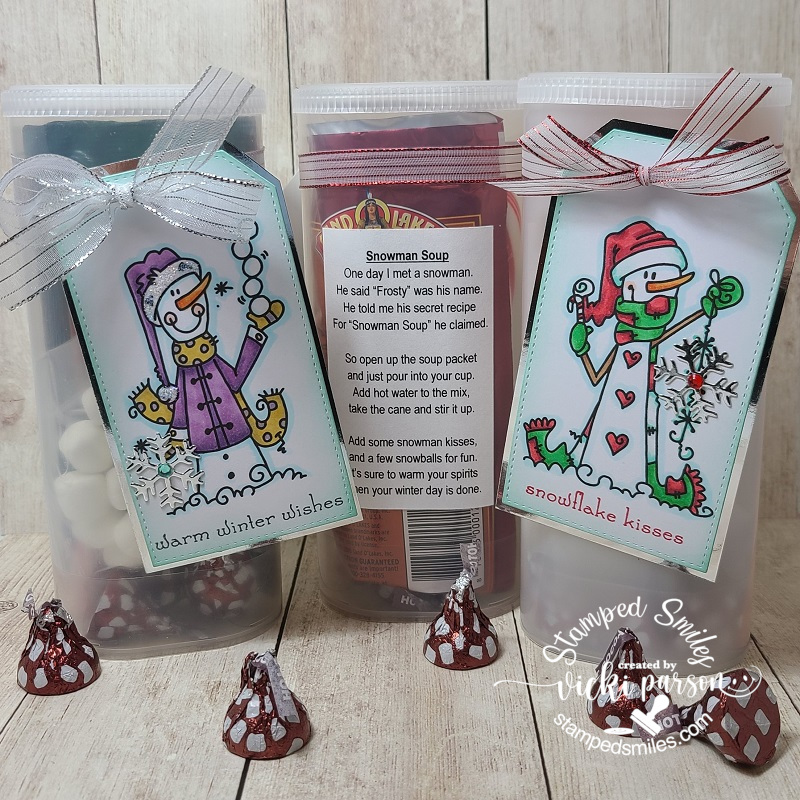
This is one of my entries for “Hand-Stamped item Other Than a Card”.  (I will share my other two entries for this category on another post coming later on!)  If you had followed along with my other blog or “know me” on Splitcoaststampers.com, then you may have seen the tutorial that I made for them called “Shaker Money Holder” (Click name to view tutorial or click the photo for it on the sidebar of my blog here.)  I basically took the same concept for it and adapted the measurements to make it a gift card holder instead.

Vicki-ShakerGiftCardHolder

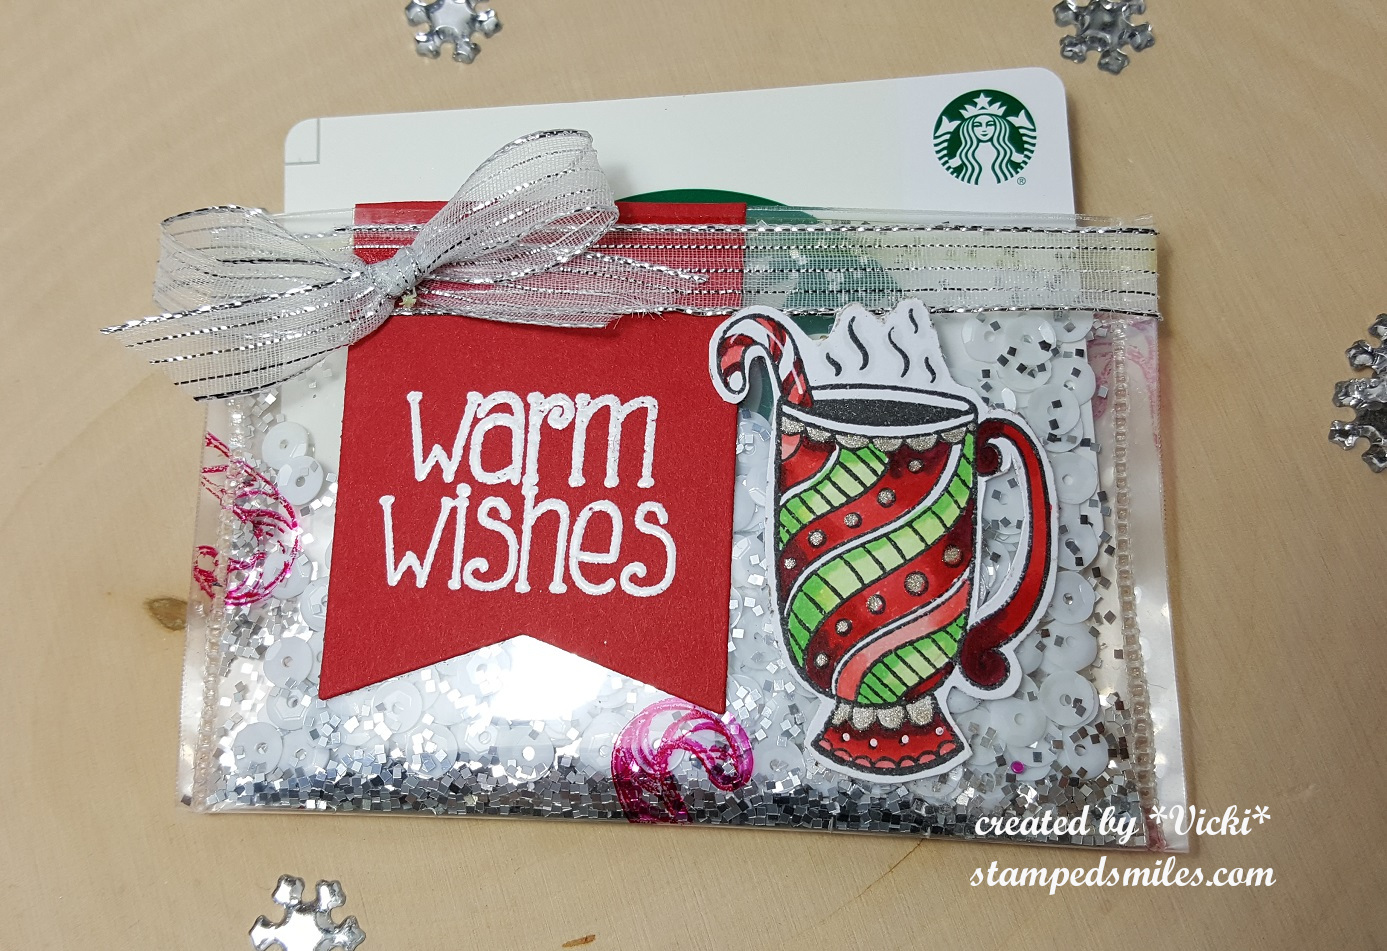
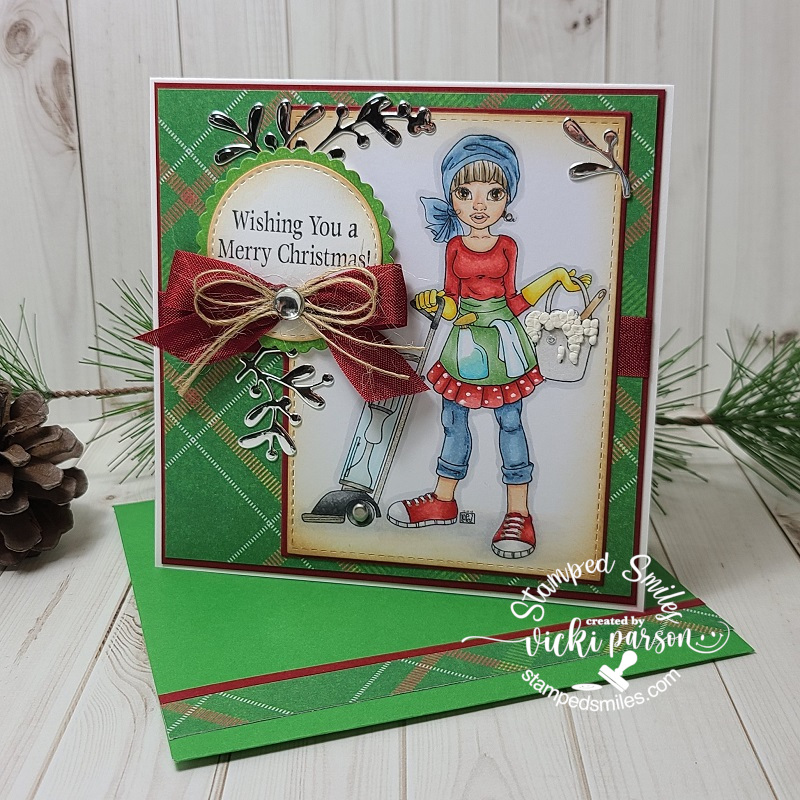
I have been wanted to play with this really fun stamp set from Pink and Main called Christmas Mugs which I’m sure I’ll be using again this year!  Yum! 🙂  It was the perfect compliment for gifting a Starbucks gift card!  (This was one of the “many” purchases I had made when I went to the Collinsville, IL stamp convention earlier this Summer!  So happy that Pink and Main had a booth there!)

For this shaker gift card holder, I stamped the candy cane from the same stamp set with some red Staz On ink before adding the shaker contents to it.  I had fun coloring the mug image with Copics and glitter gel pens.  I’ve also added some shimmer to the liquid in the cup with a Shimmer glitter pen.  I then fussy cut it out and used my Xyron machine to make a “sticker” with it to attach to the plastic.  I white heat embossed the sentiment from the same stamp set over red card stock, die cut it with a banner die and attached it in the same way I did the mug.  If you follow along with my tutorial, i was finished off in a very similar manner.

Now looking at this photo, I’m thinking it would have been cute to add one of those snowflake accents to the center of the bow or around the red banner! LOL!!  It was fun and easy to make regardless and will be nice to have on hand for Christmas!  It was also very nice to see that it got placed 3rd too!

Hope you have enjoyed my post today and seeing the things I have been so busy with creating this Summer!  I always look forward to Fall and the end of the year projects so I know things will start getting really busy soon!  I have lots to prepare for the up-coming craft booths that I will be sharing with my mom this year!

Thanks so much for dropping in!

*With the exception of the above card, I won’t enter the Christmas projects in any challenges due to the fact that I had made these in July. *

Challenges for card ONLY:

  1.  Use Your Stuff – Summer Fun  (What could be more fun than laying in a suncatcher?  LOL!)
  2. Papercraft Challenges – Summer
  3. The Creative Crafters – Anything Goes
  4. Aud Sentiments – Anything Goes + a sentiment
  5. Creative Knockouts – Sparkle and Shine