Hello friends! I’m so excited to share the “Handmade for the Holidays” release at Taylored Expressions today! You can go check out all the things right now in the store! I’m extra excited that I get to be a part of this special release with them as a guest designer too! (This was for my win during the TE 13th birthday celebration challenges I had entered from last month! 🎉 Yay!) There will also be a huge post about it on the Taylored Expressions Blog too! I really hope that you enjoy the projects I’ve made to share with you and if you stop by the store, please let Taylor know that I sent you!

For my first set of projects, I’ve made a fun Christmas décor item that you can gift for the Holidays, use as a center piece for your table setting, etc. I’ve taken the Taylored Expressions (new) Accordion Tree die and used it to make a trio of trees with the “poinsettia style” attached to the accompanying TE Tree Stumps (sold separately) to go with this die and another two trees without the stumps. For the trio of trees, I’ve used the Merry Blooms Stamps, Stencil & Clear Combo set to create a background over a Toffee cardstock base inking and blending with Sweet Basil, Cherry Pop and Mulled Wine inks. I’ve also used the same products to make the tag as well. I’ve gold heat embossed the centers for the poinsettias in the background. I’ve also taken the TE (new) Itty Bitty Sentiments Holiday stamp set and used the tiny images from the set to create backgrounds for the other two trees. I’ve splattered the tree backgrounds as well as the tag background with acrylic white and gold paints. These die cut trees were glued back-to-back with the score line in the center as a guide which makes them 3D looking. I’ll explain each item below:

This was such a fun 3D project to create! I wanted all the trees together in one piece, so I thought it would be fun to grab one of these wood slices I’ve been hoarding forever and glue the trees to this base. There is an accordion star that comes with the accordion tree die, but I thought it would be fun to take the TE Perfect Poinsettia die and cut out several of the smallest bloom to make that the “star topper” for the poinsettia tree. I’ve used the coordinating stamps to stamp the “veins” and gold heat embossed the centers for them. I folded them in half and glued it to the top of the tree. I also attached some TE Gold Drip Drops for the “ornaments” over the tree (TE Drip Drops make perfect “ornaments” for these trees!) and added some gold twine bows front and back. I’ve ink blended the edges of the poinsettia tree with Toffee ink and gold paint sponged on the poinsettia topper.

This is what the other side (back) of this piece looks like…so it’s visible from all angles. Here you can better see the other two trees and how the backgrounds were made. I’ve also added some thick white paint to the edges of them to make it look more like “snowed over” trees especially since they were splattered with white paint. For the wood slice that the trees are attached to, I’ve used some Ranger Mica Flakes for a bit of sparkle attaching it with Multi-Medium Matte glue.

For the tag, I’ve die cut the background explained above with the TE Stacklets 2 die and wrapped some gold twine around it with the TE (new) Itty Bitty Sentiments & Tags Holiday set for the little tree with the gold heat embossed sentiment over it. I’ve also gold heat embossed the large sentiment from the Joyful Season stamp set & dies that I’ve popped with my favorite product TE Sticky Strips. I’ve cut out another layering piece behind the tag with Sweet Basil cardstock, punched a hole and added more gold twine.
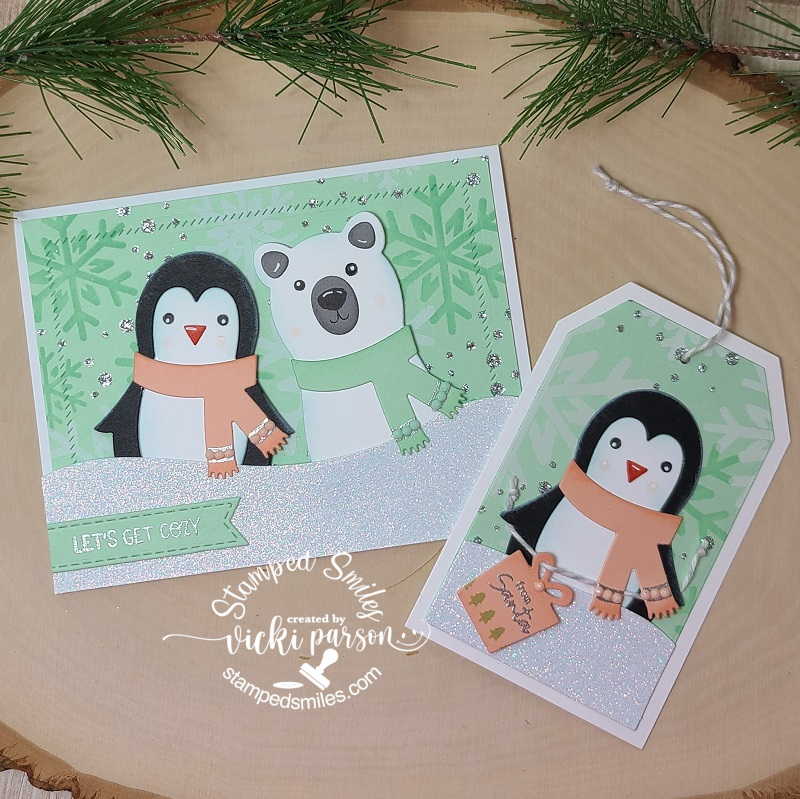
And how stinkin’ CUTE are these guys?! This is my second set of projects for this release using the NEW TE Snow Squad Dies & Clear Stamp Combo set. As you can see, the cute die cut critters are made to perfectly fit the Tag Stacklet dies! I’ve the Tag Stacklet 2 die set for my sweet penguin! The critters are so easy to cut out and decorate them as you like! I like that the clear stamp set comes with it to stamp in the eyes as those tiny dots can be so hard to deal with and loose! You get a penguin, a polar bear and a snowman with this die set!
Again, I thought it would be fun to create a background for my card and tag set, so this time, I’ve taken the TE Let It Snow Layering Stencil set for a snowy background. I’ve started with a Mint Julep cardstock base, blended the same color ink for the first layer, Sugar Cube ink for the second layer and for the third layer, I’ve used some TE Glitter Grab and immediately covered it with some TE Silver Glitter. Love how it turned out with the subtle color!
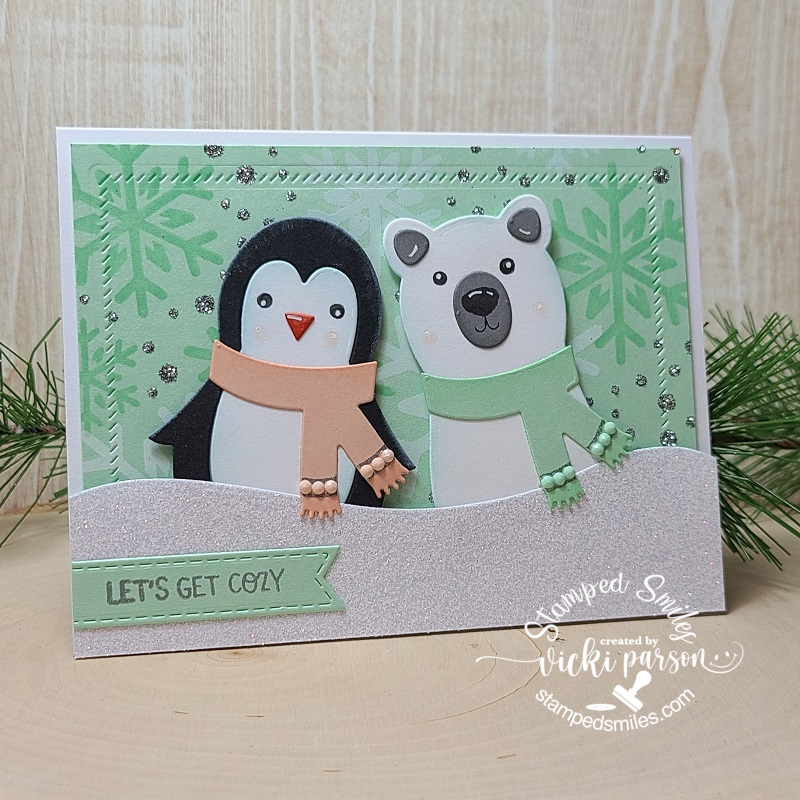
Starting with my card details, I’ve decided to give the snow squad critters soft colors with their scarves. The clear stamp set with the dies also come with a two-line image for adding details to the scarf, so I silver heat embossed those and then added some matching TE Tiny Diamonds Pastel in between those lines. They matched up perfectly! I inked around the edges of each die cut piece for the critters and stamped the face images including the cheeks which I off-stamped first to keep them light. I used a white gel pen for highlight details.
I thought it would be fun to have these Snow Squad critters pop out from a snow drift, so I took some TE Sugar Cube Glitter Cardstock and cut out a “snow drift” with a piece of the their scarves over it and popped them up over the snowy background I’ve created using a TE Diagonal Stitch Rectangle Stacklets for the stitching details behind them which was layered over an A2 sized Sugar Cube top folding card base. For the sentiment, I silver heat embossed it from the TE Winter Wishes clear stamp set over a Mint Julep cardstock that was cut out using the TE Stitched Banner Stacklets die.

And of course, I had to use the penguin again for my coordinating tag! I’ve used part of the same background I’ve made for the card and cut it out using the TE Tag Stacklets 2 die set with another Sugar Cube cut out for the layering base.
I did the same thing for this tag that I did for the card above with the snow drift, but I also added a tiny tag that he’s holding with some Doodlebug Gray Twine. The tag was created with the same TE (new) Itty Bitty Sentiments & Tag Holiday sets. I’ve stamped the row of tiny trees from the set with the Mint Julep ink and then silver heat embossed the sentiment above it. I’ve also used more of the TE Tiny Diamonds Pastel for the center of the bow on the present along with the penguin’s scarf. I’ve punched a hole at the top and added more of the same twine at the top.
So how about you?! Are you ready for the up-coming Holiday Season? I sure hope that I was able to bring you some inspiration with your handmade projects for the Holidays! Again, you can check out all of the brand new Taylored Expressions products in the store as it’s now been released! Be sure to check out all of the wonderful inspiration on her blog too!
Thanks so much for stopping in today! I appreciate all of your kind support friends! Have a great day!
Challenges:
- Happy Little Stampers – OCT Anything Goes with Dies (all projects are using dies!)
- Simon Says Stamps Wednesday – NOT a card
- Penny’s Paper-Crafty – Anything Goes using paper
- Krafty Chicks – Christmas
- Creative Knockouts – Embossing (I used heat embossing)
- The Crafter’s Cafe – Use a Stencil (used on all projects)
- Creative Fingers – #217 Anything Goes
- Lil Patch of Crafty Friends – Anything Goes
