Snowman’s Birdie Friend For Whimsy Stamps

Hello friends!  I really can’t believe how COLD it’s been our way especially for October!  We even have SNOW in the forecast!  Eeek!  Now that’s scary for Halloween!

So since Christmas is on the way, I suppose it’s a good time to get into the spirit of the cold with a cute little snowman and his friend from Whimsy Stamps:

Vicki-WSSnowmanBirdie-Oct29

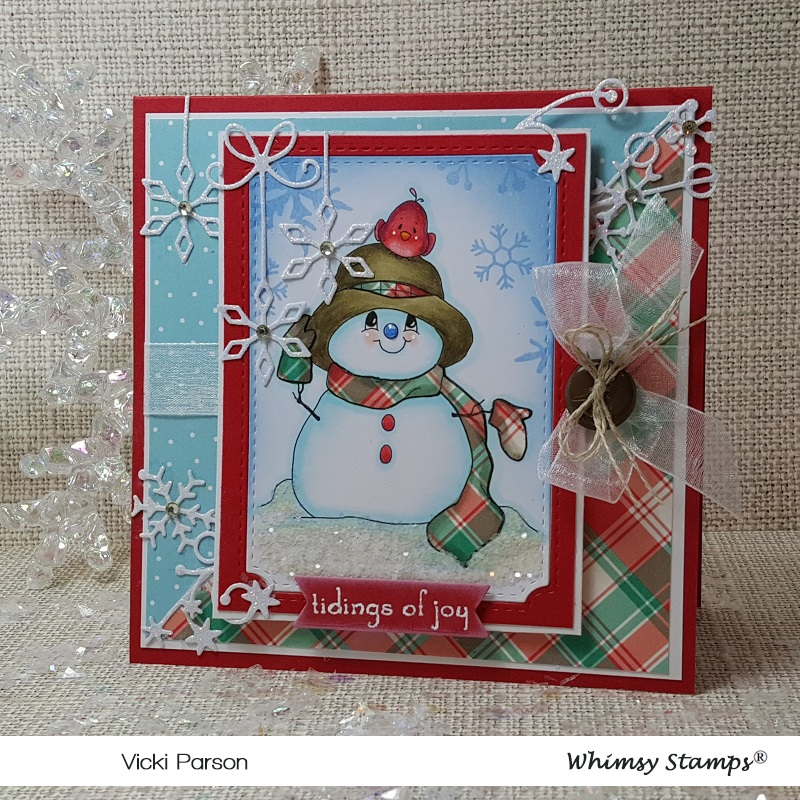
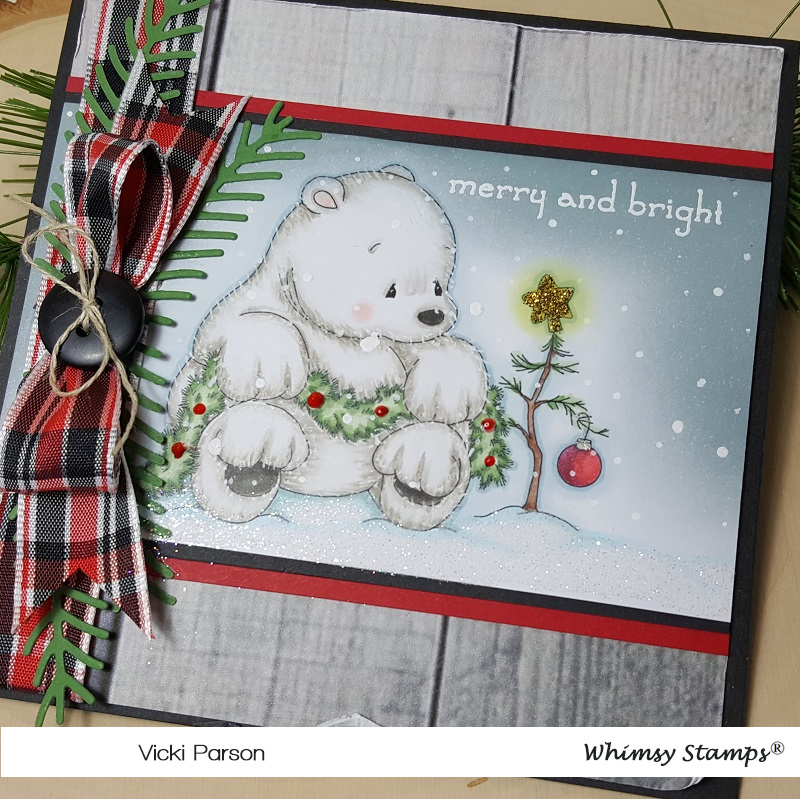
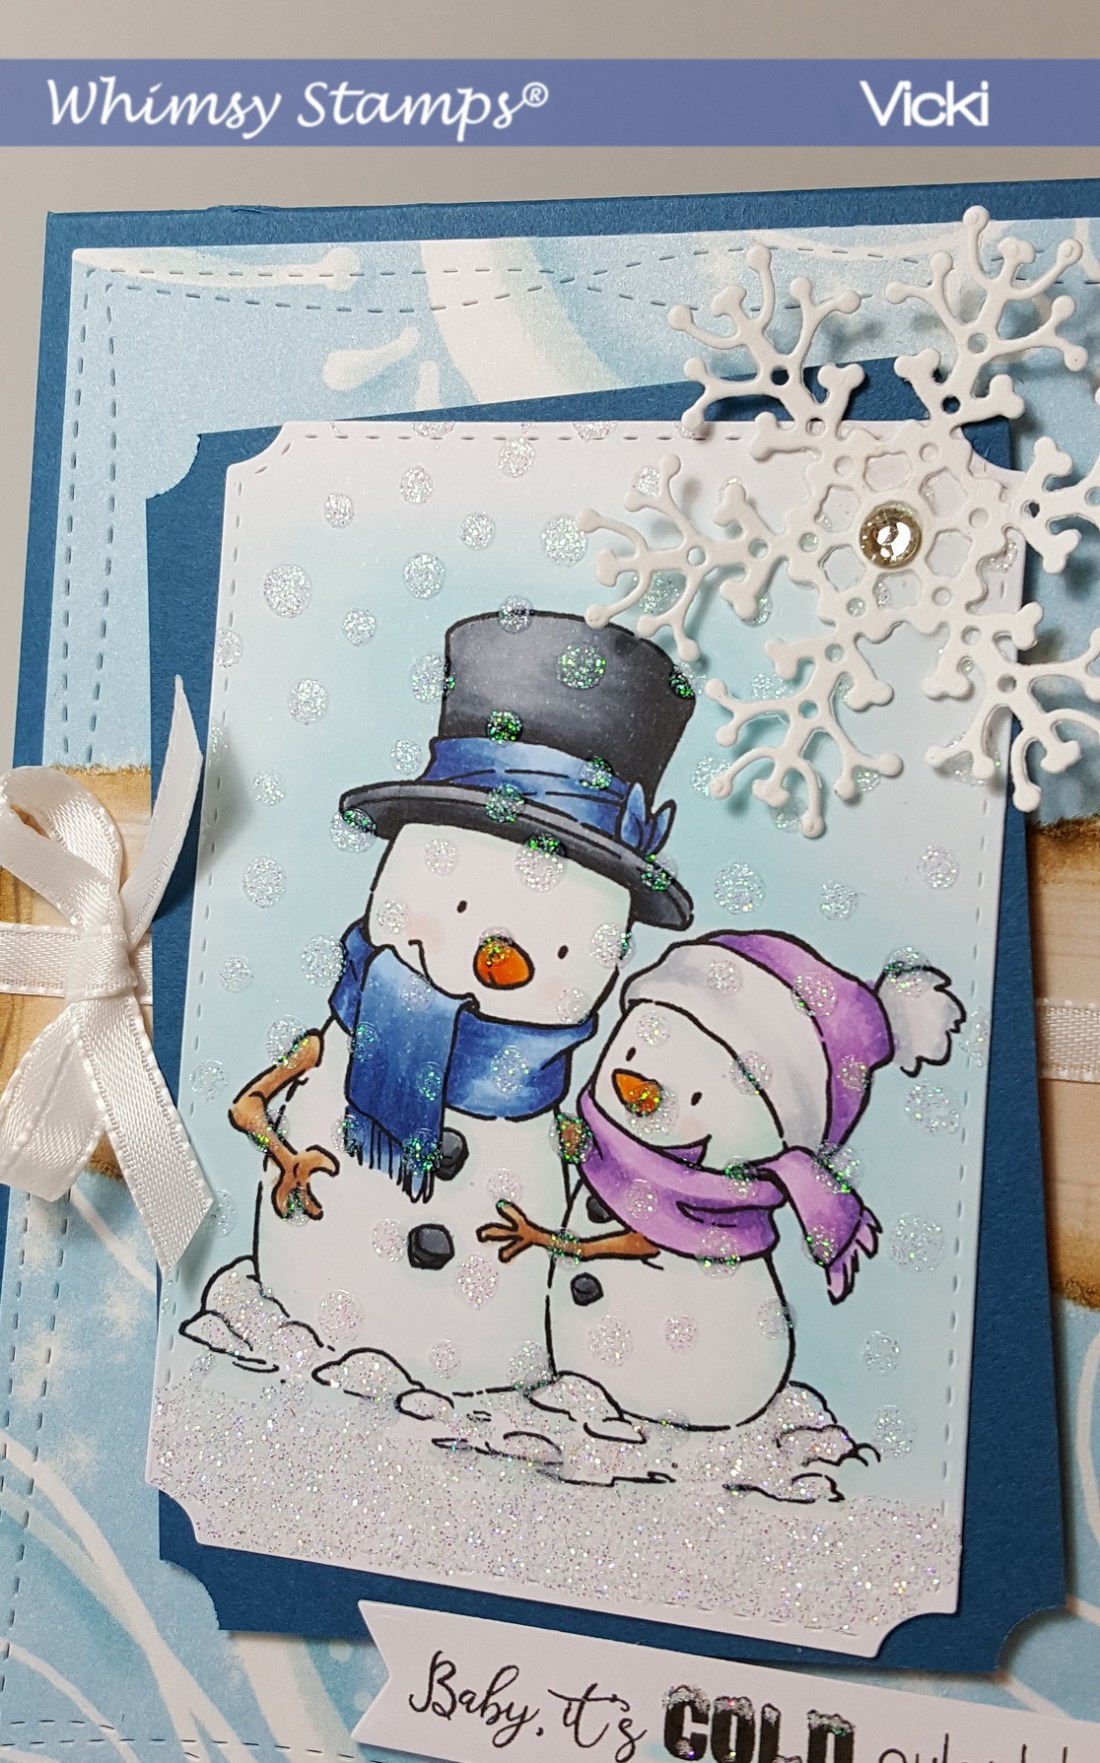
This guy looks so happy that his bird friend found a place to rest on his hat! 🙂  This image is called Snowman’s Birdie Friend by Crissy Armstrong for Whimsy Stamps.

I wanted to make a nice little “snowy scene” for the image, so I took out the Whimsy Stamps Snow Flurry clear stamp set and stamped some of the snowflakes from the set around the top of the image panel.  I then die cut the image out along with creating a red “frame” with the Whimsy Stamps Notched Rectangles die set.  (To do this, I just glued the red frame made with the die onto a piece of white cardstock and then glued the image panel inside the red frame.  It’s the same size, so it fit into each other.)  At this point, I added some glue to the bottom area under the snowman and sprinkled on some chunky white glitter for the snow-covered ground.

Since I was following a card sketch (see challenges below), I took out some papers from my stash and cut them on a diagonal and attached them over a piece of white cardstock and then wrapped some white organdy ribbon around it before attaching it to the top folding red 5″ square card base.

I took the Whimsy Stamps Holiday Mini Sentiments clear stamp set and white heat embossed the sentiment over the red cardstock and cut it out with a banner die from my stash.  I popped this up with foam tape over the image panel.  I also had a snowflake die and a border snowflake die that I cut with some glitter cardstock and attached around the card design and added some rhinestones in different areas.  (I thought this helped add to the wintry scene of the image too.)

Lastly, I’ve added a brown button and natural twine over top of my white organdy bow.

Vicki-WSSnowmanBirdie-Oct29-close

Here’s a closer view of how I’ve colored in the image.  As you can see, I’ve done a bit of paper piecing on the image by taking the same paper from the right edge of the card design and using it for the scarf, mittens and hat band.  (I’ve used Copics to give it a bit of shading too, which you can see details below.)

Maybe a bit hard to tell in the photo, but I’ve added just a small dot of Glossy Accents to his blue nose.  There are also highlights with a white gel pen on his nose, cheeks and the bird’s cheeks.

Here’s the Copic markers I’ve used to color the image with:

  • Snowman’s Hat – E89, E87, E84
  • Bird & Buttons – E39, E37, E35, E32 (Y17 for beak)
  • Snowman’s nose – B26, B24 (R00, R000 for cheeks)
  • Snowman’s Shadows – B00, B000, B0000
  • Scarf and Mittens Shadows – W3, W1

Vicki-WSSnowmanBirdie-Oct29-flat

Hope you’ve enjoyed my card today and it has brought you joy in some way! 🙂  I sure had lots of fun putting it together!  Thanks so much for joining me today and I’ll see you soon!

Challenges:

  1.  Sketch Saturday – Sketch #587
  2. Crafty Creations – Anything Goes #401
  3. Jingle Belles – Rudolph and Friends
  4. Crafty Catz – Anything Goes
  5. Winter Wonderland – Merry and Bright
  6. QKR Stampede – Anything Goes #369

Merry and Bright for Whimsy Stamps

Hello friends!  Hope you all had a wonderful weekend!  I had another great weekend out with hubby, but this time we visited Starved Rock National Park.  Really amazing nature hike we took and I’m wore out!  I sure wish I was able to do more hiking than what we did, but what we did do was amazing.  I will share some photos soon of our last two weekends out.

For today I have a sweet image from Whimsy Stamps to share with you and another Christmas card that I was able to add to my pile which is always nice to have!

Vicki-WSPolarBearXmasTree

This little guy is so sweet trying to decorate his poor “Charlie Brown” Christmas tree here! LOL!!  This is another adorable Crissy Armstrong image called Polar Bear’s Christmas Tree.

I’ve cut out the image the whole length of the card front panel and layered it over a piece of black cardstock and then some red cardstock.  I was placed over a piece of digital paper that I printed out from the Whimsy Stamps Rustic Wood and Brick Digital Paper Collection.  I ran the edge of some scissors along the edges of it and then added some of the plaid ribbon along the left side.  I then mounted this over a 5.25″ square top folding black card base.

I die cut some pine boughs from green cardstock and arranged and glued it down over the strip of plaid ribbon.  I then added a plaid ribbon bow over top and then attached a black button with a twine bow in the center of that.

Vicki-WSPolarBearXmasTree-close

I’ve put a lot of detail into this image which is why I wanted this to be the main focus of the card.  I actually didn’t use too many different colors of Copic markers, but it took a while to get the “fur” looking the way I wanted.  (See list below.)

I started the scene by ink blending around the top edges and a bit around the sides with Weathered Wood distress ink.  After the ink blending, I took the sentiment from the Whimsy Stamps Holiday Mini Sentiments clear stamp set and white heat embossed it over the top right edge of the image panel.

For finishing details, I took some yellow chalk for around the star at the top of the tree for a glow look and then covered the star with some gold Stickles.  I brushed the red ornament with a glitter brush pen and then the “hook” was colored with a gel pen.

I covered the entire bottom of the image panel with a glue pen and then sprinkled on some clear glitter for the snow.  Lastly I’ve added some red “berries” to the garland that the polar bear is holding with some Red Nuvo Drops.

Here’s the list of Copic markers that I’ve used to color in the image with:

  •  Polar Bear – W9, W7, W5, W3, W1, W0, blender 0, R00 and white gel pen
  • Tree and Garland – E25, E23, YG67, YG63, YG61, R39, R37, R35
  • Snow Ground and Shadows – BG000

Vicki-WSPolarBearXmasTree-flat

I love the “woodsy” look to this image and I was trying to capture it in my design too.  I hope that you’ve enjoyed my Christmas card today and were inspired or helped bring you a smile!

Thank you so much for stopping in with me today and I’ll be seeing you soon!

Challenges:

  1.  Merry Little Christmas – Anything Christmas Goes
  2. Crafty Animals – Anything Goes + animal
  3. Christmas at Sweet Stampin’ – Anything Goes with optional: stars
  4. Crafty Creations – Anything Goes
  5. Simon Says Stamp Wednesday – Christmas
  6. CRAFT – Christmas
  7. Crafty Catz – Anything Goes

Whimsy Stamps New Release with 2 Christmas Tails

Hello friends!  It’s October 1st which also means it’s time for a brand-new release for Whimsy Stamps…I’m back to share a card I’ve made for the brand-new digital release at Whimsy Stamps.

Today I’m sharing a Christmas card I’ve made using an adorable image:

Vicki-WS2XmasTails-Oct1

These adorable critters are having some festive fun!  This image is by Crissy Armstrong called “2 Christmas Tails“.

This is an unusual size and card opening for me on this card, but I wanted to be sure that the image fit completely on the design I was creating.

So I started with a 4.5″ x 5.75” side folding white card base.  I took a piece of red foil paper and clear heat embossed the snowflakes over it from the Whimsy Stamps Basic Christmas Backgrounds clear stamp set.  I mounted this over a piece of gold foil paper, added the striped paper in the bottom corner, the oval cut image panel and tied a glitter ribbon around the layers and mounted it to the white card base.

I took the Whimsy Stamps Christmas Large Word die and cut it from some of the gold foil paper and layered it over top of the gold foil banner I created by black heat embossing the sentiment.  I finished it off with some snowflake rhinestones above the critters.

Vicki-WS2XmasTails-Oct1-close

Here’s a closer look at how I’ve colored in these adorable critters.  The photos never show everything about the details of the card, but it’s so cool in person! 🙂

I’ve used Copic markers to color this in.  Here are the colors that I’ve used:

  • Santa Hats & Candy Cane – R39, R37, R35, R32, BG000
  • Bunny – E35, E33, E31, E30, R20, R00, C3, C1, C0
  • Mouse – W7, W5, W3, W1, R20, R00
  • Bell – Y28, Y26, Y21, YG13, YG11
  • Ground/Shadows – E84, E81, C1, E0000

I used a white gel pen for highlights on the candy cane and parts of the bunny’s tail.  I also covered the bell with a glitter brush pen.  I took a glue pen and added some clear glitter over the hat trimmings.  To get the blue faded color around the image, I used the oval die I cut it out with as a “mask” to blend some blue distress ink softly over it.

Vicki-WS2XmasTails-Oct1-flat

I hope you’ve enjoyed my Christmas card today and have been inspired in some way!

Thanks so much for joining me today and I’ll be seeing you soon!

Challenges I’d like to enter this card for:

  1.  Crafty Creations – Anything Goes
  2. The House That Stamps Built – S2519 Anything Goes
  3. Creative Knockouts – Anything Goes
  4. Crafty Catz – #476 Anything Goes
  5. QKR Stampede – #365 Anything Goes
  6. Simon Says Stamp Monday – Let’s Get Ready for Christmas
  7. Crafty Cardmakers – Add a Critter
  8. Sketch Saturday – (I turned sketch)

Clearly Foiling

Hello friends!  I had so much “foiling fun” that I kept going with making more!  This time, I’m using those “clear sheets” from the Designer Toner Sheets:

For my Christmas card here, I’ve used my laminator to foil over the “clear sheet” from the Peppermint Twist Designer Toner Sheets with the Red Static Foil Sheets.  This creates a “see-through” area for the shaker contents.

For the shaker part, I’ve taken a Self-Adhesive Shaker Pouch, attached it to a piece of white cardstock, very carefully trimmed off the edges, filled it with lots of sequins and confetti stars and then sealed it up to keep the contents inside moving freely.  I then placed the clear foiled piece over top of it by using some Stick-It sheets which helps to keep the adhesive from showing through.

I then took an A2 sized top folding white card base and used some score tape along the two edges and then rubbed some of the Gold Static Foil over it.  I then took the shaker panel and mounted it over top.

Vicki-FoiledShaker-Christmas-close

The greeting and the Santa hat were attached over top from the Yuletide Greetings stamp set that I’ve cut out using the Yuletide Greetings Cut File.  I’ve colored up the hat with Copic markers and then added some glitter over the fur trimming.  I’ve just used my Xyron machine to run adhesive on the back of these pieces to adhere them.

Vicki-FoiledShaker-Christmas-Flat

I’ve added a ribbon in the upper corner with a couple of gold bells tied to the center of the bow.


So I continued on with my “foiling fun” by also making Halloween too….

My second card uses one of the clear sheets as well from the Carved Designer Toner Sheets and I’ve used the Orange Sketch Foil sheet over that.  Since this is a clear sheet, I thought it would be fun to make the pumpkin faces stand out a little bit.  So I turned the sheet over and added some glitter behind each pumpkin face and let it dry.  (This might take some time to dry depending upon how thick you make it.)  Once dry, I took a Stick-It sheet again to attach it to a piece of black cardstock.

I mounted this over a piece of Green Neon Cardstock that I’ve also used for my sentiment banner.  I then added these layers over an A2 sized top folding card base.

Vicki-FoiledPumpkins-close

Here you can see the glitter showing through pumpkin faces and how they appear to somewhat “glow” with the darker panel behind them.

For the sentiment banner, I took the sentiment from the Trick or Treat stamp set and heat embossed it with the Raven Sparkle EP and cut it into a banner.  I added a small wooden pumpkin for the accent that I painted with orange paint and clear glitter paint over that.

Vicki-FoiledPumpkins-flat

Thanks so much for stopping in today!  I hope that you’ve enjoyed my creations and were inspired in some way!

Wishing you all a wonderful rest of your weekend and I’ll be seeing you again soon! 🙂

It’s Time for Foiling Fun!

Hello friends!  Happy Saturday!!  I hope you have a fun weekend planned!

I’d like to share with you a couple of creations that I’ve made using some new Deco foil products:

For this card, I used both the Red and Gold Static transfer sheets and foiled it with the Ornamental Toner Sheet.  I first foiled it in red (but that sheet wasn’t used for this.)  I took the negative of that red piece and placed it over a full Deco Foil Toner Sheet and then the black areas where the ornaments are, I took the gold transfer sheet and foiled the ornaments in that.  So it’s sort of a double foiling!

I added this foiled panel over a piece of white cardstock that I wrapped some gold ribbon around and then I heat set the sentiment from the Yuletide Greetings stamp set with Gilded embossing powder.  The sentiment was stamped with Embossing Ink from a Yuletide Greetings Cut File.  I also had fun making a Halloween card:

For this card, I pretty much did the same as the card above in where I took the “negative” from the foiled Webbed Toner Sheet using the Gold Transfer Sheet which made the webbing black.  I left it like that for the background of my card.

For the “ground” I took a piece of black cardstock and ripped some strips for the “dirt” and sponged the edges of it with a gold ink.  I took the images from the Trick or Treat stamp set and colored them up, fussy cut them out and arranged a scene at the bottom.  I took a Copic liner to write in my own grave markers. 🙂

I took the silhouette bat from the stamp set and heat embossed it over the foiled background with Raven Sparkle embossing powder.  I also used this for the sentiment banner that I made from some Speckled Egg card stock.  I also took some of the same cardstock and layered it behind the card front and then mounted this over an A2 sized top folding card base.

Hope you’ve enjoyed my fun foiled cards today!   Thanks for stopping in today and I’ll see you again soon!!

Challenges:

  1.  Always Fun – Create a Scene #127 (bottom Halloween card)
  2. Pammies Inky Pinkies – PIP1936 Anything Goes
  3. Simon Says Stamp Monday – Stamp It
  4. Sweet Stampers – Use a Sentiment
  5. Through the Craft Room Door – Anything Goes
  6. Crafty Creations – Anything Goes

It’s Anything Goes for Cute Card Thursday!

Hello friends!  Here we are with the first week of September already coming to the end!  Wow!  I think it may be time to start thinking about that “C” word! (Christmas of course!)

Today is a new challenge over at Cute Card Thursday today and we have our first of the month “Anything Goes” challenge this week!  We our sponsored again by the lovely Whimsy Stamps, so be sure to enter for a chance to win a fun prize!

Here’s what I’ve made with our sponsor’s product:

Vicki-CCT598-WSPenMistletoe-Sept5

I’ve used this really sweet digital image from Whimsy Stamps called “Penguins Under the Mistletoe” and of course Crissy’s penguins are so fun to color up!

I have followed a sketch for my design using a challenge (see below) and have pulled out some older papers in my stash that I thought looked really festive and went with the colors I have picked out.

I white heat embossed the sentiment from the Whimsy Stamps Holiday Mini Sentiments on the green colored layer and popped the image panel layered in red cardstock over top with some foam tape.

I’ve taken some silver glitter paper and die cut a few snowflakes from the Whimsy Stamps No-See All Season Tree die set along with cutting a strip for the top of the card too.

Vicki-CCT598-WSPenMistletoe-Sept5-close

Here’s a closer view of the image so you can see how I’ve colored it up.  I’ve used the following Copic colors below:

  • penguin bodies:  C8, C7, C5, C3, C1, R20, R00, Y38, Y35, Y32
  • Santa Hat and Candy Cane:  R39, R37, R35, R32, BG000
  • Mistletoe:  YG67, YG61 (berries are red Nuvo Drops)
  • Hat and Scarf:  BB26, B24, B21, BG000
  • Gift:  G09, G07, Y17, Y15, Y11
  • I used BG000 for snow ground shadows

I went around the edges of the image panel with Tumbled Glass Distress Ink and the ink foam blending tool.  I ten took my quicky glue pen and added some dots for the snow as well as underneath the penguins and sprinkled on some glitter.

Vicki-CCT598-WSPenMistletoe-Sept5-flat

Thanks for stopping in and I’ll see you again tomorrow for something fun!

Challenges I’d like to enter this for:

  1.  The Holly and Ivy Christmas Challenge – Anything Christmas Goes
  2. Sketch Saturday – Pick any sketch from 215-578 (I chose sketch #356)
  3. Merry Little Christmas – Anything Christmas Goes
  4. Love to Craft – September Anything Goes
  5. Pammies Inky Pinkies – PIP1935 Anything Goes
  6. ABC Christmas Challenge – ‘S’ & ‘T’ are for Sparkle and Texture

Be Merry for Paper Nest Dolls New Release!

Hello friends!  I hope you’ve had a wonderful weekend!  I was busy making “treats” for my husband to content him for the week!  LOL!  Speaking of treats, Paper Nest Dolls has a brand new mid-month release and it’s full of ADORABLE images!

As a matter of fact, I’ve made a card with one of them here and it’s my very first Christmas card of the year!

Vicki-PNDElfJackinBox-Aug

Isn’t she so sweet?!  This one is called “Elf with Jack-n- Box” and she is available from the store.

I thought this “elf” needed to be colored up in green and so I found some fun papers to compliment her along with a sparkly silver glitter strip of cardstock, and added some seam binding, twine with button and festive embellishments too!

Everything was mounted onto a 5×5 white top folding card base.

Vicki-PNDElfJackinBox-Aug-close

Here’s a closer look at how I’ve colored her in with my Copic markers.  I’ve used some gel pens to color in parts of the “Jack in the Box” as well.  I’ve cut her out with a stitched rectangle die and white heat embossed the sentiment over a strip of red cardstock and I cut out and attached along the side of the image panel and then I used some white ink to sponge around all the edges.  I’ve added some rhinestones on the sentiment strip and then I popped up the image panel with some craft foam before attaching it onto my card.

Vicki-PNDElfJackinBox-Aug-flat

I hope you’ve enjoyed my festive card today!

Thank you so much for stopping in today and I’ll see you soon!

Challenges:

  1. Merry Little Christmas Challenge – August Anything Christmas Goes
  2. Double D – Pearls, Gems or Rhinestones
  3. Creative Knockouts – Tic-Tac-Toe (I went diagonally from top left:  stamp, sentiment, ribbon/twine
  4. QKR Stampede – #360 Anything Goes
  5. Crafty Friends – Add embellishments

Find Peace with a Winter Deer

Hello friends!  As I had mentioned in yesterday’s post, we are currently being hit with snow AND ice over my way…so I might as well embrace it, right?!   Although I’ve been trying to sneak in some Spring creations, I also enjoy creating Christmas/Winter cards throughout the year so that I can take my time and not be hurried during the rush of the Season at the end of the year which makes it more enjoyable…and peaceful! 🙂

I’m using a stamp set called Winter Deer which I’ve used on my card for today:

Vicki-SnSWinterDeer-Feb

I started out with a piece of watercolor paper and used the Blue Blitz and Atlantis Burst Nuvo Shimmer Powders to create the background by spritzing it with water until I achieved the look I wanted and set aside to dry.

I cut this panel out with an oval die and using my cut-out deer for reference to see where I wanted to position the sentiment, I embossed the sentiment from the stamp set with White EP.  I used some Magic Speckle EP for a really cool background effect over the watercolor panel! (You can see it better in the photos below.)  I’ve used both Dimensional Glue as well as foam dots to attach the deer image and oval layers together.  I’ve used both white cardstock as well as some gold mirror cardstock for the layered panels.

Vicki-SnSWinterDeer-Feb-Close

Here’s a closer look at the Copic coloring I’ve done on the deer as well as the Magic Speckle EP effect on the background!  Since it’s a thicker type of powder, I didn’t attach it with anything.  I just added “piles” of it where I wanted and melted it from underneath, so it didn’t blow all over.  Loving how it has that “icy look” to it!

For the deer, I’ve used my Tim Holtz 5″ Mini Scissors to VERY carefully cut this image out and then used a black marker to go along the edges to hide my imperfections. For the snow over the branches, I’ve used a Nuvo Precision Glue Pen to go over it and then sprinkle some Sparkling Snow Glitter over it.  I also took the Nuvo Red Berry Crystal Drops and covered the “berries” with it.  I set this aside until dry to work on the rest of my card.

Vicki-SnSWinterDeer-Feb-Flat

So for the glittery background panel behind the oval layers, I took a piece of white cardstock and attached it with a piece of the Adhesive Sheets and die cut it out with a scallop rectangle die.  I removed the release paper from it and burnished some of the same Sparkling Snow Glitter into this panel.  I attached it over another piece of gold mirror cardstock and then wrapped some organdy ribbon around it and attached a bow along the side.

In the center of the bow, I added a snowflake sequin and then put a dot of the Dimensional Glue in the center of it and then added some more of the Sparkling Snow Glitter.

These layers were attached to an A2 sized top folding white card base and then the oval layers were attached over the glitter panel next to the bow.

I hope you’ve enjoyed my card today and got inspired to keep ahead of making your Christmas cards this year!  Thank you so much for dropping in!  I really appreciate your kindness and support so much!!  (Reading your comments always brightens my day more than you know! HUGS)

Challenges I’d like to enter this card for:

  1.  Winter Wonderland – Anything Christmas Goes
  2. Merry Little Christmas – (MLCCB7) Anything Christmas Goes
  3. The Holly and Ivy Christmas Challenge – Anything Christmas
  4. 4 Crafty Chicks – Lots of Layers
  5. Happy Little Stampers – Anything Goes with Dies
  6. Allsorts – Winter Sparkle

Anything Goes for Cute Card Thursday

Well can you believe the first week in December is almost already done?!  Yikes!  Christmas is coming very quickly, so I’m happy to be making up some more Christmas cards as I post along here! 🙂

Today starts another new challenge over at Cute Card Thursday and this week it is an easy “Anything Goes“!  So play, create and have fun to your heart’s content and share it with us in the gallery over there!  We look forward to seeing what you’re working on!

Vicki-WS-Christmas Unicorn-CCT559-Dec6

Now I don’t know about you, but I think a unicorn for Christmas would be a “yes please”!  I have used the new December image by Crissy Armstrong called A Christmas Unicorn.  I thought there was lots of opportunity to really bling up this fun image!

First, I have colored up this image with the following Copic markers:

  1.  Unicorn mane/tail/hooves: W9, W7, W5, W3, W1, W0
  2. Unicorn body:  C3, C1, C0, R00 (nostril/ear)
  3. Unicorn horn:  YR24, Y23, Y21
  4. Candy Cane/Ornaments:  R39, R37, R35, C1 (white areas)
  5. Tree:  YG67, YG63, YG61
  6. Star/Bell:  YR24, Y17, Y15, Y13
  7. Ground/Around entire image:  B00, B000

Then I thought one of the sentiments from the Whimsy Stamps Penguins Christmas Sentiments 1 digital set fit perfect with this image.  I fussy cut it out by hand as to capture the curve in the design and then I used a sponge dauber to apply a bit of ink around the edges of it and glued it right underneath the image.  (I think it makes it look sort of like a little ‘snow drift’ in front of the unicorn.)

For the card front base, I’ve picked out some papers to use from the Whimsy Stamps Christmas Red, Gold & Green digital collection and then added a silver glitter strip as well as a red cardstock strip that I ran through an embossing folder and then rubbed some white ink over the raised areas.  I glued these pieces to the green paper and then cut it out with a stitched rectangle die.  I mounted this piece over a piece of red cardstock that I attached to an A2 sized top folding white card base.

Vicki-WS-Christmas Unicorn-CCT559-close

Now for the details of my image, I’ve used a Spectrum Noir clear glitter brush pen to go over the unicorn horn and bell around his chest.  I then covered the candy cane with some glossy accents.

For the garland around the tree, I took a Nuvo Precision Glue Pen and sprinkled on some Sassy Silver Glitter.  For the star, I used Diamond Dust Glitter, and then, for on top of the sentiment as well as along the edges of the image panel, I ran some Nuvo Liquid Glue over it and then sprinkled on some Waterscape Glitter.  (You can see the difference in the glitters next to each other.  The Waterscape is finer than the one I used on the star.)

Vicki-WS-Christmas Unicorn-CCT559-1

I’ve then mounted the image panel onto a piece of red cardstock and attached it to the front of the card front.  I took some silver sparkle cardstock and die cut three snowflakes and attached them to the left side of the image panel and added a red star rhinestone to the center of each one.

Really had fun with the festive colors and details on this one!  Hope you’ve enjoyed my card today!

Here are some challenges I’d like to enter my card for:

  1.  Tuesday Morning Sketches – TMS482 (I flipped the sketch around)
  2. Fussy and Fancy Friday – Winter/Christmas
  3. Inkspirational – Anything Christmas
  4. Crafty Animals – Anything Goes + animal
  5. Crafty Friends – Christmas
  6. Crafty Calendar – It’s Christmas Time

Whimsy Stamps New Release Snowman Couple

Hello friends!  I’m thinking after the several inches of snow we received last week; this is a really “time appropriate” creation to share with you!! LOL!  The first of the month is always a brand-new release for Whimsy Stamps.

Vicki-WS-SnowmanCouple-Dec3

For my card today, I’m using this darling new image called Snow Couple for my design!  Super quick and easy image to color up, so adding more details to it is always something fun! 🙂  I’ve taken the Whimsy Stamps Notched Rectangle dies to cut it out with.  I’ve also cut out a separate navy cardstock layer to mount behind it.

For my card front base, I’ve used the Whimsy Stamps Christmas Azure digital papers and cut it out with the Whimsy Stamps Hand Stitched Nested Rectangles die for the background and then mounted this over a navy A2 sized top folding card base.  Then I’ve also cut a strip of the musical papers from the Whimsy Stamps Christmas Traditions digital paper collection and then ripped each side of it.  I took some distress ink and sponged around the edges of it and mounted it over the card front base along with some white ribbon.

I took the image panel and navy layer and added some craft foam to the back of it and attached it to the front of my card base layer.  I took some more of the white ribbon and made a bow to attach to the side of the image panel.  I’ve also taken a sentiment from the Whimsy Stamps Penguin Christmas Sentiments 1 digital set and cut it out with a banner die that I then placed over the Hand Stitched Nested Rectangle die to make the stitch lines in it.  I then took some foam tape and attached it on the bottom corner.  For the sentiment, I’ve taken a Copic marker to go around the “cold” word and added some glitter for the snow details on it.

Lastly, I’ve taken an old Whimsy Stamps Snowflake die and cut out a piece from white card stock to attach at the top as an accent.  I put a rhinestone in the center of it.

Vicki-WS-SnowmanCouple-Dec3-close

For coloring up this image, I’ve used the following Copic markers:

  1.  Snowman top hat/coal buttons:  C8, C5, C3
  2. Snowmen bodies/arms:  BG000, R00 (cheeks), E33, E31 (arms), YR24, YR15 (noses)
  3. Snowman top hat trim/scarf:  B39, B37, B34
  4. Snowwoman hat/scarf:  V17, V15, V12, C1, C0
  5. Background Sky/Ground:  B01, B00, B000

After coloring this image, I’ve taken a snowflake stencil and then added some Nuvo Glimmer Paste Moonstone over top of it with a palette knife which created these cool glittery snowflakes over top of the image.  You can still see through to the image which is exactly what I was looking for.

I then took some glitter and added it to the ground, the snow around the snow couple as well as the letters on the word “cold” within the sentiment with both a Nuvo Medium Tip Glue Pen (for the ground), as well as a Nuvo Precision Glue Pen for the snow on the lettering.

Hope you’ve got inspired with my creation with the new Whimsy Stamps digital release this month!  Be sure to come back for more inspiration later on in the week!  Thanks for stopping by!

Here are some challenges that I’d like to enter my card for:

  1.  Try it On Tuesday – Winter Wonderland
  2. Crafty Catz – Anything Goes with optional twist:  Too cute
  3. A Perfect Time to Craft – Anything Goes
  4. Sisterhood of Snarky Stampers (SOSS124) – ‘W’ is for Winter
  5. That’s Crafty! – Winter Wonderland
  6. Stamps & Fun = Creativity – White/Blue