Q is for Quote

Hello friends!  I hope that all of U.S. friends celebrated a wonderful Thanksgiving!  I have a couple of scheduled posts while I’m away for today and tomorrow.  It’s a busy time of the year and I’ll try to keep up with my “blog duties” the best I can.

Today is a new challenge over at the Alphabet Challenge Blog!  Our next letter is “Q”, and this time it was my turn to pick a theme with this letter and I’ve chosen “Quote”   I hope you will join in the fun with us!  *Please remember that this is a bi-weekly challenge, so you have two weeks to enter.*  Here’s the project I’ve made for this challenge:

I’ve always loved using quotes for things and you can catch me with my kids saying quotes from movies all of the time.  We can say a quote and know exactly where it came from.  Some people don’t understand what we’re talking about which makes it even funnier!😉

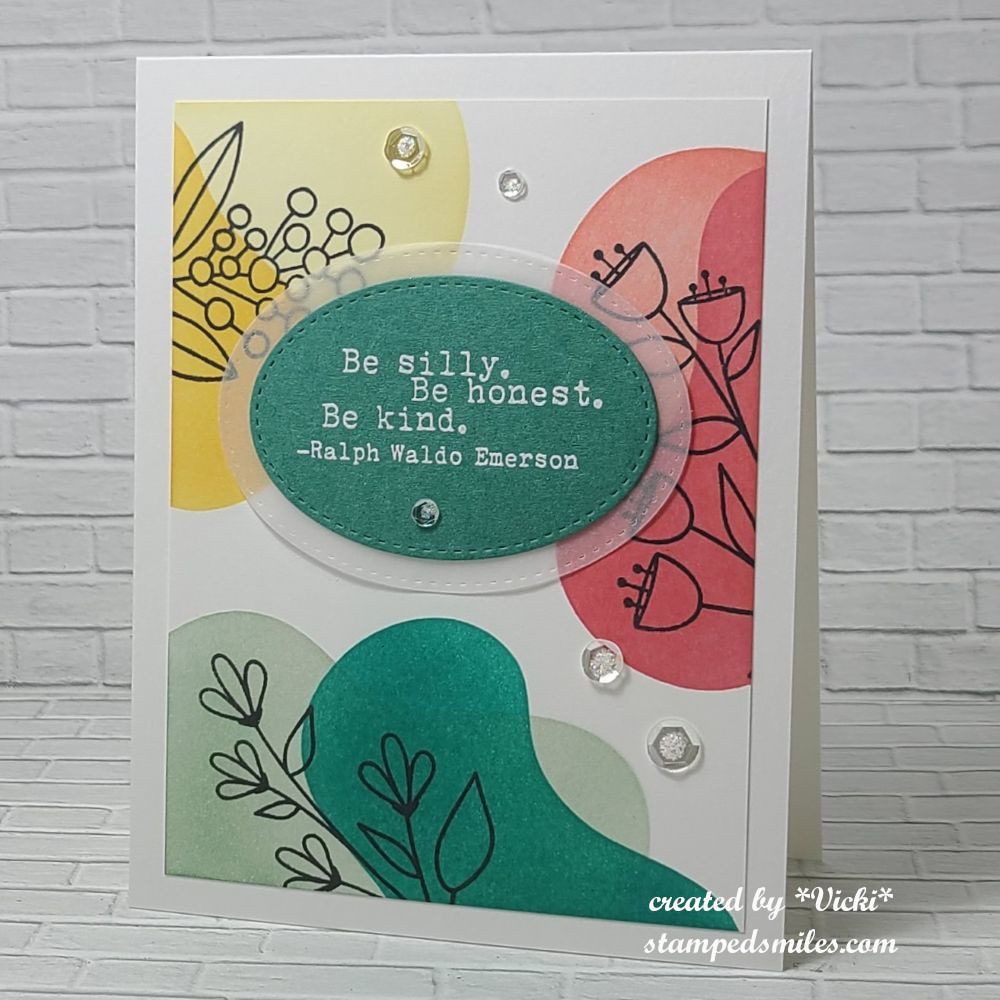
I’ve pulled out a Catherine Pooler stamp set called “Notable & Quotable” that I don’t remember where I purchased it from, but I fell in love with the quotes in it.  It also came with the flower images in the set too.

For the background, I used a My Favorite Things “abstract” stencil and blended over it with several different colors.  I then took a couple of the floral images from the stamp set and stamped over the stenciled “blobs”.  I then white heat embossed one of the quotes from the stamp set and cut it out with a stitched oval die and then layered another stitched oval vellum layer behind it.  I popped it up with foam tape over the center of the background and then attached the entire layer over a white top folding A2 card base.  Lastly, I added some clear sequins with Stickles in the center of each one.

  • Thanks so much for stopping in today!  I hope you like my card and will come join in the fun with us!  I’ll be back again tomorrow with my monthly Art Journal Page!

Mix It Up by Keeping it Simple!

Hello friends!  Happy November!  It seems like I was just thinking about Autumn with cooler temps…and now we’re getting REAL close to Christmas and the end of the year! Time is going so quickly!  Are you getting your Christmas cards started yet?

So let’s take a moment for ourselves and work on keeping life simple!  This brings me to a new challenge over at the Mix It Up Challenge Blog.    The challenges always run for 6 weeks so there is plenty of time to enter.  The theme given for us this time is: KIS (Keep It Simple) or you can always do the ‘Anything Goes” too.  Here’s the card that I came up with for the challenge using the theme:

I thought that “keeping it simple” for Christmas cards and getting down to the wire for making them and sending out would be a good thought for this challenge!

I pulled out this cute Scrapbook.com stamp set called “Holiday” to create a simple design with the solid bauble images and added a few heat embossed elements over two of them and then heat embossed a hook for each.  I heat embossed the sentiment in gold to match the hooks and then just stamped a couple of doo-dads around the panel and drew lines from the ornament hooks coming off the edge with a gold fine line pen.  That’s pretty much it!  I did die cut a few “Mini Bows” from Taylored Expressions for each ornament.  Then I layered the ornament panel onto gold and then onto a white A2 card base.

This would certainly be a very easy design to mass produce using the MISTI tool.

I hope you like my card and will stop by the challenge blog to see what the rest of the design team has created too!  *NOTE* This is the last project that I’m making for this challenge blog as I have decided to step down from the design team.  Thank you to Tina for having me as part of the challenge team this year and keeping the blog running.  Best wishes for the coming year!

Thanks so much for dropping in today!  Wishing you a wonderful weekend!

Challenges:

  1. Ally’s Angels Anything Goes
  2. Crafter’s Cafe Anything Goes with optional: Christmas
  3. ABC Christmas -‘U’ is for Uncluttered (CAS) & ‘V’ is for Vertical
  4. CRAFT Christmas

K is for Keep It Simple (CAS)

Hello friends and happy Friday!  The weather has decided to cool down quite a bit over the last couple of days and it’s been very nice to have the windows open for a change!  I think we’re supposed to have another spell of warm weather, but I’ll take the cool down for now!

Today is a new challenge over at the Alphabet Challenge Blog!  Our next letter is “K”, and the hostess has chosen “K is for KEEP IT SIMPLE (CAS style)   *Please remember that this is a bi-weekly challenge, so you have two weeks to enter.*  I hope you’ll join in the fun with us.  Here’s the project I’ve made for this challenge:

That cat is not a fan of winter! LOL  I do love me some snark for the Holidays, so I thought this stamp set called “Holiday Grumplings” (retired stamp set) from Taylored Expressions would be great for a simple Holiday card.

I also think that CAS style cards are great for pulling out those left over scraps from your papers for little strips to create a simple layout, so that’s what I did here.  I stamped, colored with Copics the kitty and popped him/her up with foam tape over the snowflake strip.

Lastly, I just added a light brush with pink ink to the left of the kitty and then gold heat embossed the sentiment over it.  Placed the white panel over a pink A2 sized top folding card base and done.

  • I’m happy to report that I’ve spent some time going through my stash of cards and realized that I have several already finished and ready for sending out Christmas cards!  So I’m basically DONE for Christmas cards!  Yay!  The first time ever that I’m ready ahead of time!  NOW…hopefully I’ll send them out on time too! LOL

Hope you’ve enjoyed my card today and helped to inspire you to “KEEP YOUR CRAFTING SIMPLE” and join us for the challenge!  Look forward to seeing what you make!  Thanks so much for stopping in today! 

Challenges:

  1. Critter Crazy Anything Goes with Featured Critter
  2. Crafty Animals Anything Goes including Animal
  3. Pammie’s Inky Pinkies – PIP2535 Anything Goes
  4. Merry Little Christmas Anything Christmas Goes
  5. Creative Inspirations Christmas in September

Clean & Simple at Sparkles Monthly

Hello friends!  We’re still having some very warm temperatures with humidity making it worse. With seeing the kids starting back up at school, I am so ready for Autumn weather to get here!  Notice I didn’t mention the “W” word…just Autumn! LOL  Hope your able to have stable conditions wherever you are.

Today is time to share a new challenge over at Sparkles Monthly and we have the theme of “CAS (Clean & Simple)  this month.  I always find this theme great for making a quick card when you need one.  Here’s what I came up with: 

Although I’ve only used one flower image for my card, I’ve also added a few die cuts and simple foiling on the sentiment to elevate the design a bit.

The flower image is actually the July “freebie” from Taylored Expressions when you place any order with them.  I quickly colored it up with Copic markers and then die cut the panel out with the TE Petite Scallop Gallery Builder die set and cut out another panel for the scallop frame around it with TE Blueberry cardstock.

For the sentiment, I used the TE Foil-It Sundry Sentiment panels and used the coordinating die set to cut it out.  I then used some silver Deco Foil over it.

Here’s a closer view of the flower and foiled sentiment pieces.  I forgot to mention that I’ve also dotted the center of the flowers with a silver gel pen.

For the finished card design, I used a regular A2 sized top folding horizontal white card base and then I cut an additional white card front piece from the TE Petite Scallop Rectangle Stacklets dies.  I also used the TE Diagonal Stitched Rectangle Stacklets dies to make the slanted stitch marks on the inside of the scallop panel.  (this doesn’t cut anything out, it just makes those lines around the edge.)

I placed this panel along with the flower and sentiment pieces over top to finish the card.

  • Hope you’ve enjoyed my card today and that you’ll stop by the challenge blog to see what the rest of the design team has come up with.  You have a whole month to join in the fun with us!  Hope to see your creation in the gallery!

Thanks so much for stopping by today!

Challenges:

  1. Crafts Galore Encore Anything Goes
  2. We Love Stamping – Flowers
  3. A Cut Above – Anything Goes with Die Cut(s)
  4. Pammie’s Inky Pinkies – PIP2532 Anything Goes
  5. Penny’s Anything Goes with Paper


The January Blues at Sparkles Monthly

Hello friends!  For those of us that experience the cold weather season for January, I hope you’re finding ways to keep warm.  I have been wrapping myself in blankets with fluffy slippers around the house…and yes, I have the heat up too! LOL  I think I seem to feel the cold more as I get older in age!  This week will be really cold for us here. So I suppose that’s why they say “January Blues”?🥶

Anyway, that brings me to the January challenge over at Sparkles Monthly and for this month, our hostess is asking for “January Blues” (monochromatic blue) on your project.  Be sure to stop by the blog to see what the rest of the design team has created for you.  Here’s my project for this challenge:

Usually, when I think of blues, especially in January, I tend to think of snowflakes.  I wanted to do something a bit different and decided to pull out my blue tone alcohol inks and make a background.  It was really fun to play around with, and of course, you make a panel and make more than one to save for other cards! Blue makes for such a great masculine card too.

I found some cardstock to match up with the background and die cut the alcohol panel with a stitched rectangle die, layered it over a piece of white to attach to an A2 sized top folding blue card base.  (I’m glad that I’m using some older items from my stash as I think this is old Stampin’ Up! paper that needs to be used!  I THINK it’s Pacific Point?)

I pulled out a leaf die from Taylored Expressions called Subtle Sprigs and cut one in white to place over top the alcohol background.  I also used the TE On Occasion stamp set by white heat embossing over blue cardstock, cutting it out with the die and placing it over the background with the sprig.

It’s a very simple card, but I wanted the alcohol background to take the stage on this one.

I hope you’ve been inspired today to play along with us this month for the challenge at Sparkles Monthly! (P.S.  This will also work with the Monochrome challenge at Mix It Up this month too!) Thanks so much for stopping in today with your kind support!  I really appreciate it!  See you soon!

Challenges:

  1. Addicted to CAS – #274 Blue
  2. Crafty Catz – #685 Anything Goes with optional: CAS
  3. Pammie’s Inky Pinkies – PIP2502 Anything Goes
  4. Try it On Tuesday – Feeling Blue
  5. C.R.A.F.T. – #746 Anything Goes 
  6. The Male Room – #194 Clean & Simple

Clean & Simple at Sparkles Monthly

Hello friends!  I hope you’re having a wonderful week so far!  We’ve been getting some rain, which is great for the freshly planted flowers.  I enjoy being able to sit on my covered porch and listen to it rain as long as it doesn’t get too stormy!

Today starts a new challenge theme over at the Sparkles Monthly Challenge!  For this month, we’d like to see your CAS (clean & simple) creations!  I look forward to seeing the inspiration in the gallery, so I hope you can join!  Here’s what I’ve made for this challenge:

Sometimes I can really struggle with a clean and simple design because I always feel like I need to add something more.  The end result is in the minimal embellishments and design.  This one got stuck in my head and came together rather quickly and I like how it turned out.

Most everything used on my card came from My Favorite Things.  I started with watercolor (Bristol Smooth) paper and the Watercolor Wash stencil and blended a rainbow of colors over it.  While the stencil was still in place, I took a water bottle to spritz water droplets over it and removed the stencil.  I let it dry and then clear heat embossed the sentiment that was stamped in a black pigment ink.  (The key to this is to make sure the watercolor area is completely dry before you heat emboss anything over it.)

I cut out the panel with a wonky stitched rectangle die.  I’ve attached it to an A2 side folding black card base.  I was pulled to splatter over this, but thought I needed to keep it simple, so I took some drip drops in “cosmic” color and added them randomly to the design.  

  • So, what do you think?  Simple enough you can do it too and enter it in the challenge, right?  If you need more inspiration, check out the challenge blog to see what the other design team members came up with for CAS.

Thanks so much for stopping in today!  I hope you have an amazing week!

Challenges:

  1. AAA Birthday – #61 CAS birthday card
  2. CRAFT – Birthday (Happy 15th birthday!)
  3. AAA Cards Anything Goes Birthday (Happy 10th birthday!) 
  4. Pammie’s Inky Pinkies – PIP2419 Anything Goes

Mix It Up with Inlaid Die Cutting!

Hello friends and happy May!  I hope you are having a wonderful week and have been enjoying your Spring season with lots of sunshine and flowers!  There’s always lots of things to do when the weather turns warmer, but that’s a good thing!

Today starts a new challenge over at the Mix It Up Challenge Blog!  There is always lots of wonderful inspiration from the team, so please go check it out and play along!  The challenges are always ANYTHING GOES with an optional themeThis month’s optional theme is Inlaid Die Cut (flat or raised)!  For these challenges, you have plenty of time to enter as they run for 6 weeks!  I look forward to seeing what you come up with!   Here’s the project I made:

I think this card turned out very well using the inlay die cutting technique!  I found the perfect dies, but of course you can use almost ANY dies you want to try this including your regular shaped die cuts!  I always find those frame style dies to be very easy to work with for this.

I received this cool freebie die from Taylored Expressions called “Simple Stems” and thought it would be perfect for this technique.  I also inlaid a sentiment die from my stash over top of the flower and inlaid that too.  I used the Taylored Expressions Frame in Frame 3 die set to create the middle pattern and glitter frame around the flower.  These were also inlaid into the white card front panel.  

It’s a little tricky at first to figure out in what order to die cut all of your pieces so that it looks right.  Mine is very flat which I find helpful for mailing out and with the cost of postage stamps going up again this Summer, I need to rethink the type of cards I make any more.  Here’s a photo so you can see that everything lays flat to the card front:

For the inlaid die cutting, I also find sticky sheets very helpful.  I took a piece of double-sided sticky sheet and placed it on the back of the white card front panel AFTER I had cut out the frame from it.  This makes the inside of the panel sticky so that I could lay all of my pieces on top and also keep it flush with the white card front panel.  Once I laid all of the die cut pieces, I took the backing off the sticky sheet and attached it the A2 top folding white card base with everything in place.  You also don’t have to worry about liquid glue oozing out.

It’s a simple CAS card, but it was so fun to do!  Hope you’ve enjoyed my card and take some time to check out the challenge this month!  Thanks so much for dropping in!  See you soon!

Challenges:

  1. Daring Cardmakers – “Something Old, Something New” (old glitter paper and new die cut + I used blue paper)
  2. Simon Says Stamp Monday – Feminine
  3. Moving Along With the Times – #166 Flowers

NO STAMPING ALLOWED at Sparkles Monthly

Hello friends!  It’s been a bit since my last posting!  I’m still crafting, but I’m also enjoying the outdoors lately too!  I’m just not making the time I need to post on my blog here!  However, being on a design team helps to keep me focused on posting and hopefully it’s something that will bring motivation because I need it!  So I will try and get some more posts in!

Today starts a new challenge over at the Sparkles Monthly Challenge and the theme is “No Stamping Allowed!This may seem a bit challenging, but I look forward to seeing what people come up with for it!  Be sure to check out the blog to see what the design team has come up with for inspiration!  Here’s what I’ve made for the challenge this month:

I was trying to channel something that would work and realized that I had these fun strip dies from Taylored Expressions and I wanted to play with some new colors, so I ran with that on the middle of my card front by alternating the strip colors.

I also die cut a frond three times and glued them together for thickness and sturdiness.  I attached it over the colored strip panel and then added a sentiment that was already toner printed so that I could foil over it with silver Deco Foil.  I also had a die that cut it out which was popped up with foam strips and added to the bottom of the die cut frond.  Lastly, I’ve just added some silver glitter drops randomly over the card front.

Hope you’ve enjoyed my non-stamped card today and will think about joining in the challenge with us this month!  Thanks so much for stopping in! Have a great week!

Challenges:

  1. Craft Rocket – Use Dies
  2. NBUS – #51 June – new colors and dies
  3. Creative Fingers – Anything Goes
  4. A Place to Start – Anything Goes and/or twist: flower + one other thing
  5. Penny’s Paper-Crafty – Anything Goes using paper
  6. The Crafty Addicts – Anything Goes
  7. CAS on Friday – Leaves


Going CAS at Sparkles Monthly

Hello friends and happy Wednesday!  Today starts a new challenge over at the Sparkles Monthly Challenge Blog and this time we would like to see your CAS (or “clean and simple”) creations!  I hope you will hop on over to see the inspiration from the team and consider joining in the fun with us!

Here’s the DT creation that I’ve made for it:

Sometimes I feel that CAS can actually be even more difficult than regular cards and I struggle with thinking I’ve added too much, or it doesn’t look right.  I think it’s more of me over-thinking something, though!

It was my son’s birthday yesterday and I thought this would be a great opportunity to make a card for him.  He’s a postal carrier, so I thought this cute owl from the Lawn Fawn Special Delivery would work great for this.  I started with the LF Stitched Cloud Backdrop and the LF Stitched Rectangle Frames dies to create the main focal panel.  I lightly blended some blue ink in a circle before adding the Copic colored postal owl popped up with foam.

Over some red cardstock, I white heat embossed the sentiment.  (I don’t remember which LF stamp set it came from) I die cut it with a banner die and popped it up over the cloud panel.  I also had an extra die cut heart lying on my table, so I thought it would be great to add with the owl.

Thanks so much for stopping in today!  Hope you’ve enjoyed my CAS card and have been inspired to join us this month with your take on the challenge too!

Challenges:

  1. Country View – Birthday card for a man
  2. Love to Scrap – Anything Goes
  3. 613 Avenue Create – Anything Goes optional: CAS
  4. Lawn Fawnatics – All things birthday
  5. Sunday Stamps – SSC304 sketchSSC304

Challenge Up Your Life with a RAINBOW!🌈

Hello friends!  I don’t know about you, but I’m so happy to see the month of May starting!  That means the flowers will be coming out along with the warmer weather!  It’s also a great time of the year to see a rainbow perhaps?!

#147_regenbogen_CUYL

Today I’m super excited to be joining the “Challenge Up Your Life” challenge blog as a guest designer!  I had previously won a Top 3 and a future guest design spot from a past challenge I had entered, so I’ll be joining them as a guest for April, May and June challenges!  Today their new monthly challenge for May is “RAINBOW“.  Hope you can share your lovely creations with us this month!  (Check out the challenge blog for details and inspiration!)

Here’s my guest design creation for this month’s challenge:

Nothing better than to look up into the sky and see a rainbow!  What’s also fun is to be able to create your own and especially on a card to send to someone to brighten their day!  I’ve used a previous card kit from Taylored Expressions that contained these products:  Make a Rainbow Stencils, Over the Rainbow clear stamp set, Rainbow Cloud Duo dies, and Over the Rainbow Sentiments clear stamp set to create this card.  I ink blended the different colors through the rainbow stencil and stamped the orange dots over the rainbow as well as a few hearts in light blue ink. The sentiment was also stamped with black ink over top of the rainbow.  I then die cut the one cloud twice from white cardstock and ink blended some light blue around the edges of it and popped it up with foam tape at the ends of the rainbow.

Then the card front panel was run through the die machine using the Taylored Expressions Diagonal Stitch Rectangle dies (Which actually doesn’t cut anything out but creates the lines.)  I layered it onto a piece of black to make the rainbow pop a bit more and then attached it to an A2 sized top folding TE Pineapple card base.  I also topped it off with a couple of TE Bits & Pieces-Full of Heart sequins. 

I knew the minute I went to create for this challenge that my zippered pouch from Taylored Expressions that has the “A Rainbow of Possibilities” sticker over it was what I was going to grab!  All of my rainbow things are in it!  Makes it easy to grab when you know everything is in there!

I hope you’ll stop over at the challenge blog and join with us to share your rainbow too!

I hope you’ve enjoyed my card or been inspired!  Thanks for stopping by and I’ll see you soon!

Challenges:

  1. Sweet Stampin’ – Rainbows & Rainy Days
  2. Arty Divas – Anything Goes
  3. Penny’s Paper-Crafty – Anything Goes
  4. Krafty Chicks – All Occasions (encouragement)
  5. Creative Fingers – Anything Goes