Mix It Up with Mixed Media

Hello friends and a happy July to you!  We’re celebrating July 4th Independence Day this weekend and I know it will be hot!  I think we’ll be watching fireworks from our TV inside the cool air this year!  Hope that whatever you’re doing this weekend that you stay cool and safe while you’re having fun.

Today also brings us to a new challenge over at the Mix It Up Challenge Blog.    The challenges always run for 6 weeks so there is plenty of time to enter.  The theme given for us this time is: Mixed Media or you can always do the ‘Anything Goes” too.  Here’s the card that I came up with for the challenge using the theme:

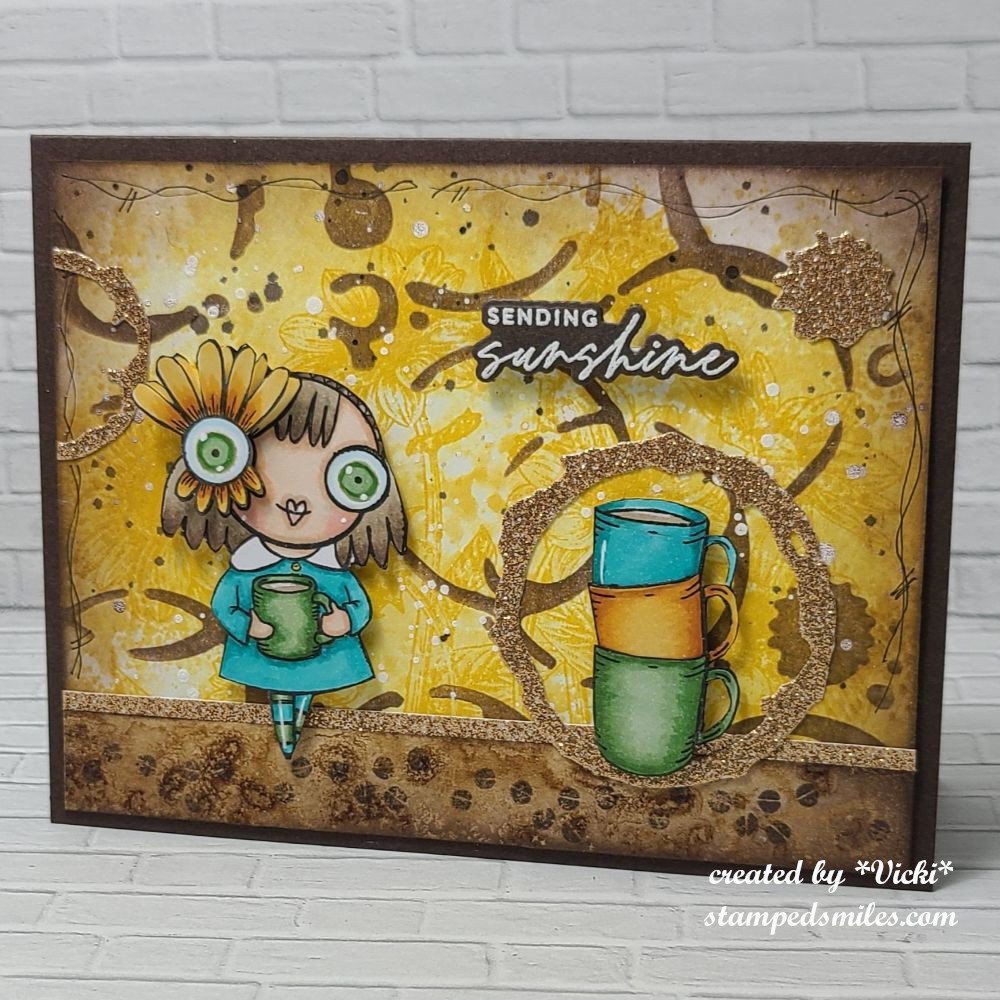
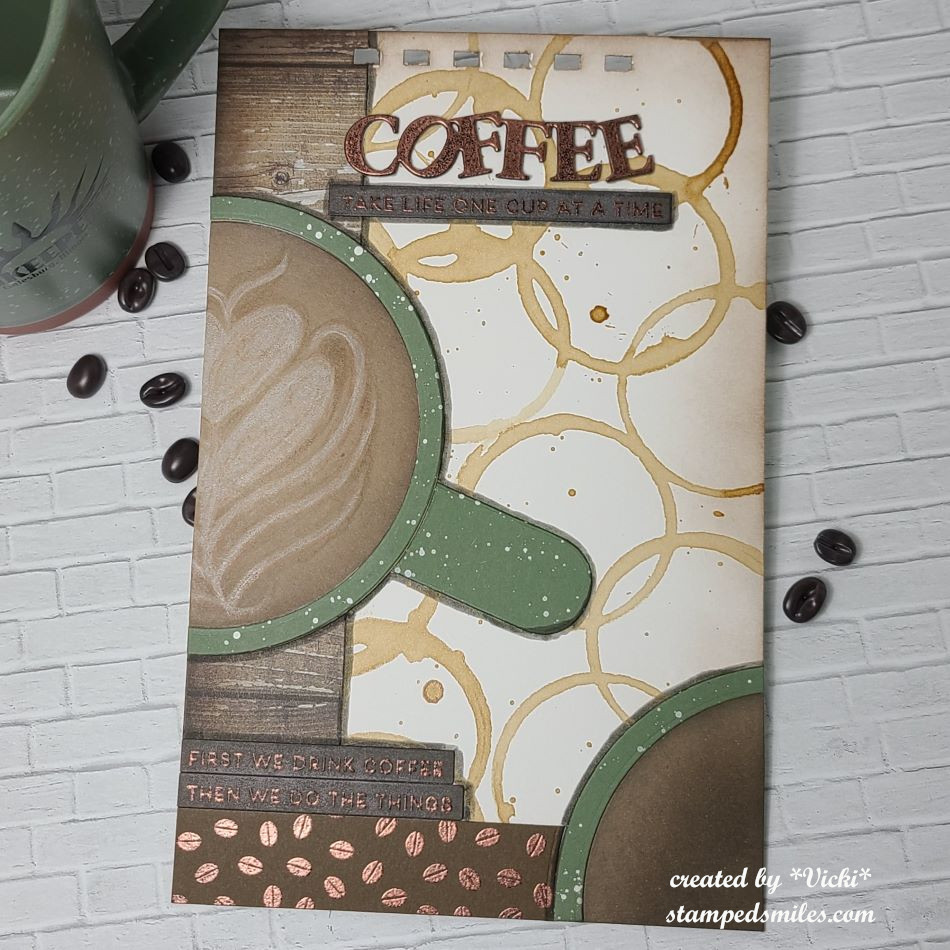
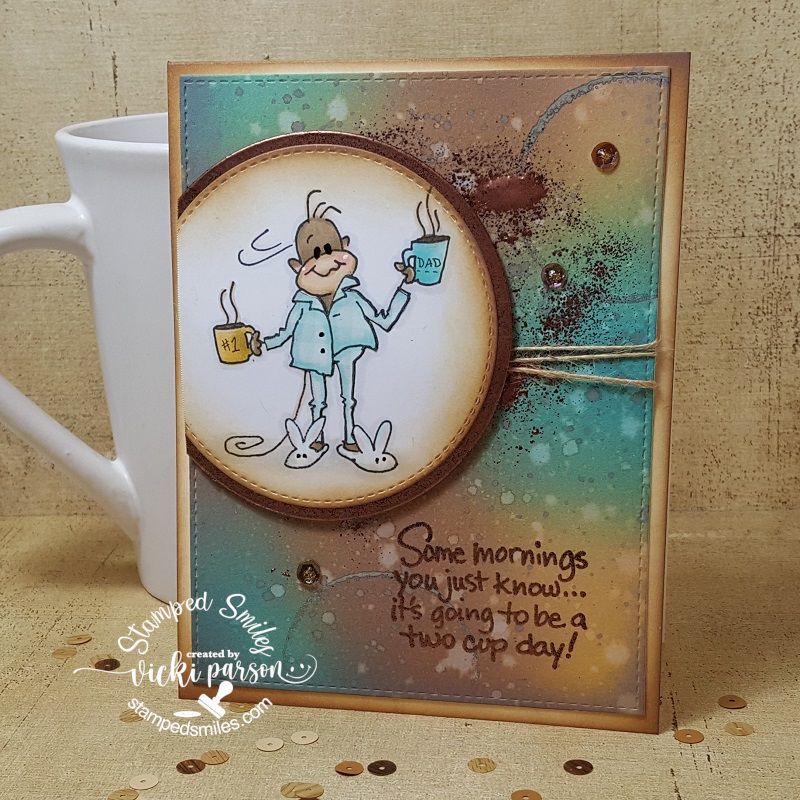
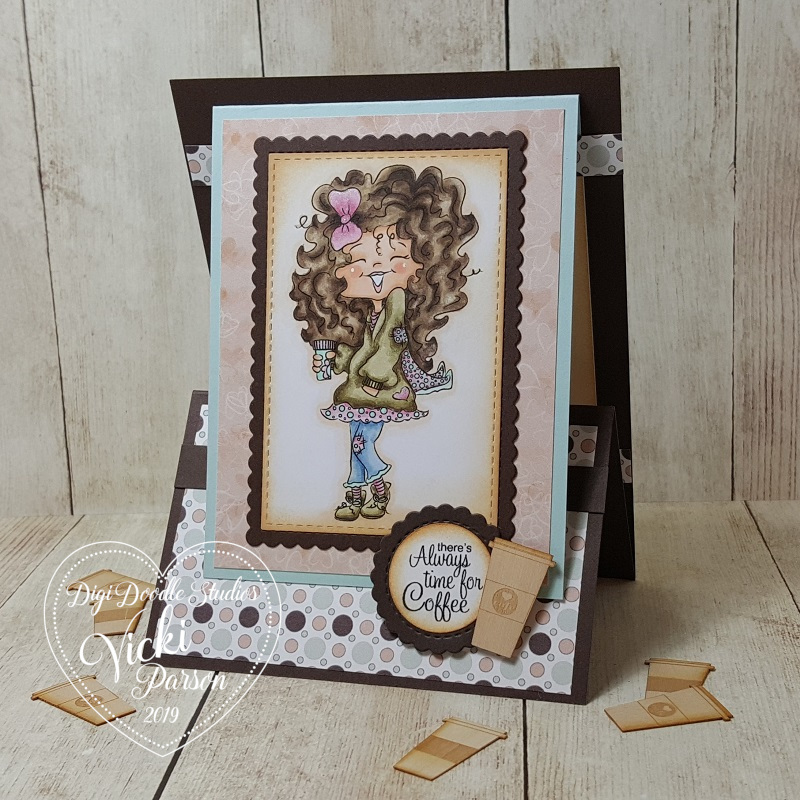
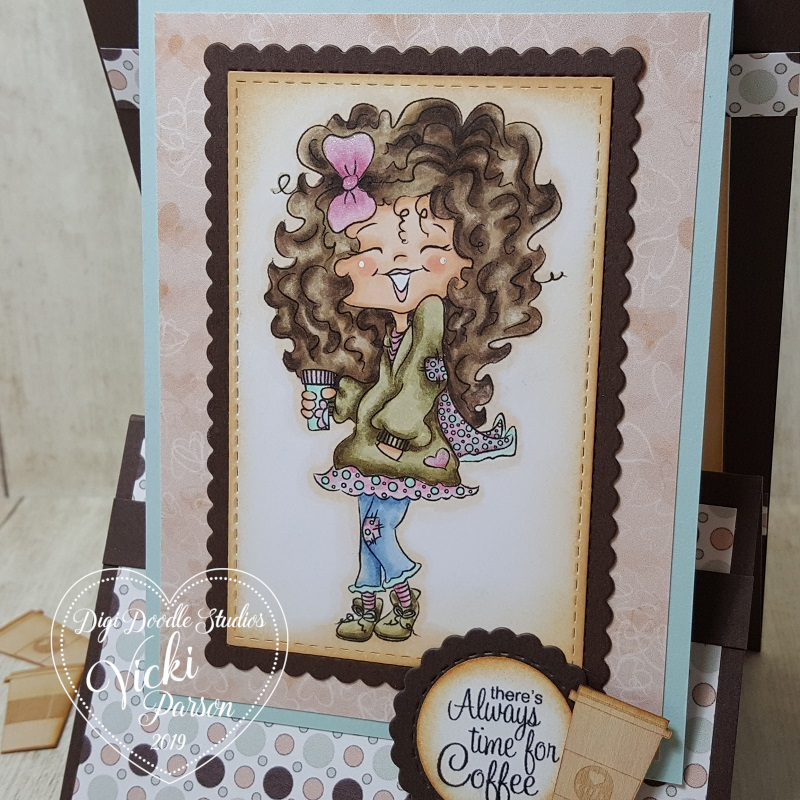
This was such a fun card to make!  I normally do mixed media on my art journal pages or a larger/3D item, but this time I wanted to make a card for this theme.  I pulled out some really fun AALL & Create products that I’ve been wanting to use and I thought this would be a good opportunity to try them out!  (I don’t know what it is about these wonky characters, but I think the weird eyeballs are so cute!)  I’ve used the “Coffee Time” stamp set with the girl, coffee cups and coffee beans at the bottom.  I’ve also used a Simon Says Stamp “Sunflower Fields” in the background and the “Sending Sunshine” sentiment.

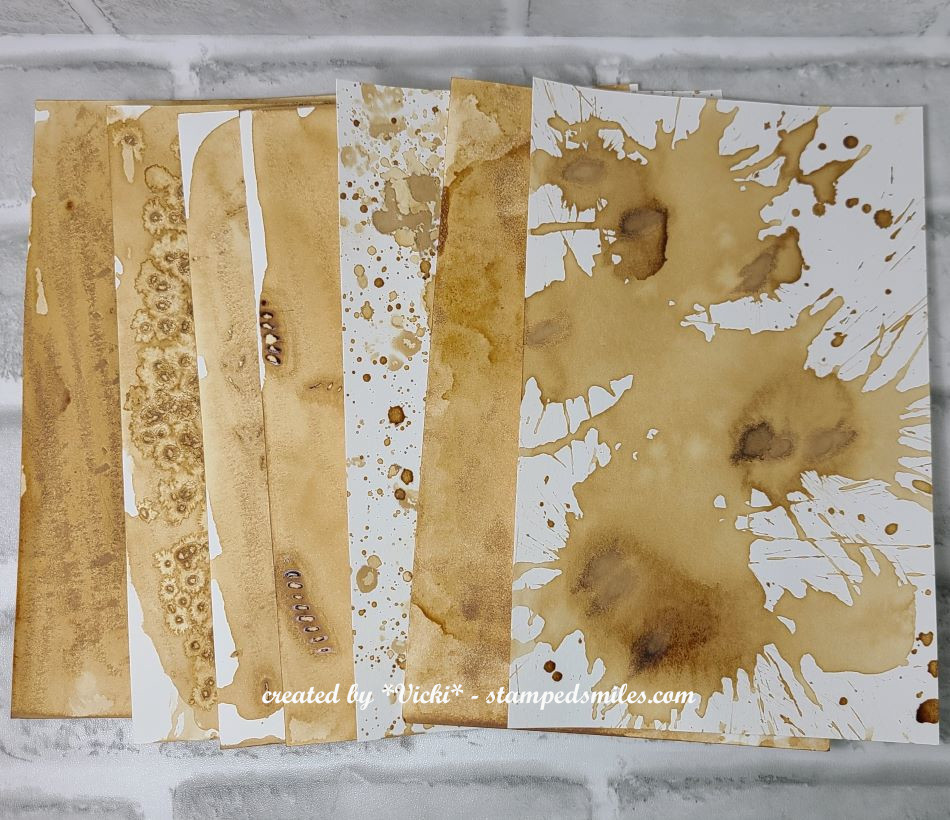
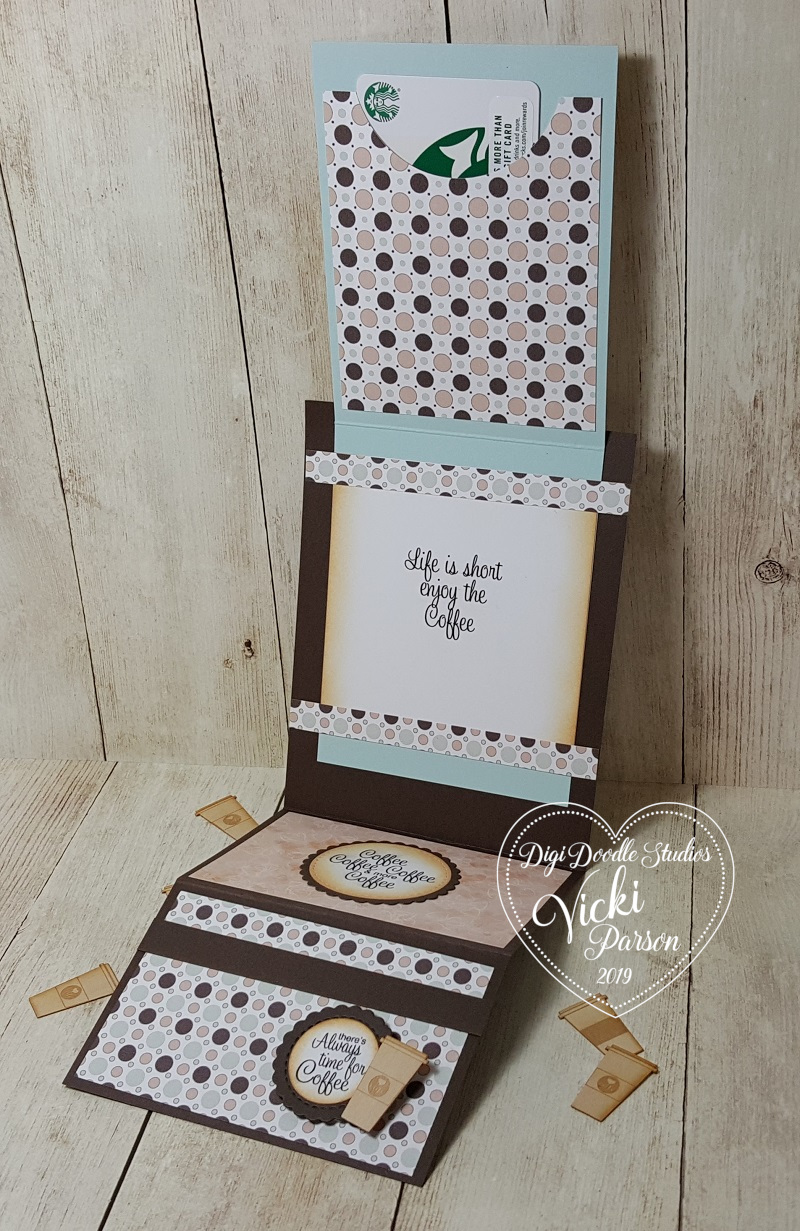
To create the background: I’ve stamped a very large sunflower image in yellow ink over a white card base.  I’ve then used an AALL & Create “coffee stains” stencil with brown ink over top.  I then ink blended some more brown inks over the edges of the panel and then splattered it with both brown and white paints.  I took a pen and doodled around the edges and then attached it to an A2 top folding brown card base.  I had a left over strip from a collection of coffee backgrounds that I’ve made in a previous post you can see HERE and attached that to the bottom where I stamped the coffee beans in brown ink over it.  (I thought it would make for a good “grounding” for the coffee girl and cups to stand on.)

I’ve used another AALL & Create product called “Heart Nook” that I die cut some circles from, and I thought looked like coffee stains, in glitter cardstock.  I also cut an additional strip of that to go along the bottom strip of the card.  I then added the stack of coffee cups, the girl that I colored up with Copics and fussy cut out.  I white heat embossed the sentiment, die cut and popped both that along with the girl using foam tape.  I also separately cut out her eyeball and popped that up over her for extra dimension.

I hope you’ve enjoyed my coffee mixed media card today!  I had fun coloring her up and very happy to use more things from my stash too!  Please be sure to pop on over to the Mix It Up Challenge blog to have a look at what the rest of the team created and play along!

Have a wonderful July 4th weekend.

Challenges:

  1. Just Us Girls Stencil Week (coffee stains stencil)
  2. Crafty Catz Anything Goes
  3. Creative Fingers Anything Goes
  4. Pammie’s Inky Pinkies – PIP2526 – Sunshine (hope sentiment and yellow works!)
  5. Addicted to Stamps & More – Die Cut(s) and/or Stencil(s) – I used both!

Thankful for Fall, Pumpkins and Coffee!

Hey friends!  Just poppin’ in with another card I made and wanted to get it in before the deadline ends…which I normally don’t always do!😁

I have been playing along (with the exception of the last few years) with the Coffee Loving Papercrafters “Coffee Lovers Blog Hop” which has been going on since 2014!  It’s hard to believe it’s been around that long, but looking back at the posts that were shared recently for “a look back”, I had a different blog platform and there I was playing along 10 years ago!  Really appreciate all of the fun that Amy has provided to us through the years as well as the many sponsors that have been apart of it.

I’ve pulled out some stamp sets from one of the sponsors (Newton’s Nook) new and older from my stash in honor of this occasion:

That is the cutest cup of Pumpkin Spice Latte that I’ve ever seen!  I’ve used the NN Newton’s Mug stamp set with coordinating die to stamp, color and cut him out.  He was popped up with foam tape over the background.  For the pumpkin image on top of the mug, I’ve used an older NN stamp set called “Love a La Carte” (No longer available).  I just stamped, colored and fussy cut the image to place over the mug.  I also added some gold glitter on the heart above it.

For the background:  I cut a piece of paper with the NN Frameworks die set and pulled out some watercolors for the background and then splattered some gold after the background was dry.  I layered this over the brown cardstock.  I also used a piece of that brown cardstock to white heat emboss the sentiment which came from an older STAMPtember collaboration set with NN called “Talk Turkey“.  I cut it out with a banner die and attached it to the side of the scallop panel.  The leaves under the mug and over the watercolor panel were from the NN Autumn Mice stamp set and coordinating dies.  

I was trying to also follow along with a fun sketch from the Inky Paws Challenge (see below) and so I’ve pulled out some more papers from the NN Coffee House Stories paper pad that I thought went with the coloring on my cup and attached it to an A2 top folding brown card base.  I also added a strip of gold glitter paper to bring out the touch of glitter on the tiny heart above the pumpkin.

  • That’s it for today!  I hope you’ve enjoyed my coffee card or have been inspired to create something fun too!  I’m off to check out all the other entries for more inspiration!  Have a wonderful weekend ahead!

Challenges:

  1. Coffee Loving Papercrafters – #fallwinter2024clh 2024 Fall/Winter Coffee Lovers Hop using coffee, tea, cocoa, and/or apple cider
  2. Inky Paws Challenge – #234 sketch
  3. Double Trouble – #179 Lotsa Layers
  4. Inspiration Station – #67 inspirational photo (the coffee, leaves and pumpkin inspired me)
  5. Crafty Animals Anything Goes + animal
  6. Critter Crazy Anything Goes with a Featured Critter
  7. Inkspirational – #328 Layer It (layered leaves and panels)
  8. Shopping Our Stash – #534 Time for a Hot Drink

April AJ Page-One Cup at a Time

Hello friends!  I hope you’ve been enjoying your month so far!  We’ve had a few really nice days this month, but it’s still a tad bit chilly and hopefully it will warm up more next month!  It’s hard to believe we are already headed into May for this year!

That means it’s time for the monthly Art Journal Page collaboration with my crafty friend, Carol (from Crafty-Stamper)! We get creative trying to use up our never-ending stash piles along with a prompt for each month.  I know she always has great inspiration to share, so please check out her blog too! Here’s my AJ page with the “SMASH OUR STASH” April prompt of “HALF” -(e.g. 2 halves to create whole item/half of something):

Yes, coffee please!  I’m a coffee lover and so is my husband!  I don’t think we’d be able to start a day without it!  I know there are lots of people who don’t like coffee and that’s OK…as long as there will be some somewhere for me, I’m good! 😉☕

It was my husband that inspired this page for me when I asked him what his favorite shape was, and he answered with a circle.  Looking down at my coffee cup was the circle I saw and decided to take more inspiration from a coffee cup we purchased at one of our favorite local coffee cafes you can see in the top corner of the photo.  To achieve the look, I took a cardstock color matching the cup and splattered white paint over it.  The “HALF” is obviously the coffee cup that was cut out with circle dies.  I cut another piece of the handle which makes it look like the view you would see from the top of the cup.  The other “HALF” of the cup was placed in the corner area at the bottom and this coffee is more of my husband who likes plain black coffee.  But this is certainly how we start our day together which is great since he’s retired now.  The other “HALF” cup has the latte art, and I did that one with light sponging around the edge and then took my colored pencils to free hand the design.  Not sure if that’s exactly what it looks like, but I gave it a try.

  • For the background:  I’ve used a strip of wood plank pattern paper from my stash, and I’ve also heat embossed a coffee bean background stamp with, of course, coffee embossing powder that I’ve had for a very long time, and it was a great time to use it!  I’ve also heat embossed the “coffee” sentiment and quotes with it. Below the embossed coffee is a sentiment that says:  “Take life one cup at a time” and the other two at the bottom say: “First we drink coffee, then we do the things”😂 
  • The coffee cup-stained background, I’ll share more about below.

I also took a big brush marker to go around the edges of the cups and the sentiment strips.  I wanted the heat embossing to stand out a bit more over the brown cardstock, so I took a white Tim Holtz crayon and rubbed over top of it to brighten it up.

Have you ever made backgrounds with coffee?  I had such a fun time playing with it and decided to make several different backgrounds that I could use for later!

I don’t drink instant coffee, but I have some in my cupboard because I like to make a chocolate cake that has instant coffee in it…so good!  I took some of this instant coffee and made the coffee cup-stained background for my page to create more circles that went with my circle coffee cups.

I also decided that since I had a cup of it, that I would go ahead and make more backgrounds with it and just play around with different things.  I splattered, I smooshed, I’ve added salt along with a few other things and let dry and make patterns with.  Once dry, I cleaned them off and here are the results of my play.  I wish I had done another cup circle background though.

I hope you’ve enjoyed my art journal page and been inspired in some way!  Thanks so much for dropping in!  Have a great weekend!  Mine will be busy!

Challenges:

  1. Art Journal Journey – Geometric Forms
  2. Creative Artiste – Anything Goes Mixed Media
  3. Creative Fingers – Anything Goes
  4. Try it On Tuesday – Inspired by a Song (Can’t think of coffee with the “Coffee Song” by Frank Sinatra!)
  5. Lil’ Patch of Crafty Friends – Anything Goes
  6. Penny’s Paper-Crafty – Anything Goes using paper

It’s Never Too Latte For a Friend

Hello friends!  Hope that your week has been going great so far and you’re getting ready for Thanksgiving Day for my friends in the U.S. that celebrate.  So since Christmas is coming up quickly, I thought it would be fun to share a couple of little gifts for a friend you might like to share coffee/cocoa with:

Aren’t these little mini coffee cups with the gift card holder so fun?!  I had fun making and gifting them!  Of course, I love coffee, but if your friend would rather do a cocoa, that will work for this too!  I’ve used this adorable Inky Stamper Latte stamp set to create my project here with that adorable “Rosie” character popping out of the cup.  I colored and cut her out with the coordinating die.  For the “candy cane” image on the front of Rosie’s cup, as well as the “coffee ring stain” image on the coffee cup sleeve, I used the Inky Stamper Warm Beverages stamp set to accompany my design.  (There are some great cocoa images in there to trade off for the coffee too!)

This little mini coffee to go cups were found on Amazon (4 oz cups pack of 50 with lids) and there are tons of videos on You Tube on how to construct the holder for these.  I sort of tweaked mine from a die set that I’ve had for years, but there’s no reason to buy a die if you can create without an additional purchase.  I’ve added an additional backing with a pocket and thumb opening to hold a Starbucks gift card in.

And then when you open the coffee cup, there is a great place to add some extra treats inside!  I chose to add some Bailey’s chocolate truffle candy inside of these cups.  You can also see how I decorated the cups with papers that has peppermint candies on them as well as the top of the lid, the cup sleeves with stamping and the red twine wrapped around the lid as well.  The little peppermints that I’ve added on the top of the lid as well as on Rosie’s head came from the Inky Stamper Christmas Candy Mix…love that container!  The Doodlebug red Gingham/Linen papers come from the Inky Stamper store as well.

And since the lid on the cup was not as secure as I would’ve liked it to be, I decided to wrap the entire thing inside of a gusseted cello bag and tie it up with some more of the red twine, which also made it look like a gift wrapped present too!

I hope you’ve enjoyed my project(s) today and have been inspired to create a fun gift for Christmas too!  Thanks so much for stopping in and have yourself a very grateful Thanksgiving Day!🦃

Challenges:

  1. Double D – Hot Beverages
  2. Sparkles Monthly – Dies and/or Punches (both used!)
  3. Creative Knockouts – Anything Goes
  4. Colour Crazy Craft – Anything Goes + coloring
  5. Crafty Catz – Anything Goes optional Christmas
  6. Creative Fingers – Anything Goes

Inky Stamper *NEW* Stamps Inspiration!

Hello friends!  I’m really excited to be sharing some more inspiration today as a guest designer this month using some brand-new Inky Stamper stamp sets that were just released!  Stop by the store and check them out…they’re so cute!

First, I have a couple of shaped interactive cards for those warm drinks as the temperatures start to cool down.  I made one for Autumn and shared it in the Inky Stamper FB Group and was asked how it I made it, so I thought I’d share that one along with another Christmas style version that I made too:

Aren’t these so cute with that little raccoon from the Inky Stamper Warm Beverages stamp set?!  The one on the right is the one I made with Fall colors covering the front of the cup with the Doodlebug Gingham/Linen paper pad.  I also used the Doodlebug Bon Bon Twine around the cup sleeve.

The cup on the left is more Christmas themed and I’ve used pretty much the same products, but just changed up the colors a little bit.  This cup is slightly different because it’s about 1/4″ shorter so that it would properly fit inside an A2 envelope.  The Autumn card was a bit snug, so I tweaked the size a bit more on the Christmas to make it fit nicely.

When you pull the lid off the top of the coffee cup, there is an insert with a greeting and/or a place where you can add a gift certificate.  These were so fun to create and easy to do!  Mass production could be possible for sure!

All that is needed are some measurements and a few tips along the way to get you started.  I thought it would be easier to understand with a video, so check that out below or watch on You Tube HERE.


I also had a birthday card that I needed to make for someone, so I thought I’d pull out the new Inky Stamper Hippo stamp set and have some fun with it!

Aren’t these party animals so cute?!  I thought this one would be fun to turn into a polaroid style, so I pulled out a square die to create my own polaroid frame with it!  I also cut another one in black cardstock so that I had a bit of dimension with it.  I stamped the sentiment from the set at the bottom of the frame.

The background behind the Hippo was created by white heat embossing the music note image from the stamp set over some Inky Stamper Watercolor Panels and then using some watercolors for an emboss resist background.  I colored up the Hippo, bird and party hat and cut them out to arrange over the background.  I added a couple of pieces of the Doodlebug Grey Swiss Dot Washi Tape over top of the Doodlebug Gingham/Linen Paper that was cut out with a wonky stitched die and attached to a white top folding A2 card base.  I found a couple of sequins from the Picket Fence Rubber Duckies mix and then filling the centers of them with yellow Stickles.

So many different things going on in this post, but I hope that you’ve enjoyed it and have been inspired to create something too!  Thank you so much for stopping in today!

Challenges:

  1. Love to Scrap – Anything Goes 
  2. Love to Craft – Anything Goes
  3. Krafty Chicks – Stamp Act
  4. My Time to Craft – Critters
  5. Colour Crazy Craft – Anything Goes + coloring
  6. Lil Patch of Crafty Friends – Anything Goes
  7. Pammie’s Inky Pinkies – Anything Goes
  8. The Corrosive – Anything Goes

Pink & Main Video Hop with Hello Autumn Slimline

Hello friends!  I hope you’ve had a fantastic week!  It seems like this month is flying by!

I’m excited to share with you a fun video hop collaboration with Pink and Main on my You Tube Channel today! (Be sure to check it out on MY VIDEO because there is a giveaway and you’ll need to leave comments on the videos to be entered to win!)  So head on over to see the wonderful inspiration with the Pink and Main products going on!

Here’s the fun Autumn themed slimline card I’ve made for the video hop today:

So Pink and Main has come out with some fabulous new products which I’ve used for my card here and I’ve added some fun techniques to use with some of those products as well!

The background was really fun to create using the Pink & Main Blending Brushes along with the new Crackling Campfire Distress Oxide Ink color that just came out!  I’ve also used the wonderful Leafy Stencil from Pink & Main over the background too.  The cups and leaves were also colored using the oxide inks and a waterbrush which you can see in my video as well as how I’ve inked and cut out the one image backwards so I have two cups with the handles in opposite directions on my design here. 

You can check out how I’ve put this design together and the techniques I’ve used in this video below, or to leave a comment and see the link to the next person in the video hop, CLICK HERE to go to the video on You Tube.

I absolutely fell in love with that Need to Venti stamp set and coordinating dies!  I loved that older Christmas Mugs stamps they had previously came out, but Autumn is awesome to add to my collection because it’s my favorite time of the year!  So be sure to check out how to stretch out the use of this set in video above!

The Blessings slimline die was so fun to use on my card too and I love that the frame cuts out separately from the center and there was room to layer behind it before attaching to your slimline card base.  The Brutus Monroe Copper Glitterstock was the perfect accent behind the scallop frame. That frame was cut out with several layers of cardstock and stacked together for thickness.

The same Copper Glitterstock was used to cut out the sentiment dies as well.  I’ve used some vellum to layer behind the Autumn sentiment, which the backing diecut was also included in this same slimeline die set!  The final measurement of my slimline card was a piece of brown cardstock measuring 8.5″ x 7″ and scored at 3.5″ in the center.  The finished card will fit inside a #10 envelope when closed.

Here’s a closer view of the details with my colored cups using the distress oxide inks and waterbrush.  I’ve also used the same Need to Venti stamp set and oxide ink colors to stamp the leaves and die cut them out to arrange over my scene as well.

I popped up the cups with foam squares and added some drops over the whip topping in the cups with some Nuvo Honey Gold Crystal Drops.

Hopefully you can see the pretty Autumn colors and dimension in the card.  I sure had lots of fun putting all of this together!

Thanks so much for dropping in today and I’ll be seeing you soon!

Challenges:

  1. Challenge Up Your Life – Autumn Mood 
  2. The Paper Funday – #21 Anything Goes optional:  Fall/Autumn
  3. Dream Valley – Embossing wet/dry (embossed cup images)
  4. The Sisterhood of Crafters – Autumn Inspiration
  5. CCEE Stampers – CCEE2037 Slimline Cards
  6. Not Just Cards – Anything Goes
  7. Crafting Happiness – Anything Goes
  8. Pammie’s Inky Pinkies – PIP2037 Anything Goes
  9. Simon Says Stamp Monday – Frame It

Dir-Tea Birthday Bunny Coffee Card🐰

Hello friends!  I’m back again today with another fun card that I wanted to enter before the time runs out!  So check it out:

Vicki-TSDir-teaBunnyCup

This adorable smiling bunny is so fun and I really loved creating this coffee themed cup shaped card using some products from Trinity Stamps.  I’ve used the Dir-Tea Bunny stamp set along with the coordinating dies that also cut out his hands so you can stick stuff between them like I did with the coffee cup and balloon!  The coffee cup came with the stamp set and I added that sentiment to it!  The balloon is a die set from MFT.  I cut out the balloon with vellum and used my Copic marker to color it in.

I used the Trinity Stamps Coffee Mug Card die set in white cardstock and then took the Slimline Stripes stencil to sponge over it.  I completely sponged over the handle of the cup and then I sponged the center of the cup in grey colored ink for the bunny to be on top.  I also stamped a few coffee beans from the stamp set with the same sponged ink.  I took some Glitterstock to cut the die cut piece for the top of the coffee cup and for the inside of the card is where I added my gift card holder which comes with this die…which is pretty cool!  It’s already to go for my coffee loving birthday person now!!

I did not have a Trinity Stamps birthday sentiment, so I pulled out one from my stash and white heat embossed it over a strip of cardstock that is the same color of ink from my cup.  The banner was actually cut out with the Trinity Stamps Slimline Scalloped Card Panels and Banners die set.  (I just shortened it as needed.)  I used foam squares to pop up the die cut bunny to sit on top of the banner.

Vicki-TSDir-teaBunnyCup-close

Here’s a close up view of the details on the card.  I’ve used Copic markers to color in the bunny and added dots to his cheeks with a white gel pen.  I’ve also took some glitter and added it to the inside of his coffee cup to make it look as glittery as the larger cup!

Hard to tell in the photos, but the blue vellum balloon was also covered with a Spectrum Noir glitter brush pen for a bit of shimmer.  To attach the vellum balloon, I ran it through my Xyron Machine so you couldn’t “see” any glue marks.

(I love how he can hold different items!) 😀🎈

Vicki-TSDir-teaBunnyCup-flat

Wished I remembered to take a photo of the inside of the card, but it just has a coffee gift card holder on the inside along with a greeting and more stamped coffee beans.

Hope you’ve enjoyed my funny bunny shaped coffee cup card today!  I sure appreciate you stopping in and I’ll be seeing you again soon!!

Challenges:

  1.  Trinity Stamps Crafty Troop Birthdays + Trinity Stamps products
  2. Pammies Inky Pinkies – PIP2025 – Anything Goes
  3. Dream Valley – #228 All Occasions
  4. Always Fun – #168 Anything Goes
  5. The Male Room Use Die Cuts
  6. The House That Stamps Built – J2420 Anything Goes
  7. Watercooler Wednesday– WWC277 All About Occasions

Caffeinated Changito☕

Hello there friends! Really hope that you have enjoyed your long Memorial weekend! The weather finally turned warm and once it turned warm, it REALLY turned warm and humid over my way! So we were able to plant some flowers in our garden pots outside and enjoy some cookout time too!

I noticed that the “Spring/Summer Coffee Lovers Blog Hop” had started up this weekend and I thought it would be a great opportunity to pull out some old stamps and have some fun with it while making a masculine card for the up-coming Father’s Day holiday too:

Does anyone remember these cute little “Changito” stamps back in the day?! I have used the Changito Coffee stamp (only found this one online) and the sentiment to go with it too! I actually bought these wood mounted rubber stamps years ago at a convention I had went to and have kept them hoarded like my other old stamps. LOL!

I stamped the image on Copic blending card and then again on some blue gingham background paper for paper piecing his PJs in! For the sentiment, I heat embossed it over my background with some appropriately named “Coffee” EP which has a metallic copper with some brown speckling in it…very cool. the store is no longer active that it came from.

For the background of this card, I had some fun playing with my Oxide Distress Inks in Vintage Photo, Broken China, Scattered Straw and touches of Espresso. I sprayed and dried layers as I went. I even took the bottom of a jar I had laying on my table to ink up some Espresso ink to make the “ring” marks over the background. I also took some more of that “Coffee” EP and sprinkled some over the background for even more distressing.

I wrapped some twine around it and attached it to an A2 sized white card base that I sponged around the edges with some Vintage Photo ink.

Here you can see a better look at the image and how I’ve got him colored up with Copic markers. You can barely see the gingham pattern in his paper pieced PJs, but I thought it was cute! I also took a black Copic liner and drew lettering on the coffee cups. I added just a hint of sparkle over the coffee inside the cups with a Spectrum Noir glitter brush pen. I also took a black gel pen to dot his eyeballs, the buttons on his PJs as well as dot the bunny slipper eyes. I think that little detail really makes his pop more with a bit of character.

The image was cut out with a stitched circle die and then I also cut out an additional circle to mat behind him, which I took a VersaMark ink pad and then used the “Coffee” EP to heat set along the edges of it so it has the same look and texture as the background and sentiment. This was attached over the background with twine.

Lastly, I’ve taken some brown colored sequins from my stash and attached them to the background and filled the centers with some Nuvo Honey Gold Glitter Drops.

Hope you’ve enjoyed my masculine and quirky card for today! Thanks so much for dropping in and I’ll be seeing you again soon!!😉

Challenges:

  1. Spring/Summer 2020 Coffee Lovers Blog Hop – Coffee/Tea/Cocoa Related Project

2. Addicted to Stamps and More – #391 Anything Goes

3. Cute Card Thursday – #635 Critters

4. Creative Knockouts – #351 Embossing Delight (wet or dry)

5. QKR Stampede – #399 Anything Goes

6. Simon Says Stamp Monday – “Going Around in Circles”

7. Pammie’s Inky Pinkies – PIP2021 Anything Goes

8. Die Cut Divas – Make it a Beverage + die cut/embossing folder

I’m Going to be Tagging You!

Hello friends!  This year I’ve been really inspired with all of the cool tags I’ve been seeing lately during this festive season and I wanted to join in on the fun too!  So you’re going to be seeing lots of tags from me scattered within my postings for the next several days!

The inspiration that I’ve been seeing comes from Tracey’s 25 Tags of Christmas Event and this is her 9th year of doing it!  Every day there has been some really cool and inspiring tags, so I had to join before the time runs out!  I did make a tag earlier…but a few more are to follow starting now:

Vicki-BMTags-Day 1 and 4

I’ve been wanting to pull out a few of my stash that I and haven’t had a chance to take the time to play with!  So I decided making tags would be a quick and fun way to play around a bit!  These were really fun to make!

Vicki-BMTags-Day1 only

The “Joy Coffee” tag was something that I had actually started during the “Coffee Lovers Blog Hop” this last time and never got around to posting it!  I was trying to combine the two events together as the inspiration for that tag came on Day 1 from Jen Schow’s tag for Altenew inspirational tags post.  I like how she cut out the wording on her globe and I thought I’d do the same idea with the word “joy” over my coffee cup.

I’ve used the Cozy Coffee stamp set and colored in the coffee and fussy cut it out.  I stamped the sentiment from the same stamp set, but only cut out the word “joy” from it and popped it up over the cup.  I also took the hearts from the stamp set and stamped them over the kraft background with kraft colored ink.

I’ve taken the Holiday Essentials stamp set and heat set the snowflakes in the background of the tag with white EP.  Also for the background, I took some metallic gold watercolor and splattered some over it as Jen did on her tag and I liked that subtle look to it.

I’ve taken some gold thread and made a nest under the cut out coffee cup that was popped up with some foam tape over the tag.  (The tag itself was an old die cut from my stash BTW!)  Added seam binding and twine at the top.

Vicki-BMTags-Day 4 only

For this tag, I was really inspired with Kim’s tag on Day 4 of the Uniko post.  LOVED the monochromatic red with all the sparkle!

I really love the glitter paper and I didn’t have a large enough tag die that I wanted to use, so I took a tag from my stash and traced around the backside of the Red Glitter paper and cut out my shape.  I had some rounded rectangle dies (Hero Arts) which I made a frame with the white glitter paper.

Within that frame I took the Holiday Essentials stamp set again and used several of the images to stamp over a piece of white cardstock with red ink.  (It was fun to create a stamped background panel for this!)  I heat embossed one of the sentiments from the stamp set over a red piece of cardstock with the White Sparkle EP…it sparkles really pretty IRL!  I die cut the sentiment out with a banner die and tucked it behind the white frame I made with the stamped images.

I finished the tag with some sparkling clear sequins with some White Blizzard Nuvo Glitter Drops in the center of each one and then I added some white organdy ribbon with a bow at the top.

Hope you’ve been inspired in some way as I’ve been inspired to create these!  Thanks for stopping in and I will have a new post to share again with you tomorrow so stay tuned!

Challenges:

  1.  25 Days of Christmas Tags – Day 1 and Day 4
  2. Always Fun Anything Goes
  3. The Holly & Ivy Christmas Challenge – Anything Christmas Goes
  4. Try it On Tuesday – Inspired by a Song or Christmas Carol (I was inspired by “Joy to the World” on the first tag and “We Wish You a Merry Christmas” on the second with music notes!)
  5. Through the Craft Room Door – Anything Goes

Z-Fold Gift Card Holder with Digi Doodle Studios for Coffee Lovers Blog Hop + Video Tutorial

Good morning friends!  Aaah!  It sounds like a great morning for coffee, doesn’t it?!  Well it sure does to me anyway!  Today, my post is all about coffee…so grab yourself a cup, sit back and enjoy!

I’m so excited today to share my post with you because Digi Doodle Studios is a first-time sponsor for the Coffee Lovers Blog Hop!  There are lots of fun coffee themed products in the store and I’m thrilled to be sharing some with you today:

Vicki-DDS-CoffeeHop-ZfoldGiftCard

Isn’t she just adorable with coffee in hand?!  This image is called “Ginger” from Digi Doodle Studios and I’ve got her all-colored up front and center of my Z-Fold Gift Card Holder.

If you have ever made a Z-Fold card, then this is something with a little bit of extra added fun with a gift card holder pocket on the inside, plus you can see how the card nicely displays on the front which is perfect for popping into an envelope to mail out to your coffee loving friend!

The papers that I’ve used for this work perfectly with the theme today which are also from Digi Doodle Studios called Coffee Break Digi Papers.  (I love that I never have to worry about running out of my favorite pattern!!)  There are also several sentiments from Digi Doodle Studios used on my project called Coffee Anyone Sentiments.

*If you want to see a video with detailed instructions on how to make one of these Z-Fold Gift Card Holders along with a sharing of the full collection of the digital papers that I’ve used on my project, check out the video below or CLICK HERE to view it on You Tube:

This is such an easy and fun project to put together especially for the up-coming Holidays, but as you can see this is very neutral so that I could easily use it for most any time of the year.

Vicki-DDS-CoffeeHop-ZfoldGiftCard-close

Here’s a closer view of “Ginger” and how I’ve colored her up with Copic markers.  Of course, if you know me, I had to add a bit of sparkle somewhere.  I took a glitter brush pen and added some sparkle to her pink bow, the heart on her coat and the lid and flower on her coffee cup.

I die cut her out with a stitched rectangle die and then layered a piece of brown cardstock die cut with a scallop rectangle die.  For the around the edges of the image panel as well as the other sentiments I printed out, I sponged some Tea Stain Distress Ink around the edges.  The sentiment were cut out with a stitched circle die and then layered with a piece of brown cardstock cut with a scallop circle die.

To keep the image panel in place, a foam dot was used at the bottom panel so that when you pull up on the flap it opens up:

Vicki-DDS-CoffeeHop-ZfoldGiftCard-open

And this is what is so fun, is that when you flip up the front panel, you see how it opens up with the fun coffee sentiments inside and the surprise gift card holder at the top!

I have an urge to go to Starbucks now! LOL!

I hope you’ve enjoyed my fun Coffee themed project today as well as the video tutorial on how to make one yourself!  I’d love to see yours if you make one!  If you have any questions about anything, please let me know!

Now to sip on some more coffee and join in on all of the coffee inspiration today!  Thanks so much for stopping in and I’ll see you again soon!

Challenges:

  1.  Coffee Lovers Blog Hop – Anything Coffee/tea/cocoa/cider related.
  2. Watercooler Wednesday – WWC245 Anything Goes
  3. Simon Says Stamp Wednesday – Anything Goes
  4. As You Like It – Favorite Papers and Why? – Digital papers because I never have to worry about running out of my favorite pattern and I don’t have to worry about storage!