An Autumn Anniversary

Hello friends!  It’s been so cold over my way and even snowed the other day which is a tad bit early for this time of the year.  I’m still trying to hold onto to Fall a bit longer as I know that the Holiday/Winter Season will be approaching us very quickly now!  It seems that Autumn never gets it’s due justice and goes by so fast!🍂

I’m popping in today to share a card I’ve made for hubby to help celebrate our special day of 21 years together🥰:

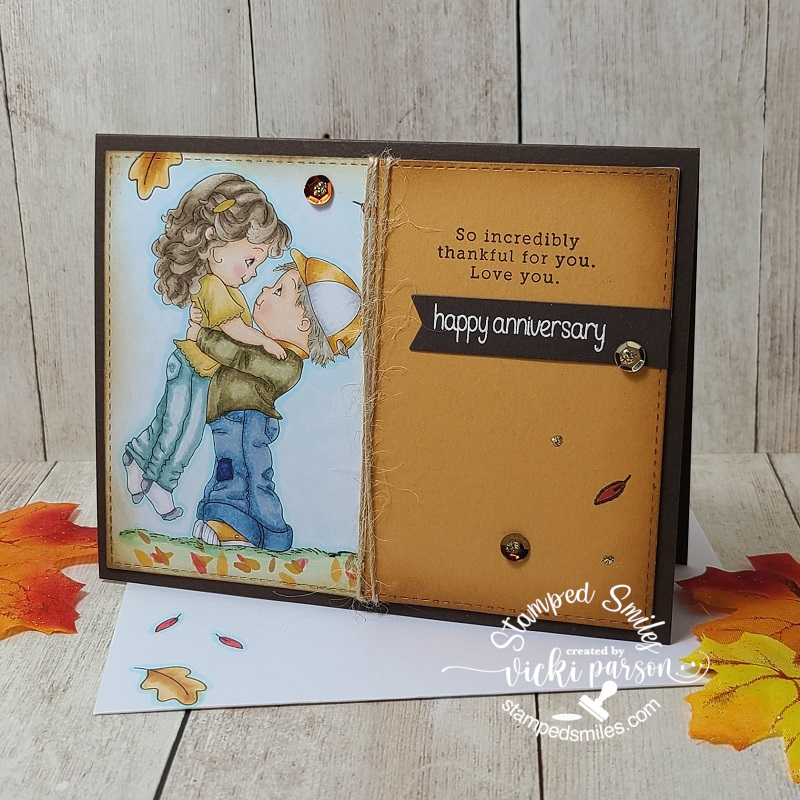
I adore this sweet image by Crissy Armstrong for Whimsy Stamps called “Your Love Lifts Me” as I thought it was a great representation of how I feel about hubby and how I wanted it to reflect on my card for him.  He will have already received this card by the time this posts…so it’s OK if he sees this!😉

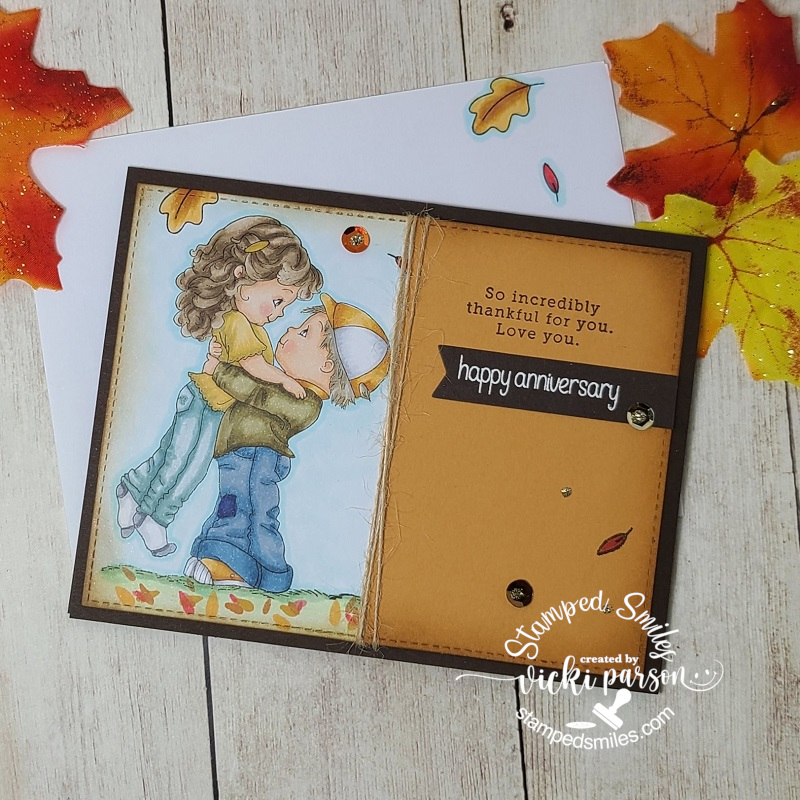
I’ve stamped the image over a panel of Copic Blending Card off to one side of it and then cut it out with a stitched rectangle die.  I took a piece of orange colored cardstock and used the same die to cut it with, but I cut this piece in half, stamped the sentiment over it and sponged around the edges of it with some Vintage Photo Distress ink.  I also took the Whimsy Stamps Everyday Mini Sentiments set and white heat embossed it over a piece of brown cardstock that was cut out with the Whimsy Stamps Quick Strips die set and attached underneath the sentiment and cut off at the edge.

The few leaves over the design was stamped from an older Simon Says Stamp set and colored with Copics.  I then added some more Vintage Photo sponged around the image panel and attached the orange sentiment panel over top of the colored image panel and wrapped some twine around the center of it. I layered this panel over top of an A2 sized top folding brown card base.  I’ve added some sequins filled with gold Stickles in the center along with a few more dots.

Here’s a closer look at the Copic coloring I’ve done over the image.  I’ve kept it pretty simple and decided I didn’t want to add white dots to their cheeks like I usually do.  I don’t know why there are times I do and times I don’t.  This time it just seemed to call for none.

I used a light blue marker to color in the background and then with the same colors that I’ve used to color in the leaves, I took the markers and made my own leaves on the ground surrounding the couple.  I even stamped some more of the leaves on the inside of the card as well as the envelope and colored them.


I hope you’ve enjoyed my Autumn Anniversary card today as I sure had fun colored this sweet image.

I’m very lucky to have such a wonderful person to share my life with in the past 21 years and look forward to our times together in the future.  Thank you for stopping in today friends!  See you soon!

Challenges:

  1.  Colour Crazy Craft – Anything Goes + coloring
  2. Allsorts – Celebration Time
  3. Pammie’s Inky Pinkies – PIP2043 Anything Goes
  4. Watercooler Wednesday – WWC295 All About Occasions

5. Simon Says Stamp Wednesday – Anything Goes

6. The House That Stamps Built – O2820 Anything Goes

Bubble Bath Beauty

Hello friends!  Yes, I’m still here!  I was hoping to share some photos with you of my crafty retreat and what I was teaching, but when I got home I had some other troubles to deal with and didn’t get a chance to make a post for it, but I will  hopefully get to it this week so you can see what was happening!  LOTS of fun stuff!! 🙂

Today, I have a silly kitty card to share with you today:

Vicki-Bath Cat-May7

Oh my, that face just really cracks me up!!  It’s been several years since I have ever had to give a cat a bath, but I believe that’s pretty much how they feel about water in general.  I have used this Whimsy Stamps digital image called Bath Cat by Crissy Armstong.  (It was preciously released as a rubber cling stamp, but now you can also get it in digital format if you prefer that!)

I started out my card with a piece of white cardstock and clear heat embossed several of the solid circle images from the Whimsy Stamps Circles Circles Circles clear stamp set.  I then took a few of the distress ink colors and blended them over the heat embossed circles.  The ink resisted those and then I spritzed it with some water and dapped it with a paper towel for water dropplets.  I heat embossed the sentiment with white EP and cut it out in a banner to attach over my background.

The circle inked background was corner chomped on two of the corners and then I placed it over a blue A2 sized top folding card base which I also corner chomped the same two corners on that as well.  I then added the image panel and popped it up over some craft foam to attach to the front of the card.  I then cut off the edge of the circle with my scissors and lastly added some clear sequins to the design.

Vicki-Bath Cat-close-May7

Here’s a closer look at the coloring I’ve done on the kitty.  I’ve used the following Copics to color him in with:  (You can purchase Copic markers at Whimsy Stamps by Clicking HERE.)

  • Kitty – W7, W5, W3, W1, R11, R00
  • Bathtub – B24, B21
  • Bubbles – BG000
  • Duckie – Y17, Y15, Y13

After I cut the image out with a circle die, I sponged around the edges of it with some of the distress ink I used on the background.  I used a Wink of Stella glitter pen on some of the bubbles and then used some Nuvo White Blizzard Glitter Drops on the water drops.

Vicki-Bath Cat-flat-May7

This one gave me a chuckle and sometimes even when you are feeling yucky, you just want someone to tell you that you are beautiful!

Thanks for dropping in today!  I’ll see you again soon!

Whimsy Stamps Products Used on my card today with affiliate links:

bath_cat_color_display_digi_1024x1024

circles_20circles_20circles_20display_wm_1024x1024

WS-Copic display

kuretakewosclear_800x_0fab0d61-5a3e-4885-b433-a6a8b8fc7bee_large

Nuvo White Blizzard

Challenges:

  1.  Simply Create Too – Anything Goes (no twist)
  2. Daisy Chain – Anything Goes
  3. Pammie’s Inky Pinkies – PIP1918 Anything Goes
  4. Get Creative – Anything Goes (no twist)
  5. Crafty Animals – Anything Goes + animal

Whimsy Stamps November New Release -Seal On Ice

Hello friends!  Back with you today to share another image from the November brand new digital release from Whimsy Stamps!  Check it out:

Vicki-WSSealonIce-Nov2

These seals by Crissy Armstrong have stolen my heart!  I had to create with this Seal On Ice digital image too and share it with you today!

I started with my image by coloring it up with the following Copic marker colors:

seal:  C5, C3, C1, C0 W1, W0, R00 – Hat/scarf:  BG49, BG45, E53, E51, E50

I fussy cut him/her out and went along the edges with a black Copic friendly marker.

For the card design, I found some matching cardstock to go with the seal’s outfit and used it as the 5×5 Top folding card base as well as a mat layer behind the image panel.  I took the Whimsy Stamps Pierced Border Trio Dies to cut some pieces for the snow with some glitter paper.  I put one strip at the bottom of the card base and another on the bottom of the woodgrain paper I’ve used to place the seal on.

Before adding the seal to the snow border with foam tape, I took the Whimsy Stamps Snow Flurry clear stamp set and stamped some of the snowflakes with pink ink over the woodgrain paper.  I added this layered panel onto a piece of the new digital papers this month called Christmas Roses & Snowflakes which I’ve cut out with a square stitched die along with the woodgrain paper.  I took a sentiment from the Whimsy Stamps Holiday Mini Sentiments clear set and white heat embossed it and cut it out with a portion of the square stitched die as well and attached it to the design.

I’ve finished it off by adding a bow to the corner of the woodgrain paper panel with some clear sparkly ribbon and added another one of those snowflake gems to the center of it!

Vicki-WSSealonIce-Nov2-close

Here’s closer look at the coloring details.  Isn’t this a cutie?!  I love the feminine look to it by adding in the pink snowflake digital papers and sparkly ribbon.

I hope you’ve enjoyed seeing my creations with the newly released images this month from Whimsy Stamps!  Be sure to check out more inspiration on the Whimsy Stamps Inspirations Blog and Facebook Group too!

Thanks so much for stopping by today!!  See you soon!

challenges:

  1.  Cardz 4 Galz – Let’s Go Digital
  2. Addicted to Stamps and More! – Anything GoesAnything Goes badge
  3. Watercooler Wednesday (WWC194) – Anything GoesWWC194 - Anything Goes Challenge
  4. Crafty Animals – Anything Goes + animal/teddy bear
  5. CRAFT – Winter

Anything Goes at Cute Card Thursday + Whimsy Stamps November Release is HERE! (Post 1 of 3 today)

Hello friends and welcome to November!!  It’s hard to believe that we are closing in on the end of another year!  Time has went by so fast especially since I’ve started back up on my new blog here! 🙂  So glad you are here with me!  Thank you for that!

I actually have THREE posts going up today and each one of them brings something fun, new and exciting with it!  So be sure to check them all out!

Today starts a brand new challenge over at Cute Card Thursday!  For this week, it’s an easy “Anything Goes” challenge!  And since our sponsor this week is Whimsy Stamps, I thought this would also be a great time to introduce to you an image from the brand new Digital Release that has just came out TODAY!!  Check it out:

Vicki-WSSealinWater-Nov1

This cute seal critter is presenting his underwater gift for the Holidays!  This new digital image from Whimsy Stamps is called Seal in Water by Crissy Armstrong.  I had fun coloring him up with my Copic markers.  I decided to use the markers in a “pointilism” fashion to give him a spotted seal look. (I’ve also added some light dots with a white gel pen.) Copics used:  for seal – Blender 0, W7, W5, W3, W1, R00 for hat/bow – R39, R37, R35, R32 for package – BG99, BG96, BG93 for trimming/bubbles – C3, C1, C0, BG000

For the background I used a stencil to blend some blue colors to make them appear as if he’s underwater as he has bubbles around him.  I cut him out with a stitched oval die and cut out a piece of gold foil cardstock with a larger stitched oval for matting behind the image.

If you take a look at those fun festive papers on my card, this is also part of the new Whimsy Stamps November Digital release as well!  The papers are from the Christmas Traditions Collection.  I’m sure I’ll be using more from this collection on an upcoming card soon!  I have took the corner chomper and rounded the two bottom corners and then took a gold ink pad to rub along the edges with it.  You can also see that I’ve used one of the Whimsy Stamps Penguin Christmas Sentiments 1 digital set and cut a banner with it to place on the bottom of my card.  I’ve die cut a border in red cardstock going across the middle and added some white silk ribbon with a bow.  I mounted the oval image panel on the card front with foam tape and then cut off the edge.  I mounted everything over an A2 sized red top folding card base.

I’ve finished off my card with some Christmas sequins filled with Tinsel Stickles and I’ve also covered the bubbles with some Nuvo White Blizzard Crystal Drops.

Vicki-WSSealinWater-Nov1-close

Here’s a closer look at the coloring details of my spotted Holiday seal along with the sequins, glitter and bubbles!  Gotta love that popped out belly!! 🙂

Be sure to check out not only the new Whimsy Stamps release on the Inspirations Blog, but please be sure to check out the Cute Card Thursday challenge to see the inspiration from the rest of the design team and play along this week!  We love to see what you’ve created!

Thanks for stopping in!  Please stay tuned in for more posts today!

Challenges:

  1. Winter Wonderland – Color It!
  2. Crafting From the Heart (226) – Anything Goes
  3. Make My Monday – Stencil Stories (Used a wave stencil for behind the seal)


Spots and Dots for Cute Card Thursday

Hello friends!  It’s Thursday once again and time for another new challenge over at the Cute Card Thursday blog!  I really enjoy creating with challenges as it gives me inspiration and a push to finish a design in a way I might not have thought about doing otherwise.  If you haven’t done this yet with your card making, I encourage you to give it a try…you never know what you might come up with!

I know we are in the heat of August, but I think this month is going by fairly quickly and the Autumn Season will be here before you know it!  I was inspired by this along with another GORGEOUS image released this month from Whimsy Stamps, so check out my card for this week’s Cute Card Thursday challenge:

Vicki-CCT543spotanddots-WSAutumnHarvestRide

I have used this stunning Fall image From Whimsy Stamps called Autumn Harvest Ride by Crissy Armstrong.  I had some older Fall papers from my stash that had this fun dotted print on them and used these for the theme of the challenge to combine it with this wonderful Fall image as well.

The special card design I’ve used is called a Center Step Card.  (Click on the link to see the tutorial on how to make one for yourself on Splitcoaststampers.)

Vicki-CCT543spotsdots-WSAutumnHarvestRide

Upon a closer look at the design, I have also used a brand new (to me) elegant die cut by Spellbinders that I received as a prize winning from a fellow blog friend at Granny’s Attic.  (Thank you Connie, love the die!)  I’ve cut that with some garden green color and used that as a “back-drop” for my main image panel.  I’ve taken the Whimsy Stamps Pierced Border Trio Dies and cut another garden green piece for the image to sit.  I’ve also stamped out the sentiment with the Whimsy Stamps Everyday Mini Sentiments set and cut it out with an older Whimsy Stamps tag die to attach on the image panel with some twine.  I popped up the image panel with craft foam and layered this on the center panel of my card design.  I’ve also added a couple of Prima leaves between that.  I’ve attached some other dotted papers to the other panels including the bottom long panel and wrapped some gold ribbon around the bottom one before attaching it.  Lastly the gold ribbon and twine bows were added along with the button in the center gold bow and then I’ve added gold enamel dots on the side panels.

Vicki-CCT543spotsdots-WSAutumnHarvestRide-close

Here’s a closer look at the image and the coloring I’ve done with it.  I’ve mainly used my Copic markers to color it in and then added some gold gel pen coloring to the carousel pole, the saddle and bridle with the gold parts on them.  I took some Tinsel Stickles glitter to add to the “dots” on the saddle and bridle.  I then fussy cut it and attached it over the white dotted background and garden green border panel at the bottom.

Hope you’ve enjoyed my creation today and inspired you in some way to come and play along with us over at the Cute Card Thursday challenge blog!  Be sure to stop by and take a look at the rest of the wonderful creations from the design team.

I’ll be back again soon to share more creations!  Have a great day!

Here are the Whimsy Stamps products I’ve used on my card today.  Click on the photos for a direct link to the product.

autumn harvest ride displayEveryday_20Mini_20Sentiments_20display_1024x1024Pierced_Border_Trio_display_1024x1024


Here are the challenges I’d like to enter:

  1.  Creative Fingers – Anything Goes
  2. Crafty Friends – Anything Goes
  3. My Time to Craft – More Than One Fold
  4. Shopping Our Stash – Leaves
  5. Crafty Gals Corner – Add Ribbon and/or Bow