Spooky Ombre & Welcome Gnomes for Dare to Get Dirty

Hello friends!  I’m back again today to share a couple more cards that I’ve made for the Splitcoaststampers “Dare to Get Dirty” event!  They’ve released another batch of challenge over there today!  There is certainly lots of crafty fun going on lately, isn’t there?!😀

My first card was made for a challenge from the lovely Lee:

Vicki-DTGD20LuvLee-ombre

This card was so much fun to create!  I’ve used only purple shades to make this entire design!  I started out with a white piece of cardstock using the MFT Rolling Clouds stencil and ink blended them in with several Stampin’ Up! inks that I’ve had in my stash for quite a while now! LOL!  After I was done, I spritzed it with a water bottle.

I took the awesomely spooky Trick or Treat stamp set and used some SU! Elegant Eggplant ink to stamp the witch image, bat and the sentiment at the bottom.  I used my MISTI to stamp several times to darken the ink up on them.

I cut out the panel with a stitched rectangle and then cut out an additional piece of Potion Cardstock with a stitched scallop rectangle die from MFT. I layered it over an A2 sized top folding Elegant Eggplant card base.

Vicki-DTGD20LuvLee-ombre-close

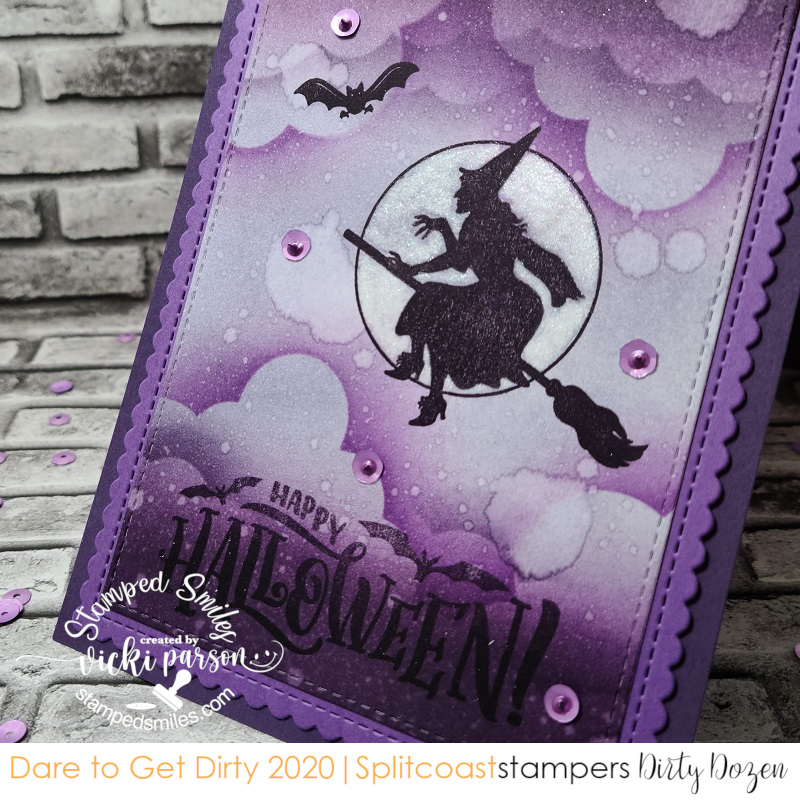
I then took a glitter brush pen to “color in” the inside of the moon around the witch that gave a really cool shimmer look to it. I then started noticing that it was taking away some of the purple ink while doing this, which was really awesome as it made the moon glow even more!  (I just had to be careful around the witch because she was stamped with regular dye purple ink and I didn’t want to blur it.)

I finished the design with some Lilac Matte Sequins that I filled with some Violet Galaxy Crystal Nuvo Drops.  It’s much more sparkly in person!


My next card was made for a challenge from the lovely Kelly:

Vicki-DTGD20MiamiKel4-gnomes

This scene was really fun to put together!  I fell in the love with the little house and gnomes from the Simon Says Stamp Gnome School.  I thought it would make a nice “new home” type of card.  I colored them up and cut them out with the coordinating dies to arrange over my scene.

The scene started with a piece of kraft that was ran over with the SSS Petal Plate die for the texture in the background.  I cut out some clouds and a border of grass with dies and inked them up with some inks for shadows.  I then took this panel and cut it all out with a stitched rectangle die and mounted it over a top folding A2 sized black card base.  I also took a sentiment strip from the SSS Gnome School Sentiment Strips to place over the design while arranging the images over the scene.

Vicki-DTGD20MiamiKel4-gnomes-close

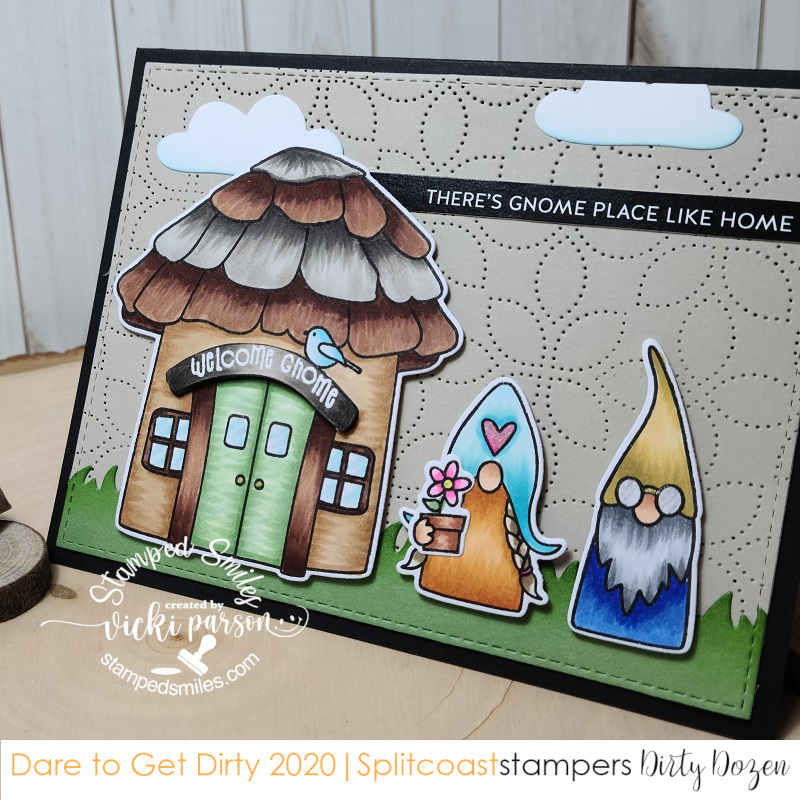
For the sign on top of the “home”, I used one of the sentiments made for that spot and white heat embossed it over my coloring.  Hard to tell in the photo, but I’ve also covered the heart on the gnome’s hat as well as the glasses on the gnome with a glitter brush pen.  I also did the same for the windows on the home.

I hope you’ve enjoyed my creations for today and I sure appreciate you stopping in to check out all of the happenings that are going on!  Hope you’re able to join in some of what’s going on too!  See you soon!

Challenges:

  1.  Simon Says Stamp Wednesday – Oh So cute (bottom card only)
  2. Stamps & Fun = Creativity – #372 Lavender or Purple (top card)
  3. Always Fun – #177 In the Sky Scene (top card)
  4. Crafting Happiness – #63 Anything Goes

A Unicorn with Sprinkles & Rainbows for Dare to Get Dirty

Hello again today my friends! Yes, still posting and with another “twofer post” again today! It will calm down eventually, but for now I have lots of things to share with you!😀

As you may have read in my second post from yesterday, we kicked off the “Dare to Get Dirty” Event over at Splitcoaststampers and I shared the card I made for one of the challenges. I have another creation to share with you that I made for one of the challenges released today and this one is for the lovely Lori:

This really brought out the little girl in me when creating this card with the rainbow colors and magical scene! This sweet little unicorn image along with the rainbow in the background and the sentiment all come from the Digi Doodle Studios Unicorn Wishes Pairables set. I’ve printed them out, colored them with Copic markers and fussy cut them out with the exception of the sentiment which I left and cut out as a cloud with my Lawn Fawn Cloud Border dies. I’ve also used that die to cut some clouds from a piece of vellum and an additional piece of white cardstock.

I’ve used an older My Favorite Things Stitched Rainbow die from white cardstock that I colored with Copic markers to place behind the first set of clouds behind the unicorn. Before layering my clouds, I took some distress ink and blending tool to add a bit of blue shadow behind them. After attaching all the cloud and rainbow layers, I cut it out with the MFT Blueprints 27 die set .

Lastly, I’ve attached this layer over an A2 sized white top folding card base and popped up the fussy cut unicorn with foam tape. I took some random sequins to attach over the design.

Here’s a closer view of some of the details in the card. I added some loose glitter over the unicorn’s wings with a 2-way glue pen and some loose glitter. Hard to tell, but I’ve also added some shimmer to the rainbows and the unicorn’s mane with a glitter brush pen. I also added a bit more blue cloud shadow under the unicorn’s feet before attaching him on the card.

This was really fun to create and I know it will make a fun card to share.

Thanks so much for dropping in!

Dare to Get Dirty Has Begun with Something Festive!

Hello friends! Yes, I know, not only am I posting every single day, now I’m posting twice in one day!?! What’s going on with me?!😂 Really sorry to “bombard” you with all of these posts, but this is what I meant by me being SO busy “behind the scenes”! If I do miss a day, you’re going to wonder if I’ve left again! It sure is busy, but it’s also fun while the long days of Summer go by.

Today starts the Splitcoaststampers “Dare to Get Dirty” annual event full of fun challenges by current and past alumni from the Dirty Dozen Design Team. This is the 16th year that this special event has happened! I’m very proud to be associated with Splitcoaststampers and have been apart of the community since 2003…a lurker👀 a few years before that too! I have some LIFE LONG friends as that’s where I started putting anything I ever created online anywhere. So in June of 2016 I was honored when asked to be apart of the Dirty Dozen Design Team! They certainly have my creative heart forever. So I think I missed last years event because I was not well at that time, so I will be participating as a challenge hostess this year. You must be a “Fan Club Member” over there to be able to see the event, so if you’re interested in joining, please check out the “How to Become a Fan Club Member” page. (Otherwise you will not “see” the event details.).

So each day, there’s about 5-6 new challenges released starting today and lasting until Friday August 28th…that’s a whole lot of challenges! I obviously didn’t have time to make something for every single challenge, but I have made a few to help my fellow “Dare to Get Dirty DT friends” create samples for their challenge.

The first challenge I made a creation for was the lovely Kittie’s challenge. And obviously, I cannot reveal what the challenge is about, I can show you my creation and ask that you head on over to the event to see the details and play along with us….

I had such a fun time creating this fun Holiday themed slimline! I pulled out an old favorite “Santa’s Elves” stamp set from My Favorite Things for this one. I’ve stamped and colored several images from this set using Copic markers and cut them out with a coordinating die. For the scene, I’ve taken a piece of white cardstock and used a wave border die to cut out the different snowy hillsides and before attaching them down, I’ve used a blending tool to add some blue ink to the edges. I then took each individual hill and embossed them with an embossing folder.

I arranged the “hills” over a piece of brushed gold cardstock that was cut out with a stitched slimline die from Trinity Stamps. I “tucked in” the cut out images in between the hills. The gold layer was attached over a red stitched scallop slimline piece that was mounted over a 3.5 x 8.5 slimline card side folding white card base. I’ve also used one of the banners from that Trinity Stamps die set to white heat emboss the sentiment from the stamp set and then popped up the little elf over top of that with foam tape over the bottom of the card front. I also attached that little holly image at the end of it.

Lastly, I topped the card off with holiday colored sequins filled with gold Stickles in the centers.

Here’s a little bit of a closer view of the images on the card. I’ve taken a glitter brush pen and went over the stars on the trees as well as the ornaments and the bell on the elf’s hat for a bit of shimmer. I also covered the holly berries on the bottom sentiment with some glossy accents. (Hard to get all details in there!)

Hope you’ve enjoyed my Christmas slimline card today as well as all of the daily posts I’ve been sharing! I look forward to either seeing what you create during the “Dare to Get Dirty” event or anything else you may be working on! The end of the year is coming soon and I know everyone will be creating lots of fun things!

Thanks for joining me today friends! I’ll see you again tomorrow! Stay well and happy!

Challenges:

  1. Merry Little Christmas – Anything Christmas Goes for August
  2. Jingle Belles – Cardstock Christmas
  3. Crafty Cardmakers – Lots of Layers
  4. The Pper Girls – Emboss Like a Boss (both heat and embossing folder used)
  5. Shopping Our Stash – Pile it on! (layers)
  6. Cute Card Thursday – Embossing