November AJ Page-Peace Love and Hope

Hello friends!  Hope that you’re having a wonderful weekend and I can’t believe we’re looking at the end of November already as well as almost the end of the year too!  Since I’ve been doing most of my post this month with guesting for Inky Stamper, it’s time to change it up a bit.

At the end of the month, I do an Art Journal page and collaboration with my crafty friend, Carol (from Crafty-Stamper), so please check out her blog for her AJ page too!🥰  We’re trying to get creative by using up our never-ending stash piles!  So here’s my Art Journal inspiration with the “SMASH OUR STASH” November prompt of “washi tape/stickers/border stickers, etc” :

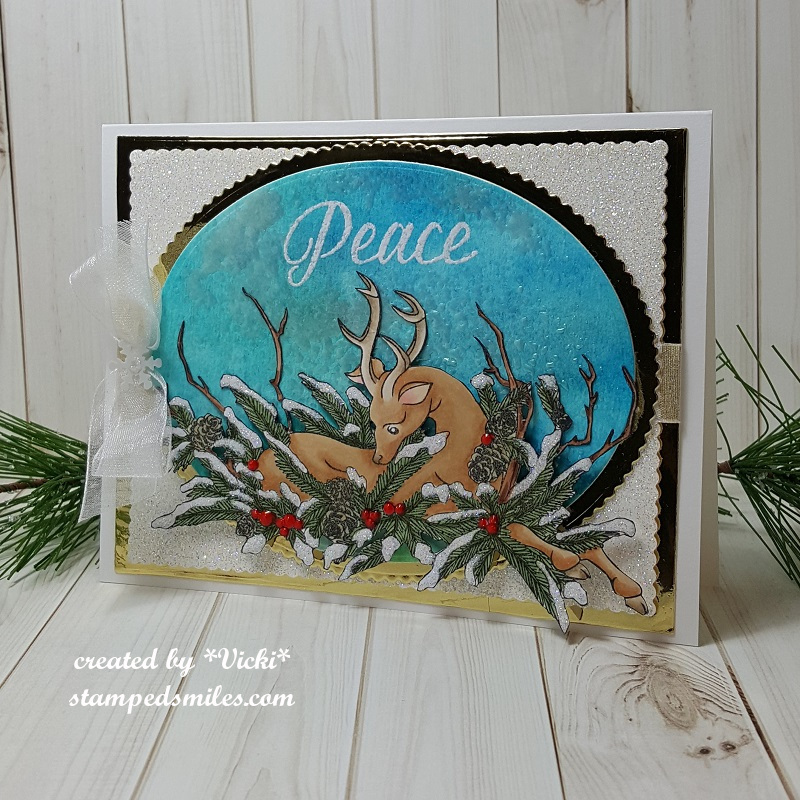
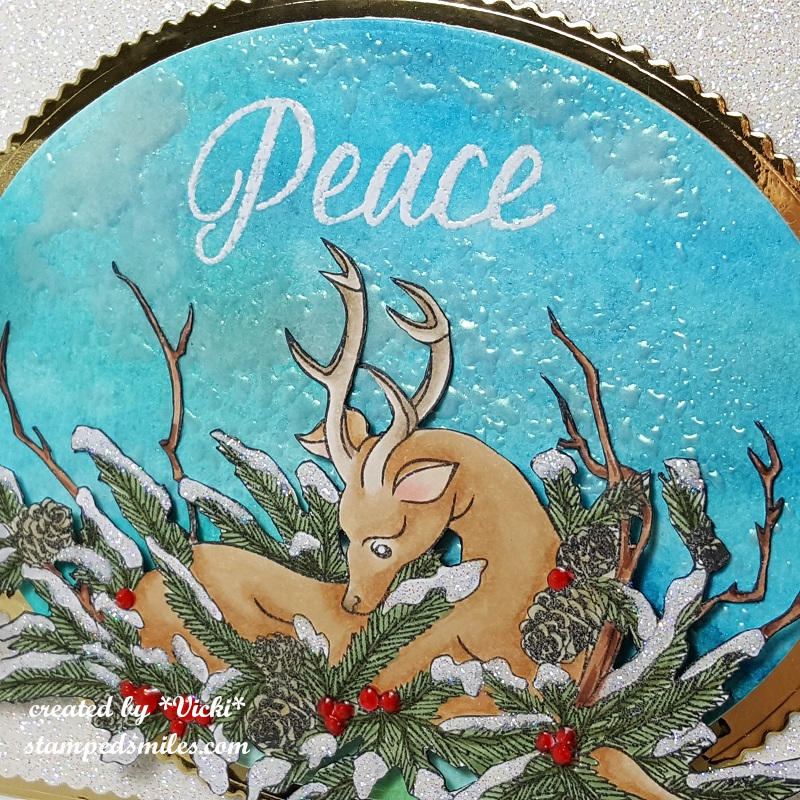
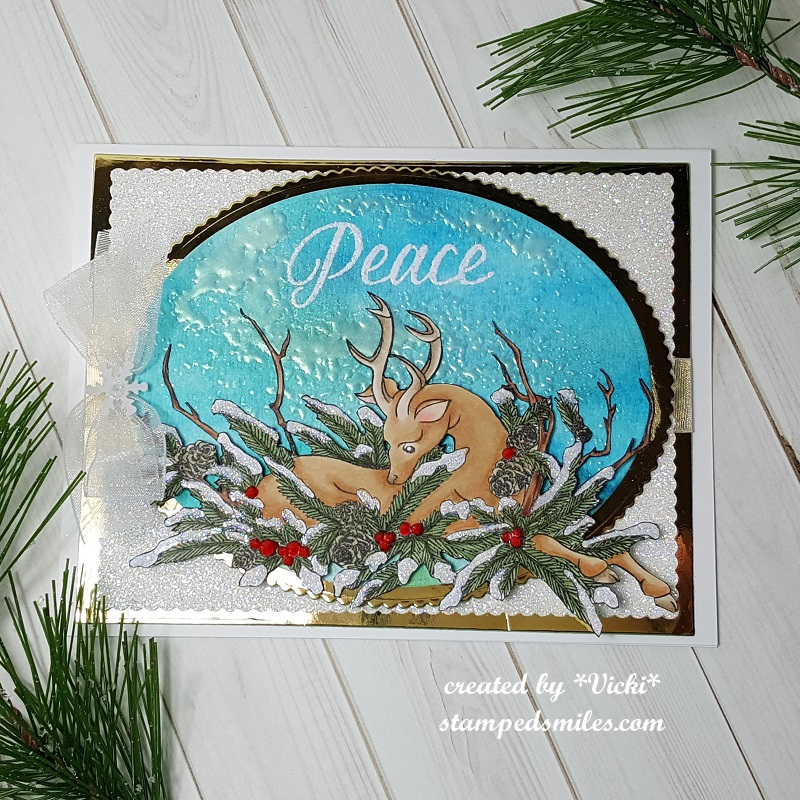
So with the Smash our stash theme, I went through and pulled out so many stickers in my collection…and then realized that I’ve had some of these things for such a long time!  I couldn’t use them all, but I made something work with a fun Christmas theme in mind.

For the background:  I started out with my pre-punched holes at the top of my 140# cold press paper sized 6″x9″ and covered the bottom portion of the page with some Tim Holtz Christmas themed washi tape.  I thought it was a bit too bright and went over it with some white paint and a brayer.  I also took a collage paper of Christmas music sheet paper and stamped a couple of different images over it to further the collaged background.  I also covered this area with a thin layer of mixed media silver paint.

I die cut a pine tree and sponged some inks around the edges and turned that as well as the die cut sparkle snowflakes into stickers using my Xron machine.  I stamped the two deer in black ink and heat embossed over it a clear EP.  I then took a Tim Holtz stencil and used some sparkle texture paste over it for snow. (Before I attached the larger snowflake stickers.)  I also splattered the page with some white paint too…lots of snowfall going on!

For the wording:  I had some black thickers (as they call them, which are thick foam letter stickers) for the “PEACE” and then the other words are stickers from my stash.  The heart is from the thicker sheet too.  I took some silver rubbing paste with my finger and went along the edges of the page as well as the thicker letters to add some interest.  Lastly: I made a “snow ground” for the deer by applying some glue and covering it with some glitter crystals.  I also added some black gem stickers to the center of each snowflake sticker.

I hope you’ve enjoyed my art journal page today and have been inspired in some way.  Thanks for much for stopping in and I’ll see you soon!

Challenges:

  1.  Art Journal Journey – Collage Fodder and/or Food and Drink (collage fodder here)
  2. Mixed Media Lovers – Letters/text/quote 
  3. Creative Artiste – Anything Mixed Media
  4. Creative Moments – Winter
  5. Arty Divas – Anything Goes
  6. Simon Says Stamp Wednesday – NOT a card

Sending a Smile to a Hunter and Winner on You Tube!

Hello friends! Welcome to the month of September! I cannot believe that Fall is at the door here! The weather has already started to cool us down a bit and Summer is starting to fade as you can see the flowers starting to die off. Now I will look forward to the changing color of leaves which is always amazing.

Today I have a project to share that I’ve made for the Splitcoaststampers Teapot “Make it Pop” challenge. This card is in need of a special SCS friend’s father who is having some difficulties with health and I wanted to help with a smile for him if I could:

“Pop” as he is lovingly called, enjoys the outdoors and hunting which is something that several men in my own life enjoy, so I knew that this would be a direction I was going in with some stamps I have from Newton’s Nook.

For the background, I took a woodgrain embossing folder before fully assembling the card.

Since this is a hunting theme, I thought it would be fun to make a camouflage background and so I’ve used the fabulous tutorial on SCS HERE to create the look.  I also cut off a thin strip towards the bottom to add some interest to the design as well.  Over top of the background, I layered the sentiment from MFT and also cut it out with a banner die.  I used a grassy feilds border die from MFT for the strip at the bottom of the panel and stamped the “Pop…” over it in brown ink.  I stamped and cut out the deer from the Newton’s Nook Serene Silhouettes set with coordinating dies.  I also die cut a few green leaves with an older MFT die for a few accents inside and out.

When you open up the card…

vicki-mmtpt632-forpop-open-1

Because of the name “Pop”, the challenge was “Make it Pop”, we needed to show some sort of element like this on our design.  So I found this really fun “Pop-Up Diorama” card tutorial on SCS for my design.

I’ve used an oval die to cut the center of my card and then used a piece of cardstock for the background to attach behind it.  On this panel, I created a scene with blending inks and adding stamped and die cut elements from the Newton’s Nook Whispering Pines stamp set that I’ve also used the sentiment from on the inside.

For the rest of the card, I’ve used the same stamp set that I used on the outside of the card and arranged them to create this scene with different layers that are popped up.

Hope this helps bring a smile over to “Pop”.  Thanks so much for stopping in today and I hope you were inspired in some way too!

Have a great day friends and I’ll see you soon!

Challenges:

  1.  Splitcoaststampers Teapot Tuesday – Make it Pop
  2. International Art & Soul – Include an animal
  3. Crafting Happiness – #64 Anything Goes
  4. 2 Crafty Critter Crazies – Anything Goes + animal
  5. Moving Along with the Times – Create a Scene
  6. Crafty Animals – Anything Goes + animal

DDS and PND Collaboration Blog Hop is Here!

Hello friends!  Today is the “special day” of our really fun and festive Collaboration Blog Hop!  Hope you will be joining along with us for lots of inspiration and prizes!  Woohoo!

MY HOLIDAY HOP PROJECT:

I am on the Digi Doodle Studios Design team and here is my interpretation of combining each companies’ images together to come up with this fun snow scene for the Holidays:

Vicki-DDSandPND blog hop

For my card here I have taken the Digi Doodle Studios Penguin Wobbles Special Delivery digital stamp along with the Paper Nest Dolls Holiday Friends digital stamp and printed them out over a piece of Copic Blending Card.  I’ve colored them up and fussy cut them out for my scene here.

To create the scene, I’ve used some blue cardstock for the background and splattered some watered down gesso over it and then used a die cut to create the fun frame within it.  I layered it over a piece of gold cardstock so it shows through.  I also die cut some snowy hills with white glitter cardstock and some pine trees with green cardstock.

I arranged them over my blue cardstock panel  and created the scene.  I popped up the front layer of snow hill along with the penguin image with foam tape.  I covered this snow hill layer with some texture snow paste…it’s so glittery!!  I also added some more glittery details here and there on the images too.

I white heat embossed the sentiment and placed a peppermint candy embellishment next to it and attached the strip over the blue background.  I then mounted this entire scene layer over some fun and festive foiled striped papers and then onto another blue piece which was then mounted over a top folding white 5.5″ square card base.

Vicki-DDSandPND blog hop-close

Here’s a bit of a closer look at the images and how I’ve colored them up with Copic markers.  You can see that I’ve used my white gel pen for details on the bow in the present along with the shinny look on the candy cane and the cheeks of all the images.  I’ve added a few dots on the deer’s back tail too.

I’ve used a gold gel pen to color in the sleigh runner, the band around the gift sack, the “lettering and dots” on the penguin’s sign as well as the bells the little girl is holding.  I used a red gel pen to color in the little deer’s nose.  I’ve used a green gel pen to create “dots” on the penguin’s present and the deer’s bow.

I’ve also added some glitter to the heart candies and the girl’s outfit trim.

You can also see just how puffy and dimensional that snow is too! It’s really glittery and was so fun to add to the scene!  It looks like they’re gearing up to deliver some presents and the cute little Mr. Penguin Wobbles is all loaded and ready to go! LOL!

Vicki-DDSandPND blog hop-flat

I really hope that you’ve enjoyed my card today and have been inspired with it in some way to get you into the festive Holiday spirit!

Thanks so much for stopping in today my friends!

Challenges:

  1.  Stamping Sensations– Dec Anything Goes
  2. Love to Craft – LTCCB41 – Dec Anything Goes
  3. Lil Patch of Crafty Friends – Anything Goes
  4. Shopping Our Stash– Happy Holidays!
  5. Crafting By Designs – Dec Anything goes
  6. The Paper Funday – Dec Anything Goes with optional twist:  Christmas Holiday
  7. Winter Wonderland – Anything Christmas Goes

Let it Snow for 2 Crafty Critter Crazies

Hello friends!  Happy November!  The weather has come in full force with the several inches of snow that came over our area on Halloween!  I blinked and Fall was over!   I don’t ever remember it snowing this early before, but I guess it’s very fitting for my card today then! LOL!

Since today is the first of the month, we begin a new challenge over at 2 Crafty Critter Crazies and the theme is always “Anything Goes + use a CRITTER” and it can be any type of crafty project you like to make!  Hope you will join us this month and share your lovely critter creations!

We are sponsored this month by The Paper Shelter and here’s the card I made:

Vicki-2CCC32-TPS

We were provided an image set to share for the team, and this beautiful set is called “Holy Night” and it comes with both the regular digital image, plus a colored version as well as some beautiful background scenes to go with it.

For my card, I printed out the “non-colored” image and used my Copic markers to color it and then used some oval dies to cut it out.  I also stamped a sentiment from Whimsy Stamps at the bottom of the oval.

I printed out the background scene paper and sponged around the edges with some blue ink that I’ve also sponged around the oval edges as well.  I added some silver metallic ribbon around the background layers and slipped the brown oval layer behind the ribbon.  I die cut some MFT snowflakes with silver glitter paper and added them around the card design.  These background layers were then mounted over a top folding white 5″ square card base.

I popped up the oval image panel with craft foam and then added a few rhinestones in the center of the snowflake over the oval and the one in the center of the bow.

Vicki-2CCC32-TPS-close

She looked a little Vintage to me and with the wintry papers, so I wanted to color her outfit in blue tones and accent with browns. For the “spots” on the deer, I used my blender 0.

I wish you could see it better in the photo, but I’ve used a gel pen for accents around her outfit trimmings including the lines of the inside of her cloak.  I also used the gel pen for the “berries” in the holy around the deer’s neck and her hair piece.

For the snowfall, I took a glue pen to add the “dots” over the image and lined the ground with it and then sprinkled some glitter over the entire oval image.

Vicki-2CCC32-TPS-flat

I hope you’ve enjoyed my wintry card today and were inspired in some way.

Thanks so much for stopping in today and please stay tuned for another post coming up from me today!!

Challenges:

  1.  The Paper Shelter – #404 Make it Square (square card)
  2. Aud Sentiments – Anything Goes + a Sentiment
  3. CRAFT – Winter

Find Peace with a Winter Deer

Hello friends!  As I had mentioned in yesterday’s post, we are currently being hit with snow AND ice over my way…so I might as well embrace it, right?!   Although I’ve been trying to sneak in some Spring creations, I also enjoy creating Christmas/Winter cards throughout the year so that I can take my time and not be hurried during the rush of the Season at the end of the year which makes it more enjoyable…and peaceful! 🙂

I’m using a stamp set called Winter Deer which I’ve used on my card for today:

Vicki-SnSWinterDeer-Feb

I started out with a piece of watercolor paper and used the Blue Blitz and Atlantis Burst Nuvo Shimmer Powders to create the background by spritzing it with water until I achieved the look I wanted and set aside to dry.

I cut this panel out with an oval die and using my cut-out deer for reference to see where I wanted to position the sentiment, I embossed the sentiment from the stamp set with White EP.  I used some Magic Speckle EP for a really cool background effect over the watercolor panel! (You can see it better in the photos below.)  I’ve used both Dimensional Glue as well as foam dots to attach the deer image and oval layers together.  I’ve used both white cardstock as well as some gold mirror cardstock for the layered panels.

Vicki-SnSWinterDeer-Feb-Close

Here’s a closer look at the Copic coloring I’ve done on the deer as well as the Magic Speckle EP effect on the background!  Since it’s a thicker type of powder, I didn’t attach it with anything.  I just added “piles” of it where I wanted and melted it from underneath, so it didn’t blow all over.  Loving how it has that “icy look” to it!

For the deer, I’ve used my Tim Holtz 5″ Mini Scissors to VERY carefully cut this image out and then used a black marker to go along the edges to hide my imperfections. For the snow over the branches, I’ve used a Nuvo Precision Glue Pen to go over it and then sprinkle some Sparkling Snow Glitter over it.  I also took the Nuvo Red Berry Crystal Drops and covered the “berries” with it.  I set this aside until dry to work on the rest of my card.

Vicki-SnSWinterDeer-Feb-Flat

So for the glittery background panel behind the oval layers, I took a piece of white cardstock and attached it with a piece of the Adhesive Sheets and die cut it out with a scallop rectangle die.  I removed the release paper from it and burnished some of the same Sparkling Snow Glitter into this panel.  I attached it over another piece of gold mirror cardstock and then wrapped some organdy ribbon around it and attached a bow along the side.

In the center of the bow, I added a snowflake sequin and then put a dot of the Dimensional Glue in the center of it and then added some more of the Sparkling Snow Glitter.

These layers were attached to an A2 sized top folding white card base and then the oval layers were attached over the glitter panel next to the bow.

I hope you’ve enjoyed my card today and got inspired to keep ahead of making your Christmas cards this year!  Thank you so much for dropping in!  I really appreciate your kindness and support so much!!  (Reading your comments always brightens my day more than you know! HUGS)

Challenges I’d like to enter this card for:

  1.  Winter Wonderland – Anything Christmas Goes
  2. Merry Little Christmas – (MLCCB7) Anything Christmas Goes
  3. The Holly and Ivy Christmas Challenge – Anything Christmas
  4. 4 Crafty Chicks – Lots of Layers
  5. Happy Little Stampers – Anything Goes with Dies
  6. Allsorts – Winter Sparkle

Birthday Wishes for Hubby

Hello friends!  Happy Friday!  I wanted to share a few things from my husband’s birthday we celebrated last night along with the card I made for him.

Vicki-MFTDeer-Bday

I was going for a masculine look of course and I know that he likes nature, wildlife, etc. and with his birthday being in November, I thought a Fall scheme would work out nicely.  Besides, I had gotten some My Favorite Things products and wanted to have a play with them, so I used the current color challenge when making this one.  (See challenges list below)

For my design, I went with a Natural cardstock base, rounded the corners with a corner chomper and ink blended along the edges with some Vintage Photo distress ink.  I got a little more carried away with the inking than what I wanted, but then went over it by spritzing some water and dabbing it up with a paper towel for the water marks.  (I’ve also cut out some leaves with the Falling Leaves Die-namics die set and then sponged some colors around the edges for them as well.  These were added as accents on the over-all design.)

Vicki-MFTDeer-Bday1

I was so excited about using this Delightful Deer Die-namics set.  There are some T-I-N-Y bits in there to cut out and attach! LOL!  I sponged around the edges and bottom of legs with a brown ink.  I die cut some white dots and the piece for tail as well as cut out a couple of brown dots for eye and nose as well as cutting out his antlers.  I also added a few extra “dots” with my white gel pen on the deer.  It was popped up over the scene with some foam tape.  The main deer was cut from Persimmon cardstock which is also what I’ve used to cut out a banner (from the Essential Fishtail Sentiment Strips die-namics) that I white heat embossed the sentiment from the Essential Sentiments stamp set.

Vicki-MFTDeer-Bday2

For my scene, I took some of the MFT Candy Land Paper Pack and use the dotted “Sour Apple” color piece and die cut a panel of it with the Stitched Rounded Rectangle STAX die-namics and placed it over my ink blended natural card front base.  I then used the Stitched Valley die-namics and cut some pieces from brown cardstock and lightly sponged some white ink over top of the “hills”.  I placed those over top of my natural card front base and also cut out some trees from one of the FREE die-namics dies that I received with an order from some Sour Apple card stock and attached them over the “hills”.

Lastly, I wrapped some twine around the card front base, added my die cut leaves where I wanted them, attached this panel to a top folding A2 sized white card base that I’ve also rounded the corners on with a corner chomper.  Lastly, I’ve added some clear crystal drops in random places.

I enjoyed creating this one using mainly die cuts and minimal stamping!  I hope you’ve enjoyed my masculine card design as well! 🙂

Here’s the challenges that I’d like to enter this card for:

  1.  MFT Color Challenge – Persimmon, Sour Apple, Milk Chocolate, Neutral
  2. Happy Little Stampers Anything Goes with Dies –
  3. City Crafter – #437 Woodland Animals
  4. Crafting By Designs – Anything Goes
  5. Creative Moments – Anything Goes

If you happen to follow along with me on FB, then you may have seen where I’ve had the talented lady Dina Kowal create a portrait for me using a past photo from our beloved family member Mocca that passed away this last February.  Dina is extremely talented with her pencils!  My hubby was amazed and here is a photo of him with it last night after he opened it up for his birthday present:

BertBday-11-08-2018-gift

He said, “Oh wow!” when he opened it and wanted me to tell her that she did an amazing job, it looks just like her!   I went through the photos with hubby (he’s not on social media) that Dina had shared of her on-going creative process with the portrait, and this was one from the beginning:

Mocca drawing photo 1

And this was the photo that she used for her creative process:

OLYMPUS DIGITAL CAMERA

We are thrilled and honored to have this stunning work of ‘Mocca’ art in our home and look forward to getting it framed and put up!  Thank you to Dina for sharing her talents with all of us! 🙂

Thanks for dropping by my friends!  See you soon!

Father’s Day Makes

Hello friends!

Hope that you had a good weekend!  Since the celebration is over and there are no “peekers” to worry about anymore, I can post the cards that I’ve made!

OLYMPUS DIGITAL CAMERA

This truck image is part of my purchase from the Stamp Convention that I went to from the Rubber Cottage booth.  As a matter of fact, I purchased a kit from them which is where the embossing folder and silver metallic paper comes from on my card.

I just colored the truck with Copics, cut it out with the die and popped it up over the “tree scene” with foam squares to make it look like the truck is driving into the scene.  The papers in the background along with the tree image and rest of the card comes from some old Stampin’ Up! products in my stash…too numerous to count all the old! LOL!

This next card was made especially for my husband:

OLYMPUS DIGITAL CAMERA

This one took me a bit out of my comfort zone as I basically watercolored the entire scene.  The only set of watercolors that I own are the Kuretake Gansi Tambi ones.  I really do like using them, but the pans are starting to empty out on a few colors now.  So I’ve been looking into different kinds to see if I will try some new ones.  Do any of you have watercolors that you like using?

I did have a bit of help with the trees from the Newton’s Nook Whispering Pines stamp set.  I took the images, scribbled some watercolor crayons (very old SU! ones!) over them, misted them with water and stamped them where I wanted them to be.  I used my paint brush to move around the colors a bit so they blended with the scene a bit more.

I stamped the silhouette images from the Newton’s Nook Serene Silhouettes and the greeting from the Winton’s BBQ set with black ink using my MISTI tool several times as it was watercolor paper which is always hard to get a complete impression on.  I also used a Spectrum Noir clear glitter pen to go over the blue for the water area.  Layered onto a piece of black and then onto a white side folding A2 sized card.

Sometimes it can be a challenge making masculine cards appropriate for each male you need a card for, but I think I did fine keeping in mind the people they went to and they were really fun to make!  Hope you’ve enjoyed them too!

I would like to enter these challenges:

  1.  Try it On Tuesday – For the boys
  2. Crafty Creations – Anything Goes
  3. Creative Moments – Anything Goes
  4. Watercooler Wednesday (WWC174) – All About Occasions – Father’s Day
  5. Crafty Catz – Anything Goes
  6. Crafty Friends – Anything Goes