Gingerbread Christmas Tag

Hello friends!  It seems like it’s been a while since my last post!  I have been feeling a little under the weather for a few days and I’m trying to get myself back on track…so hopefully I’m getting there!  Thank you to all who’ve left comments and a big welcome to my new followers!  So happy to have you here and hope you enjoy the postings!

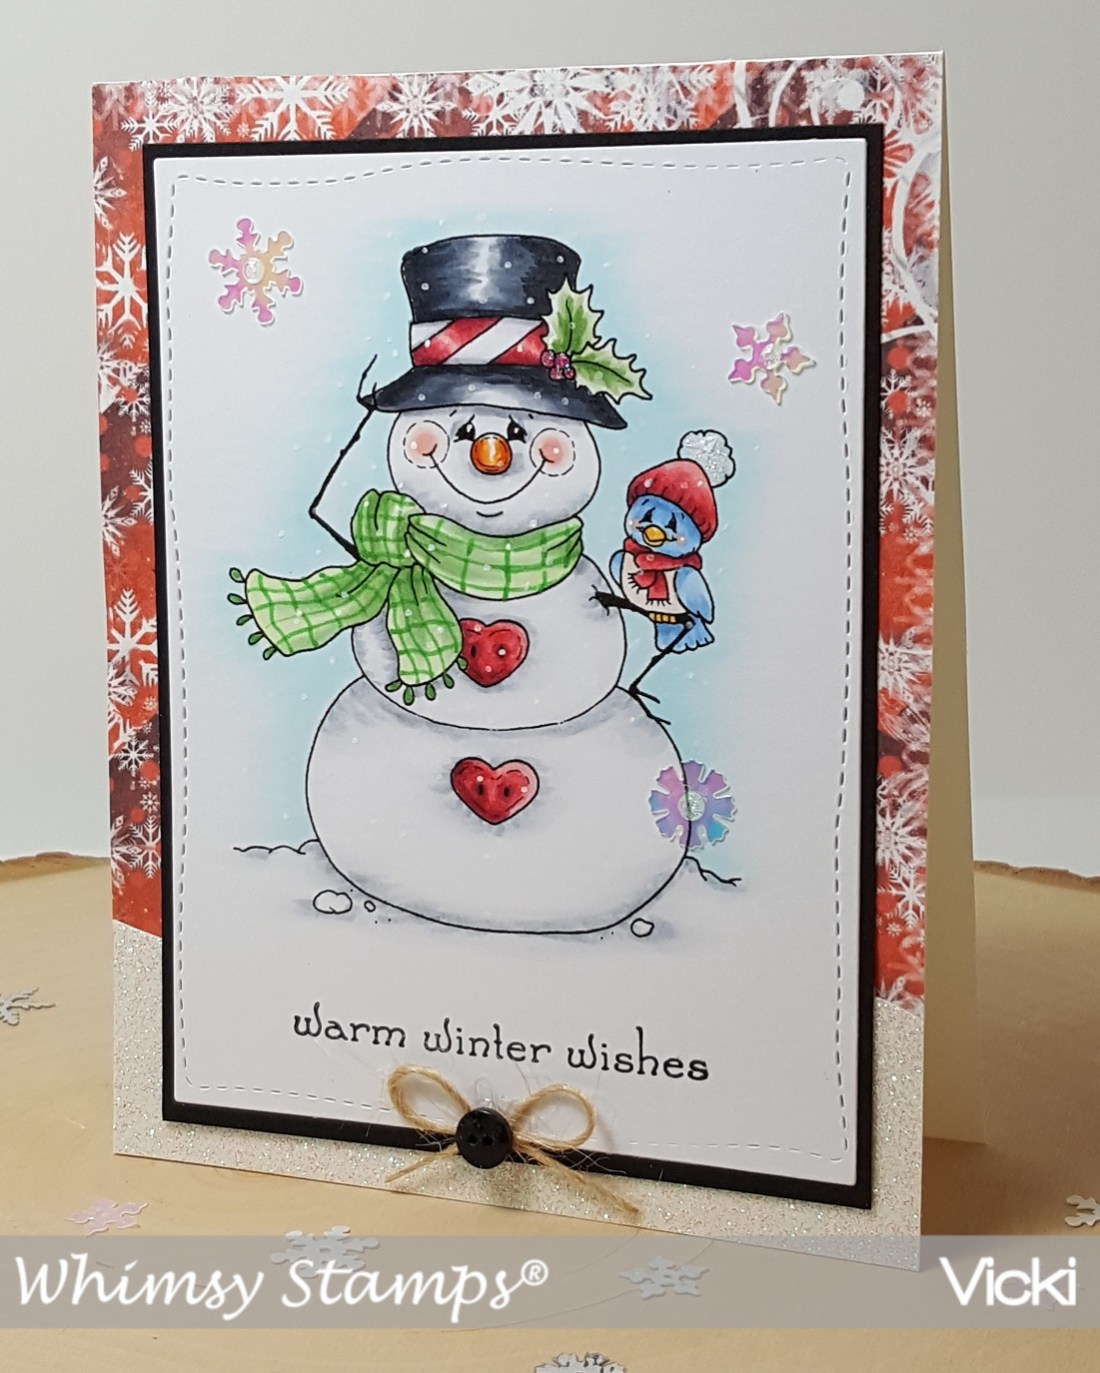
I have a cute Christmas tag to share with you today using an oldie but a goodie Whimsy Stamps digital image:

Vicki-Oct24-Gingerbreadman Tag

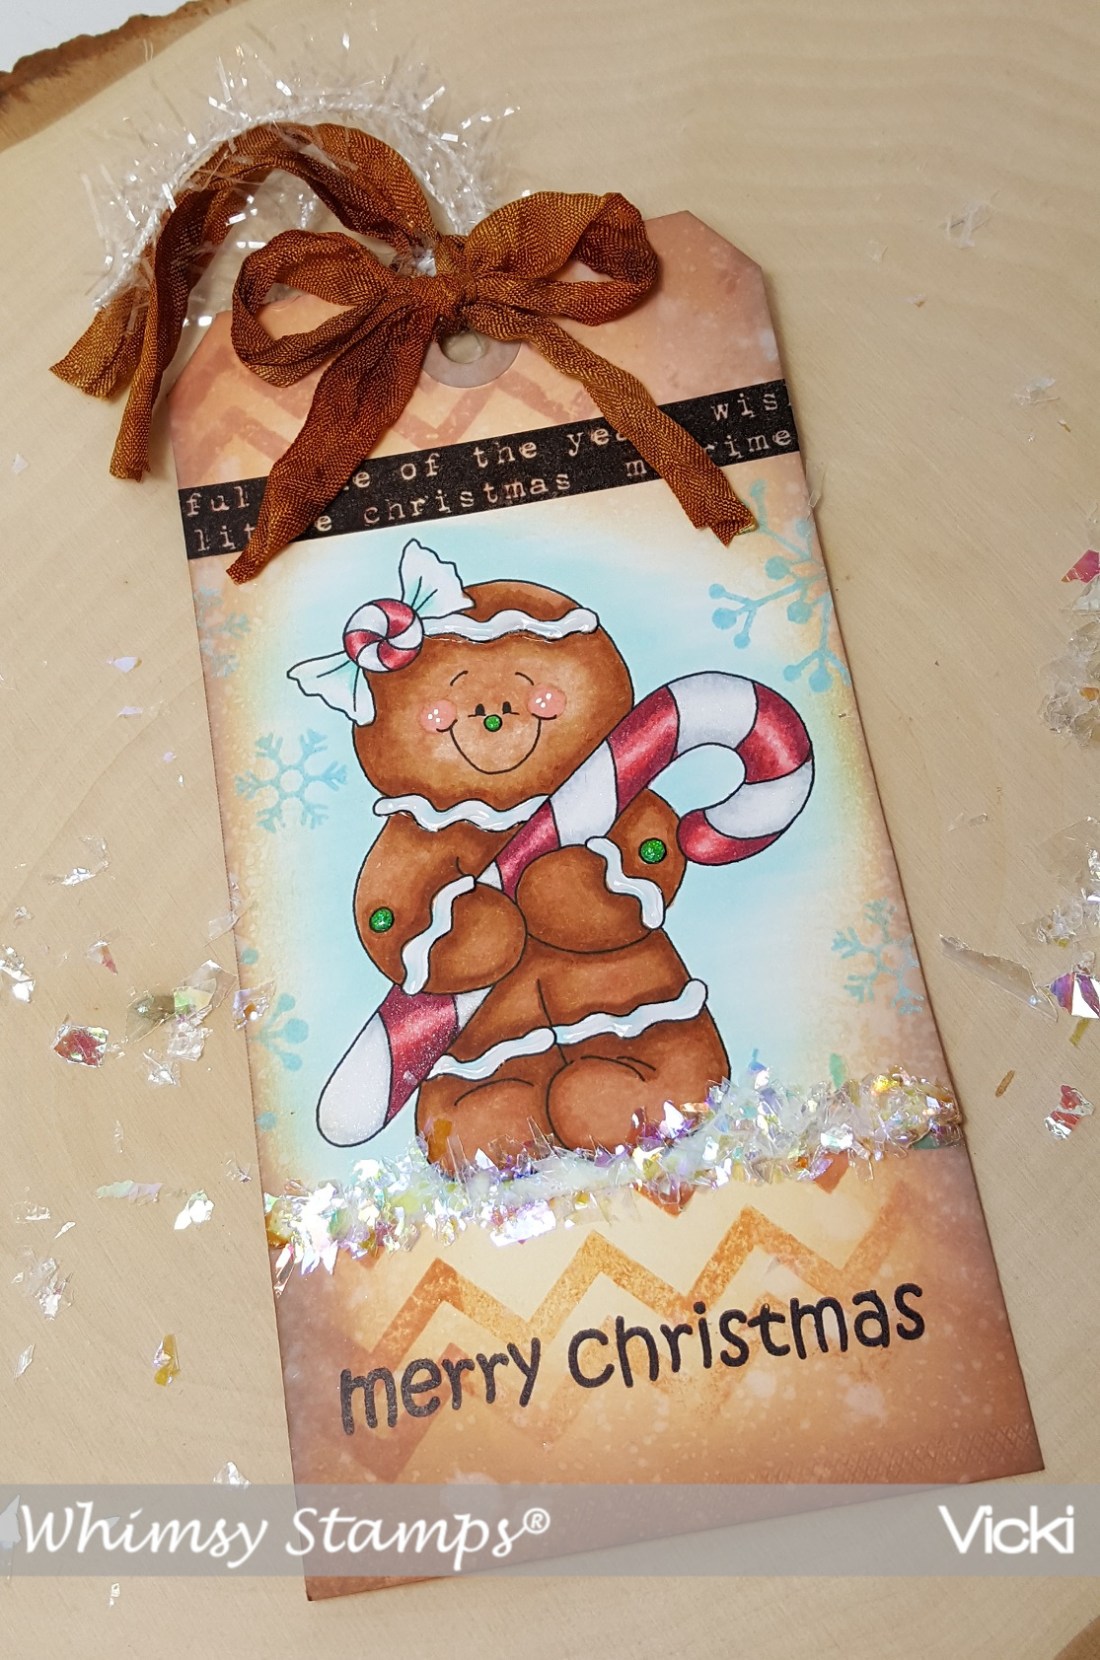
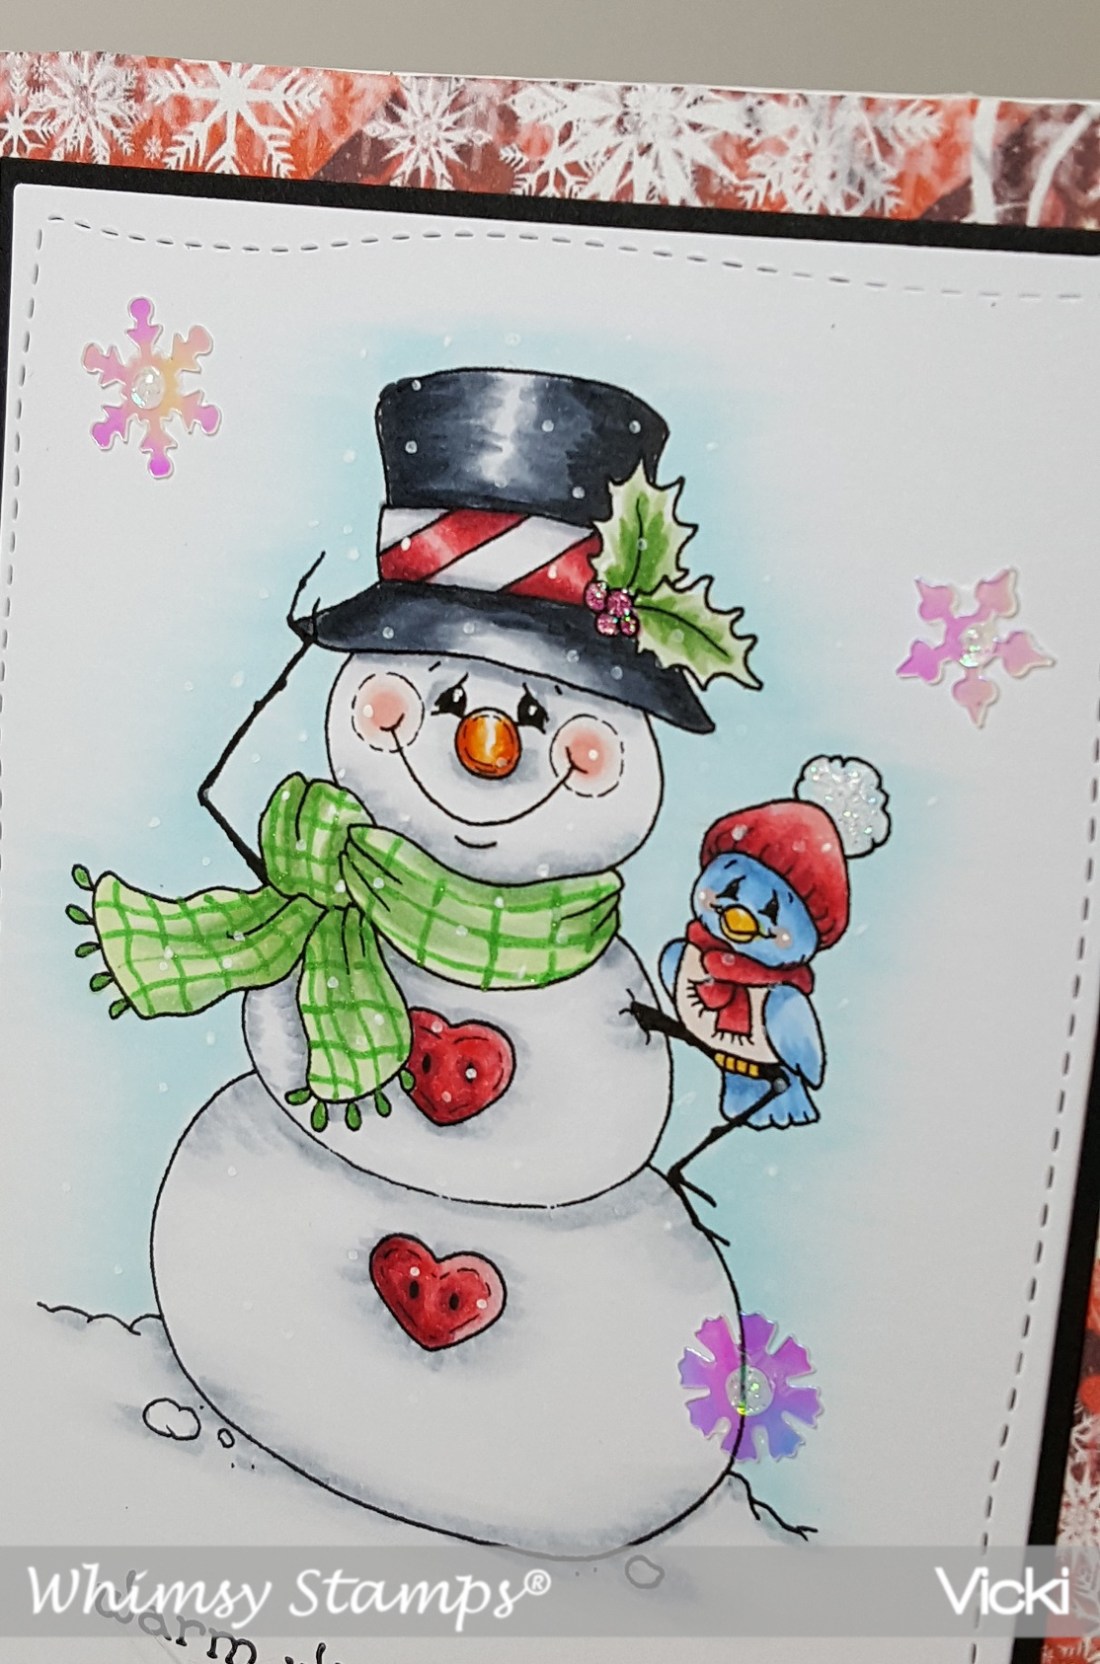
This sweet little Gingerbread Man was so much fun to color and “bling up” a bit with some accents!  I have him colored up with Copic markers in the following:

  1.  Body:  E39, E37, E35, E15, E13 (Cheeks 0blender, R20 and frosting BG000 in certain areas.)
  2. Candy Cane and circle candy:  R39, R37, R35, R32, C3, C1, C0
  3. Nose and arm accents:  G16, G09
  4. Outer Edge of image:  BG10, BG000

I used a manila tag and got out a zig zag image from an older Whimsy Stamps clear set called Basic Backgrounds & Borders (retired) and stamped it on the tag with Rusty Hinge Oxide Ink.  I also used that color along with Tea Stain and Vintage Photo Oxide inks to sponge around the edges of the tag.  I used a water spritzer to add some drops and then blotted it with a towel to get the watermark look.

The gingerbread man panel was cut to fit the tag and I used some Tumbled Glass Oxide ink to stamp a few snowflakes around the gingerbread man from the Whimsy Stamps Snow Flurry stamp set and then sponged around the edges of this panel with the same brown oxide inks listed above.   I also stamped a sentiment at the bottom of the tag from the Whimsy Stamps Penguins Winter Adventure stamp set with Archival Jet Black ink.  I then added a strip of black washi tape from Tim Holtz Ideaology Christmas collection and then added some “faux snow” flakes at the bottom of the gingerbread man panel with some liquid glue.

For the ribbon, I used some seam binding ribbon and sprayed it with distress ink sprays in the same brown colors as inks that I’ve used, crinkled up and let it dry.  I added that to the top of the tag along with some tinsel ribbon.  I thought it went well with the snow!

Vicki-WS-Oct24-gingerbread-close

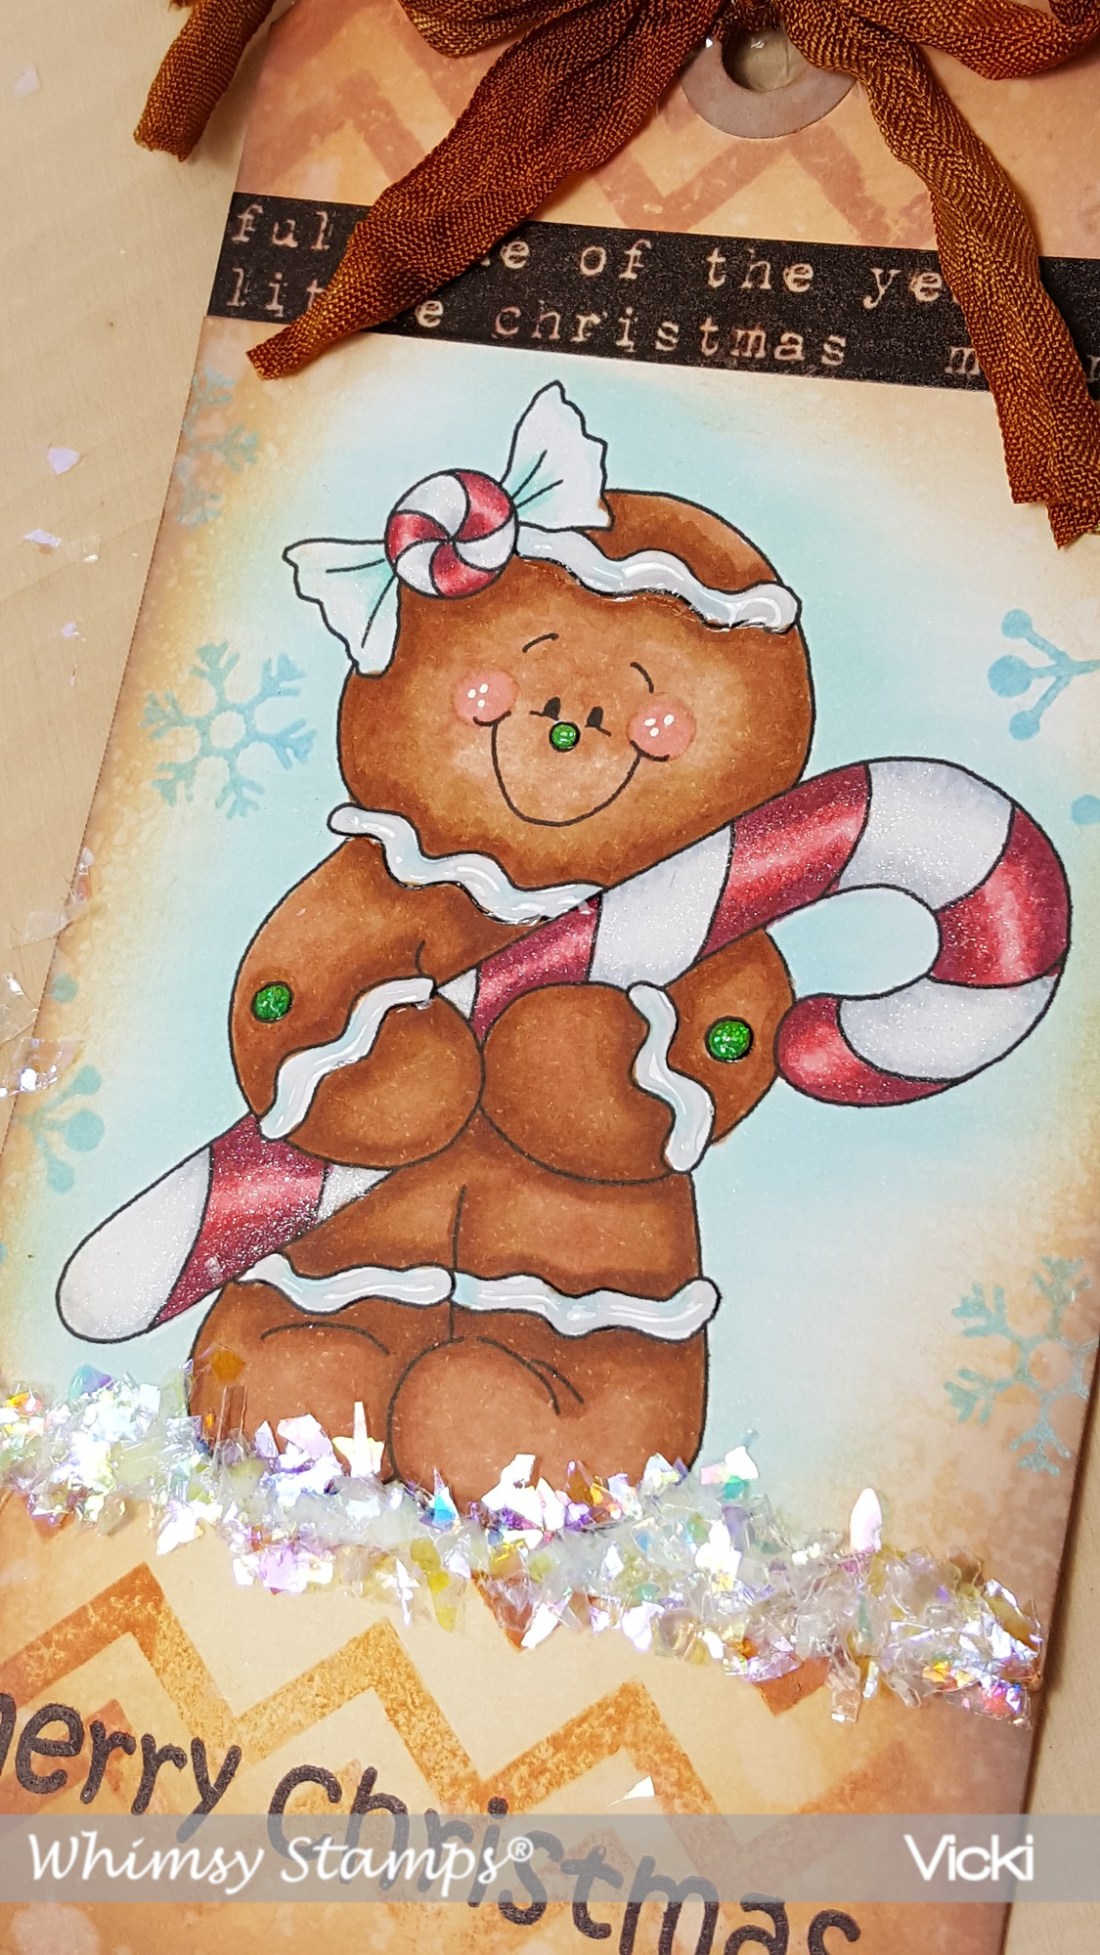
A closer view of the gingerbread man and you can see the added extra details that I’ve added to him.  For the candy cane and circle candy on his head, I covered them with a Spectrum Noir Glitter Brush Pen.  I’ve added some Nuvo White Blizzard Glitter Drops to the green dots and then some Nuvo Clear Crystal Drops to the frosting lines.  (You can see how it shines in the photo!)

Thank so much for stopping in today!  Hope you’ve enjoyed my tag and I’ll be seeing you very soon!! 🙂

Challenges:

  1.  The Holly & Ivy Christmas Challenge – Anything Christmas Goes
  2. QKR Stampede – Anything Goes #318
  3. Sweet Stampin’ – Chevrons or Stripes
  4. Crafting From the Heart – Anything Goes
  5. Little Red Wagon – distressing (Distress Oxide inks)

Top O Morning Snowman Wishes

Hello friends!  Well, it’s certainly not morning, but maybe it is where you’re from or it’s morning when you see this post! 🙂

I have a really fun Whimsy Stamps digital image to share with you today appropriately named to coincide with my post title:

Vicki-Oct16

This really sweet, faced snowman is called Top O the Morning Snowman which is a digital image created by Crissy Armstrong for Whimsy Stamps.  I thought it was so cute with the little birdie joining him and his little heart buttons!  I had fun coloring him up!

I’ve colored him with Copics and cut it out using the Hand Stitched Nested Rectangles die and matted some black cardstock behind that panel.  I’ve also used the October Digital papers release called Christmas Red, Gold and Green and attached it to the front of an A2 sized white card base.  I then took the wavy die from the Pierced Border Trio dies and cut a piece of glitter cardstock to add at the bottom of the decorated digital paper panel.

I then added the snowman panel over top and then stamped the sentiment below the snowman with the Holiday Mini Sentiments stamp set.  I then added the twine bow and button as well as a few snowflake sequins and filled the centers with some Nuvo Crystal Drops to finish it off.

Here’s a closer view of the coloring:

Vicki-Oct16-close

I have used all Copic markers to color this image in the following colors:

  1.  Hat and Snowman body/snow:  C8, C5, C3, C1, C00
  2. Hat Band, buttons, bird hat/scarf:  R37, R35, R32
  3. Holly:  YG67, YG63, YG61, (hollies colored with pink glitter gel pen and covered with Nuvo Crystal Drops
  4. Snowman Scarf:  G24, G21, G20 + green glitter gel pen for lines and ends
  5. Snowman nose and cheeks:  R20, R00, R000, YR18, YR15, Y11
  6. Bird:  B34, B32, R00, E000, Y21, Y11

I’ve also used a white gel pen for the cheeks on both the snowman and bird as well at the eyes on the snowman and to randomly add some dots for falling snow effect.  I also went around the outside of the image with a B000 marker for a bit of sky behind him.

Thanks so much for stopping by today!  Hope you’ve enjoyed my card!  See you soon!

Challenges:

  1.  CRAFT – Christmas
  2. QKR Stampede – Anything Goes #317
  3. Allsorts – Christmas
  4. The Merry Christmas Challenge – Anything Christmas Goes
  5. The Creative Crafters – Anything Goes

It’s Halloween On Cute Card Thursday

Hello friends!  Happy Thursday!  As this month creeps along and the weather slowly changes to cooler temps, the eerie feeling of Halloween comes to mind!  So get your “Halloween” on and come join us this week at Cute Card Thursday!

Vicki-CCT551-ADU

Here’s the project that I’ve made for the challenge using this adorable image from this week’s sponsor All Dressed Up!  The image is called “Have a Magical Evening” and I have colored the entire image panel including the background with Copic markers.  I have also used gel pens to color in gold details on the stars, her dress and shoes.  Then I took the gold and white gel pens to add dots for the background sky.  I’ve used a gold ink pad and rubbed it around the edges of the panel and then I mounted it over a gold foil cardstock base.

For this treat box, I’ve used the 2-5-7-10 box tutorial on Splitcoaststampers.com to create a similar version, but I cut off the flap part and made a handle for my version.  I covered the box with some fun “spooky” papers from my stash, added some gray with black stripes silk ribbon on the front panel along with making some bows with it for the sides of my box handle and glued them on.  The image panel was added over top of the ribbon strip and design paper.  It’s ready to add a nice treat inside for someone’s “magical evening”!

Vicki-CCT551-ADU-close

Here’s a closer look at the coloring of the image.  I have also added some shimmer to the crescent moon with a Spectrum Noir glitter brush pen which of course is hard to capture in the photo, but you can see the areas where I’ve used the gel pens.

The blue background was made using my Copic markers and I blended them out so that the lighter tones were towards the witch and the darker tones to the edges.

I hope you’ve enjoyed my treat box creation and thanks so much for stopping in today!

Challenges:

  1.  Craft Rocket – Autumn/Halloween
  2. Brown Sugar – (October) Spooky Halloween and/or Autumn
  3. Use Your Stuff – Autumn/Halloween (always great to use more paper from my stash!)
  4. Tuesday Throwdown – Anything Goes
  5. Words 2 Crafty By – “Listen!  The Wind is rising, and the air is wild with leaves.  We have had our Summer evenings, now for October’s eves.”
  6. Crafty Creations – Anything Goes
  7. Simon Says Stamp Wednesday – Anything BUT a card
  8. All Dressed Up – #85 Anything Goes + use ADU image
  9. Scor-Pal (Oct) – More than one score Fall/Harvest/Halloween (Scored at the marks, 2-5-7-10 inch marks)

The Feeling of Happy Mail

Hello friends!  Back with you again today to share another Whimsy Stamps digital “pretty”!  If you missed my Guest Design post for the Retro Rubber Challenge Blog, please click on the link or scroll down below this post. – thank you

You all know the feeling you get when you receive “happy mail” from the mailbox, and I think this cute image on my card today really sums up that feeling:

Vicki-WS-Pretty Girl Happy Mail- Oct 9

I have used the brand-new October digital stamp from Whimsy Stamps called “Pretty Girl Happy Mail” on my card today.  Oh those curly locks are adorable!

I have colored her in with my Copic markers in the following:

  1.  Coat/hat (darker tone) – R85, R83, R81 and for trimming – E11, E00, E000 (also coat fasteners)
  2. Coat/hat (fur) – W5, W3, W1 and highlighted with white gel pen flicks.
  3. Hair – E47, E43, E42 (eyebrows too)
  4. Skin – E21, E11, E00, E000, R20, R00 (eyes BG49)
  5. Mail – B00, B000 (unsure of tiny bit of color on postage stamp or coat fastener centers and string)

I then took a retired Whimsy Stamps clear set called “Handmade From Me” which had a couple of tiny solid hearts in it, and I took some pink colored ink to stamp a few hearts around the girl.  She really loves all her mail after all! 🙂

I cut her out with a stitched circle die and then mounted her over a piece of silver foil cardstock cut with a scallop stitched circle die.  I have used the same stamp set that I’ve mentioned above to heat emboss the sentiment with silver EP and cut it out with a banner die cut.  This is the same-colored cardstock I’ve used for the A2 sized top folding card base too.

The snowflake paper is from my stash and some I’ve been hoarding because I love it so much, but the snowflakes on it are silver metallic and have the texture on it as if it was heat embossed.  I placed this panel over my card base, attached the banner and then added the circle image panel over top of that including some craft foam to raise it up slightly over the design.

I was thinking that this image would work for either Christmas, winter or Valentine’s Day.  Yes, I know, I said the V word already!! Oops!

Vicki-WS-Pretty Girl Happy Mail-Oct 9-close

Here’s a closer view of the coloring that I’ve done on her as well as the heat embossing.  Had so much fun coloring her up.  I think she especially looks wonderful on such a simple style design!

Thanks so much for stopping in and sharing your thoughts with me!  I appreciate that so much!  See you soon!

Challenges:

  1.  Creative Fingers – Anything Goes
  2. QKR Stampede – Anything Goes #316
  3. Crafty Friends – Use more than 1 die (I’ve used 3)
  4. Stamp & Fun = Creativity – Die cuts
  5. Crafting From the Heart – Anything Goes

Happy World Card Making Day!

Hello friends!  Of course I can’t let this day go by without making a card for it, right?!

I love Halloween and when I received this image, I thought it would be so fun to create a card with it for the occasion!

Vicki-WCMD2018-Freebieimage on FB

This image is from the retired artist Kirsten Winkelbauer (for Whimsy Stamps) and she’s so cute and perfect for Halloween crafting!  I’ve colored her up with Copic markers and added a few details with my gel pens.  I’ve also put some loose glitter over the eyes and nose of the pumpkin on her hat.  I fussy cut her out and popped her up with foam squares over a Kraft cardstock cut out stitched oval that was sponged with some black ink.  I’ve also cut around the sentiment and sponged some more black ink around the edges and attached it to the oval panel.

For the card base, I used an A2 sized Kraft card base and then I took another piece of Kraft card stock and cut out a piece using the Whimsy Stamps Hand Stitched Nested dies that I’ve covered with a piece of Halloween paper from my stash and also sponged around the edges with some black ink.   I wrapped a piece of Halloween purple ribbon around it and attached it to the back and then adhered my card front to the card base.  I die cut a web twice with black card stock and glued it to the corners of the card front and then brushed over it with a clear glitter brush marker.

Vicki-WCMD2018-WSCloseup

Here’s a closer look at my coloring.  You can better see where I’ve added my gel pen dots and the glitter on my pumpkin.  Her green hair was so fun to color! 🙂

Hope that you are taking the time to have fun and create a card today!  Thanks so much for stopping by!!  See you soon!

Challenges:

  1.  {Cupcake Inspirations} – CIC455 ‘Bump in the Night’
  2. Always Fun – Dies & Punches
  3. Creative With Stamps – (CWS31) Halloween or Leaves
  4. Artistic Inspirations – Anything Goes

Anything Goes For Cute Card Thursday!

Hello friends!  It’s Thursday and time for a new challenge over at Cute Card Thursday!

This week is an easy “Anything Goes” challenge!  So please share with us what you are working on this week weather it be a card, a scrapbook page, journal page or altered item, etc.  We look forward to seeing what you’re doing!

I’ve decided to use another newly released image from Whimsy Stamps (our sponsor this week) on my design today:

Vicki-CCT550-WS-Oct 4

Isn’t this cat just too stinkin’ CUTE?!   I’ve used the newly released October digital stamp Scruffy Cat by Crissy Armstrong for Whimsy Stamps on my card today.

*Edited to Add Copic marker colors I’ve used! *

For hat:  R59 for darkest shadows blended out with R29, R27 and R24.  I’ve used a white Prismacolor pencil for some highlighting.  I did use some B000 for shadows on the hat trimmings, but the loose glitter I glued on covers it up in the photo.

For cat:  I used W5, W3, W1 and W0 and started with the darkest color along edges and flicked in with the other colors.  R20 blended out with R00 for his ears and cheeks.

Collar:  G07 and G05.  I used a glitter gel pen for the tag.

I have used the Whimsy Stamps Notched Rectangles die set to cut him out with and mount him over a piece of red card stock.  I’ve also used a strip of red card stock cut with the same die and white heat embossed the sentiment from the Whimsy Stamps Holiday Mini Sentiments clear stamp set and attached under the kitty.

Before attaching the kitty panel, I’ve used some of the Whimsy Stamps Christmas Cool Mix digital papers and added a white organza ribbon around it.  I also sponged around the edges with some white ink using a sponge dauber and then I attached that to the front of a red top folding card base.  Lastly, I’ve attached the kitty panel along with the ribbon bow underneath and finished the card with snowflake sequins and silver glitter in the centers.

Vicki-CCT550-WS-Oct 4-close

Here’s a closer look at my coloring as well as the glittery details on the kitty collar tag and the loose fine glitter on the hat trimmings.

Please be sure to check out the challenge blog to see the details of the challenge and catch the inspiration from the rest of the design team!

Hope you’ve enjoyed my card today and look forward to seeing what you come up with!  Thanks so much for stopping in!

Challenges:

  1.  QKR Stampede – Anything Goes #315
  2. The Paper Players (PP412) – Tic-Tac-Toe:  Green, any embossing, sequins/glitter
  3. Crafty Animals – Anything Goes
  4. Crafty Cardmakers – Lace or Ribbon

It’s New Release Time at Whimsy Stamps!

Hello friends!  Can you believe that October has gotten here so fast?!  I thank you SO MUCH to everyone that has shared about my give away and I really have been enjoying your comments about the way you share smiles through your creations.  It is such an inspiration and joy to hear about this.

For my card today, I am sharing a sweet and fun festive image from the new release:

Vicki-PenguinElvesWorkshop-Oct2

Yes, I cannot get enough of the penguins that Crissy Armstrong makes up for Whimsy Stamps!  This image is called Penguin Elves at the Workshop and I think they’re having lots of fun for Christmas!  They’re colored up with Copic markers and then I’ve taken a white gel pen for highlights as well as a silver and gold gel pen for detailing.  I took some fine loose glitter and attached with liquid glue on parts of the penguins’ hats and then a glitter brush pen on the bow the penguin is holding.  I have used the Pierced Border Trio dies to cut the panel on the top and bottom of the image.  I then took an ink blending tool to add some distress ink around the panel.

For the sentiment banner, I printed out the new released Penguin Christmas Sentiments 1 and cut out a banner and then went over it with a Copic marker so that it matched up with my design.  For the front panel of my card, I also took the newly released digital papers called Christmas Red, Gold and Green and printed them out and trimmed it to size my A2 white card base.  I also took my ink blending tool to distress more coloring on the edges to match my image panel.  I then took that and mounted it over the papers and then glued some gold thin ribbon on the top and bottom of the image panel and added a bow along with some festive sequins filled with Stickles tinsel glitter glue.

I hope you’ve enjoyed my card today using the new digital release from Whimsy Stamps this month.  Be sure to check back for other creations I make from the new release this month too!!  Thanks so much for stopping by!

challenges:

  1.  The Holly and Ivy Christmas Challenge – Anything Goes with Christmas
  2. Christmas Card Throwdown – Technique:  Coloring
  3. Crafting By Designs – Get Ready for Christmas
  4. Aud Sentiments – Use a 2 word sentiment
  5. Winter Wonderland – Anything Goes + Christmas
  6. Crafting From the Heart – Anything Goes
  7. Make My Monday – Animals

I’m Joining a Critter Challenge Design Team!

Hello friends!  Welcome to October!  There are so many fun and exciting things yet to come this month and I’m thinking it will probably fly right by me!  But first, this exciting news is something that I will share with you first!

I have been invited to join the 2 Crafty Critter Crazies challenge blog as a design team member and I’m truly honored to be crafting alongside several of my blog friends already on the team!  Thanks so much for welcoming me to this wonderful team! 🙂  If you are not already familiar with this challenge blog, please stop by and check it out!  Obviously you must use a critter on your creation (any crafty style make), plus it’s an always “anything goes” as long as you use a critter and you have an entire month to enter!  Of course I am a huge critter fan and love using those type of images on my creations…so I hope you’ll come along and play! – The challenges are always the very 1st of each month.

So for my creation this month, I have used a gorgeous image kindly provided by our sponsor:

Vicki-2CCC-Ching-Chou Kuik

I have used Flutter Butterflies Grey Scale digital image from Ching-Chou Kuik on my card for today.  for this image, I decided to pull out my case of Prisma pencils to color it in as I thought it would be a good one to practice with.  Including the background, I’ve colored the entire panel with pencils.  It took some time to do the blending and such, but it was very therapeutic, and I enjoyed the process of it.  I used a white gel pen for a few highlights in areas on the butterflies.  (Some of it was also from a white pencil.)

I cut out the colored panel with a stitched rectangle die and mounted it onto a black scallop rectangle panel that I’ve popped up with craft foam.  I’ve also added a kraft doily that I’ve cut in half on both the top and bottom of the panel.  I found some pretty black and ivory design paper to mount her on.  I took some sparkly black ribbon to go across that paper and then mounted it all over a top folding A2 sized black card base.

Lastly, I’ve cut out some extra butterflies in black cardstock to accent my image panel and then I’ve added some clear glitter Stickles along the edges of the image panel to finish it off.  I really wanted the image to be the main focal of this especially since I spent so much time in the coloring.

Here’s a closer look at the image and coloring:

Vicki-2CCC-Ching-Chou Kuik-close

Looking at this photo, I also added some shimmer to the colored butterflies with a Spectrum Noir clear glitter brush pen.  Sometimes you have to angle it just right to capture the shimmer on it.

I hope you have enjoyed my card today!

Thanks so much for stopping by today!  See you soon!

challenges:

  1.  Crafty Creations – Anything Goes #375
  2. Fab ‘n’ Funky – All Creatures Great & Small
  3. Creative Moments – Anything Goes
  4. Creative Knockouts – Anything Goes

It’s Autumn at Cute Card Thursday

Hello friends!  It’s Cute Card Thursday again and we are going all Autumn over there this week!  Sounds like a great challenge to me…hope you will stop over and check out the inspiration and add your creation in the gallery too!  Looking forward to seeing your makes!

Here’s my card:

Vicki-CCT549-KindaCute

I thought this image was so darn cute!  I’ve used an image from our sponsor this week called Girl with Wheelbarrow from Kinda Cute Stamps.  She is busy gathering pumpkins in that wheelbarrow and looks to be on a mission with it too!  I adore that sweet little bunny along for the ride!

I’ve colored the image with Copic markers including for the ground.  I’ve taken a tiny sponge with some blue ink and very lightly sponged in a sky.  The sentiment was stamped with brown ink from an older Lawn Fawn set.  I’ve also used the Stitched Leaves die from Lawn Fawn to cut out some leaves with kraft cardstock and then sponged some color over the edges to attach to the design.

I cut out both the image panel and the orange design paper with a Stitched Scallop rectangle die set from My Favorite Things.  I’ve also cut out a tiny brown banner at the top left corner from a die set from MFT as well.  Lastly, I’ve added some gold sparkling enamel dots around the leaves.

Hope you are out and about enjoying the Autumn season!  Thanks so much for stopping by my blog today, I’m so happy to have you here!  See you very soon!

Challenges:

  1.  Sweet Stampin’ – Dies/Punches (I stamped the sentiment-hopefully this qualifies)
  2. Always Fun – Anything Goes
  3. Addicted to Stamps & More – Anything Goes #311
  4. Crafty Gals Corner – Anything Goes + Fall
  5. Mod Squad – Autumn Colors (Orange, red, purple, yellow, brown) I used all EXCEPT purple! – must use at least 3

Just A Girl and Her Pumpkin

Hello friends!  Wow, I think Fall has begun over my way as the air has changed with cooler temperatures and I absolutely LOVE it! 🙂  Although I’ve been busy crafting away in my room, I like to get outdoors for a few breaks to walk around and see signs of the leave starting to change over.

Today, I am over at the Whimsy Stamps Inspiration blog to share my card with you using one of the really adorable images from this month’s release called “A Girl and Her Pumpkin” digital stamp by Crissy Armstrong:

Vicki-WSGirlPumpkin-Sept25-blogpost

Isn’t she adorable?!  I really enjoyed coloring her up with my Copic markers.  As I was coloring, it actually reminded me of going to a near-by apple orchid with my children as they were growing up.  I would take photos of them with all of the pumpkins surrounding them as they would pick out which one they wanted to carve for Halloween.  (My oldest was not a fan of “pumpkin guts” and so we always ended up doing that part for him! LOL!)  But it must have made an impression with them because they still enjoy going as adults now!   Besides, what’s better than apple cider donuts and freshly picked apples?!  YUM!

So, after the reminiscing of memories, I cut her out with the WS Hand Stitched Nested Rectangles along with the card front base and attached to a white A2 sized top folding card base.  For the sentiment, I took a piece of vellum and heat embossed a greeting from the WS Painted Sayings stamp set and I also took some of the splatter images from the same set and stamped them randomly in the background with white ink.

Before attaching the image panels onto the card, I’ve added some gold ink around the edges, attached some leaves behind it and popped it up with foam tape.  The piece of vellum was hand cut into a banner and folded around card base and attached with glue behind the letters to hide it.  I then put some burlap ribbon around the card front base as well as the image panel, vellum banner and gold sequins filled with gold Stickles.

Vicki-WSGirlPumpkin-Sept25-close

Here’s a closer view of the image and how she’s colored.  You can also better see the gold inked edges.  And of course, the photo didn’t pick it up, but I took some Wink of Stella clear glitter brush pen to go over the pumpkin with.

I’ve also used a cloud stencil to lightly sponge in a nice Fall sky behind her.

I think she would look so cute surrounded by a field of pumpkins…so there’s an idea!  Maybe I’ll work on that for next time!

Thanks so much for stopping in today!  I appreciate you taking the time!  See you soon!

challenges:

  1.  QKR Stampeded – Anything Goes #314
  2. Just Us Girls – JUGS459 photo week
  3. Crafty Friends – Autumn Colors
  4. Stamps & Fun = Creativity – Fall
  5. Crafting From the Heart – Anything Goes