Try It On Tuesday GDT-Say It With Flowers

Hello friends and happy Tuesday!  Hope you’re having a great start to your week. Now that Spring has officially began, we can start seeing signs of Spring everywhere and look forward to warmer temperatures here!  Yay! 

new tiot banner for blogsTioT guest designer 2022I’m excited to share my project for the new challenge over at the “Try It On Tuesday” Challenge Blog as their guest designer this time! An AJ page I entered in a previous challenge earned me a spot as a future guest, so I’m thrilled to be joining with them for a new challenge!  Their theme for this challenge is to “Say It With Flowers“, so please be sure to stop in and have a look at the amazing inspiration from the team!  Here’s what I’ve made for the challenge:

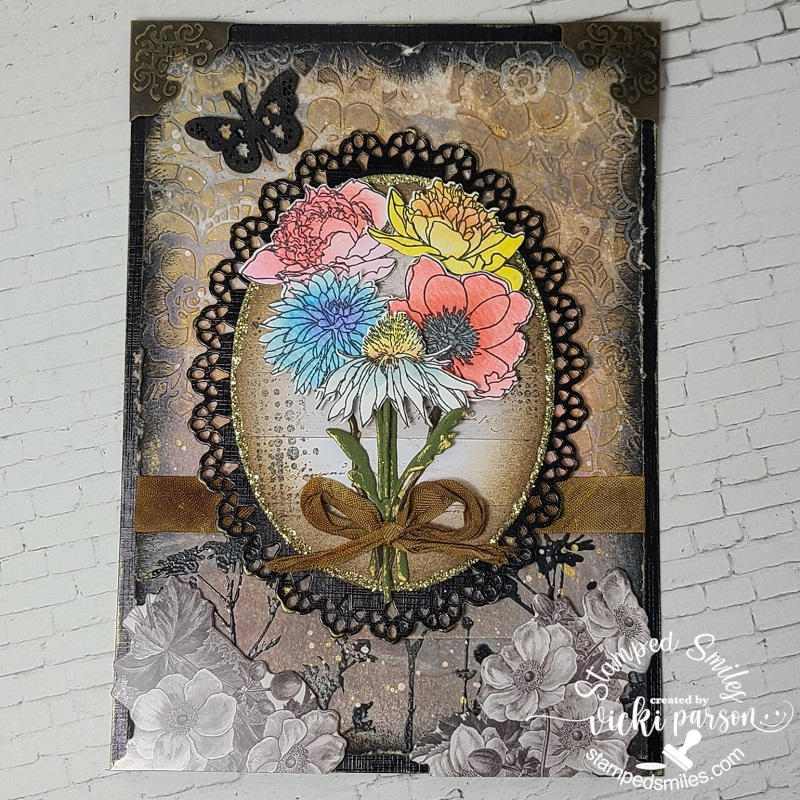
Since I usually add a sentiment to my makes, I decided to say what I wanted to convey without any words which is how I took the challenge.  So my thoughts were about Spring coming out in color with the dull drab of winter in the browns and blacks in the background.  The dead is coming alive again in color!  That was my thought process anyway. LOL

I love the flowers in the Tim Holtz Mini Bouquet stamp set.  I’ve used watercolor paper to stamp them and then used the Distress ink pads smooshed on a mat to watercolor them in including the new Salt Water Taffy color that I’ve been wanting to try out.  I used the coordinating dies to cut them with and then also die cut some stems in green and brown cardstock to attach onto the flowers.  I rubbed a bit of gold paint with my finger over the edges of them.  They were popped up with foam tape over a prepared oval die cut panel stamped with various TH stamps with some gold glitter added around the edges.  I die cut an oval ornate piece behind it with some glossy black cardstock.

For the background, I’ve done various things to it including using Distress Oxide sprays for the background, adding some black heat embossed silhouette florals to the bottom as well as modeling paste through a TH floral stencil.  To bring out the texture of the stenciled background, I used some more gold paint to rub over it with my finger.  I also added some splatter with the gold paint over the entire background along with another splatter layer of white paint.

I distressed the edges and layered it over a piece of black glossy cardstock sized 5″x7″.  I found some TH ephemera black and white florals that I cut in half to pop up over the bottom two corners and then used some metal corner pieces for the top.  I sprayed a wooden butterfly with black spray stain and some Distress Mica Spray Stain in Crooked Broomstick as this gave it that “black/brown” combo I was going for.

Lastly, I took a piece of tan seam binding and sprayed it with some more Distress sprays, crinkled it up and wrapped some around the front layer and then added a bow over top of the stems of the bouquet.  The oval panel was popped up over the center with foam tape.

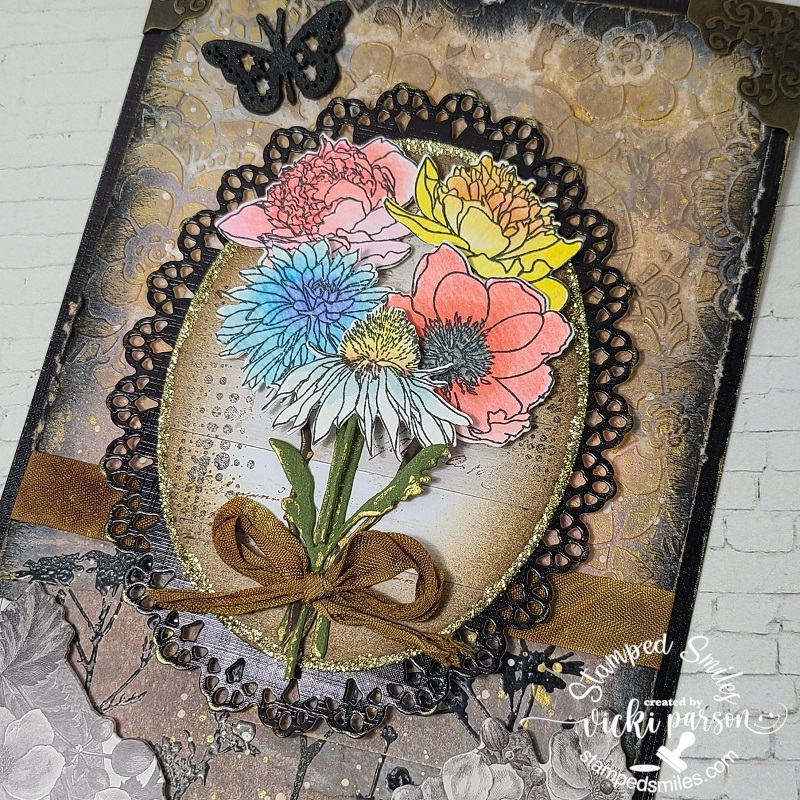
There is actually lots of dimension on this as you can get a better look of it with a close up here.  There are different layers in the flowers as well as all of the layers of panels underneath it.  I like how it turned out and had lots of fun playing around and using up some more of my never ending stash too!  ( I think I’m becoming a spray-a-holic lately! LOL)

So please be sure to hop on over to the “Try It On Tuesday” Challenge Blog to see the rest of the inspiration for the challenge.  I hope you will take the time to join in the challenge with us too!  Would love to see what you come up with!  

Hope that you’ve enjoyed my make today!  Thanks for dropping by and I’ll see you soon!

Challenges:

  1. Mixed Media Lovers – Anything Goes mixed media
  2. Creative Artiste – Anything Goes mixed media
  3. The Funkie Junkie Boutique – “Rather Blustery Day” – Struggle with NOT adding words/sentiments…I ALWAYS want to do that and so it’s a huge challenge NOT to want to add that somewhere! Plus, omitting color in some way.
  4. The Four Seasons – Anything Goes Spring
  5. Shopping Our Stash – Spread Your Wings (Wooden butterfly from stash! Yay!)
  6. Crafty Friends – Flowers
  7. Creative Inspirations – Spring Flowers

Spooky Undertaker Tag for {Cupcake INspirations} Color Challenge

Hello there friends!  I’ve been a bit MIA lately but that’s because I’ve actually been having fun attending a virtual stamp event which I will be sharing some things I’ve done with you later and I’ll be doing it all over again this weekend as well!🥳  Although it doesn’t replace an in-person live event, it was lots of fun!  I’ve also been enjoying time visiting with my son who stopped by for the weekend!


Today I’m stopping in to share my creation with you for the brand new challenge over at {Cupcake Inspirations} using this unique color combo:  OLIVE, RED and LAVENDER  The first thing I had thought of was the inspirational photo to go along with it and it reminded me of this cool Tim Holtz stamps/stencil set I bought a few years ago:

I thought it would be fun to play around a bit with my Distress Spray Stains over one of those Distress Tags.  So I sprayed a few of the colors over it and then also sprayed water over it as well to get the colors moving and blending together.  I think it turned out pretty cool.  I used the Distress Sprays I used were Crushed Olive, Fired Brick and Seedless Preserves.

I then took the stencil from the Tim Holt “Halloween 2 Stamps/Stencil” set and used some Black Soot distress ink to sponge the bats in the center of the tag.  I then used the coordinating distress ink colors and used the other portion of the stencil to sponge the colors with.  I took a thin strip of black cardstock to attach above and below the stenciled bat areas.

I took the skull image from the Tim Holtz “Halloween 2” stamp set and stamped it with black pigment ink over a piece of vanilla style cardstock and heat set it with clear embossing powder.  I fussy cut him out and added a piece of purple metallic ribbon around his hat and then glued on a purple flower along the side before popping him with foam tape in the center of the oval die cut piece from silver foil cardstock.

I stamped the “undertaker” sentiment from the stamp set with black permanent ink along with some scripty words in random places over the tag.  I also had some Tim Holtz Halloween rub-ons that I used for the spider and the “31” numbers.  I finished the tag with some more of that purple metallic ribbon and the key charm at the top.

Here’s a closer view of the skull with the embossed details along with the shine from the foil cardstock and ribbons.

Really had fun putting this tag together and I think it will make a fun spooky treat to share with someone I love because I have several family members that are really into the spooky Halloween theme besides myself! Yay!

Thanks for stopping by and leaving your kind support! It’s very much appreciated and I’ll be seeing you again soon my friends!!

Challenges:

  1. Unicorn – Spooky and/or Cute
  2. Arty Divas – #30 Anything Goes
  3. Creative Craft Cottage – #134 Spooky and/or Cute
  4. The Paper Funday – #22 Anything Goes optional: Halloween/All Hallows Eve
  5. Creative Moments – #200 Anything Goes
  6. As You Like It – Fave non-card project and why? (I love making tags because I feel like you can “experiment” with different media on it and I like that I can use it for putting on gifts or even add to a card later.)
  7. This is Halloween – #2 Anything Halloween
  8. The Divas That Cut Paper – Autumn-Thoughts of Halloween + die cut/punch
  9. Crafty Cardmakers – Create a Tag
  10. Two Old Bats Halloween – Anything Halloween Goes *new challenge blog*

Brand New Images from Digi Doodle Studios + Video!

Hello friends!  Happy Friday!  I’m happy for the weekend to get here, how about you?!  The weather has started to cool down slightly and it’s so nice to have that air conditioning turned off for a change!

Today I’m super excited to share with you some really fun and adorable new image set that Digi Doodle Studios has come out with from the brand new “Pairables” Collection!  The set that I’m sharing today is adorable and so fun to mix and match images with!  Check out the two cards I made with it:

Vicki-DDSWizardPairables-video

I absolutely had so much fun creating a little scene with the images and then printing them out for coloring and making cards with!    All of the images that I’ve used here come from the new Digi Doodle Studios Charming Enchanters Wizard Pairables Digital Stamp Set and I believe that I’ve probably used most of the images from the set on these two cards.

Vicki-DDSWizardPairables-boy

For this particular card, I’ve used my computer to arrange the stars from the wizard’s wand and the sentiment how I want them placed and then printed it out twice.  One I printed on Copic blending card and another image printed out on Neenah Solar White cardstock so that I can do the ink blended background on it.

Vicki-DDSWizardPairables-boy-close

Here’s a closer view of the coloring details on the wizard.  You can see that he has a bit of a “glow” about him.  So after I colored him in with my Copic markers, I decided that I could use a yellow color pencil to add just a bit of glow to certain parts of the image.  I’ve then used gel pens to color in other detailed portions of the image and a white gel pen for the stars in the background as well.  I’ve tried to capture a little bit of that stunning shimmer for the background, but of course it doesn’t show up as great as it is in real life!

He was fussy cut out and placed over the ink blended background that I’ve made.

Since my last video on the ink blending, I’ve had a few more questions about it, so I thought I’d share a more in-depth look into it.  To see a video of how I’ve created the background on this “wizard” card, I’ve made a video to show in detail how I’ve done it with a few tips and tricks along the way.   So check it out below or watch it on You Tube by CLICKING HERE.

I hope that this helps a little more on explaining how I achieved the look for ink blending backgrounds.  I know that I’ve had people ask me to do a video on another background I’ve made on another card, so perhaps I will share another video on that later.

If you do have any questions, please feel free to leave a comment here or on You Tube or contact me and let me know!  If you have other suggestions, I’d always love to hear that too!

Vicki-DDSWizardPairables-girl

Here’s the other card that I’ve made using the same Charming Enchanters Wizard Pairables Digital Stamp Set.  Again, I’ve arranged and sized the images how I wanted them on my computer, printed it out just the same as above and fussy cut out all of the colored images to place over my background.

I’ve mounted the image panel over a piece of purple cardstock and then placed it over a top folding 5″ square black card base.  I’ve used a piece of ribbon to run behind the layered image panel and then added some fun decorative metal corners on it.

For this card on the background, I didn’t distress it with water, I just left it ink blended.

Vicki-DDSWizardPairables-girl-close

Here’s an up-close look at the coloring I’ve done on the image.  You can see again that I’ve used my gel pens to color in the tiny details like the stars on her hat, the bubbles from her cauldron, the bookmarker and the tiny nail on the wall.

To get the glow on the images, I’ve taken a green colored pencil and added it in the places that I thought her green magic potion would glow from.

Thanks so much for stopping in and hanging out with me today!  See you soon!

Challenges I’d like to enter:

  1. Get Creative – Anything Goes
  2. Through the Craft Room Door – Anything Goes
  3. Try it On Tuesday – Boys/Girls/Children
  4. Addicted to Stamps and More – Make Your Mark
  5. Crafting By Designs – September Anything Goes

Happy Halloween – All Treats & No Tricks! :)

Hello friends!  I want to thank you thank you thank you from the bottom of my heart for everyone of you that has left such sweet comments full of birthday wishes and lots of kindness that you’ve shared through something we have in common which is creating and sharing smiles!  I so enjoyed the stories that you’ve left about how you share your handmade creations with others.  PLEASE continue to create doing what you love and share those smiles with as many people as you can!  It really makes the world a much better place when we can serve one another in kindness.

I have always loved Halloween as a child and have so many fond memories dressing up each year and thinking about what I would be.  I tried to pass that tradition onto my children, and I dressed up right along with them!  For me, Halloween is full of lots of fun things besides just treats!  I wanted to celebrate those memories with a card today:

Vicki-BM-HalloweenBox

I’ve stamped the trick-or-treaters and bat and then colored them up with my Copic markers and fussy cut them all out and put them aside while I worked on the rest of the card.

For the background of the card, that “tree branch” panel came in the kit, so I ran it through my laminator to foil it…it turned out awesome!  (See photo below!)  I then took my distress inks and blended in a night sky over it.  I spritzed it with water and dried it off with a towel to get the water drop look.

I took this awesome border silhouette die from Impression Obsession and attached to the bottom of the scene for the trick-or-treaters to stand on.  I sponged the bottom edge with white ink.  Speaking of white ink, this is what I used to stamp the sentiment on a piece of black cardstock as well as sponge around the edges with it.  I used the glow-in-the-dark embossing powder over top of it.  (Unfortunately, I couldn’t get a good photo of it glowing in the dark…. but it does, and it looks cool!)  I made a banner with that strip and attached it to the left side of the card and then popped the bat up over it with foam tape.

Vicki-BM-HalloweenBox-foiled

Here you can capture a better look at the foiled tree branch in the background as well as the heat embossed sentiment.  I glued down the mummy girl and then I took foam tape to pop up the Frankenstein for dimension and depth.  I also added some yellow Stickles to the eyes and mouths on the pumpkins.

This card was so fun to do!  Hope you’ve enjoyed it as well!

Wishing you all a very fun Halloween however you choose to spend it!  I think I will be watching some scary movies and eating some popcorn which is something I enjoy doing with hubby!

Challenges I’d like to enter:

  1.  Creative Moments – Anything Goes with optional twist: Spooktacular
  2. Crafty Gals Corner – Halloween Colors
  3. Simon Says Stamp Wednesday – Halloween/Spooky
  4. The House That Stamps Built (O2418) – Anything Goes
  5. Moving Along With the Times – Halloween
  6. Crafty Catz – Anything Goes with an Optional Twist:  Halloween
  7. Always Fun – Halloween

Animal Star Gazers

Good evening friends!  Just swinging by to share a card I made with some cute animal star gazers! 🙂  I thought evening would be an appropriate time to post it:

Vicki-LFUponaStar-Com

When this set first came out from Lawn Fawn called Upon a Star, I knew I had to get it as I fell in love with it.  I really hadn’t used it all that much, so it was great to get it out for a play as I needed to make a commissioned card.  I have created a scene for these critters using masks that I made with my circle die set and some ink blending with my distress inks.  For the stars, I took a brush and splattered some “Super Sparkle Lumiere Paint” watered down a bit while masking off the moon and hill.  The moon was created with some watered-down distress inks and a brush.

I then stamped the critters sitting on top of the grassy hill where I wanted them and colored them in with my Copics.  I took a brush filled with clear water to “take out” the inks on the critters before I did that.  I also took a gray Copic marker to create shadows on the animals as well as draw in my own shadows on the hill.  I took a white gel pen to add some highlights on the animals where I thought the moon would be shining on them.  I also put dots in the center of the bunny’s eyes to make it appear as if a star is reflected in them.

To cut out the image panel, I have used a rectangle frame die which was used to cut out some watercolor cardstock.  I then used the same die and cut out a piece of this gorgeous black glitter cardstock and popped the frame up with foam tape to go around the edges of the image panel design.  I mounted everything over a black A2 sized top folding card base.

Vicki-LFUopnaStar-Com-close

Here’s a closer look at the details.  Here you can better see the shimmer on the moon.  As always you have to get just the right angle for the photograph, but I covered the moon with a Spectrum Noir Glitter Brush Pen.

I took a couple of the tiny solid stars from the stamp set and heat embossed them with Sparkle N Sprinkle Vanilla Ice EP.  Love the way it gives a bit of extra sparkle!  I think the stars really show up beautifully and it always looks better in person of course! 🙂

I do not have a sentiment on this as waiting for instruction on how to proceed with that if necessary.  I’m happy with the way this turned out and look forward to playing with more starry sky creations!

Thanks so much for stopping by this evening and I wish you a wonderful weekend my friends!

Challenges:

  1.  Lawn Fawnatics – Bling It Out!
  2. AAA Cards – Moonlight
  3. Sunny Day Crafting – Animals
  4. The Creative Crafter – Anything Goes
  5. Simon Says Stamp Monday – Starry Night
  6. Simon Says Stamp Wednesday – Animal Antics