June Art Journal Page-Finding Happiness

Hello friends!  Happy weekend!  I hope you’re enjoying yourself with whatever you have going on.  It’s hard to believe that it’s almost time for us to celebrate the 4th of July holiday! 

We’ve been having higher than normal temperatures this time of year and you never really know if that humidity is going to circle back up in the air to create a thunderstorm.  Nature can be a wonderful thing though, and this is what the focus is for my page.

  • It’s time for the monthly Art Journal Page collaboration with my crafty friend, Carol (from Crafty-Stamper)! We get creative trying to use up our never-ending stash piles along with a prompt for each month.  I know she always has great inspiration to share, so please check out her blog too! Here’s my AJ page with the “SMASH OUR STASH” June prompt of “DISTRESS”-(rough up/sand/rip, etc): 

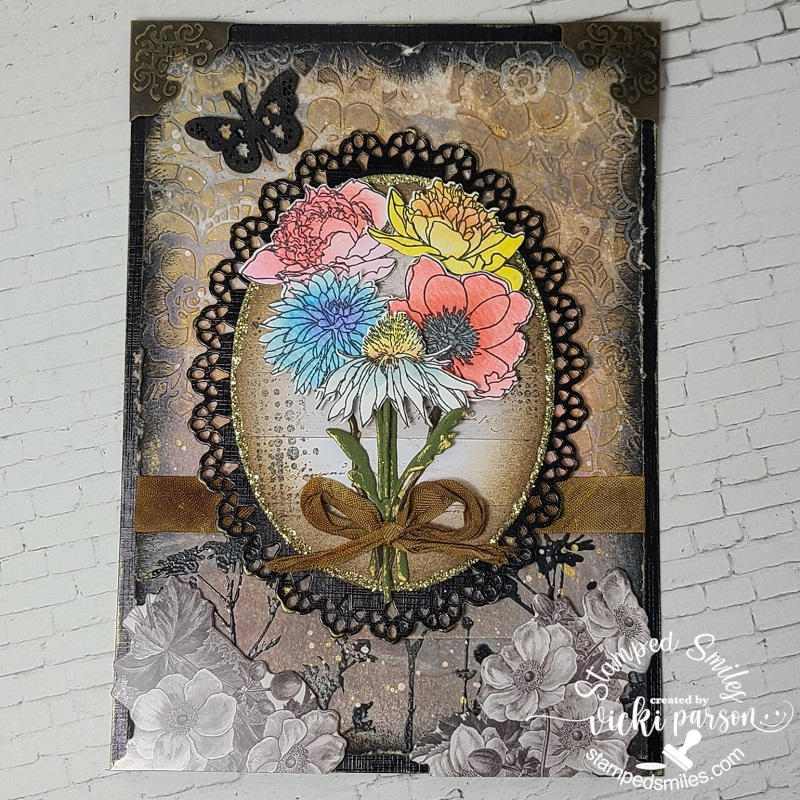
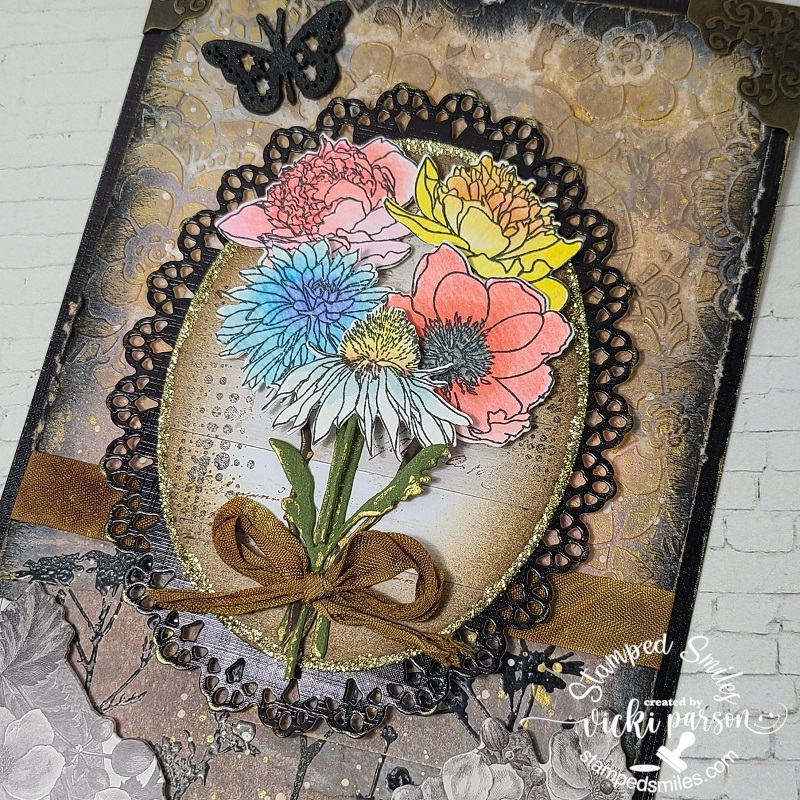
So taking this approach with the prompt of “distress”, I thought it called for green colors and lots of nature collage type elements from my stash!  I have tons of those Tim Holtz ephemera packages, so I pulled those out along with distress oxide sprays.  I haven’t used those in quite a while.

For the background:  I started with a 5.5″ x 8.5″ (pre-punched holes with the Bind-It-All machine) very heavy weight canvas paper.  I started with a couple of pieces of ripped printed papers and distressed/inked the edges of it with Vintage Photo Distress Oxide ink.  I then took a Tim Holtz stencil and randomly applied paste over it.   After the paste dried, I placed the panel into a box and sprayed it with variations of water and distress oxide sprays in Peeled Paint, Rustic Wilderness, Fossilized Amber and Vintage Photo.  I added water and dried with my heat tool after each color until it was blended as I liked.  I took off the Vintage Photo cap and splattered a few drop with it.

Before applying the ephemera pieces, I had a solid fern stamp that I randomly stamped with Rustic Wilderness Distress Oxide ink.  I also stamped a few of those “rain drop” images randomly in the center of the page with black waterproof ink.  I removed the background color out of the images with a watercolor brush and then added back in a touch of blue color from an ink pad lid.  I used a white gel pen to add a highlight and covered the drops with a glitter brush pen.

Finishing the page, I’ve stamped the bug and magnifying glass, colored them in and added some acetate behind the magnifying glass, I ripped, sanded and distressed the edges of the page, the card behind the bird and randomly over the background.  Before attaching the pieces, I took some white pearl wax and rubbed over the stenciled paste areas.   I also sanded around the edges of the black sentiment strips.  I attached all of the ephemera pieces and popped the card and butterfly pieces with foam tape.  I added a safety pin to the card and glitter to the tops of the flowers in the corner.  (hard to see in photo)

  • The sentiment at the top reads:  if you want to find happiness, find gratitude.

Another prompt I worked on with this is the challenge over at Art Journal Journey which was “What Makes You Happy“.  So although nature helps with happiness for me, I find that happiness is multi-faceted with the purpose being exactly what the sentiment says.   I thought it went perfectly with this page.

Since my husband is retired and we now have time to take little road trips here and there and sometimes stop along the way to find an interesting trail or nature walk or park to explore.  We’ve had some great times doing this and I love being out in nature especially among the trees after a gentle rain.  The smell and coolness in Autumn are fabulous for this!

 Click on a photo to enlarge it if you’re on my website:

This was quite a wordy post, but I hope you’ve enjoyed my inspiration today and how it was inspired.  Thanks so much for joining me today and please check out Carol’s blog too!

Challenges:

  1. Art Journal Journey – What Makes You Happy
  2. Creative Artiste – #105 Anything Goes Mixed Media
  3. Anything Goes in a Card Free Zone – June challenge ATG
  4. A Place to Start – Anything Goes optional:  Anything but a card
  5. Paperminutes – #852 Stencils

Try It On Tuesday GDT-Say It With Flowers

Hello friends and happy Tuesday!  Hope you’re having a great start to your week. Now that Spring has officially began, we can start seeing signs of Spring everywhere and look forward to warmer temperatures here!  Yay! 

new tiot banner for blogsTioT guest designer 2022I’m excited to share my project for the new challenge over at the “Try It On Tuesday” Challenge Blog as their guest designer this time! An AJ page I entered in a previous challenge earned me a spot as a future guest, so I’m thrilled to be joining with them for a new challenge!  Their theme for this challenge is to “Say It With Flowers“, so please be sure to stop in and have a look at the amazing inspiration from the team!  Here’s what I’ve made for the challenge:

Since I usually add a sentiment to my makes, I decided to say what I wanted to convey without any words which is how I took the challenge.  So my thoughts were about Spring coming out in color with the dull drab of winter in the browns and blacks in the background.  The dead is coming alive again in color!  That was my thought process anyway. LOL

I love the flowers in the Tim Holtz Mini Bouquet stamp set.  I’ve used watercolor paper to stamp them and then used the Distress ink pads smooshed on a mat to watercolor them in including the new Salt Water Taffy color that I’ve been wanting to try out.  I used the coordinating dies to cut them with and then also die cut some stems in green and brown cardstock to attach onto the flowers.  I rubbed a bit of gold paint with my finger over the edges of them.  They were popped up with foam tape over a prepared oval die cut panel stamped with various TH stamps with some gold glitter added around the edges.  I die cut an oval ornate piece behind it with some glossy black cardstock.

For the background, I’ve done various things to it including using Distress Oxide sprays for the background, adding some black heat embossed silhouette florals to the bottom as well as modeling paste through a TH floral stencil.  To bring out the texture of the stenciled background, I used some more gold paint to rub over it with my finger.  I also added some splatter with the gold paint over the entire background along with another splatter layer of white paint.

I distressed the edges and layered it over a piece of black glossy cardstock sized 5″x7″.  I found some TH ephemera black and white florals that I cut in half to pop up over the bottom two corners and then used some metal corner pieces for the top.  I sprayed a wooden butterfly with black spray stain and some Distress Mica Spray Stain in Crooked Broomstick as this gave it that “black/brown” combo I was going for.

Lastly, I took a piece of tan seam binding and sprayed it with some more Distress sprays, crinkled it up and wrapped some around the front layer and then added a bow over top of the stems of the bouquet.  The oval panel was popped up over the center with foam tape.

There is actually lots of dimension on this as you can get a better look of it with a close up here.  There are different layers in the flowers as well as all of the layers of panels underneath it.  I like how it turned out and had lots of fun playing around and using up some more of my never ending stash too!  ( I think I’m becoming a spray-a-holic lately! LOL)

So please be sure to hop on over to the “Try It On Tuesday” Challenge Blog to see the rest of the inspiration for the challenge.  I hope you will take the time to join in the challenge with us too!  Would love to see what you come up with!  

Hope that you’ve enjoyed my make today!  Thanks for dropping by and I’ll see you soon!

Challenges:

  1. Mixed Media Lovers – Anything Goes mixed media
  2. Creative Artiste – Anything Goes mixed media
  3. The Funkie Junkie Boutique – “Rather Blustery Day” – Struggle with NOT adding words/sentiments…I ALWAYS want to do that and so it’s a huge challenge NOT to want to add that somewhere! Plus, omitting color in some way.
  4. The Four Seasons – Anything Goes Spring
  5. Shopping Our Stash – Spread Your Wings (Wooden butterfly from stash! Yay!)
  6. Crafty Friends – Flowers
  7. Creative Inspirations – Spring Flowers

Bookmark for the 2 Crafty Critter Crazies September Challenge

Hello friends!  Welcome to September!  Can you believe that it is here already?!  I’m looking forward to all things Fall and seeing all the wonderful crafty inspiration from everywhere for sure!

It’s been a while since I’ve shared a post for the 2 Crafty Critter Crazies Challenge, but I’m so happy to be back with my design team friends for this month’s challenge!  The theme each month is always “Anything Goes + a critter“.  So if you make something with a critter on it, we want to see it!  We look forward to seeing your crafty critter creations this month!

Our sponsor for this month’s challenge is QKR Stampede and they’ve provided some fun images for the team to use in their creations.  Here’s my project:

Vicki-2CCCSept-QKR

September is the time we know that the kids are back at school.  I remember telling my boys that it was time for them to start “hittin’ the books!”  They never seemed to care for that too much though!  LOL!  Thinking back at those old school days, I thought it would be nice to create a school themed bookmark with this adorable image from QKR Steampede called Reading Books.

Speaking of learning, I pulled out some Distress Oxide Sprays and played around with them on my tag to see what results I got.  I was surprised at how nicely the colors blended together.  I then took a Tim Holtz stencil and inked it up with embossing ink and heat embossed the letters with a Brutus Monroe Raven Sparkle EP.

Not quite finished with my background, I knew I wanted to use some black seam binding ribbon for the top of my tag, so I grabbed some silver alcohol ink and dabbled the ribbon with it.  What was left on my glass surface, I took a fan brush and splattered some of it over the tag background.  I also rubbed it along the edges of the tag.

To give the bear image a bit of a “ground” to sit on, I took a strip of Brutus Monroe Black Glitterstock and attached it at the bottom of the tag.  Then for the word strips at the top, they’re from a cardstock sticker panel I had from an old card kit.  (They got splattered along with the background.)  Lastly, I just added a button with some twine in the middle of my seam binding bow.

Vicki-2CCCSept-QKR-close

And here’s a better look at this adorable bear image who’s studying really hard on his book!  I thought it would be funny to title the book for him.  So I took out my Copic liner pen and wrote in “Book of Honey” on the cover!  LOL!

I’ve colored up this image with Copics and fussy cut him out to attach to the bottom of the tag/bookmark.  I turned him over and rubbed a stylist over him to add some dimension to the image.  I popped him up with some foam dots over the black glitterstock strip.

Vicki-2CCCSept-QKR-flat

I hope you’ve enjoyed my bookmark/tag project today!  I had fun playing around with some media that I hadn’t had a chance to play with which was really fun!

Thanks for hanging out with me this weekend!  Hope you had fun or were inspired in some way!  I’ll be seeing you soon!

Challenges I’d like to enter:

  1. QKR Stampede – #361 Anything Goes
  2.  Simon Says Stamp Monday – ‘S’ is for…”Sprays, Stack of books, seam binding, school, study, stories, sit”
  3. TGIF Challenge – #TGIF227 Product Spotlight embossing powder