Happy September friends! Can you believe we’re getting ready to get into the Autumn season already?! It seems like the summer flew by, but I have to say that I’m so very ready for the falling leaves and all things Autumn to start up now…especially cooler temps!
Today also brings us to a new challenge over at the Mix It Up Challenge Blog. The challenges always run for 6 weeks so there is plenty of time to enter. The theme given for us this time is: Fancy Folds or you can always do the ‘Anything Goes” too. Here’s the card that I came up with for the challenge using the theme:
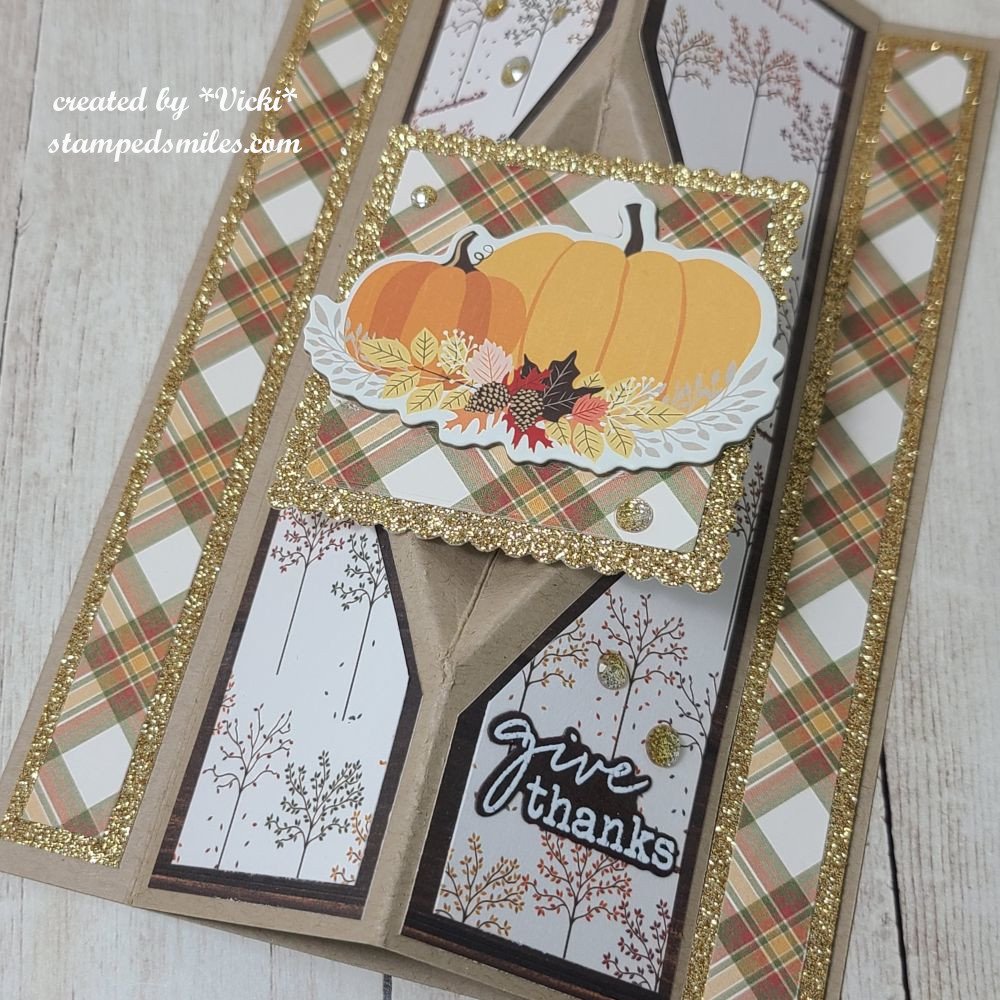
This is a something I came across a while back and saved the tutorial for later to give it a go. This is called a “Faceted Vertical Easel Card” and this is a 5″x7″ size. I would give you a link to the tutorial, but when I started creating half-way through to come upon the layers, I noticed the measurements were not quite right, so I had to figure out an adjustment to make it work correctly. I do love the look of it with its unique faceted design. It’s basically just an easel style card with a bit of a design in the center fold area and going vertical instead of horizontal. (If I make another again, I’ve decided another easier way to work it.
Since I was in the mood for the Autumn season, I decided to make my design with that in mind. I started with a kraft cardstock base measuring 10″x7″ with all of the different scores/cuts for this design as well. For decorating it, I’ve pulled out some Autumn papers by Photoplay in my stash and added a layer of glitter gold cardstock. To make square aperture with the pumpkins, I pull a cardboard cutout from the paper pack to use with it, and then white heat embossed a sentiment and die cut to place on the bottom right of card. Lastly, I’ve added some gold gems to both panels as well as the square panel in the center of the card.
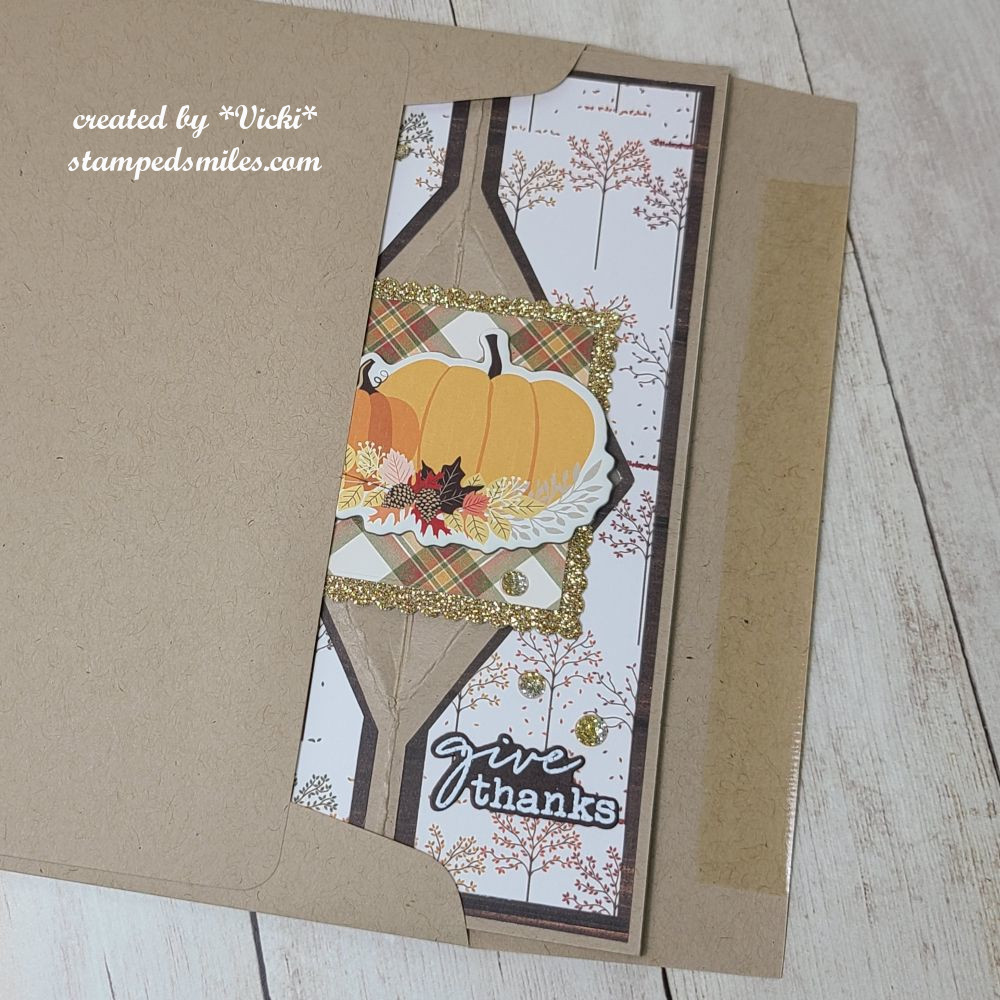
I think what I like most about this is that it folds completely flat for mailing in an envelope. Once the recipient receives it, you can slide it open to catch the strip on the right side of the card and it will stand up like the first photo in this post.
I hope you’ve enjoyed my fancy fold card today and you’ll hop on over to the challenge blog to see what the rest of the team has come up with. I look forward to seeing the gallery and what fancy folds will be in there!
Thanks so much for stopping in today! Have a great day!
Good evening friends! Tomorrow is about “LOVE” for Valentine’s Day! I hope that whatever you’re doing that you spend it with those that you love or at least tell someone how much they mean to you! I have a special post this evening that is dedicated or inspired by love. ❤️
First up is my art journal page with the prompt/theme of “LIGHT/KEEPING IT LIGHT” that I’m guest hosting this month for the Art Journal Journey Challenge. It’s been so fun to see all of the wonderful art created so far!
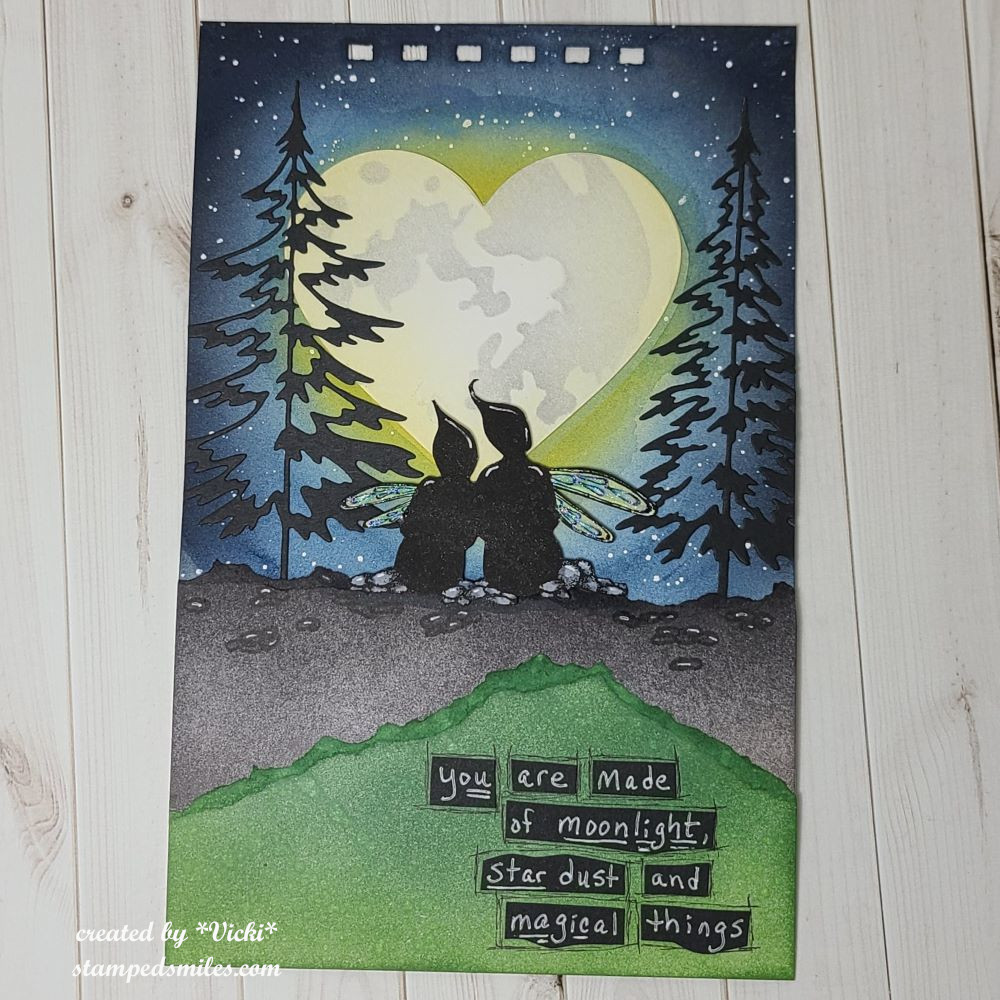
This page was inspired by not just the “light” prompt for the challenge, but it was also inspired by the love of my life. We have spent many moons together and have enjoyed our time in the moonlight as we both love nature and have spent some time traveling and seeing some beautiful things. I’m so thankful to have had these special memories with him.
For the background: I started with a 5.5″x8.5″ watercolor with pre-punched holes at the top with my Zutter machine. I used my watercolor to create the blue sky background with an idea of where I was going to place the moon. I left that area to watercolor in the yellow rather than the blue. I then used some white opaque copic watered down and splattered over top for stars. The “moon” was die cut in white with a heart shaped die and I added a moon stencil over top to make it look like a heart shaped moon and glued it in the center of the watercolor background.
The bottom portion was made with just ripping some cardstock and ink blending one with the greens and one with greys and black. I die cut the trees in black and glued them in place and then added the ripped layers over top.
I stamped the Lavinia Stamps “Star Gazers” stamp in black in and fussy cut it out. I colored the rocks they were sitting on as well as their wings and popped them up on the grey ripped border. I also hand drew more rocks around them and used a white gel pen to highlight. I added some glitter to the wings. Lastly, I wrote over black cardstock with a white gel pen, cut them out and attached to the ripped green border. I then used a black pen to doodle around the words.
Next up are a few Valentine cards that I’ve made. I’m actually really bummed because I would’ve shared another two cards that I made, but I forgot to take photos of them before I sent them out! I used a pizza theme and they were so fun!
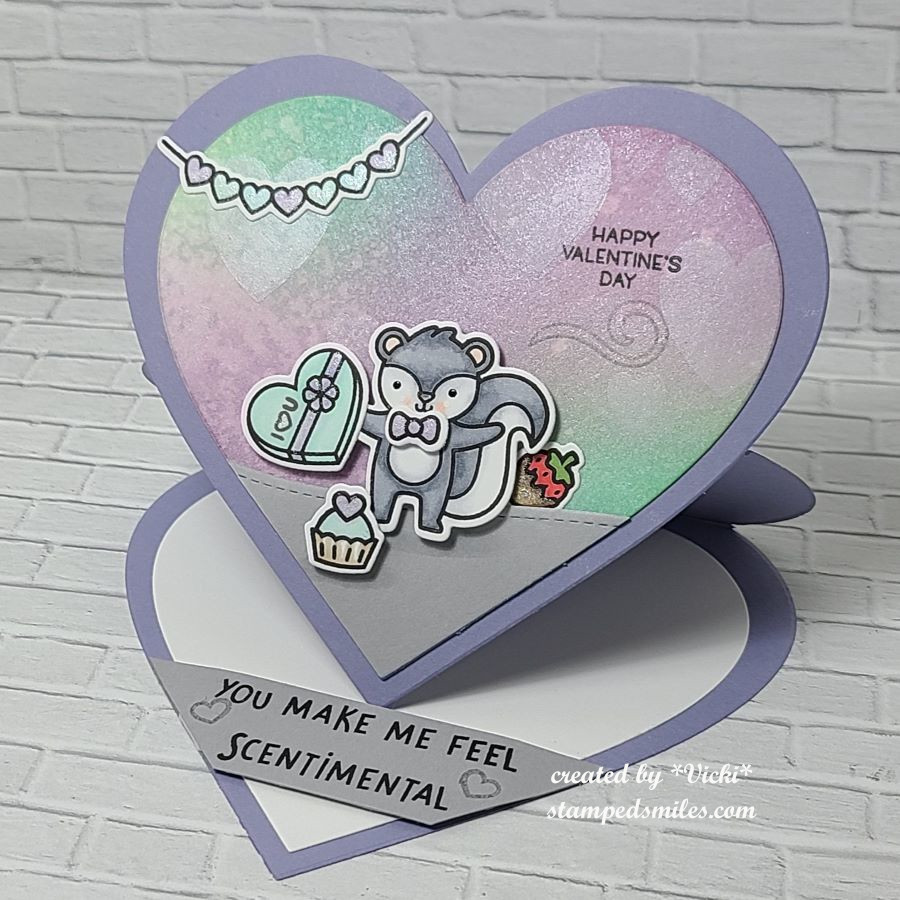
This first one is for my husband and I’ve used the Craft Roulette #201 parameters to create it:
We had to make an easel card, so I decided to make a heart shaped one. I’ve used the cute skunk from Lawn Fawn with all of the “sweets”. (which was also one of the parameters) My husband loves his sweets! I also had to use “quiet” colors and some sort of bokeh, so I’ve made a bokeh background and used a solid heart stamp in white over the blended colors. It reminds me of those conversation hearts. This skunk makes me smile!
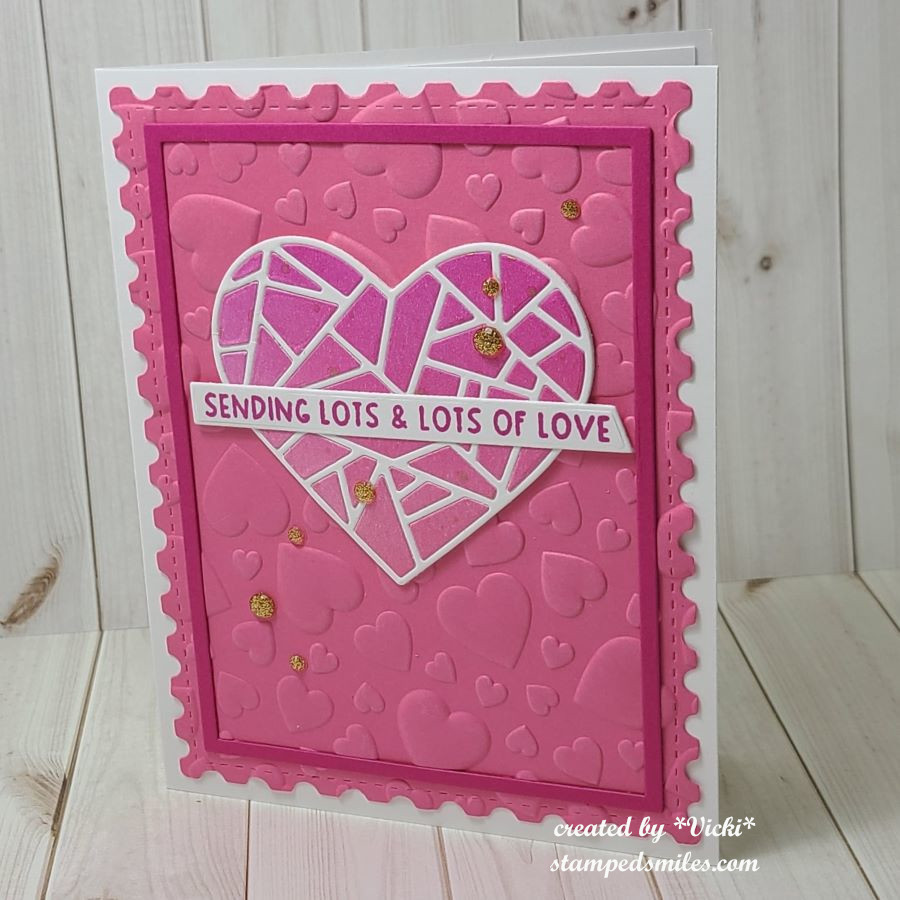
This is another fun card that I’ve made for a friend! I couldn’t wait to use this fun mosaic heart from Taylored Expressions. It came as a freebie for a limited time with a Valentine release. I like that it comes with the solid heart backer which makes putting it together easier. I ink blended a panel in two shades of pink and then die cut the heart with the pieces. I used the frame cut in white and then popped in the ink blended pieces inside the frame.
The embossed heart background was made after cutting out a piece of Bubblegum cardstock with the postage rectangle die. I stamped and die cut the sentiment over top of the heart and added some gold rhinestones.
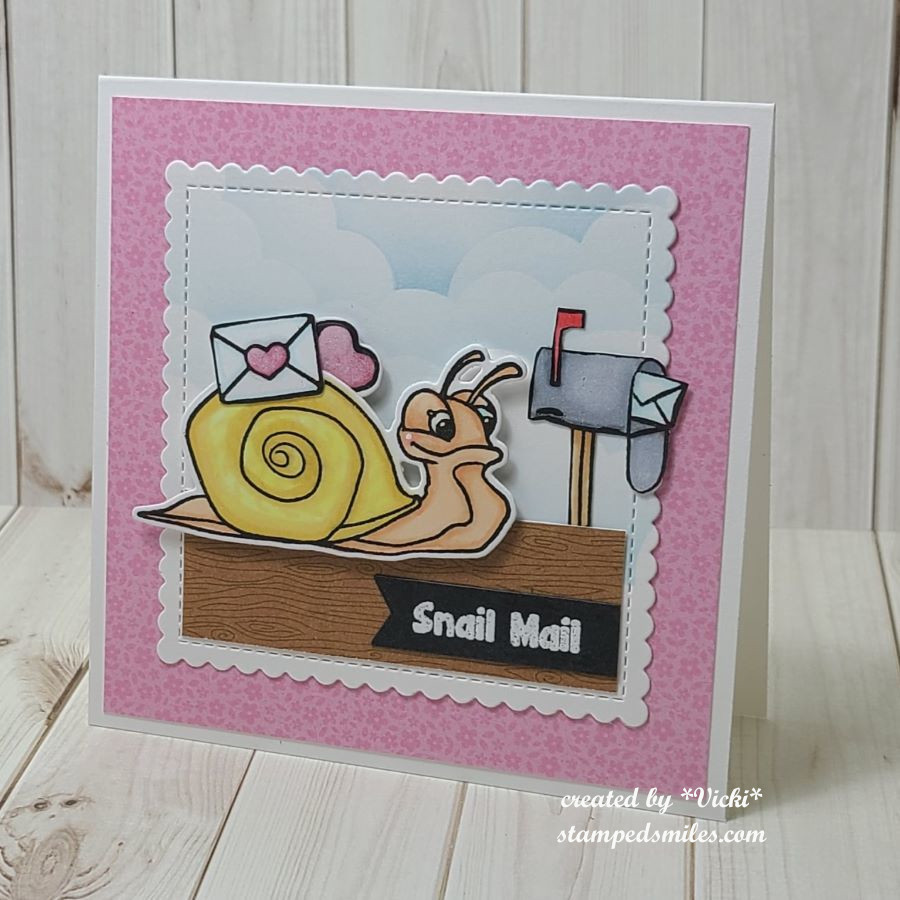
And this card was done for the Inky Stamper FB challenge which was to create a square card. I have made this one 4.25″ square and used the cute Snail stamp set along with some Doodlebug papers which you can also find in their store.
I just stamped, colored and cut out the images, added a border at the bottom and cut out a scallop square in white and stenciled some clouds at the top. More pink papers onto a white square card base and called it done! There’s nothing better than getting snail mail!
I hope you’ve enjoyed my heart-filled post today and you’ve been inspired in some way! Thanks so much for stopping in and I’ll see you again on Thursday for a new challenge to try! Happy Valentine’s Day!
Hello friends! Happy Friday and are you ready for the weekend? I’m supposed to be helping hubby with some outside work, but my allergies have been bad and I’m not feeling well. Hopefully some medicine will be helping so we can get things finished up!
I have been a “grumpy” fan of Taylored Expressions for a few years as you might have seen in some of my past posts…so of course I get “pulled in” by other cute products too and that’s what happened…my story anyway! In their FB fan group there is a monthly #TEmakerchallenge with prompts to follow as long as you use at least one of their products. So I’ve made a fun card for this month I’d like to share:
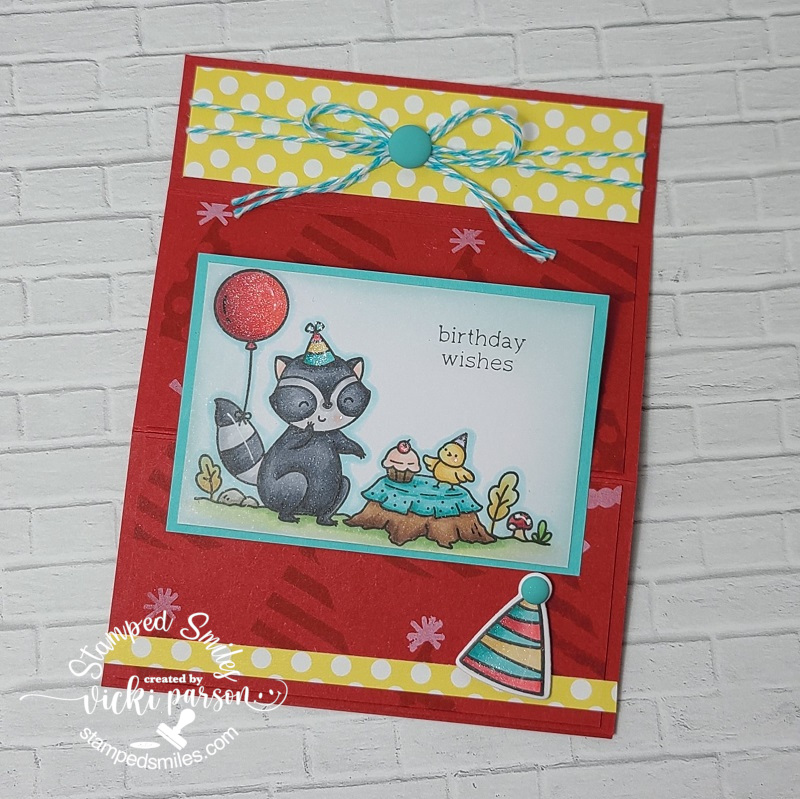
Now how CUTE are these little critters?! During TE’s Sept birthday month (13 years in business), they released a collection of birthday related items, and this is the introduction of “Chip & Charlie Party“! I’m saying that Chip is the bird and Charlie is the raccoon…not sure, but that’s what I’m saying! LOL I’ve colored them up with Copic markers and added some shimmer to the balloon, party hats and cherry on cupcake with a glitter brush pen. I’ve also added some highlights with a white gel pen.
I wanted something in the background, but not too distracting from the critters, so I stamped the Party Time background stamp in the same cardstock color (Cherry Pop) I then used the stencil from this combo set to white ink blend the tops of the hats. The paper strip accents came from a TE paper pack I had in my stash. I thought it needed an extra little image element on the front of the card, so I added some Doodlebug Twine and the party hat from Big Grumpy-Birthday, colored with Copics and popped up with foam tape on bottom corner. It was covered with a glitter brush pen, and I also added a Doodlebug Matte Sprinkle at the top of the party hat and in the center of the twine bow.
You might notice that the image panel is not completed adhered to the card front and there’s a score mark in the center as well. So, I was going for something a bit different than a regular A2 birthday card…and the Sept challenge prompts are 1. Heat or non-heat embossing, 2. Napa Valley color quad and/or 3. Something that begins with “E” You have to pick at least one of these along with a TE product. So, for the “E” I’ve decided on making an Easel card…
So, when you open up the bottom flap, you place it behind the popped-up sentiment that was white heat embossed (also a challenge prompt) and cut out with the coordinating die from the “Get the Word Out-Celebrate” set. I’ve also added some more of those yellow polka-dot papers and a thin strip of Cookie Monster cardstock which is what I used to mat behind the image panel as well as for the sentiment. There is still room to line the inside of the card with a special birthday message.
I hope you’ve enjoyed my card and please see at the end of this post for other challenges I’ve entered…PLUS a special birthday give away if you’re interested!
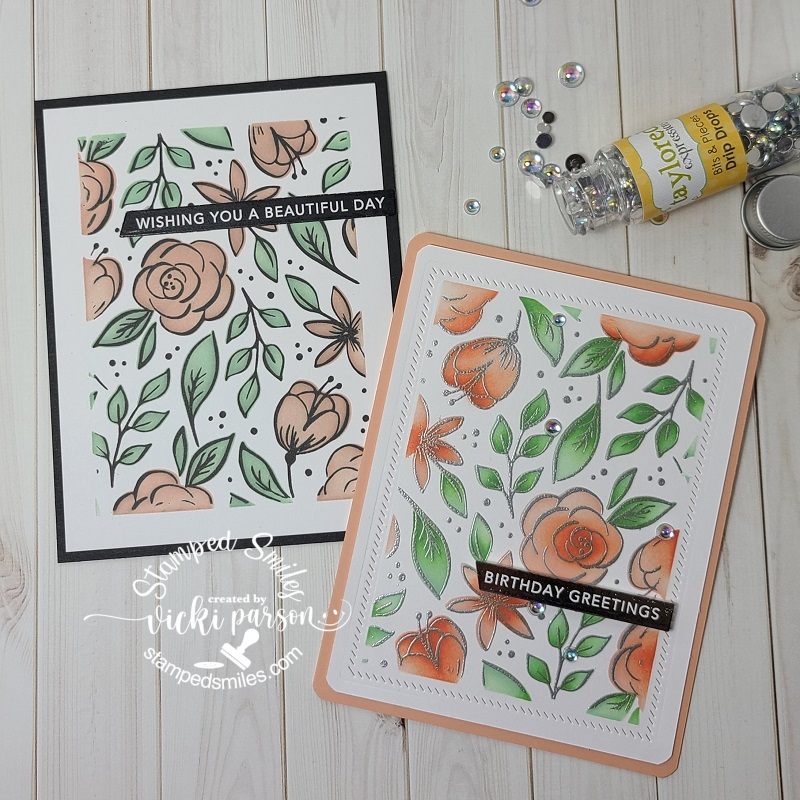
Taylored Expressions was holding a special set of birthday challenges this month in their FB fans group with certain prompts for each one. There was a set of four different challenges, and I decided to make something for each challenge, and I ended up winning a future guest design spot for a future release! WHAT?! Taylor shared which one was her favorite I made in THIS FB ANNOUNCEMENT, but I will share all the creations I made here: (click on the photos to enlarge them if you are viewing them on my blog.)
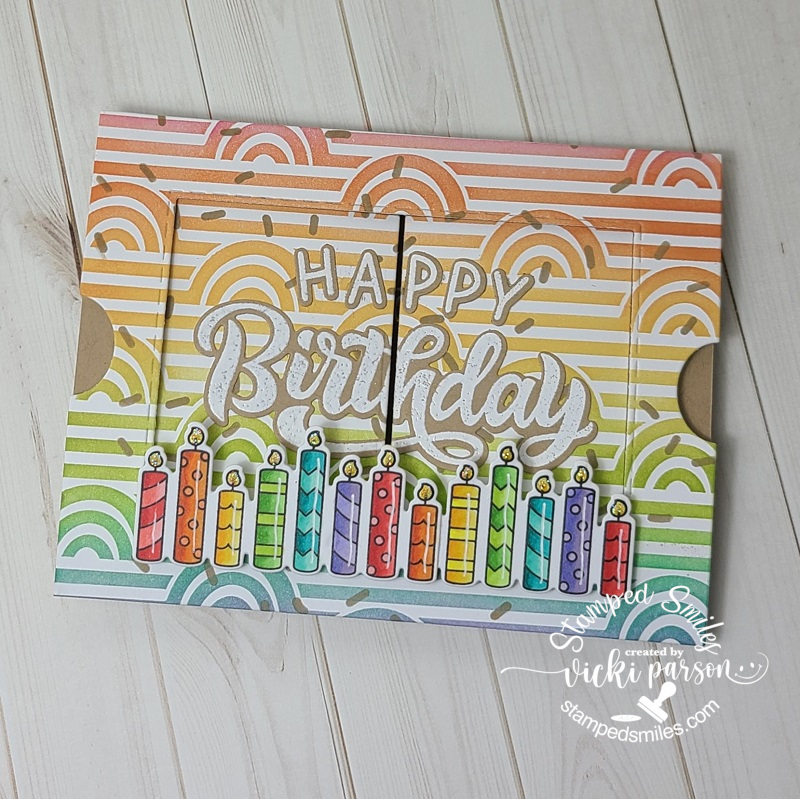
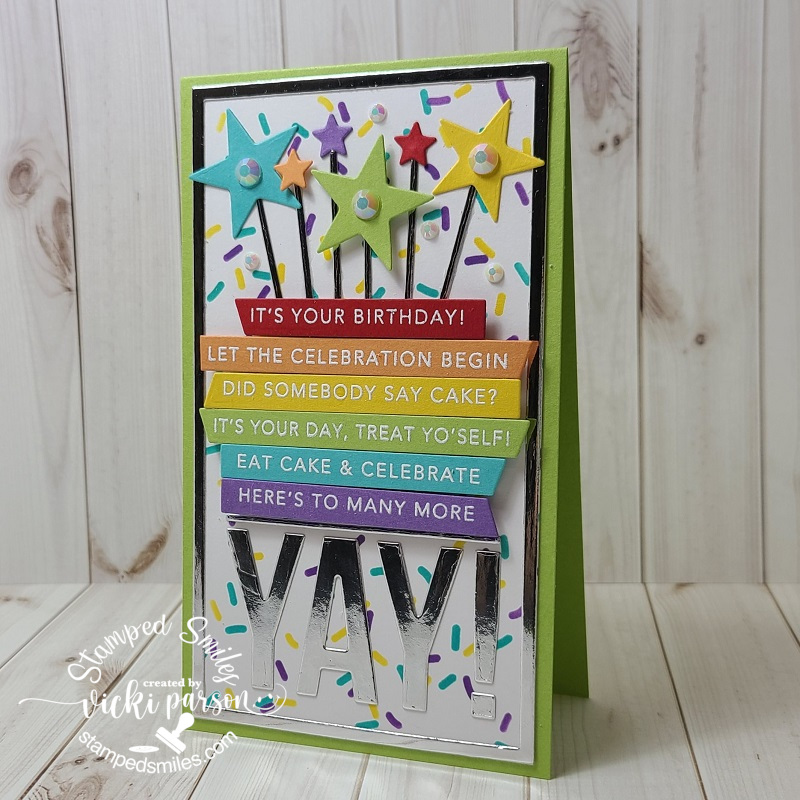
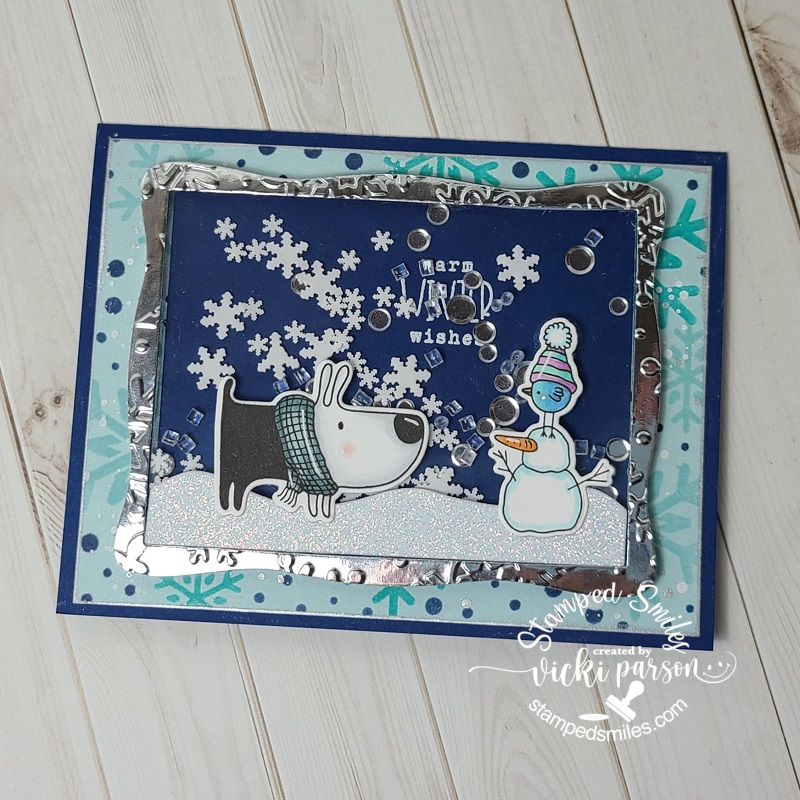
The first challenge was using Toffee color cardstock/ink + ROYGBIV (rainbow) colors. I made a theater fold design with the Toffee card base and a stenciled rainbow colored background. I also counted out exactly 13 candles to use on the front of the card for TE’s 13th birthday. I’ve also stenciled a few Toffee confetti sprinkles over top. When you pull on each side of this card, it opens up which you can see in the photo below.I white heat embossed the sentiment on the inside and then I took the same confetti stencil and added some white ones over the toffee inside. You can see the candles popped up in the center opening. This card was Taylor’s favorite pick! 🙂 These cards were made for the 2nd challenge which was to create a CAS design and then take the similar style and “Step it up”.For the third challenge, you were given a choice of two different photos for inspiration and you had to pick one to create a project from. I sort of was inspired by both and I some what combined the two for my mini slimline card here. This took a bit of time to white heat emboss the sentiments in the rainbow colors and cut all the stars, etc, but I like how this turned out.The fourth challenge was called “shake it up” which meant to create a shaker card. I’ve used this adorable Gus & Gertie set along with some other elements for design from my stash. I ran an embossing folder over the silver foil frame a die cut to make my shaker element from. Check out the next photo for the shaker bits…And this is the shaker lying flat with all of the inside shaker elements. I’ve used some snowflakes from a past kit as well as silver sequins and ice beads.Taylored Expressions 13th Birthday Challenge entries
I honestly wasn’t thinking about winning anything! I was basically just enjoying the process of creating and pulling out some stash that I hadn’t yet used and wanted to use so I thought I’d just play along. I was very surprised to see that I was picked as a winner! Very humbled and honored by that! So be watching for an upcoming GDT post!
I have actually joined several of Taylor’s classes, virtual events, etc. and have made many cool things during the time that I wasn’t blogging, so I never shared them… but like I said, I’ve been creating and having fun! I do remember something fun she taught in a virtual event from July I was a part of that was Halloween themed, so I’ll have to pull those cards out soon as well since the time is coming up and I do love me some Halloween! 🎃
One last thing! With all of the fun and exciting things going, I realized it’s my birthday month as well! I’m not 13, but let’s just say a few years older!😁 So I think the best thing to do for my birthday is to give rather than receive! If you feel the same and think someone would enjoy this little Taylored Expressions bundle that I have shown above in the photo, let me know! If you’d like to gift this for yourself, let me know! I would love to give someone these extra set of items already in my stash to someone! There is a Banner Simple Strips die, a 3 piece balloon layering stencil with a clear stamp set combo, a Cupcake ink pad (unwrapped, but NOT used at all, I just noticed I already had one after unwrapping it!) and a tiny cake and celebrate stamp set all from Taylored Expressions and perfect for party making! (There may be a few other things added as well!)
**Please just leave me a comment that you are interested in the TE give away by October 10th, 2021 and I will be happy to pick someone to send it out to!**
Whew! I think that’s about it! Thank you for stopping by friends and enjoy your weekend!
I’d like to enter the top easel card ONLY in these challenges:
Hello there friends and happy Wednesday! Hope you’re all doing well and having a great week so far! It’s so hot over our way with a heat advisory in triple digits, so it’s a good time to stay in and craft, right?!
Stopping by today with another project I’ve made for Inky Stamper! This one sort of cracks me up a bit as you can see by the title of my post! 😂
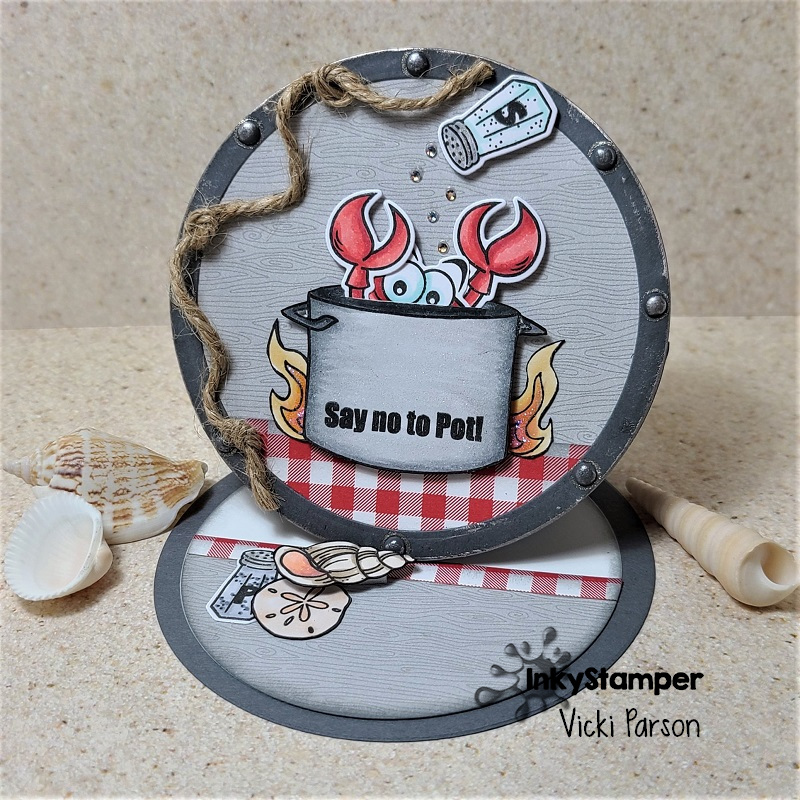
So, the sentiments from this Inky Stamper Crab stamp set are hilarious and I know many of the stamp sets come with funny sentiments like this too! It’s always great to have different options for sentiments to go with an image! Now, I don’t think that I’ve ever been to a crab boil, but I do love me some crab legs! 🦀 How about you?!
I’ve used some of the Doodlebug Paper Pads (also in the Inky Stamper store) and made that for the base of my background for the large “pot” image to sit over. The sentiment was stamped directly onto the “pot” image before I colored it with Copics. For the “flames” behind the pot, I’ve used the Inky Stamper Bear stamp set. I’ve found so many different uses for that set. I think it’s one of my faves from this store!
As you can see, the “crab” is inside the pot. So for this, I used a craft knife to cut a slit for the “crab”, but when you use the coordinating die to cut out the “crab”, he will not exactly fit…so I dismantled the “crab”…like you would for cooking…and placed the cut up parts so his hands were in the air and his eyeballs are sticking out.😆 I taped him on the back of the pot so he would stay put through the slit in the pot and popped it up with foam tape over the flames. I took the other images from the Crab stamp set and die cut the salt and pepper shakers and fussy cut the seashells to add to my easel card.
For the easel style card, I’ve used some circle dies for the easel as well as to create the frame for the “port hole” around the cooked crab scene. I’ve used some brads and rubbed some mixed media silver paste around it. I’ve also added a piece of rope/twine that I randomly tied a knot on for an accent. I’ve also added some gems from the Picket Fence – Sand collection (also sold at Inky Stamper) above the crab…for seasoning of course! The seashell on the inside grouping of the card has foam tape to secure the card front in place for the easel design. This card will fit perfectly inside an A2 envelope so I can give someone a chuckle of course!
Hope you’ve enjoyed my easel card today and had a chuckle! Thanks for dropping by!
Hello again friends! We are on day 3 of celebrating over at {Cupcake Inspirations} with another feature of sponsors for our 500th “birthday celebration” challenge!! Yay!
Today, we are highlighting Crafty Scrappers & Gerda Steiner Designs – check out the challenge blog for more details about these sponsors.
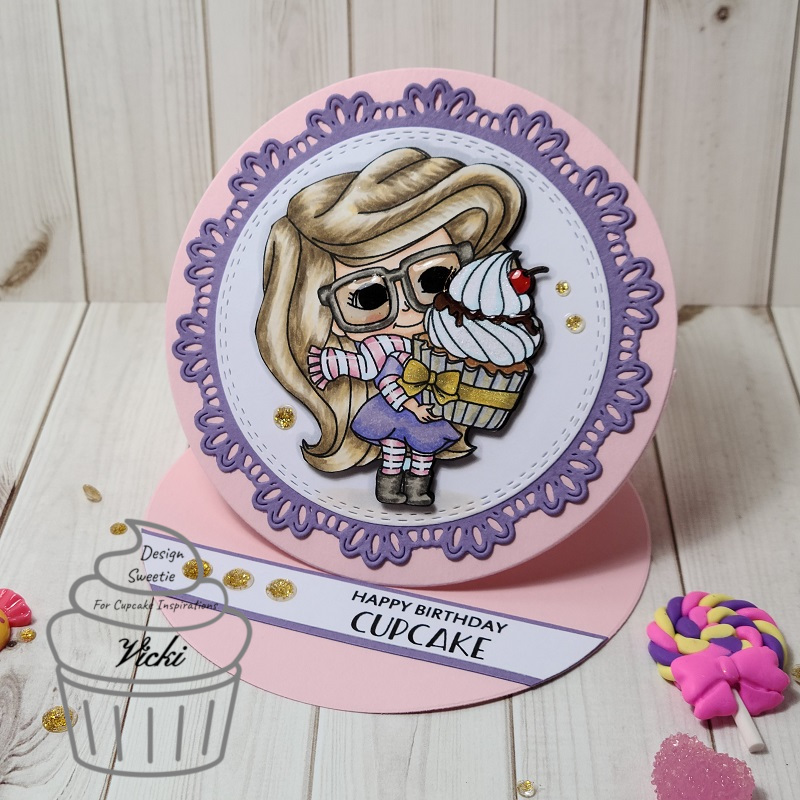
The DT was given images from Crafty Scrappers to use for our creations:
Isn’t she the cutest with her oversized cupcake and glasses?! I’ve used images including the sentiment from the Ms. Cupcake stamp set provided by our sponsor.
I had so much fun coloring her up with Copic markers and then adding lots of details to it like the gold glitter shimmer over the ribbon on the cupcake, the shimmer over the frosting and then some glossy accents for the chocolate syrup, cherry on top and over her glasses too! I’ve also used a white gel pen for highlights on areas. I actually fussy cut her out and popped her up over the circle die cut panel with foam tape.
I thought she fit the circle nicely and would work for a circle easel card design. I matted her over a purple fancy circle die cut layer and then made the circle easel base a pink color. I cut a strip for the sentiment and layered that over purple cardstock for the inside which is helping to keep the front layer propped up. I’ve also added some gold sparkle crystals over the design to match her ribboned cupcake.
Thanks for dropping in today friends and I’ll see you tomorrow!
As You Like It– Favorite Color to Pair With Pink and Why? (Purple is my favorite color, but I think it’s amazing with pink because it gives a wonderful feminine look…and it’s great for princesses and unicorns too!)
Creative Knockouts – #363 Finish the Inside (my inside is propping up the front of card!)
Hello friends! Hoping you all had a wonderful weekend!
Today I’m sharing a fun circle shaped design using a cute new Pairables set from Digi Doodle Studios:
This cute little elf is sitting atop of an ornament, getting out the list for Santa and marking down who’s naughty or nice! LOL! This image and sentiment are apart of the Christmas Elves Pairables Digi stamp set. On my computer I actually expanded the ornament image to make it larger and then added the cute little elf from the set right on top of the ornament. I printed it out as one image and colored it up with Copics. I’ve also stamped some snowflakes around the image and cut him out with a circle die. I used some Broken China distress ink to sponge around the edges.
I layered him onto a brushed gold die cut circle and added some gold stickles around the edges. I then layered these onto a red die cut circle that was embossed with an embossing folder, which is also the same one that I used for the green piece on the inside of the card.
I made a circle easel card and then cut out the sentiment from the digi set in a strip (also sponged with Broken China ink) and mounted it over another piece of red cardstock and attached it on the inside right above the green embossed layer. (This strip is what helps keep the front layer propped up.)
Here you can see the side view of the card design. These are very simple to make with die cut shapes and I love how they nicely display for the recipient.
I’ve add some green saddle stitch ribbon to the center of the red circle before attaching it to the easel card backing and then added a bow that I’ve tied 2 gold bells on with a piece of twine. I then used the twine to make a double bow to go behind the green one and glued them on my card.
I added some snowflake accents and placed a blue rhinestone in the center of each.
Here’s a closer view of the details on this cutie. I actually have lots of thing going on with this image. First, I covered the bottom of his ornament with glossy accents. It’s a fairly thick layer and you can see the details of it in the photo below, but I had to let it dry over night!
I have taken a gold gel pen and colored the “bells” on the elf’s outfit. I then took a white gel pen for his cheeks. On top of the ornament, I used a glue pen and covered it with some clear loose glitter.
For the trim on his hat, I took some Brutus Monroe Snow Paste and a small brush to apply it. It’s REALLY thick stuff, so for a small area like that, I had to be a bit careful. Love the sparkle in it and you can see, in the photo above this one, the side view of how thick it actually is! I heat set it with my heat gun because it “puffs” up a bit when you heat it.
Here’s what the card looks like when it is closed up. I think this would also make for a really cute ornament too! You can really see the shine on the glossy accents from this photo and why it took all night to dry! LOL!
I hope you’ve enjoyed my easel card today and gotten some inspiration and/or a smile! Thanks so much for stopping in today! I’ll be seeing you again soon!
Hello friends! Well it feels nice to get back into the swing of things here again! I want to thank you from the bottom of my heart for the awesome welcome back I recieved from you guys! Wish I could reach out through the screen and give you all a big hug! 🙂
Today is August 1st AND it’s on a Thursday too, so I wanted to share the card I made for the Whimsy Stamps August Digital new release as well as a brand new Cute Card Thursday Challenge too!! Whimsy Stamps is our sponsor this week and it’s an easy “Anything Goes“, so please be sure to stop by the blog to see the wonderful inspiration from the rest of the design team and play along with us!! We look forward to seeing what you’re working on!
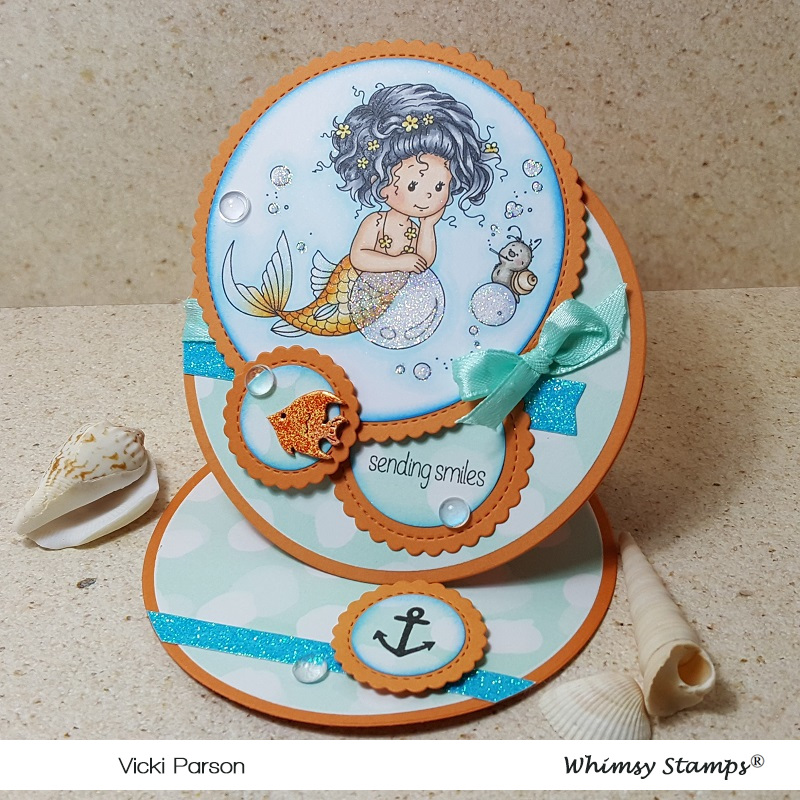
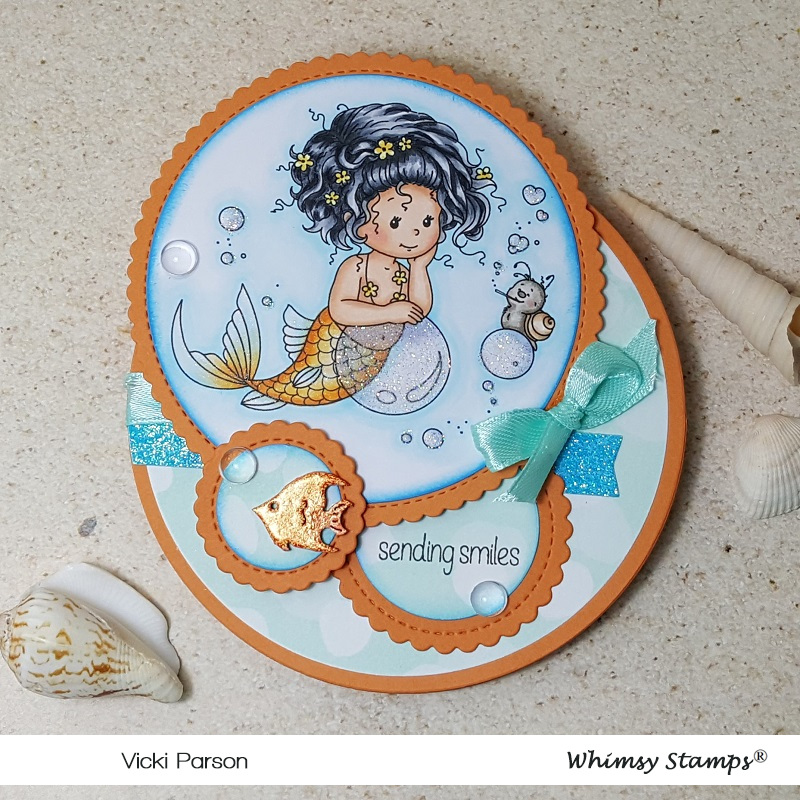
Oh aren’t these Sylvia Zet images just as cute as can be?! I so enjoyed coloring her up! (See the close up photo and details below.) This is the DIGITAL version of “Goldie” just released from Whimsy Stamps this month. You can still also purchase the rubber cling stamp, but now it’s nice to be able to have the option to choose either one!
Since her name is “Goldie“, I had to use the orangish color palette for her! When looking at the image, I immediately saw “bubbles”, so I thought it would be fun to make a circle easel card design with her! This actually turned out to be a “non-traditional” circle easel card with the circled image going askew from the main area…which makes it seem more like several bubbles underwater!
I have cut several different sizes of circles, one for the main circle card base and several others with some old SU! bokeh looking papers from my stash. I used a stitched scallop circle die set to cut out the layers behind the circles. I sponged all circles with some blue ink for more depth. I’ve added a strip of blue glitter cardstock on the main card front layer as well as some ribbon to attach to the front. I arranged the circles where I wanted them and added some foam tape here and there to pop up the layers.
To hold up the card front, the inside of the easel card has another strip of that blue glitter cardstock and I stamped an anchor image over one of the circle panels using an older Whimsy Stamps clear set. I used some foam tape to pop that up so that the front card panel would prop up.
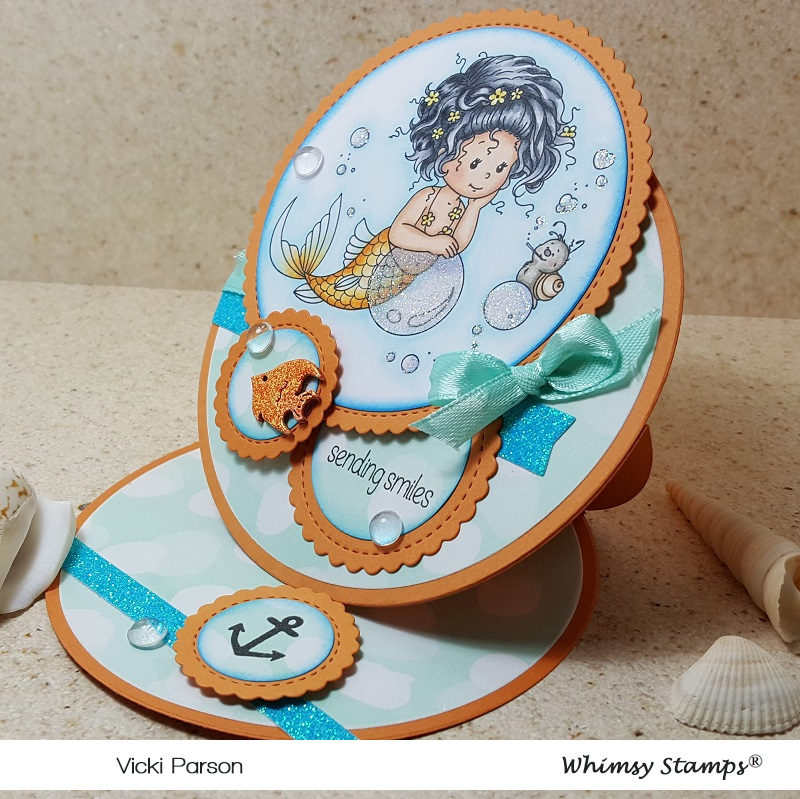
I’ve taken the Whimsy Stamps Everyday Mini Sentiments stamp set to stamp the sentiment under the image panel with black ink. For the accents on the card, I’ve used some clear acrylic bubbles randomly and glued them in places. For the fish, it was a wood veneer from my stash that I heat embossed with some cool orange metallic embossing powder.
Here you can see the details from the side view of the easel design and how it’s propped up with that anchor circle holding the front card panel in place. to mail this card, you just unfold it and lay it flat as shown in the last photo below.
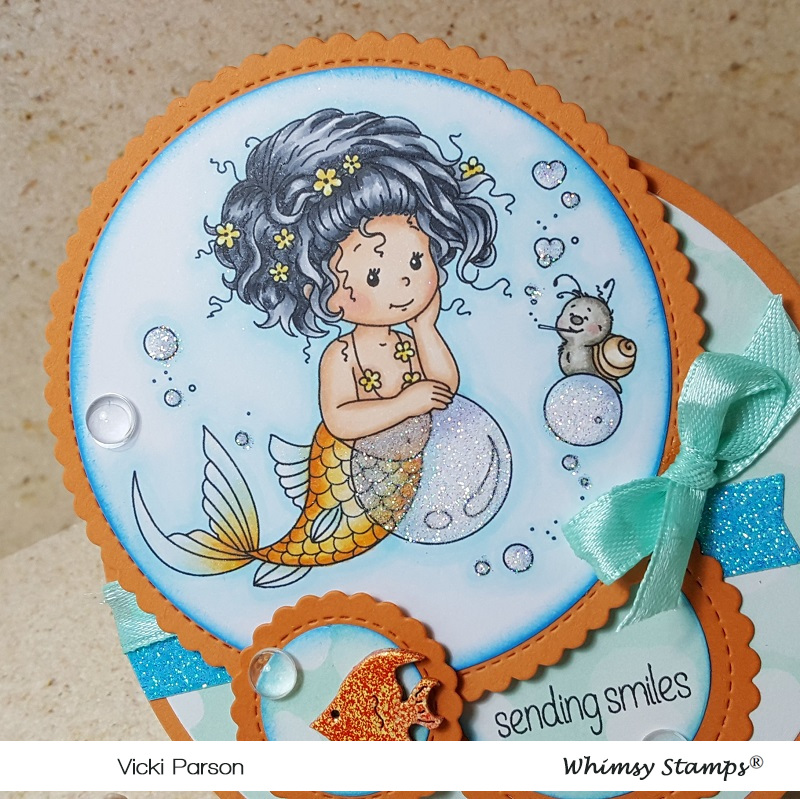
Here’s a closer look at this really sweet image. Below are the list of Copics I’ve used to color her in with:
Fins, flowers, Bubbles – Y38, Y35, Y32, BG000
Hair – C8, C5, C3, C1
Skin – E21, E11, E02, E00, E000, R20
Snail – W5, W3, W1, E33, E31, R20
Wink of Stella used for mermaid body, clear glitter and 2-way glue pen used for the bubbles. I used a black gel pen to dot the center of flowers.
Here’s what the folded and closed circle card looks like. She will not quite fit into a regular A2 sized envelope because I arranged the circles differently, but a nice 5×5 size would work great. I do have an envelope creator which is handy for those odd shaped designs that I can custom make.
Hello friends! Sorry to be throwing so many posts out to you at once, but as you can see there are so many exciting things going on the first of the month and I’m happy to be sharing it with you!
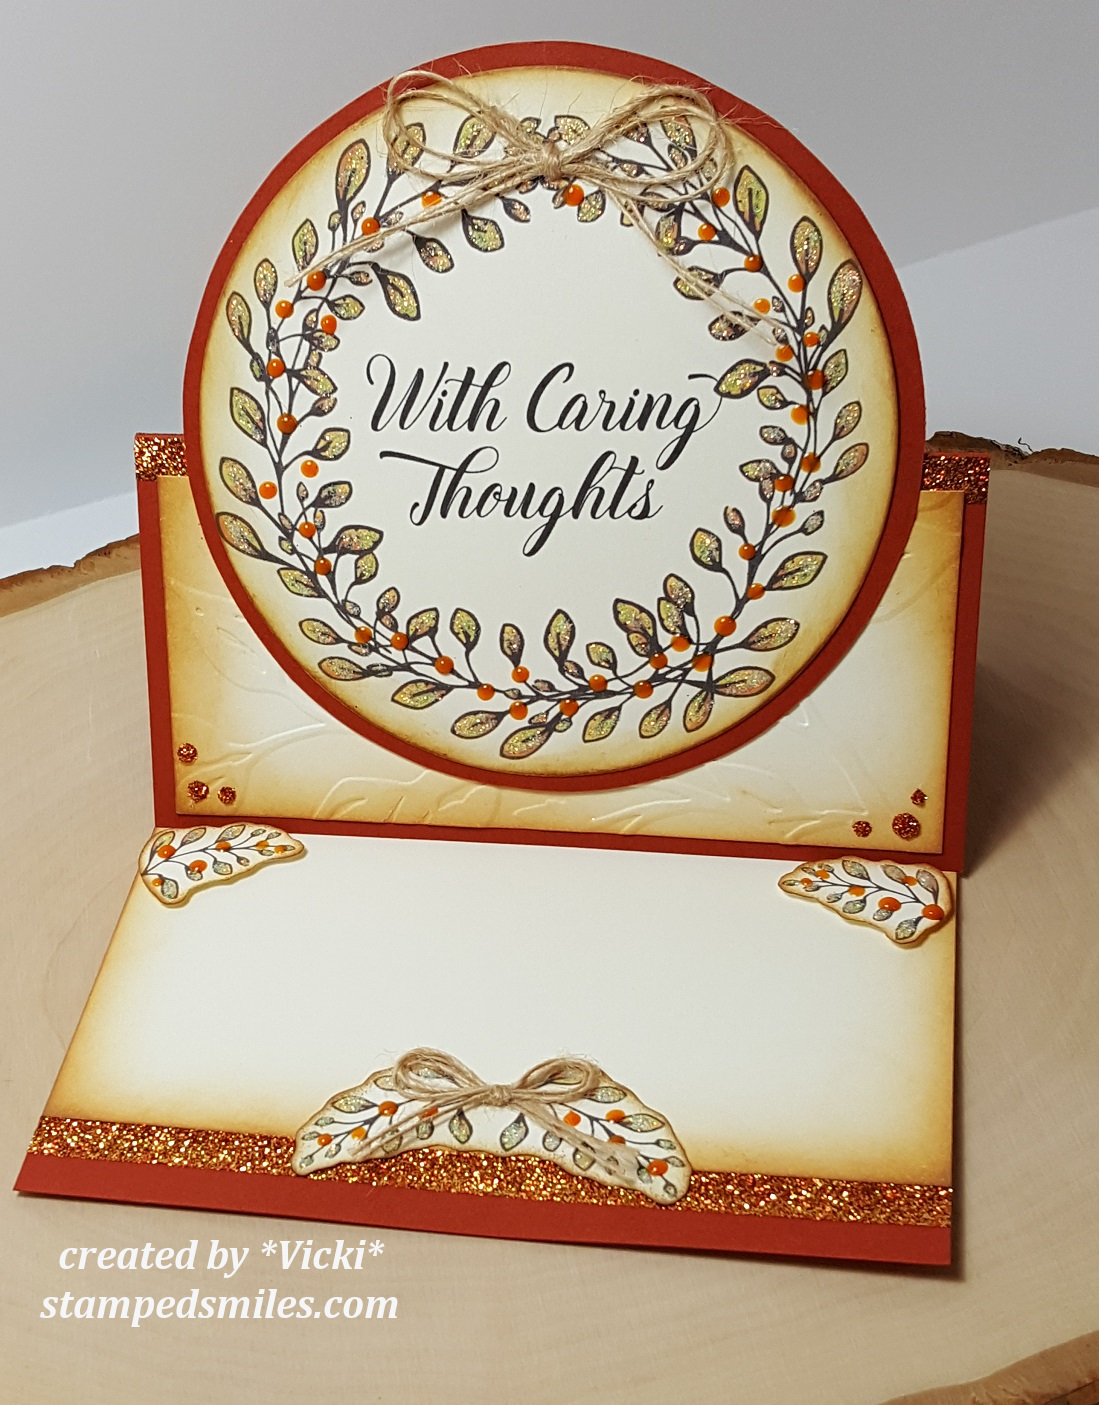
I have come up with an easel card design that I’ve created using the digital set called Memory in Our Hearts:
The great advantage to using a digital set is that they come with pre-colored images as well as outlined images to create many different looks you’re wanting. In addition to that, you can also manipulate the size and structure of your image as I have done with my card here. (This is a great way to come up with a unique design too!)
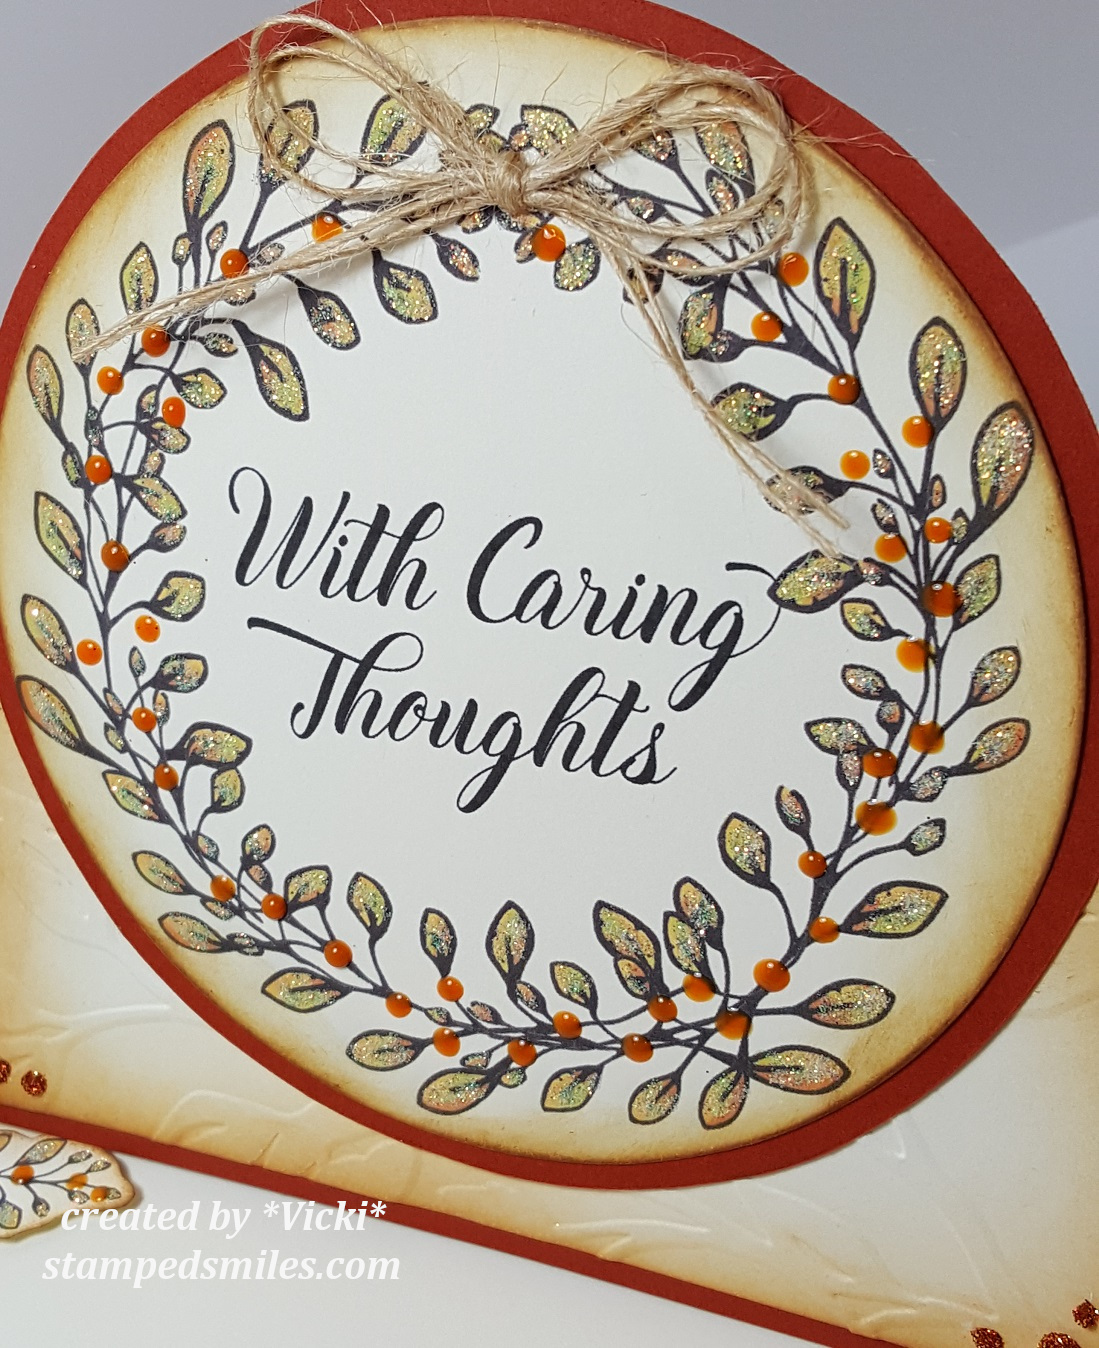
I have taken some of the pre-colored “sprigs” in the fall theme color and sized and moved them around in a Word doc. to create my own Fall wreath with it! I then added the beautiful sentiment to the center and placed where I wanted it and then printed it out along with a couple more sprigs that you see on the inside of this design.
To step things up a notch, I’ve used a protractor to draw a circle around my wreath image as well as a larger circle for a mat behind it and fussy cut them out. (I didn’t have a circle die large enough to accommodate my wreath image.) I took my ink blending tool and some Tea Dye and Vintage Photo distress inks to add some color around the edges. Since I made a Fall wreath design, I wanted to add some glitter to the leaves. So, I took the Nuvo Precision glue pen and added some glitter over them. For the “berries”, I took some Ripened Pumpkin Nuvo Crystal Drops in random areas around the leaves. I made a bow with some natural twine and added it to the top of the wreath. (I did this same process for the smaller “sprigs” on the inside of the card as well.)
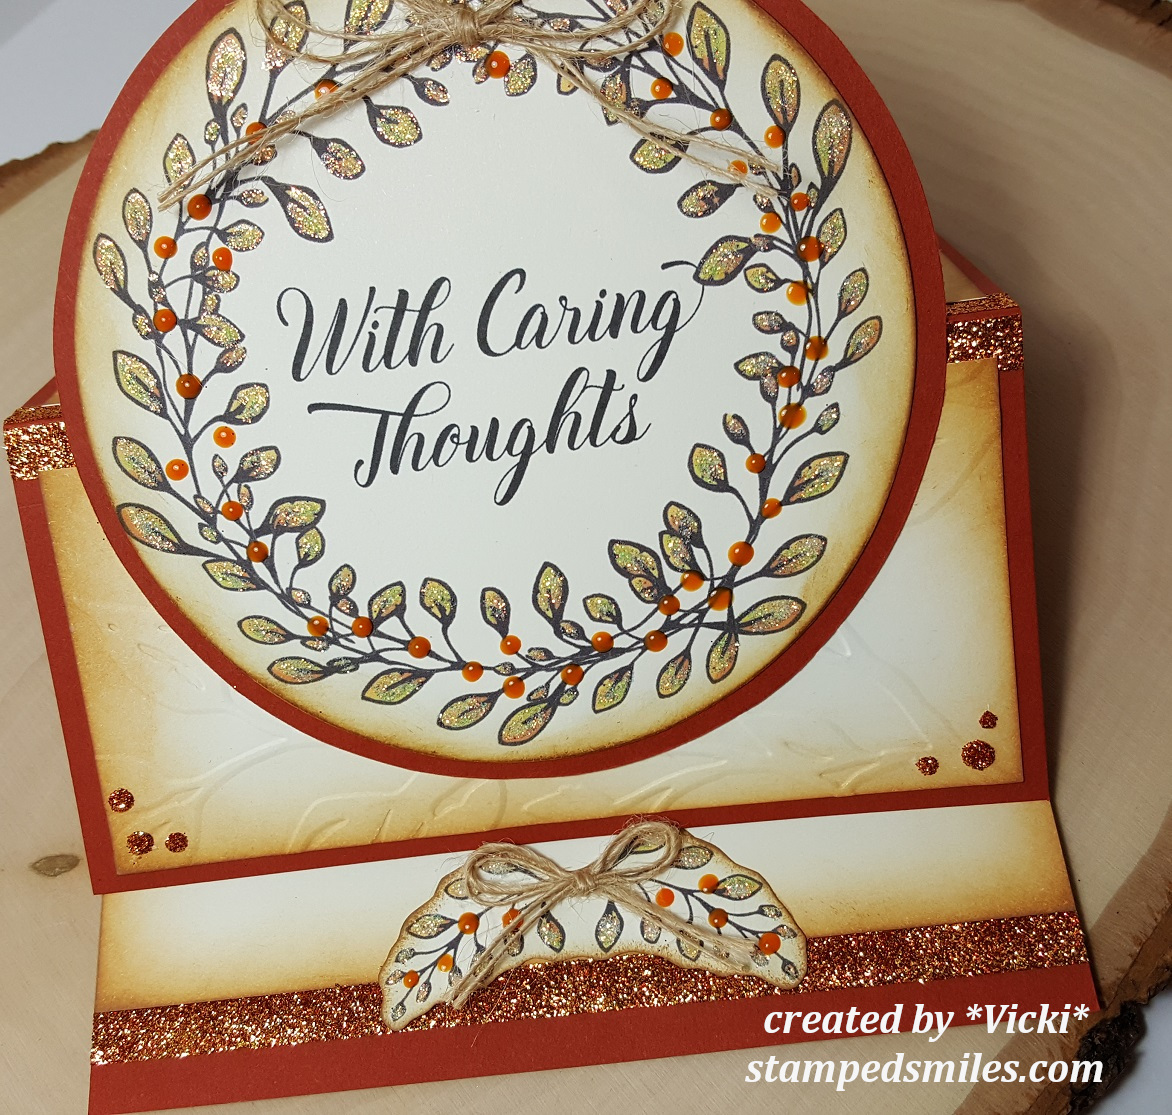
For my card design, I have made an “easel style” card (more on that below). My card size is a 5 1/2″ square. I have used the same cardstock color that I’ve used to print out my wreath image and separated it in two panels to fit on the front of my card base. I took an embossing folder from my stash to add some texture to my design and also used the distress inks again to add some color around the edges. I used glue to add some “dots” in the corners and then sprinkled some “Autumn Medley” glitter over them and let it dry. I have also taken some 1/4″ Tear Tape to the middle edges of the card base and burnished some of this same “Autumn Medley” glitter to that. I think it really brings in that pretty Fall color theme with some added sparkle!
And for the inside of my card, you can see that those extra “sprigs” that I’ve printed and cut out create an easel style “stopper/display” function for my card design. It’s easy to create this look with a score mark made in the center of the card front base as you can see with the circle wreath shown fully.
I have used some of the same-colored cardstock as the printed-out wreath for the inside of my card with some more distress inks along the edges as well as another strip of 1/4″ Tear Tape along the bottom edge burnished with some more of that “Autumn Medley” glitter. I’ve used some foam tape to pop up the “sprig” cut out images so that they create the “stopper” for the front card base to rest while being displayed.
I hope that you’ve enjoyed my interactive card today and I look forward to sharing many more projects with you during my guest design spot!
Thanks so much for stopping in today my friends! Please be sure to check out my earlier posts from today! See you soon!
Hello friends! It’s another Thursday that has gone by this month already! This Summer seems to be going very quickly and I hope you’re out enjoying it!
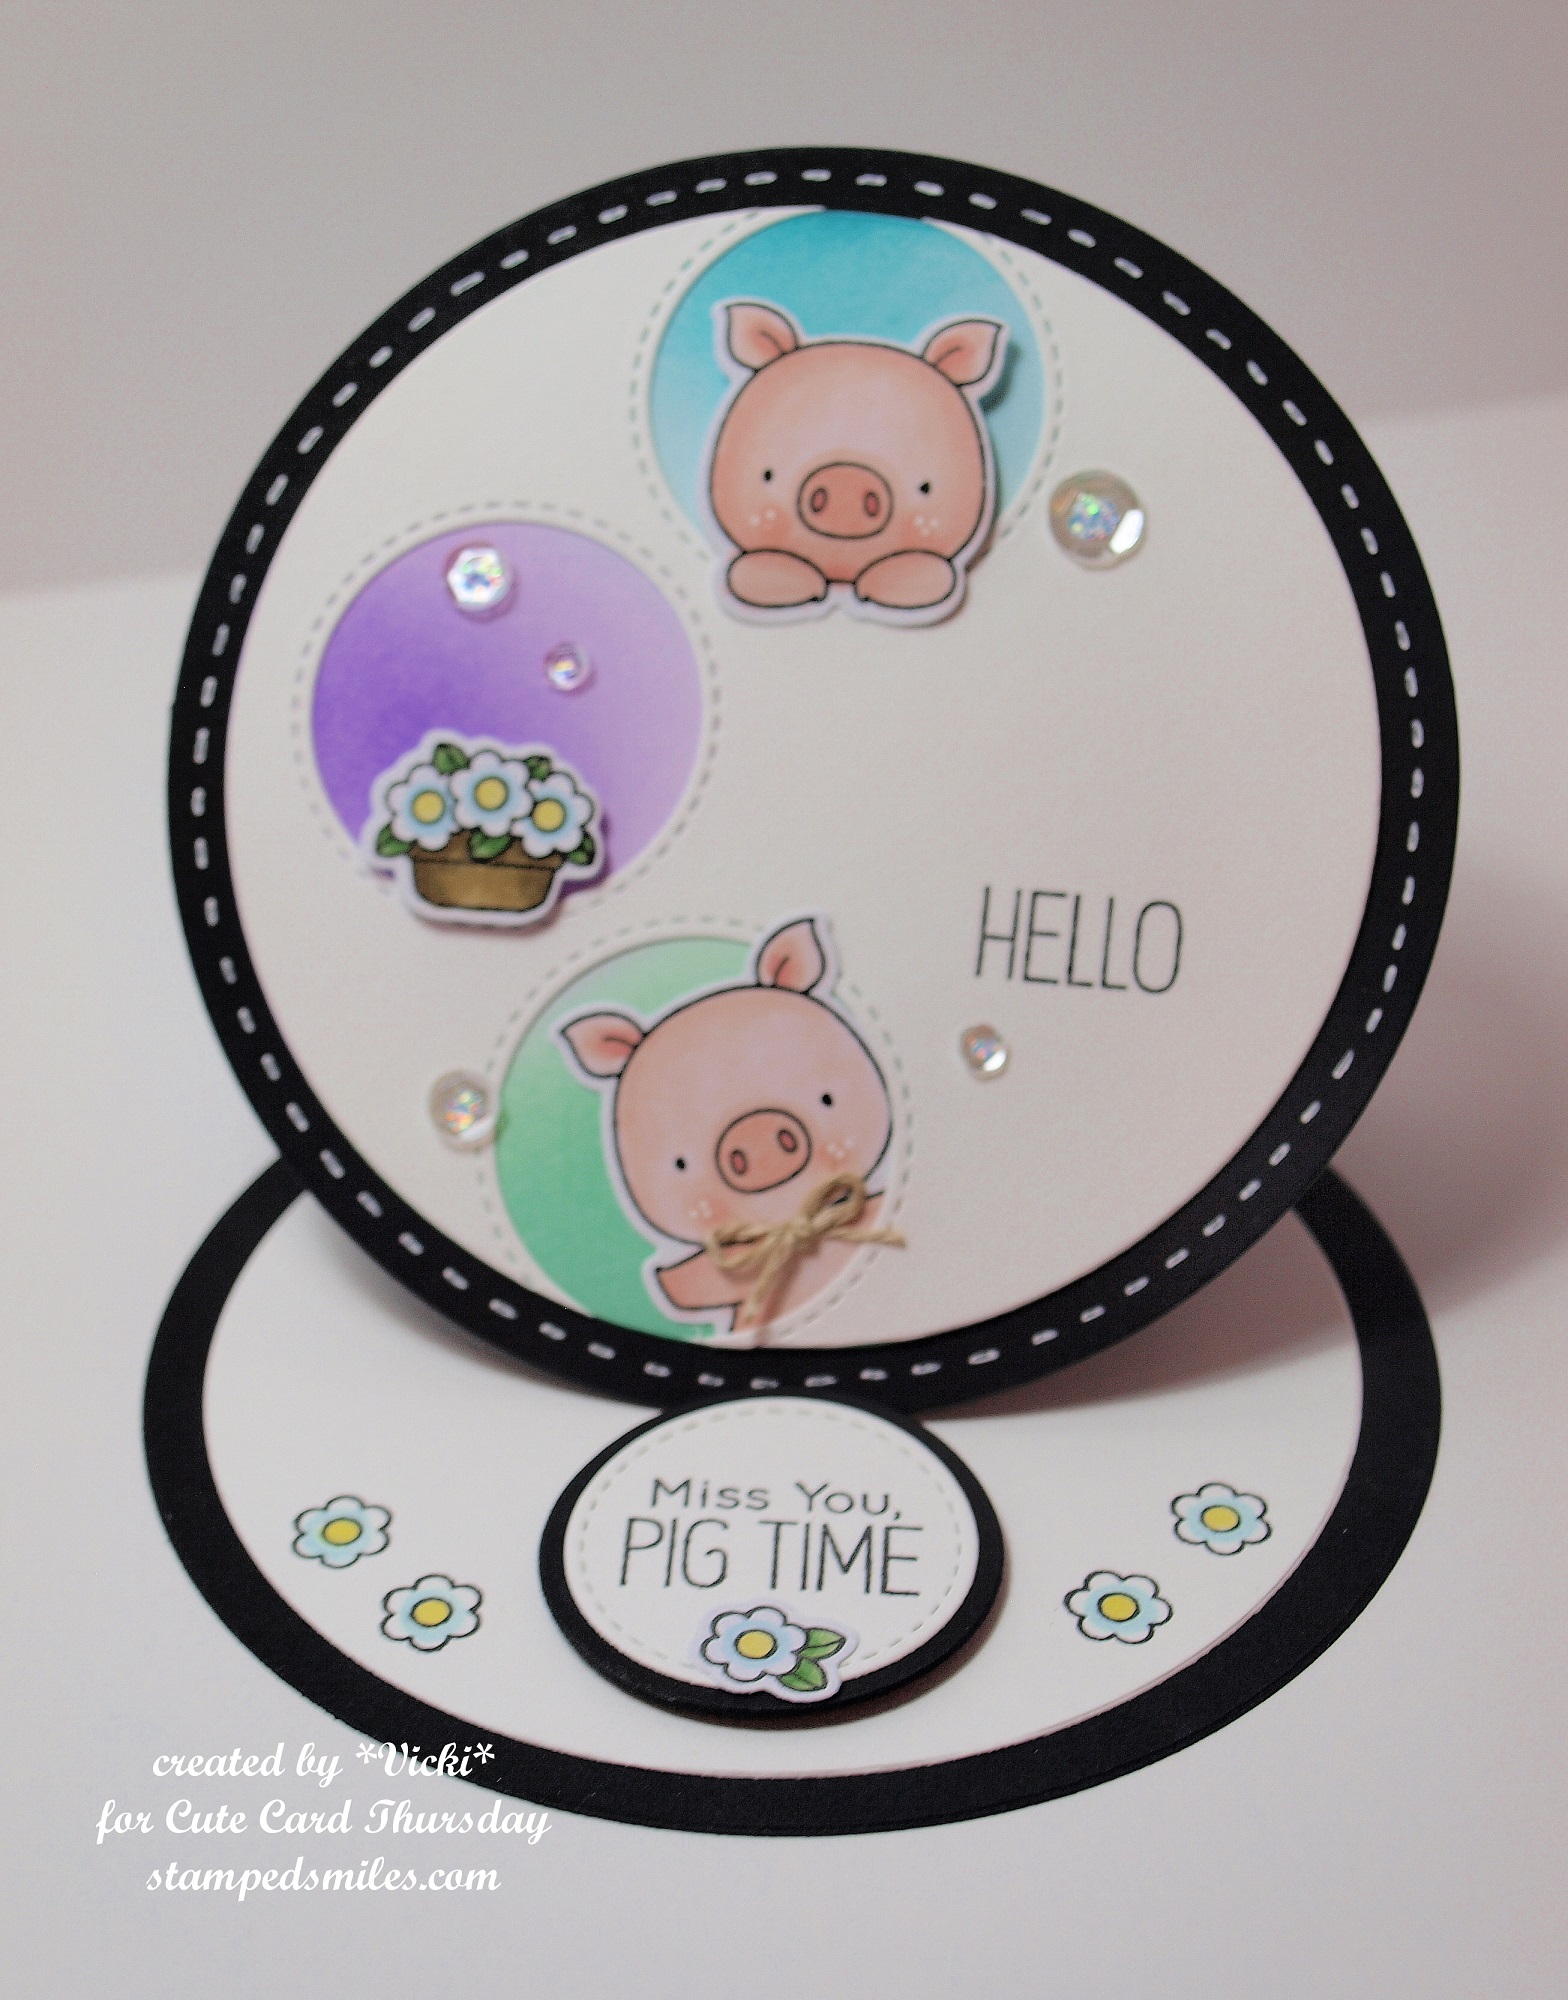
There is another fun challenge this week at Cute Card Thursday! I hope you will join with us to share your “Circles” themed creations! Here’s the creation that I’ve come up with for my card:
I have decided to make a circle shaped easel style card along with using even more circles within my card design! With the exception of the circles for the card shape, everything else I’ve used is from My Favorite Things stamps! I thought it would be fun to take the Stitched Tripple Peek-a-Boo Window die to cut out the circle windows to fit these adorable pigs in from the Hog Heaven stamp set. I cut out an additional circle for behind the window and sponged some different colors of distress ink behind them. I colored and die cut the images out with the coordinating dies and popped them in various places behind the circle windows as well. I stamped the sentiment and cut it out using some circle dies and this works as a “stopper” for my easel card design. I popped it up with some foam tape. I stamped the flowers from the same stamp set.
And here’s a closer look at the front of my card. I just love how the top piggy is leaning over the circle and window and the bottom piggy is peeking out with a wave from the bottom circle window! I thought he needed a little twine bow tie too! Finished it out with some circle sequins with a little glitter Stickles in each center.
Hope you’ve enjoyed my card today! Please be sure to stop by the challenge blog to see the other wonderful circle creations from the team! See you tomorrow!
challenges:
Allsorts – Use at Least 2 dies (3 circle type dies)