Thank You for Sparkles Monthly

Hello friends and happy weekend to you!  As we inch closer and closer to Thanksgiving at the end of this month, I think this is a perfect time to create a few thank you style cards to use throughout the year!

This brings us to a new monthly challenge over at Sparkles Monthly and we have the theme of “Thank you Card  this month.  I look forward to seeing all of the projects in the gallery for this one.  Here’s what I came up with: 

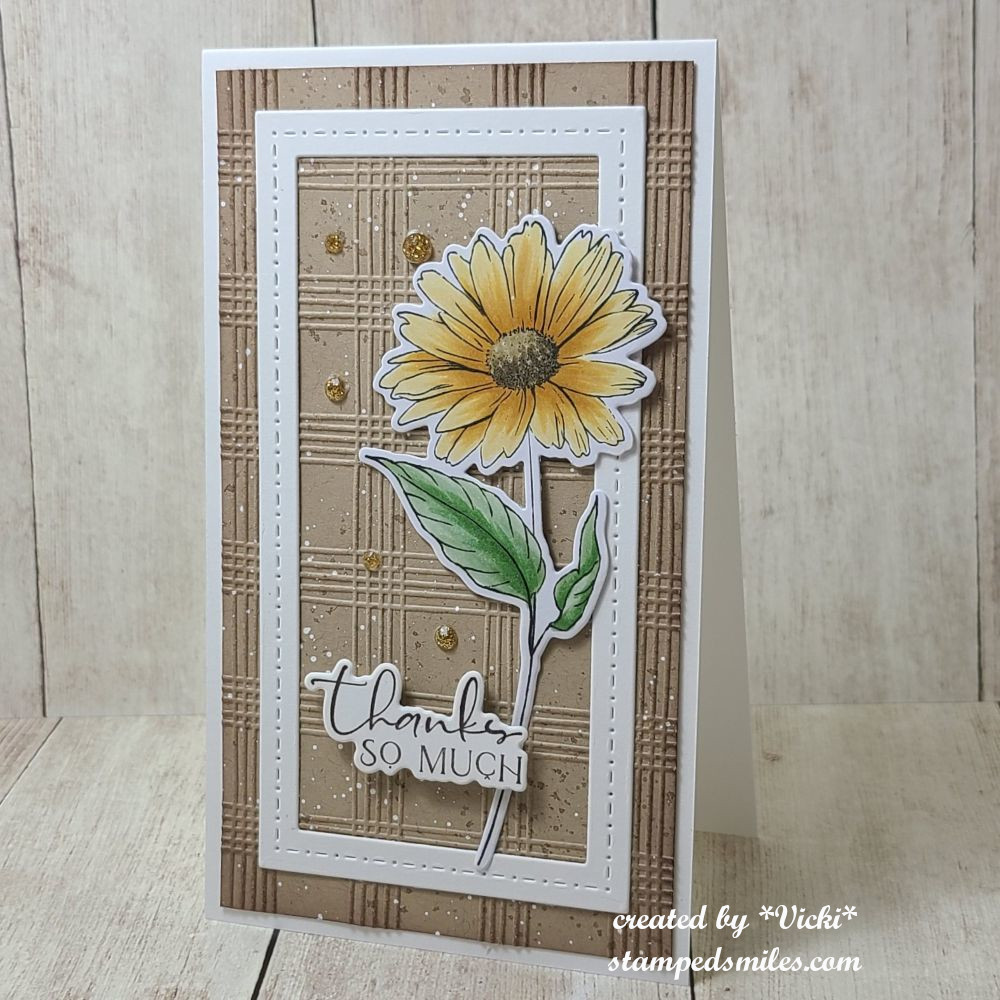
I thought I’d try out a mini slim sized card for this one and the tall larger flower was a great fit for it!  I used the Taylored Expressions Natures Canvas Card kit (no longer available).

For the background panel, I embossed a kraft cardstock piece with the TE Sketched Plaid embossing folder and the went around the edges with the same color ink and then added some brown and white splatters before attaching it to a mini slim top folding card base.  I also die cut a frame from the TE Mini Slim Frame in Frame dies out of white cardstock to place over the embossed layer.

I stamped, hand colored and die cut the flower.  I used one of the greeting panels (from card kit) to gold foil and cut out the coordinating sentiment with it to pop up with foam tape over the flower stem.  It was then finished off with some gold gem/rhinestones.

  • I hope you’ve been inspired by my thank you card and will join in the fun with us this month for the challenge!  **NOTE**  This will be my final project for the Sparkles Monthly Challenge as a design team member.  I have enjoyed my time and wish Caz all of the best for the challenge blog in the coming year as well.  Thank you!

Challenges:

  1. Crafts Galore Encore Anything Goes
  2. 613 Avenue Create – Anything Goes with optional: Thank you
  3. Triple B – Birds, Blooms &/or Butterflies (bloom)
  4. Penny’s Anything Goes using Paper
  5. Crafty Catz Anything Goes/Thanksgiving/Thank you
  6. Pammie’s Inky Pinkies – PIP2545 Anything Goes
  7. Simon Says Stamp Wednesday – Thank you

E is for Embossing

Hello and happy Friday!  Thank you so much for the congrats from my last post about the baby!  I look forward to meeting our new family member soon!  It’s starting to get really warm over my way, so it’s a great time to be indoors with the cool air and craft.

Today starts a new challenge over at the Alphabet Challenge Blog!   Our next letter is E and the hostess has chosen “E” is for Embossing (heat or dry)  *Remember that this is a bi-weekly challenge, so you have two weeks to enter*  I hope you will find some time to play along!  Here’s what I’ve created:

I absolutely love to emboss!  I first fell in love with stamping because of the magic of heat embossing and then fell in love again when those embossing folders came out!  So I’ve decided to do both versions for my card.

I haven’t had a chance to use this Drifting Flowers embossing folder from Simon Says Stamp.  I thought it was so pretty!  I wanted to emboss in black and try out my Lisa Horton Interference Inks with it, so after I embossed it, I used my finger to rub white ink over the raised areas.  I then used the LH Interference Inks over that once it dried.  (I can’t remember exactly what colors I used, but it basically started as an experiment and I had several pads open!)  I also used a silver ink pad to rub the centers of each flower minus the large one.

I should also mention that some of the white ink was very slightly rubbed over the open areas as well because I got a white streak on it…so I just continued to rub all over those areas until blended in.  I didn’t mind the look.

While the inks were drying, I silver heat embossed the sentiment and cut out it with the coordinating die.  I additionally cut out two more for added thickness and attached to the panel.  I layered this embossed panel onto a mirror silver layer with both of these layers getting rounded on two ends with my corner chomper.  I added these onto a chomped top folding A2 black card base.  Lastly, I added some silver sequins.

Please be sure to stop by the challenge blog to see the inspiration from team as well!  I look forward to seeing your embossed projects in the gallery.  Thanks so much for stopping by today and I hope you like my card.  See you soon!

Challenges:

  1. Crafty Calendar – Add a Sentiment
  2. Pammie’s Inky Pinkies – PIP2523 Anything Goes
  3. Simon Says Stamp Wednesday – Fur, Feather and/or Flowers
  4. As You Like It – Favorite: to add a sentiment or not and why?  (I most always have sentiments on my cards because I feel it’s important when sending a greeting card to someone and it’s hard for me to leave it blank.)
  5. The Flower Challenge Embossing (heat/dry)

Christmas Florals for Sparkles Monthly Challenge!

Hello friends!  I hope you’re having a great month so far and looking forward to a great weekend ahead!  I know it’s starting to get “crunch time” with the Holidays quickly approaching us in a few weeks, so it’s time to get those Holiday cards finished up and sent out!  

Today starts the November challenge over at Sparkles Monthly and for this month, our hostess is asking to see Christmas Florals on your project.  Be sure to stop by the blog to see what the rest of the team has created for you.  Here’s my project for this challenge:

When I saw this challenge, I knew what I wanted to pull out to play with right away!  I’ve pulled out the beautiful Taylored Expressions Scattered Holiday Blooms Bundle. I also wanted to use the Scattered Holiday Blooms Foil Panels which I foiled in gold.

After I foiled the panel, I used the coordinating layered stencils to go over it.  I was almost thinking that I might not want to cut the panel out after blending it because I liked it so much, but I wanted to try out the die that cuts each of the blooms out.  I love that the center of the large poinsettias has an extra cut in the center to lift up the edges too.  I ended up layering two of the poinsettias together for each one for even more dimension.  I layered some of the leaves around them and they were popped up over the card with foam tape again.

For the background of the card, I used the TE Sketched Plaid embossing folder over a toffee cardstock.  I took some gold ribbon and wrapped it around the two corners with the top one in a bow.  I then attached this over a white top folding A2 card base.  I used my corner chomper to round the corners of the base and toffee card panel.

Lastly, I die cut the “JOY” letters in white and gold mirror cardstock and attached them by slightly off-setting them before placing on the card front.  I added the holly to the “O” and a few more of the tiny blooms that were cut out from the blended panel to finish off the card.

  • I hope you’ve enjoyed my card today or have been inspired to get those holiday makes going by joining in the challenge with us this month!  I look forward to seeing what you create!  Thanks so much for stopping by and I’ll see you soon!

Challenges:

  1. Creative Friday – #372 Christmas
  2. Crafty Catz – #682 Anything Goes with optional: ribbon/twine
  3. Pammies’ Inky Pinkies – PIP2445 Anything Goes
  4. Krafty Chicks – #742 Christmas
  5. Just Us Girls – #753 Word Week:  JOY
  6. Crafts Galore Encore – #129 Anything Goes
  7. Love to Craft – #83 Anything Goes
  8. Merry Little Christmas – #59 Anything Goes Christmas
  9. Let’s Craft & Create – Anything Goes with optional: use a bow

Butterflies at Sparkles Monthly

Hello friends!  Hope that your week has been a good one for you!  Thank you to everyone for stopping by and taking your time to spend with me as I appreciate your kindness.

Today starts the August challenge over at Sparkles Monthly and for this month, our hostess is asking to see a butterfly or butterflies on your projects.  I love butterflies and look forward viewing the gallery on this one.  Be sure to stop by the blog to see what the rest of the team has created for you.  Here’s my project for this challenge:

I like how this one came together!  I’ve used several butterfly items from Taylored Expressions.  I started with the background by taking the Fluttering Friends Layering Stencil and stencil the colors Sour Gummy, Spearmint & Peaches ‘N’ Cream over a white card base.  Once the stenciling was finished, I used the Fluttering Friends 3D embossing folder over it which also impresses the bodies and antenna on them.  I layered this over a top folding A2 Spearmint card base.  (I also cut out a frame with the same colored cardstock using the Frame in Frame 3 Cutting Plate).

For the butterfly focal, I white heat embossed a butterfly from the Beautiful Butterfly Wings stamp set and cut it out along with the layered wings and body from the Beautiful Butterflies die set.  I layered it onto a piece of vellum cut out with the Petite Scallop Circle Stacklets die.  I also white heat embossed the sentiment from the Mini Strips-Fluttering By stamp set over Sour Gummy cardstock cut from the Mini Strips die.   I used foam strips to pop it up and I also added some rhinestones on the butterfly wings.

I hope you like my inspiration for the challenge and that you’ll take some time this month to create something with butterflies too.  

Thank you for stopping in and have a great day!

Challenges:

  1. Cut It Up – #310 ‘Thinking of You’ + use of die cut
  2. The Divas That Cut…Paper! – Wet/Dry Embossing (I did both)
  3. Crafty Gals Corner – #258 Anything Goes optional: Embossing Folder
  4. Lil’ Patch of Crafty Friends – Anything Goes
  5. Can You Handle the Pressure? – Anything Goes using Embossing Folder optional: wheels
  6. Stencil Fun – Anything Goes using Stencil optional: Summertime
  7. Triple B – Butterflies/Birds/Blooms (I used butterflies)

Hey! Let’s Squash It! I’m Guest Designing!

Hello friends!  I hope you’re having a great week!  I’m stopping in today as a guest design spot winner to share a fun new challenge today over at the Let’s Squash It! Challenge Blog!

I’ve just recently discovered this challenge blog a few months ago and thought it was fantastic because I have so many embossing folders and I know I only use them a fraction of the time creating cards.  I thought that this would give me some inspiration to use them and learn fun new techniques with them to stretch out the use as well!  I had won on a previous challenge so was asked to be a guest designer for them in this month’s challenge!  How exciting!

So, for the challenge this month, they ask that you “use some stenciling over your cards and then use an embossing folder over it“.  So, this had me thinking and I don’t really recall doing this before!  So of course, you start pulling out tons of stencils and then grabbing the embossing folders to see what looks you might achieve with the idea and here’s what I thought of…

I love how it turned out!  I’m so thrilled that the card is pretty much flat first of all.  It has only the card front layer attached to the card base and then the sentiment strip.  Great for mailing a Christmas card!

I took the Taylored Expressions Rectangle Masking Stencils and then also added a Snowflake Masking Stencil (unknown from my stash) so that I could line it up properly over the rectangle area.  I started by ink blending with TE inks in a rainbow color pattern in a diagonal direction. BEFORE removing the stencil, I sprayed it with some Shimmer Spray.  I lifted off the snowflake mask being careful to leave the remaining rectangle stencil in place and then I took the “negative” snowflake from the stencil to cover it up.  I then used some blue tones of TE ink over the rectangle stencil in a straight across direction with the rainbow snowflake being covered up.  Once I was happy with the ink blending, I removed all stencils.

Lastly, I took the entire stenciled panel and ran my Sizzix Winter Snowflakes Textured embossing folder over top of it.  That added bit of an embossing folder really stepped it up!  I also rubbed over top of the impressions with a white ink pad on the colored sections to make it pop a bit more.

I white heat embossed the sentiment from Taylored Expressions Mini Strips Holiday and die cut it out with the TE Mini Strips Asymmetrical Die over a TE Blue Corn cardstock piece which was what the card base is cut from too.  Popped up the strip with foam tape and finished with some silver sequins.

So, I hope you’ve enjoyed my creation today and that you’ll pop on over at the “Let’s Squash It!” Challenge Blog to check out the challenge this month and play along with us too!  Looking forward to seeing what everyone’s comes up with for this one!  Thanks for stopping by today and I’ll see you soon!

Challenges:

  1. Creative Inspirations – Wonderful Winter/Feeling Festive
  2. Crafty Creations – #427 Anything Goes
  3. Crafty Calendar – Anything Goes
  4. Dragonfly Dreams – Christmas/Winter
  5. Pammie’s Inky Pinkies – Anything Goes
  6. Christmas Crafts All Year ‘Round – Letters ‘U’, ‘V’ or ‘W’ for inspiration (I used “W” for winter!)
  7. Merry Little Christmas – Anything Christmas Goes