Cute Card Thursday Has Wings!

Hello friends!  It’s Thursday already which means it’s time for a brand new challenge over at Cute Card Thursday!  This is a really fun one to play with!  This week we’d like to see your “Wings” things!  Can’t wait to see what everyone makes!!

This week we are being sponsored by All Dressed Up Stamps and I have used one of their lovely images for my card today:

Vicki-CCT569-ADUWings

Isn’t she the sweetest little thing?  I have used the Fairy Magic image that was kindly donated from our sponsor and I have colored her up using Copic markers.  I’ve also sponged some light blue ink around the image panel before matting it onto a green sparkly layer cut with a scallop square die.  I also used some craft foam to pop up the image panel over my card for a bit of dimension.

I have just bought these gorgeous Fairy Garden papers from Kaiser Craft and used them on the background panel of my card.  I also used some gorgeous shimmery light green cardstock to go with it!  I’ve taken a thin strip of the glitter cardstock and attached it up against the butterfly papers and then attached some lace over it.  I then mounted this entire panel over a white top folding 5″ x5″ card base.

Vicki-CCT569-ADUWings-close

Here’s a closer view of the coloring and the little sparkly details I’ve added to her.   For the wings, I’ve taken a glitter brush pen over them and then used some metallic colored gel pens to add some dots to her wings as well as the butterfly wings along with some gold dots around her ribbons and the sentiment.

Here you can also see the wood veneer butterfly accent that I’ve added at the top.  I painted it with white gesso and then painted over it with some pretty pearl shimmer paint before attching it to the card.

Vicki-CCT569-ADUWings-flat

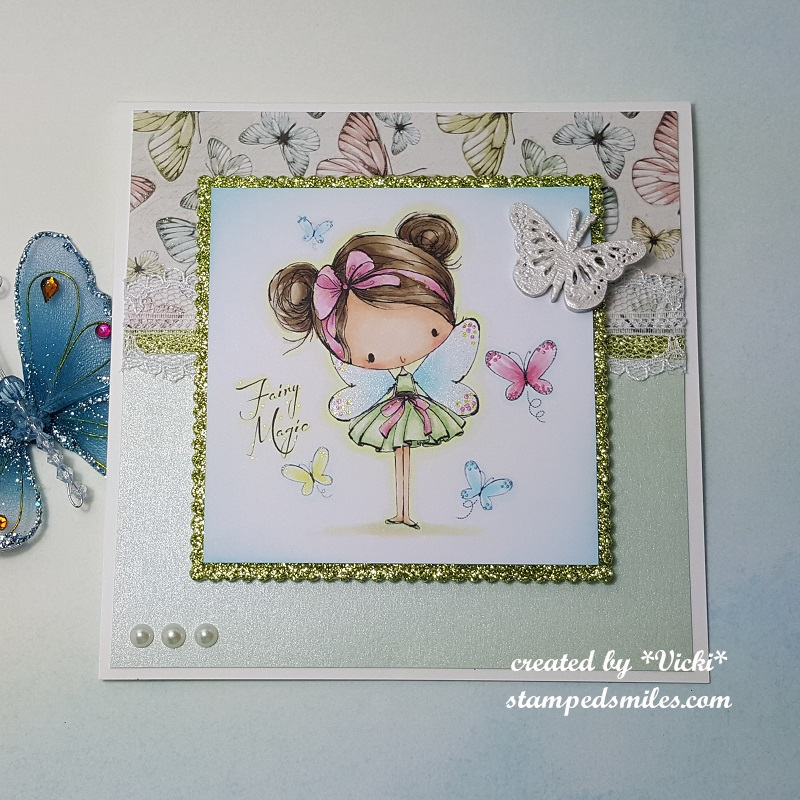
Lastly, I’ve added three pearls at the bottom left corner of the card.  In this photo you can see the pretty shimmer on the light green background cardstock.  It was hard to capture in the photos, but the butterfly papers are sparkle embossed as well.

I hope you’ve enjoyed my creation today and are inspired to come join the challenge with us this week for Cute Card Thursday!  Please be sure to stop by and see the rest of the inspiration from the design team as well!

Thanks so much for dropping in today and I’ll see you again tomorrow as I will announce the winner from my Turner Syndrome Awareness Blog Hop Giveaway!!  Stay tuned!!

Challenges I’d like to enter this card:

  1.  All Dressed Up Challenge – #89 Anything Goes + ADU image
  2. Not Just Cards – Anyhing Goes
  3. Crafty Creations – Anything Goes

Spread Love at Whimsy Stamps

Hello friends!  Hope you all had a wonderful weekend!  Although it’s supposed to be VERY cold in January over my way, it has actually reached warm enough temperatures that we can cook out on the grill! I’ll take it for now as I don’t think it will last!

Have you been over to see the Digital January release at Whimsy Stamps yet?  There are SO MANY really fun and adorable images to color along with a couple of fun digital papers to help you finish up your cards!  Since Valentine’s Day is coming near, I decided to make a card with that in mind:

vicki-spreadlove-ca-jan8

I have used this darling Spread Love digital stamp by Crissy Armstrong.  I just adore her wings and “heart antlers” sprinkling hearts everywhere! 🙂

I have colored her up in Copic markers in the following:  (Click on the underlined numbers to purchase from Whimsy Stamps)

  1.  Dress, shoes and a couple of the hearts – R85, R83, R81 
  2. Heart on dress, heart antlers and other hearts – R24, R22, R21
  3. Wings – R00, BG000
  4. Hair – E27, E25, E23, E21
  5. Skin – E11, E00, E000, R20, R00 (cheeks)
  6. Around image – B000, E0000

I’ve also taken a cloud stencil to add some clouds in the background with an ink blender foam tool and Tumbled Glass Distress Ink.  I then embossed the sentiment from the Whimsy Stamps Snow Flurry clear stamp set with some gold embossing powder.  I went around the edges of the image panel and added a few “dots” around the hearts with the Nuvo Honey Gold Glitter Drops.

For the background of the card, I’ve used the new Hearts a Flutter Digital Papers and cut out a piece with the Whimsy Stamps Hand Stitched Nested Rectangles die.  I then trimmed this piece at an angle and attached it to a strip of this white punched border that I’ve made.  I’ve also cut out a piece of pink cardstock with the same die and trimmed this out an angle as well.  Both of these pieces were attached to an A2 sized white top folding card base.  The image panel was attached over a piece of craft foam and mounted to the front of the card along with the gold ribbon.

vicki-spreadlove-ca-jan8-close

Taking a closer view of this image, you can see on the wings that I’ve added some shimmer to them with a Wink of Stella clear glitter brush pen.  You can also see where I’ve taken a gold gel pen and went over the swirls in her dress as well as the “heart antler stems” on her head.  I always love to add little details like on my coloring and I hope you’ve enjoyed it today as well!

Thanks so much for dropping in and I’ll see you soon!

Here’s the Whimsy Stamp products I’ve used today:

Click on photos below to purchase from Whimsy Stamps.  (To purchase Copic markers, see the numbered link list above.)

spread love color display

hearts a flutter paper cover

Snow_Flurry_display_1024x1024

handstitched_20rectangles_20die_20display_1024x1024

ibt40965_big_large

tumbled_glass_redo_large

757n_packed_1000_rgb_x700_5de9a9e0-879f-4780-b249-850816cfcfbc_large

kuretakewosclear_800x_0fab0d61-5a3e-4885-b433-a6a8b8fc7bee_large

Challenges I’d like to enter this card for:

  1.  Creative Inspirations – Anything Goes
  2. Crafting by Designs – Anything Goes
  3. As You Like It – Anything Goes/Show Your Style
  4. Crafting With an Attitude – Anything Goes
  5. Daisy Chain – Add Some Sparkle

Embossing at Cute Card Thursday

Hello friends!  It’s time for another Cute Card Thursday challenge this week!  We would like to see some “embossing” on your creations this week!  You can make it heat embossed, dry embossed or I would say embossing paste would work too!  Or you could challenge yourself and try to combine more than one kind!  🙂

We are sponsored  this week by All Dressed Up Stamps, so be sure to enter the gallery for your chance to win a prize!!  Here’s what I’ve created for this week’s challenge:

Vicki-CCT560-ADU-embossing

This is such a cute and fun image!    I thought it would make a really fun “New Year’s” type of card, so I created with that in mind.  This image from All Dressed Up is called Season to Sparkle.  I colored her up with Copic markers and then used a gold el pen to color in her crown.  I’ve also taken the Spectrum Noir clear glitter brush pen and colored her dress with it.  The sparkle on her wings are liquid glue and loose glitter.

I’ve cut the image out with a Zig Zag circle die and then layered a piece of gold mirror cardstock cut with a circle behind it.  I attached the circle image panel over a dry embossed black card front panel that I’ve also wrapped some gold ribbon around and attached the bow to the front.

I also heat embossed the sentiment with some gold EP and cut out a banner strip to pop up over the circle image panel.  I cut the tail end to match the card front.  This card front panel was layered onto an A2 sized white top folding card base.

Vicki-CCT560-ADU-embossing-close

Here I wanted to show you a closer look at the image panel and the close up details of the frantage embossing powder over it.  (This is such a fun embossing powder to play with!  You have to heat it up from underneath.)  You can also see the gold embossed sentiment too.  I did take some gold tinsel Stickles and added a few drops around the image for more sparkle.

Vicki-CCT560-ADU-embossing-sec

I hope you’ve enjoyed my card today!  Please be sure to stop by the Cute Card Thursday challenge blog to see the inspiration from the rest of the design team and hope you can play along with us this week!!  Looking forward to see your embossed makes!!

Thanks so much for stopping by and I’ll see you soon!

Challenges I’d like to enter this card for:

  1.  All Dressed Up – Anything Goes + All Dressed Up image
  2. Creative Fingers – Anything Goes
  3. Pammie’s Inky Pinkes – Anything Goes (PIP1849)
  4. Crafting From the Heart – Anything Goes (232)
  5. Little Red Wagon – Black & White + one additional color (GOLD)

Cute Card Thursday is Getting “Too Cute”!

Hello friends!

It’s Thursday and time for a new challenge at Cute Card Thursday!  If you are not challenged by the title of the challenge blog, then let’s get even cuter by making the challenge this week “TOO CUTE“!!  LOL!  We’re looking forward to seeing your cute creations in the gallery!

Our sponsor this week is Kinda Cute and they have kindly donated an image that I have used on my card for you today:

Vicki-CCT540-TooCute

When I saw this image, I thought this was perfect for the challenge theme!  I have used the Fairy and Snail digital stamp from our sponsor.  I printed it out and colored it in with Copic markers.  I have used a white gel pen for certain areas and I have added some Spectrum Noir clear glitter pen over the fairy wings.  I have also used some Nuvo White Blizzard Glitter Drops for some sparkle underneath the snail where it’s wet from his ‘slithering path’.

I have also taken the Lawn Fawn stamp set Stinkin’ Cute (of course) and stamped the sentiment above the image in the top right corner.  I also decided to take the solid heart from the set and stamp a few purple hearts between the characters.  I also took some linen thread to make a tiny bow because I thought the fairy would look CUTE with one on her curly hair!  LOL!

I cut the image panel out with the My Favorite Things Stitched Mini Scallop Rectangle STAX die and then sponged some Tumbled Glass distress ink around the edges of it.  I mounted it onto a piece of black cardstock and then I wanted to add some ribbon to it so I took my slot punch and punched out a hole on each end of the image panel to slip some silk purple ribbon around it.  I tied a bow and added it over top to the right side.  I then found some purple dotted papers and cut out a panel with the Lawn Fawn Large Stitched Rectangle Stackables die to cut it out with.  The purple ribbon was secured onto the back of this piece and then mounted onto a white top folding card base.  Before sticking down the image panel, I put some fun foam on the back for a bit of dimension.

Hope you like my “CUTE” card for today and I hope you’ll stop by the Cute Card Thursday challenge blog to see more CUTE inspiration and join us for the challenge this week!

Thanks so much for dropping by!  See you soon!

Challenges:

  1.  Stamps & Fun = Creativity – Anything Goes
  2. Make My Monday – colored image
  3. Addicted to Stamps & More – Make Your MarkMake Your Mark badge
  4. Crafty Creations – Anything Goes
  5. Crafting by Designs – Anything Goes