P is for Pumpkin(s)

Hello friends!  I hope that your month of November has been a good one for you so far!  It’s getting cooler by the week, but I try to get out to enjoy the warmer days as much as I can before the winter gets here!  

Today is a new challenge over at the Alphabet Challenge Blog!  Our next letter is “P”, and our hostess, Deborah, has chosen “Pumpkin(s)”   I hope you will join in the fun with us!  *Please remember that this is a bi-weekly challenge, so you have two weeks to enter.*  Here’s the project I’ve made for this challenge:

When I saw this challenge, I remembered that I had gotten a stitched pumpkin die set from Lawn Fawn a few years back and haven’t used them yet, so I pulled them out to use for this challenge!  (I had to clip the metal dies apart, so I knew I hadn’t used it yet!)

I decided to cut them out in different colors of cardstock and then ink blended the bottoms of each in a darker shade including the stem on the top pumpkin.  I also took them and splattered some gold, brown and white over all three pumpkins before assembling them in stacking order.

For the card front, I took a stitched white panel and stenciled some leaves (Pink & Main-not in store) in light tan ink.  I made my scene for the pumpkin stack by using some Fall Plaid papers (not in store anymore) by Lawn Fawn for the background and die cutting a hill for the pumpkins to set on.  I placed the plaid paper and ground over a darker brown cardstock layer and popped it up with foam tape over the stenciled leaves card front.  I attached all of these layers onto a white top folding A2 card base.

For the sentiment, I white heat embossed the sentiment (not sure what Lawn Fawn set I used this for it) over dark brown cardstock and cut out a banner to pop up above the pumpkin stack with thin foam squares.  I added a few gold rhinestones for sparkle.

  • Hope you’ve been inspired by my card today and stop on over at the challenge blog to join in the fun with us!  I look forward to seeing what you come up with!

Thanks so much for stopping by and I’ll be back tomorrow with another challenge project!

Challenges:

  1. Four Seasons – Fall
  2. Lil’ Patch of Crafty Friends Anything Goes
  3. A Place to Start – Anything Goes with optional:  Something new (I used a “new to me” stitched pumpkins die set from Lawn Fawn!)
  4. A Cut Above – Anything Goes with a die cut (used several Lawn Fawn dies!)
  5. Addicted to Stamps & More – Die Cuts and/or Stencils (I used both!)

Autumn Leaves & Pumpkins for Sparkles Monthly

Hello friends!  I hope that your October month is going well so far.  We’re starting to get some noticeably cooler temps in the forecast as we creep towards Halloween at the end of the month.  Love this time of year when those leaves start showing their pretty colors as they fall from the trees!  We should be getting that soon as well to clean up the yard! LOL

This brings us to a new monthly challenge over at Sparkles Monthly and we have the theme of “AUTUMN LEAVES & PUMPKINS  this month.  I look forward to seeing all of the projects in the gallery for this one.  Here’s what I came up with: 

I fell in love with this cute scarecrow from Newton’s Nook called Autumn Fields and I knew that I wanted to use it for this challenge.  I colored up the image along with a few pumpkins and cut them out in the coordinating dies.  I was going to add a couple of leaves for the background, but I thought it would be cool to pull out the NN Fabulous Fall Toner Card Fronts and ink blend over it for the background.  So I gold foiled the background and blended some various inks to create the background scene for the scarecrow.

I die cut a grassy hill border from Lawn Fawn and inked the blades with a gold ink pad and layered that onto my foiled leaves background.  I tucked in the scarecrow and pumpkins for grounding and then white heat embossed a sentiment (from the scarecrow set) that was cut out with a banner die (from MFT- closed).  I also used the gold ink pad around that as well.

I cut out the entire layered panel with a cross-stitched rectangle die from Lawn Fawn and then used a scalloped rectangle die from Taylored Expressions cut from white cardstock to layer behind it.  I attached everything to an A2 side folding card base in the Latte color from Taylored Expressions.

  • Hope you’ve enjoyed my card and will hop on over to the challenge blog to check out what the rest of the design team has made for inspiration.

THANKS SO MUCH FOR STOPPING BY TODAY!!

Challenges:

  1. Try it On Tuesday – Autumn Colors
  2. Pammie’s Inky Pinkies – PIP2541 Anything Goes
  3. Four Seasons – Anything Goes Fall
  4. Pearly Sparkles Pumpkins and/or Fall Leaves
  5. Creative Fingers Anything Goes
  6. Stamping Sensations – Autumn/Anything Goes
  7. We Love Stamping – Anything Autumn/Anything Goes
  8. Cupcake Inspirations Fall Harvest
  9. Aud Sentiments Ink Blending and/or Fall/Thanksgiving + sentiment

Mix It Up with a Fancy Fold

Happy September friends!  Can you believe we’re getting ready to get into the Autumn season already?!  It seems like the summer flew by, but I have to say that I’m so very ready for the falling leaves and all things Autumn to start up now…especially cooler temps!

Today also brings us to a new challenge over at the Mix It Up Challenge Blog.    The challenges always run for 6 weeks so there is plenty of time to enter.  The theme given for us this time is: Fancy Folds or you can always do the ‘Anything Goes” too.  Here’s the card that I came up with for the challenge using the theme:

This is a something I came across a while back and saved the tutorial for later to give it a go.  This is called a “Faceted Vertical Easel Card” and this is a 5″x7″ size.  I would give you a link to the tutorial, but when I started creating half-way through to come upon the layers, I noticed the measurements were not quite right, so I had to figure out an adjustment to make it work correctly.  I do love the look of it with its unique faceted design.  It’s basically just an easel style card with a bit of a design in the center fold area and going vertical instead of horizontal.  (If I make another again, I’ve decided another easier way to work it.

Since I was in the mood for the Autumn season, I decided to make my design with that in mind.  I started with a kraft cardstock base measuring 10″x7″ with all of the different scores/cuts for this design as well.  For decorating it, I’ve pulled out some Autumn papers by Photoplay in my stash and added a layer of glitter gold cardstock.  To make square aperture with the pumpkins, I pull a cardboard cutout from the paper pack to use with it, and then white heat embossed a sentiment and die cut to place on the bottom right of card.  Lastly, I’ve added some gold gems to both panels as well as the square panel in the center of the card.

I think what I like most about this is that it folds completely flat for mailing in an envelope.  Once the recipient receives it, you can slide it open to catch the strip on the right side of the card and it will stand up like the first photo in this post.

  • I hope you’ve enjoyed my fancy fold card today and you’ll hop on over to the challenge blog to see what the rest of the team has come up with.  I look forward to seeing the gallery and what fancy folds will be in there!

Thanks so much for stopping in today!  Have a great day!

Challenges:

  1. Creative Creases Anything with a fun fold
  2. Penny’s challenge Anything Goes using paper
  3. Simon Says Stamp Wednesday – Anything Goes
  4. The Four Seasons Challenge – Fall
  5. The Crafter’s Cafe Anything Goes optional:  Use Pattern Papers
  6. The Creative Crafters Anything Goes

J is for JUMP

Happy Friday friends! 🎉 I see that we are nearing the end of August and that it’s time for kids to get back to school, which means, Autumn is heading our way!  I think I’m ready for cooler weather right now!  I just love all things Fall as it’s my favorite time of the year!  What is your favorite season?

Today starts up a new challenge over at the Alphabet Challenge Blog!  Our next letter is “J”, and the hostess has chosen “J is for JUMP (this can be anything that jumps!)   *Please remember that this is a bi-weekly challenge, so you have two weeks to enter.*  I hope you’ll join in the fun with us.  Here’s the project I’ve made for this challenge:

I knew when I saw the theme for this challenge that I had to use a pile of leaves for “jump“!  I also think the best critters for that would come from Lawn Fawn of course!  Can you see the little “wee” mouse jumping out from the pile?!

I started with a white card front by blending some blue inks in the background for the sky.  I also used the Lawn Fawn Leafy Tree Backdrop: Portrait die to go over my ink blended sky background.  The frame and tree were cut out from dark brown woodgrain texture cardstock.  I used some green cardstock to cut the circle from the die set to place behind the tree as well as the LF Grassy Hillside Border die behind the tree and frame as well.

For the Autumn leaves pile and sentiment, I used the LF Jump for Joy stamp set/dies.  All images were colored with Copics and I white heat embossed the sentiment over the ink blended sky.  For the mice critters, I used the LF You Autumn Know stamp set/dies.  For the little bunny, I used the LF Butterfly Kisses stamp set/dies.  Some of the die cut images were just attached and others were popped up with foam tape for dimension.  I actually wanted my pile of leaves to be larger, so I stamped, colored and die cut two of them.  (I needed that little mouse on the right to be jumping out from the pile too!)

This was a fun one to make because I kept pulling out different sets to figure out which critters I wanted to use, but these cute mice get me every time.  It makes me look forward to seeing the colors, sights, smells and sounds of Autumn coming.  I hope you’ve enjoyed it too and I look forward to seeing all of the “jumping” that will appear in the gallery!

Thanks so much for stopping in today!  Have a great weekend!

Challenges:

  1. Ally’s Angels Anything Goes
  2. The Creative Crafters Anything Goes
  3. Sweet Stampin’ – Animals
  4. Lil’ Patch of Crafty Friends Anything Goes
  5. Pammie’s Inky Pinkies – PIP2533 Anything Goes
  6. Creative Inspirations – Anything Goes
  7. Craft Rocket Animals

Thankful for Fall, Pumpkins and Coffee!

Hey friends!  Just poppin’ in with another card I made and wanted to get it in before the deadline ends…which I normally don’t always do!😁

I have been playing along (with the exception of the last few years) with the Coffee Loving Papercrafters “Coffee Lovers Blog Hop” which has been going on since 2014!  It’s hard to believe it’s been around that long, but looking back at the posts that were shared recently for “a look back”, I had a different blog platform and there I was playing along 10 years ago!  Really appreciate all of the fun that Amy has provided to us through the years as well as the many sponsors that have been apart of it.

I’ve pulled out some stamp sets from one of the sponsors (Newton’s Nook) new and older from my stash in honor of this occasion:

That is the cutest cup of Pumpkin Spice Latte that I’ve ever seen!  I’ve used the NN Newton’s Mug stamp set with coordinating die to stamp, color and cut him out.  He was popped up with foam tape over the background.  For the pumpkin image on top of the mug, I’ve used an older NN stamp set called “Love a La Carte” (No longer available).  I just stamped, colored and fussy cut the image to place over the mug.  I also added some gold glitter on the heart above it.

For the background:  I cut a piece of paper with the NN Frameworks die set and pulled out some watercolors for the background and then splattered some gold after the background was dry.  I layered this over the brown cardstock.  I also used a piece of that brown cardstock to white heat emboss the sentiment which came from an older STAMPtember collaboration set with NN called “Talk Turkey“.  I cut it out with a banner die and attached it to the side of the scallop panel.  The leaves under the mug and over the watercolor panel were from the NN Autumn Mice stamp set and coordinating dies.  

I was trying to also follow along with a fun sketch from the Inky Paws Challenge (see below) and so I’ve pulled out some more papers from the NN Coffee House Stories paper pad that I thought went with the coloring on my cup and attached it to an A2 top folding brown card base.  I also added a strip of gold glitter paper to bring out the touch of glitter on the tiny heart above the pumpkin.

  • That’s it for today!  I hope you’ve enjoyed my coffee card or have been inspired to create something fun too!  I’m off to check out all the other entries for more inspiration!  Have a wonderful weekend ahead!

Challenges:

  1. Coffee Loving Papercrafters – #fallwinter2024clh 2024 Fall/Winter Coffee Lovers Hop using coffee, tea, cocoa, and/or apple cider
  2. Inky Paws Challenge – #234 sketch
  3. Double Trouble – #179 Lotsa Layers
  4. Inspiration Station – #67 inspirational photo (the coffee, leaves and pumpkin inspired me)
  5. Crafty Animals Anything Goes + animal
  6. Critter Crazy Anything Goes with a Featured Critter
  7. Inkspirational – #328 Layer It (layered leaves and panels)
  8. Shopping Our Stash – #534 Time for a Hot Drink

GDT for Creative Artiste Mixed Media Nov Challenge – Autumn Teapot

**THERE WILL BE TWO POSTS FROM ME TODAY.  THIS IS THE FIRST POST OF TWO**

Hello friends and happy November!  The weather has finally decided to give us a bit of a cool down and it feels more like that Autumn Season right now.  We’ve been waiting on some rain as it’s been dry and then the wind blew in some cool with it too!  I always like to give Autumn it’s “due justice” as it never seems to have a spotlight as much I think it should.

I’m very excited to share a mixed media project I made for a guest design spot (that I had won a top spot from a previous challenge).  I was asked to join this month as a guest designer for the Creative Artiste Mixed Media Challenge Blog!

The theme for these monthly challenges is always “Anything Goes Mixed Media“.  So be sure to check out the wonderful inspiration from the team and share your mixed media project over there!  I look forward to seeing your inspiring makes!

I’m always excited when I have an “excuse or reason” to get out all of my mixed media things and play around to make something!  I thought since it was November, it would be a great time to pull out the Autumn media:

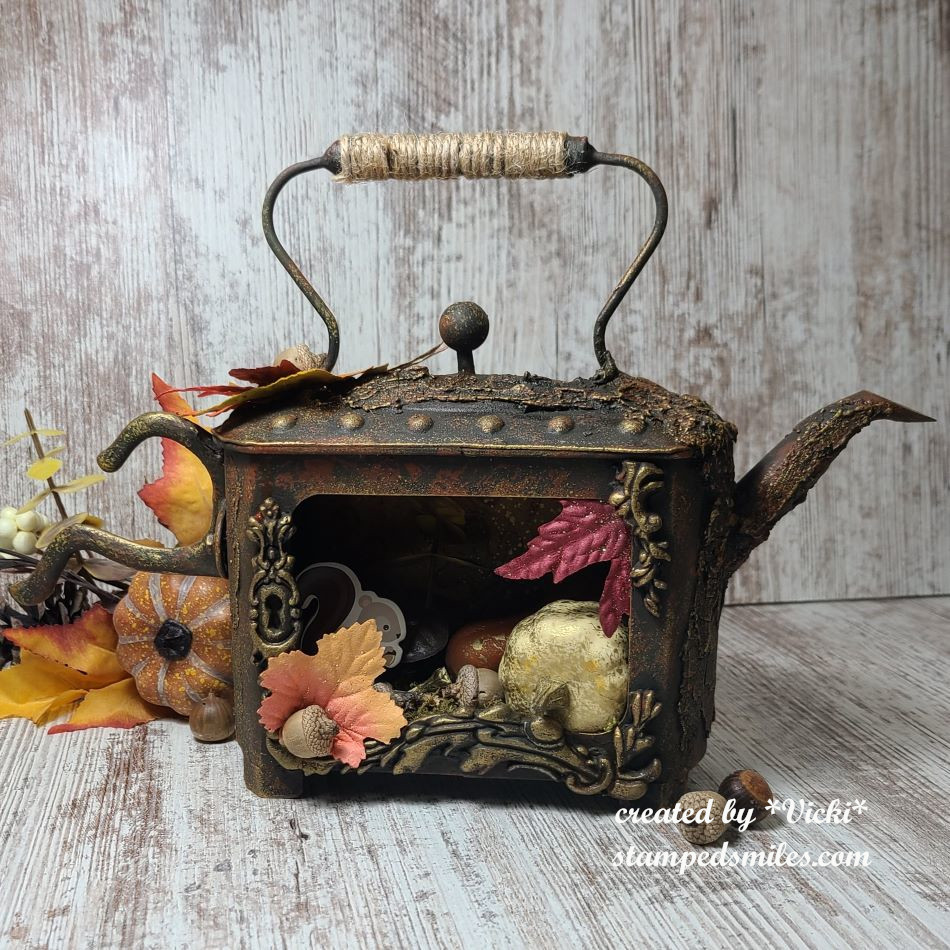
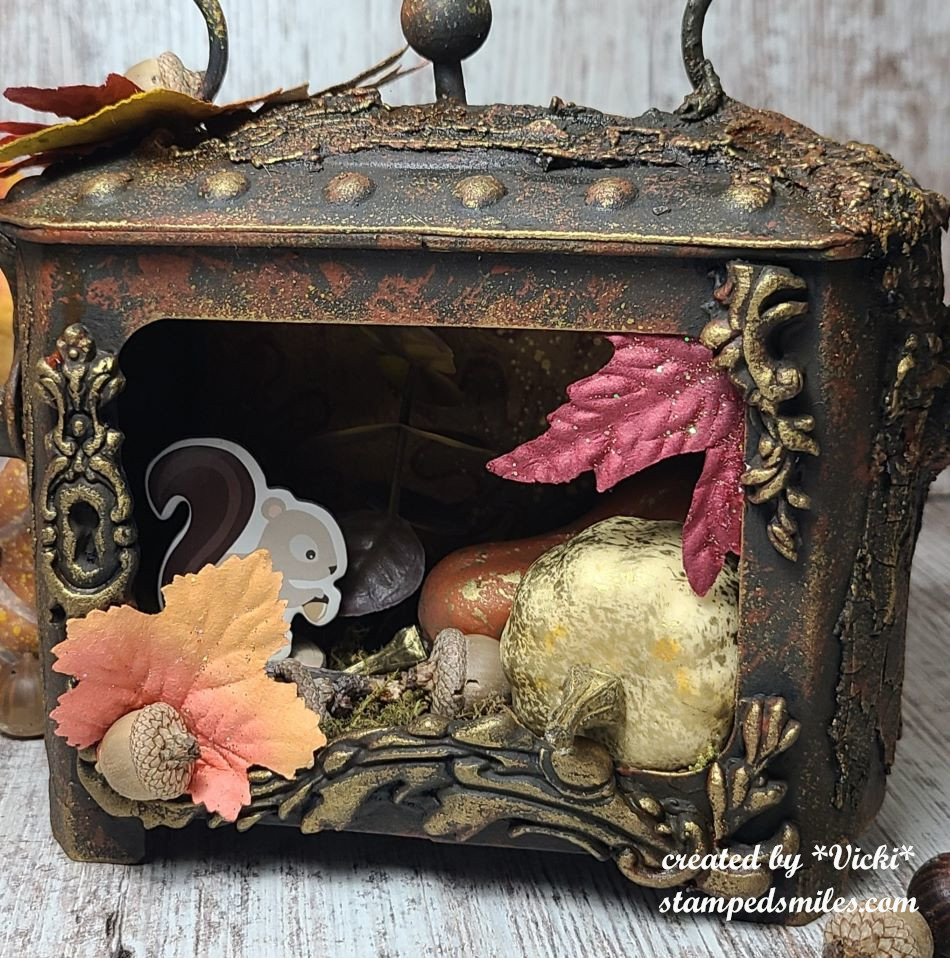
I made this fun center/accent piece for Autumn and pulled out the cool Finnebair rusty metal teapot from my shelf to finally decorate on!  It actually looks pretty cool by itself, but I had to add some other details to it that I thought would make it my own.

For the base:  The only thing that was missing for me was a “handle” for my teapot and I went through my husbands things and found an old metal coat hook that I had him screw onto the side.  I also had some extra pieces laying around from the molds I made with resin, so I attached those along the frame opening with 3D matte gel.  I wanted to also add some texture to my teapot and that’s where I added some crackle paste in various areas…all of these things had to dry for quite some time.  It didn’t look pretty at that point as those pieces were white. LOL  The “hurry up and wait” had begun.

After the long drying time:    I started by covering the entire thing with two layers of black gesso so that all of those white areas were completely covered up.  I pulled out some acrylic paints in Raw Umber, Burnt Orange and very light touch of Marigold.  I started with the darkest color first and did not use a brush to apply the layers.  Instead, I used a sponge after each layer was dry.  I very lightly and sparingly used the yellow.  I even went back in with the Burnt Orange and Raw Umber to get the look I was wanting.

After all of the painting, I used more of the 3D matte gel and wrapped some jute/rope around the top handle.

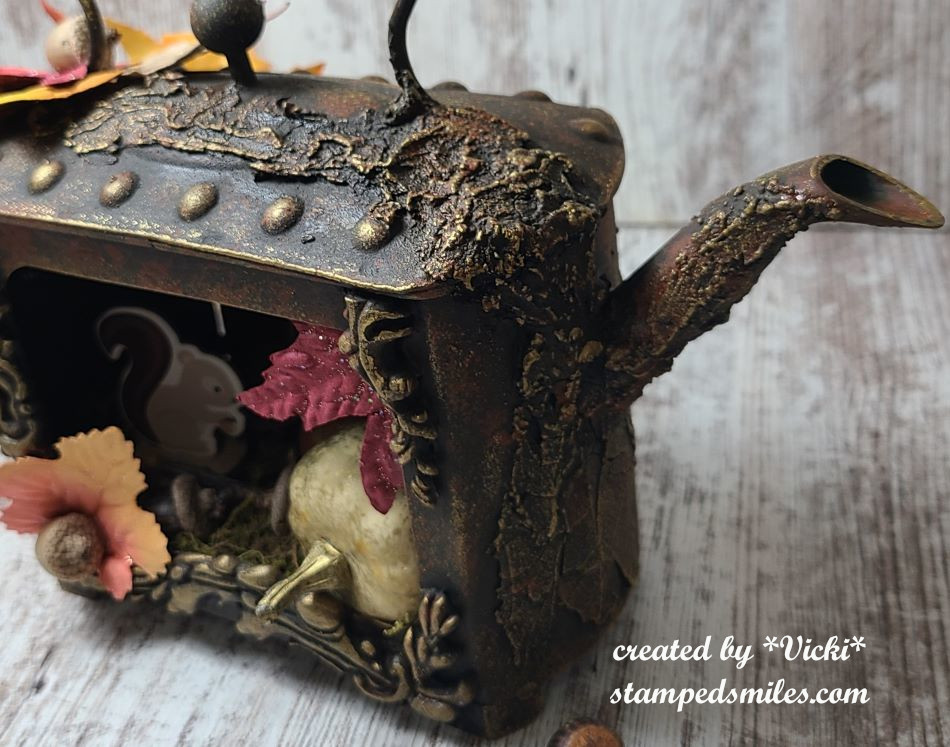
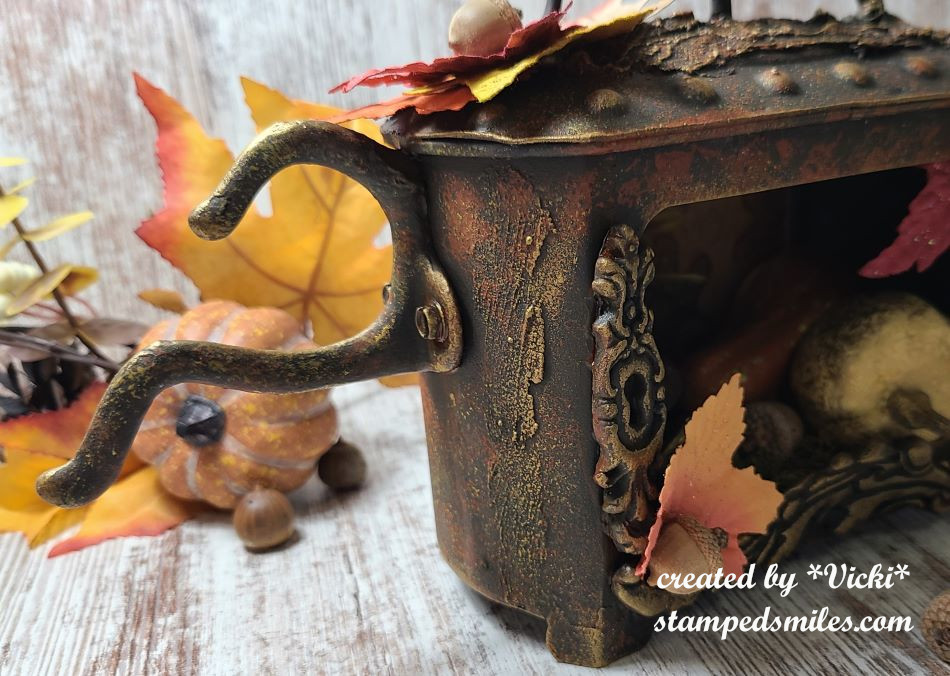
Going to the right side of the teapot, you can see where I’ve added all of that crackle paste and the painting that I’ve done over it.  The only thing missing at this point was the “highlights” to make it look like a found rusty metal teapot.  Since it was Autumn themed, I pulled out the Finnebair Vintage Gold Wax and rubbed over the raised areas with my finger.  You can see the look it gives over the paste and decorative molds around the frame and even the raised “dots” along the top of the teapot.

Moving over to the left side of the teapot, you can see where I’ve screwed in the metal hook to the side of the teapot.  I just incorporated the silver screws with the design by adding paint.  I told my husband that I thought it looked cool to turn the coat hook up-side-down as it looked more like a handle.

And now if we take a closer look to the inside of the teapot frame, you will see an Autumn scene in there.  The back of the teapot comes out so you can decorate how you’d like.  I know it’s a bit hard to see in the photo, but I found some leafy background paper to attach over the metal backing and I also splattered some gold paint over it.

For the bottom of the teapot, I attached some woodland moss mixture with 3D matte gel and also used it to attach the gold splattered gourds, eucalyptus, a wood slice, a cardboard squirrel, sticks and some acorns.  I also went around the outside areas to attach some Fall leaves and more acorns.  The only thing I didn’t have in my stash were the acorns and sticks.  My husband said that he could get them for free…and of course he went to our local park and picked them up! LOL  So those are the only “real” things on my teapot.

I had thought about maybe adding some fairy lights inside at the top so the inside would be more visible, but not sure if I would like that or not…what do you think?

And in case you might want to know, the measurement of the teapot are 12″ across (including the added metal coat hook), 8″ tall and about 3.5″ in depth.  I currently have it sitting in my cabinet at home.

I hope you’ve enjoyed my mixed media teapot!  I would love to see your mixed media project as well if you play along with us this month at the Creative Artiste Challenge Blog!

Thanks so much for stopping in!  Stay tuned as I will have another post coming up in a couple of hours!

Challenges: (if this project doesn’t fit with your challenge, just delete.)

  1. Ally’s Angels Anything Goes
  2. 613 Avenue Create – October Anything Goes with optional: lots of leaves (Fall/Spring)
  3. Dragonfly Dreams – October Anything but a Card
  4. Krafty Chicks – #740 Anything Goes
  5. Classic Design – #10-2024 Anything Goes with optional twist:  Anything but a card
  6. The Creative Crafters – #81 Anything Goes

Mushrooms at Sparkles Monthly!

Hello friends!  I hope that your October has been a good for you!  We have just started seeing some cooler weather and even a bit of frost coming tomorrow night!  I also wanted to say thank you for your comments about my last post.  After having such a break, getting my crafting back on has been touchy.  I’m trying to get organized!😁

Today starts the October challenge over at Sparkles Monthly and for this month, our hostess is asking to see a mushroom(s) on your project.  Be sure to stop by the blog to see what the rest of the team has created for you.  Here’s my project for this challenge:

I really like how this one turned out!  I was trying to keep it in an Autumn feel with using these colors and adding leaves.  Everything I’ve used came from Lawn Fawn.

I started by cutting out the background panel, the leaves and the mushrooms in different colors of cardstock.  I sponged over the each of the pieces for dimension and shading and then splattered over top of them with brown and white paint.

I just attached all of the layers together that I thought was pleasing to my eye and then I white heat embossed the sentiment over the brown cardstock and cut out the banner and popped it up over the leaves with foam tape.  Lastly, I just added a few white gems for sparkle.

I hope you like my card today and has inspired you in some way to play along with us for the challenge this month!  I would to see your mushroom creations in the gallery!  I appreciate you stopping today!

Challenges:

  1. Penny’s Paper-Crafty – #582 Anything Goes Using Paper
  2. Just Us Girls – #748 Leaves
  3. Creative Friday – #370 Faux Stitching (in die cut background)
  4. Crafty Catz – #680 Anything Goes optional: Autumn Colors
  5. Pammie’s Inky Pinkies – PIP2441 Anything Goes
  6. Four Seasons – Anything Goes Fall
  7. Crafts Galore Encore Anything Goes
  8. The Paper Funday – #70 Anything Goes optional: Autumn


September Art Journal-Fall Texture

YAY!  I’m back…but a tad bit late for my monthly AJ post!  (So sorry about that Carol!!)  I’m trying to get back into crafting again as it feels like I’ve been away from it for a long time!  It was a fun, crazy, beautiful time away and there a few photos below this post if you care to see….

BUT FIRST, TODAY (BETTER LATE THAN NEVER)….is the monthly Art Journal Page collaboration with my crafty friend, Carol (from Crafty-Stamper)! We get creative trying to use up our never-ending stash piles along with a prompt for each month.  I know she always has great inspiration to share, so please check out her blog too! Here’s my AJ page with the “SMASH OUR STASH” September prompt of “TEXTURE” (anything to create texture): 

Texture is something that I really enjoy using, but sometimes when you’re making cards, you don’t always want that texture or bulk adding to your design because you want to be able to slide it into an envelope to mail out.  Doing an art journal page with lots of texture and bulk is something I can do because it’s my own piece of art to keep and it’s fun to play with lots of media from my stash to create it!

For the background:  I started with my usual 5.5″ x 8.5″ heavy weight watercolor panel with pre-punched holes at the top using my Bind-It-All machine.  Starting with some media paste and my “go to” dotted stencil, this was a quick way to add texture to the background.  I then pulled out some watercolor in blue tones and covered over the background with it and sprinkled some sea salt over it, let it dry completely and then brushed it off.  This leaves some cool effects to the watercolor and it creates some texture as well!

Moving down the page, I have die cut lots of pumpkins and leaves!  These are all die cut sets from Taylored Expressions that I’ve had in my stash for a few years now.  All the pumpkins were cut from orange cardstock.  For the largest pumpkin, I’ve used my Copic markers to give it some dimension/texture.  The other pumpkins had another piece that I cut from a darker orange cardstock.  The stems all cut from green cardstock.  I decided to splatter some brown, gold and white paints all over them for even more texture.  Before attaching the pumpkins, I used some printed tissue paper that was sprayed with color and scrunched up and attached to the bottom of the page with media paste.  Lots of texture going on at the bottom here!

For the leaves, I die cut them out from kraft cardstock and ink blended over them in various fall colors.  You will notice around the edges of the leaves as well as the textured paste background on the page, that I’ve used some gold wax and rubbed around the edges and over the texture.  I then arranged all of the leaves and pumpkins at the bottom of the page with some popped up with foam tape.  I’ve also taken some green wire and curled it to use for a couple of the pumpkins that were attached to the back of them.

Lastly, I’ve added the sentiments that were die cut, gold foiled and attached at the top along with the thin strip of orange cardstock.  The “FALL” letters were popped up with foam tape as well as a portion of the leaf on the side of it.

  • Really hope you’ve enjoyed my art journal page today!  It was fun getting messy and playing around with crafting again!  I really missed doing it!

Here are just a couple of photos to share on our time away.  We started by flying to Seattle as we’ve never been and visited the Space Needle.  We took a bus to Canada where we boarded a Cruise ship that took us into Alaska to see the glaciers!  We sailed for a week, but went further up to Denali Park in Alaska where we stayed an additional week and made our way back home.  This was certainly a once in a lifetime experience that we’ll never forget!  The photos look nowhere close to how gorgeous it was to see in person. 

While we were traveling on our way back home, it seems that one of our pieces of luggage decided to take a trip to Mexico!  So once we figured all that out, got our luggage back and tons of laundry, cleaning, groceries to get, done….I had an appointment to get an impacted tooth removed the other day!  Been feeling a little overwhelmed, but starting to get better!  

THANK YOU SO MUCH FOR YOUR KIND SUPPORT, COMMENTS AND COMING TO VISIT ME HERE!  I’VE MISSED CRAFTING AND CATCHING UP WITH ALL OF YOU!  HOPE YOU ENJOY YOUR WEEKEND AND SEE YOU SOON!!

Challenges:

Art Journal Journey – Anything Goes

September AJ Page-Thankful Imprint

Hello friends!  Can you believe we’re already through September?!  Today is a scheduled post from me as I’m away in an area with spotty to no connection right now, but wanted to be sure that I had my Art Journal Page posted for this month.

It’s also hard to believe that this is the 9th page done for this year!  I’m so glad I’ve done the monthly Art Journal Page collaboration with my crafty friend, Carol (from Crafty-Stamper)! We get creative trying to use up our never-ending stash piles along with a prompt for each month.  I know she always has great inspiration to share, so please check out her blog too! Here’s my AJ page with the “SMASH OUR STASH” September prompt of “IMPRINT” (using gel plate, print machine, leaves or something to create an impression):

Really had a fun time with this as I hadn’t gotten a chance to play around with my gel plate very much and I received about 15 different prints in one sitting!  It started out like I didn’t have a clue, but the more I kept experimenting, the more fun and unique prints came out.  Do you have a gel plate and/or do you use it often? (If you’re new to Gel Printing, here’s a link to a You Tube video showing you basics on how to get started The Basics of Gel Printing)  

For my print here, I decided to try something from nature and found a couple of maple leaves in my yard that were laying on the ground starting to turn.  I think there are about 3 layers of prints on this one…hard to remember when you just keep going!  I cut it out to fit the size of my AJ page.

FOR THE BACKGROUND – I started with my usual 6″ x 9″ Canson 140# cold pressed watercolor paper with pre-punched holes at the top and covered it with DecoArt media fluid acrylic Primary Cyan applied with a baby wipe.  Really love the blue background it gave here.  Then this is when I applied the gel print piece to my background.  I then used some orange, black and white colored acrylic paints to create some splatters over the background and gel print piece.

I die cut some maple looking leaves from the Taylored Expressions Garden Variety-Fall die set and ink blended them.  I also splattered some orange paint over them as well.  I had some gold glitter sheets that I cut down in a couple of thin strips to add to the top and bottom of my gel print piece.  I then attached the die cut maple leaves.  

I cut out the word “Thankful” from Impression Obsession three times in Pumpkin cardstock and layered them together for my page.  I also grabbed this sentiment from the Tim Holtz small talk stickers and layered it over the same Pumpkin cardstock and attached it next to the “Thankful” word on the page.

I thought about adding something more, but I then thought it would distract from the printing which already has a “busy” look to it and so I called this one done.

  • I’m very THANKFUL that you’ve taken the time to stop by and your kind support!  It’s always more fun to craft with like-minded friends!  I’m also THANKFUL to my crafty friend Carol for sharing this monthly AJ fun with me as well!  (I will stop by to see your page as soon as I can my friend!)

Have a great day and see you in October! 😊

TO LEAVE A COMMENT:

  1. Start typing in the comment box below each post you’d like to comment on and leave whatever message you’d like. 
  2. Once you start typing within the box, you will see 3 buttons show up with the options: “W” for WordPress icon, “F” Facebook icon and an “envelope” icon.  Choose one of these buttons in which to “login” or enter your name/email because this blog doesn’t allow anonymous comments.
  3. If you’re a Gravatar.com user, then you can click on the “W” button to sign in which will automatically show your profile photo and a “gear” button next to it.  If you already see your profile photo showing up, then all you need to do is leave your comment and hit the highlighted reply button.
  4. If you’d like to just enter your name and email (email address is not published), then click on the “envelope” icon.  Once you’ve done that, the “reply” button should be highlighted so that you can leave a reply.  Hopefully, once you’ve left your comment, it will “remember” who you are the next time you visit, and you won’t have to keep entering your information. **If you’re already logged into WordPress, this option WILL NOT work.  If you see your Gravatar profile with a gear next to it, you are ready to leave a comment.

*****If you are NOT seeing your comment appear immediately after you’ve left your comment and hit the reply button, I may have to “approve” your comment.  But once I’ve approved you, you shouldn’t have to be approved again unless you’re leaving several links within your comment.

I hope this helps!  Sorry if you’re having a problem leaving a comment and I really appreciate you taking the time to support your kindness with me!  BIGGEST HUGS

Apple Picking Fun

Autumn is always a favorite time of the year with the changing of the Season: cooler temps, pretty colors and being able to go out enjoy all of nature with its bounty and beauty.  There’s also nothing better than freshly picked apples from the orchid too!  It’s something that I love to do with my husband every year at our local orchid.  

So, when Lawn Fawn came out with this adorable set along with a free craft-a-long class, I knew I wanted to participate!

This is the first card we created using the LF Apple-solutely Awesome stamp set and dies.  For the class, we actually stamped, colored and cut out all of the images that we would be using for both of these cards.  I think the fun thing about this set is arranging the images to figure out where you want to place them for your scene.  Since it was a class and I didn’t have to think too much, I decided to just follow along with what I had and just enjoy the process.

I didn’t have the stencil set that they used for the class, so I had this Pink & Main Leafy Stencil that I thought would work out fine and I just blended different colors with some Oxide inks.  The white panel was cut with the LF Small Stitched Rectangle dies, popped up over the stenciled leaf panel and the sentiment was stamped at the bottom before attaching the images.

  • I’ve already sent this card to someone that gifted us some homemade applesauce…YUM!  (Already gone!)

And here’s the second card we created for the class using the same stamp set and stitched rectangle dies.  I had fun with that “cider jug” and adding a bit of sparkle to the contents inside with my glitter brush pen.

For the sentiment, I die cut it out with some LF Woodgrain Cardstock and ink blended some brown Oxide ink at the bottom of the die cut.  I used some foam strips to pop it up over the panel.  The white panel was done the same as the above card.  I used the same stencil as the above card as well but only kept the yellow tones for this one as it seemed too busy with all that was going on with the card.

So, although this was a class that I mainly followed along with except for a few minor changes, I had fun making these while getting into the Fall spirit!  I hope you’ve enjoyed them as well!  Thanks for stopping in!

Challenges:

  1. Four Seasons – Anything Goes Fall
  2. Crafty Friends – Use More Than One Die
  3. Happy Little Stampers Stencils – Anything Goes + stencil
  4. Stamping Sensations – All Things Autumn
  5. We Love Stamping – Autumn Colors
  6. Addicted to Stamps & More – Die Cuts & Stencils