Tricorn Fold Cuteness

Hello friends!  I hope that you’re having a wonderful week so far!  We have officially started Spring over my way and now I’m just waiting for the weather to warm up to match it.  I’m looking forward to being outside with the flowers!

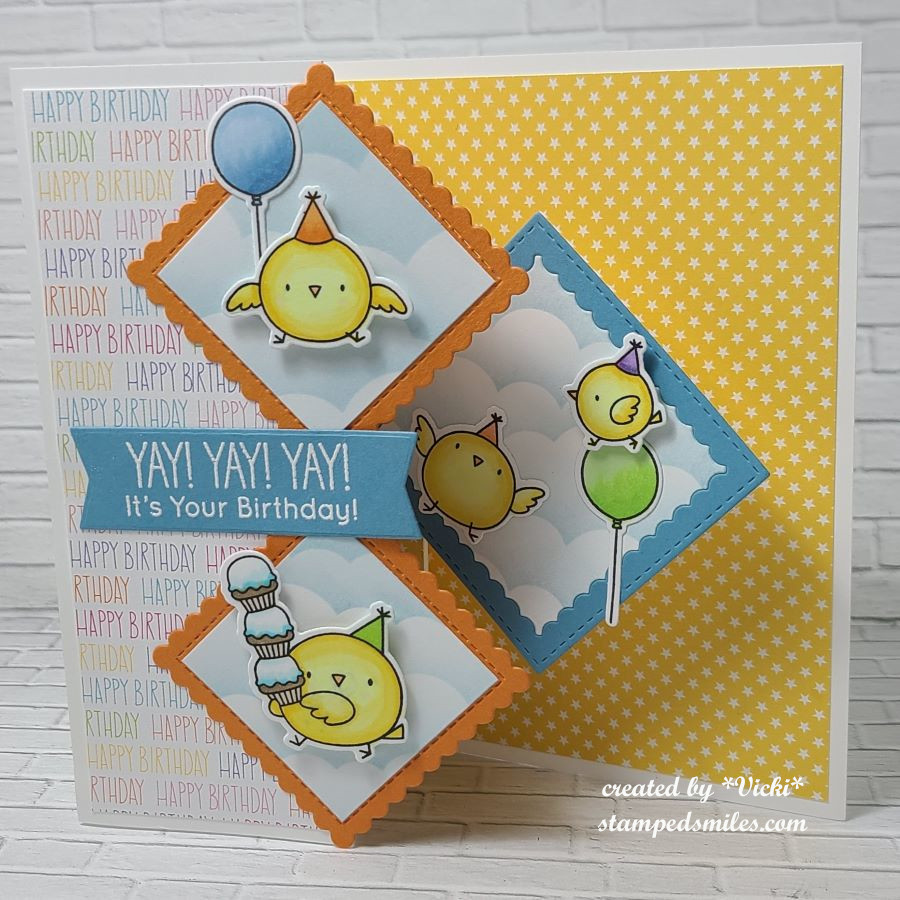
Speaking of flowers, I saw this really cute image over at Beccy’s Place and wanted to play along, so I printed it out and colored it, but didn’t quite know what I wanted to do with it until I saw Beccy’s tutorial – Tricorn Fold Card: (click name for her tutorial)

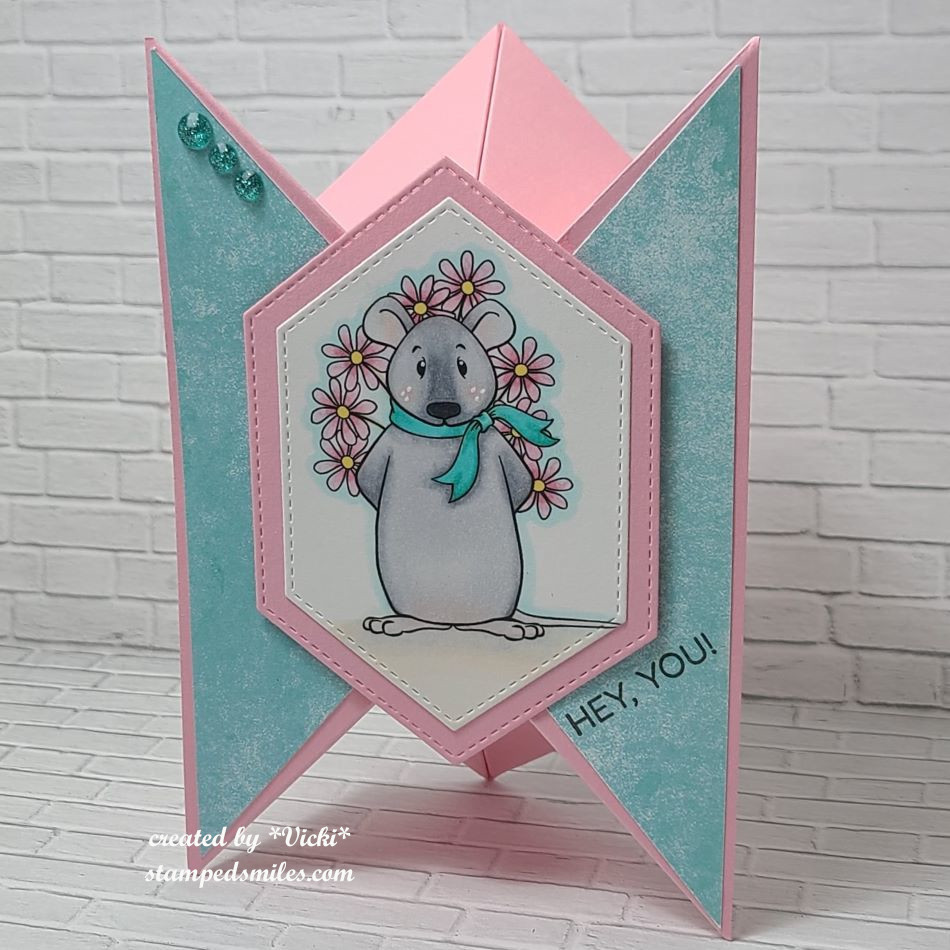
Isn’t this so fun!?  I thought it was such a unique design that stands up, but also folds flat for a 4×6 card size.  I usually make an A2 (5.5″x4.25″) card size, but I can also easily create my own envelope for any size too.  It was a bit tricky at first and I messed it up because I put the scores going in the opposite direction, so I had to start over.  I wasn’t confident enough to figure out the mat layers of all the angles, so I just added some pattern papers to the largest two panels and then placed blank white on the back of the card for a message.

I also found a stitched hexagon layering die in my stash that worked out for the design which is what I used to cut out my colored mouse and layer behind him.  I found a sentiment that worked well for the space I had on my card and then finished it with a couple of teal rhinestones I had laying on my table.  It was fun to create, and it will also be great to send out too!

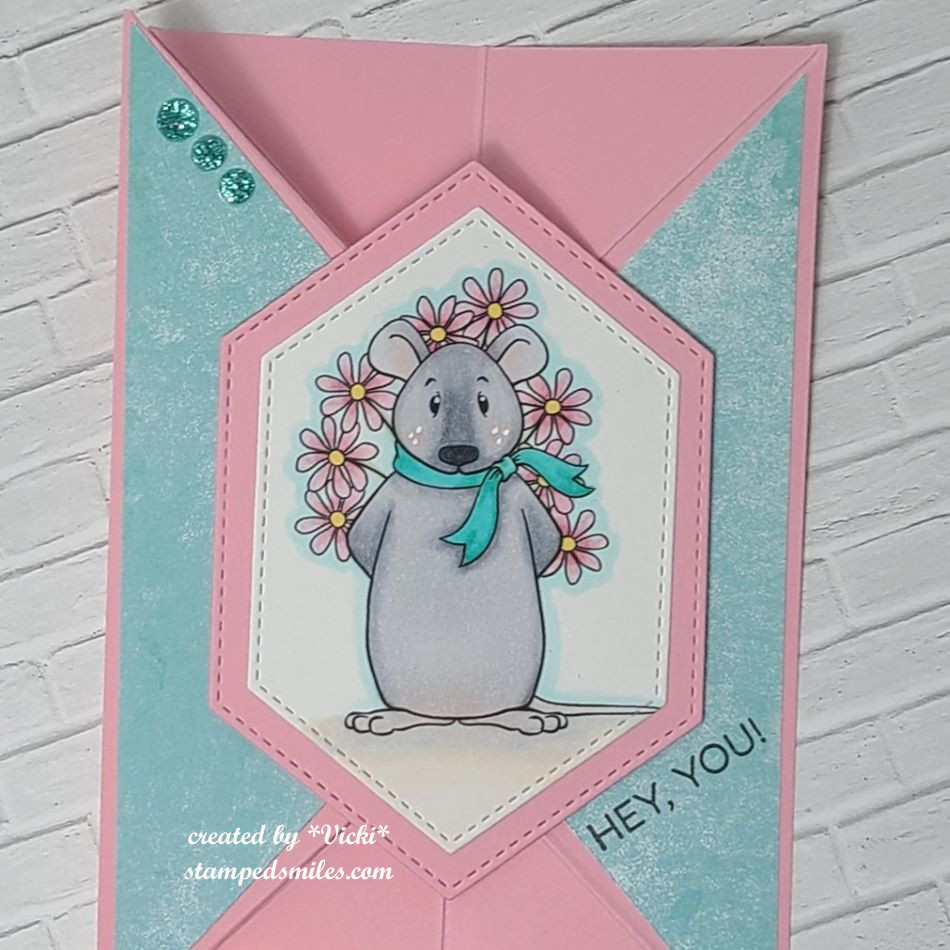
Here’s a closer view of the colored image that I’ve done using Copic markers.  I did add a few white dots to his cheeks with a white gel pen as well as the center of his eyes.

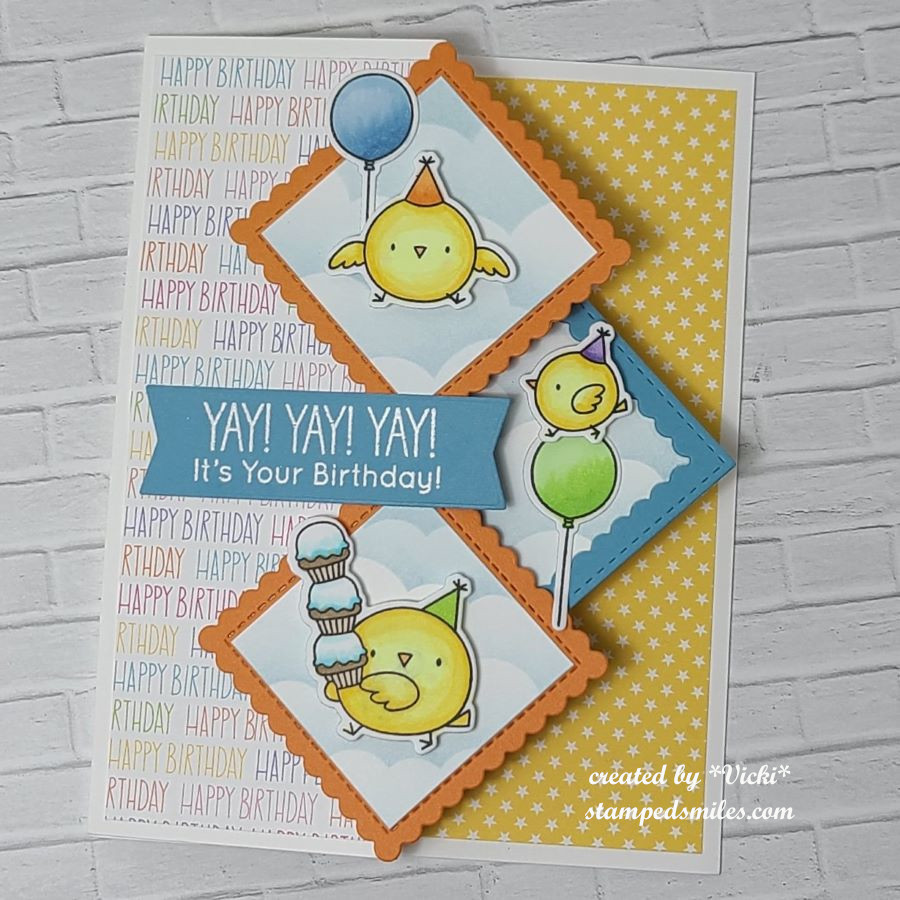
I have my card lying flat so you can see that it will fit inside an envelope for mailing.  It does spring back up, but I think that’s what will be great for a recipient to pull out of the envelope to see that the card stands up by itself.

Thanks for dropping in today and I hope you’ve enjoyed my card!

Challenges:

  1. Beccy’s Place – March Monthly Challenge optional Bingo (Not sure if the flowers in the image qualify, but if it does then I used the center across row)
  2. Crafty Catz – Anything Goes #667
  3. Crafty Animals – Anything Goes + animal #81
  4. Critter Crazy – Anything Goes featuring animal #84
  5. Creative Creases – Anything Goes with Fun Fold #78
  6. Creative Inspirations – Anything Goes
  7. The Crafty Addicts – Anything Goes
  8. Lil’ Patch of Crafty Friends – Anything Goes #226
  9. Crafty Calendar – More Than One Fold

Mix it Up With a Fun Fold

Hello friends!  Happy March!  I’m happy to see this month come as signs of Spring start popping out everywhere!  Pretty soon the flowers will start coming up too!  Are you ready for Spring?

Today starts a new challenge over at the Mix It Up Challenge Blog!  There is always lots of wonderful inspiration from the team, so please go check it out and play along!  The challenges are always ANYTHING GOES with an optional themeThis month’s theme is FANCY FOLD!  For these challenges, you have plenty of time to enter as they run for 6 weeks!  I look forward to seeing what you come up with!   Here’s the project I made:

These birds are ready to party!  How fun are those party hats?!  I’ve found this really cool take on a “Z” fold card, but this one has been named “Diamond Z Fold Pop-Up Card“.  There are so many variations of this that I found on You Tube, but they’re all the same concept of the two diamond shapes on front and then an additional diamond pop-up mechanism on the inside that moves when you open the card.  (Click on the card name for a tutorial.)  The only thing I did differently than hers was using scallop square die cuts and I covered the pop-up mechanism on the inside with pattern paper so it’s not as noticeable.

I’ve used the My Favorite Things (retired) Birthday Chicks that I stamped, colored and die cut out and arranged over the design.  I’ve also used the My Favorite Things (retired) pattern papers and of course the same for the scallop stitched squares.  For the white squares, I’ve used a MFT cloud stencil with blue ink for the clouds and the sentiment was white heat embossed and cut out with a banner die.

When this card is closed, this is what it looks like.  Notice that you do not see the bird on the inside panel next to the bird on top of the balloon as he is hidden until you open it.

It folds up just like a Z fold would and it’s A2 and ready for a regular A2 envelope.  I’ve placed an extra panel on the back of the card for a special handwritten message and decorated it a strip of pattern paper and another party bird.  I didn’t put anything on the inside stars pattern because I thought it took too much away from the front of the card and you don’t want an inside message to show on the front of the card.  It takes a bit of maneuvering to decorate images and sentiments as to where to put them strategically on the card, but it was so fun!

  • I hope you’ve enjoyed my card today and go check out the challenge to come and play along with us!  I really look forward to seeing all of the different fancy fold projects in the gallery this month! 

Thanks so much for dropping by and I’ll see you soon!

Challenges:

  1. Make My Monday – Fun Folds #220
  2. Penny’s Paper-Crafty – Anything Goes using Paper #566
  3. Simon Says Stamp Wednesday – Anything Goes
  4. Crafty Catz – More Than One Fold/Anything Goes #666
  5. Krafty Chicks – #705 Anything Goes

Grateful & Encouraged

Hello friends!  It’s Thanksgiving tomorrow for us in the United States and I’d like to send a heartfelt Thanksgiving greeting to you all!  I would also like to say a huge thank you to everyone for your kindness and friendship.  I’m very grateful for you and encouraged by your support!

I’ve been working on several things and haven’t spent the time to photograph and share everything yet, but I will be sharing soon.  In the meantime, I’d like to share a few projects that I’ve made in lieu of the Thanksgiving holiday:

I don’t normally send Thanksgiving cards, but it’s a great way to say thank you to someone that hosted a dinner or brought something to share or just spend time with you!  That is the ONLY turkey stamp I own!  The stamp set is called “Sassy Thanksgiving” by CZ Designs at Simon Says Stamp.  I thought the sentiments in it were too cute and funny.  You certainly could make this any type of thank you as well.

This is also a fancy/fun fold card called a “Swing Easel Card”.  I found a tutorial using a vertical style on You Tube here – SWING EASEL TUTORIAL (I also used the same detail of embossing an additional panel with leaves and went over the texture with some gold paste.)

I made another panel for the center area and ink blended some blue that faded out and then splattered some gold paint over it.  I then layered it over a piece of gold that fits in the center panel of the easel.  I gold heat embossed the large sentiment and cut it out with the die.  It was popped up over the leaves.  I also cut an additional strip with the gold for the “catcher” of the front panel of the easel card.  I added the turkey and leaves along with the stamped sentiment on the inside bottom.


Autumn is my favorite time of the year and I enjoy using the colors and images in the cards I make, so here’s more that I’ve made:

I’ve made a couple of encouragement cards to send out to some people and I’ve used a favorite card kit from my stash by Taylored Expressions.  The images come from the stamp set Wheatfield Dreams.  I’ve used an oval die and oval mask to do some ink blending and just cut out the colored image to pop them over top.  Both sentiments were copper heat embossed.

I kept the backgrounds simple with the one on the left stamped with a background stamp from TE and the other was cut out with a wonky stitch die and layered over a green card base.

Hope you’ve enjoyed my creations, and I am so grateful you’ve chosen to stop by!❤️

Challenges:

  1. Creative Fingers – Anything Goes
  2. Lil Patch of Crafty Friends – Anything Goes
  3. Pammie’s Inky Pinkies – Anything Goes
  4. Crafting Happiness – Thanksgiving/Harvest #148
  5. Four Seasons – Fall Season
  6. The Crafty Addicts – Anything Goes
  7. Crafts Galore Encore – Anything Goes

Classes, Donation and Challenged

Hey friends!  Hope you’ve had a wonderful weekend and will be enjoying the first ‘official’ day of Autumn tomorrow!🍂 Yay!  I know that this is my most favorite time of the year and today it seems like it has finally cooled off a bit which is very welcoming to give the air condition a break!  Decorating for Fall/Halloween is also a favorite thing I like to do along with being outside…so I’ll be doing that this week and weekend for sure!

Today I have some creations that I’ve been working on.  The first one comes from a challenge that I wanted to enter along with breaking out a new stamp set, but excited about using an older embossing folder and some paper that has been in my stash for far too long:

He even looks like a wise old owl…and I thought he would be cute with a little bow around his neck too!  This is not a ‘new’ stamp set from Inky Stamper, but it’s the first time I’ve broken out to use this Owl stamp set!  Their challenge issued this month was “embossing” and so I pulled out a VERY old embossing folder (remember the Cuttlebug days?! LOL) I think it was one of my very first ones!  Plus, I pulled out some Coordination’s textured and colored cardstock.  It is weathered looking, but when you sand over it, the color comes out underneath…really cool stuff that I haven’t used very much!  You can get the coordinating dies for this ‘Owl’ set which also cuts out the owl and the leaf in the set.  I’ve colored them up with Copic markers and used the die to cut them out with.

For the embossing folder card front, I took a piece of the Coordination’s paper, die cut it out and then ran that piece through the selected embossing folder and then sanded over it with a sanding block.  I also die cut a frame the same color as the card base and took a separate embossing folder from Stampin’ Up! to go over that with and sanded it a bit as well before popping it up on the card front.

Before placing all of the elements on the card front, I decided to add some white and black paint splatters over the background.  I also copper heat embossed the sentiment underneath the owl, die cut the strip and popped it up with one of the leaves over top. (You can also see along the edges that I’ve heat embossed too!)  I popped up the owl but left him grounded to the frame and then finished it with copper sequins filled with glitter drops.  The copper twine bow was a last element decision.  LOL🦉    

Speaking of sanding, it reminded me of this class I took with Inky Stamper making these cards. (couple weeks ago)

Anyway, the sanding reminded me of this class because at the bottom of the card, the kit included sandpaper for the beach.  Really love the look it gave to the design with the texture and tiny bit of sparkle in it!

And the same day I had the class above, I had this class from Craft Fancy during their OOAK event.  These were made from their “Alcohol Pearls Butterfly card kit” (I think they have some left in store if interested).  The kit came with one alcohol ink color in Celestial Pearls, which is beautiful, but I decided to also add some copper metallic from my stash for another bit of color.  I also went on my own a bit with the white heat embossed sentiments at the bottom.  I really had fun playing with the alcohol backgrounds and being able to cut them out in one pass for different looks.

I thought this set of four cards would be perfect to add to my donation box to The Butterfly Project in support of domestic violence.  So, I was able to send off a batch of cards for that this past week too.

Hope you’ve enjoyed my mixed collection of projects here and I’m sure I’ll have more fun things coming soon!  Thank you for stopping in!

Challenges I’d like to enter for OWL CARD only:

  1. Inky Stamper Inkspirations FB Sept Challenge – Embossing (heat or dry)
  2. Let’s Squash It! – embossing folder (Cuttlebug & SU! used on mine) with letters or #s and sand it
  3. Pammie’s Inky Pinkies – Anything Goes
  4. Lil’ Patch of Crafty Friends – Anything Goes
  5. Allsorts – ‘real’ animal/creature
  6. My Time to Craft – embossing (heat/dry)
  7. Splitcoaststampers – SC871 Wednesday Sketch