Art Journal Inspiration-Soul Singing

Hello friends!  I’m back today with one last inspiration for Art Journal Journey to remind you that there are still a few days left to enter your art journal project for this month!  So please be sure to hop on over to the Art Journal Journey Challenge Blog to see the details about how to enter.  I have really enjoyed all of the inspiration from the gallery!  So fun to see what everyone comes up with using my “MUSIC” theme this month!  I thank everyone for having me along as a host and sharing your kindness in welcoming me back this year.

I went with some animals this time:

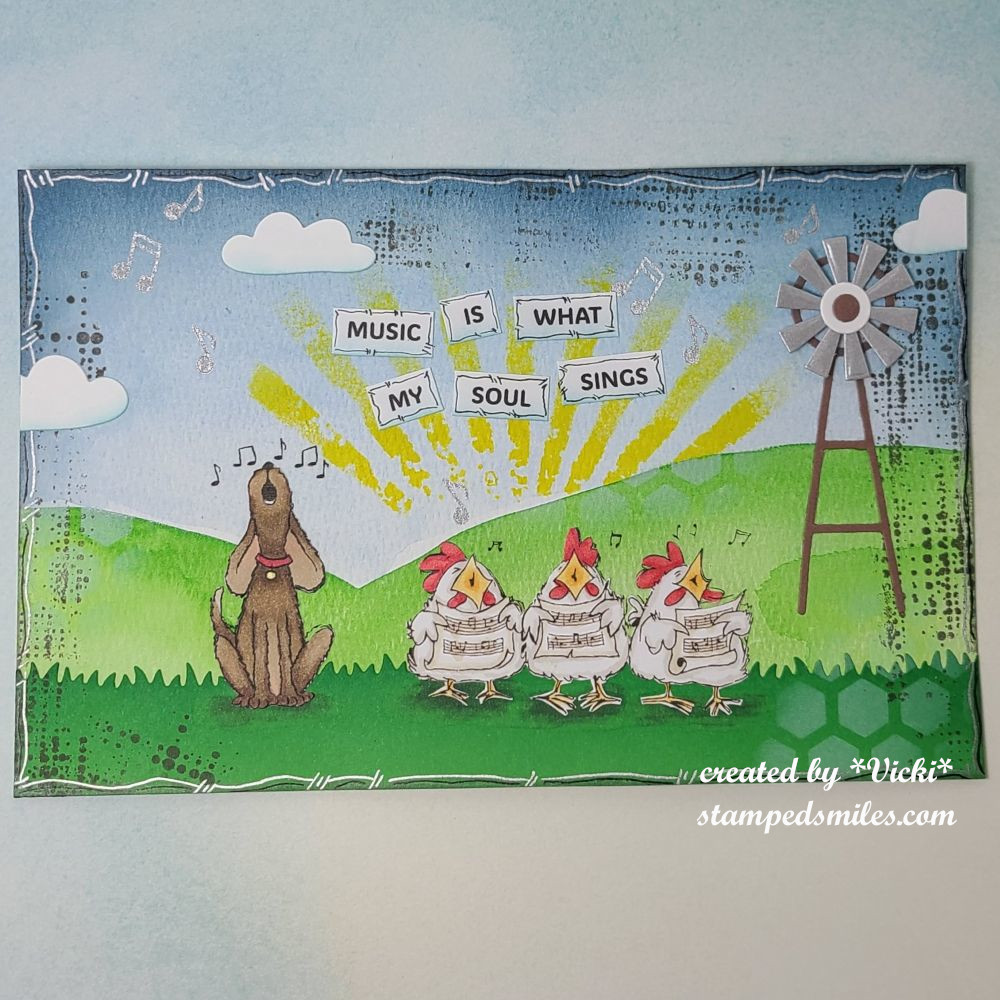
I’m pretty sure that there has to be some sort of music going on at farm too, right?!  LOL  I found these cute “singing” critters online and thought that a farm scene would be a perfect platform stage for them!  This is also the first time that I’ve ever added an interactive element to an art journal page, so that was fun!

For the background:  Starting with an 8.5″x 5.5″ watercolor paper,  I printed the critters over it in the position that I wanted…this is so that the musical notes showed on the page.

I then used my Kuratake Gansi watercolors and brush to paint a scene starting with blues for the sky, letting that dry and then adding some green hills for the bottom of the scene.  I went over the areas a couple of times to get the look I wanted and let it dry.  I also die cut a green grassy border at the bottom of the page with green cardstock being careful to place it so that it covered the “legs/feet” of all the critters.

More layers over the background:  I used older Tim Holtz stamps to add some texture by stamping brown ink, then I used an old TH stencil and some yellow paint for the “sun rays” around the hill with a sponge to apply it.  I also used a sponge with white ink to stencil over another stencil in areas and lastly, I stamped some musical notes in silver ink in a few places.

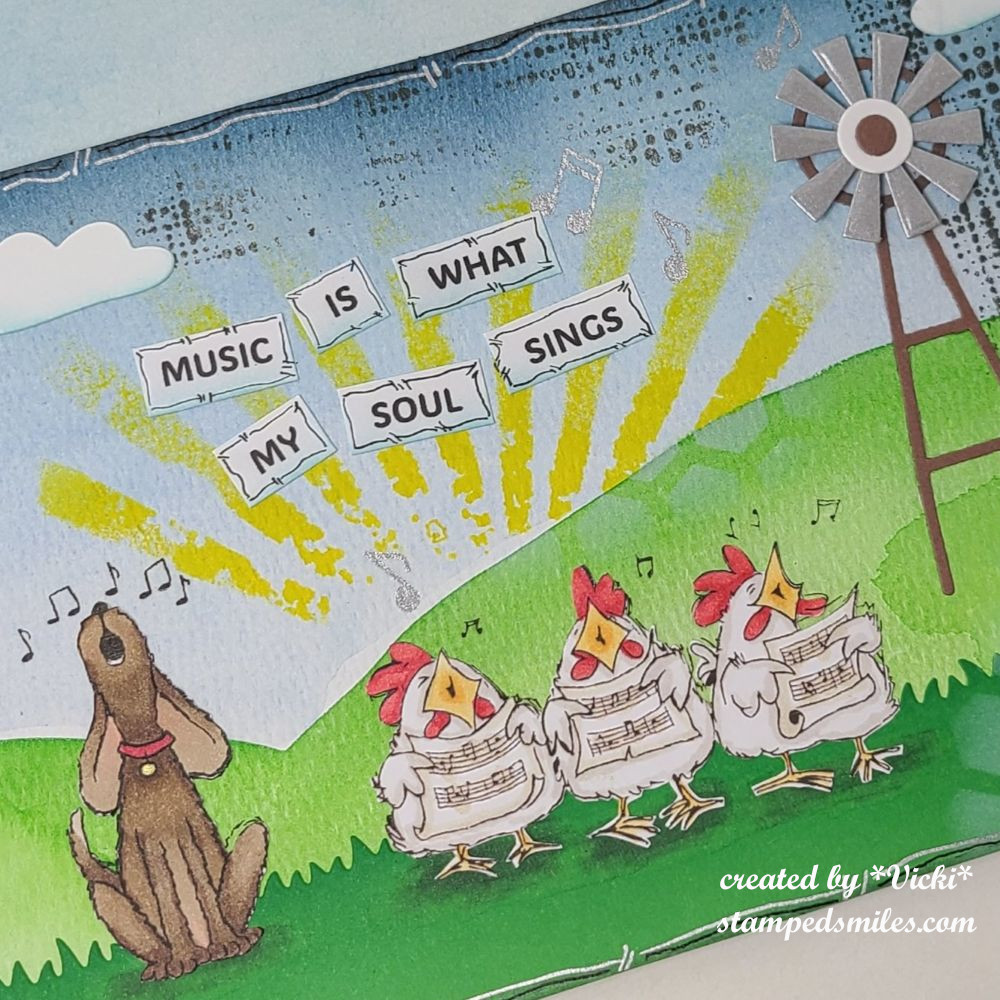
Here’s a closer look at some of the details including the critters.  

Since I covered up the critters with the grassy border, I printed out the critters again on a separate piece of cardstock, colored them with Copic markers and fussy cut them out with my scissors.  I attached them over top of the printed out ones on the page so that they align with the music notes above them.  I used more markers to add some darker shadow grounding underneath each critter before permanently attaching to the page.

For the interactive element:  I used a die cut to cut out the pieces for the windmill in the brown, white and silver cardstock pieces.  I then used a circle die to cut a hole in the center of the windmill on the page and then added an element that makes the wheel portion spin in a circle when you spin it with your finger.

I went around the edges with some blue ink for the sky, attached some clouds and then printed out the quote on my computer and cut out each word attached to the page.  I used some blue ink to lightly add to the bottom of each one.

Lastly, I went around the edges of the page along with the edges of each word with a black micron pen and then I used a silver paint pen to go around the edges of the page again.

It’s a pretty flat page, but it made me happy!  What song do you think they’re singing?  

  • I hope you’ve enjoyed my page today as well as my art journal inspiration throughout the month!  Thank you so much for your kindness and support!  See you soon!

Challenges:

  1. Art Journal Journey – MUSIC
  2. Creative Artiste Anything Goes Mixed Media
  3. We Love 2 Create Mixed Media Anything Goes MM/Papercraft
  4. Creative Fingers Anything Goes
  5. Gem of a Craft – Anything Goes

On the Farm Reminder for {Cupcake Inspirations}

Hello friends! I hope that you’ve enjoyed your weekend. I’m still spending some time with my husband as it’s a long Labor Day weekend for him. The weather over our way will certainly start to shift now and I’m looking forward to everything Autumn which is my favorite time of the year! Such a great time to be outdoors before the Winter sets in!

Today is our midway reminder over at the {Cupcake Inspirations} challenge blog with our “On the Farm” theme.  So if you haven’t played along with us yet, I hope you’re able to share your project with us within the next week!  We are enjoying seeing the wonderful creations so far!

Here’s my reminder project for this week:

I decided to pull out one of my past card kits that I didn’t get much a chance to play with and put together a card with that Farmhouse Friends stamp set included with it.

There were lots of different textures included with the kit including that piece of buffalo check pattern mesh fabric that I put a layer of red cardstock, included in the kit, behind it.  I ran a piece of brown cardstock through an embossing folder as well as stenciled a cloud background over one of the printed panels included in the kit.  I also took some copper DecoFoil Transfer papers and foiled over the printed barns on it.  I put together this fun layout with those different pieces, cut them up and then die cut the entire panel with a Wonky Stitched Rectangle die from MFT.  I used the die again to cut an additional panel out with some kraft cardstock. 

That layer is where I’ve added the stamped, colored and cut out images from the stamp set.  I’ve also stamped a sentiment from the set at the bottom of the panel as well.  I layered this piece over some more of the brown cardstock and popped it up with foam tape.  Before attaching it to the panel, I wrapped some twine around the front panel and added a bow next to the animal panel. I added another layer of brown cardstock behind this and attached it all to an A2 sized top folding kraft card base.

Here you can see the shine from where the printed barns were foiled over the cloud stenciled background.

There was a “stain pen” included with the kit that you could actually use on the tiny wooden fence also included in that kit which you can see as a prop in my photo.  But I used it to color in my stamped fence on the card this time.  I’ve also taken a white gel pen for highlights on the animals and then I added some glossy accents to the chicken’s head, the pig’s nose and the sheep’s eyes which you can sort of see the reflection of light over those parts.

I lastly added some real wooden dots over the design including in the center of the twine bow.

Have you ever been to a farm or are familiar with the setting of a farm?  I grew up out in the country and have pretty much lived most of my life either near a farm or in a rural small town setting, so farm surroundings are very familiar to me and I forget that not everyone has had the experience of it.  I can’t imagine not being able to hear the sound of a cow “moo” for instance.  If you’ve not been on a farm, it’s quite an experience and lots of hard labor, but also a rewarding experience at the same time…so check it out sometime in your life if you can!

Hope you’ve enjoyed my creation today friends and thanks for stopping in!

Challenges:

  1. 2 Crafty Critter Crazies – Anything Goes + animal
  2. Crafty Animals – Anything Goes + animal 
  3. QKR Stampede – #403 Anything Goes
  4. Arty Divas – #29 Anything Goes
  5. Crafty Creations – #413 Anything Goes
  6. Simon Says Stamp Wednesday – Stamp It! (no digis)
  7. Aud Sentiments – Anything Goes + sentiment
  8. Krafty Chicks – #523 Stamp Act
  9. My Time to Craft – #440 Embossing (Wet/dry)

We’re On the Farm for {Cupcake Inspirations}!🐄

Hello friends!  Hope that you’ve had a wonderful weekend!  I sure enjoyed my time with hubby relaxing and enjoying the cooler temps for sure!  After all the “partying”, are you ready for a new challenge?

Today we’re starting with a brand new challenge over at {Cupcake Inspirations} with the theme “On the Farm“!  So whatever farm related project you’re working on, please be sure to link it up in our challenge!  We look forward to seeing what you all come up with!

Here’s what I’ve made for the challenge:

Vicki-CIC501-week1

I’ve been wanting to use this fun barn die from My Favorite Things for a while and this was super fun to create a farm scene with!  It even has the little embossed markings on the barn along with a bail of hay!🐓

I started out using the MFT cloud stencil and Tumbled Glass Distress Ink for the background panel, then layered over a grass border at the bottom and then cut this panel out with the stitched rectangle die.  I also stamped the sentiment as well as a few animals from the MFT The Whole Herd stamp set, colored and cut them out with the coordinating dies. (can’t find in the store!)  I then placed my fence border over top of the grass border, popped up the barn with foam tape where I wanted it and then placed all of the other images arranging them over the scene.  This front panel was attached to a top folding A2 red card base.

Vicki-CIC501-week1-close

So I love how the door on the barn can open up with that die cut!  Of course I had to add something inside the barn and with the nest of eggs sitting on top, it only felt right to place the chicken in there!  For the backing of the barn, I’ve taken a piece of paper from the MFT Woodgrain Whimsy Paper Pad and attached it from behind before popping it up with some foam tape.  I’ve also taken a pen and wrote the “milk” word over top of the colored can next to the cow.

Vicki-CIC501-week1-flat

Hope you’ve enjoyed my creation today!

Thanks so much for stopping by and I’ll be seeing you again soon!

Challenges:

  1.  Cardz 4 Guyz – #252 Explore Outdoors
  2. 613 Avenue Create – Anything Goes