Mixing It Up with a New DT!

Hello friends!  Happy November!  The time is getting closer and closer for Christmas to arrive and so the Christmas cardmaking ramps up!  Have you started on yours or have them done?

new-miucb-designer-badge

I’m very excited to announce that I’ve joined up as design team member over at the MIX IT UP CHALLENGE BLOG!  Woot! 🎉 Really happy to be supporting a fellow blog friend Leslie with one of the many challenges she runs!  Thanks for having me along!  So, I hope you’ll go check it out and play along with us!  The challenges run for 6 weeks which is plenty of time to enter and these challenges are always “Anything Goes” with an optional twist involving a technique of some sorts.  Sounds fun to me!  And I can use any products I like!  Count me in!

For the November challenge this month, we have “Anything Goes with optional stamping (use clear or rubber – no digis)” This is my first creation with the team, and I look forward to seeing what you come up with for the challenges too, so I hope you can join!

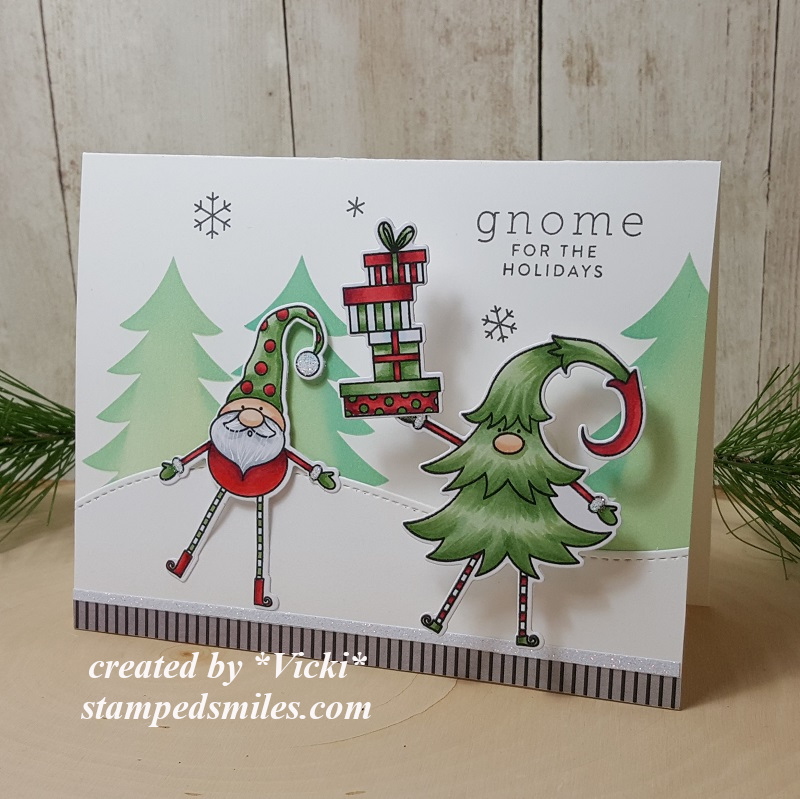
Of course, I love to stamp!  I have SO many and why not use them?!  I was lucky enough to have gotten the STAMPtember Trinity Stamps set called: “Sledding Gnomes” (no longer available) and it was so fun to play with for this card.  I also decided to make it a slimline card which I haven’t made in quite a while.

For the background:  I white heat embossed some snowflakes from the Simon Says Stamp “Frozen Fractals” stamp set (no longer available).  Then I took some Oxide Inks in Mermaid Lagoon, Blueprint Sketch and Chipped Sapphire to ink blend over the embossed snowflakes for an embossed resist technique.  Lastly, I’ve splattered some Copic Opaque white with water and a fan brush.  This panel was cut out from the Trinity Stamps Stitched Card Panels & Window Slimline dies.

I stamped, colored and die cut the characters and cut out some white cardstock using a Lawn Fawn Stitched Hillside Borders die set.  I arranged the slopes and tucked in the trees behind each layer and popped up the characters with foam tape.  I also white heat embossed the sentiment with red cardstock and die cut it out, which was popped with foam tape.

Here’s a closer look at the coloring: (using Copic markers)

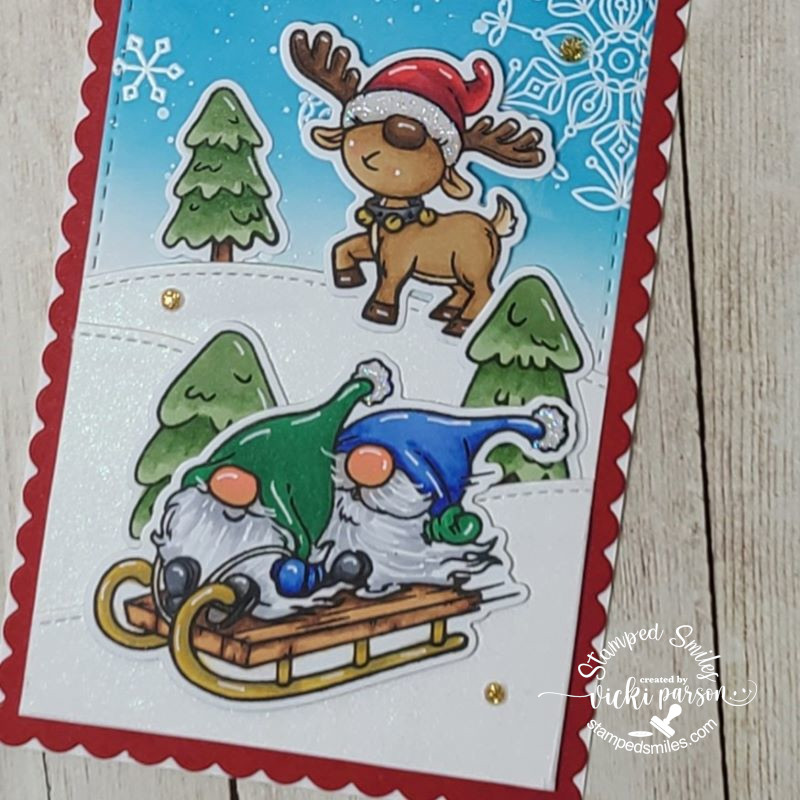
Before attaching the stitched slopes to the bottom of the heat resist snowflake panel, I sprayed some shimmer spray to give it a snow look.  I attached this panel to a red piece that was cut from the Trinity Stamps Scalloped Card Panels & Banners Slimline die set.  I then layered both of these panels to a white side folding slimline card base measuring 8.5″ x 3.5″.

Lastly, I’ve added some Stickles Stardust glitter to the gnome hat ends and the hat on the reindeer.  You can see where I’ve added some white highlights with a gel pen and then I took some gold glitter gems and attached randomly.

I hope you’ve enjoyed my project today and will stop by the Mix It Up challenge blog to check out the rest of the inspiration and play along with us this month!  Remember you have 6 weeks!

Thanks for stopping in today!

Challenges:

  1. Crafty Catz – Anything Goes optional: 4-legged critter (reindeer)
  2. Daring Cardmakers – A Bit of Bling (shimmer spray, Stardust Stickles, and gold glitter gems)
  3. Allsorts – Embossing Heat/Dry (heat embossed snowflakes & sentiment)
  4. ABC Christmas – ‘U’ is for “Use it Up” & ‘V’ is for “Vertical” (I made a vertical slimline card and I used up my supplies of sprays, glitters and gems!)

Spooky Ombre & Welcome Gnomes for Dare to Get Dirty

Hello friends!  I’m back again today to share a couple more cards that I’ve made for the Splitcoaststampers “Dare to Get Dirty” event!  They’ve released another batch of challenge over there today!  There is certainly lots of crafty fun going on lately, isn’t there?!😀

My first card was made for a challenge from the lovely Lee:

Vicki-DTGD20LuvLee-ombre

This card was so much fun to create!  I’ve used only purple shades to make this entire design!  I started out with a white piece of cardstock using the MFT Rolling Clouds stencil and ink blended them in with several Stampin’ Up! inks that I’ve had in my stash for quite a while now! LOL!  After I was done, I spritzed it with a water bottle.

I took the awesomely spooky Trick or Treat stamp set and used some SU! Elegant Eggplant ink to stamp the witch image, bat and the sentiment at the bottom.  I used my MISTI to stamp several times to darken the ink up on them.

I cut out the panel with a stitched rectangle and then cut out an additional piece of Potion Cardstock with a stitched scallop rectangle die from MFT. I layered it over an A2 sized top folding Elegant Eggplant card base.

Vicki-DTGD20LuvLee-ombre-close

I then took a glitter brush pen to “color in” the inside of the moon around the witch that gave a really cool shimmer look to it. I then started noticing that it was taking away some of the purple ink while doing this, which was really awesome as it made the moon glow even more!  (I just had to be careful around the witch because she was stamped with regular dye purple ink and I didn’t want to blur it.)

I finished the design with some Lilac Matte Sequins that I filled with some Violet Galaxy Crystal Nuvo Drops.  It’s much more sparkly in person!


My next card was made for a challenge from the lovely Kelly:

Vicki-DTGD20MiamiKel4-gnomes

This scene was really fun to put together!  I fell in the love with the little house and gnomes from the Simon Says Stamp Gnome School.  I thought it would make a nice “new home” type of card.  I colored them up and cut them out with the coordinating dies to arrange over my scene.

The scene started with a piece of kraft that was ran over with the SSS Petal Plate die for the texture in the background.  I cut out some clouds and a border of grass with dies and inked them up with some inks for shadows.  I then took this panel and cut it all out with a stitched rectangle die and mounted it over a top folding A2 sized black card base.  I also took a sentiment strip from the SSS Gnome School Sentiment Strips to place over the design while arranging the images over the scene.

Vicki-DTGD20MiamiKel4-gnomes-close

For the sign on top of the “home”, I used one of the sentiments made for that spot and white heat embossed it over my coloring.  Hard to tell in the photo, but I’ve also covered the heart on the gnome’s hat as well as the glasses on the gnome with a glitter brush pen.  I also did the same for the windows on the home.

I hope you’ve enjoyed my creations for today and I sure appreciate you stopping in to check out all of the happenings that are going on!  Hope you’re able to join in some of what’s going on too!  See you soon!

Challenges:

  1.  Simon Says Stamp Wednesday – Oh So cute (bottom card only)
  2. Stamps & Fun = Creativity – #372 Lavender or Purple (top card)
  3. Always Fun – #177 In the Sky Scene (top card)
  4. Crafting Happiness – #63 Anything Goes

Merry Christmas Friends!

Merry Christmas to all of my friends here and I’m honored to be a little part of your life with you in some way…I hope you know that!

**This is a pre-scheduled post to wish you all a special happy day.  I’m away spending time with my family right now, so sit back with your favorite beverage for a time out and I hope you enjoy today’s long post.**

Just wanted to share BATCHES of the cards and creations that I’ve made for the Holidays this year.  I know that I make lots of creations, but for the purposes of mailing cards, I try to keep these particular cards as “mail friendly” as possible, so these are more simple in style for me, but really enjoyed making them and just had fun:

Vicki-GlitterSnowSceneSet

I tend to do bulk cards in a set of 4-6 so that I don’t get “bored” with it or run out of a certain supply or something! LOL!  So this first set of 6 cards is using the gorgeous Stampin’ Up! stamp set “Winter Woods”.  I stamped up the scene background and then covered the entire panel with double stick adhesive and then covered it with dazzling diamonds glitter.  (The deer I added is from a favorite Newton’s Nook stamp set called Serene Silhouettes.)  The white heat embossed greeting is from the Stampin’ Up! stamp set “Itty Bitty Christmas”.  (I think this set was probably my favorite to do!)

Vicki-PenguinChristmasSet

I just *had* to get these penguins in there somewhere! LOL!  These set of cards are actually all just a bit different, but I colored up the penguins from the “Pablo the Penguin” free stamp set included with the Making Cards Magazine for December and cut them out in different ways and then mounted them onto cards.  Some of them use some of the free papers that were also included with the issue.  So this is another set of 6 cards that were mailed out.  Love those cute penguins with the different hats! LOL!

Vicki-ReindeerChristmasSet

Here’s another set of cards that I’ve made to send out, but because these were even more simple than the ones above with very little stamping involved, I made 8 of these.  (So if you’re counting, I’ve made 20 total so far…not including some other special cards I’ve mailed out to people along the way.)  – I absolutely fell in love with this die set from STAMPlorations called “Two Reindeer” and was so excited to see that I had won a gift certificate from their blog and this was something that I knew I would be getting right away!  This was cut from gold cardstock and mounted over a piece of various different Stampin’ Up! pattern paper from my stash…it’s always nice to be able to use up more of my hoarded paper stash!  The sentiment is again from the Stampin’ Up! “Itty Bitty Christmas” stamp set.

Vicki-GnomeXmasWobbler

Now I didn’t want to leave out a couple of cards that I made especially for my boys.  They know their mom likes to stamp, but they know I have to add in a bit of my goofy humor with them as well! 🙂  So of course I had to pull out this fun Simon Says Stamp “Gnome for the Holidays” card kit (sold out) to make them!  I think I ended up using ALL of the wobblers in the kit too!  I told my son that this is me wobbling with the presents about to drop everything and my hubby is trying to save everything! LOL!

Here’s a little wobbler action for you too…

And of course I had to make another card for my other son too…

Vicki-GnomeXmasWobbler2

I absolutely feel in love with all of those cute gnomes that came out everywhere this year for crafting…so I still have more that I didn’t get a chance to use, but thought this would be perfect for my son with this trendy style design…of course using a wobbler too!  And I do love him GNOME matter what! 🙂

For some reason, I thought the wobbler action on this one was more fun! LOL!  Not sure if it’s because of the weight/size or what…but cool to see the difference.

And whilst in the middle of making up all of these cards to mail out, I also had fun playing with the Christmas Advent Calendar that I had purchased a while back.  Because it’s an “Advent Calendar” you start with December 1st and open each day.  So each day to open was pretty cool because there was a new surprise stamp inside!  So I took each day’s stamp and made a tag for each one clear up until today’s last window to open: (obviously previously opened and made to finish! LOL!)

Vicki-BMAdvent-Week1

I will show by the week.  So this is week 1 with the first 5 days opened.  The stamp that I received for each day is noticeably featured in each tag.

Vicki-BMAdvent-Week2

And these are the tags made for week 2.  The angel tag was made with Deco Foil in the background.

Vicki-BMAdvent-Week3

These are week 3 tags made.  The purple colored tag on the left bottom is actually a shaker.  The window sheet was glaring in the camera.

Vicki-BMAdvent-Week4

This is week 4 of the tags.  Hubby picked out the candy canes as his favorite of all of them.  Mine was the stockings tag.

Vicki-BMAdventTags-Week5

And here is the final last week of the tags from the Advent Calendar.  Really cool to have all of these tags on hand for gifts!  I needed them! 🙂

And of course I wasn’t done with the Advent Calendar box itself because I thought I could “recycle” the little window flaps on the box because they had some cute images on them for each day…so I cut them off with my scissors after I opened that day and kept them:

Vicki-BMAdventTags-windowflaps

So I thought it would be fun to use them to create a card!  They had numbers on them, but I have covered them up in certain ways so that they’re not showing.  The cover die was cut out from the same colored cardstock for the background too.

Whew!  Now to get finished up with my wrapping and “merry making” before the big day!  I hope you are or have enjoyed yourself a wonderfully HAPPY Christmas day no matter how you’re celebrating it!  Thank you for spending some of your time here on my blog today!

I’ll be seeing you soon my friends!