It’s Christmas in July at Sparkles Monthly!

Hello friends! Have you’ve been enjoying the month of July so far? We finally got some rains, but now it’s humid and warmer. That’s OK because it’s always warm this time of year anyway and a great time for crafting indoors with the air conditoning!

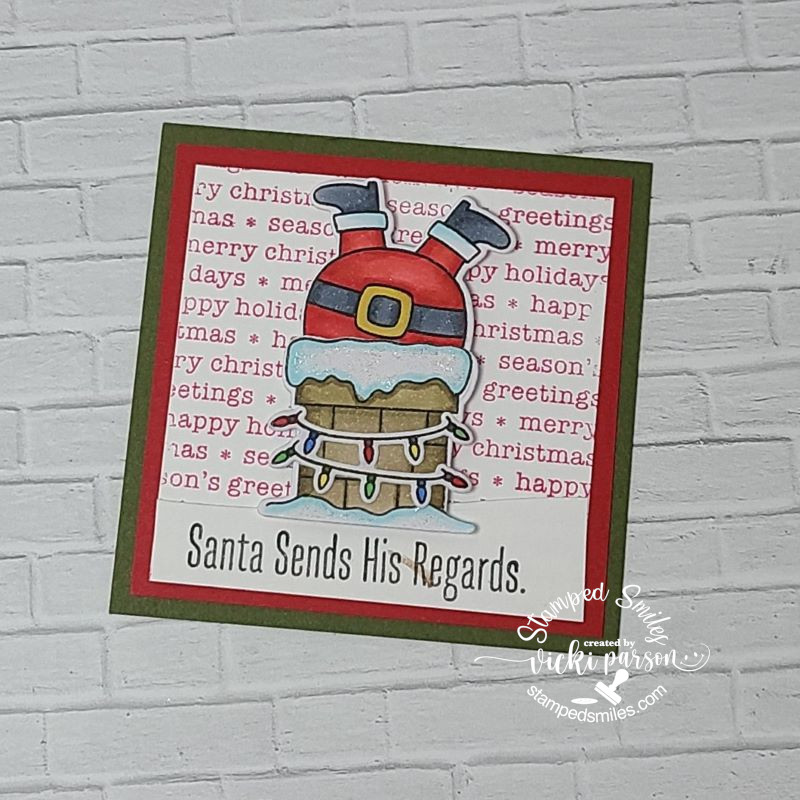
Today starts up a new challenge for the Sparkles Forum Monthly Challenge Blog with the theme: Christmas in July! It’s a favorite for many card makers this month so that they can get an early start on those Christmas cards without having to wait last minute to get them all done. I don’t have an outrageous amount to send out, but I do like to donate and I have done 5 Christmas so far! So if you’re up for it, make a Christmas card and join the gallery at the challenge! Here’s the card that I’ve made:

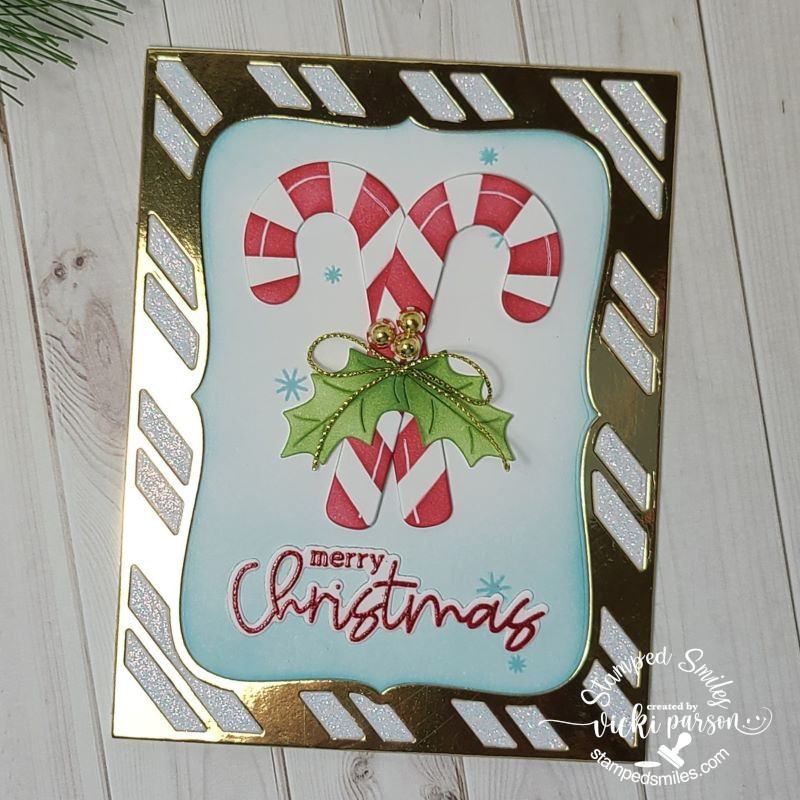
There’s nothing like the smell of peppermint for Christmas (for me anyway!)  I had gotten this Candy Cane Lane card kit from Taylored Expressions last year and never really used it, so I thought this would be a good time to pull it out.

In the set, there came this cover plate die and I cut it out in the following, gold mirror, white glitter and white cardstock in A2 sizes.  I paper pieced each one over an A2 sized white card base front.  I added some light blue ink blending around the edges and bottom of the center panel and stamped a few “snowflakes” in the same color.

I die cut the candy canes and leaves and ink blended/stenciled those stacked together.  I used a white gel pen for the highlight over the canes, added a gold cord bow and some gold drip drops for the “berries”.  There was a stamp set with sentiments that I stamped out in red and then went over top of it with VersaMark ink so that I could emboss some Peppermint smelling embossing powder over it…that’s where the smell of peppermint came in for me!  I die cut it out with the coordinating die and glued it at the bottom of the candy canes.

Hope you can join the challenge with your Christmas cards this month!  Thanks so much for dropping in today!

Challenges:

  1. Sparkles Christmas – Include Gold
  2. Merry Little Christmas – Anything Christmas Goes
  3. Get Creative – Christmas in July
  4. Craft Rocket – Christmas in July
  5. Most Magical Time of the Year – ATG Christmas/Halloween optional:  Christmas in July
  6. Christmas Craft Creations – Christmas in July007July
  7. Little Red Wagon – Christmas or New Year?  (I hardly ever send out New Year cards)
  8. Krafty Chicks – Christmas
  9. CRAFT – Christmas

Rainbow Chicken

Hello friends!  Hope you’re enjoying your week so far.  We’ve been having some really hot and dry days lately, so I’m trying to get some motivation going and have some play time for crafting!

I have not played along before, but I decided to grab this fun digital freebie from the Beccy’s Place Challenge and have a go at it because it really made me laugh when I saw it!

Isn’t this such a fun image?!  There was an option of different pre-colored images, but I decided to print out the lined image to color in.  I colored the chicken in rainbow and then added a pair of die cut glasses in silver mirror cardstock that I had on hand.  (I already had the glasses cut out from another card I made that was laying out on my desk, so when coloring this image, I thought it would be fun to add!)

The layout came from a sketch challenge that she’s also sponsoring. (see challenge list below) I thought that I was going to leave it as just black and white to make the rainbow chicken stand out, but I found some fun rainbow papers and decided to add one panel to go with the chicken.  I came up with and typed out the sentiment underneath the image and printed them both together.

For another part of Beccy’s challenge, there is an optional theme she included which was “doodling”.  So I took a white gel pen and added some lines for highlights on the chicken.  I’ve also taken a black marker pen to make some squiggle lines around the image panel too.  I blended some grey ink around the edges and then used a distress tool for the distressed edges.

After adding the glasses, I covered the eyeballs with some crystal effects for shine. 

And this one has been sent off to hopefully make someone smile!  I hope you like it too! 

Thanks so much for dropping in and I’ll see you again on Saturday for another AJ page!

Challenges:

  1. Beccy’s Place Challenges – June Challenge using Beccy’s Place image with optional doodling
  2. Cheerful Sketches – June sketchSketch
  3. The Diva’s That Cut..Paper! – Use a Critter
  4. The Corrosive – Anything Goes
  5. Crafter’s Cafe – Humorous
  6. Crafty Catz – Anything Goes optional: FUN
  7. Lil’ Patch of Crafty Friends – Anything Goes
  8. Pammie’s Inky Pinkies – Anything Goes

NO STAMPING ALLOWED at Sparkles Monthly

Hello friends!  It’s been a bit since my last posting!  I’m still crafting, but I’m also enjoying the outdoors lately too!  I’m just not making the time I need to post on my blog here!  However, being on a design team helps to keep me focused on posting and hopefully it’s something that will bring motivation because I need it!  So I will try and get some more posts in!

Today starts a new challenge over at the Sparkles Monthly Challenge and the theme is “No Stamping Allowed!This may seem a bit challenging, but I look forward to seeing what people come up with for it!  Be sure to check out the blog to see what the design team has come up with for inspiration!  Here’s what I’ve made for the challenge this month:

I was trying to channel something that would work and realized that I had these fun strip dies from Taylored Expressions and I wanted to play with some new colors, so I ran with that on the middle of my card front by alternating the strip colors.

I also die cut a frond three times and glued them together for thickness and sturdiness.  I attached it over the colored strip panel and then added a sentiment that was already toner printed so that I could foil over it with silver Deco Foil.  I also had a die that cut it out which was popped up with foam strips and added to the bottom of the die cut frond.  Lastly, I’ve just added some silver glitter drops randomly over the card front.

Hope you’ve enjoyed my non-stamped card today and will think about joining in the challenge with us this month!  Thanks so much for stopping in! Have a great week!

Challenges:

  1. Craft Rocket – Use Dies
  2. NBUS – #51 June – new colors and dies
  3. Creative Fingers – Anything Goes
  4. A Place to Start – Anything Goes and/or twist: flower + one other thing
  5. Penny’s Paper-Crafty – Anything Goes using paper
  6. The Crafty Addicts – Anything Goes
  7. CAS on Friday – Leaves


Sparkles Monthly Challenge-Things with Wings

Hello friends!  I hope you’ve had a lovely Mother’s Day weekend and are enjoying the month of May so far!  I look forward to seeing those beautiful blooms and digging in the garden! 

Today starts a brand new challenge over at the Sparkles Monthly Challenge and the theme is “Things with Wings“!  This is a good one as there’s several ways to interpret it!  Be sure to check out the blog to see what the design team has come up with for inspiration!  Speaking of design team, Caz is looking to add to the team, so be sure to check out the details if you would be interested in joining.  Here’s what I’ve made for the challenge this month:

I thought the butterfly from this Taylored Expressions stamp set called Endless Joy would be so fun to color and use for this challenge.  They were stamped with Copic markers and cut out with the coordinating dies.

For the background, I’ve taken the rectangle masking stencil and blended some blue ink over the center and then I’ve added an additional stencil over top of it and blended bluer to get the pattern.  I then added some raw umber paint and opaque white Copic to splatter over top of it.  I cut out a stitched frame and added it over the blended area.

I added the flowers and butterfly to the card by gluing and popping out the smaller flower as well as the wings on the butterfly.  The sentiment was gold foiled and cut out with a coordinating die that was glued at the top.  I added some highlights on the butterfly with a white gel pen and added some Stickles glitter to the center of the flowers.  The white panel was attached to a top folding A2 white card base.

I hope that you have enjoyed my card today!  I hope that you will stop into the challenge and play along with us this month!  Looking forward to seeing the gallery of wings!!

Have an amazing day and see you again soon!

Challenges I’d like to enter this card for:

  1. Four Seasons – Spring Season
  2. Triple B (Birds, Blooms &/or Butterflies) – Spring 
  3. Love to Scrap – Anything Goes
  4. Unicorn – Flowers
  5. Crafty Animals – Anything Goes + animal
  6. Critter Crazy – Anything Goes + featured critter
  7. Fab ‘n’ Funky – Things with Wings
  8. The Crafty Addicts – Anything Goes

Emboss It at Sparkles Monthly + Giveaway WINNER!

Hello friends!  I hope you’re having a great month so far and being able to enjoy the nice Spring weather!  It’s been really nice over my way, but I’m seeing we have a bit of cooler temps coming too.  Hopefully not too chilly! 

Today starts a new challenge over at the Sparkles Monthly Challenge Blog and this time we would like for you to “Emboss it”!  I hope you will hop on over to see the inspiration from the team and consider joining in the fun with us this month!

Here’s the DT creation that I’ve made:

I love to do embossing on my cards, and I know it’s a favorite for many!  I’ve decided to do a “Letterpress Embossing” technique and inked up an embossing folder to achieve the effect on my orange layer panel.  The raised areas stay white on the white cardstock.

For the two corners, I’ve taken a Simon Says Stamp Garden Greetings stamp set and gold heat embossed the floral spray image.  I’ve also used the same gold embossing for the “sending hugs” sentiment strip as well as the “Get Well Soon” sentiment over the shimmer vellum which was cut from a stitched circle die.  I added some gold sequins over it.

I wanted to keep it somewhat flat for mailing purposes, but I think some of it popped up would be pretty too. I was also very happy to pull out a past card kit and make another card with it.

I would love to see your embossed creations in the gallery this month, so I’ll hope you’ll play along!  Check out the challenge here – Sparkles Monthly


***ARE YOU A WINNER?!!***

vicki-tegiveaway

20230414_141351

I have taken all of the comments from my last post, added all of the names that mentioned they would be interested in the Beautiful Butterflies dies and foil package and wrote those names on pieces of scrap paper. I folded and crumpled them up and had my husband pick out a name. He threw them all into the hat he was wearing and pulled one out!

HERE IS THE NAME THAT HE PICKED OUT…………….

20230414_141630

Yay!  Congratulations Chrissy! 

Please contact me and send me your full name and snail mail address so that I can pop your package in the mail to you!  I hope you enjoy it!  (I haven’t even used mine yet!)  Sorry if your name didn’t get pulled as I only had one, but I know I have several “double” items that I’ve placed in a bin and will be pulling them out at some point to give away! So, stay tuned!

Thanks so much for dropping in and taking the time to say hello!  I appreciate you!


Challenges I’d like to enter my above card into:

  1. Creative Inspirations – Anything Goes
  2. Can You Handle the Pressure? – Anything Goes optional clouds
  3. Pammie’s Inky Pinkies – Anything Goes
  4. Ally’s Angels – Anything Goes
  5. Little Red Wagon – At least 2 layers 
  6. Penny’s Paper-Crafty – Anything Goes
  7. Tic Tac Toe – TTTC204 (middle down: die cut, free, embossing)tttc-challenge-board-204

Class Fun & Square Samplers + Give Away

Happy April friends!  We have finished March already and onto Easter very quickly approaching!  I hope you’re enjoying all things Spring coming up your way!  We’ve had several storms and we’re in the tornado season as well, so I hope everyone is staying safe out there whatever the weather.  I do have some things that I had previously finished and wanted to share:

First, I wanted to share about the Virtual Stamp Joy Event by Taylored Expressions that I participated in a few weeks ago.  I always have so much fun and enjoy the motivation that it seems to generate!  I’m sharing them in the gallery below, so if you’re on my website post, then just click on each photo to enlarge it.

  • The first four photos were from a class using the same floral stamp set and the others are from the next day of make-n-take projects.  Please let me know if you have any questions about any of them!

The last set of four cards were a “mass production” using a background stamp in different colored cardstock panels and clear heat embossing over them.  The class sample had “hello” sentiment on each one, but I changed up the sentiments and have placed them in a card box to give them out with envelopes as a gift for someone.

Hope you’ve enjoyed the inspiration as much as I enjoyed putting them all together!


From the end of last year up until this last month, I didn’t have much time with the Holidays and everything going on, but as you may have seen in previous posts, I participate in a “square sampler swap” and when everyone sends out their squares, we then complete a home décor piece with all of the squares, so I thought I’d share mine finally completed:

  • CLICK PHOTOS BELOW TO ENLARGE

This was for the Christmas Sampler SWAP and you can see that I’ve used a black shadow box frame for my sampler and placed some red with red metallic dotted paper behind it.  The square on the right is the one that I made. (I’ve used My Favorite Things products for my square.)

This was for the Winter Sampler SWAP and I went with a white shadow box for this one.  I’ve placed some soft blue snowflake papers for behind my sampler as I thought it was soft enough to not look too busy.  The square on the right is the one that I made. (I’ve used Inky Stamper products for my square.)

And recently we finished up our Spring Animals Sampler SWAP that I used another white shadow box for the sampler.  I’ve added a piece of pink colored “Watercolor Wishes” paper from Lawn Fawn behind it.  It looks a little off in the photo, but it looks better IRL.  The square on the right is the one that I made.  (I used Taylored Expressions products for my square.)

Not sure if we’re doing any more or not, but I had so much fun making the squares to swap with friends!


Lastly, I have a fun little thing to give to whoever is interested in these Taylored Expressions dies + foil-it panels package. (It’s not sold in stores anywhere as it was a free gift with purchase) I have an extra and so I thought I’d give it away to someone!  Just leave me a comment below if you’re interested and I’ll pick someone from the comments.
Leave a comment below if you’re interested!

That’s all I have for today!  Thanks so much for stopping in!  I’ll be seeing you soon!

Party Pandas

Hello friends!  I had another birthday card to make and this person likes panda bears, so I thought I’d go through my stash and see what I had for that.  Here’s what I came up with:

So, I found this cute little guy that I believe was a “freebie” a few years back for your birthday month from Lawn Fawn called “Party Panda” and the extra was that “Happy birthday” sentiment as well.  There was also a set of coordinating dies with it that cut out the panda as well as the tiny cupcake.

So, to make it a good party, you need more than one panda, so I stamped him out three times and stamped out some “party elements” as well from the Lawn Fawn Party Animals stamp set, colored and cut everything out with the coordinating dies.  These little guys turned out so cute with their party hats on and holding their birthday items to celebrate with another panda friend, of course!

I thought it would be fun to create a green colored frame with the Watercolor Wishes paper cut out with the Outside In Stitched Rectangle and the Reversed Stitched Scallop Rectangle dies to create a frame.  I had some additional metallic gold polka dotted papers for the background behind it that were also a freebie with one of my orders.  Before attaching it to the back of the green frame, I also added a piece of Noble Fir cardstock cut from the Grassy Border die.  Attaching this border to the frame only gave me some room to tuck the pandas behind the grass.

I stamped the sentiment in black, cut it out with my scissors to make a banner and sponged some green ink around it before attaching to the card.  Lastly, I added some gold sequins and placed it over an A2 sized top-folding white card base.  I decided to create my own envelope with more of that green Watercolor Wishes paper to mail it in.

  • Well, the green and grass have me thinking of Spring coming and I think I might party like a panda myself when it finally arrives!! 😆🎈 I’m sure ready to be outdoors! 

Hope that you’ve enjoyed my card today and have been inspired!  I’ll be back Saturday for this month’s Art Journal Page and hope to see you then!  Thanks for dropping in!

Challenges:

  1. Creative Knockouts – Add a Sentiment
  2. Lil’ Patch of Crafty Friends – Anything Goes
  3. Pammie’s Inky Pinkies – PIP2311 Anything Goes
  4. Lawn Fawnatics – Inspired by Book/Movie/Song (My book inspiration came from Xander’s Panda Party by Linda Sue Park)BandN
  5. The Corrosive – Anything Goes
  6. Creative Fingers – Anything Goes

Going CAS at Sparkles Monthly

Hello friends and happy Wednesday!  Today starts a new challenge over at the Sparkles Monthly Challenge Blog and this time we would like to see your CAS (or “clean and simple”) creations!  I hope you will hop on over to see the inspiration from the team and consider joining in the fun with us!

Here’s the DT creation that I’ve made for it:

Sometimes I feel that CAS can actually be even more difficult than regular cards and I struggle with thinking I’ve added too much, or it doesn’t look right.  I think it’s more of me over-thinking something, though!

It was my son’s birthday yesterday and I thought this would be a great opportunity to make a card for him.  He’s a postal carrier, so I thought this cute owl from the Lawn Fawn Special Delivery would work great for this.  I started with the LF Stitched Cloud Backdrop and the LF Stitched Rectangle Frames dies to create the main focal panel.  I lightly blended some blue ink in a circle before adding the Copic colored postal owl popped up with foam.

Over some red cardstock, I white heat embossed the sentiment.  (I don’t remember which LF stamp set it came from) I die cut it with a banner die and popped it up over the cloud panel.  I also had an extra die cut heart lying on my table, so I thought it would be great to add with the owl.

Thanks so much for stopping in today!  Hope you’ve enjoyed my CAS card and have been inspired to join us this month with your take on the challenge too!

Challenges:

  1. Country View – Birthday card for a man
  2. Love to Scrap – Anything Goes
  3. 613 Avenue Create – Anything Goes optional: CAS
  4. Lawn Fawnatics – All things birthday
  5. Sunday Stamps – SSC304 sketchSSC304

Rainbow Bridge

Hello friends!  Welcome to March!  Although it’s still cold and even some snow coming in our forecast, I know that warmer weather is coming soon along with those pretty flowers!  I have a full weekend of crafting coming, so I’m prepared to get through this cold snap!

So, I have unfortunately had to make and send a couple of pet sympathy cards as I didn’t have any on hand.  I decided that I needed to pull out a card kit from My Favorite Things called “Rainbow Bridge“, I think.  It’s no longer available, but I know they have a few things in pet sympathy.  I wanted to make sure that I still had some of these on hand when needed because I feel like these can be hard to make.

This card was made and sent out in January for someone who lost their precious fur friend.  I thought the silhouette looked a similar shape to the photos I saw.  I’ve used the stencil and dies that came with the kit along with some of the papers included in the kit with the paw prints.  I’ve also used the same papers as a liner for the inside of the envelope that you can see in the photo.

I’ve ink blended some rainbow colors and then used the die set in the kit to make the rainbow bridge and added some hearts around the silhouette pup which was popped up over the rainbow bridge.

I also needed to make a kitty one and then just decided that I was going to use this card kit to make several of these different pet sympathy cards so that I had some on hand when needed.  I thought that was a clever card kit and knew it would be very useful to create lots of pet sympathy cards with.

  • These are all in the gallery below, so if you’re on my website, just click on each photo to enlarge the size so you can see the details:

Sometimes it’s just good to sit down and craft to have some cards on hand that you know you’ll probably need at some point, but don’t want to hurry to try and put something together because you need it.

Hope you’ve gotten some inspiration in my post today or found some inspiration with it.  Thanks so much for stopping in today!  

Challenges:

  1. Allsorts – Anything Goes optional 4-legged Friends
  2. Crafty Animals – Anything Goes + animal
  3. Critter Crazy – Anything Goes + Featured Creature
  4. Pearly Sparkles – Include Sentiment/Verse
  5. The Diva’s That Cut Paper – Anything Goes
  6. Penny’s Paper-Crafty – Anything Goes Using Paper
  7. Love to Craft – Anything Goes
  8. Pammie’s Inky Pinkies – Anything Goes

New DT for Sparkles Monthly Challenge!

Hello friends!  Hope that you’ve had a wonderful Valentine’s Day and a great start to this new week in February!

designer

I’m really excited to share that I’ve just been invited as a new design team member over at the Sparkles Monthly Challenge Blog!  I really like the fact that it has fun monthly themes to get you thinking and also that I can use up my never-ending piles of my own craft stash!   This fits perfectly well with me and something I can handle!😉  So I hope you’ll stop by and follow along to play with us each month!  You can find a new one on the 15th of each month.

Today starts a new monthly challenge theme which is #161 “Men Only“…so anything masculine will do!  With having sons in my family, I’m always in need of masculine style cards for sure!  Here’s my card for this month’s challenge:

Oh yes…tools!  This always seems to be a favorite in my craft supply when creating a masculine card for sure!  I made this one for my husband who’s a very handy guy, and he likes the color blue.  I always like to add lots of textures, distressing and layers when making a masculine card.  This also helps for using more of those craft supplies!

I’ve had these stamps and dies from My Favorite Things for quite a while now and only used them a couple of times.  I die cut the background panel in the pegboard cover die and stitched rectangle dies, plus, layered with a couple of different blue panels that were stapled together.  A die cut circle in woodgrain and blue papers were attached and cut off at the edge before attaching to the top folding white A2 card base.

I’ve added the die cut tool elements over top of the circle using some silver mirror and blue colored cardstocks to cut them out.  I added some sponged ink over some places and topped it with a ripped strip of silver embossed screw heads, a strip of dark blue and the stamped sentiment stapled together and placed it over top with a piece of “messy” thread.  Lastly, I added the dark blue die cut hearts and covered them with a glitter brush pen.

I hope that you will stop by the Sparkles Monthly Challenge Blog to check out the challenge and inspiration from the creative design team!  I look forward to seeing what everyone creates!

Thanks so much for stopping in and I’ll see you soon!

Challenges:

  1. Creative Inspirations – Anything Goes
  2. Pearly Sparkles – Anything Goes
  3. The Paper Funday – Anything Goes optional: Lots of Layers 
  4. Lil’ Patch of Crafty Friends – Anything Goes
  5. Creative Fingers – Anything Goes
  6. Ally’s Angels – Anything Goes
  7. Allsorts – Anything Goes optional: hearts
  8. The Corrosive – Anything Goes