Amazing Autumn🍂

Hello friends! Happy October! I hope that you’re having a great week so far and looking forward to doing something crafty this weekend for World Card Making Day!!🌍😀 I have decided to post something a bit early as I know there will be tons and tons of special posts planned by many, so I thought it best to post today instead!

IN THE MEANTIME, I DO HAVE A FUN GIVEWAY LOCATED ON MY POST BELOW OR CLICK HERE TO SEE IT!!  YOU HAVE UNTIL OCTOBER 10th TO ENTER…JUST LEAVE ME A COMMENT THAT YOU’RE INTERESTED!!

There are SO MANY things going on this time of the year and maybe that’s why I love Autumn so much. (WCD, Halloween, birthday, Cooler temps, warm clothes, Harvest, yummy foods, pretty colors, changing leaves, Halloween…oops already said that…but you know!)  I am thankful for all of it!  I have a couple of cards from a TE kit I recently got (yes, I know…another one to pile on!), but I fell in love with it so much & I am using it right away! 😁

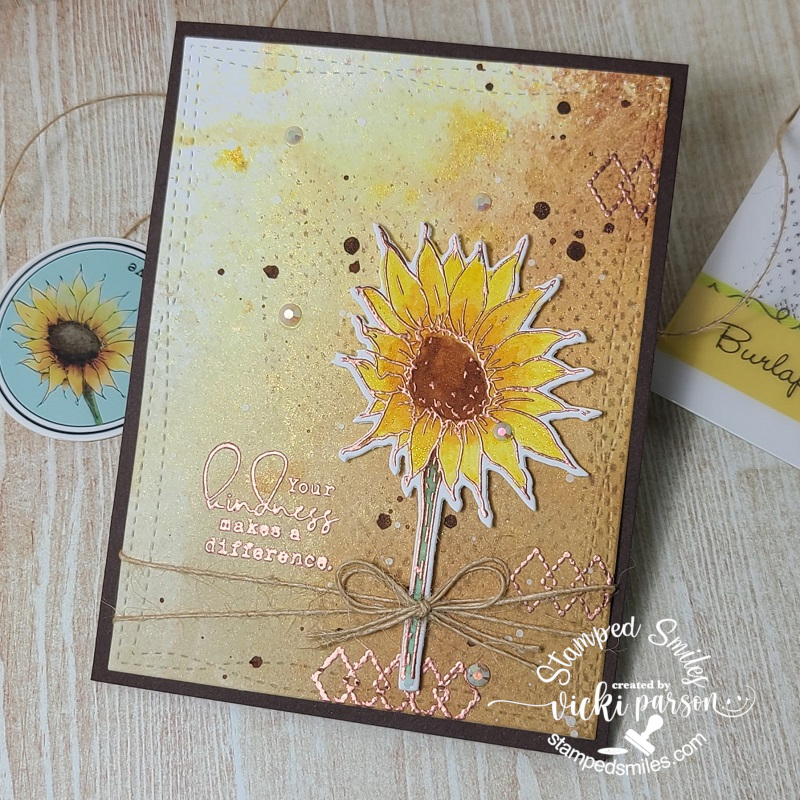
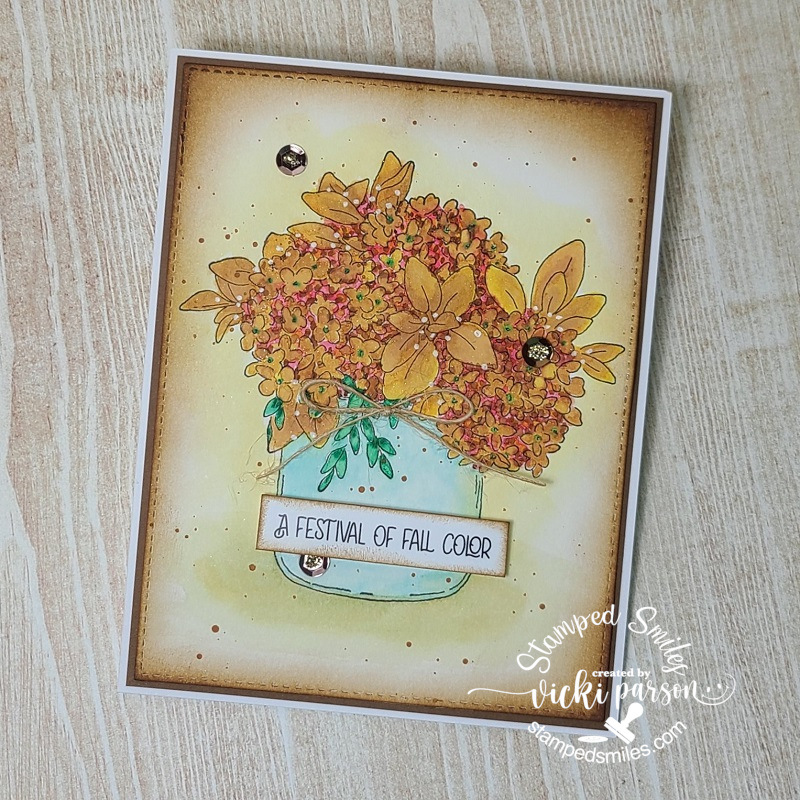
There is some copper EP that comes in the kit, so I heat embossed both the sunflower and wheat images together so that I could color them both at the same time with some watercolor.  I then cut them both out with the coordinating dies and set aside to work on my background.

The background was so fun!  I’ve used a Bristol Smooth watercolor panel and pulled out some Mica Stains and other sprays from my stash with a spray bottle filled with water and just played.  Some of it I splattered to make “dots”.  I used the “Burlap” background stamp in the kit and randomly stamped the background as well as heat embossed an element and sentiment from the stamp set.  I cut this panel with a die and wrapped some twine around it before attaching to a chocolate truffle card base.  I used some foam strips to pop up the flower and added a twine bow to it.  Finished it off with some Iridescent Rhinestones.

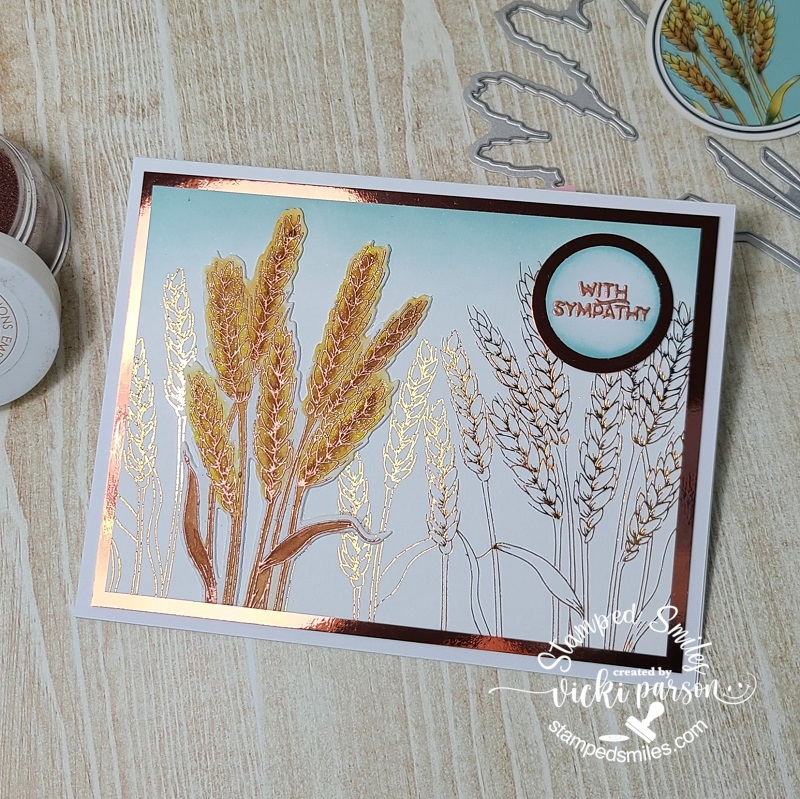
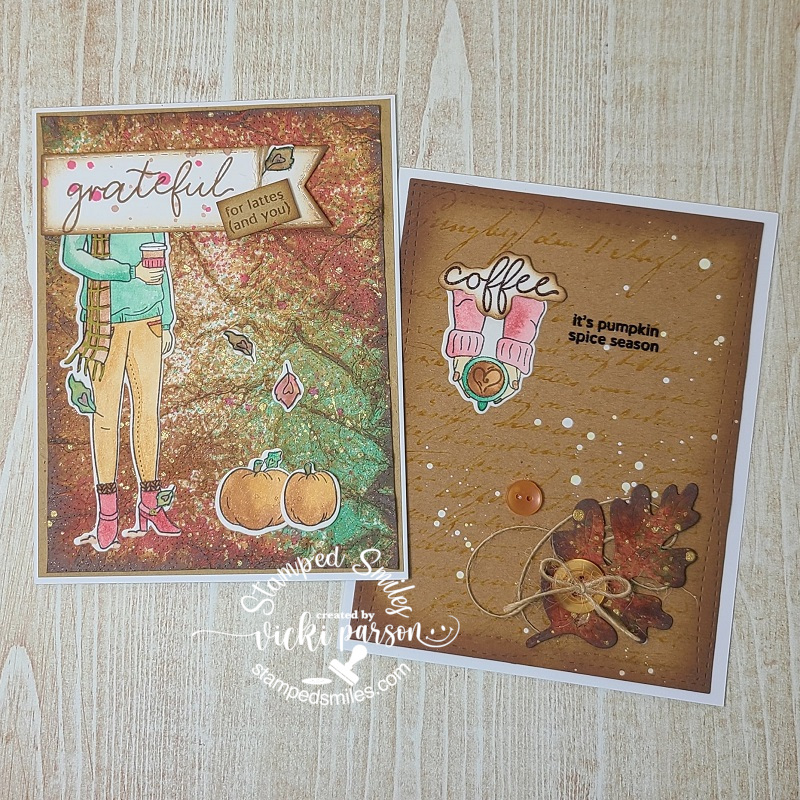
And this is the second card I’ve made using the wheat image that I previously colored with the sunflower image above.  What’s nice about this card is that the background was done using one of the foilable panels from the kit.  I found some copper foil and ran it through my laminator.  I lined up the cut out wheat image with the background and glued it over top cutting off the bottom portion that stuck out.  I also heat embossed a sentiment from the TE clear set in my stash and then punched it out with a circle punch.  I used my blender brush to very lightly add some Sea Salt ink at the top of the foiled panel as well as around the sentiment circle.

Lastly, I attached both the image and sentiment panels onto a piece of copper foil cardstock and then mounted it onto a side folding A2 white card base.  It was simple, but I like the shine it gives.

I had been discussing with someone recently how I really need to make more sympathy cards to have on hand…so here’s a start to getting a pile going hopefully.

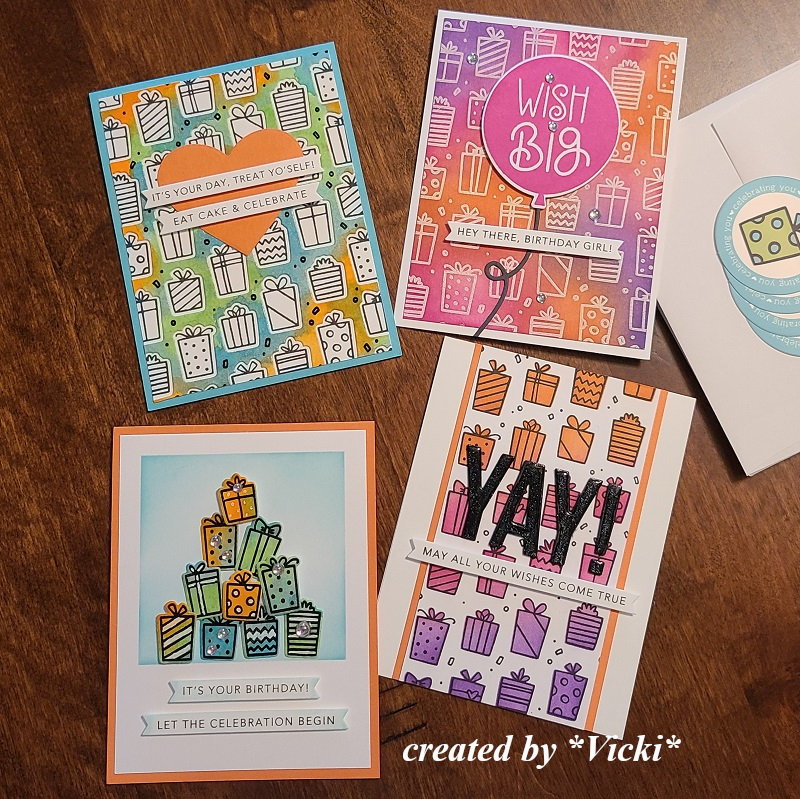
Speaking of needing cards, all of the birthday cards from my last post have been spoken for!  Everyone seems to really need birthday cards and like having them on hand.  I can totally relate to that!  I think I need to get some “sorry I forgot” ones thrown in there too! 😂  

I still have some projects that I’ve been working on in the background from some classes I took over the Summer but still haven’t shared yet, so I thought I’d start a little bit at a time and I think these “Autumn themed” cards work with my post today:  (If you’re seeing this post on my website, just click on the photos below in the gallery to see them up close.)

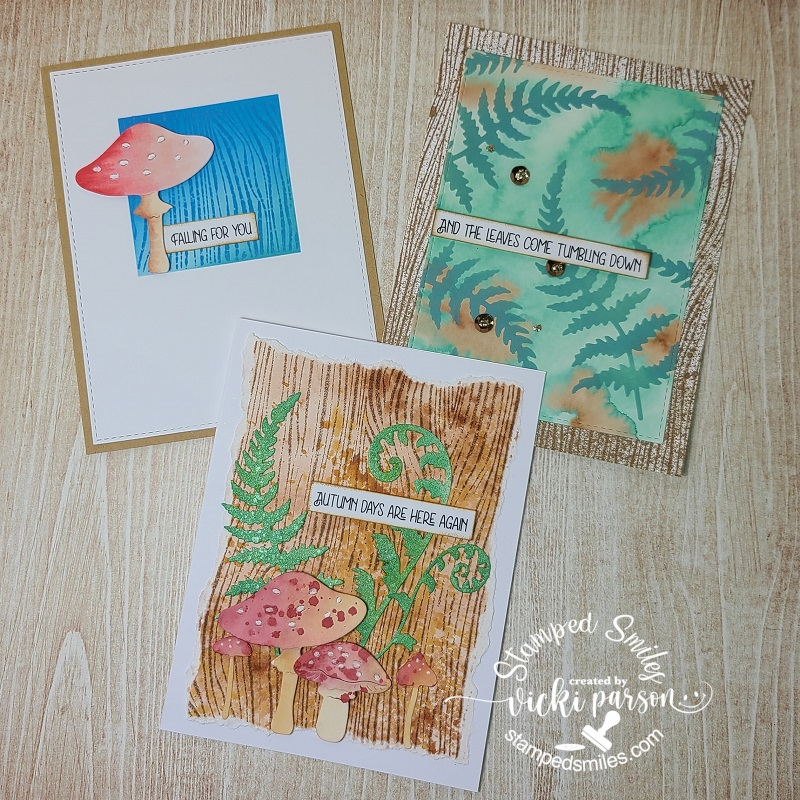
I have taken SO MANY classes, so I still have many more projects to share as I go here!  Hope that you enjoy seeing what I’ve been up to!  It’s just fun to play around and in the process…no matter how little a piece I use…I am using my stash somehow and I’m very happy about that!  At least I’m still crafting anyway! LOL

Thanks for dropping in and have a great crafty weekend!

Challenges to enter for the first two cards only:

  1. Sketch Saturday – Sketch #679 (my second card turned)
  2. Pammie’s Inky Pinkies – Anything Goes
  3. Make My Monday – Embossing (heat on both cards)
  4. Penny’s Paper Crafty – Anything Goes using Paper
  5. Simon Says Stamp Wednesday – Anything Goes
  6. Happy Little Stampers – Watercolor (used on both images)
  7. Creative Knockouts – Fall is in the Air

Taylored Expressions Sept Birthday Challenges & Exciting News!🥳

Hello friends!  Happy Friday and are you ready for the weekend?  I’m supposed to be helping hubby with some outside work, but my allergies have been bad and I’m not feeling well.  Hopefully some medicine will be helping so we can get things finished up!

I have been a “grumpy” fan of Taylored Expressions for a few years as you might have seen in some of my past posts…so of course I get “pulled in” by other cute products too and that’s what happened…my story anyway!  In their FB fan group there is a monthly #TEmakerchallenge with prompts to follow as long as you use at least one of their products.  So I’ve made a fun card for this month I’d like to share:

Now how CUTE are these little critters?!  During TE’s Sept birthday month (13 years in business), they released a collection of birthday related items, and this is the introduction of “Chip & Charlie Party“!  I’m saying that Chip is the bird and Charlie is the raccoon…not sure, but that’s what I’m saying! LOL I’ve colored them up with Copic markers and added some shimmer to the balloon, party hats and cherry on cupcake with a glitter brush pen.  I’ve also added some highlights with a white gel pen.

I wanted something in the background, but not too distracting from the critters, so I stamped the Party Time background stamp in the same cardstock color (Cherry Pop) I then used the stencil from this combo set to white ink blend the tops of the hats.  The paper strip accents came from a TE paper pack I had in my stash.  I thought it needed an extra little image element on the front of the card, so I added some Doodlebug Twine and the party hat from Big Grumpy-Birthday, colored with Copics and popped up with foam tape on bottom corner. It was covered with a glitter brush pen, and I also added a Doodlebug Matte Sprinkle at the top of the party hat and in the center of the twine bow.

You might notice that the image panel is not completed adhered to the card front and there’s a score mark in the center as well.  So, I was going for something a bit different than a regular A2 birthday card…and the Sept challenge prompts are 1. Heat or non-heat embossing, 2. Napa Valley color quad and/or 3.  Something that begins with “E” You have to pick at least one of these along with a TE product.  So, for the “E” I’ve decided on making an Easel card…

So, when you open up the bottom flap, you place it behind the popped-up sentiment that was white heat embossed (also a challenge prompt) and cut out with the coordinating die from the “Get the Word Out-Celebrate” set.  I’ve also added some more of those yellow polka-dot papers and a thin strip of Cookie Monster cardstock which is what I used to mat behind the image panel as well as for the sentiment.  There is still room to line the inside of the card with a special birthday message.

I hope you’ve enjoyed my card and please see at the end of this post for other challenges I’ve entered…PLUS a special birthday give away if you’re interested!

____________________________________________________________________________________________________________________

**Now for some EXCITING NEWS**

Taylored Expressions was holding a special set of birthday challenges this month in their FB fans group with certain prompts for each one.  There was a set of four different challenges, and I decided to make something for each challenge, and I ended up winning a future guest design spot for a future release!  WHAT?!  Taylor shared which one was her favorite I made in THIS FB ANNOUNCEMENT, but I will share all the creations I made here: (click on the photos to enlarge them if you are viewing them on my blog.)

I honestly wasn’t thinking about winning anything! I was basically just enjoying the process of creating and pulling out some stash that I hadn’t yet used and wanted to use so I thought I’d just play along.  I was very surprised to see that I was picked as a winner!  Very humbled and honored by that!  So be watching for an upcoming GDT post!

I have actually joined several of Taylor’s classes, virtual events, etc. and have made many cool things during the time that I wasn’t blogging, so I never shared them… but like I said, I’ve been creating and having fun!  I do remember something fun she taught in a virtual event from July I was a part of that was Halloween themed, so I’ll have to pull those cards out soon as well since the time is coming up and I do love me some Halloween! 🎃

One last thing!  With all of the fun and exciting things going, I realized it’s my birthday month as well!  I’m not 13, but let’s just say a few years older!😁  So I think the best thing to do for my birthday is to give rather than receive!  If you feel the same and think someone would enjoy this little Taylored Expressions bundle that I have shown above in the photo, let me know!  If you’d like to gift this for yourself, let me know!  I would love to give someone these extra set of items already in my stash to someone!  There is a Banner Simple Strips die, a 3 piece balloon layering stencil with a clear stamp set combo, a Cupcake ink pad (unwrapped, but NOT used at all, I just noticed I already had one after unwrapping it!) and a tiny cake and celebrate stamp set all from Taylored Expressions and perfect for party making! (There may be a few other things added as well!)

**Please just leave me a comment that you are interested in the TE give away by October 10th, 2021 and I will be happy to pick someone to send it out to!**

Whew!  I think that’s about it!  Thank you for stopping by friends and enjoy your weekend!

I’d like to enter the top easel card ONLY in these challenges:

  1. Taylored Expressions FB Fans Group Sept #TEmakerchallenge – heat/dry embossing and easel card for something beginning with “E”
  2. Festive Friday – #FF0093 I used: balloons, red & twine
  3. Krafty Chicks – All Occasions (birthday)

Guest Designer for Addicted To Stamps & More – Any Occasion

Hello friends!  Hope you’re having a great week so far and have been enjoying the September month!  I look forward to the Autumn Season and all of the beautiful changes it brings!  Today, I have a fun post to share with you!

Super excited to have won a guest design spot over at the Addicted to Stamps and More Challenge blog!  Have loved playing along with the challenges over there for years!  A few years back I had been on the DT for a bit which was really fun too!

They have fun challenges every other week with a select set of 5 categories/themes that alternate for each challenge which makes it nice so that you can plan your creations according to each one!  So, the category/theme for this challenge happens to be “Any Occasion.

This turned out to be a really great category to work with because my husband came to me and said one of his friends that he used to work with broke his leg.  So he’d asked me to make an “interactive” get well card for him:

The first thing that came to mind for this was the cute Lawn Fawn stamp set “Get Well Before n Afters” along with the “Magic Picture Changer” die set.  Once you’ve made one of these picture changers, it’s not hard at all and it’s really fun to see it change.  I had made a card a couple of years ago for someone else with this set and it was a really fun card to make! So I grabbed the items and started with the scene for the background.

As you can see, there’s not much showing once you place the pull tab picture changer layer over it.  So I just sponged some clouds over the white background and die cut a grass border for the bottom section of the card.  I also white heat embossed the sentiment at the bottom of the grass section, but waited until the picture changer area was done so that I could use that for placement of the sentiment.  I also added one of the band-aids for decoration to the right of it.

I wanted a tiny scene inside of the picture changers with the cute turtle.  If you’re familiar with the stamp set, then you know there is a turtle on his back not feeling well and then there’s also a “healthy turtle” image too.  So for the “sick turtle” I sponged the sky and grass behind him and the stamped clouds by using masks I cut out from the images.  I then colored him up with Copics.

And then of course when you pull on the slider tab, the picture changes and you see the “healthy turtle” with the sun and rainbow instead of the clouds and rain.  LOL, I colored the images with Copics again and made masks for the images so that I could sponge over them for the sky and ground.

I popped up the picture changer section with foam tape over my background panel and then layered it over a top folding A2 sized card base so that there’s message inside too.  Lastly, I’ve added another band-aid image on the green frame and stamped some band-aids on the envelope for mailing too.

It’s certainly no fun to be laid up with a broken leg, so maybe this will help cheer him up!

I hope you’ve enjoyed my card today!  Please stop on over at the Addicted to Stamps and More Challenge Blog to check out the inspiration and come play along with us!

Thanks so much for stopping in!

Challenges I’d like to enter this card in:

  1.  Crafty Animals – Anything Goes featuring an animal.
  2. 2 Crafty Critter Crazies – Anything Goes featuring an animal (last challenge-closing)
  3. Colour Crazy Craft – Anything Goes with coloring (turtled colored with Copic markers)
  4. Watercooler Wednesday – All About Occasions
  5. Happy Little Stampers – Anything Goes with Dies
  6. Creative Fingers – Anything Goes

Working in Washi Encouragement

Hello friends!  Happy Labor Day!  Can you believe we’re in September already?  The time goes so quickly!  I’ve been helping my husband around the house so we can finish up some projects before the weather starts getting cooler on us!  He does keep me busy since being retired! LOL!

As I had mentioned, although I wasn’t posting on my blog, I was still crafting.  I’ve also been trying to organize my craft room with my husband helping me to move things around as my space had really gotten to be over-whelming.  Carrying several card kits (many never used) and boxing them up to store, I realized how many things I actually have and never used!  It’s fun to buy stuff, but I think it’s even better to use something I have…as I’m becoming my own store!  So for this reason, my purpose has really shifted to TRY using what I already have if possible!  I know many of us are in the same boat, so perhaps I can help inspire too!

Here’s a set of cards that I’ve been working on from a virtual class that took place sometime in July.  It was supposed to be a set of 4 cards created with this gorgeous paper, stamp set and washi tape collection from Teresa Collins (Called “Create a Beautiful Life”).  The purple and butterflies really spoke to me, and I got the kit…which I honestly didn’t need, but this is how it’s been!  I was supposed to get some already cut butterflies with the kit, which I didn’t…but it was fine, as of course, I had some dies that worked just fine for these cards, and I decided to go off a bit on my own anyway.

Remember the post I had recently done about the washi tape challenge?  This is what made me think about this card kit class and that I needed to finish it up!  There are a couple ideas in there using some of the pretty washi tape from the TC collection.  I think taking all of these virtual classes has taken a tole and burned me out a bit as well because although I’m making the cards (and have a huge stash of them), I usually still have extra product/material to use up too!  It sort of compounds the problem and doesn’t really help much.  I think it’s just time to consider a heavy freeze on it all!  Or at least until some of my stash gets used up anyway! 🙄

Here’s a closer look at each one of the cards in the set.  If you’re on my website, just click on each photo below to enlarge it or if you are set up with e-mail, it will probably show in original form.  (There’s a caption under each card with the details too.)

I stamped some of the sentiments that were included with the stamp set from the collection, but there were also strips at the bottom of some of the pattern papers, so I took some of them and used them for some of the other cards.

I really like how they’ve turned out and this will be a nice set of encouragement cards to send along for my donation box this month to “The Butterfly Project” for domestic violence.

Really hope they were inspiring for you as well and that you’re reminded to use your own stash of papers, washi tape and other forgotten materials too!

Would love to play in these challenges for fun:

  1. Crafty Sentiments – Anything Goes 
  2. Crafty Creations – Anything Goes
  3. 2 Crafty Critter Crazies – Anything Goes + animals (butterflies count!) 
  4. The Crafter’s Cafe – Anything Goes
  5. Love to Scrap – Anything Goes
  6. Penny’s Paper Crafty – Anything Goes
  7. Cute Card Thursday – Anything Goes (birthday optional)
  8. Just Us Girls – 6 of anything (Didn’t realize it, but used 6 strips of pattern paper on the last card in the gallery!)  Thanks Vicki D!😉

Soaking it All in!

Hello friends!  Really hope your week is going well.  My thoughts go out to all of those that are experiencing difficulties in their life and hope things turn better for you very soon.  I hope to bring a smile for you today.

I’ve really had such a fun time playing around as a guest designer this month for Inky Stamper and this will be my final project for them this month.  Chelsea has some really cute stamps and I hope you’ll check them out!  (I have the badge on the sidebar of this blog if you need to come back later to find it.  Just click on the badge to get to the store.)

For my final project, I’ve decided to create a mini slimline card with an interactive component!  If you’re not familiar with a “mini slimline” size, you take a piece of cardstock measuring 6″ x 7″ and then fold it in half on the 7″ side so that your card base is 6″ x 3.5″.  I really don’t mind any size of card really as I have been known to make my own envelopes too.  But I first learned about this “mini slimline” size from Taylored Expressions as she has many products in this size including the envelopes.  (I have used one of the “slimline stitched dies” from TE to cut one of my panels on this card.)

I’ve used BOTH of the Chaise Lounge stamp set with “Freida the Frog” (as she is named) as well as the Splash stamp set with “Rosie” (as she is named) from Inky Stamper on my card here today!  I think they’re so CUTE!  Ever have those moments with a friend floating around in the swimming pool and just soaking in the sun and some secrets?!! LOL!  That sounds like a fantastic summer event to me!

For the “water” background, I took some Bristol Smooth cardstock and white heat embossed the “water wave” image (both stamp sets have one of these images in it).  I took out some of the Nuvo Shimmer powders from my stash and made a fun watercolor panel with them.  I haven’t used these in quite some time, so it was fun to play with and I forgot how shimmery they are!  Obviously, the white embossed waves resisted the watercolor.

I cut out the panel with the TE slimline stitched die and mounted it over a piece of dotted paper from the Doodlebug Swiss Dot Paper Pad. I stamped and colored the images, die cut them out and popped them up over the floaty tubes.  (Remember the tip about using a white gel pen to go around the edges to get rid of those lines you see when you cut them out.) I then punched a hole on this watercolor panel where I wanted the images to be, so they weren’t too close to each other to freely spin around!  Inky Stamper has these awesome interactive elements called “Clear Move-Its” and I LOVE them!  They snap together and voila!

You can see bits of the shimmer from the watercolor background here too!

I popped up this panel with foam tape and then layered it over my black mini slimline card base so the spinners could move freely.  I’ve also added a black sentiment banner that was white heat embossed with the Chaise Lounge stamp set.

I couldn’t resist adding a bit more “bling” so I also pulled out the Picket Fence Mermaid Water sequins being careful not to interfere with the spinners and then filled the centers with some Stickles from my stash.  I could just keep spinning these all day long! LOL!

Really hope that you’ve enjoyed my projects this month as a guest designer for Inky Stamper and you’ll pop by to check them out!  Super fun stuff!  (Be sure to join the InkyStamper Inkspiration FB Group for more fun!)  I’m sure I’ll play with their stuff again in the future!

Thanks for popping in today and finding my posts!  Glad you’re here!

Challenges to play in for fun:

  1.  Dragonfly Dreams – Summer Fun
  2. Penny’s Paper-Crafty – Anything Goes using Paper

What’s Up With Washi and Camping Fun!

Hello friends!  Hope you’re having a great week so far!  Today, I have some cards I made for my GDT month at Inky Stamper using washi tape!  I have loads of washi tape because I have a “squirrel moment” when I see it and think how pretty…and it’s not that expensive and easy to craft with and whatever excuse I can come up with!😁  Then it sits around unused!  

This is why I’m glad that the “Washi Tape Challenge” came up for this month in the InkyStamper Inkspiration FB Group!  You just need to use at least 1 Inky Stamper product and your washi tape…any you have!  I decided to go for 2 cards:

For both I cards, I took a scrap piece about 4.25″ x 5.5″ of black cardstock and covered it diagonally with 3 different types of washi tape.  One was from the Inky Stamper Doodlebug Lily White Swiss Dot washi tape, another from some metallic shiny silver washi tape and another from some clear sparkly washi tape in my stash.  The white turned up almost grayish over the black and the clear sparkle turned up differently as compared to it on the crab card in the background over white cardstock.  I thought it was cool the different looks I got with it.

I then decided to use some dies to cut it out with and then cut the remainder in different sized strips for my cards as well so I wouldn’t have to waste the rest of it…

Vicki-InkyStamperGDT-Washi Challenge-cat

For this card, I took a “hello” die from my stash and cut it out of the washi tape piece I created on the black cardstock piece.  I then cut out the “negative” sentiment with a rounded corners rectangle die and layered another piece of black cardstock behind it that was cut out slightly larger and popped up over an A2 card base that I’ve also layered with more of the washi tape strips I cut out from the left over.  I added this cute kitty from the Inky Stamper Cat stamp set along with the sentiment at the bottom.  I thought it would be fun to add a couple of paw prints at the bottom in white ink from the Inky Stamper Dog stamp set.  Lastly, I thought it needed some Doodlebug Twine too!

Vicki-InkyStamperGDT-WashiChallenge-crab

And for this card, you see that I’ve taken the die cut “hello” sentiment from above and added it to the crab’s claws to hold up in the air…so fun!  I still had a couple more left-over strips from above and added that to the top and bottom of the scene I’ve created on this card. 

So, for the scene, I’ve used the cute Inky Stamper Crab stamp set along with the sentiment at the bottom.  The sparkly looking “sea” in the background comes from a couple of different glitter washi tapes I had in my stash.  I then used a border die cut to cut it out to go across the card front.  Die cut some waves for the sand and tucked in all of the stamped and colored elements over a stenciled cloud background.  I added this card front scene to an A2 sized black card base.

How about you?!  Do you hoard your washi tapes?  I sure had fun playing around with it making these cards and I think it’ll be fun to sit and play some more with it as I have so much of it!  I think it was fun to die cut too! 


Just wanted to share some projects with you I’ve made this past weekend from a Craft Camp that I went to with Inky Stamper.  We made lots of fun projects: (click on photos to enlarge!)

Thanks so much for stopping by today!  Really hope you’ve enjoyed my washi tape cards and you can come join in the challenge with us this month!  Have an amazing crafty day!

Challenges:

  1. Aud Sentiments – Anything Goes + sentiment
  2. Allsorts – Add some sparkle 
  3. Sweet Stampin’ – Feature an animal
  4. Lil Patch of Crafty Friends – Anything Goes
  5. Crafty Sentiments – Anything goes

Some Boos on Friday the 13th!

Hello friends! Thank you for taking the time to stop in, say hello and I apologize if you’re experiencing any problems with anything on my blog. I hope that I can figure out what’s going on, but right now I seem to be able to create posts and I’ll just keep trying that.

I love Halloween and all of the fun that goes with it! I thought this would be a perfect day to share some “BOOs” since it’s Friday the 13th!

I’ve made a couple of cards with some cute Taylored Expressions products.  The backgrounds were fun to create and would be totally fine left like that with the “BOO” sentiment, but I also thought it would be great to pull in some images from an older TE stamp set.

Taylor has a couple of classes available and I had fun making these up!  I made a Z-fold card on the left and then used a stencil with glitter grab and black glitter on the second card.

Vicki-TE-Boo Bundle class II

This second set of cards was so fun as I did some foiling with my laminator along with the glitter grab paste.  I didn’t want to waste the negative from the foiled piece, so I made another card that I’ve attached a black piece of cardstock with an adhesive sheet for the foil to stick to.

Hope you’ve enjoyed my cards today.  Do you have any crafty plans?  I have a fun virtual Craft Camp going on and I’m looking forward to it!

Thanks for stopping in and have a great weekend!

Challenges:

  1.  Two Old Bats Halloween – Anything Goes Halloween
  2. Cute Card Thursday – Anything Goes
  3. Lil Patch of Crafty Friends – Anything Goes
  4. Creative Fingers – Anything Goes
  5. Crafty Sentiments – Anything Goes
  6. Alphabet – “J” is for Just ONE word

Say NO to Pot!

Hello there friends and happy Wednesday!  Hope you’re all doing well and having a great week so far!  It’s so hot over our way with a heat advisory in triple digits, so it’s a good time to stay in and craft, right?!

Stopping by today with another project I’ve made for Inky Stamper!  This one sort of cracks me up a bit as you can see by the title of my post! 😂

Vicki-InkyStamperGDT-Crab-circle easel

So, the sentiments from this Inky Stamper Crab stamp set are hilarious and I know many of the stamp sets come with funny sentiments like this too!  It’s always great to have different options for sentiments to go with an image!  Now, I don’t think that I’ve ever been to a crab boil, but I do love me some crab legs! 🦀 How about you?!

I’ve used some of the Doodlebug Paper Pads (also in the Inky Stamper store) and made that for the base of my background for the large “pot” image to sit over.  The sentiment was stamped directly onto the “pot” image before I colored it with Copics.  For the “flames” behind the pot, I’ve used the Inky Stamper Bear stamp set.  I’ve found so many different uses for that set.  I think it’s one of my faves from this store!

As you can see, the “crab” is inside the pot.  So for this, I used a craft knife to cut a slit for the “crab”, but when you use the coordinating die to cut out the “crab”, he will not exactly fit…so I dismantled the “crab”…like you would for cooking…and placed the cut up parts so his hands were in the air and his eyeballs are sticking out.😆  I taped him on the back of the pot so he would stay put through the slit in the pot and popped it up with foam tape over the flames.  I took the other images from the Crab stamp set and die cut the salt and pepper shakers and fussy cut the seashells to add to my easel card.

For the easel style card, I’ve used some circle dies for the easel as well as to create the frame for the “port hole” around the cooked crab scene.  I’ve used some brads and rubbed some mixed media silver paste around it.  I’ve also added a piece of rope/twine that I randomly tied a knot on for an accent.  I’ve also added some gems from the Picket Fence – Sand collection (also sold at Inky Stamper) above the crab…for seasoning of course!  The seashell on the inside grouping of the card has foam tape to secure the card front in place for the easel design.  This card will fit perfectly inside an A2 envelope so I can give someone a chuckle of course!

Hope you’ve enjoyed my easel card today and had a chuckle!  Thanks for dropping by!

Challenges I’d like to enter:

  1.  Addicted to Stamps and More – Make Your Mark (all images colored with Copics)
  2. Crafty Sentiments – Anything Goes
  3. Penny’s Paper-Crafty – Anything Goes using paper
  4. The Crafter’s Cafe – August Anything Goes
  5. Crafty Creations – Aug Anything Goes
  6. Pearly Sparkles – Aug Anything Goes
  7. Creative Knockouts – Anything Goes

August GDT for Inky Stamper!

Hello friends!  Wanted to thank you for your kind comments!  Like I previously mentioned in my last post, I’ve still been crafting and following on FB by joining some classes, challenges, etc.  So, although I haven’t been active on my blog, I’ve been crafting and sharing over there once in a while.  Just having some fun while using more of my crafty stash is all!  However, while playing around on FB, this happened:


A couple of weeks ago I was invited to join as a guest designer for Inky Stamper this month! Yay!  If you haven’t heard of this company, check out the stamps…they’re too cute and the owner, Chelsea, is so fun too!  She has such an infectious excitement about her that you can see if you happen to catch her on one of her weekly FB lives every Tuesday at 7:30 pm CST. (On the Company FB Page)

So, I will be sharing my creations using Inky Stamper products every Wednesday this month and I hope that I will be able to INKspire you with something fun!  I’m starting this Wednesday with some products that just recently released:

The first thing that Summer reminds me of is flip flops!  There is a cute little image of flip flops in this Splash stamp set which inspired me to create this shaped card and birthday tag!  That’s also where that cute little mouse you see is from as well!  But the sun and chair come from the Chaise Lounge stamp set, which I’ve combined both sets to use on my creations here.  I think these two sets go hand in hand with each other and it’s probably best to just get them both!  If you choose to get the dies with these sets, it cuts out the mouse and frog separately from the floaties they’re already on so you can pop them up!  So, they work on the floaties as well as the chairs. So cute!

For my flip flop card, I’ve taken a very old template that I had found in my stash while cleaning up my craft room and thought this would be perfect to make a shaped card with!  I started by tracing the pattern for the base of my card and cutting two shapes so that I can make a card that opens from the side as you see in the photo.  The card measures approx. 7″ x 3.5″.  It’s a bit taller than a mini slimline card, but I can easily make my own custom envelopes with my envelope punch board.  This is another fabulous way to use up those hoarded papers too!

I took the smaller template and used the fun Doodlebug Floral & Graph paper pad (Available in the Inky Stamper store too!) to cut the inner flip flop pattern with. (I had to angle the template to make it fit onto the 6×6 sized paper.)  I added a couple of flowers from my stash along with the matching ribbon for the flip flop straps before attaching to the card base.  Colored the images, cut them out and added the sentiment strip at the bottom and cut it to measure with the inner flip flop edge.  I added some texture by sanding the edges of the paper too.

  • Here’s a little tip if you’re cutting out the stamped mouse image from the floatie:  When you use the die to cut it out, the edges around it will have some stamped lines on it where the white border is.  All I did was take a white gel pen to cover up those lines to that it looks like a perfect white line around the image!  P.S.  This is also a great way to cover any coloring mistakes made! 😉  This also works for fussy cutting an image as well!

I popped up “Rosie” (the mouse), as she is called, with foam tape over the chair.  I’ve also added some Doodlebug gems to the center of the flower on Rosie and for the flower at the top of the flip flop card.

I thought this would be a nice summer birthday card so I wanted to make a matching tag to go with it.  I’ve pulled out the Inky Stamper Mini Envie Die and used it for this tag design.  Again, I pulled out the Doodlebug Floral & Graph paper pad and used this die to cut my tag with making sure that the center of the envelope die would be cut out.  This is what I’ve used for the base of my tag.  I like using these papers because they’re double sided. That way the back still has a nice color/pattern to it too.

  • I used this particular die for my tag because of the size.  Putting another strip of paper on the back side of this tag will create a pocket for you to tuck a gift card inside if you want to use it for that!  See below:

Vicki-InkyStamperGDT-flipflop-tagbackpocket

Since there are score marks to make the envelope, I ignored those lines and used my paper trimmer to cut out the center which is where the orange base of my tag came from.  I cut off the top two corners diagonally and punched a hole at the top which created my tag. I also die cut the envelope tag again with the Doodlebug Swiss Dot Paper Pad this time being sure that I had a good portion of the scallop edging cut from it.  I used that piece for a design element on the tag.

I stamped the sentiment and flip flops from the Splash stamp set as well as the sun from the Chaise Lounge stamp set, colored them, fussy cut/die cut them out to add to the tag.  I used a black pen for stitch lines along the edges.  I added my own hole reinforcer circle punched out and then added some Doodlebug Bumblebee Twine to the top. Finished it off with a couple of clear sequins from the Fishy Wishes sequins mix and filled the centers with Nuvo Glitter drops.  I also covered the sun with a Sparkle Glitter Pen.

I hope that I’ve INKspired you today with my summer flip flop theme!  Thanks so much for dropping in here.  If you’d like to see more from this company, be sure to join the Inkystamper Inkspiration FB group!  Hope to see you there!  Have a great day!

Challenges I’d like to enter:

  1. Just Us Girls – Anything but a card (tag only)
  2. Daring Cardmakers – Gift Tags Galore (tag only)
  3. Moving Along With the Times – Summer Fun and/or Colors (orange/yellow)
  4. NBUS #29 – Aug “Never Before Used Schtuff” (never used new stamps!)
  5. Aud Sentiments – Anything Goes + sentiment
  6. Sparkles Monthly – Outdoor Fun
  7. 2 Crafty Critter Crazies – ATG + critter

Hello! Anyone still with me?

Hello there friends!  I know that I had posted that I’m stepping away , but this blog is still “active” for now and I have been crafting anyway…   so after stepping away from it, I still follow along with different companies and inspiration on FB. But because I have SO much product and I wanted to be able to actually USE the things that I have instead of letting it just “sit around”, I was taking photos and posting (in FB groups) anyway, so I thought why not just BLOG IT?!  Not just the crafty aspect of it all, but blogging itself is a bit of a release too.  It gives me a “record” of my crafty experience, what and why I might have done something…so I decided for my own personal reasons, to come back to this “old dinosaur” method to enhance my crafty journey.  It may not be exactly like it had been before, but that’s how crafty journeys evolve.

It’s been fun and busy with hubby being retired and home, but after getting use to it and traveling a bit, I was and still am taking a few classes here and there and just having fun.  Because of the pandemic, so many companies have turned to “online” classes, conventions, challenges, etc so I thought it was a great opportunity to try some of that out without the expense of traveling for it!  I’ve done several actually, but just mainly posted within the groups they were made for.  Then I started thinking once again about all of the “stuff” I have and still ARE accumulating…so my mission is to actually use the product I have. I will try NOT to keep purchasing in the future!  (Let’s see how THAT goes! LOL!)  The blogging might help keep me motivated in doing that too…I hope!

So if you are still following…Wow!  Thanks for being here!!  Not really sure how often I will be posting, but this will be mainly where I will be sharing anything “crafty” that I’m doing.  Maybe I can inspire someone to use their own crafty stash?  Hope you can join the fun with me here too! 🙂  

I’m starting with a couple of summer classes that I just recently completed with Taylored Expressions.  She did a class earlier this month with a set of 4 completed cards using similar style products for each class.  The first one was called the “Gifted” class:

The top left card was used with a watercolor wash for the background.  There’s a cover plate die that cuts out all those presents which I used on the card below that one to arrange over the sponged square area.  The cards on the right side were both ink blended with the bottom right card using a stencil.  I’ve also added some sparkle with a glitter brush pen and some glossy accents to the die cut “YAY!” lettering.  Envelopes with seals were also included with this class set which you can see on the far right of the photo.  I always need birthday cards, so these will work out great!

This next set is also from Taylored Expressions that I just finished up this weekend.  Really enjoyed this class with some things that I forget about doing with my cards:

This class was called the “Diamond Botanical” class with another set of 4 cards.  The top left card was fun with a more mixed media style using paint for the background and splatters.  The only thing that I changed up was the background stamp.  I didn’t have the stamp from Taylored Expressions that they used in the class, so I used a Stampin’ Up! Birch background stamp I found in my stash. (So yay that I’ve already started with using my existing stash with the new!)

The top right card is a shaker card and the bottom left card is a gate fold card with the sentiment panel helping to hold it in place.  Again, with this class we were given envelopes with the matching seals off to the right.  These were fun little classes to take and get some cards completed with!

Hope you enjoyed these sets too and were inspired!  Are you taking any virtual or in-person classes or events this Summer?  Has your crafting experience changed for you recently and what things have you changed about it?

I know I’ll be back again with more creations I’ve been working on. Thanks for dropping in and I hope you’re all doing really well!  Have a great day! 🙂